

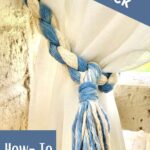
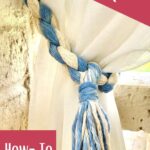
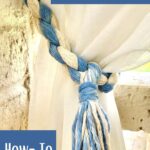
How To Make
Curtain Tie Backs With Tassels
A bit BoHo. A nod to macrame. I’m sharing how to make curtain tie backs that add a touch of style to your decor.
This post may include affiliate links, which means if you purchase anything using these links, you pay no extra, but I may receive a small commission. Please know that I will never recommend a product I do not believe in!
We needed tie backs for our patio curtain panels. So they had to be fun + casual.
And obviously, bring some style, right?
Right behind that brick screen is our “tool cabana” [who wants a shed, when you can have a cabana?} I recently added a cabana stripe awning to earn that name.
And the curtain panels are held back to frame a cabinet with recently added plaid accents.
So these bold stripes and plaids stoked my desire for twisted stripes . . . . and who doesn’t love tassels?

Where to start? This is where I started!

One day at my local Dollar Tree, these coils of nautical rope jumped off the shelf. It is so unusual to find rope of such great quality — color, weight, body, etc.
And for a buck!!! You can find them right here! (And wouldn’t it be fun to do a big chunky macrame piece with them?)
I thought this rope would be perfect to make a great tie back for this little corner of the patio. A corner that was long overdue for a “gussy-upping”. Simple ribbon was okay, but I wanted something special, but still casual.

But I didn’t want all natural. Since I was playing off the cabana stripes and plaid accents, I dyed one of the ropes.
Yep, I don’t think I’ve ever dyed anything before. I’ve always found that very intimidating.
But, I did it! And guess what. It was so easy! I’ve written a post to show you all the steps to make it an easy win!

This Is All You Need to Make Curtain Tie Back Ropes with Tassels
- Cotton rope in two (or three) colors, as desired
- Tape (nothing fancy, I used painters tape and scotch tape, whichever was within reach at the time)
- Scissors
- Paintbrush, pencil or dowel
Now Let’s Talk Terms:
The nautical ROPE I started with is actually three STRANDS made of many, many yarns/threads/fibers twisted together. Throughout:
- ROPE refers to a twisted final product — either the rope you purchased and are dismantling or the finished rope you make.
- STRAND refers to a bundle of fibers that you separate from a larger bundle and then do something to it or with it

Step 1) Prepare the Strands for Twisting
- Cut a length of 3′ off each color of rope.
- Then untwist that rope into its three original strands.
- Tape each end of these strands.


Step 2) Make Your New Twisted Rope
- Have a pencil, or something similar within easy reach
- With a slip knot, tie one end of each color together
- Hold one end steady, either use a partner, or here, I used a chair leg
- With even tension on both (or all three) strands, twist in one direction
- Twist and twist
- And twist some more, and even more, getting it really good and tight
- Keep holding the end firmly, gently push the pencil against the middle point (eyeball it) and slowly release the tension
- The rope and it will coil onto itself
So you can visualize this a bit better, below is a short video of the process. It’s really very fun and can be used for so many other crafts projects. Thick and thin. Like plant hangers, purse handles, wall hangings, macrame projects, on and on.

Step 3) Make Your Rope Loop
- Untie the slip knot and tape around all four (or six) strands as one tight bundle
- At the point where your rope folded onto itself, form a loop of two strands
- Pull the four (or six) strand ends through the loop up past the taped bundle


Step 4) Finish Off The Rope Curtain Tie Back Loop
- From your choice of colors, cut 12-inches off the original rope
- Unwind that to get a single strand
- Unwind that single strand to get a smaller section, set aside but keep handy
- Remove the bundle tape you added in the last step
- Holding all your lengths together, fold them back over the loop onto themselves
- With the set aside smaller 12-inch bundle of fibers, leave 3-inches extended and wrap the remaining 9-inches very tightly around the bundle of strands and the twisted rope several times
- Tie off with the 3-inch extension. Trim that knot
- Trim off the extending lengths of each of your twisted strands

And for extra security, add a good dose of white glue to the knot and where you trimmed it all. you can flip this over and it will be on the back side of your loop.
Don’t let these last picture throw you. Yes, I added my tassels before I finished the loops. That’s just how they lived in my head all along.
As I was writing though, I decided some may want to make these macrame inspired curtain tie backs without tassels.
NOW TO ADD THE TASSELS:

Step 5) Prepare Your Strands
- From the remaining 36-inch strands, pull off a small bundles of individual fibers and set aside
- Cut a length of 12-inches from the original rope and pull in the remaining 12-inch pieces from Step 4
- Untwist the original rope into its three strands
- Untwist as many of the strands as you want for your tassels
- Gently separate the strands into smaller bundles of fibers (I had 8 – 10 “threads” in each of my bundles)
- Lay the strands next to each other alternating colors
- When you have enough for your tassel, scrunch them together in the middles
- Optionally, twist the center a bit to blend the colors
- Fold this bundle over the bottom of the twisted rope loop


Step 6) Make the Tassel
- Take the long, small bundle you set aside and hold it next to your folded tassel with one end slightly longer than your tassel
- Hold your folded tassel and this bundle under the twisted rope loop
- Tightly wrap the long end of the separate bundle around all the pieces three or four times and then tie this long end and the original short end together on the back side of your tassel
- Tuck the ends down into the tassel
- If they want to stick out, just trim them off

One more decision!
To trim or not to trim?
As you can see, I took the mid road — a moderate at heart.
Come to think of it, I’ve always preferred my stylist to cut and then go back and do that magic with the scissors where they make the fresh cut look a bit lived in, no longer fully blunt.
Back to the topic at hand: Aren’t these the cutest! and such an easy decorative touch. If you can’t find the right color tassels to add to your new pillows, make them! If you want a bright custom color plant hanger, make it. Now you have the tools for even more creative fun. So I encourage you not to be intimidated by dying like I was for oh so many years. You can bet there is al lot my dying right around the corner for me.
Please don’t hesitate to share your projects with me. I can’t wait to see how they turn out. Let me know. Any questions? I’m here!


To hang, I use a locking cup hook. And then slide the entire rope into the hook. Next just thread the end of your curtain down through the tie back and adjust the folds as you like.
This is just one part of makeover of a corner of our patio. There are five easy projects all together, you can check a roundup of them all here.
And here is how to hang those fabulous outdoor sheers withOUT expensive and expansive rods!
And for more decor fun. Check out these FOUR cabana stripe pillows I made from ONE $5 table runner!


Thanks so much for being a trooper and reading all the wat through to here! You are T H E B E S T! I appreciate you being here. Please leave me a note i the comment section. What else would you like to see me sharing?


")


0 Comments
Trackbacks/Pingbacks