

How to Bring Festive Decor to Your Stair Landing
Add some simple Christmas decor to your stair landing to extend the festive atmosphere throughout your home.
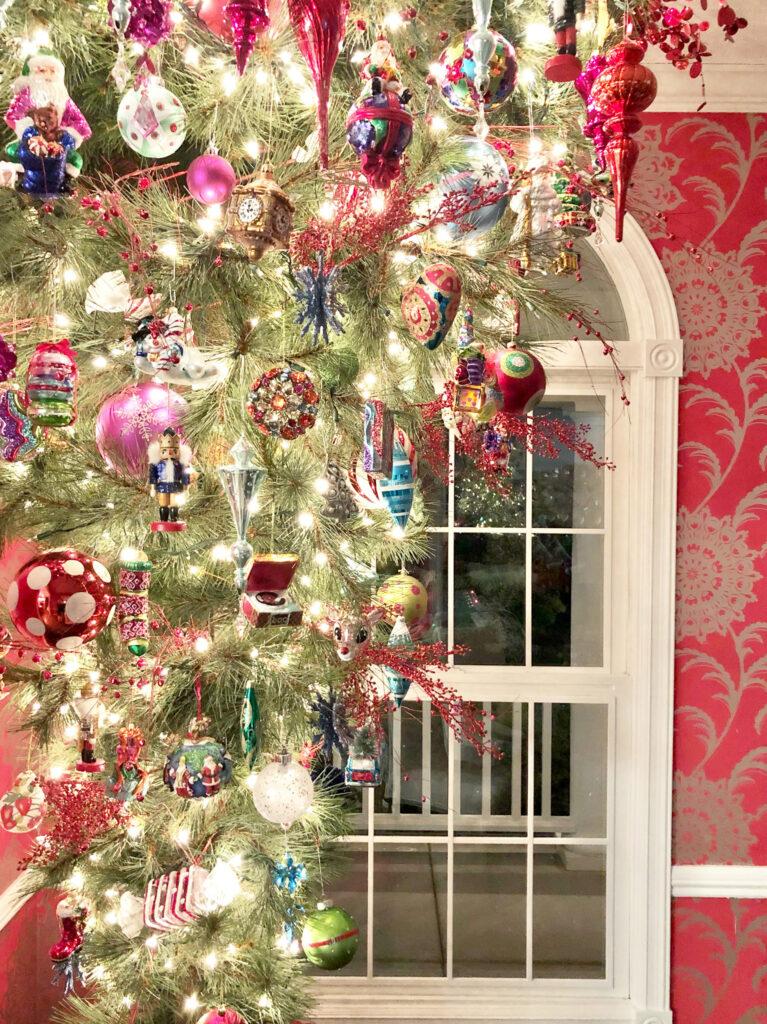
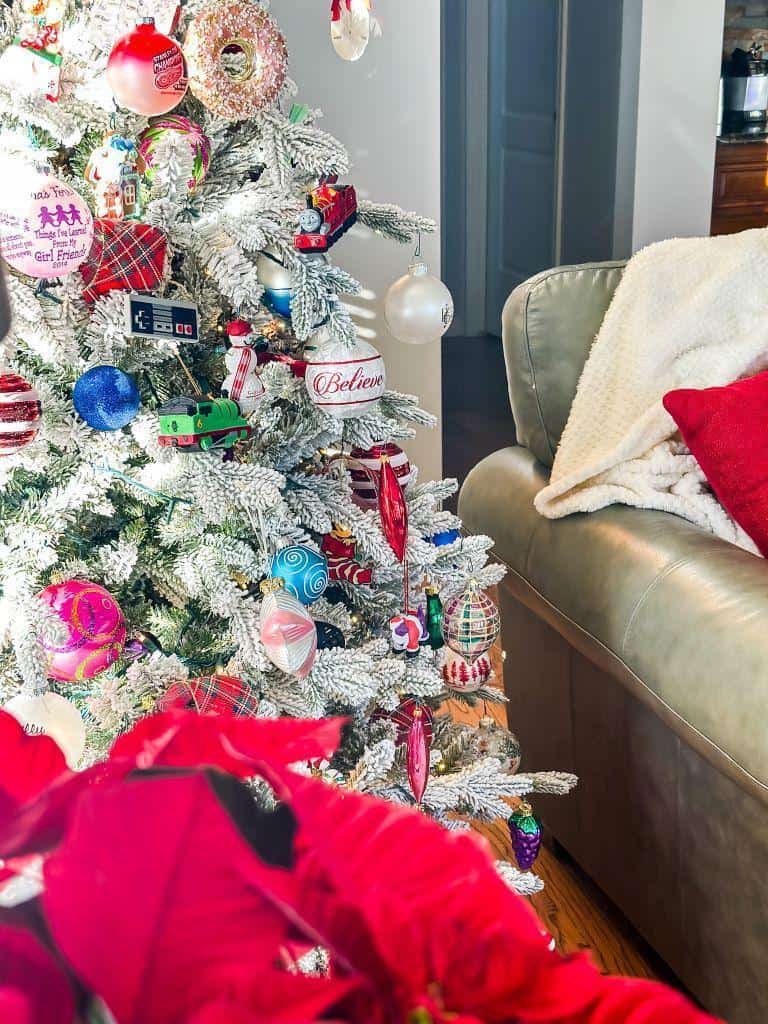
Happy Holidays! I’m so glad you’re here! Did you just come from White Lilac Farmhouse? Isn’t Tammy’s tree amazing!!!
However you got here, I’m glad you made it!
‘Tis the season to deck the halls . . . .
. . . . . And also your stairs — specifically your stair landing.
It’s a great way to take your Christmas decor to the next level — literally as well as figuratively. (pun intended)
No staircase landing? No worries, I’ve included three other nuggets of styling inspiration for you, with no stairs required.
- 8 Essential Tips for styling a great display
- How to make acorn tassels
- A great thrifted art makeover to Christmas signs
And if that’s not enough, thanks to the uber talented Wendy of WM Design House, I’ve joined eight blogger friends all sharing Christmas tree wisdom and inspiration today. Hold on to your hats — it’s full post today!!!
Why Decorate Your Staircase Landing?
Oftentimes, your staircase will be the first thing guests see when entering your home. And if that staircase includes a visible landing, why not add some Christmas decorations to this small space to turn it a cheery focal point?
A staircase landing can be a great place for festive decorations. You can carry a decorating scheme throughout your whole home or use this spot for a smooth transition between two different themes. Perhaps from a luxe look white Christmas to a classic red plaid look.
It doesn’t have to be big and elaborate. Keep reading for Christmas stair decor ideas that will inject an extra dose of holiday spirit.
Table of Contents:
Where to Start When Decorating A Stair Landing?
First things first, come up with an idea — a vision of what you’d like to see there.
Just like when making bigger decorating decisions for your home, it’s always a good idea to consider the flow between rooms and sight lines.
How visually connected is the landing to other rooms or areas of the house? The more open. it is to other rooms, the more you should coordinate the colors and styles.
They don’t have to be the same, but at least complimentary.
Ours is a quirky 60’s lake house that is a square little bungalow on the streetside who thinks she’s a Mediterranean villa on the lake side. The landing is visible from both our more formal and very neutral upstairs living room and the more casual blue and beige and brick family room downstairs.
In our case, from the street side of our home, right off the entry hall is our sightly more formal living room with an open stairwell down to the family room and kitchen where we mostly hang out, the ground floor on the lake side of the house.
There is one staircase wall. And at the landing, which is three steps shy of the bottom of the stairs, the downstairs brick wall begins.
So for me, I want my landing decor to transition between the two decorating styles and offer a welcome invitation to join the fun downstairs.
Let’s Talk Broad Ideas
Your stair landing decor can take many different shapes, depending on the size and shape of your landing, the look of your staircase, and perhaps its location to the front door, living room or even the dining room.
In most cases, consider the corner of your landing as your focal point. If that corner/focal point is open with just railing around it, then decorating the railing is your best option.
FOR SAFETY: only decorate the staircase banister on the outside, keep the handrail on the wall free.
A Christmas garland is the obvious choice. But what that garland looks like is loaded with options from faux garland to fresh cedar garland to a simple garland DIY using basic craft supplies. A pre-lit garland can be a great idea provided you have an accessible power source or be sure to get a battery powered version.
Here are just a few Christmas decor ideas that can work on a landing, arranged by how much space they might need.
These ideas require the least amount of room:
- Anything wall mounted
- Holiday Art or signs
- Ornament Christmas tree like this
- Wall tree made from twigs, driftwood, reclaimed wood, fresh greens, faux garland, etc.
- Christmas wreaths of all kinds
Then with a bit more space you can get more inventive, adding in something more with a wreath or holiday sign:
- A tall Santa or St. Nick standing in the corner
- A tall nutcracker grouping with wood boxes of various heights
- Vintage skis or sled with a wreath
- Cute stool with a pile of fun wrapped “presents”
With even more space:
- A Christmas tree
- A set of three tall, skinny trees
- Tall urn filled with long birch logs and greens with a smaller pot beside
Points to Keep in Mind
1) Scale
A staircase landing is typically tall and narrow. You want your decor tall and narrow.
A stack of faux gifts sitting on the floor is not the decorative accent you want here.
Take that same stack and elevate some on a stool, then add a tall thin tree on one of the presents to extend the display taller still. Arrange so the stool, the packages and a tree all read as one tall thin display.
Creating a vignette is easy with a few style tips:
- Vary your textures
- Vary finishes including matte and glossy
- Mix linear and curved
- Use common color theme
- Add textile (soft flowing ribbon counts here)
- Incorporate negative space
- Layers- Build up AND build out
- A triangular shape is particularly effective (a very tall, thin triangle here)
You can see how I used these tips in this vignette, this Spring vignette, and this Christmas table display.
2) Details
A little bit goes a long way in tight quarters like a stair landing.
Be a firm Editor! This is not where you want all the little details and lots of fussy “stuff” going on. Details are good, just limit the variety and make them more visually impactful from a distance.
Keep it simple but inviting and festive.
3) Lights
Can we all agree, lights make the look?!!!
From string lights to fairy lights, to Christmas lights in different colors, any can be a good choice depending on your display.
Just remember to find an accessible power source or use battery powered lights.
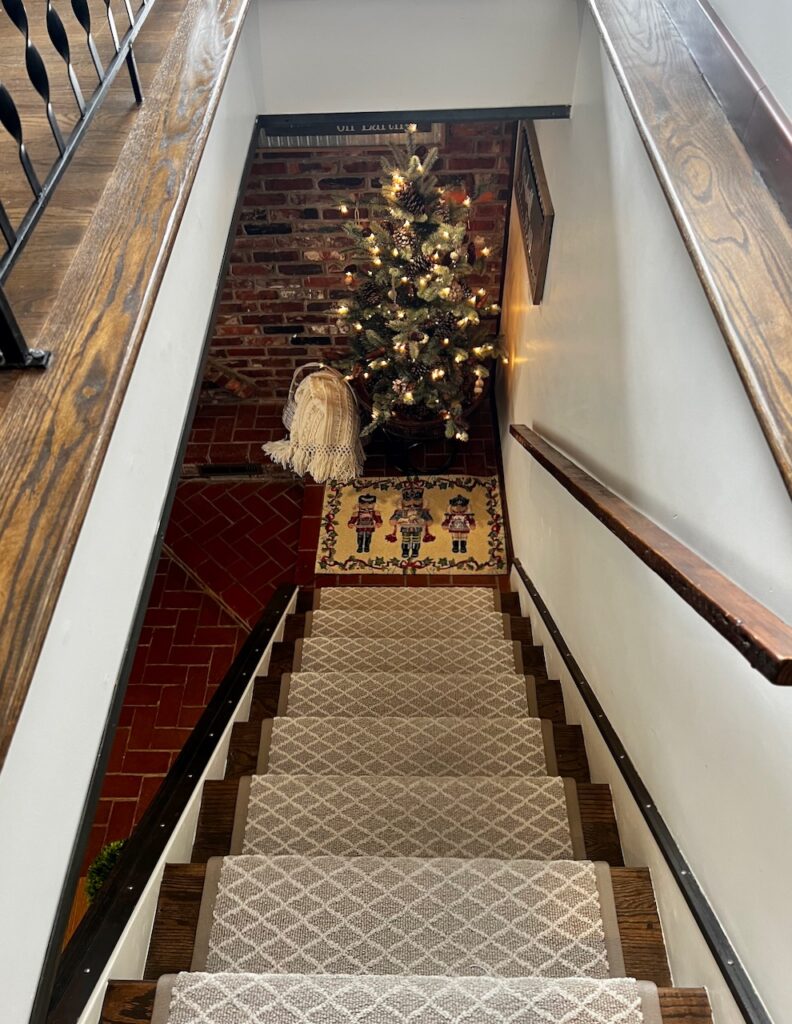
Our Stair Landing
The past two years I’ve propped vintage skis in the corner with a wreath with battery powered fairy lights hanging around the crossed tips. The white basket you see here was filled with vintage Christmas books, And the same nutcracker accent rug and a sweet little stool finished it off.
I thought it looked great from the lower level family room but was very disjointed from the upstairs. From the top of the stairs it was a bit busy with too many small details. And the fairy lights were too “timid” for the length of the staircase. They did not beckon you down.

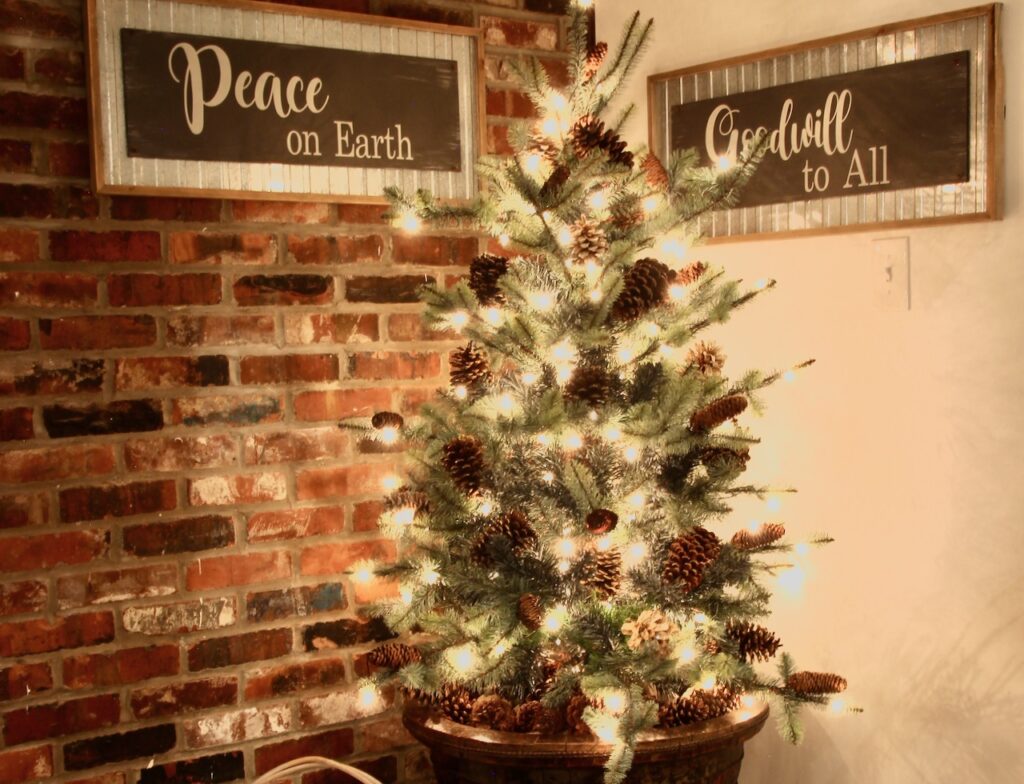
So this year, I went with a large pre-lit tabletop tree to fill the corner. On the floor it looked ridiculous, but elevated on a rattan table base that I had rescued form the curb years ago, it’s perfect.
From upstairs, there is no doubt what you are seeing and the brighter lights fill that area and shout out a warm cherry welcome.
I had to run an extension cord across the landing, so the nutcracker rug still resides there, adding safety and helps to brighten the dark brick landing floor and the additional brick steps into the family room.
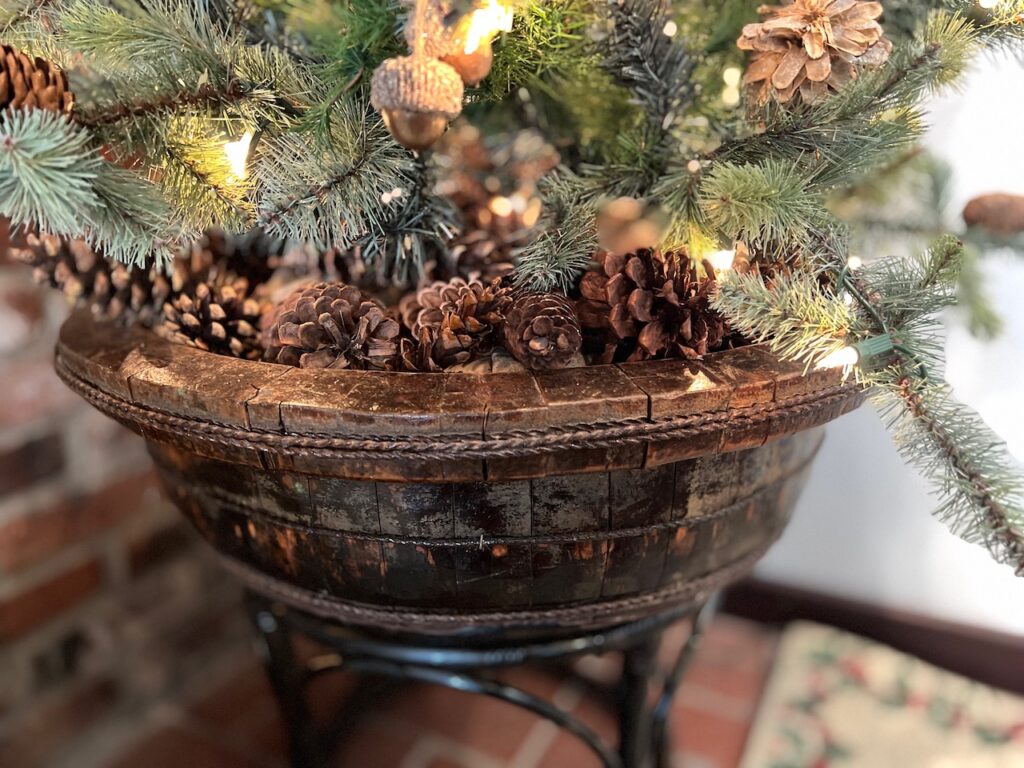
The tree stand sits inside a fabulous huge wooden antique bowl I acquired years ago. Then I filled it with rumpled newsprint and a layer of my favorite washed linen and then more pine cones. Pine cones of every variety! Nestling more in the tree branches too.

Keeping it simple, I only used natural elements — pine cones and acorn tassels. The simple tassel how-to is just below, keep reading.
To round out my display, I added the white basket with a special throw my mother had crocheted for me years and years ago.
The throw warms my sentimental heart while checking the “textile” element box. And with the basket, it adds a brightening element the corner needed down by the dark rattan base and creates the triangular shape that works so well for displays and vignettes
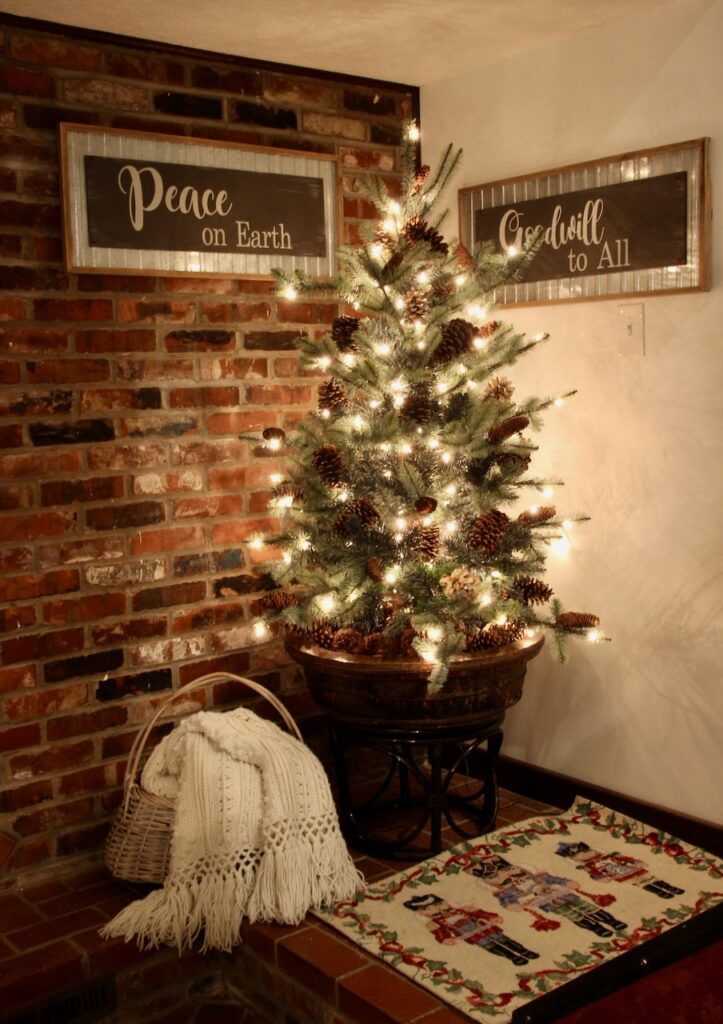
The walls looked empty so I added two signs I had made from thrifted “art”. By wrapping the corner with them, they help to soften the transition from white drywall to antique brick.
The lettering is large and simple, perfect for viewing at a distance and the galvanized steel background provides just enough shine to reflect the tree lights and add a shiny element this display was missing. The creamy lettering repeats the color of the rug and throw.
Short Pause in the Action:
Are you finding this helpful? I hope so! That’s my goal here. Please consider subscribing – YOU control how much is right for YOU. Your email is securely locked away in the Flodesk vault never to be sold or shared!
How To Make Acorn Tassels
Supplies & Materials:
- Acorns
- Metallic paint
- Thin jute twine
- Large eyed needle
- Drill with thin bit
- Hot glue gun and glue sticks
- Paint brushes
Step 1) Remove nuts from their caps-
The acorns from my neighbor have very fringed caps. If I rub on that fringe and break them away, the nut will release.
TIP: You’ll save yourself some time at the last step if you keep the matching nut and cap together
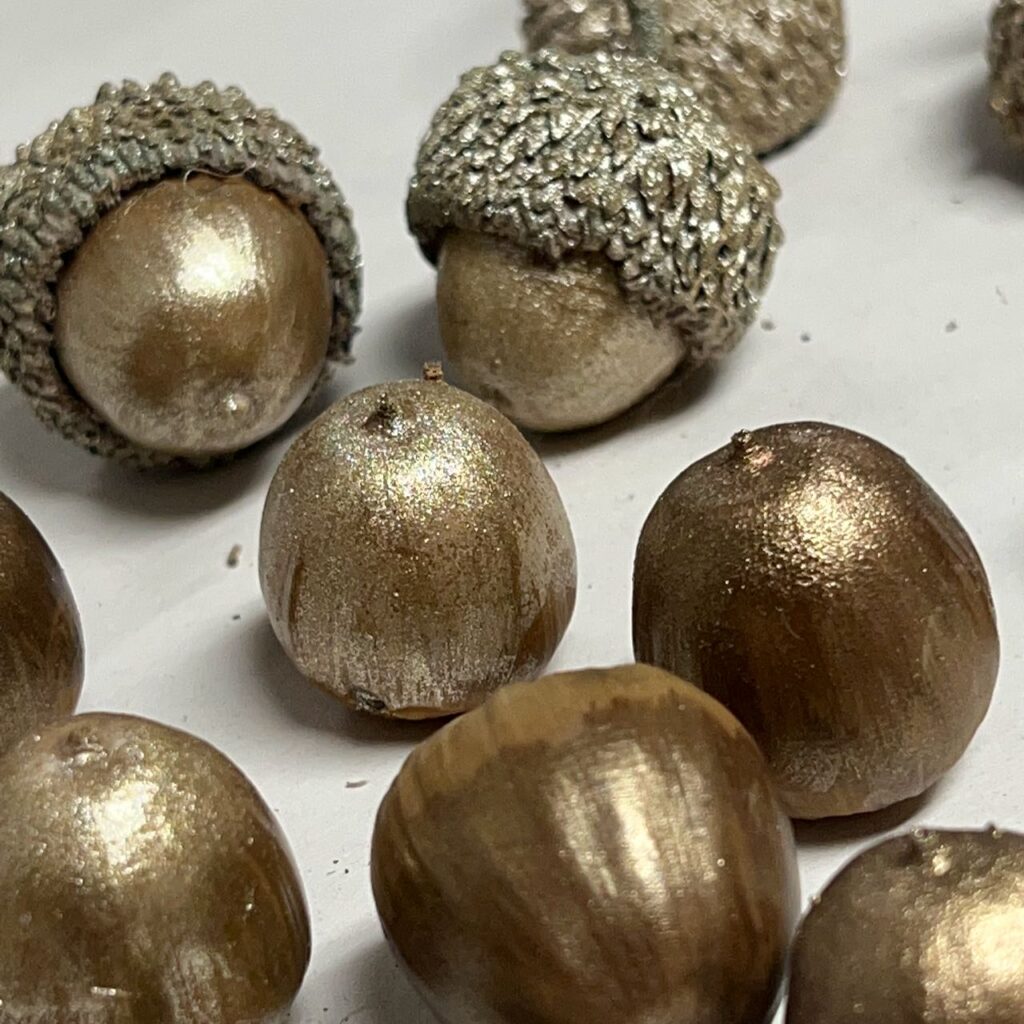
Step 2) Paint-
I painted most of the nuts with a bronze metallic craft paint and the caps with my favorite DecoFinish champagne gold paint. Any craft paint will do.
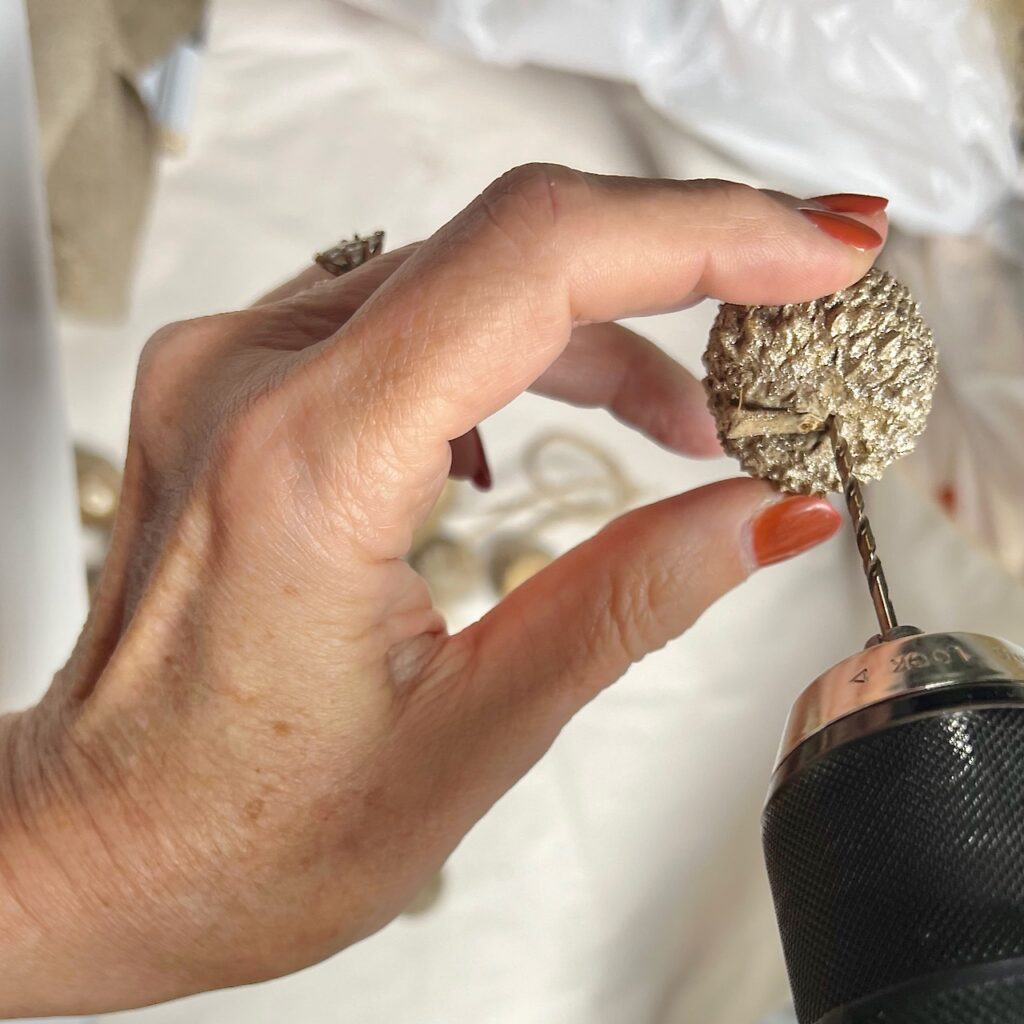
Step 3) Drill Holes-
Drill a hole in the top of each cap close to the stem. Or if the stem is broken off, then drill where it would have attached.
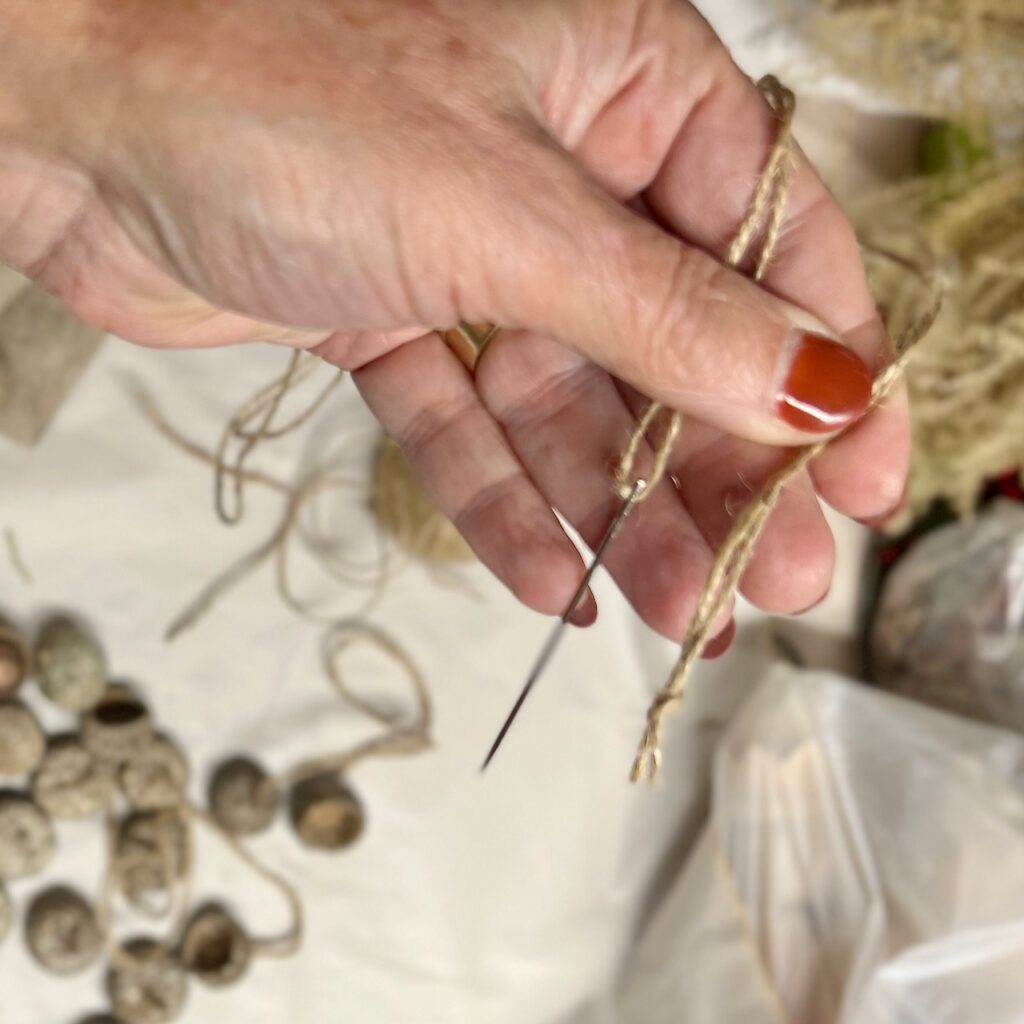
Step 4) Add Twine-
- Thread your needle with your jute twine, or your equivalent.
- Knot the two ends together.
- Then thread the need through the hole starting inside the cap.
- Slide the cap all the way to the knot.
- Thread the needle through the second cap starting on the outside of the cap.
- Slide the cap down the twine towards its partner.
- Knot your twine again about 8 – 10-inches from the original knot.
- Don’t cut yet! Tie another knot about 1/2-inch from your last knot. Now cut between those last two knots! TaDa! Your thread is now pre-knotted for the next pair. (I love little time-savers like that. (I readily admit I’m a creative time-saving geek!)
- Slide that second cap down to the knot.
- Your first knot for the next pair is done. Repeat from #3.
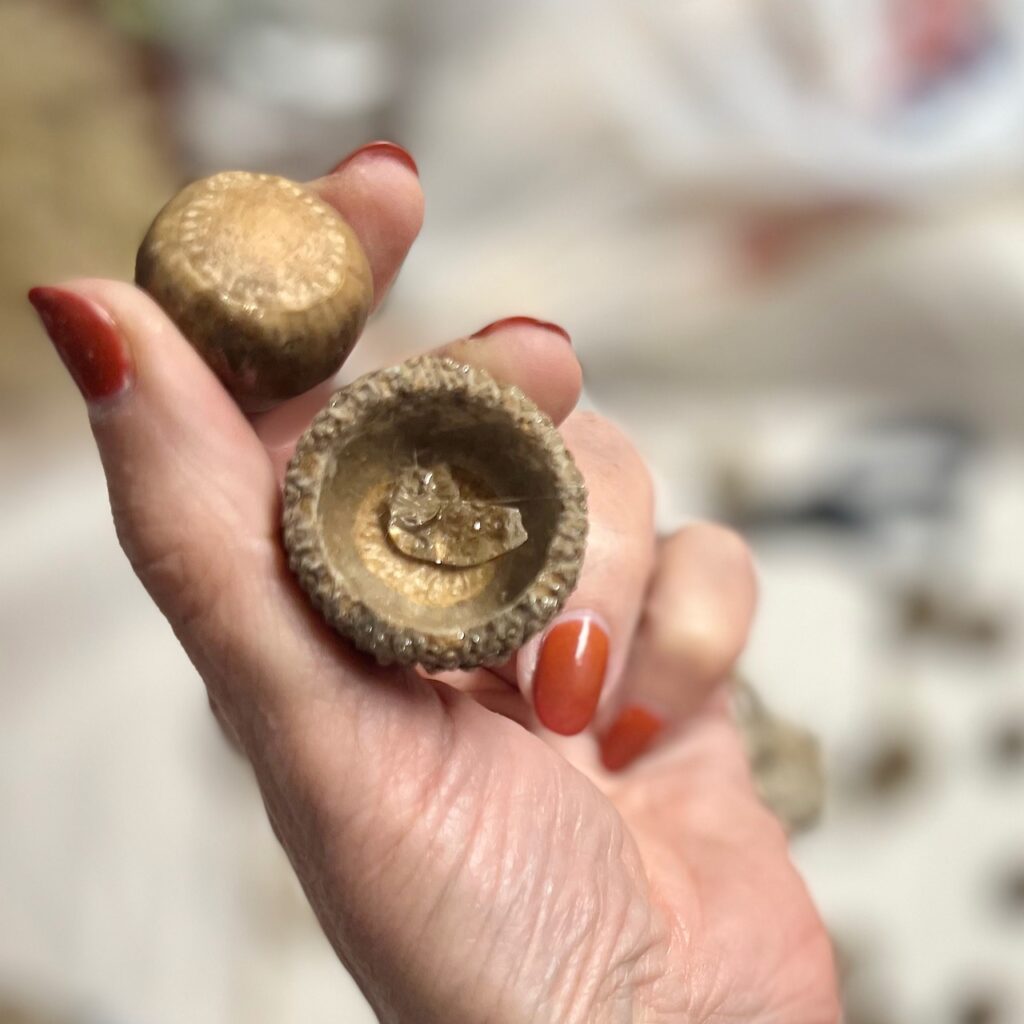
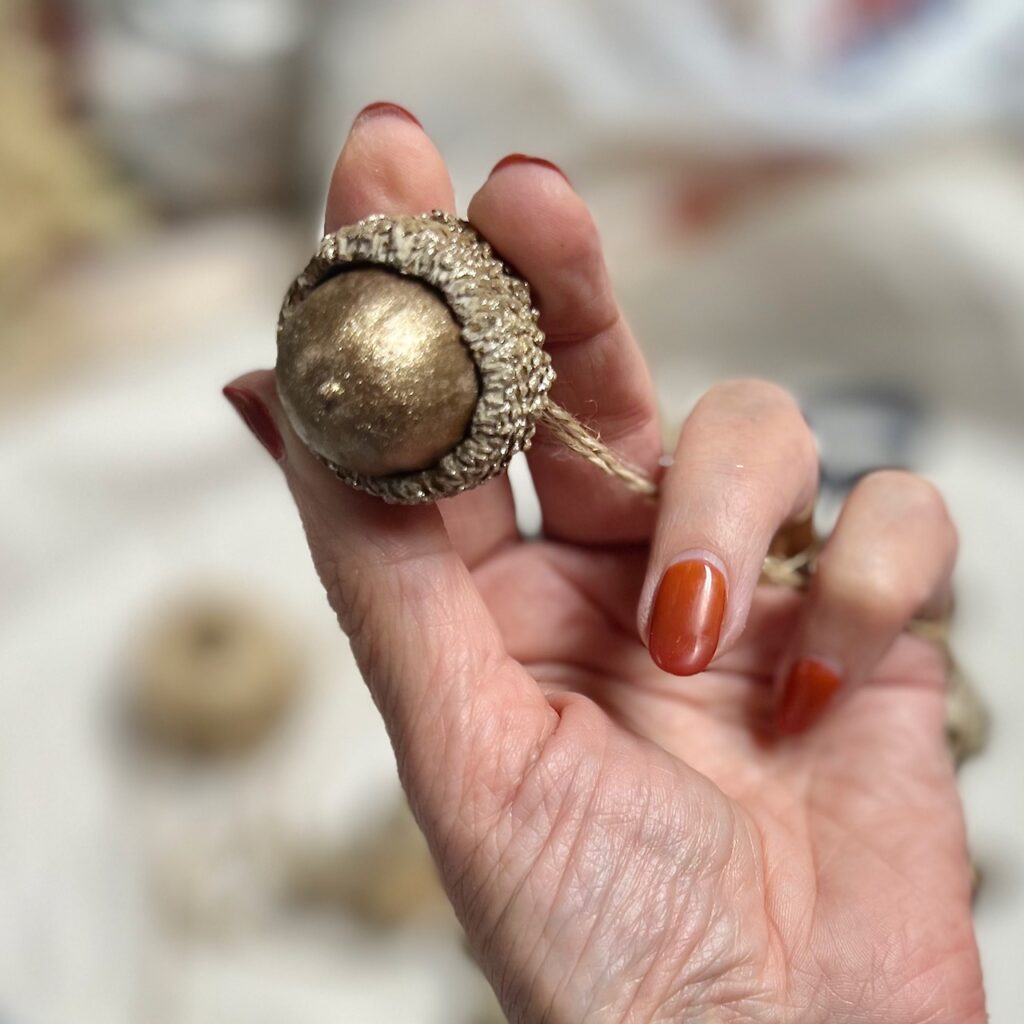
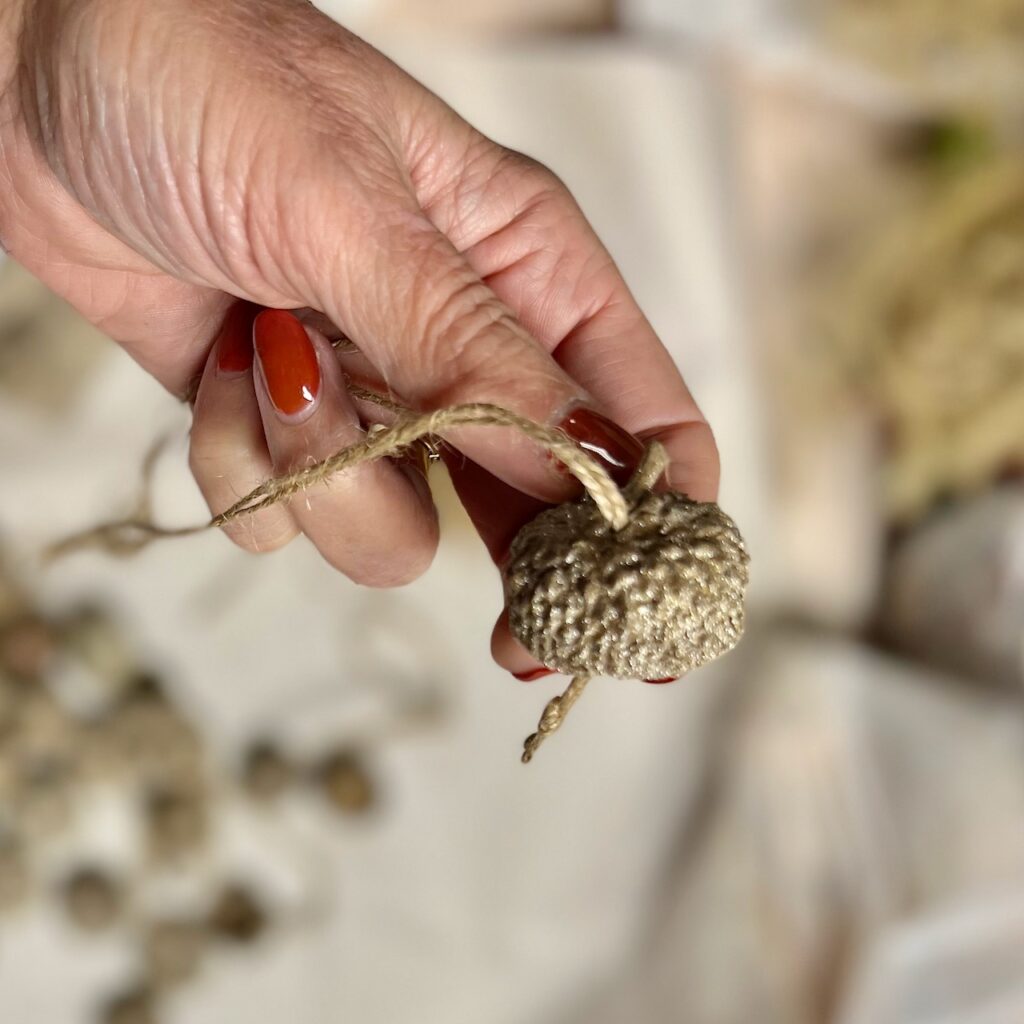
Step 5) Reassemble Acorns-
- Find a cap and nut that fit together.
- With the knots tight against the inside of the caps, add a healthy dollop of hot glue inside the cap on the knot.
- Insert the nut.
Thrifted Sign Makeover
Materials & Supplies:
- Thrifted signs
- Paint
- Adhesive vinyl
- Personal cutting machine
- Transfer paper
- Paint brush
- Needle nose pliers
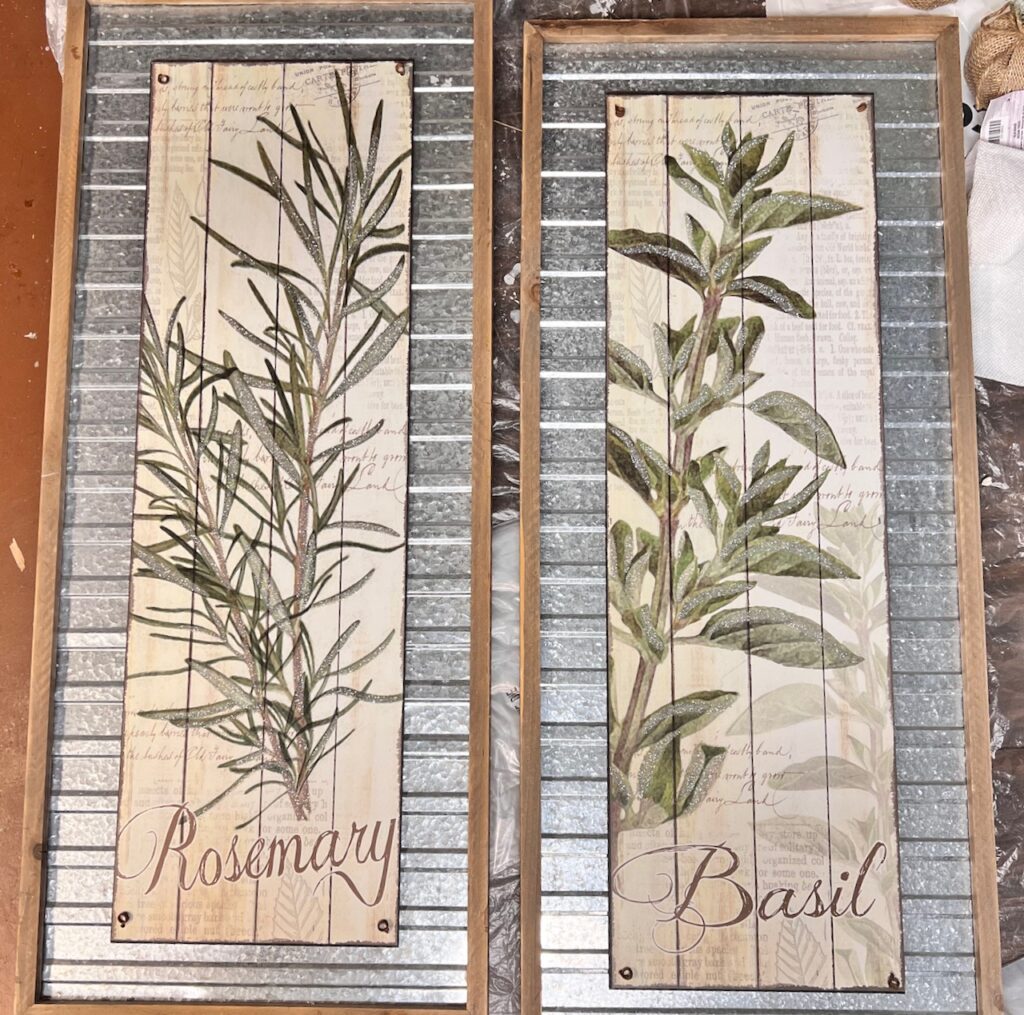
Here was my starting point! There was even glitter on the leaves. I figured I could sand them down it I needed, but got lucky and the back sides of the herbs were plain and assembled with just the wires, no glue.
Step 1) Take Apart Your Art-
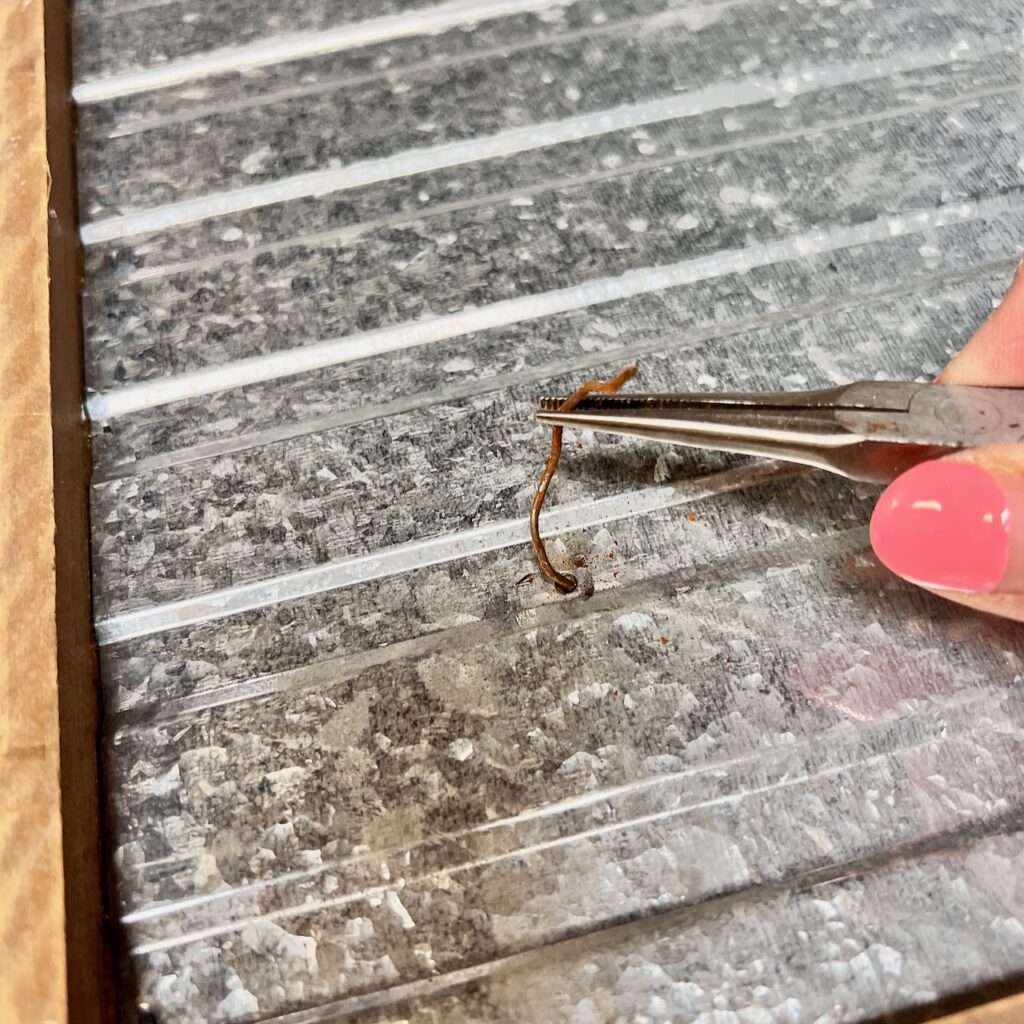
My “herb boards” were just held in place with rusted wire coiled through holes in in each corner of the boards and the galvanized steel backers. I carefully uncoiled the back side trying to keep them in tact to be able to reuse.
You may have a piece of art in a frame. Remove it from the frame. If it is one of those pieces that is glued in, you’ll have to tape off the frame.
Step 2) Paint Your Background-
I used a Chalk paint I had on hand colored with a bit of craft paint. Yes, it is possible to mix craft paints with chalk paint to alter the color of chalk paint, just keep the ratio of craft to chalk as low as possible.
You hear is all the time! Two (or more) thin coats NOT one heavy coat. Follow that advice!
When my charcoal was dry, I chose to dry brush on a bit of a light creamy taupe just to soften it a bit.
Step 3) Cut & Apply Your Message-
This is the hardest part for me, coming up wit my message! But I love my final decision. Seems particularly current right now. Is there anything greater we can ask for?
Like all cutting projects, lay it out in your machine’s design software until you have it just as you want. Load your vinyl and hit the “Go” button.
Then stand back and marvel as it performs its magic feat!
Transfer to your sign,
Step 4) Reassemble & Hang-

Exactly that, reassemble your reimagined holiday art and of course hang it for the holidays!
Then smile and give yourself a warm hug every time you walk past it.
Now Time to Hop
It been a joy to host you at my hop stop. I hope you return again and again for more creative muscle flexing all living more joy-filled lives, That’s what we do here!
I hope this has given you ideas for adding a tree (or other holiday decor) to your staircase landing. But the inspiration continues! Remember I said this is just one stop on a 9-stop hop! So many beautiful trees await you.

Next up, jump over to Kim at Perfecting Places.She is teaching us how to make adorable Christmas trees with Borax. I know!!! You read that right. Don’t skip by Kim’s stop, it is such fun
This is my last post for 2022! I’m signing off to fully enjoy our kids all being home for the holidays.
I wish you joyous holidays. Be safe. I’ll see you next year — I have all kinds of amazing plans in the works!


")


What a darling tree in the landing. It make the area look so cozy.
Thanks so much Tammy! That’s exactly what I wanted — cozy and inviting! It’s been great hopping with you.
So many great ideas, Diane! You have inspired me to take a new look at our landing. It is a small space but you have given me some fantastic ideas to try! Thanks for a great post! Merry Christmas!
Oh Missy, you’re the sweetest and always such fun to hop along with! Wishing you the merriest of Christmases overflowing with friends and family, blessing and bliss!
Diane, you have so many wonderful ideas in your post! You stairwell tree is so lovely and cozy! It’s all the small special touches that make a home feel cozy and inviting! Merry Christmas! Enjoy your time with family!
I’m so pleased with how it turned out — only took four years to figure that space out :). Cozy & inviting — just what I wanted. Have a wonderful holiday Kim!
You have given us so many wonderful ideas! Your landing tree is lovely!! So nice hopping with you today! Merry Christmas!!
It’s been a fun day. I’m so glad Wendy was able to get us all organized. Thanks so much. Hope to hop with you again, soon, The happiest of holidays to you!
Diane I really enjoyed your post! I love your tree and the thrifted makeover on the signs is amazing! They look so great. I have actually never seen a real acorn, I only see the fake ones so I had no idea their little caps come off. So happy to hop along with you. Your blog and all your posts are very beautiful.
No acorns in BC, huh? I’m lucky my neighbors have a huge tree that sadly for them drops massive quantities of acorns on their roof and all over their yard. They encourage me to take as many as I can,
so many fun and creative ways to decorate Diane. Currently in this home our only landing is heading down to our game room but you have me thinking about ways to decorate there next year! All the best, enjoy your holidays! 🙂
And happy holidays to you too, Susan! That’s exactly why I wanted something on this landing, to bridge our game/family room and the living room upstairs. I bet you’ll come up with something amazing — your always do.
Beautifully styled landing, Diane! I love all of your ideas and wishing our stair landing was large enough to have a tree!
I was pleasantly surprised that it fit! It’s only taken me 4 years to figure this little spot out. Merry Christmas to you Kristy!
So many wonderful ideas Diane. Love those acorns and all of your natural touches.
Thanks Wendy for organizing us. I really appreciate hopping with all these lovely ladies!