Handmade Frame Cards – Made to Hold a Little Art With a Lot of Heart
Sometimes a store-bought card just isn’t enough.
Not because the words inside don’t matter — they do.
But sometimes the moment calls for something more.
Something handmade, a little imperfect, and completely from the heart.
That’s the spirit behind this month’s Handcrafted Society Challenge — Handcrafted Stationery That Feels Like Art.
But, what if we made cards that hold art?
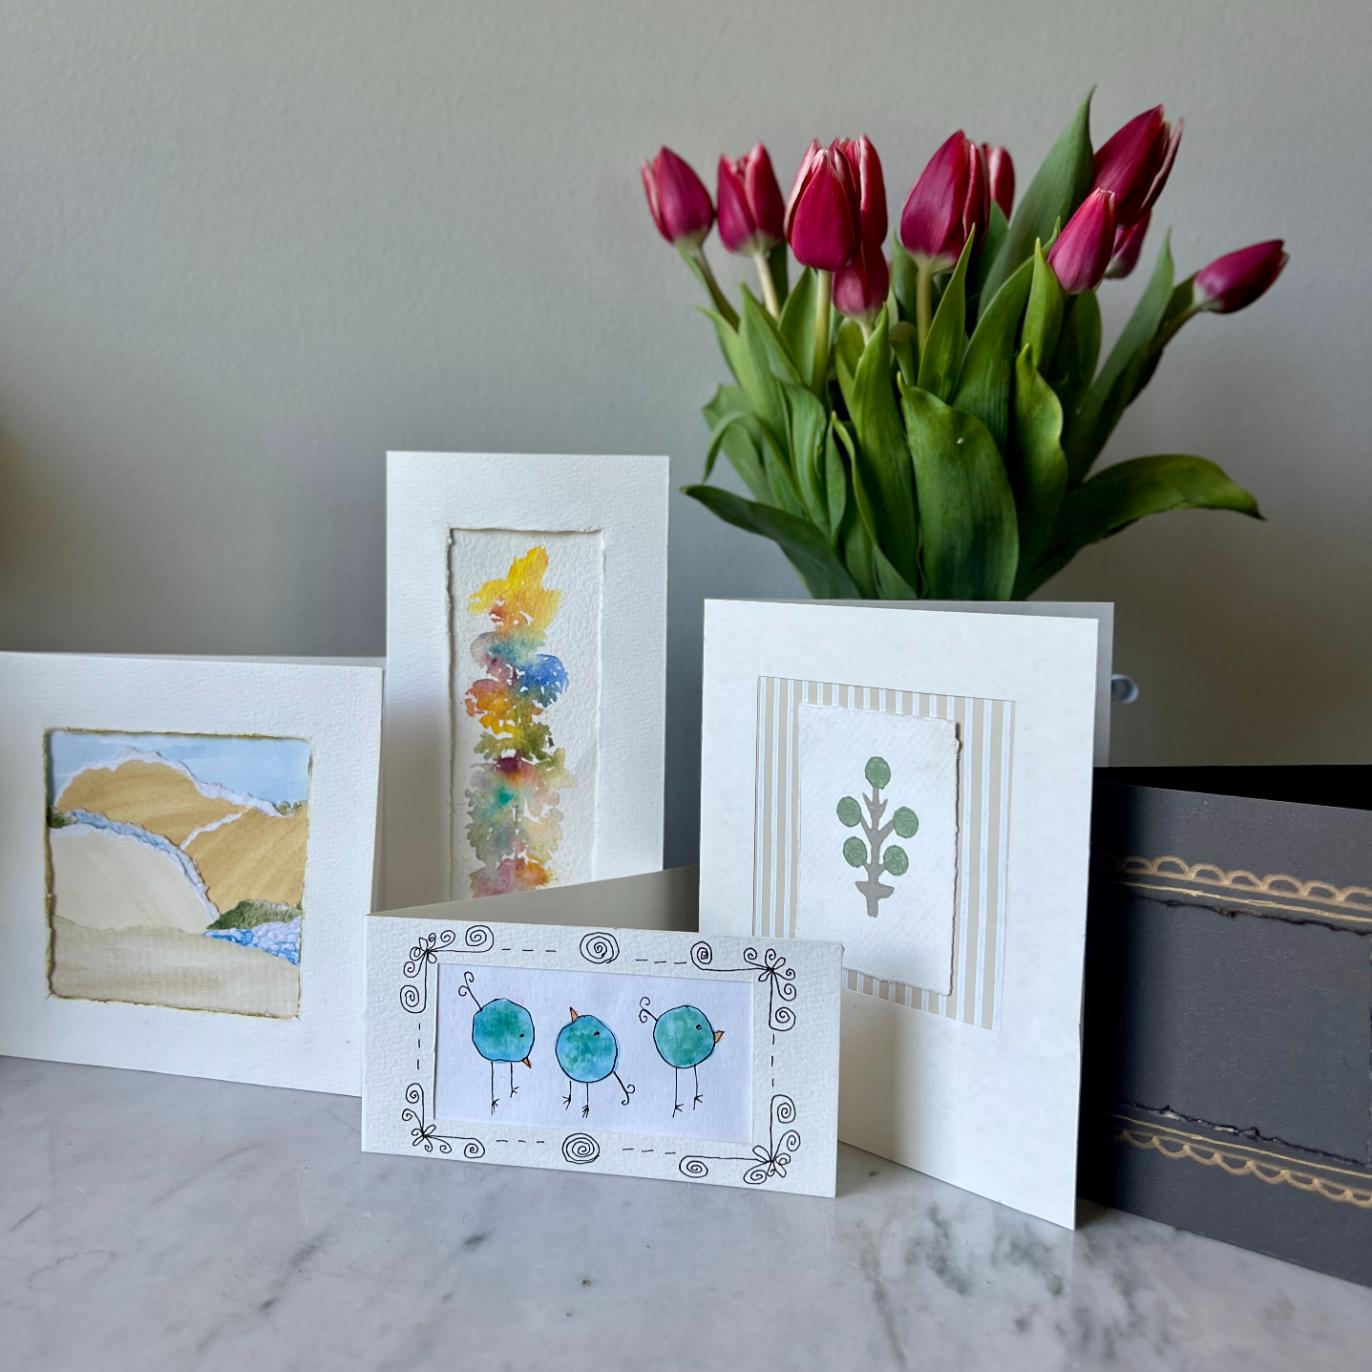
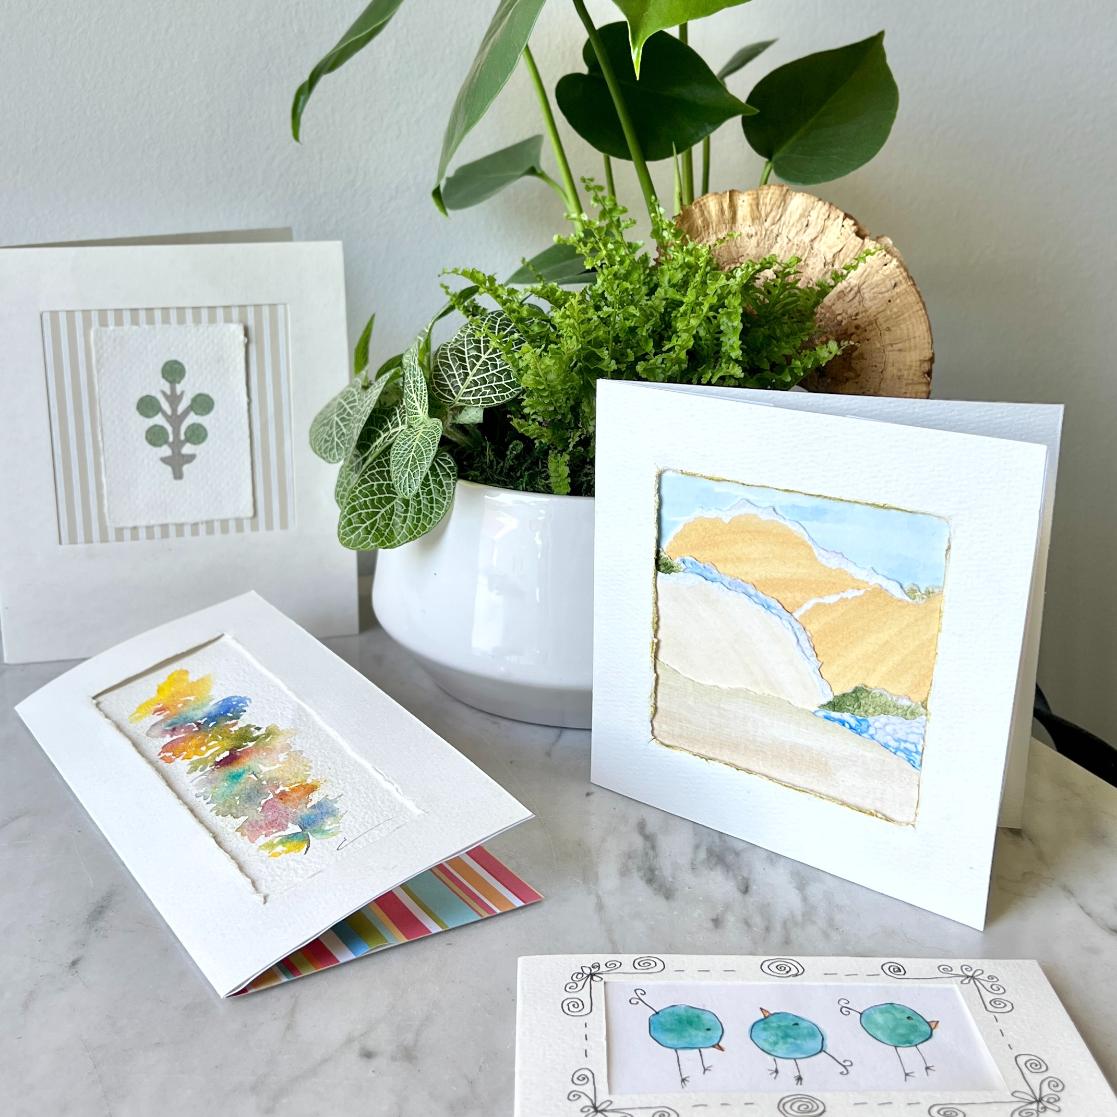
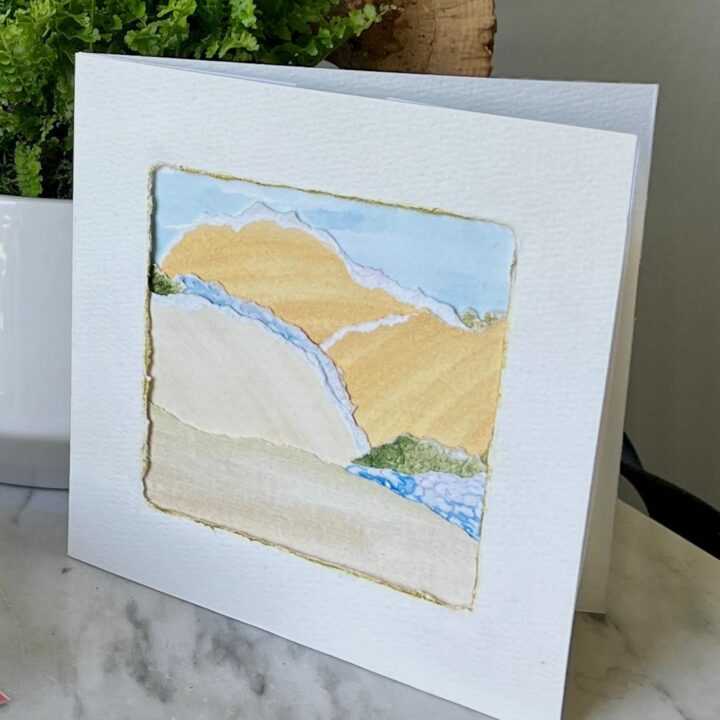
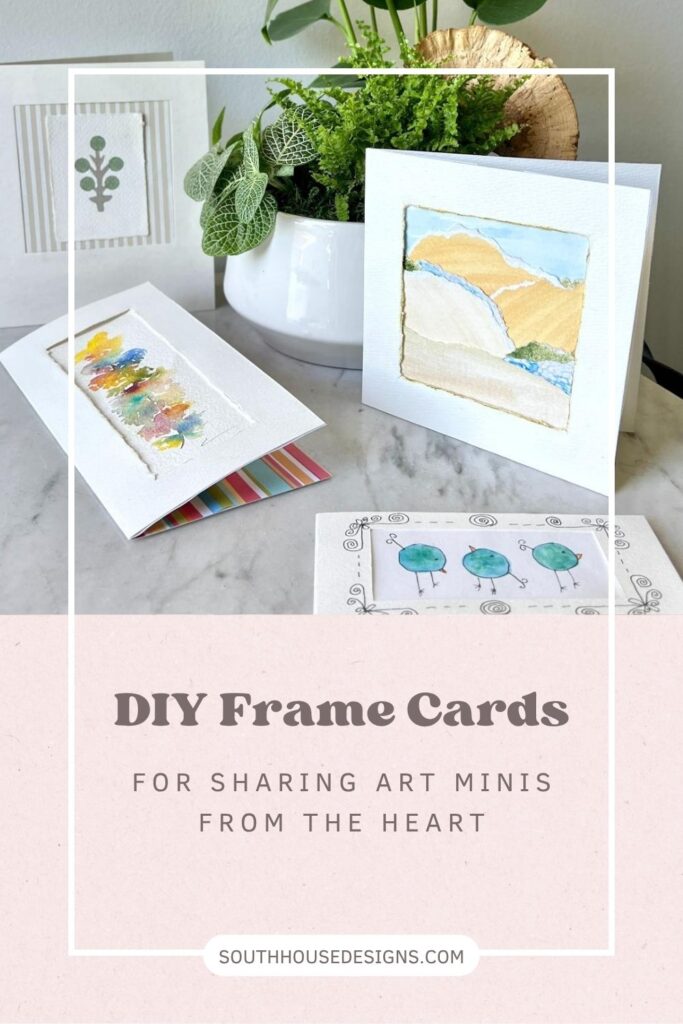
My contribution to the challenge is a handmade frame card — a folded card with a window opening designed to hold a small piece of original art. The artwork is removable. It can slide out to live as a bookmark, get tucked into a little frame, added to a pin board or be displayed on its own.
The card delivers the message. The art delivers the feeling — and the art lives on.

Ready to jump right to it?
Here’s a Quick How-To Card for Confident Crafters
If you’d rather feel like I’m right by your side, stepping you through it — no problem, keep scrolling.
Frame Card to Showcase Small Works of Art
Materials
- -Cardstock and/or watercolor paper
- -Small piece of art, a photo, or a flat keepsake to display
Tools
- -Ruler
- -Rotary cutter, box cutter, or X-Acto knife
- -Sharp scissors
- -Bone folder
- -Pencil
- -Tape runner or appropriate glue
- Optional for edge finishing:
- -Micron marker or thin permanent marker
- -Stamping ink pad
- -Gold leaf
Instructions
- Cut cardstock to 5½ x 11 inches. Score and fold in half to create a 5½ x 5½ card. Crease firmly with bone folder.
- On the front of the card, lightly mark the frame opening with pencil — centered, leaving a minimum ½-inch border on all sides. A 1-inch border is recommended and gives the card a more finished, intentional look.
- Cut the opening using your preferred method — rotary cutter and straight edge, X-Acto knife, or scissors.
- Cut a backer piece the same size as one card panel (5½ x 5½) — or ¼ inch smaller on all sides for a peek-a-boo border effect.
- Glue the backer to the inside front panel on three sides, leaving the top edge open so your artwork can slide in and out freely.
- (Optional) Finish the frame edge with a fine-line marker, a brush of ink pad, or gold leaf.
- Slip your art in, write your message inside, and mail it — or present in person!
Notes
All the details and my tips are included below -- And a inspiration gallery. Keep scrolling!
Before we get deep, may I pause and ask if you are enjoying this project? Want more? I’ve got ya!
Subscribe below for my free Creative’s Toolkit, designed to get you crafting confidently in no time:
Thanks so much! Now back to our cards:
Let’s Go Deeper — The Full How-To Make a Frame Card
First, A Word About Sizing
Before you cut a single thing, let’s talk sizing — because this is where the whole project either comes together beautifully or gives you a headache.
There are two ways to approach this:
You already have your artwork. Maybe it’s a torn paper collage you’ve been working on, a tiny watercolor, a pressed flower, or a photo you love. Start there. Measure your piece, decide how much of a border you want around it, and build your card dimensions outward from that. Your frame opening should be just slightly smaller than your artwork on all sides so it holds the piece in place — about ¼ inch smaller all around is a good rule of thumb.
You’re starting from scratch. In that case, make your card first and then create artwork to fit. This is actually the easier route for beginners.
For this tutorial, I’m working with a 5½ x 5½-inch finished card with a 4½ x 4½-inch frame opening — perfect for a 5 x 5-inch piece of art. Scale up or down as you like; the math works the same way.
Your Materials-
One of the things I love most about this project is that it starts with a single sheet of 12 x 12 scrapbooking cardstock — a staple you can find at any craft store, often for less than a dollar a sheet. The 12 x 12 size gives you plenty of room to work with for card sizes up to 6 x 6-inches.
A note on paper choice: Standard cardstock works beautifully and is the easiest to cut cleanly. Watercolor paper, 140 lb coldpress, adds a lovely texture to the frame itself and takes ink and edge treatments especially well — but it’s a bit more stubborn to cut precisely, so keep that in mind if you go this route.
Step 1: Score, Fold, and Crease Your Card-
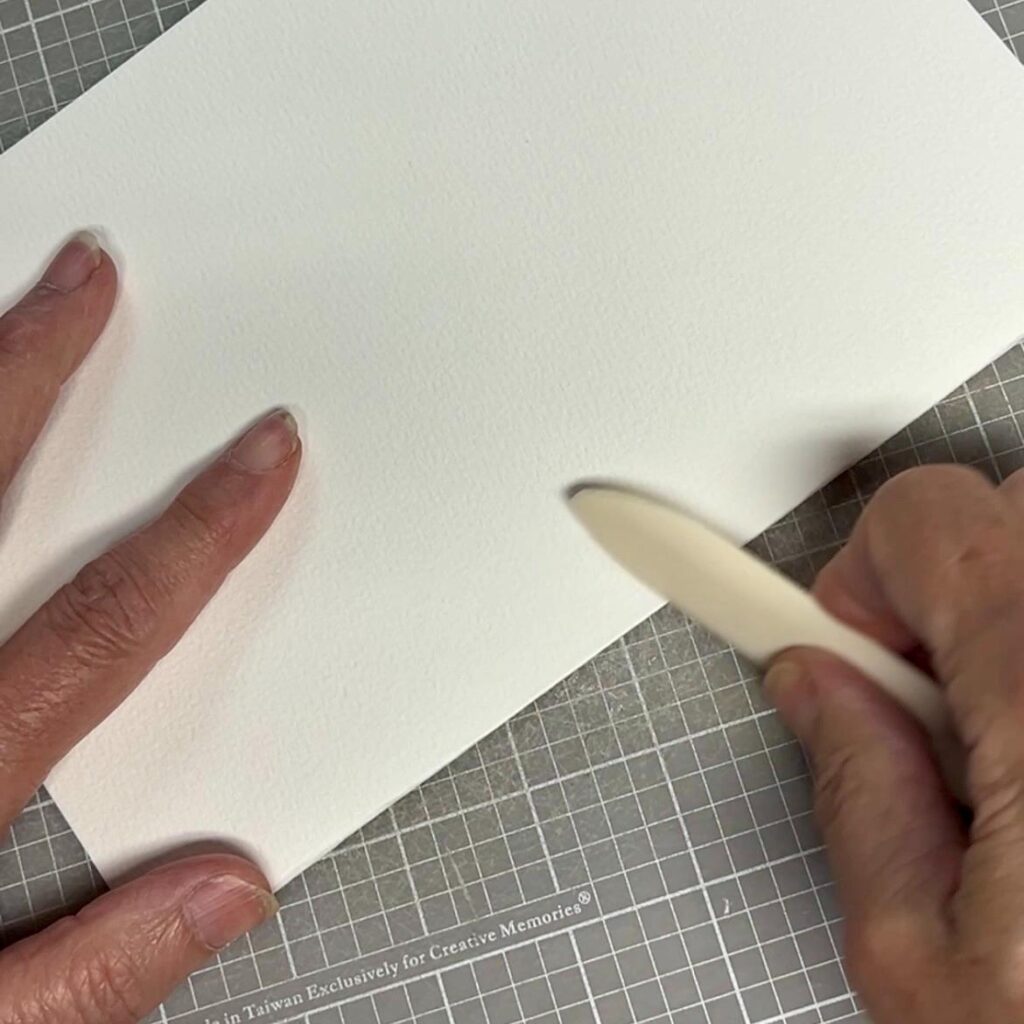
Cut your cardstock to 5½ x 11 inches.
Using your ruler and bone folder (or the back of a butter knife in a pinch), score a line down the center at 5½ inches. Fold along the score line and press firmly. Run your bone folder along the fold again for a really crisp, clean crease — this is one of those small steps that makes a big difference in the finished look.
Your card front is now the top half. That’s where your frame opening will go.
PRO TIP: I discovered my black cardstock has a white interior. I rubbed the cut edge against the nib of a black sharpie. Problem solved!
Step 2: Mark Your Frame Opening
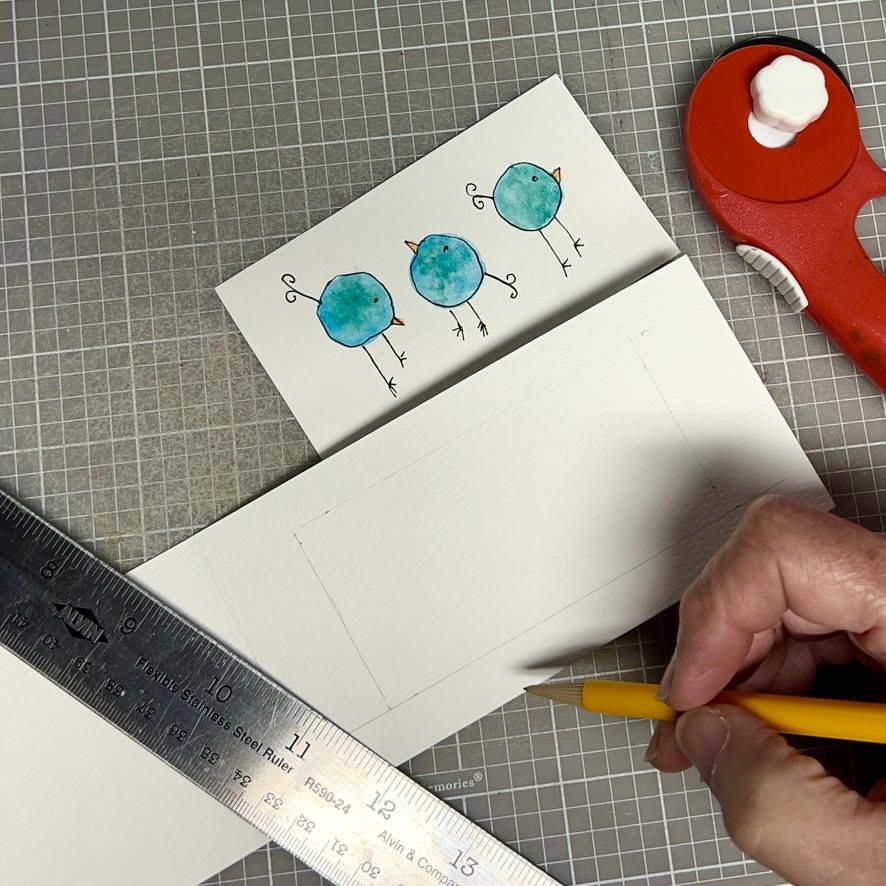
On the inside of the front panel of your card, use a light pencil mark to indicate the corners of your frame opening. I like to mark just the very corners — tiny dots rather than full lines — so there’s nothing to erase later.
For a 5½ x 5½ card, center a 4½ x 4½ opening. That gives you a generous 1-inch border all the way around, which I recommend. A ½-inch border is the absolute minimum — any narrower and the card starts to feel more like a afterthought with not much function of presence.
PRO TIP: Measure twice, cut once. Use a ruler to measure from each edge. A slightly off-center opening is surprisingly noticeable once the art is in place.
Step 3: Cut Your Frame Opening-
Here’s where you have options — and honestly, each method has its own charm.
Option A — Cricut (or other cutting machine) If you have a Cricut, this is the most precise and repeatable option, especially if you’re making a batch of cards. Set up your frame dimensions in Design Space, load your cardstock on the mat, and let the machine do the work. The result is a perfectly clean, sharp-edged opening every time.
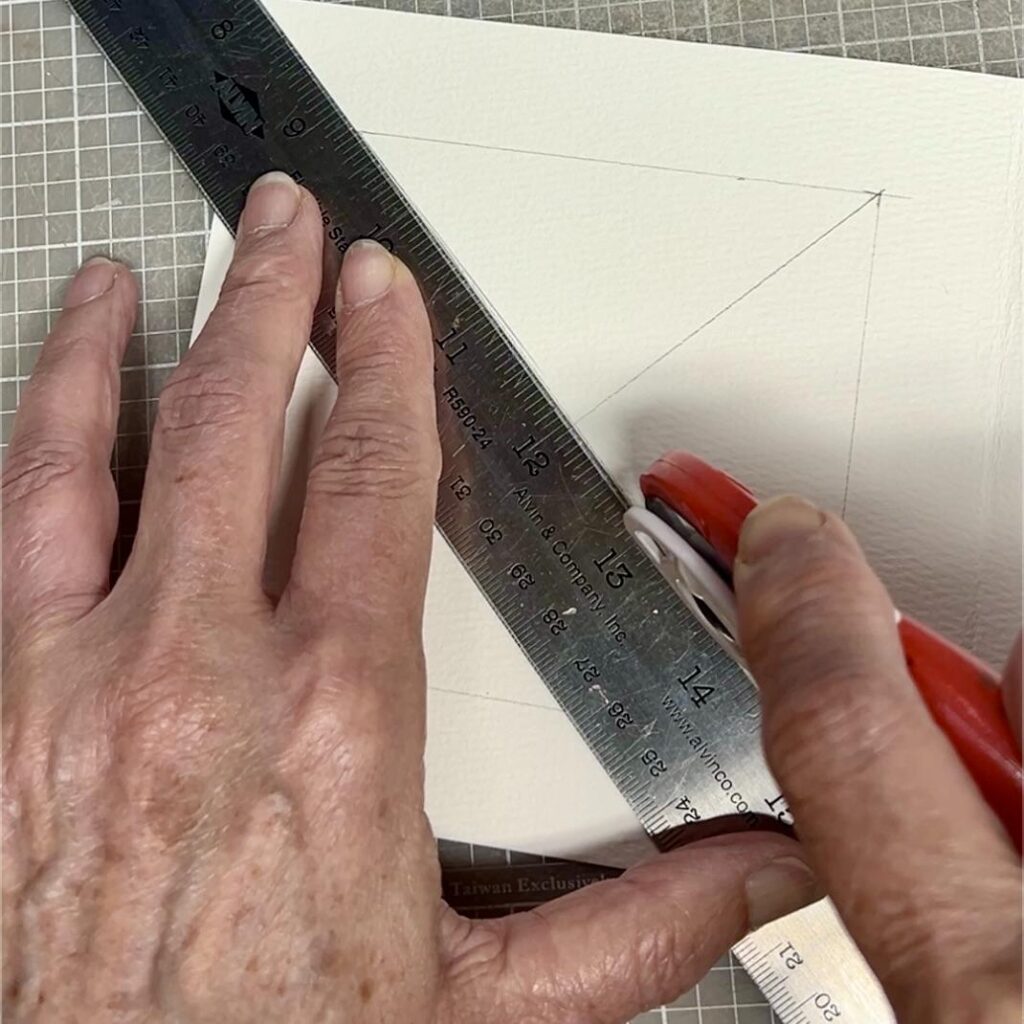
Option B — Rotary Cutter, Box Cutter, or X-Acto Knife This is my everyday go-to for a single card. Hold a metal straight edge firmly along your pencil line — I mean firmly, pressing down hard with your non-dominant hand — and draw your cutter or knife smoothly along the edge. Cut each of the four sides, then use sharp scissors to snip the corners clean if needed.
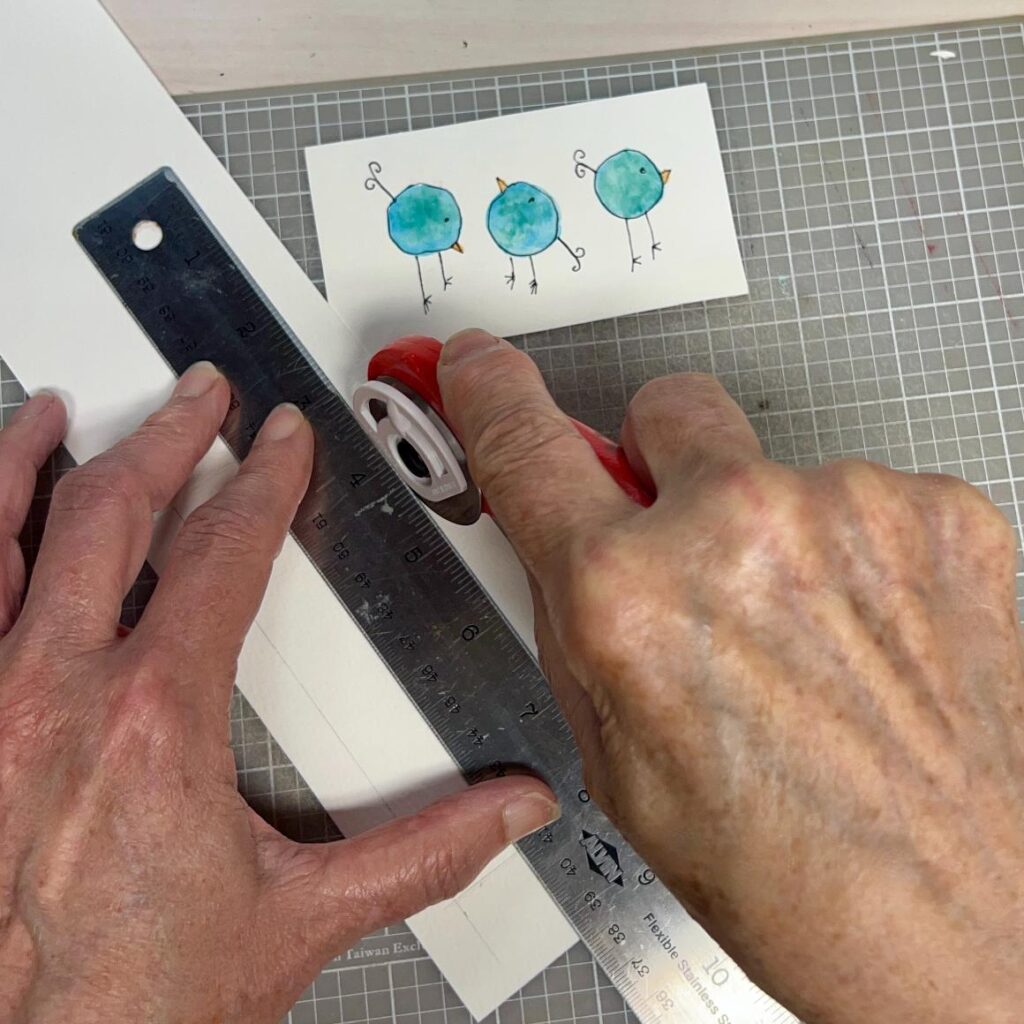
PRO TIP: For long cuts, without lifting the blade, pause in the cutting so you can lift and move your pressing hand down a bit. You want to keep your two hands across from each other.
Be patient and don’t rush the corners — that’s where most little imperfections sneak in.
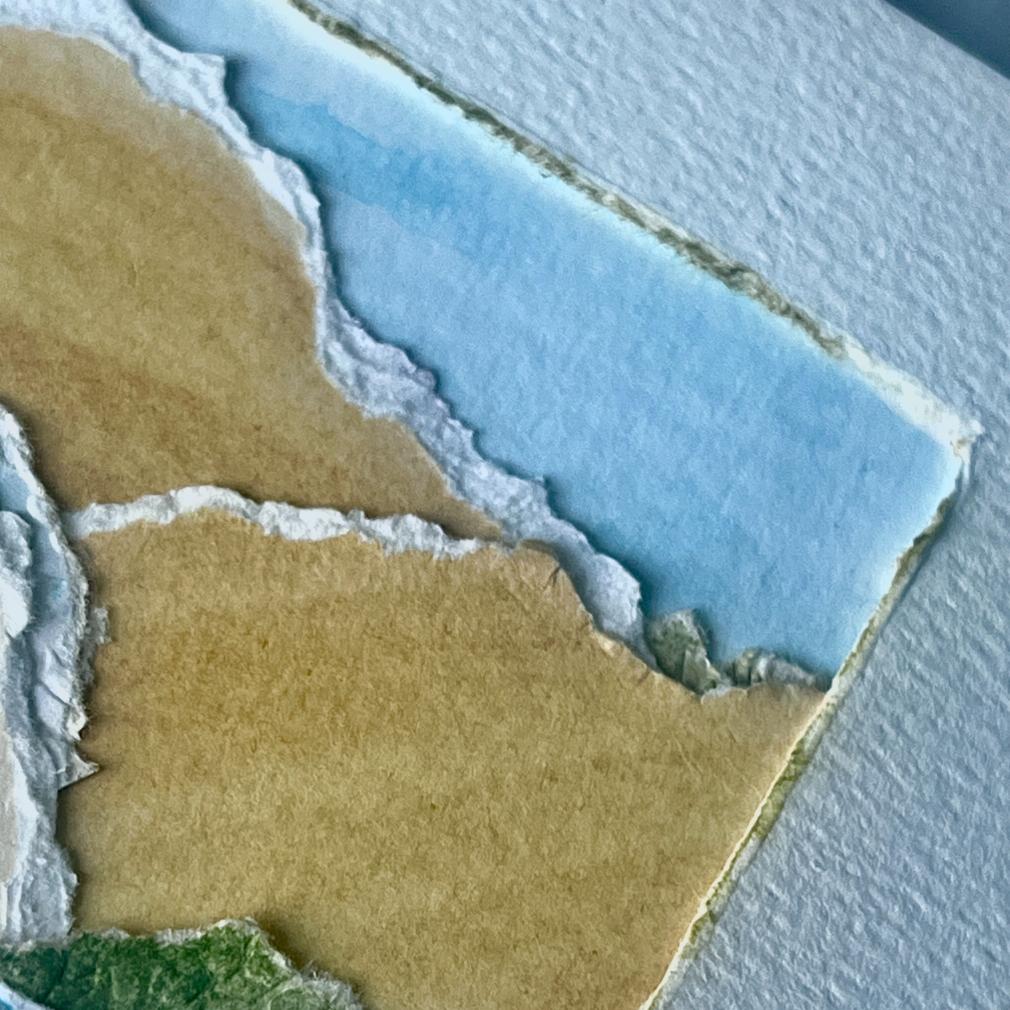
Option C — The Torn Edge (Most Charming of All)–
This is my favorite for an artistic, handcrafted feel, and it pairs especially beautifully with the torn paper artwork we’ll talk about in the next post. The torn edge gives the frame a soft, organic quality that no cutting tool can replicate.
Here’s how to get a beautiful torn edge without any special tools:
- Mark your four frame corners lightly with pencil on the inside of the card front
- Cut two diagonal lines from corner to corner being careful the lines end precisely at those pencil marks.
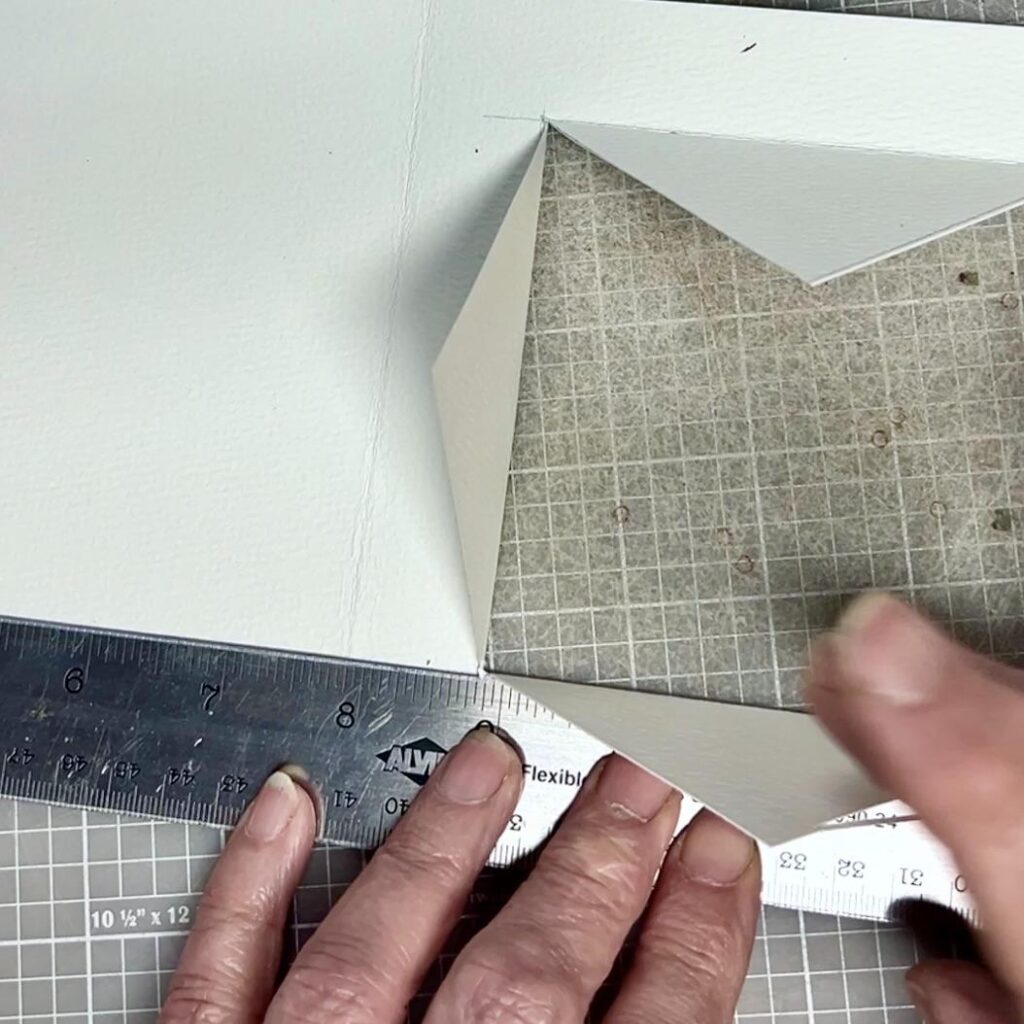
3) Fold the paper along your four frame edges . Use a straight edge to keep your first fold of each side straight and prevent buckling.
4) Run a bone folder firmly along the fold for a really strong crease.

5) Using a small paintbrush or your fingertip, “paint” the crease with water.
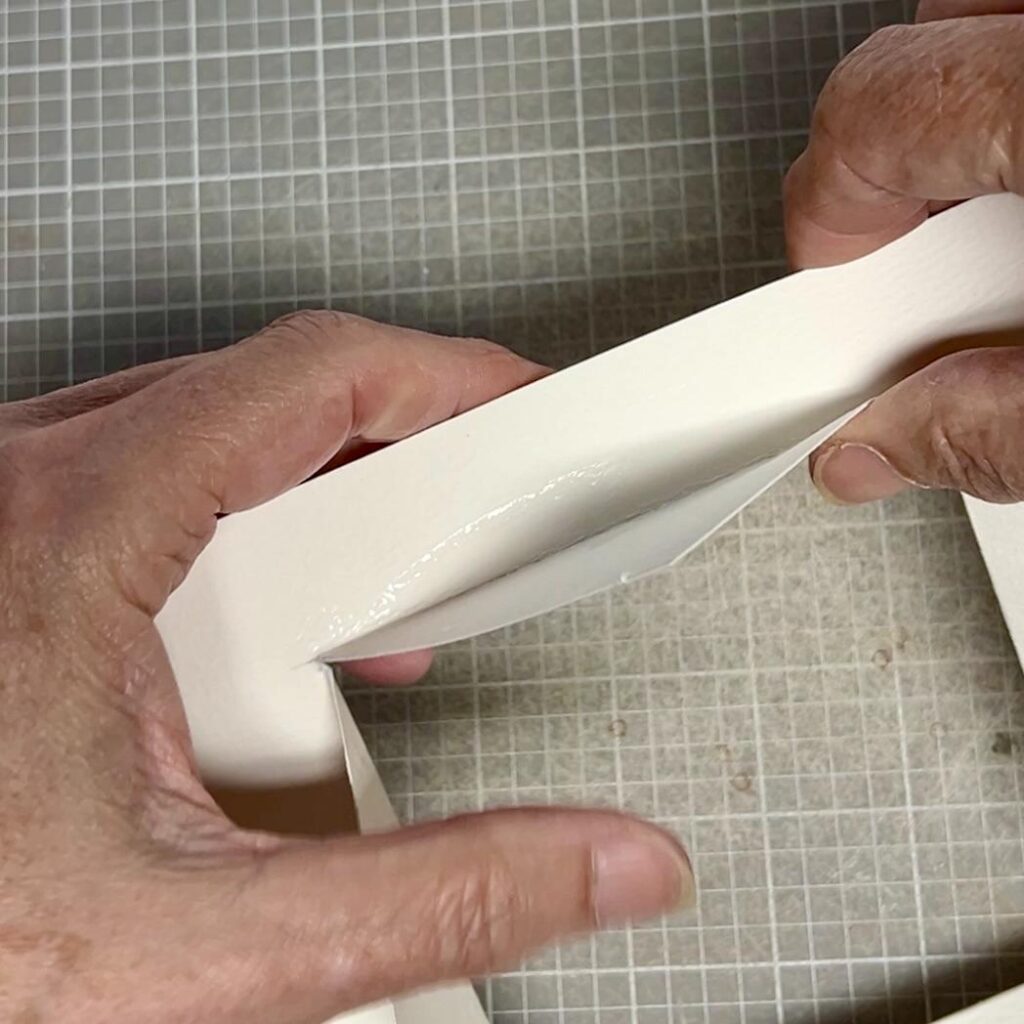
6) Open the fold and crease the fold back in the other direction.
7) Paint the other side of the crease with water as well.
8) Open the paper flat and fold back and forth several times in each direction — you’re weakening the fibers along that line.
9) Open flat. Holding the paper very close to both sides of the tear line, pull the two sides apart — not up or down, but directly away from each other.
HINT: The first and last tiny bits of the tear are the trickiest. If the tear won’t start cleanly, use the tip of an X-Acto knife to kickstart it, then continue tearing by hand.
Quick note: There’s a faster version of this — hold a straight edge firmly at your tear line and simply tear up against it. This works great and is perfectly lovely for most projects. You will see a faint line along the torn edge from the straight edge pressing into the paper.
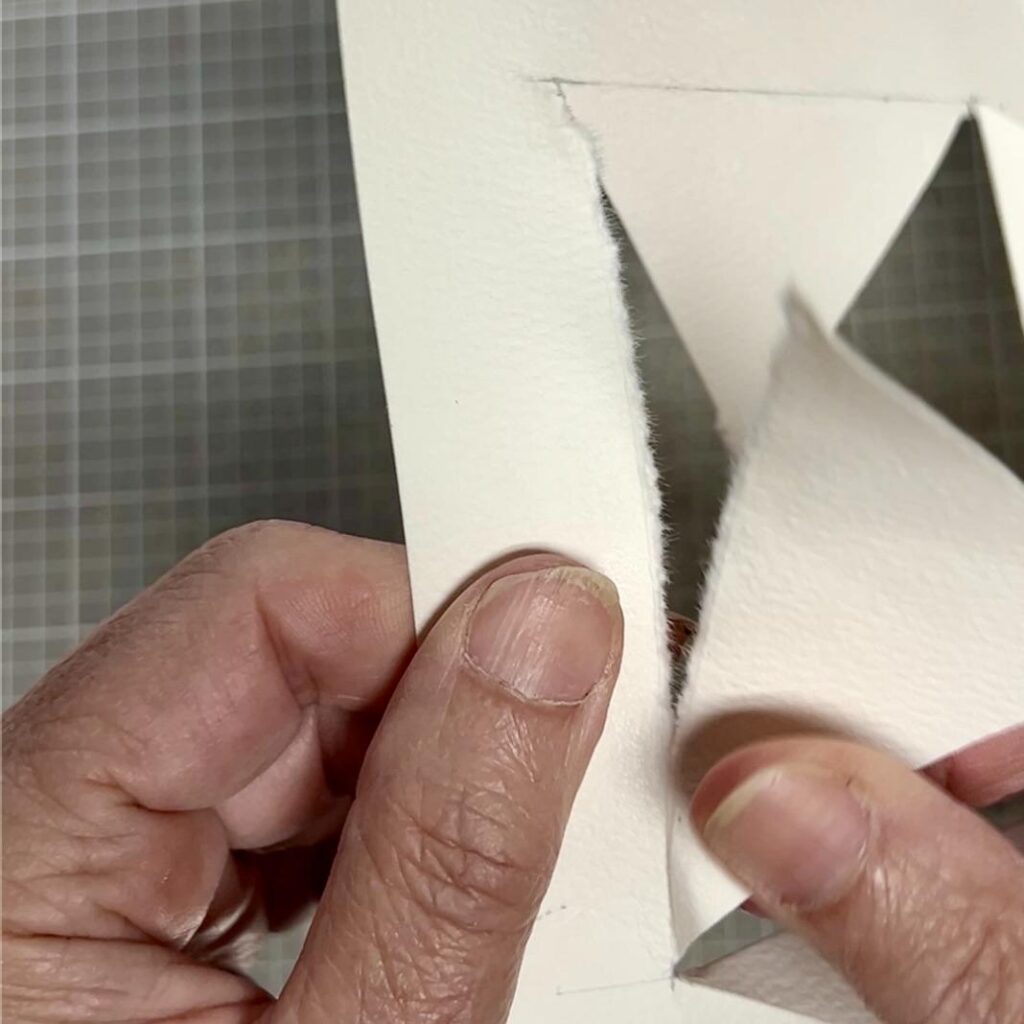
Step 4: Cut and Fit Your Backer-
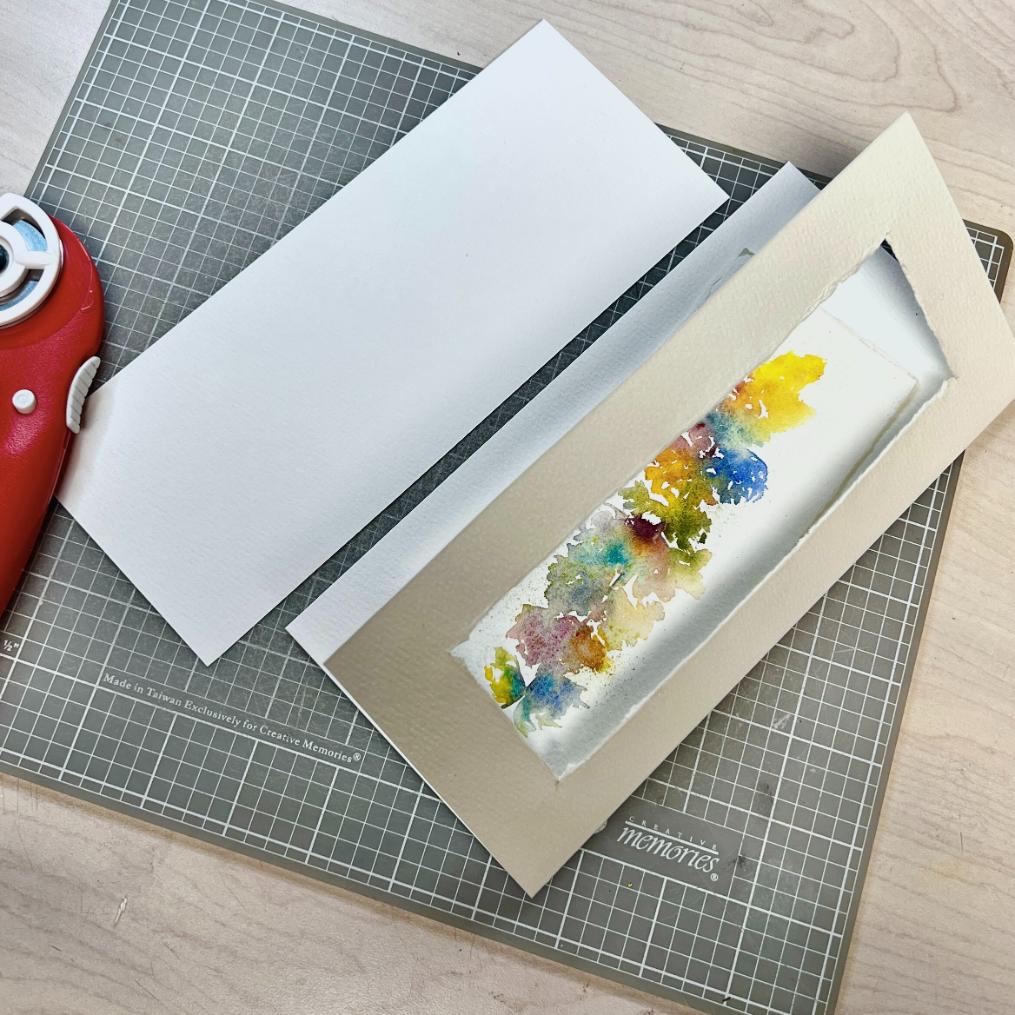
Your backer is the second piece of paper that lines the inside of the card front, or the entire inside, turning the frame opening into a little pocket that holds your artwork.
Cut your backer piece to match the front panel of your card — 5½ x 5½ inches.
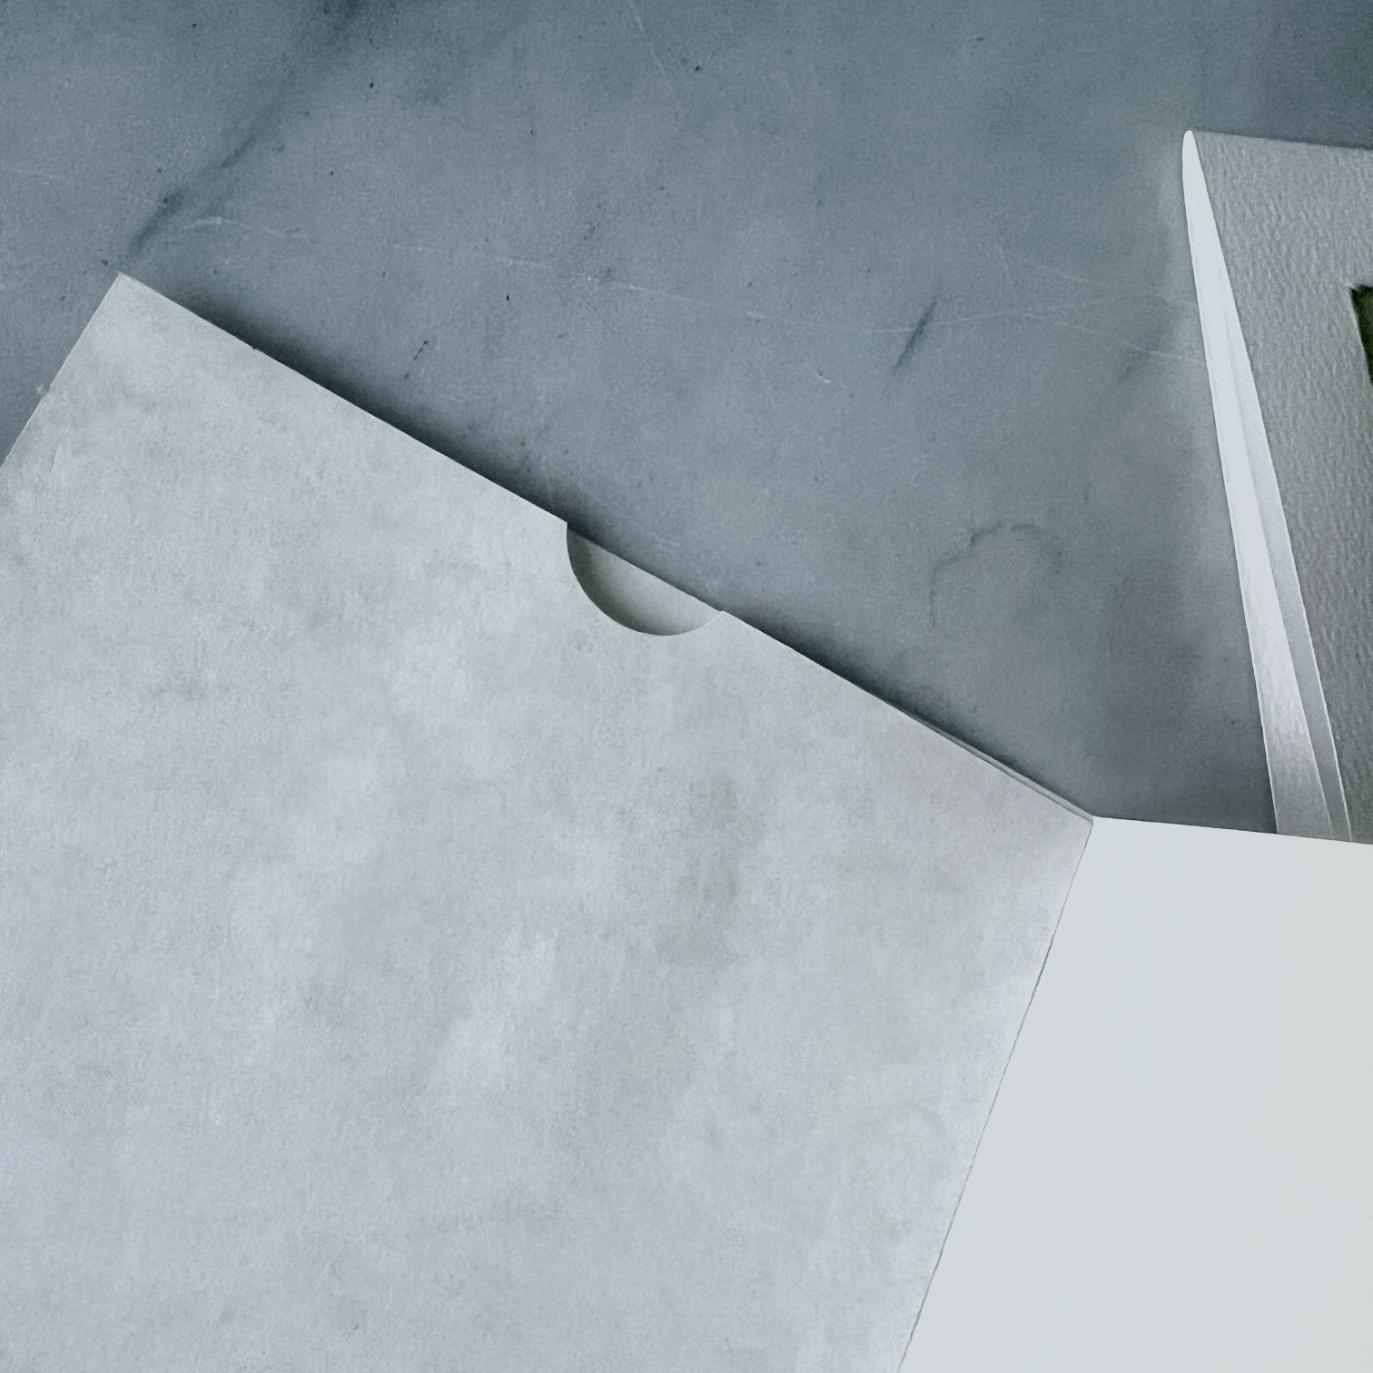
Another, super simple touch that really elevates your card is to add a thumbhole to the center of the open edge of the backer.
I just used a hole punch I have in my stash and that’s all it took.
This will hint that the art is designed to be removed and enjoyed..
Step 5: Glue the Backer in Place-
This step requires just a little bit of care, and it makes all the difference.
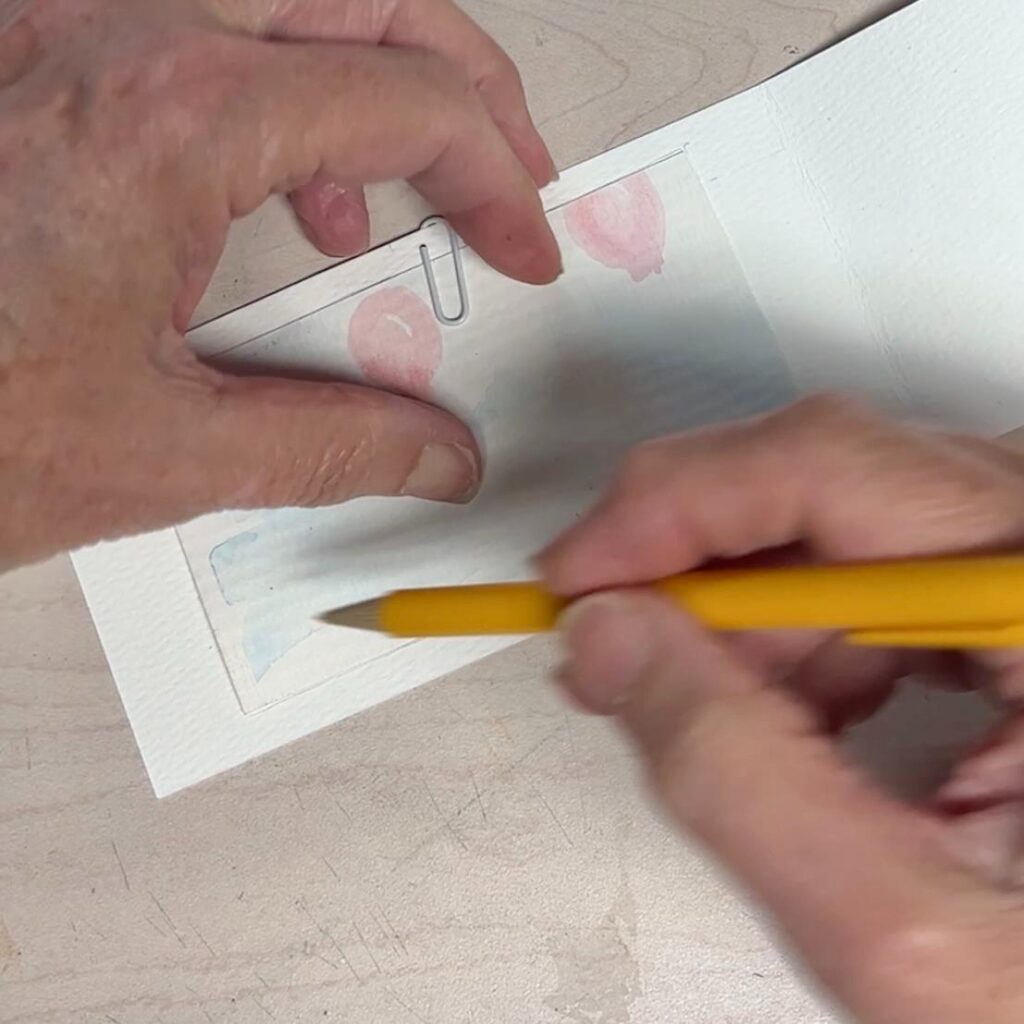
Place your artwork into the frame opening so it’s sitting exactly where it will live. Flip the card over carefully, keeping the art in place. On the back of the card front, lightly mark the outer edges of your artwork with a pencil.
This is your “no glue” zone — you need to keep all adhesive outside those marks so the artwork can slide in and out freely without catching on any glue.
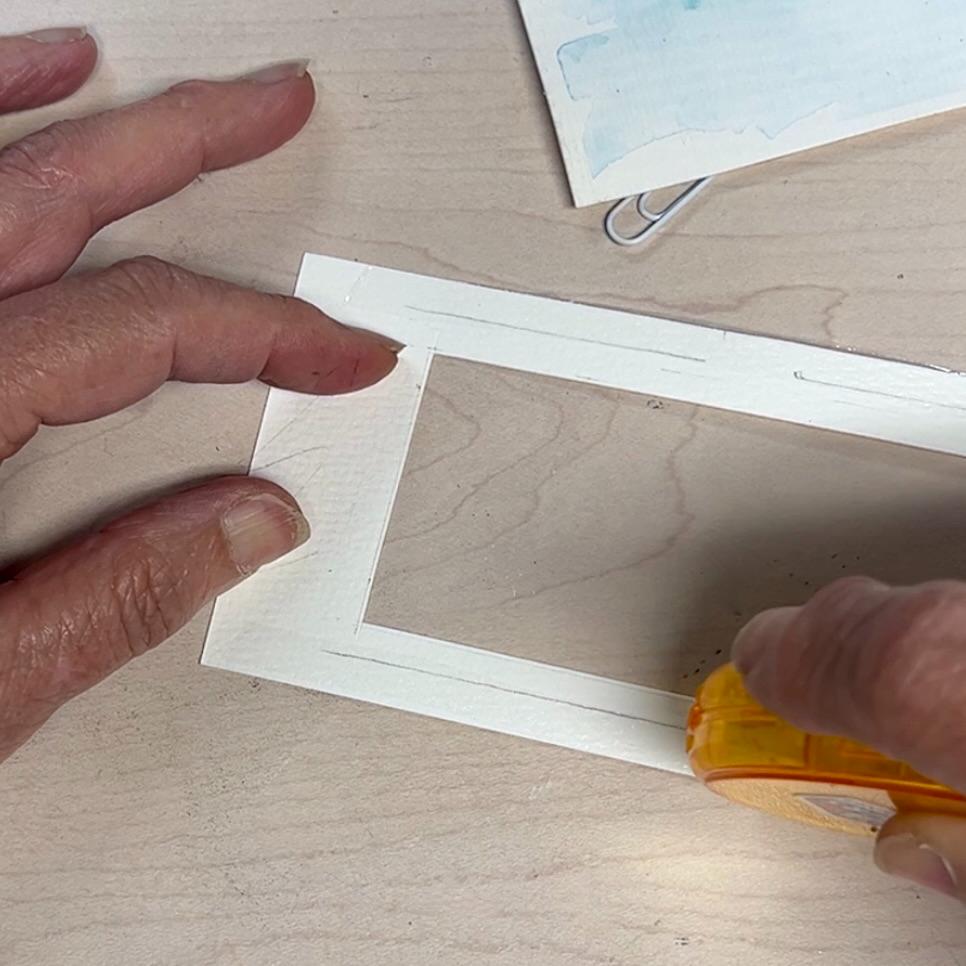
Now remove your artwork. Apply your tape runner or glue along three sides of the frame back — left, right, and bottom — staying well outside those pencil marks.
Add glue along the outside edges, again leaving the top edge completely unglued. Press the backer firmly into place on the inside of the card front.
Give it a moment to set, then test the fit by sliding a piece of paper in and out of the top opening. It should move smoothly with no catching.
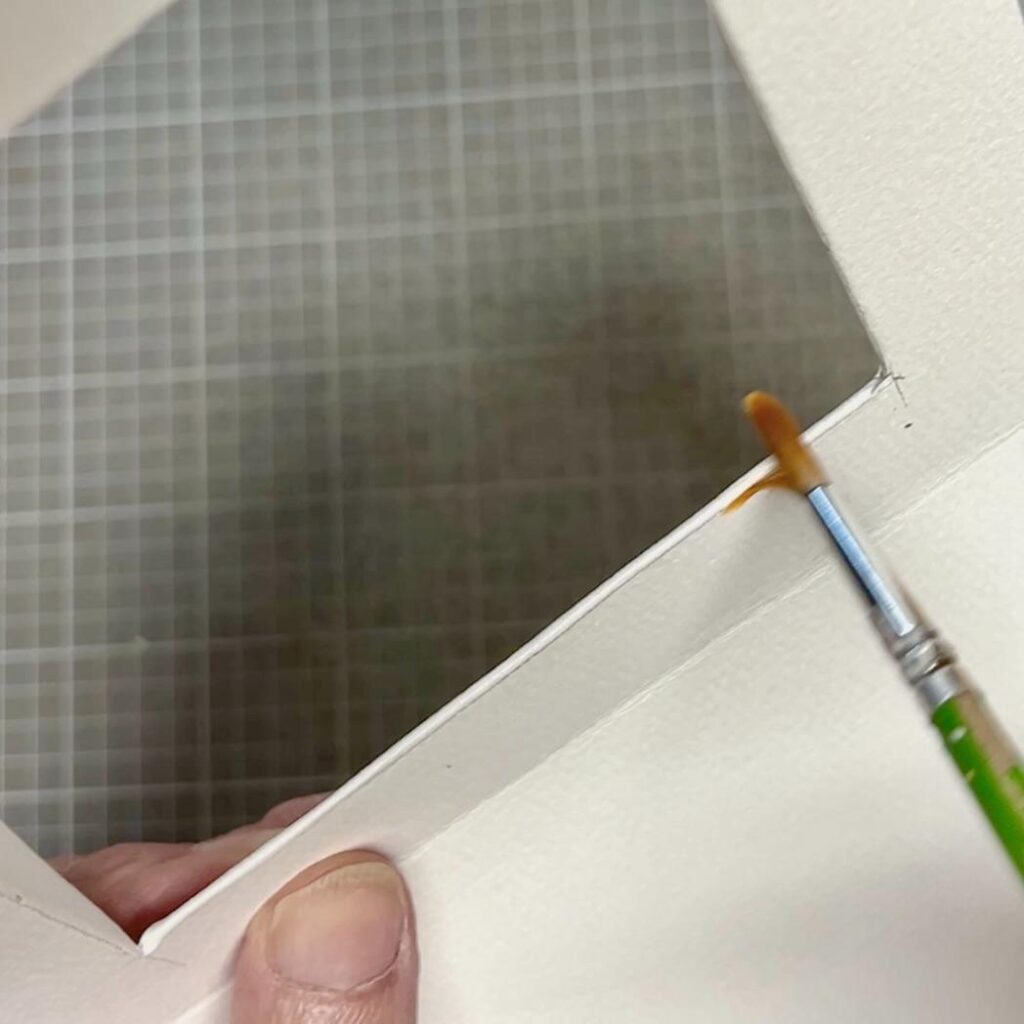
Step 6 (Optional): Finish the Frame Edge-
Here’s where the card goes from homemade to handcrafted.
Even one small edge treatment around the frame opening elevates the whole thing — it frames the frame, so to speak.
I’ll show you three of my favorites:
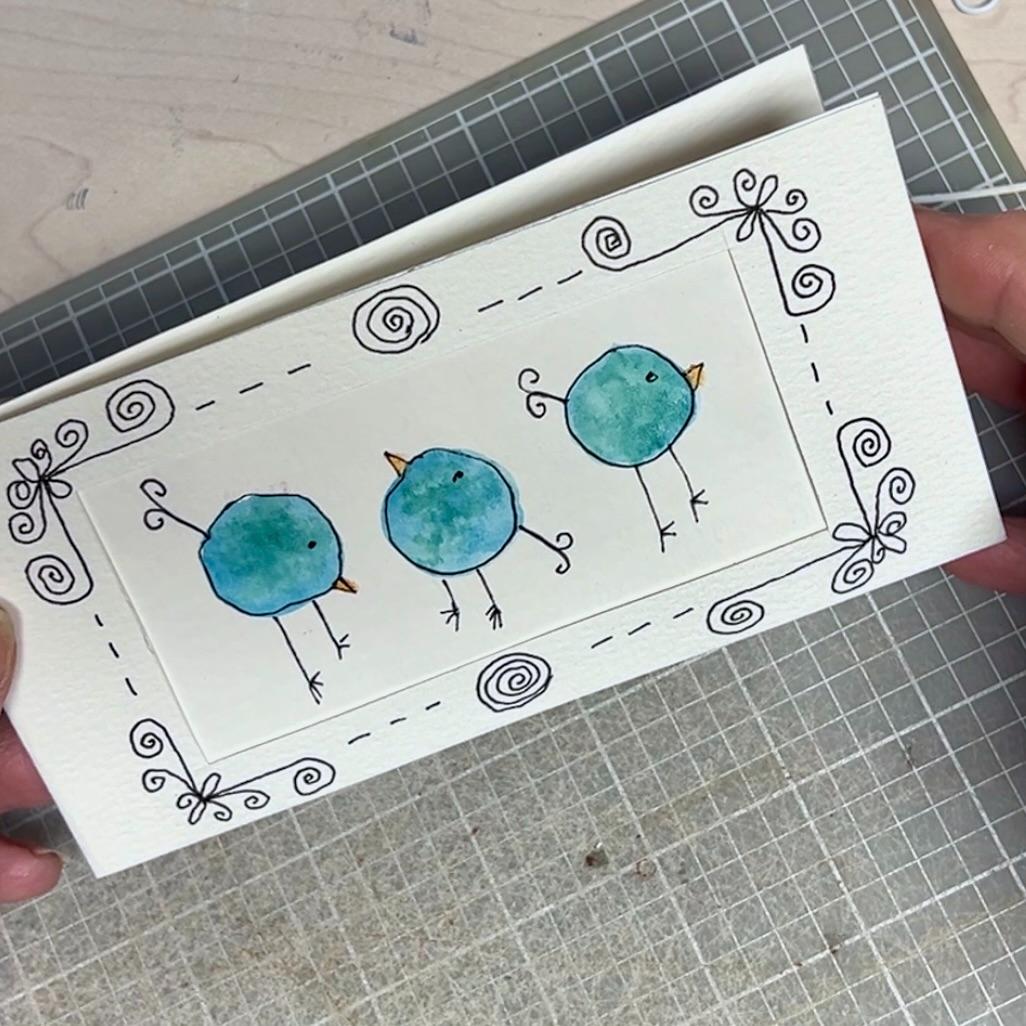
A fine-line marker border Using a Micron marker or other thin permanent marker, draw a clean line approximately ¼ inch from the edge of the frame opening. Keep it steady and confident — don’t try to correct it if it wiggles slightly. The slight imperfection is part of the handmade charm. This look is clean, minimalist, and pairs with absolutely anything.

PRO TIP: work with plenty of cleared table space. Practice this on scrap paper first. Hold your marker and rather than move your hand, move your whole arm.
I find it much easier to keep my arm steady, than my hand. And sometimes, I hold the marker steady and move the paper with my left hand.
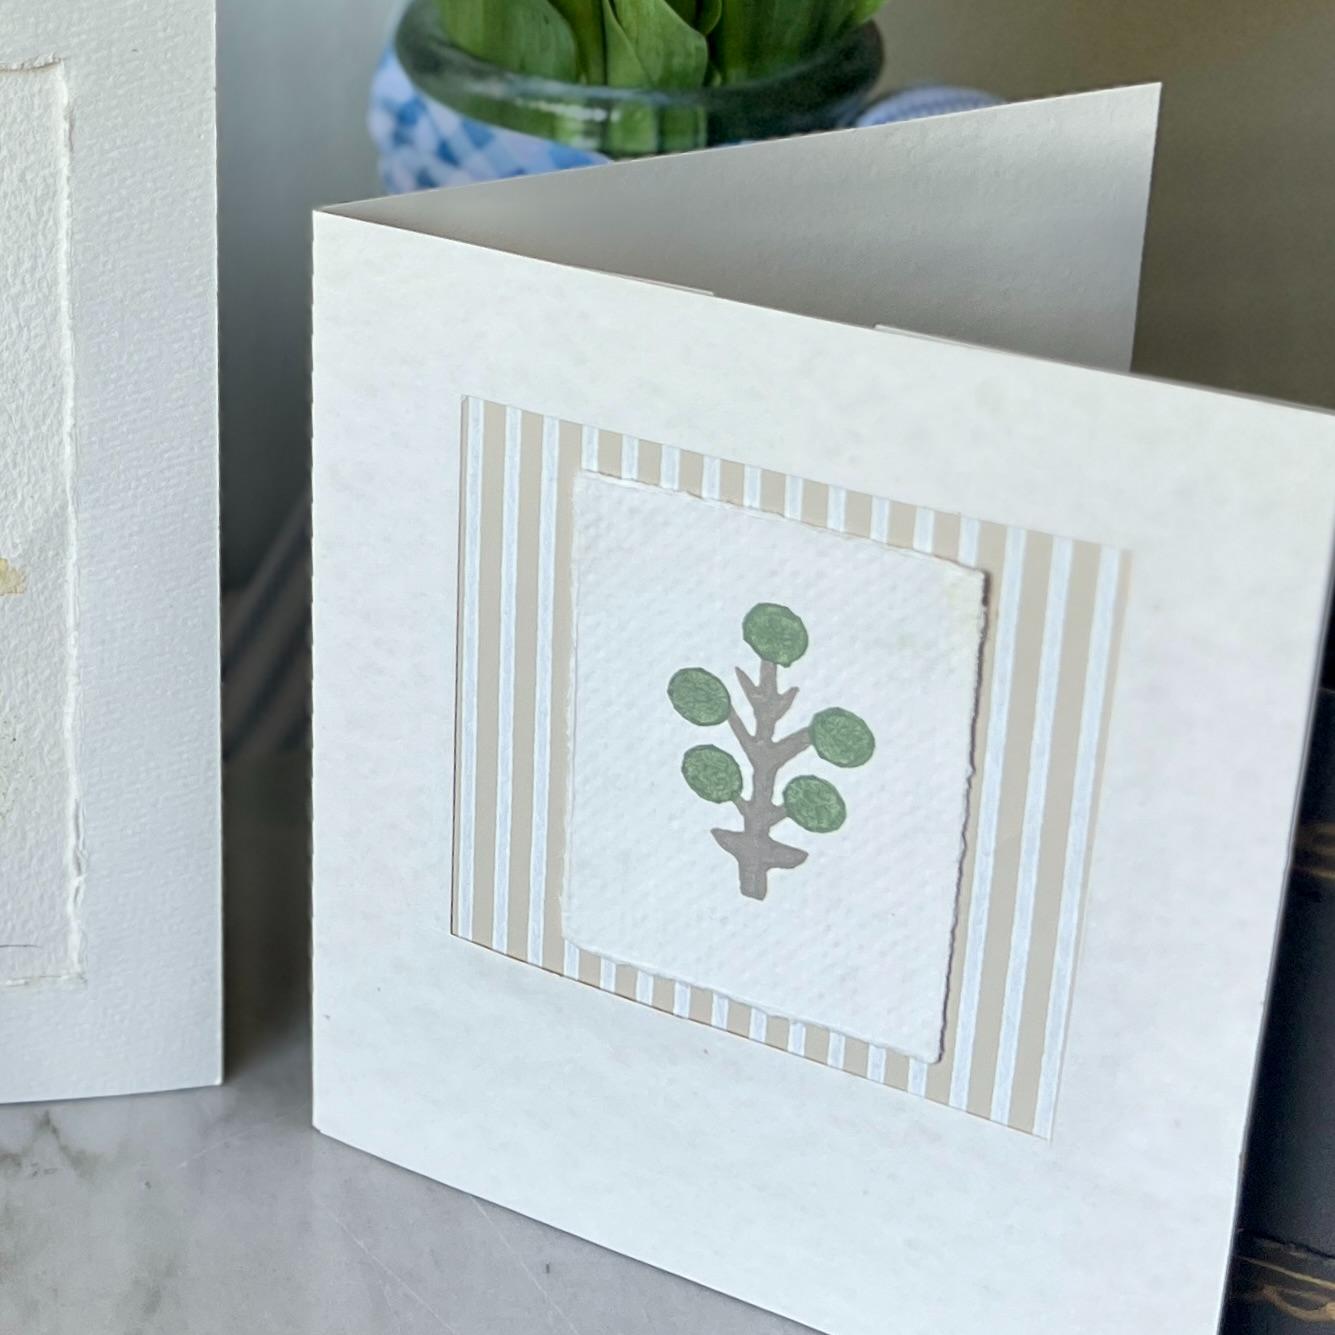
A brushed ink pad edge– Run the flat surface of a stamping ink pad lightly along the torn or cut edge of the frame opening.
This adds just a touch of depth and a hint of color — especially beautiful with a brown or black ink pad on white cardstock, or a metallic pad for something a little more special. Below, I used a muted green to pick up on the recurring green in the art.
A hand-drawn decorative border Grab your Micron marker and let yourself play. A simple repeating motif — tiny dashes, little dots, a vine of leaves, a row of Xs — drawn around the frame opening makes the card feel like a one-of-a-kind piece of stationery. It doesn’t need to be perfect. It needs to look made by a human.
More ideas to try:
- Gold leaf along the torn edge
- A watercolor wash border
- A band of washi tape
- A rubber stamp pattern
- Colored pencil hatching
- Embossing powder on a torn edge (this one is gorgeous)
The Gallery — Inspiration For What Goes Inside
This is the part I get genuinely excited about, because once you start thinking in terms of “what could live in this frame,” you start seeing possibilities everywhere.

Torn paper collage Layers of hand-torn paper — watercolored, textured, patterned — arranged into a tiny landscape or abstract composition. This is the technique we’ll dig into in an upcoming post, and it’s more approachable than it looks.
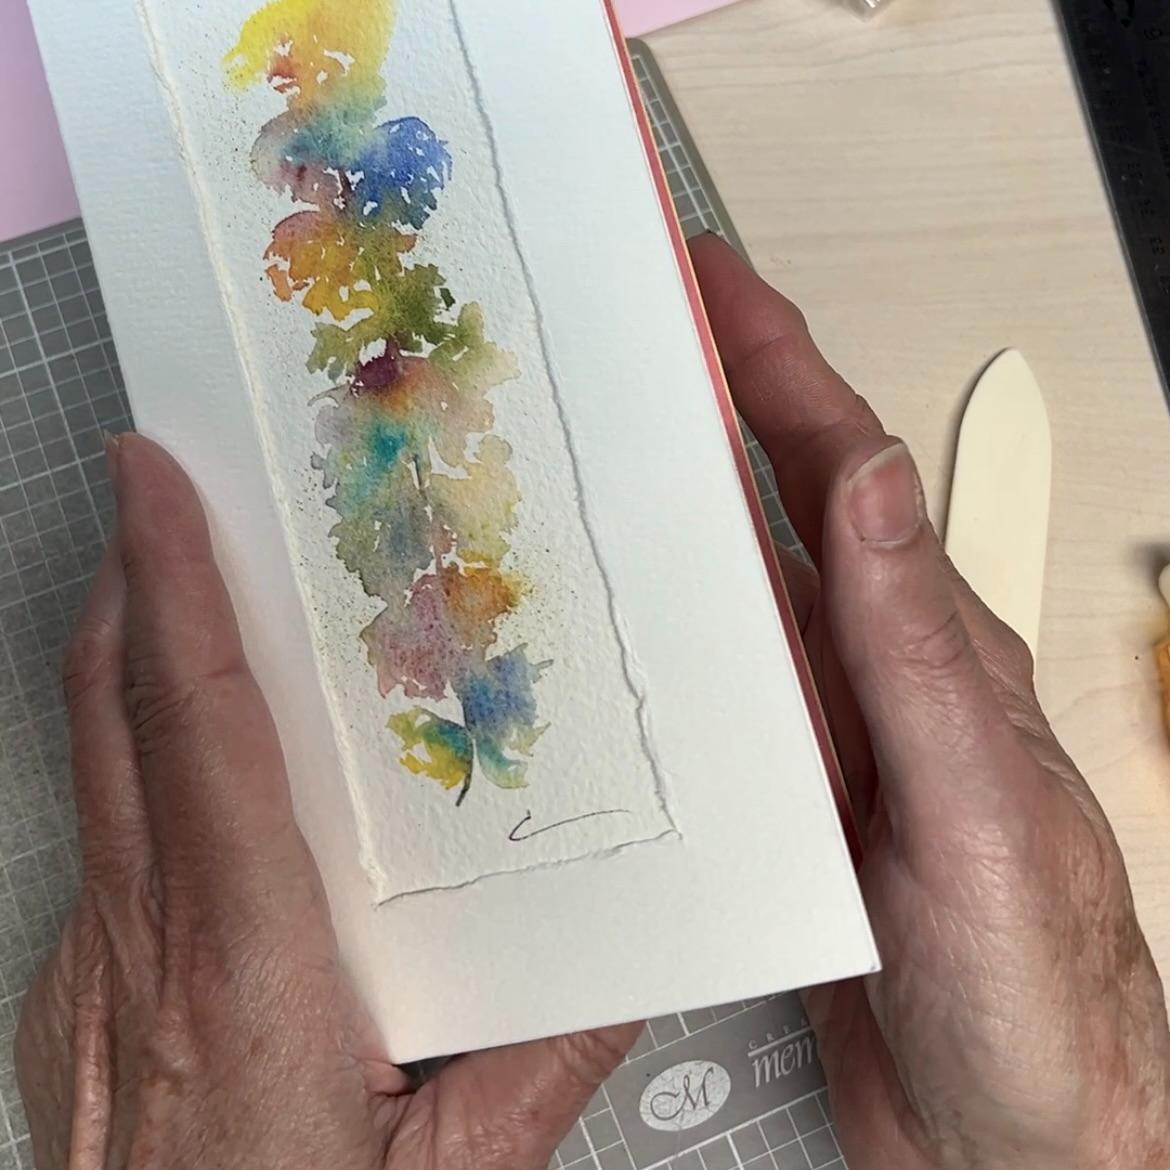
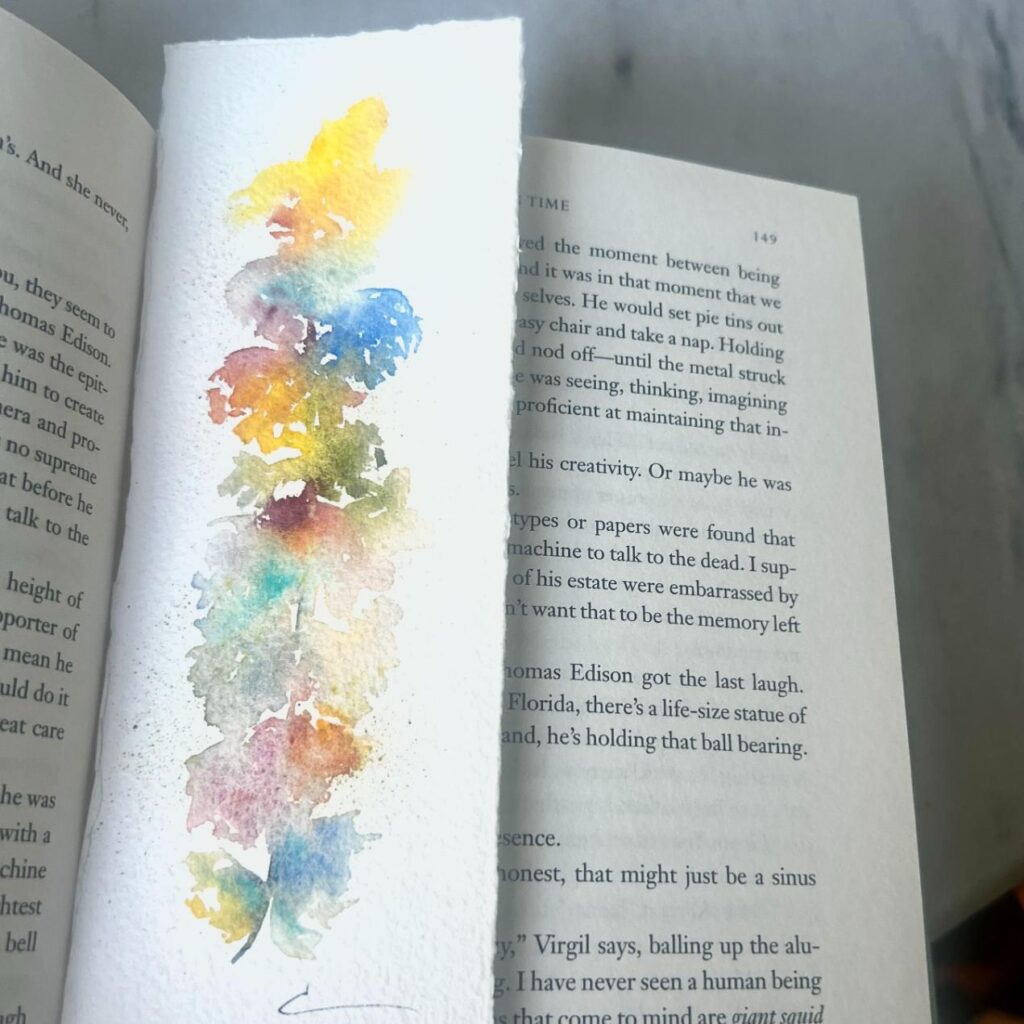
A watercolor bookmark A slender strip of watercolor paper painted with soft washes of color — beautiful through the frame opening and equally beautiful slipped out to mark a page. This bookmark was painted by the mother, Suzann Cromer, of a sweet friend.
A block print Remember my craft foam block printing tutorial? A small print on beautiful paper slips right into a frame card and becomes a completely personal gift.
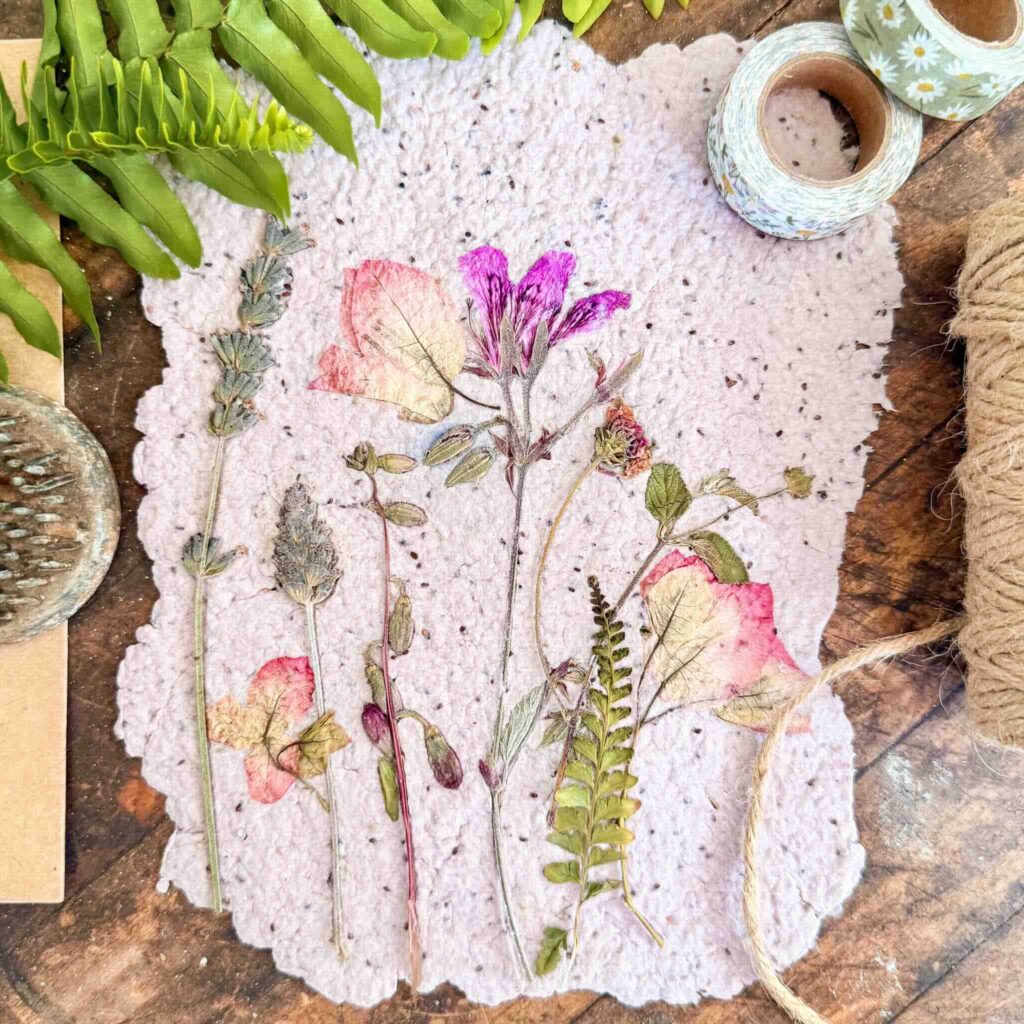
Dried botanicals A pressed sprig of lavender, a tiny fern frond, a few dried flower petals arranged just so. Slip it between a piece of acetate or vellum and your card front for a delicate, nature-inspired look.
A floral embossed clay piece A small, flat clay medallion pressed with a floral texture — just the right thickness to slip in and out of the frame.
A charm or small pendant A flat charm, a small vintage button, a coin. Tuck it into a small glassine envelope first so it doesn’t scratch the inside of the card, then slip the whole thing into the frame.
The Second Life
After the card has been read, the note written and treasured, the art slides out and takes on a whole new life.
BTW: That bookmark! It is very special to me. One of our Bloggin’ Besties, Michele of Vintage Home Designs, well her mother is an artist. When the six of us bloggers gathered in Dallas for a retreat, Michele’s mother, Suzann Cromer, painted these stunning bookmarks for each of us!
Tuck a watercolor bookmark between the pages of a favorite novel. Add a block print to your pin board.
(BTW, do you recognize that block print? Still one of my very favorite projects ever and so easy the way I created my block)
The art finds a home — and so does the feeling behind it.
That’s what makes this more than a card. The message gets read. The art gets kept.
Coming Up in the Series
Now that you know how to make the frame, let’s fill it with something wonderful:
- Torn Paper Collage Art — how to create a tiny landscape or abstract composition from scraps of beautiful paper (coming soon)
- Watercolor Bookmark — a beginner-friendly painted insert that doubles as a keepsake (coming soon)
- Floral Clay Medallion — a textured clay piece sized perfectly for your frame (coming soon)
Time to Check in With the Other Gals
I am always so thrilled to send you on to my talented — and delightful — friends.
You will be amazed! Tell them each I said “Hi”.:
Wendy @ WM Design House
Wendy has all your gifting needs taken care of with her beautiful DIY seed paper . Perfect for handmade cards, Mother’s Day gifts, wedding favors, and botanical stationery, plus a free printable “Plant Me” gift tag too!
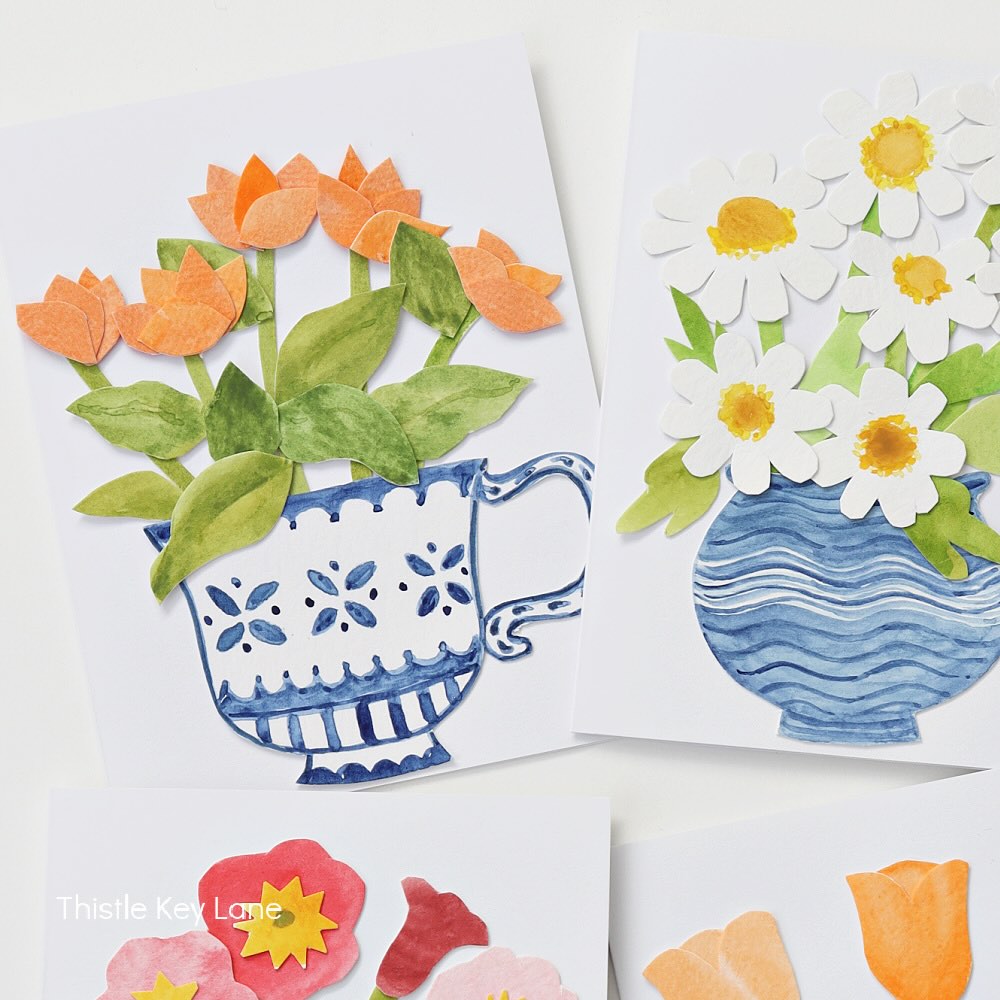
Michelle @ Thistle Key Lane
See how to Michelle created these adorable note cards with a paper flower arrangement collage. What a beautiful way to send a thank you letter or thinking of you greeting.
Missy @ Sonata Home Designs
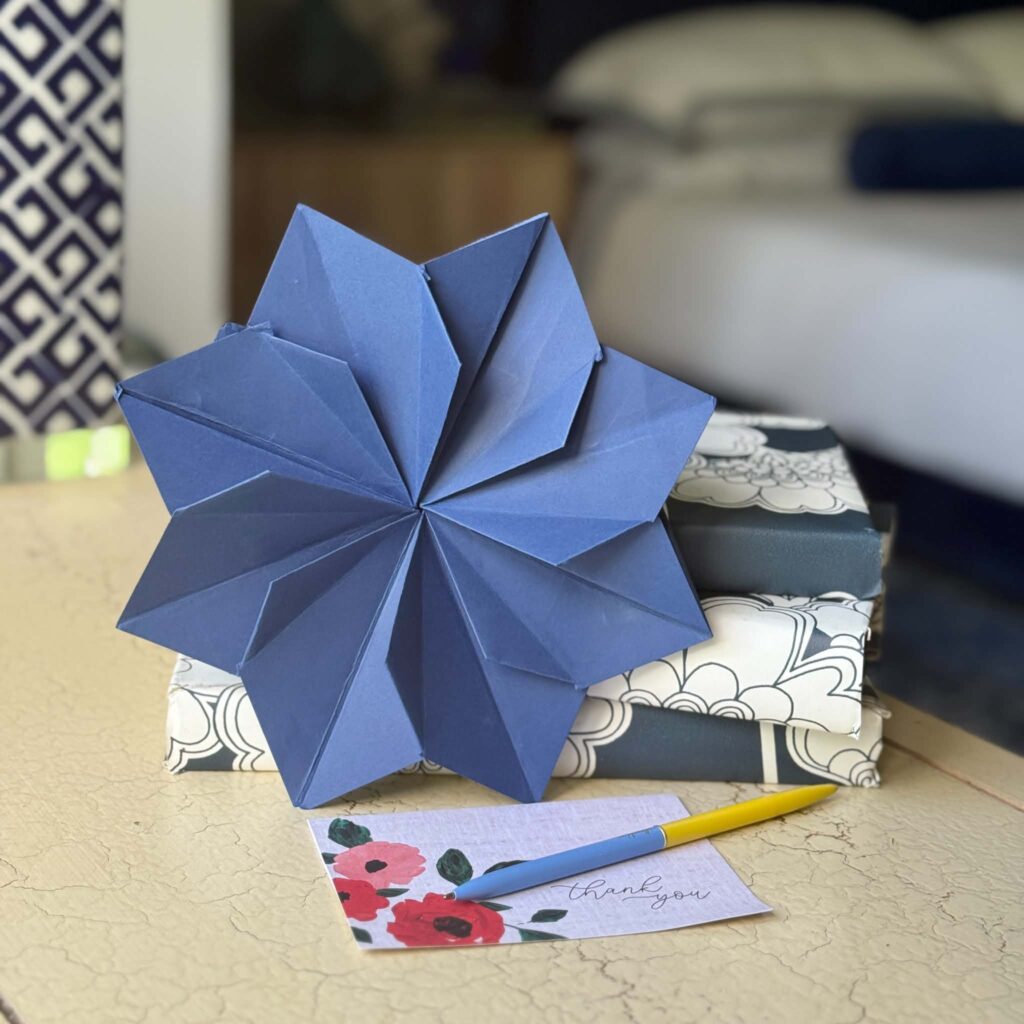
Of course Missy, the queen of color and fun, brings us this cool origami envelope.
Missy believes that how you give a message matters as much as the words themselves.
This folding flower certainly says beauty, fun and secret messages waiting inside.
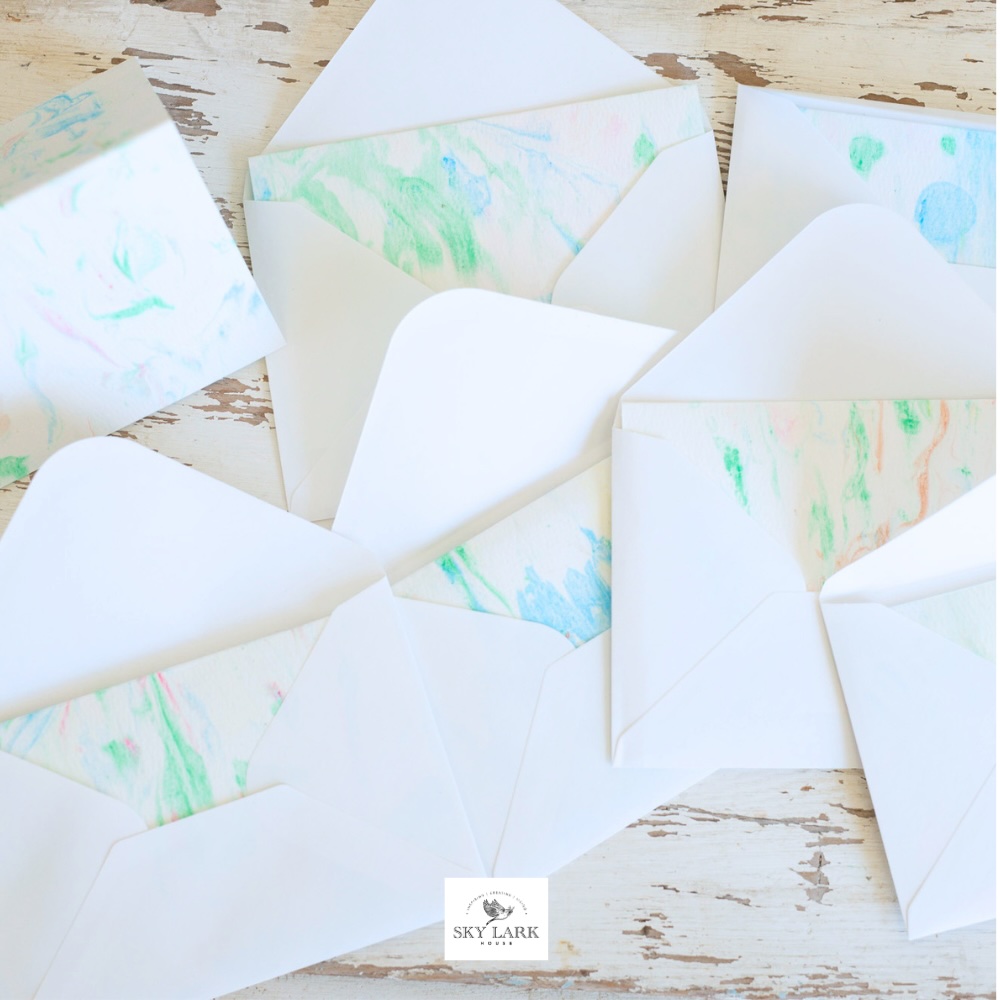
Anna @ Sky Lark House
Anna shares how she creates customized and meaningful handmade marbled cards that are also super budget-friendly!
Donna @ An Organized Season
Learn to make easy handmade cards with stamps and blending chalk that are just as lovely to display as they are to give.
WOW! This was a LOT this week, I know.
Thanks bunches for making it to the end. I really appreciate it when you do.
As always don’t hesitate to reach out with any questions or suggestions.

Such a clever way to display, save, and honor those special cards or art that can otherwise get tossed into a box! I was going through a closet the other day (attempting to clear out stuff) and came across some of my daughter’s small art pieces that she painted with her art mentor 20 years ago…just hanging out in an old box. You have shown me the perfect way to shine a light on them and display them! Fantastic post, Diane!
Get those prizes out an show them off, even if it’s just to yourself. We all need little bright happy moments throughout our days. And those are yours!!!
Hi Diane! I adore this creative way to send and display special works of art! Such a great idea to create a frame envelope! Thanks for sharing different ways to embellish them! Anyone would be thrilled to receive a card like this!
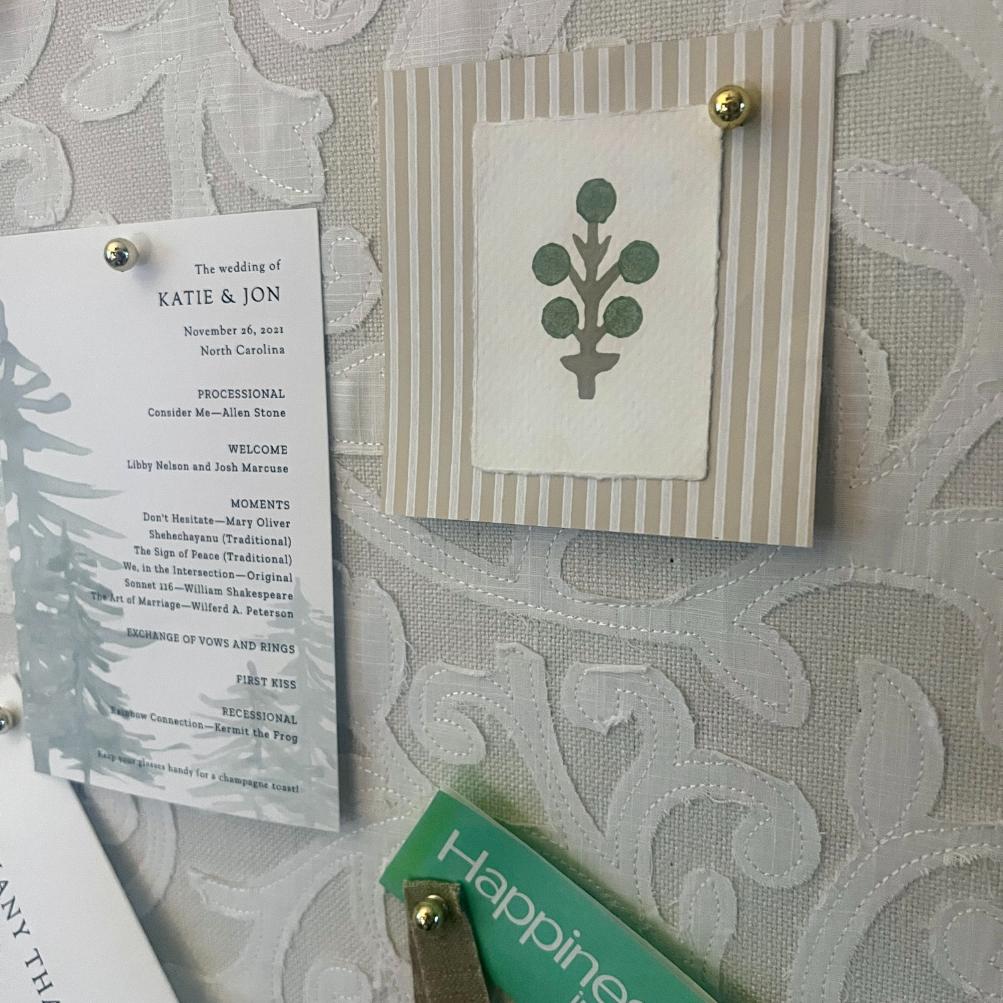
So sweet of you to say, Donna! I love filling my office pin board with little mementos and little art minis.
You’re always the inventive cool kid in the group that thinks inside and outside the box! These card frames look so professional, including the thumb cut out. I want to make a few to keep on hand, just in case I want to gift a little watercolor.
Thanks Michelle! You of all of us should have a stack on hand. And if you’re talking YOUR little watercolors, can I greedily be first in line?
Diane – I love this project because the frame can be used for so many other things. For example, pressed flowers, feathers, old post cards or even beautiful pieces of fabric. Thanks for the step by step instructions and “Pro Tips”. – all of which ensure success.
You’re right Anna — ooh the possibilities — like feathers (I had not thought of, but now I can’t think of anything else to send to one of my special friends, but feathers). Thanks for the inspiration. In fact, I might just marble the watercolor paper with shaving cream before I cut it into a card. Ans then add some sweet feathers in the art pocket.
Diane, this is such a creative and thoughtful idea. I love that the card becomes a beautiful piece of art that can be enjoyed long after the occasion has passed. Thank you for sharing such a detailed tutorial on how to make these framed keepsakes. I agree—the torn edges add so much charm and character. What a wonderful way to preserve special memories!
You know me, I tend to run long as I envision so many options ;). I love little trinkets of art tucked in on my office pin board — whether a two-year-old thumb print bug or a part of a vintage embroidery piece.