
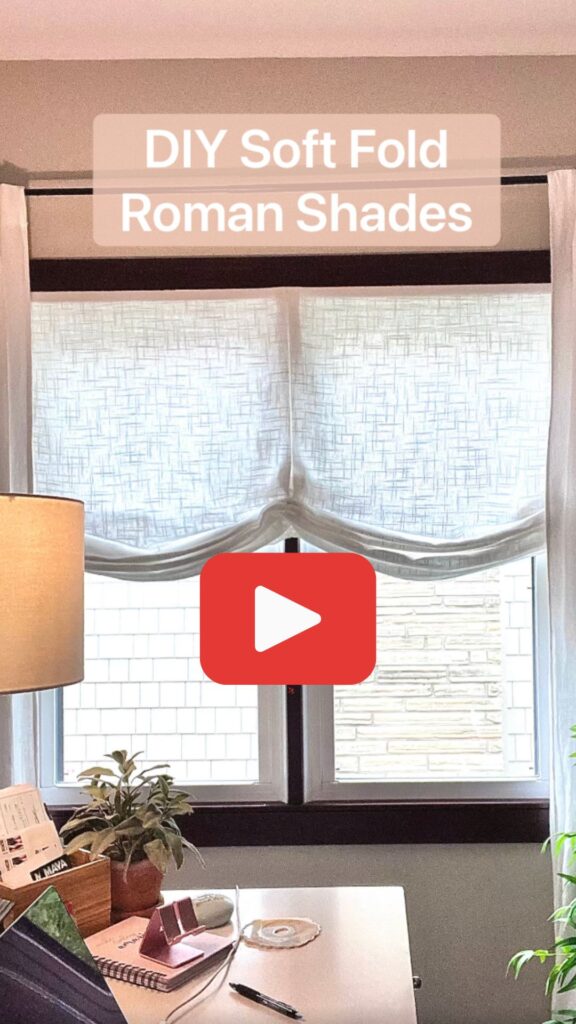
How to Make a Soft Fold Roman Shade the Super Easy Way
Looking to add some style and privacy to your windows? Make a soft fold Roman shade, or folded shade window treatment. Super easy, stylish and inexpensive!
This project is super easy to do, and it only takes a few hours from start to finish.
Yes! You can DIY Roman shades, or relaxed Roman shades in just a few hours. And you don’t even need a sewing machine.
Plus, you can customize the shade to fit your needs and taste.
For me and my office, I need to keep it light, but to also offer me (and my neighbor) a sense of privacy.
Actually, it was really about controlling the view.
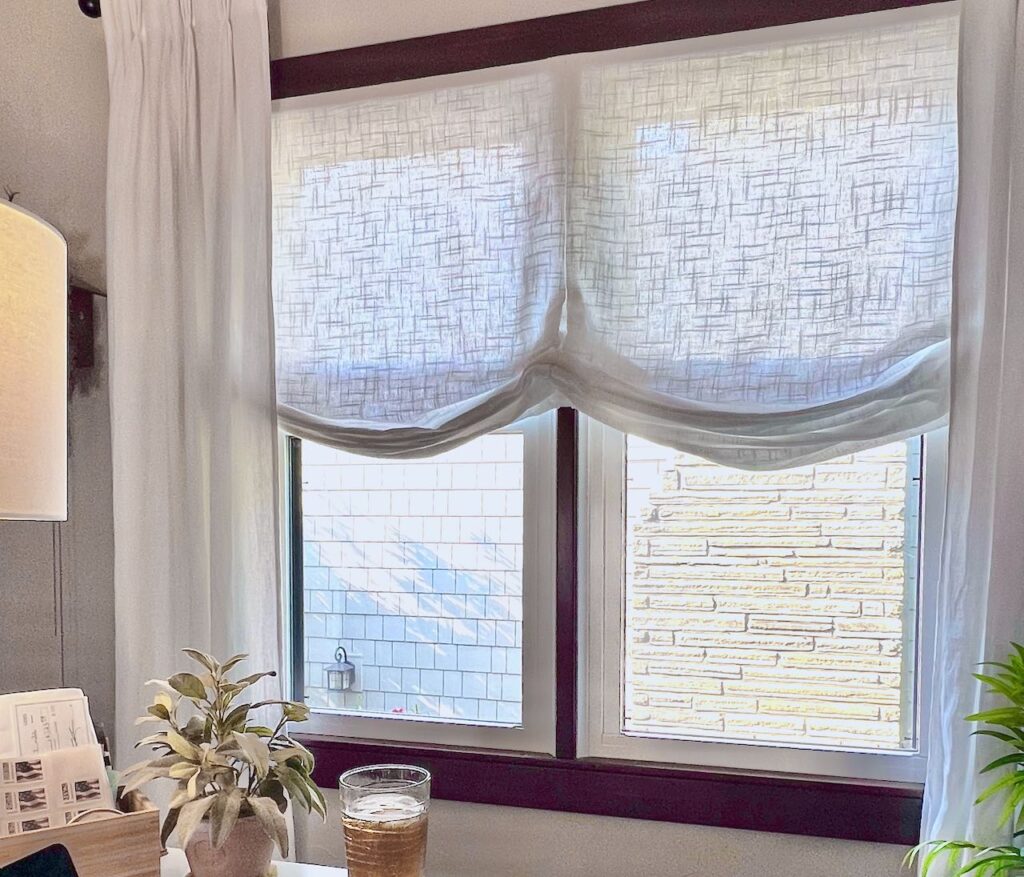
In our lake community, most of the houses are very close together. Our neighbor has lovely freshly painted siding and a great stone chimney, I just don’t like peering in each others windows, especially when I’m at my desk late at night. It just feels a bit icky and intrusive.
So I wanted something that is light and fresh.
I wanted my window covering to block just the upper half of my office window. The upper half is a view into her windows, the lower half is her siding, stonework and lovely plantings — all desirable!
I also need to lower it when we have overflow guests and my office subs in on guest duty.
What’s So Great About Roman Shades?
They are clean-lined and can be as simplistic as you like — great for a modern, minimalistic window treatment.
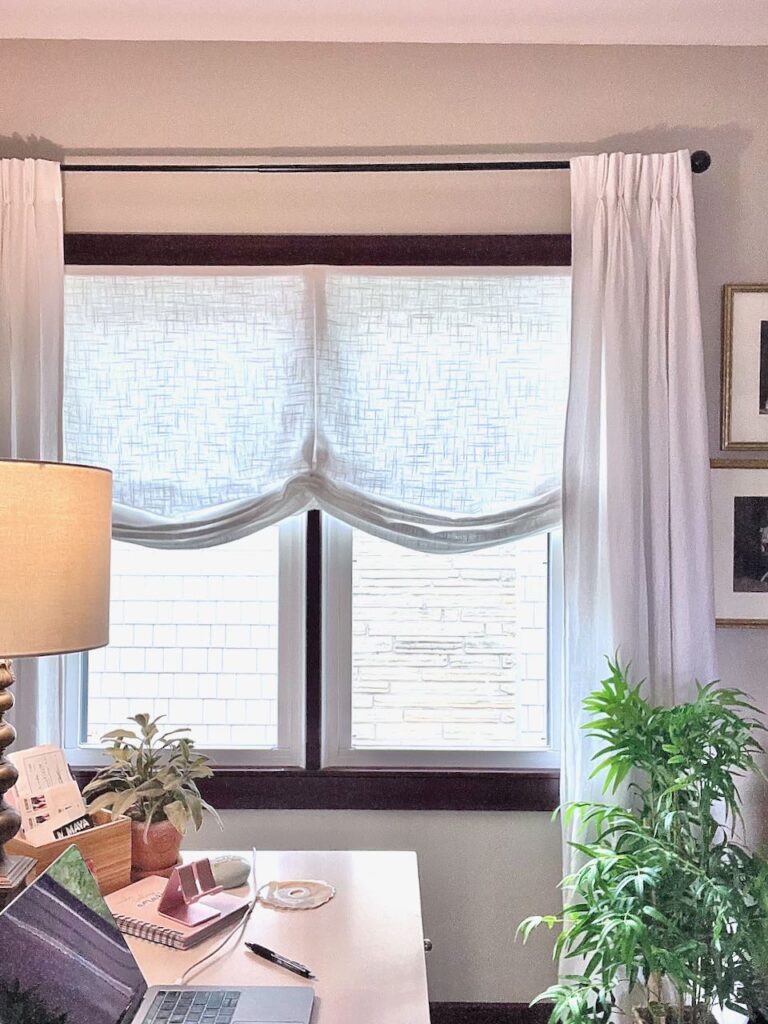
Roman shades add style without fussiness. But if you want more, you can always add stationary side panels as I did.
Plus, they are one of the easiest window covering to make and customize to your style and your windows.
And did I mention, inexpensive?
Why DIY vs. Buy?
Since roman shades typically fit inside a window casing, 95% of the time, they need to be custom ordered. That means time and money, lots of money!
But luckily I came up with an easy way to make your own custom Roman shades that is also easy on your budget. (No wonder they are called relaxed Roman shades)
How easy you ask? Only hands-sewing skills required — like first-time-ever-sewing skills!
So, if you’re up for a little DIY project, read on for all the detailed instructions and my tips and hints.
What makes this way so easy?
Glad you asked!
To make window treatments, can be difficult and time consuming because of cutting and stitching those long hems on all sides.
But what if we can eliminate the cutting and hemming? Your project turns all easy peasy, right?
The Secret Ingredient-
My secret is to use a shower curtain — yes, a fabric shower curtain (not the plastic liner).
Most shower curtains are 72 x 72-inches. That 72-inch width was perfect for my double window that is 60-inches wide. The length is longer than I need, but I only have the shade down when my office is being used as an overflow guest room. And I can live with that.
If your window is narrower, try substituting a tablecloth or a drapery panel (which are often 36, 42, 52, and 54-inches wide). Don’t worry about any extra length. You’ll have a chance to cut off that extra fabric in Step 4 and the raw edge will be hidden behind the header.
If your window is small enough, a beautiful shawl or pashmina may be the perfect answer.
You’re looking for a textile that has finished edges and is, at minimum, the width of your window or ideally a bit larger.
Those finished edges are your ticket to no side hem sewing!
NOTE ) If you need the full length of the shower curtain or drapery panel, do not choose a curtain or panel with the large metal eyelets. If you don’t need all the length, they’re okay as you can cut off the top part of the curtain. The top part will be stapled to a header board so it’s can work.
The links in this post may include affiliate links, which means if you purchase anything using these links, you pay no extra, but I may receive a small commission that helps keep this blog running. I truly appreciate you using affiliate links whenever possible. Please know that I will never recommend a product I do not believe in!
I bought my shower curtain four years ago at Marshall’s, but here are a few options from Wayfair that would work great:

(click each picture for all the details and to order)

May I take a quick pause in the action to ask if you’re enjoying this post? If yes, please consider subscribing for so much more joy coming your way:
Oodles of thanks! Not back to making our Roman Shades.
Materials & Supplies-
Materials-
- Fabric (see notes above)
- Button or Upholstery thread to match (all purpose thread will disintegrate in bright sunlight)
- Two thin wood boards* see NOTE below
- Small plastic drapery rings (need to be solid, no opening like jewelry jump rings)
- Drapery cord
- Eye screws
- Drapery cleat
- Appropriate wood screws
- White glue or Fray Check, optional
Supplies-
- Staple gun & staples
- Iron and possibly an extension cord
- Sewing needle
- Sewing scissors or thread snips
- Drill and bit
- Screwdriver or equivalent drill bit
NOTE: One board needs to be a flat board for the header, something like screen moulding trim (1/4 x 3/4-inch). The second board needs to fit in the bottom hem. It can be flat or a round dowel.
How to Make Soft Fold Roman Shades-
Step 1) Measure Window and Plan Fabric-
Determine the desired width for your Roman shade.
Now select a soft fabric that is at least that wide and more if you want folds like I did.
Folded shades work best if they sit right inside the window frame.
My window is 60-inches, inside the frame. So ideally my fabric would be between 72 and 78-inches wide.
Step 2) Cut Your Wood–
Because ours are replacement windows with a funky interior trim, I improvised a bit.
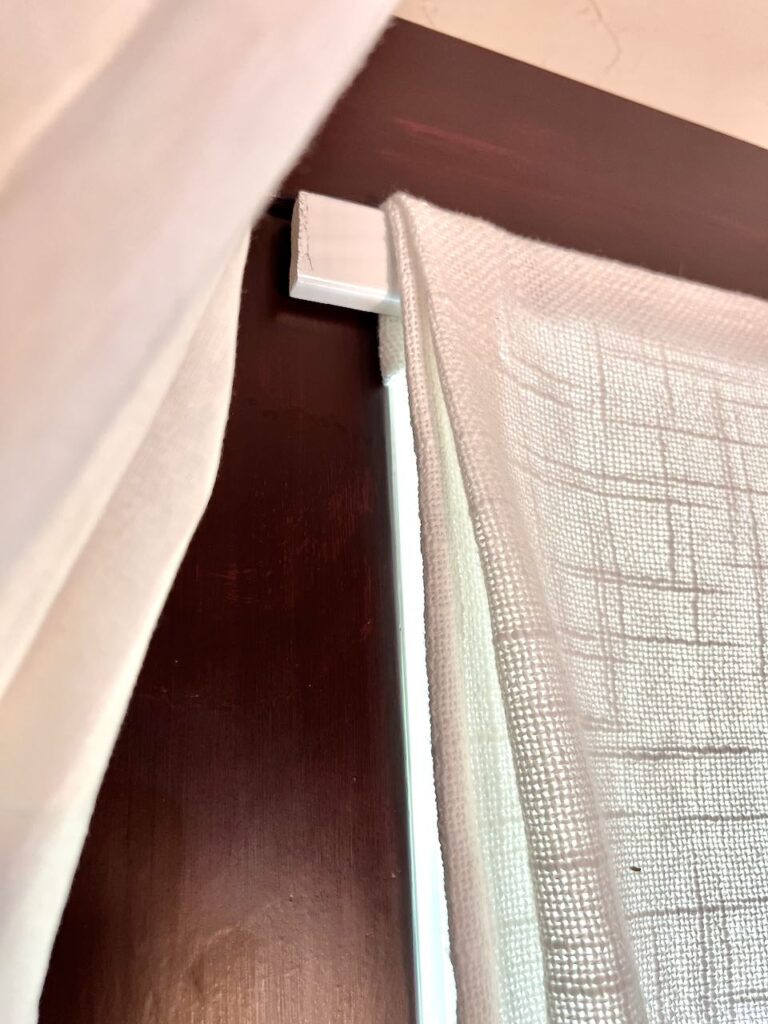
My shade fits inside the frame, but the header or mounting board extends beyond the frame, hidden behind the stationary side panels.
In this case, my lower board or weight rod is 1/2-inch narrower (due to the thickness of the side seams) than the finished width of the shade, but the top board is 3-inches wider than the finished shade.
Adjust as needed for your window.
Cut your boards and paint them white (or a color that works with your fabric) so they don’t show through your fabric.
PRO TIP: Or better still, purchase pre-primed white boards and have the home improvement store cut the boards for you.
Mark the center of your top board.
If your header board is wider than your window opening, like mine, also mark the inside window edges on the board.
You’ll line your pleats up to these marks in Step 3.
Step 3) Prep Your Panel and Set Your Pleats-
Press out any creases or fold lines from packaging or shipping — do this first, it’s much easier now than once your pleats are in.
Lay your pressed fabric flat, right side down, on your work surface.
Keep your header board with its markings handy. You’ll need it in just a bit.
Let’s figure our pleats.
Ideally, you want to have the same thickness of fabric (number of layers) at each column of rings that you’ll attached later.
Because I needed to reduce the width of my fabric by 12-inches, I took a 1-inch pleat on both sides. That reduces 2-inches on each side, for a total of 4 inches so far.
So my center inverted pleat is 4-inches across, reducing the fabric width by 8-inches, for a total of 12 inches.
NOTE: If your fabric is thick and textured, you may want to cut off the hem and press under a half-inch and then proceed with your own hem.
To arrange your pleats, grab your header with it’s markings.
Align the pleats in the bottom hem with the marking on the header board. Matching the inverted pleat to the center marking and the outer edge pleats to the window markings (or to the outer edges of the board, depending on how you are mounting your shade).
Pin the pleats in place at the top and bottom to hold everything put.
Press the pleats from the hem all the way up to the top.
PRO TIP: Measure as you go to keep them running straight.
Step 4) Hem the Bottom and Encase the Weight Rod-
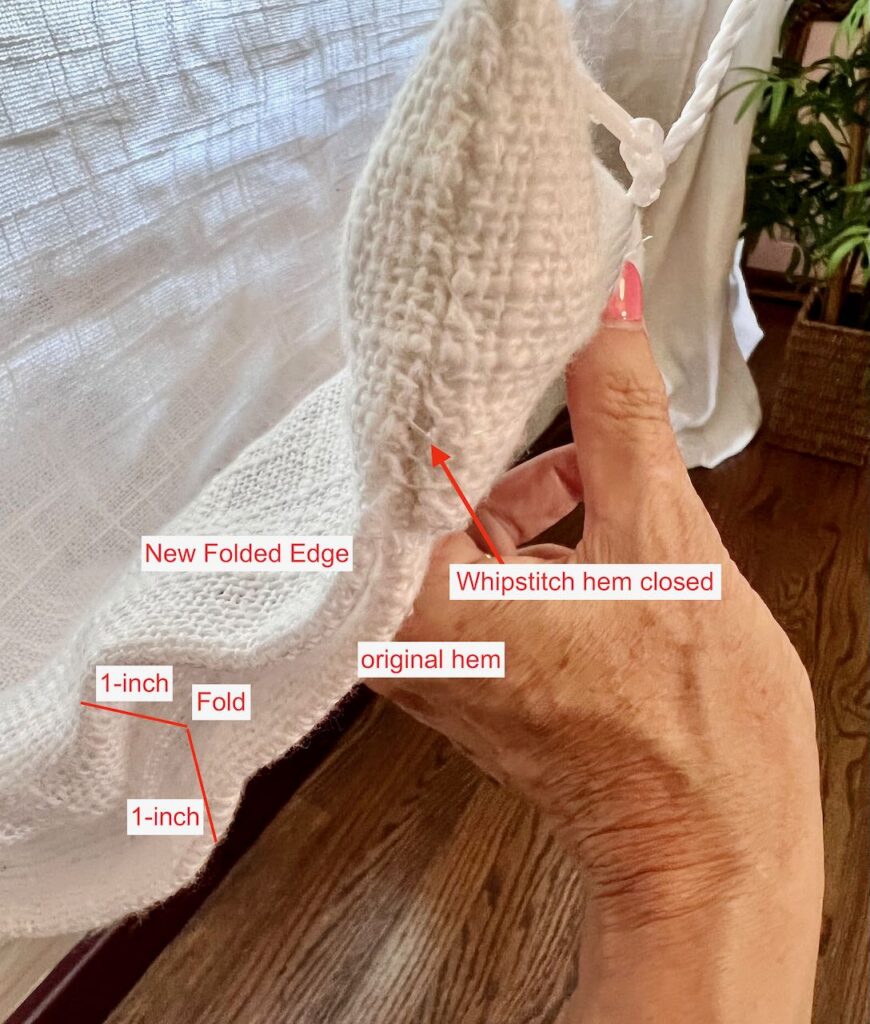
Lay your bottom board or weight rod along the bottom edge. Fold the hem — pleats and all — up and over the board or rod.
With needle and thread, starting at the bottom of one side, hand-stitch up this side, across the whole rod pocket and down the other side, fully encasing the rod.
PRO TIP: Don’t let this intimidate you — a simple whip stitch is all you need. Here’s a good whip stitch tutorial if needed. Or this video if that’s better for you.
Step 5) Attach to Header Board
Determine your desired finished length and mark it with pins on your panel.
Lay your header board on top of the fabric, lining the top of the board up with your pins and keeping the center mark, pleat, and outside edges all aligned.
Wrap the excess fabric over the board and staple in place along the backside.
Trim off the excess fabric.
If your fabric edge looks like it’ll fray, run a bit of white glue (yes, like Elmer’s) along the edge and let it dry — or go pro with a bead of Fray Check.
If it’s not an easy-to-unravel fabric, no shame in skipping this and moving on.
Step 6) Install Eye Screws-
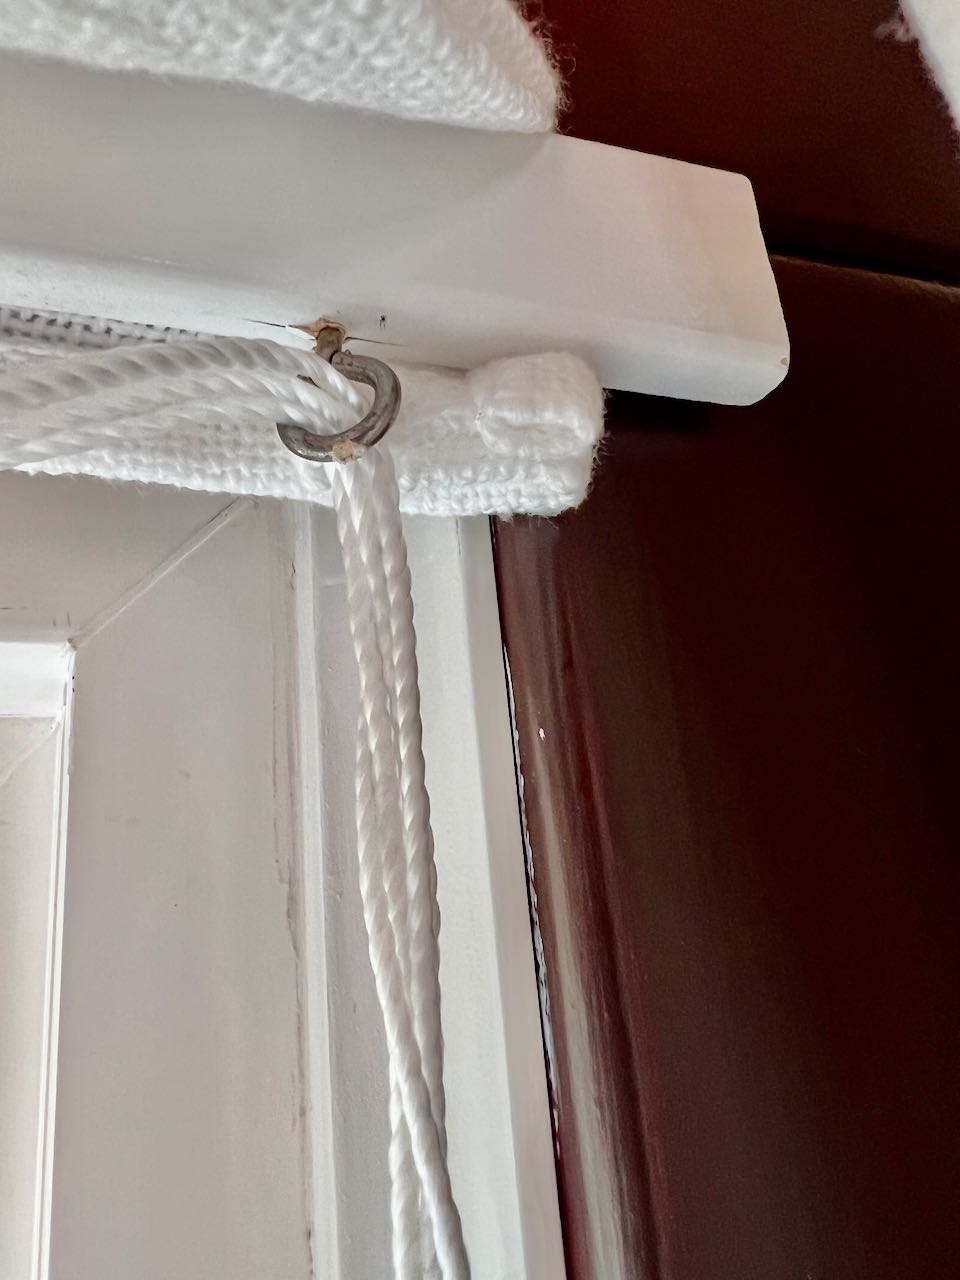
Install one eye screw into the bottom of the header or mounting board of your Roman shade. They should be directly above each pressed fold where you will be attaching the rings in the next step.
PRO TIP: Be sure to drill a pilot hole for these screws so you don’t split your board.
Step 7) Sew Rings Onto Roman Shade-
There will be four columns of rings, One column on each outer edge pleat fold and a row on each fold of the center pleat.
If yours is a single window, then you will have just two rows of rings.
Figure and mark the distance between your rings. Divide the length of the shade to determine an even spacing between the rings.
The larger the distance between rings, the deeper the horizontal pleats will be and the fewer the number of pleats which means less stack back when the shade is fully raised.
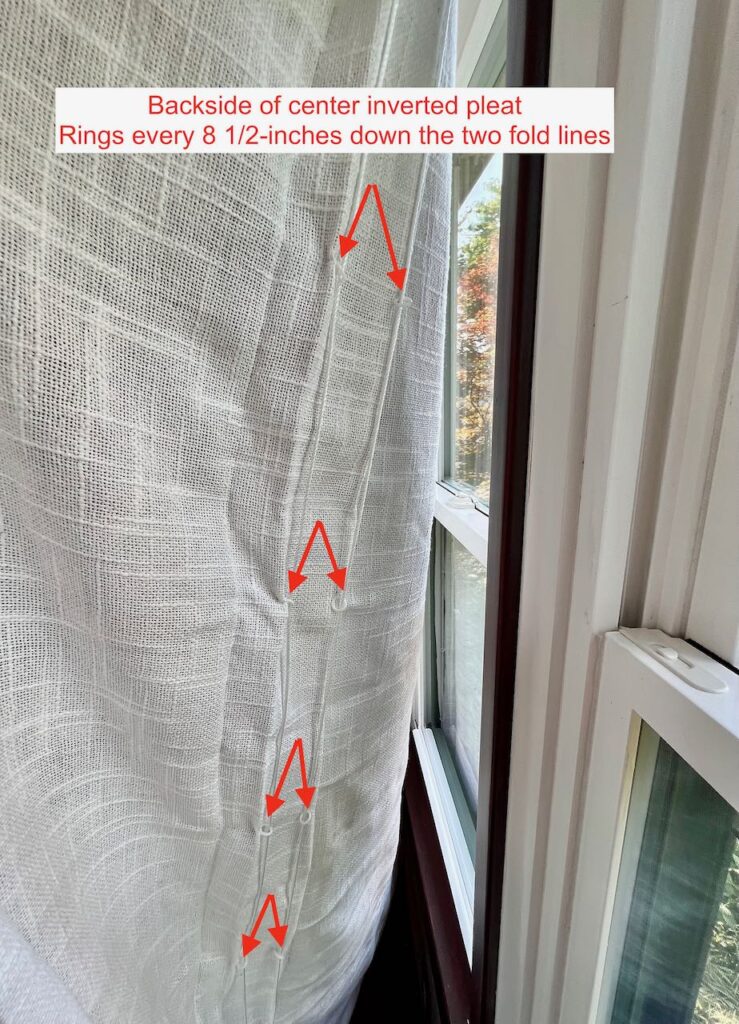
Aim for a spacing between 7 and 9-inches. My rings are 8 1/2-inches apart. And I have 9 rings in each column.
Mark the spots for each ring.
Sew each ring in place.
PRO TIP: Thread your needle and knot the double strand of thread. Pull through the fold at the marking and slip the needle between the two strands before the knot and pull tight.
With that tip, your knot is now locked into that spot and can not slip through the threads of fabric.
Loop the thread through the ring and the folded fabric several times. Tie a slip knot in your thread around the ring tightening to the loops of sewn stitches. Tie a second slip knot right at the threads.
PRO TIP: Before, you snip your thread, tie a third slip knot roughly a half-inch further up the double strand and cut between the two knots.
Now you have a knot ready for the next ring — doesn’t sound like much, but this is a huge time and frustration saver for me!!!
Here’s a short video to help with this great time-saver:
Step 8) Attach Roman Shade Strings-
Starting at the lowest ring on the side farthest from where the cleat will be, thread the drapery cord up through each ring and then through each of the eye screws and a foot or two past where the cleat with be.
Cut the cord. Securely tie the end to the bottom ring.
Repeat with the next column of rings, through three eye screws,
Third cord up and through two eye screws. and last cord, up and through one eye screw.

You should have four cords fed through the last eye screw. And each cord securely tied to a bottom ring.
Tie the loose ends in a loose slip knot so they cannot pull out of place while you are installing the shade.
Step 9) Install
Attach header board inside, or to the face of, your window frame with appropriate screws..
Step 10) Install Drapery Cleat-
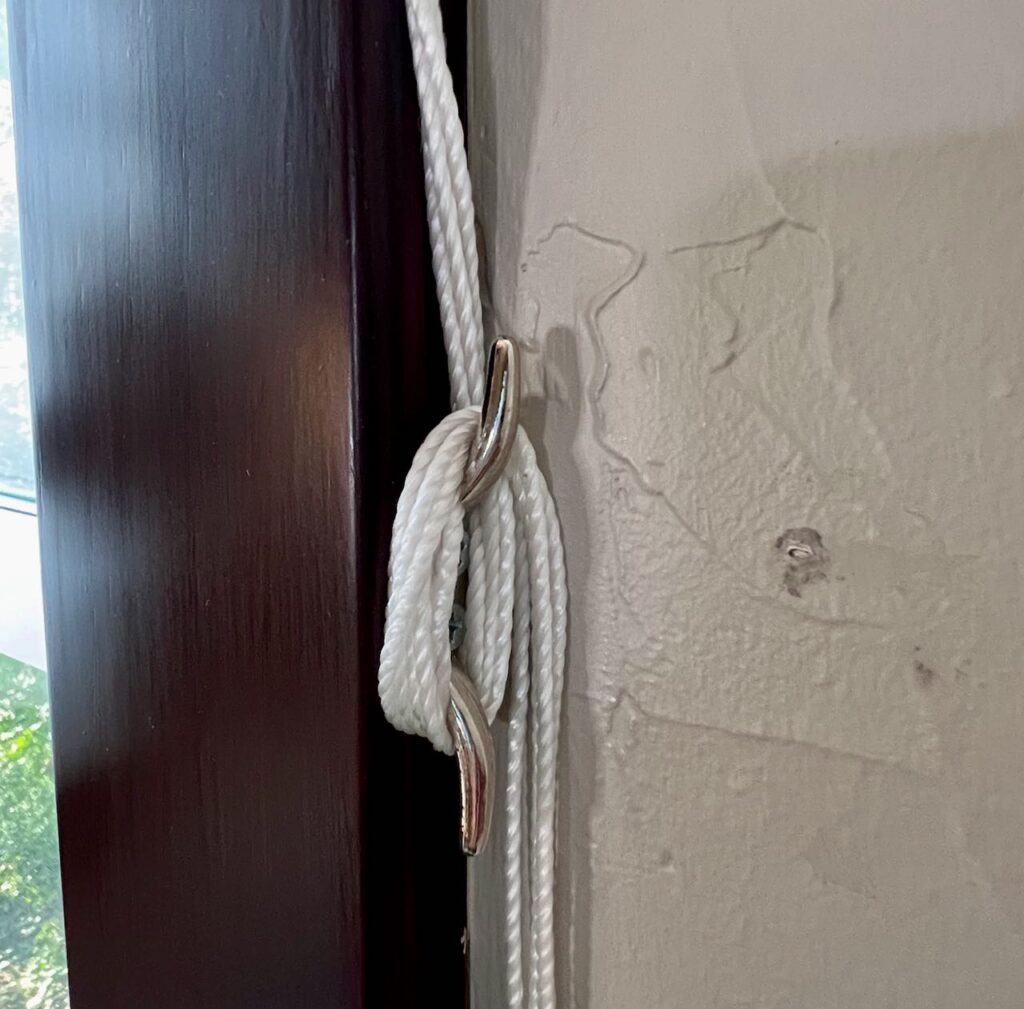
Install a drapery cord cleat with supplied screw either to the side of the window frame as I did or to the wall.
CAUTION: Keep in mind safety and install your cleat out of a child’s reach.
Step 11) Finish Off Roman Shade Cords-
Now that you have your cleat in place, with the shade hanging loosely, remove your temporary loose slip knot.
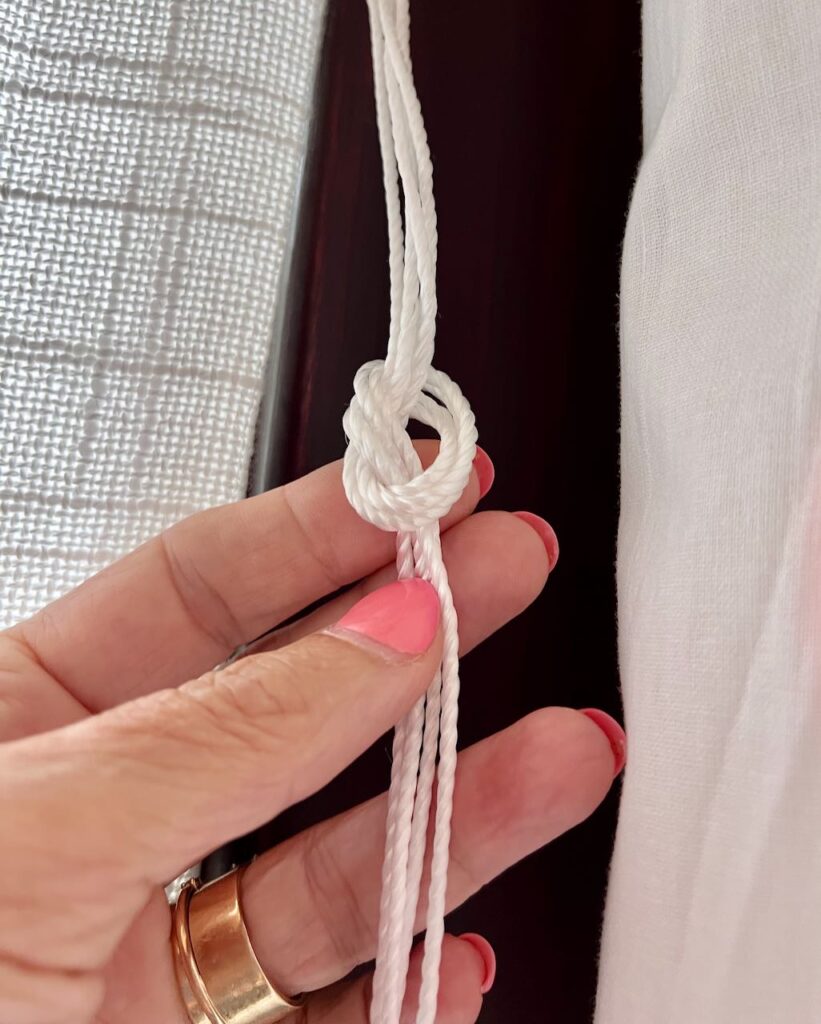
Gather all four cords together making sure they are the same tautness. knot them together with a slip knot just past the last eye screw, or lower if it’s hard for you to reach.
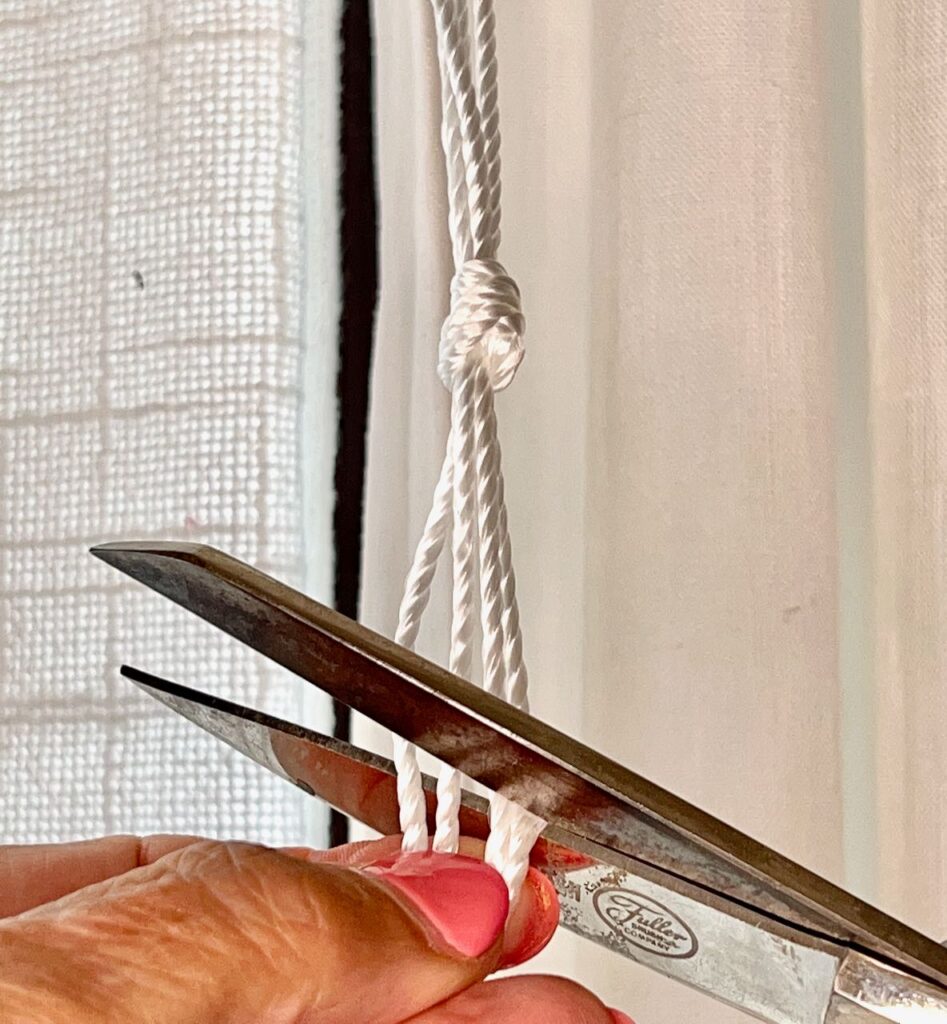
Trim the cord ends.
To keep them from fraying, you can dab each cord with a bit of white glue.
Or if your cording is nylon (and you are sure of that) you can melt the tips by holding in a candle flame for a second or two.
Operating Your Roman Shade–
To raise, pull the cord lifting the the bottom to your desired height, secure the cords around the cleat several times and adjust the folds as needed.
And that’s it!
In a nutshell: Fold and Press – A bit of Hand Sewing – Staple – Thread the Cord – Hang – Pull Cord!
Surprisingly easy, right?
Think of all the money you just saved and you still have a custom window treatment!!! That’s a double win in my book — a veritable cupcake with fluffy-filling AND cream cheese frosting too!
Roman Shade Alternatives:
Single Window Soft Fold Roman Shade:
Same basic concept as the double window above, but using a narrower fabric. In this case, I’d look for a drapery panel. You can find them as narrow as 36-inches.
Your steps are the same with just a couple of modifications:
You won’t have the inverted pleat in the center.
Divide any extra fabric width by two. That amount of excess fabric becomes the pleat along each side.
You will have just two columns of rings and cord.
Outside Mount Shade:
If you like this relaxed style but would like to extend it to an outside mount, it’s rather easy to do.
Mount the board directly to the wall above the window trim.
If your window is flanked by bookshelves or cabinets, you can mount the header on the sides of the built-ins.
Roman Shade Valance:
Generally, a valance will be mounted above the window trim and as wide as the window trim.
If you’d like these same relaxed shade but as a valance, that’s an easy adjustment. Reduce the length to double the finished length of the valance. And extend the width to include the window trim.
Balloon Roman Shade:
There are many versions of what a balloon Roman shade looks like. When I hear balloon Roman shade, I think of a puffy valance that has a bit of a scallop effect between the rows of rings.
In this case, the finished length of the shade would just be double the desire length of the valance. You would make it the same but only have the bottom two or three rows of rings. No rings above the desired length. This is how you create the puffy treatment. And if your fabric does not balloon out as you’d like, add some netting or even tissue paper in the bubble formed as you pull the cords.
How about another minimalistic window covering, but this time covering the lower part of the window? I’ve got you covered — well, your window covered — right here.
Or do you need custom extra long curtain rods without the extra large price tag? Check out these custom extra-long curtain rods.
How about sheer curtain panels for your patio or deck without expensive and expansive rods? I’ve got that for you too.
I hope you are inspired! If you have any questions, snags or just comments, don’t hesitate to reach out or leave your thoughts below! I read every one and will get back to you.

This is a fabulous idea. I have the same issue with my office. Right now I have two separate shades but I love the idea of having only 1. I am getting my tape measure out right now . . .
I’m so glad this inspired you. I almost didn’t share it because it’s so simple. But that’s exactly the kind of window treatment many of us are looking for. You know where to come if you run into any issues.
I’ve been wanting to make shades for years for my two rooms that face the front of the house. I think this is something I can handle with your instruction! Thank you
I have total confidence in you. And you know where to find me if you run into any snags.
Your instructions are so clear! I am always looking for low-sew projects! Beautiful!
And Missy, this one is so simple! Find the right textile and it practically makes itself.
Thank you for these great tips! I always have used round clips to pull the rings together to lift the shade (they are stationary) and will try the cord with 8.5” between. Thank you!
Let me know what you think. I love the ease and final function and look of this.
Your roman shade is incredible Diane! Precise, elegant and refined. I’m so impressed by your sewing skills and knowledge.
Thank you so much Diane! This is JUST what I have been looking for! Didn’t want to spend $250 on one, I knew there must be a way, so thankful for you documenting and showing us the steps!
My pleasure Jill! I’m glad to help — saving $250 definitely qualifies as joy-inducing! Don’t hesitate with any questions — and I’d love a pic or two of your ifnihsed project.
Do you have a tutorial for a single window (29”x 64”) without a pleat in the middle? Thanks
Hi Kathy, I don’t at this moment. But since you asked, I will hop on that. If you need it, then I’m sure there are others that do too. Have you subscribed? Please do so you’ll be notified when it’s available. Have a great day Kathy!
I subscribed and look forward to reading it when available. Thanks
Great Kathy! The options are churning in my head already!
Great project Diane! Thanks for the inspiration!
What a great and informative post! Thank you so much for sharing.