How To Make a Split Wreath To Hang on Double French Doors
A Spring split wreath can bring a touch of welcoming charm to your double French doors! Here’s how to make and hang a split wreath.
It’s that time again! The Handcrafted Society’s March meeting is here, and you know what that means – crafting challenges with my amazing besties!
I can’t wait to see the incredible projects everyone comes up with this month. The variety and talent in this group never ceases to amaze me!

You guess this month, didn’t you? Spring Door Decor!
Double front doors are an elegant way to showcase your home’s entrance, or double doors can be a charming addition to a garden shed, or rustic double swinging gates can can really elevate the garden.
But with two doors to decorate, finding the perfect spring wreaths or alternative decor can feel challenging.
Enter the split wreath! This great option for double door wreaths seamlessly adorns both doors while maintaining a cohesive look.
Whether you prefer the classic elegance of boxwood or the whimsical charm of moss, this guide will cover all you need to know to create a stunning split wreath that welcomes Spring and complements your French doors beautifully. AND how to successfully hang it.
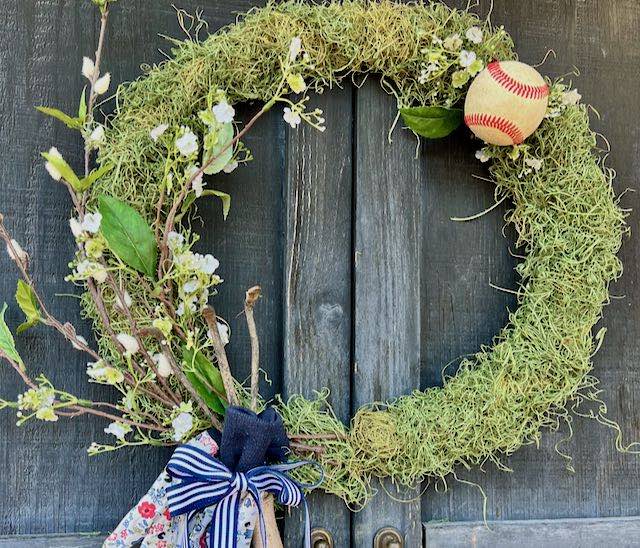
TABLE OF CONTENTS
Where to Start
My Mantra: Function first! Then we can make it pretty!
With this in mind, we need to start with a plan of how to hang your split wreath.
To keep the two halves of your wreath hanging where they need to be, you will need a total of four attachments. One on each side will not keep your wreath hanging straight.
So we add two attachment points on each side to hold it nice and straight — one at the top of the wreath and one at the bottom of the wreath.
You guessed it, traditional door wreath hangers and anything involving fishing line or hanging ribbon will not work here. But don’t despair. I’ve got some great solutions for you.
And THEN, we get to make it pretty.
How to Hang a Split Wreath on Double Doors
Hang on a Rustic Door or Gate-
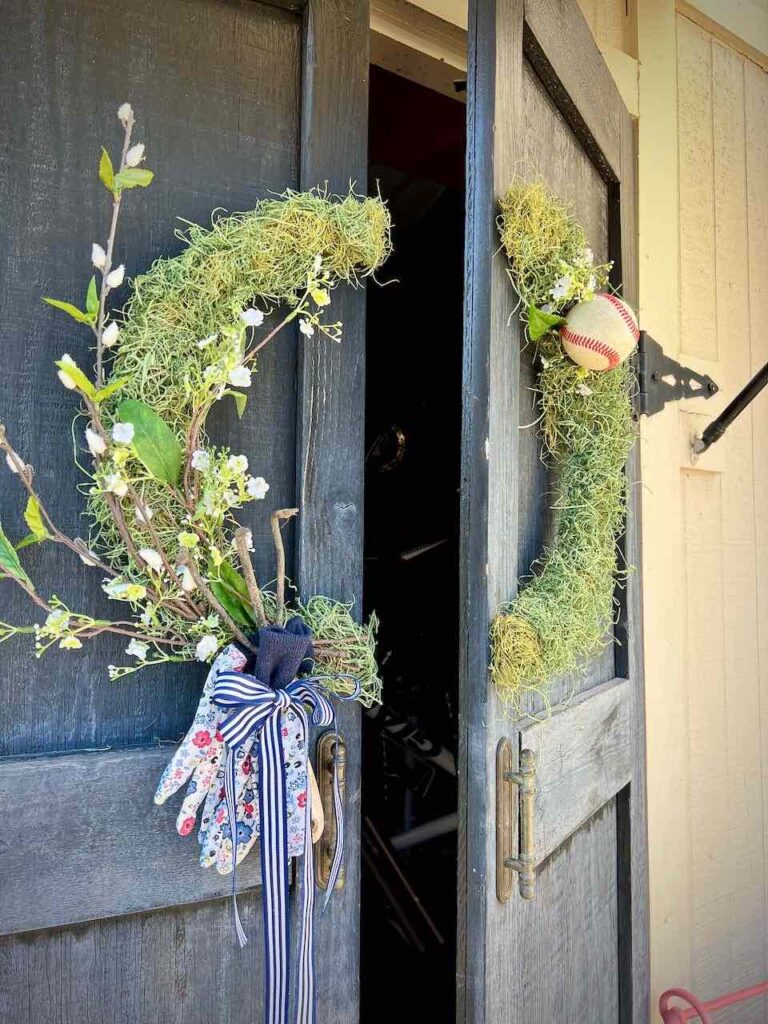
Our tool and toy cabana has narrow double doors, so a single wreath is perfect here.
There is a fun striped awning over the door, but our wreath will still get a lot of exposure to harsh weather.
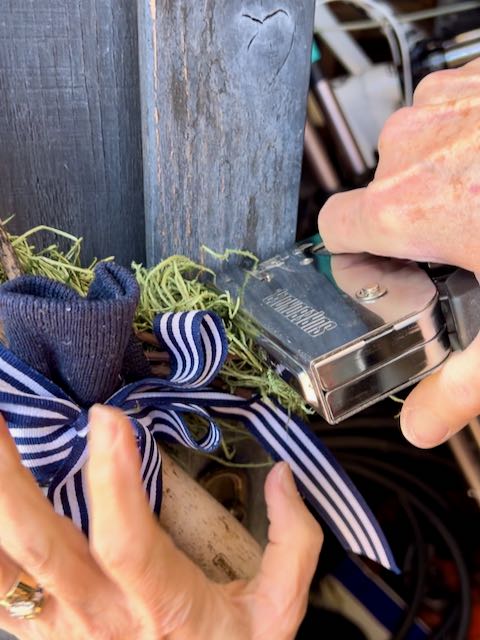
The doors are rustic, by design. So for this situation a staple gun was the perfect solution — quick, effective and free! The trifecta of all crafting!!!
For Steel Doors-
If your situation has a metal door, such as a steel door, then my favorite is a magnetic hook at each attachment point. I found this set that the base will be easier to hide than most and they are rated for 6 pounds each. Or you can spend a little bit more and get two sets of the same hooks in green so they disappear a bit more easily behind greenery.
For Doors With Glass Inserts-
If your doors have glass window inserts, the cut ends of your wreath halves will meet on the frame around the glass. So the wreath will need to sit off the glass roughly the thickness (or depth) of the frame. Because of this, suction cups with hooks on the glass will probably work best for you.
If this is a fairly shallow change between the frame and the glass surface, adhesive hooks could be your answer.
I also have used magnetic hooks on glass. The magnetic hook on the outside to hold the wreath with a metal disc on the inside to hold it in place. The down side is that the metal disc shows on the backside, which will be your entry if they are your front door wreaths. However here’s a great solution.
If you have glass French doors, my absolute favorite is to make two wreaths (that’s four halves) of greenery, embellishing just one (the two halves for the outside). Then using eight magnet hooks, four pair back to back, hang the embellished halves on exterior side of your doors and the plain halves on the interior side.
You have the stunning illusion of the glass piercing through a solid wreath.
How To Make A Split Wreath
Materials and Supplies-
- Wreath form, wire frame, foam frame or grapevine. See NOTE below
- Greenery of choice
- Embellishments, flowers, twigs, ribbon, etc.
- Florist wire
- Wire snips
- Electric knife, or serrated knife if using a foam wreath
NOTE: Now that you have a general idea of how to hang your wreath, you can see that a wire frame might actually be the easiest. You can choose to go with a green foam wreath, just know that you will need to add four pieces of wire where you plan to attach.
Step 1) Split Your Wreath Form-
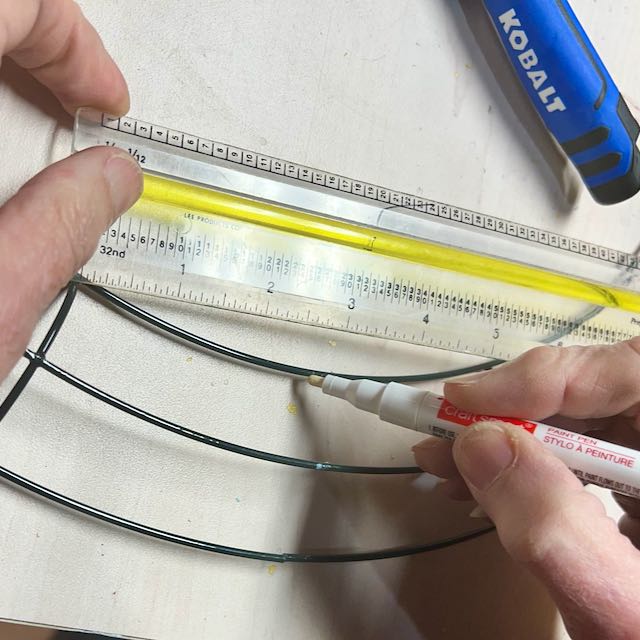
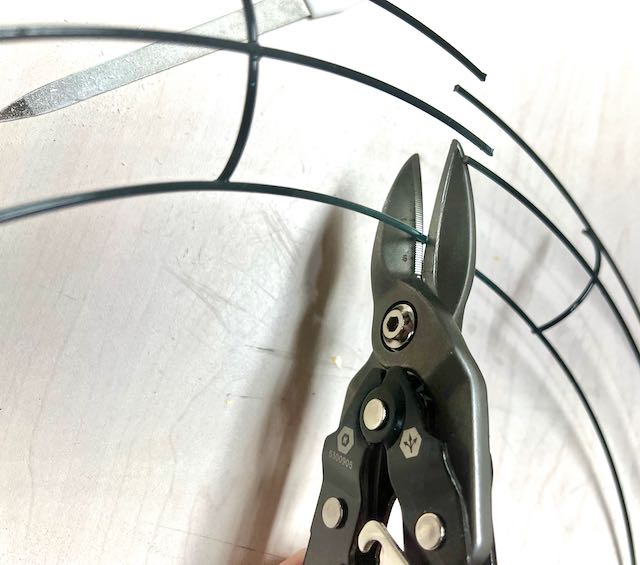
I used my wire snips to cut my wreath form in two.
You’ll want to make sure that you are at the halfway point between two of the ribs holding the circular frame pieces together.
If you are using foam, make sure you cut exact halves.
If you are using a grapevine wreath, before you cut the wreath, use brown florist wire to secure all the different vines together about a half to 1-inch from your center. Do this on both sides of where you plan to cut your top and bottom. Then cut your wreath.
Suck pause for PSA: Are you enjoying this post? Would you like more? How about subscribing:
Many thanks!!! Now back to our post in progress:
Step 2) Plan for Hanging-
If your are using a traditional green wreath form, the wire frame version, hopefully you have determined which of the above methods will work for you.
If you are using either a foam or grapevine wreath form, now is the time to add some wire loos to the back where you will be attaching the wreath halves to your door.

Step 3) Add Base Greenery to Wreath Halves-
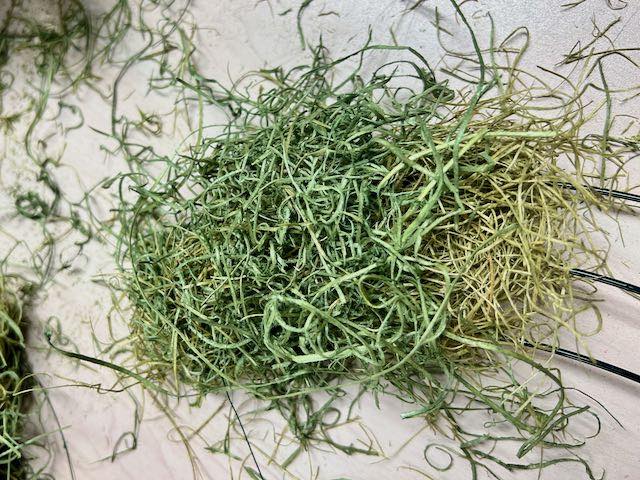
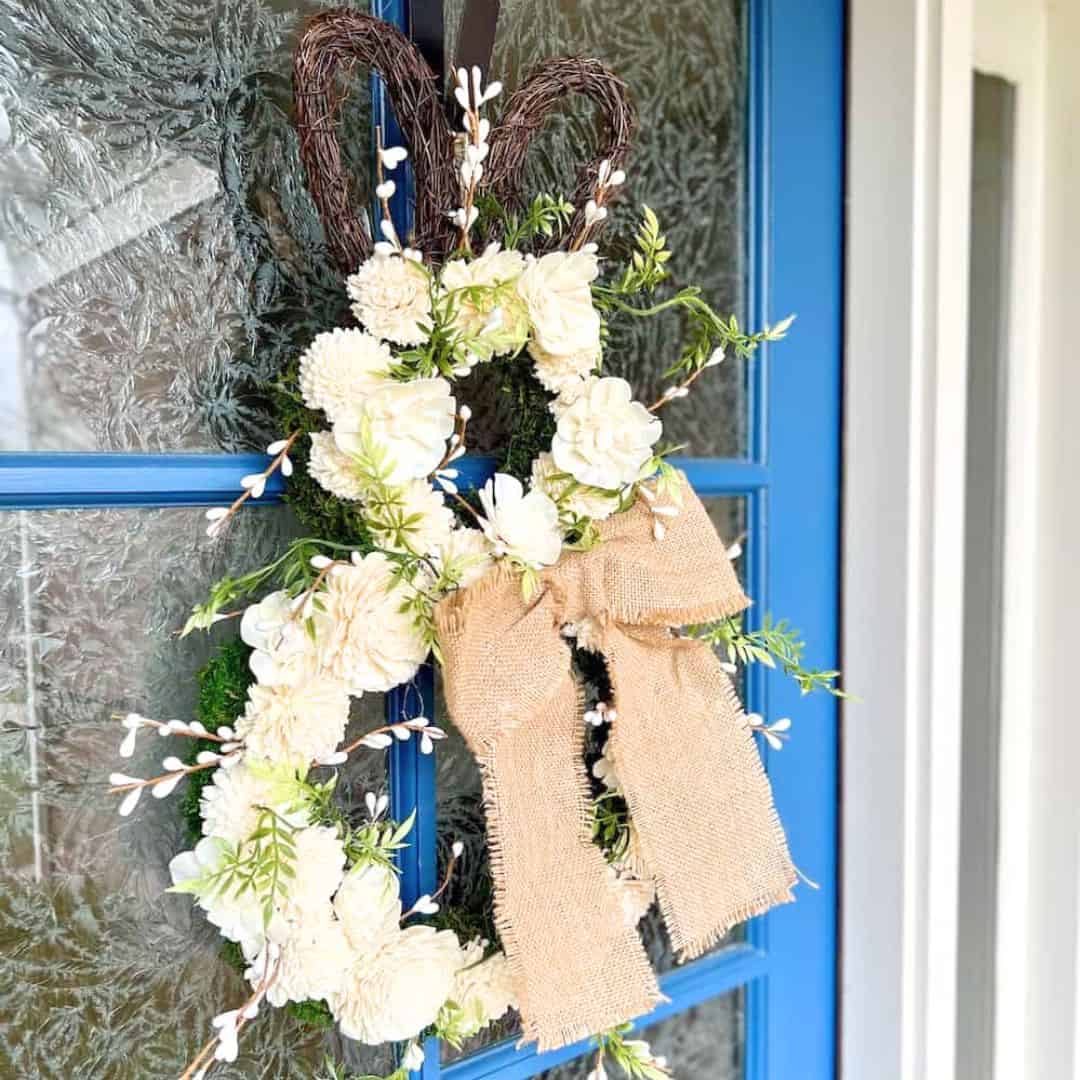
For our tool and toy cabana, I want to keep a whimsical rustic vibe going. And I wanted to celebrate Spring, so I chose to make mine a green Spanish moss wreath (I’m so done with the grey of Winter).
Working with all the different types of crafting moss is super flexible. I have a tub full of all kinds of version that I save and reuse for all kinds of projects.
Cut lengths of green florist wire. I have found that 4 foot is a good length for me. Start by cutting 5 or six lengths and you can always cut more.
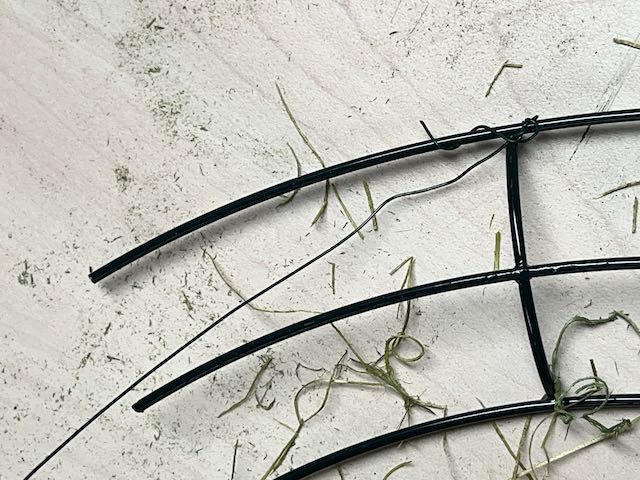

Twist the end of your first wire around one of the intersections of a rib closest to the cut and the outer frame. Twist it back on itself so it can’t pull loose.
I did not have enough of the green Spanish moss, so I started with a layer of excelsior moss that is a paler green. and layered the brighter Spanish moss over the top.
Now start wiring on your greenery.
With my moss, I laid the base or filler moss on about 6 to 8 inches of the frame. Then covered it with a thin layer of the Spanish moss. I started by wrapping the florist wire around the bundle once and then repeated but threading the wire through the top layer of moss so it would be hidden but still hold the moss in place.
Continue around the frame repeating layering the moss and then wiring in place.
When you get to the end of your first wire, attach the second wire to it by twisting the two ends together about an inch from the ends and the splitting the ends and twisting those back along the lengths to prevent the wires from puling apart.
Once your base greenery is all secured in place, you can move on to the next step — where you give it some panache!
Step 4) Add Your Desired Embellishments-
The good news with wreaths, is that almost anything goes! Wreaths are a great way to express your unique style! You can also pay tribute to the time of year. Don’t confine yourself to just the holiday season with a Christmas wreath. How about the Winter season or an Easter wreath?
Today, I, and ten of my crafting besties, are sharing Spring Door Decor inspiration for you. So be sure to look for their Spring doors all just below this project.
You’ll be amazed!
So where did my inspiration come from?
Did you know this Tool & Toy Cabana started as a boring shed the previous owner built on the back side of the house, right next to the patio? So I needed to dress up this utilitarian shed to fit the style of our patio and how we live out here. I previously shared our starting point and how it evolved into our Tool & Toy Cabana (as in garden tools and outdoor toys).
This is in the heart of where we socialize and play. It needed to be whimsical and not take itself too seriously.
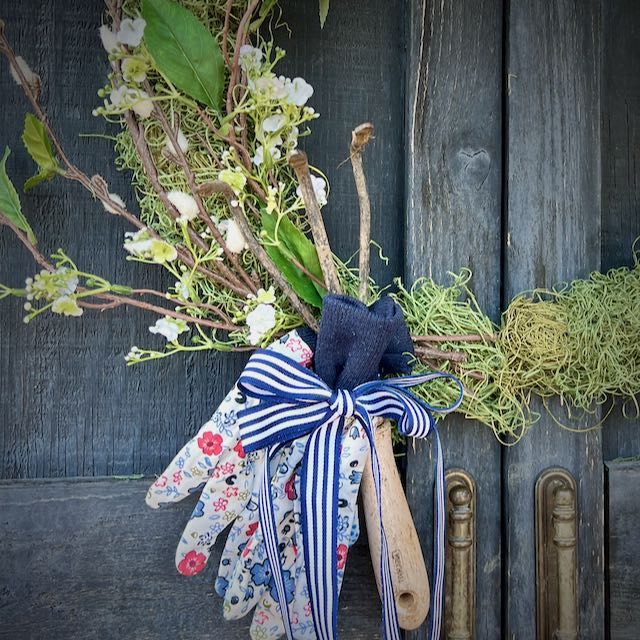
So I decided my wreath should say something about what’s hiding behind those doors. No better way than with a few Spring branches, a favorite hand-me-down garden digger and a cute pair of garden gloves (from Dollar Tree, because remember, I’m cheap). And then to add an homage to the toy side. What says Spring more than Spring ball?
With those decisions made, I gathered a bundle of stems in my hand, held them in place on the wreath and wired them on just as I had with the moss before.
After a bit of experimenting, I liked the look of one glove on the wreath and the other attached to the handle of the digger.
So I wired one glove onto the wreath while I was wiring the branches in place.
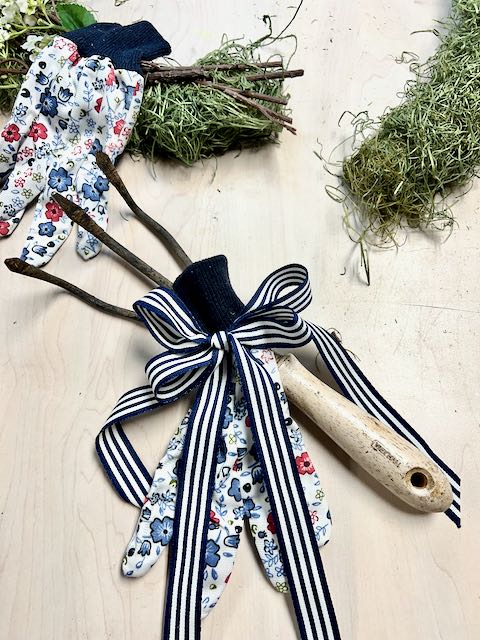
Then I tied a ribbon bow around the handle catching the second glove that way.
And these are held in place on the wreath with more wire, around the top of the handle and around the neck of the digger and one of the tinges. Then I cut off the ends of the branches that were extending past the cut edge of the wreath.
How to Attach a Baseball to a Wreath
Now it is time to add an old thrifted baseball. I had a hard time deciding, but finally went with up high on the other side of the wreath. Here I started with a few sprigs of the blooms from one of the branches and wired these in place and also brought that wire across the top to pull the moss down a bit to create a hollowed nest for the ball to sit.
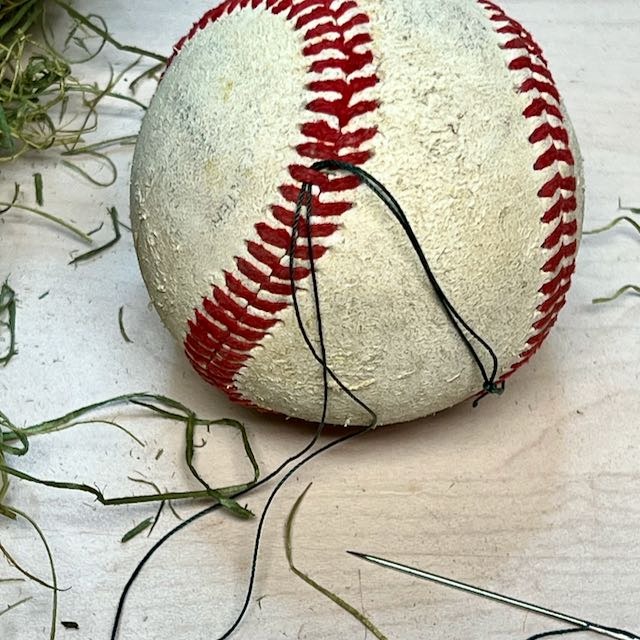

With a thick needle and upholstery thread, I pulled a double strand of the thread under a red stitch on the ball.
PRO TIP: To secure the knot, as you pull the thread, bring the needle between the two threads and pull it tight. Now it is knotted around the ball thread and cannot pull out.
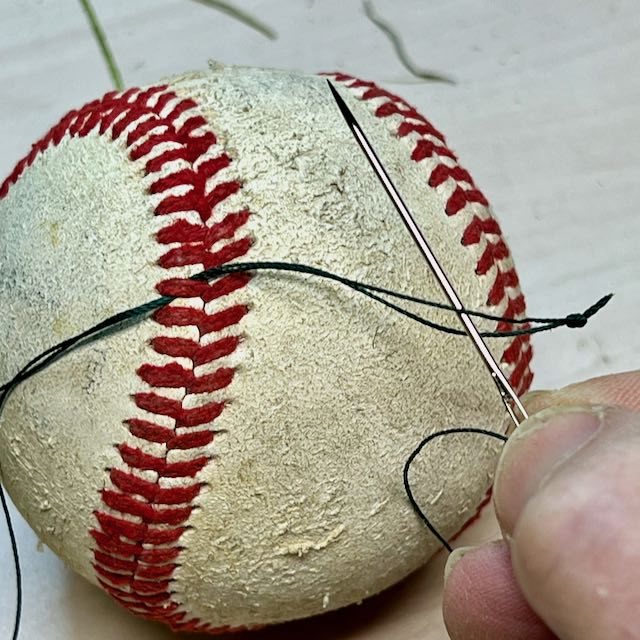
I threaded this through the moss and around the outer frame then back up to thread under another red lacing a couple of inches away, then down through the moss and around the inner most frame.
I then brought the needle back up through the moss several inches away to repeat under the red lacing, down through the moss around the inner frame up through the moss, under another lacing and down around the outer frame.
In all, there were four spots of threading under the red baseball lacing and attaching around the wreath frame in an approximate square pattern. This is holding the baseball quite firmly in place.

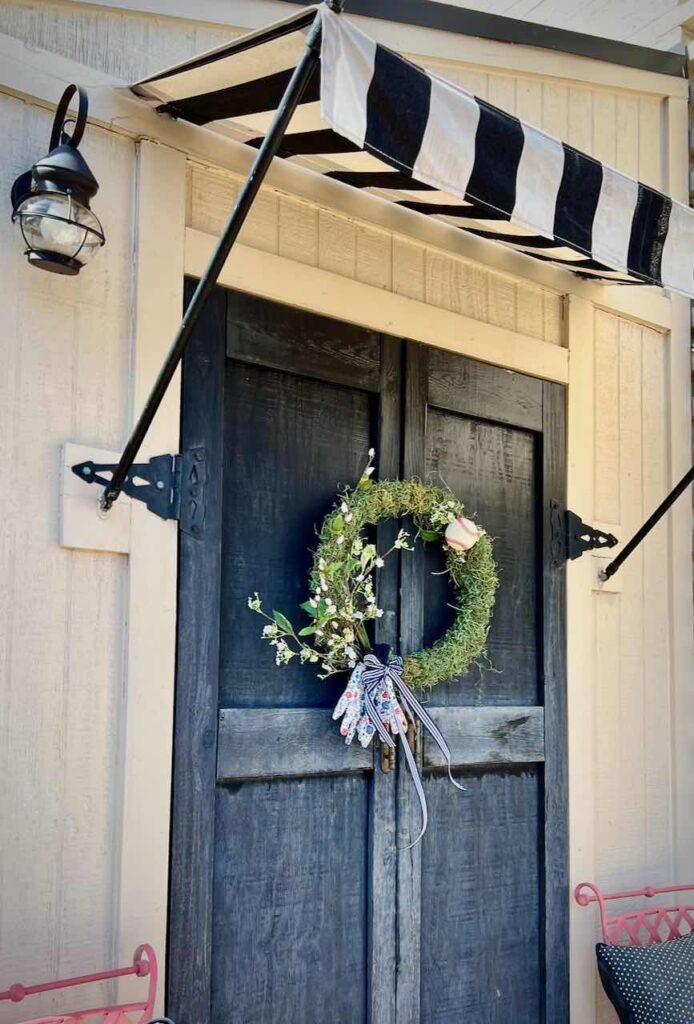
Hang Your Split Wreath On Double Doors
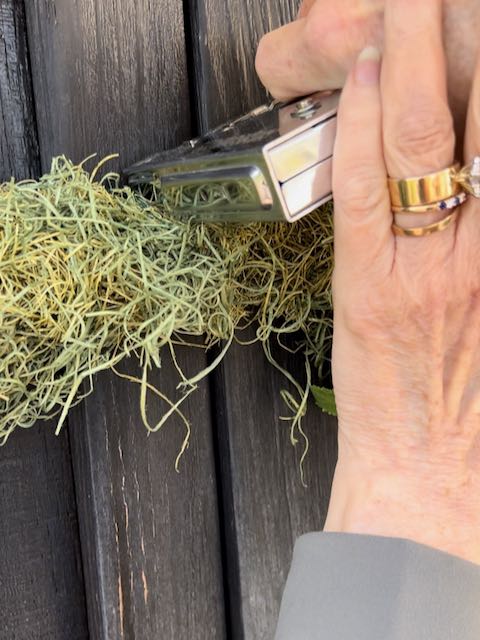
Because of the rustic syle of my doors, I could hang it using the easy way — a staple gun.
Starting at the top of one half. with the cut edge along the door edge and at the height I wanted it to hang, I just stapled (used 9/16-inch staples) over the top wire frame. Made sure the bottom cut edge was lined up with the door edge and stapled again over the bottom frame
Repeat with the other side and I was done.
It’s been hanging for about two weeks now and through a really nasty Spring storm, and it is holding up great!

With the other hanging options, you’ll have to experiment with placing the different hook to get it just right. If you have to option for the hooks to cross an intersection of a rib and an inner frame circle, I would do that first.
Here’s a Pin to help you find this post again.

I’m thrilled with this and how much charm she adds to our Tool Cabana! Just the finishing touch we needed!
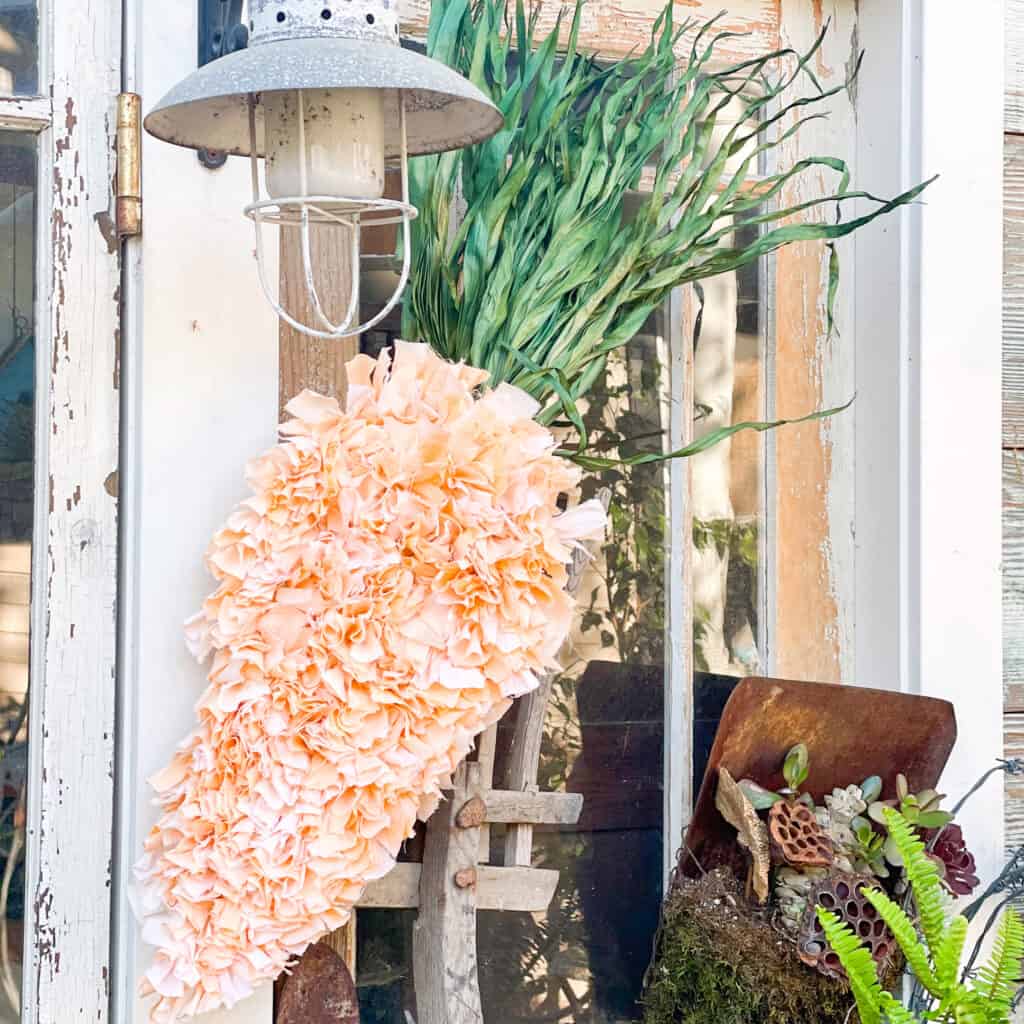
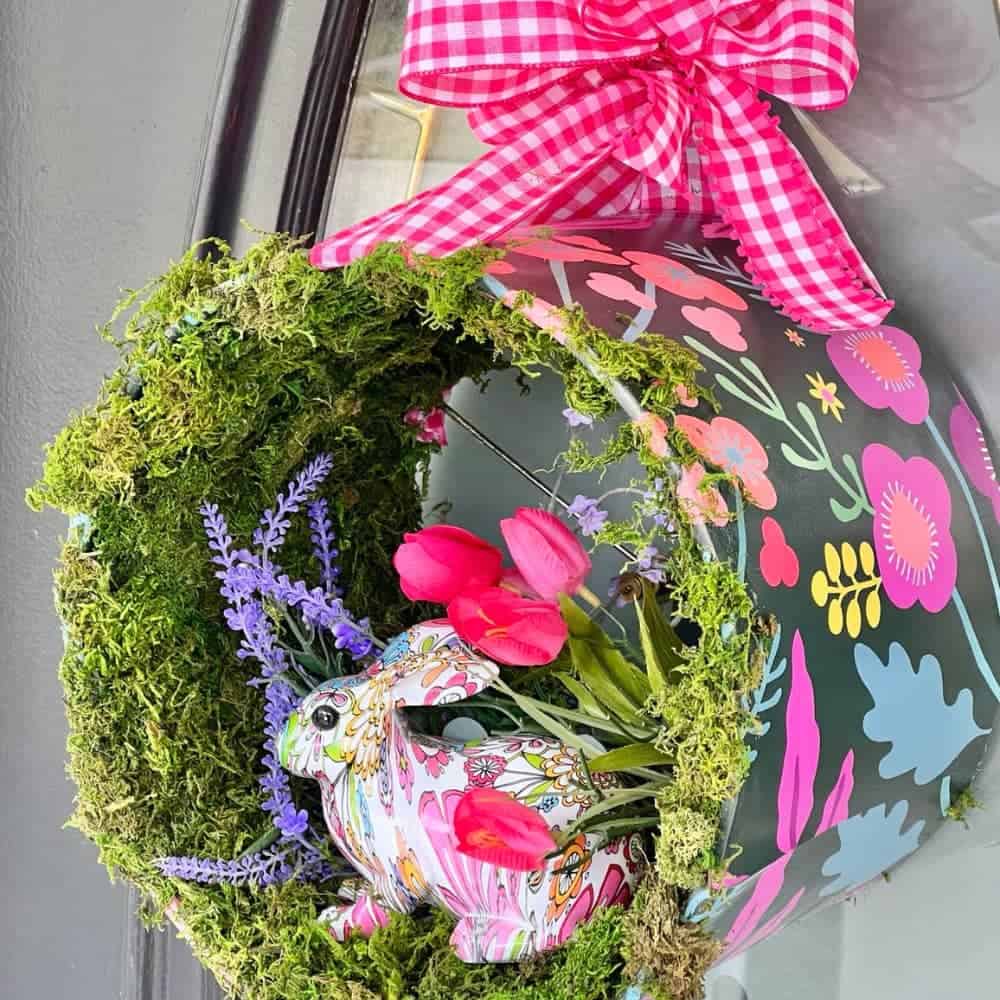
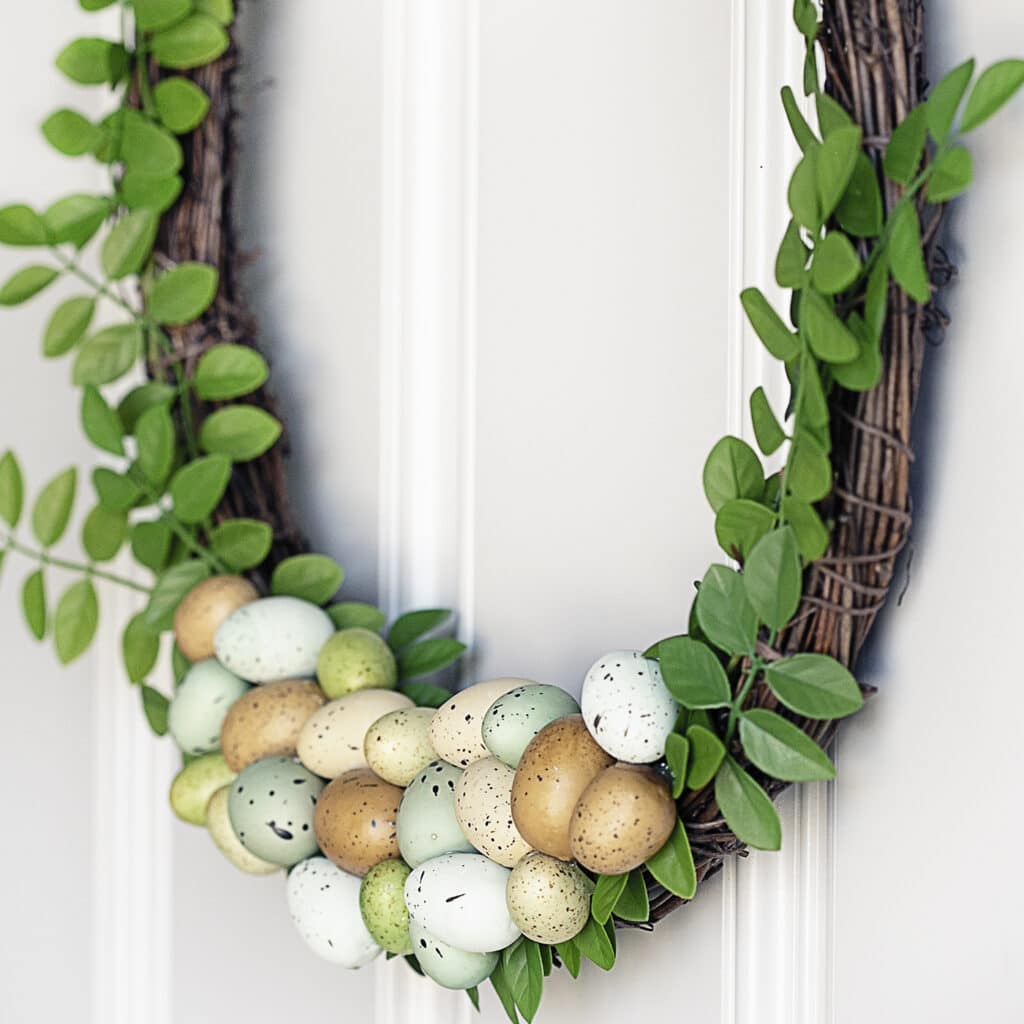
And now are you ready for more wonderful Spring Door Decor? I have to say these ladies brought it!!!
Impossible to choose my favorite!


Who can possibly turn their back on Spring after this lineup + DST (hallelujah!!!)?
I can’t wait to hear what you think of all these projects!

I would have never guess that was a split wreath. It turned out amazing.
Oh thanks Tammy! Another way the moss works so well.
Now I really want double doors! I love, love, love this project! You are so creative and really solved.a problem. It looks amazing, Diane!
awww shucks, Missy! I do love how it turned out. Perfect for the vibe of our T&T Cabana. II’ve always wanted a wreath, but the doors are too narrow for two wreaths. And the lightbulb finally came on!
What a great idea, Diane! I know so many people are going to benefit from reading these helpful tips. Especially, those who have double doors and metal gates like we do. I never thought to use magnets to keep our wreaths in place. Gah such an obvious solution – thank you! Hugs, CoCo
Thanks CoCo! Isn’t that what we aspire to do? Inspire!
It’s great crafting together. Always learning from each other.
Diane! Genius!! Thank you for the super idea and acknowledgment regarding the wreaths durability to storms. I live in southern Missouri and we can sure get some shed shakers, right? Again, thank you for your great ideas and for sharing them so freely!
Thanks bunches Candiss! I so appreciate your kind words. I’m thrilled to help and hope to inspire creativity in everyone.
This is such a smart decorating solution for double doors, and it looks fabulous too! Love the cute additions with the baseball, garden gloves and tool! So clever Diane!
I adore your split wreath Diane. You really were so creative with this wreath and how you added the baseball. And I love the shed doors! So cute.
Your creativity never ceases to amaze me! Great job coming up with a way to split the wreath! Love how you combined the theme of the shed into the wreath! It’s fabulous looking and functional! The best of both worlds!! Pinning now!
Diane, what a clever idea to split the wreath for double doors! Love the spring gardening and baseball theme! Thanks for sharing such great instructions and details for splitting and hanging the wreath!
A split wreath?!?! What is happening? Diane, you’re a genius. Not to mention all of the other great tips for steel and glass doors. Your symbolic embellishments are on point too. Creativity at its finest.
Ha Ha, Kelly. Would you mind having a conversation with my kids?
Hope you’re having a great day!!!
Hi Diane! Love this idea of a split wreath. There are so many folks who have garden sheds or small barns with two doors and this will work so well for them. I also love that you added a baseball to your wreath – (and my husband did too). Thank you for providing such clear instructions and for the great photos. Wishing you a fabulous weekend. Pinned!
Such a clever way to hang a wreath for the double doors! It looks so cute! I love how it turned out!