How To Install a Beautiful Decomposed Granite Patio
Expand your outdoor living space with a beautiful decomposed granite patio. Yes you can DIY it. All the info is right here!
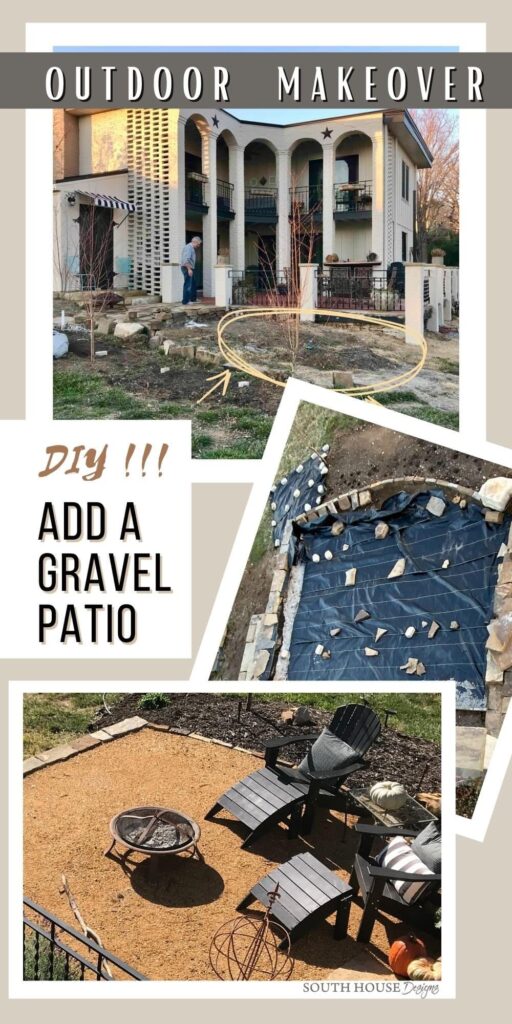
If you’re new here, a hearty “welcome”! We are in the midst of a Blog Post Super Series — Our Backyard Makeover.
I am sharing all that we have done since we first “gave the mouse a cookie” and it all snowballed (yes, mixing metaphors here).
You can find all of them here if you want/need to catch up, jump around, refer back to something — you’re in charge:
- The Prequel: Our Problem areas and three mood boards that helped to guide our decisions
- Eps. 1: The Santa Fe Tool Casita and treacherous entry became our Tool Cabana with its own front porch
- Eps. 2: The Original Starting Point — our vintage red brick courtyard with crumbling foundation and a dated and dangerous railing
- Eps. 3: Planning & Plotting the new Gravel Patio and evaluating pea gravel vs. crushed granite
- Eps. 4: How to Build a Retaining Wall with integrated stone steps
- Eps. 5: Installing the Decomposed Granite Patio (you’re right here now)
- Eps. 6: Installing Stone Steps and Walk to Make a Hillside Safe & Beautiful
- Eps. 7: How to Hang Outdoor Edison Style Cafe Lights for a warm, inviting glow
TABLE OF CONTENTS
Prepping For the Gravel Patio Addition-
So Far–
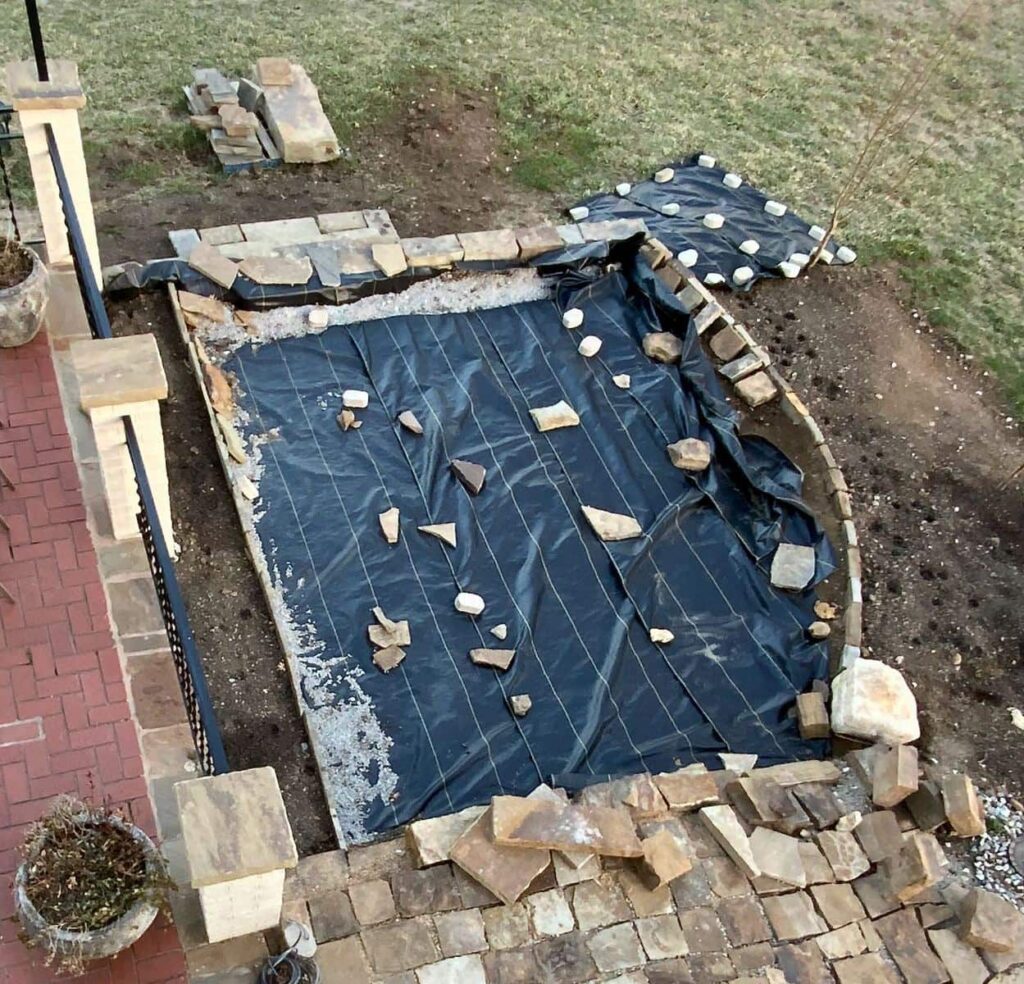
We started here with size and layout; transition points so we could determine change in elevation which required one step down from the original patio and two steps down into the yard. And decided on Decomposed Granite for our material.
Then we built the natural stone retaining wall with stone steps.
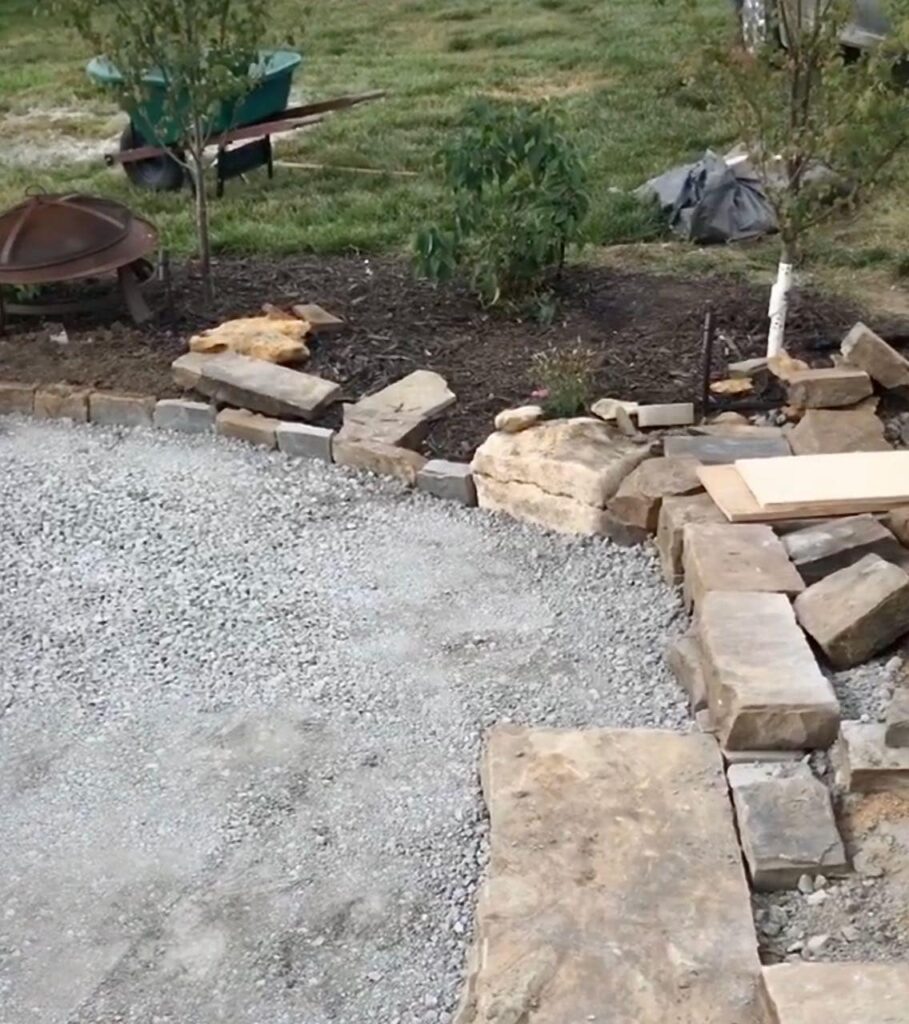
Now for the Additional Edging-
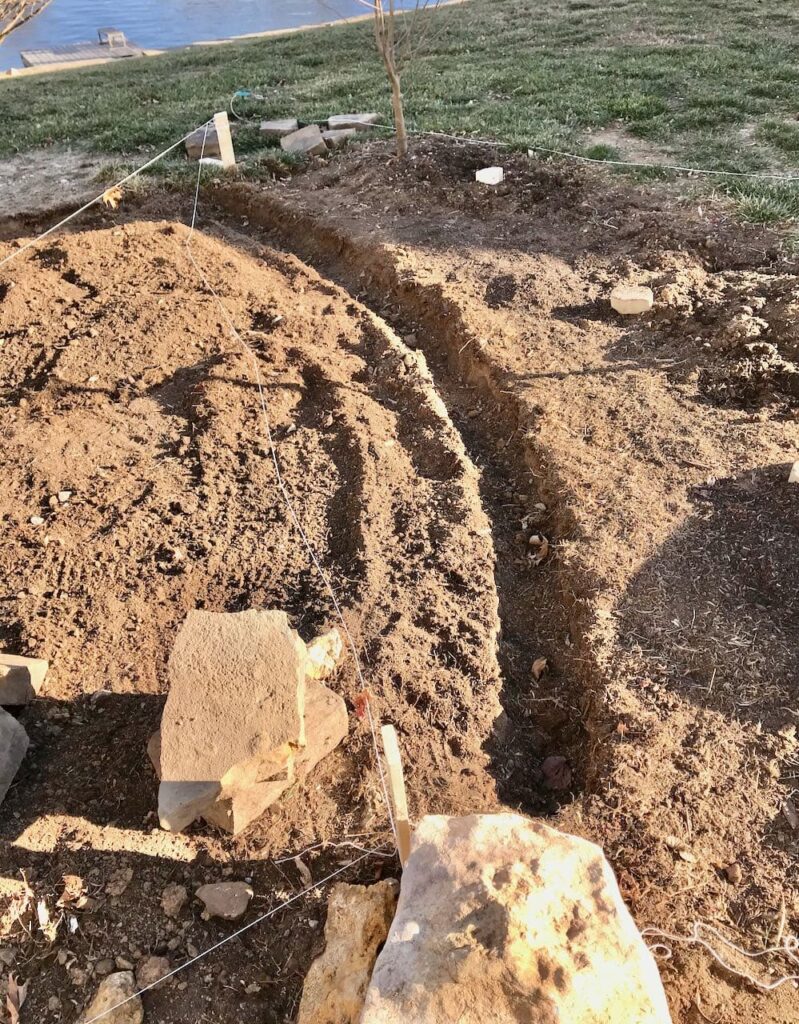
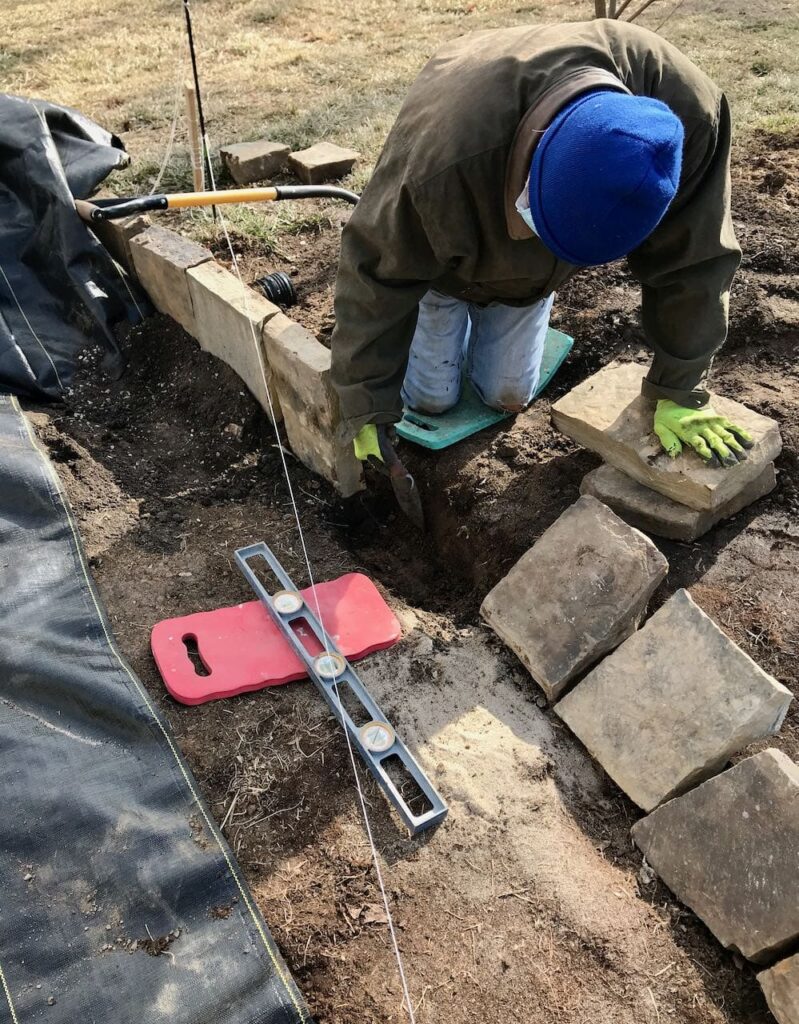
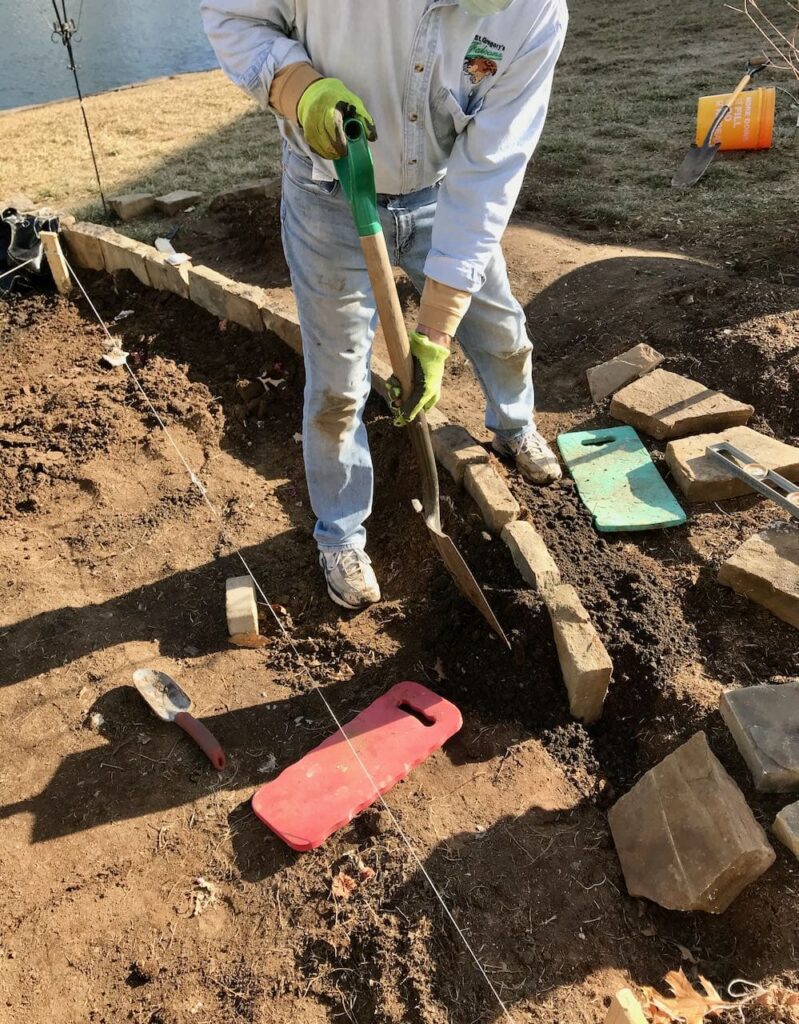
Gravel patios and paths require edging to hold the gravel or granite in place.
In our case, two sides are the stone walkway we built with the tool cabana and the retaining wall and steps. The other two sides will be planting beds. Natural stone, set on it’s side will be the edging for both that keeps the mulch and the granite from co-mingling.
It’s a very straight forward process:
- Dig a trench,
- String a level line,
- Place the stones vertically in the trench on a bit of gravel and sand
- Backfill with dirt to hold them in place
TIP: Place stones deeper or more shallow depending on the size of the stone. You want the top edge of them all to be at the same height, level based on your string line.
Our stones were salvaged from several old beds, so how much is buried is quite varied.
Drain tile, Optional-
I read that with a stacked stone retaining wall you don’t need drain tile due to the natural crevices between stones that will let the water escape.
BUT, just to be extra cautious we did lay a piece of drain tile behind the retaining wall. It ends just beyond the berm edging.
Final Prep of the Patio Surface-
Now that all the edging is in place, it’s one last chance to get the base as level as you want. You’ll need the soil base to be at least 5-inches below the planned top surface. This will allow for 2-inches of base and 3 inches of decomposed granite.
We tried to maintain roughly 6 3/4-inches depth with the intent that the top of the granite would be 1/4-inch below all the edges.
Then we opted to add a layer of landscape cloth. Not so much for weed control, but more to help prevent the base layer of road fill from being absorbed into the soil beneath.
TIP: After we back-filled the berm to the height of the stone edging, we leaned another stone against the edging stones to hold them vertical until we get the patio filled.
Detour: Retaining Wall Oops!
Learn from our mistake!
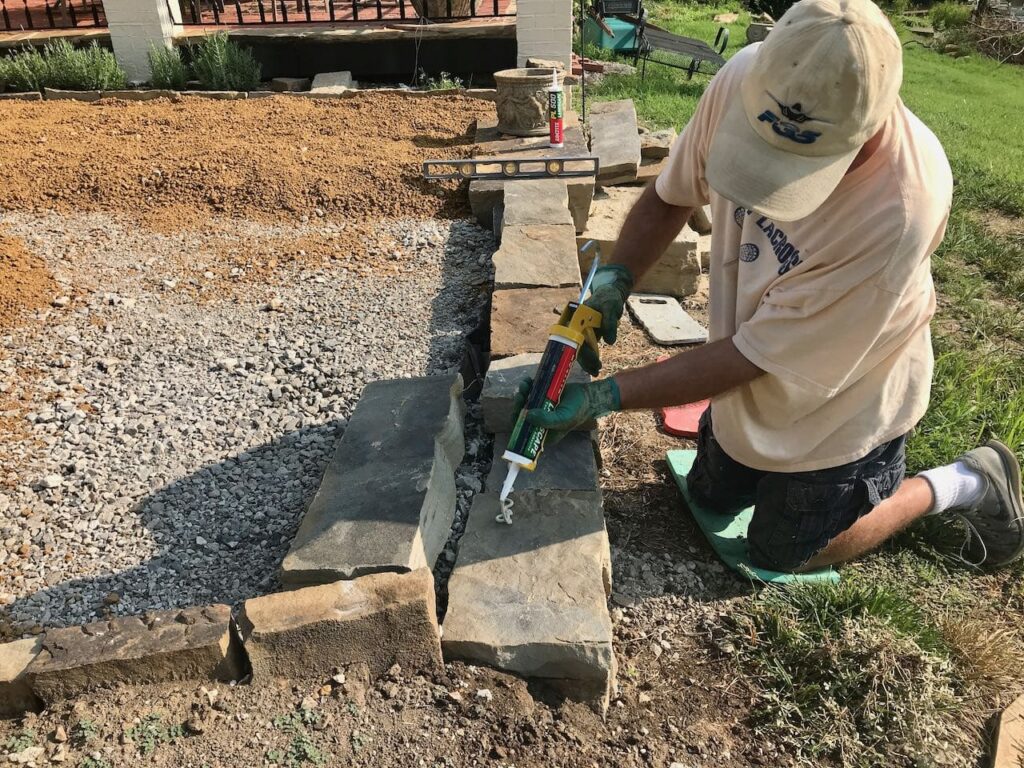
I mentioned this in a previous post. We realized that the adhesive we used on the top stones on the retaining wall did not take. Either because the weather was too cold when we applied it, or because we just swept the two surfaces clean, did not actually scrub them with water and then let them dry.
Just grateful we discovered this before we had added all the decomposed granite.
TIP: Double check the solidity of all edging and any “infrastructure” of your patio BEFORE spread you DG or pea gravel.
Improvisation: Fill the Retaining Wall Seams at the DG Level-
If you used a stacked stone wall at some point for your patio, you may want to do as we did on our retaining wall.
The stacked stone had no problem holding in the base later of gravel or road fill. But we could tell that the crushed granite wanted to slip right through the cracks and seams of the stacked stone. We needed a putty or caulk to seal a few of them.
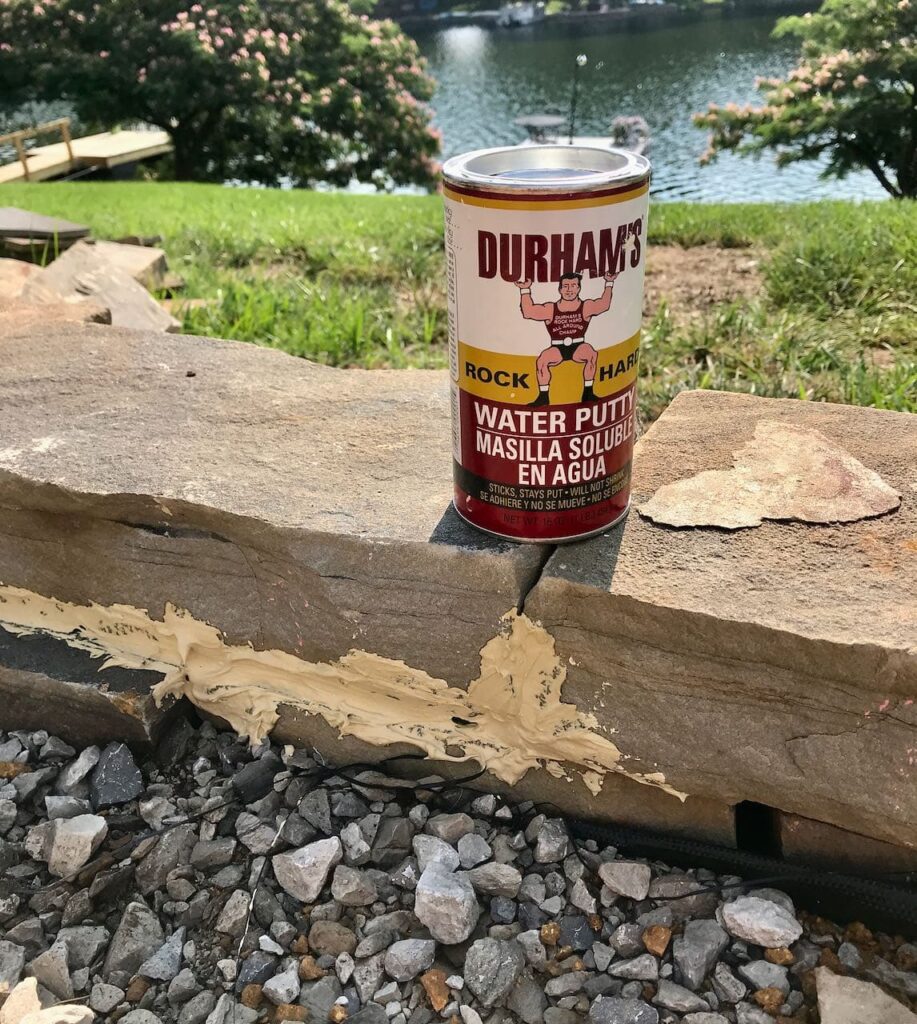
I was familiar with Durham’s Rock Hard Water Putty from using it on this project. It is amazing to work with and has held through all the crazy Midwest weather.
I mixed up a cup full and smeared it on any of the larger crevices and seams above the base layer. It dries very quickly, and we were back to it.
This is not sponsored by Durham. I just love sharing a great product when I stumble across them. And this one counts! Very inexpensive and great performance. I get mine at Home Depot.
The links in this post may include affiliate links, which means if you purchase anything using these links, you pay no extra, but I may receive a small commission that helps keep this blog running. I truly appreciate you using affiliate links whenever possible. Please know that I will never recommend a product I do not believe in!
How Much Decomposed Granite Do You Need?
Opinions vary on an absolute. But I did get a consensus that the 2-inches of base and 3-inches of granite is acceptable. We went with a bit more — 2 1/2 and 4-inches.
Tell your supplier your surface area and the depth you want of each material. They’ll run it through their formulas and tell you what you need.
On to Filling the Patio-
Add Your Base Layer-
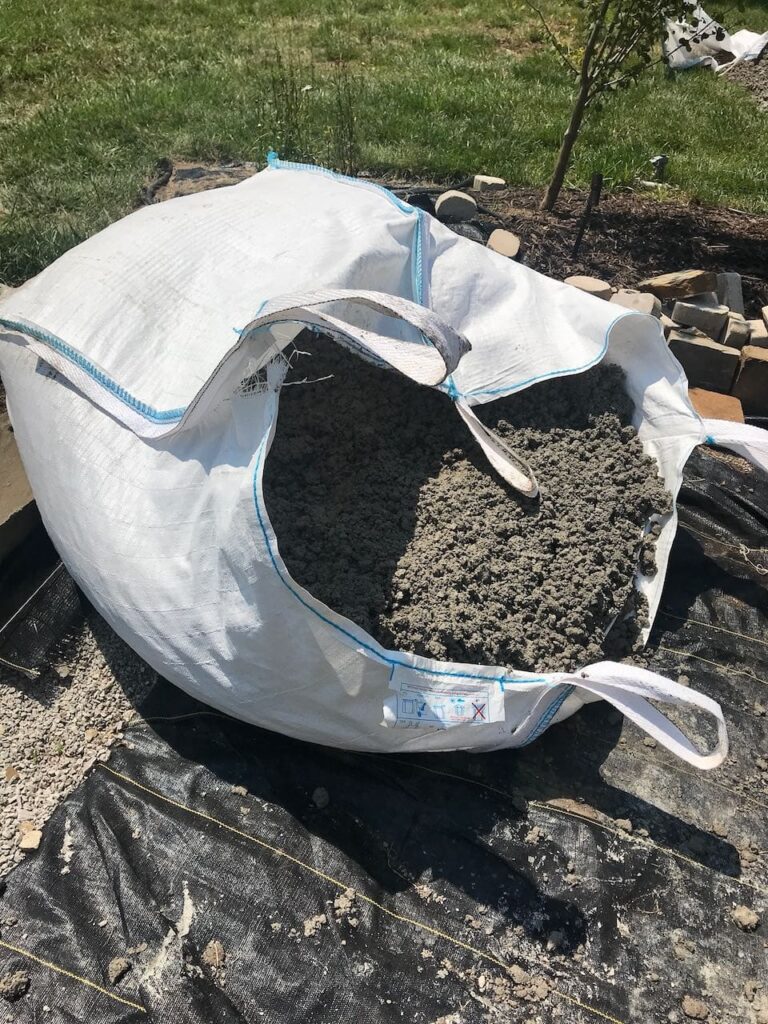
A base layer is required! Semco Outdoor delivered our road fill in 2 of these great “bulk bags”.
TIP: If you are deciding between two suppliers, I’d definitely go with the one who can deliver it bagged like this. Your back will thank you!!!!
They were able to drop it right on the corner of the patio. We were able to scoop it out from there.
We scooped and raked the road fill out of the bag on the patio .
Sadly, as they were bringing it by forklift down the hill around to the back, one of the gravel bags split in the middle of the sideyard. But we managed ferrying by wheelbarrow.
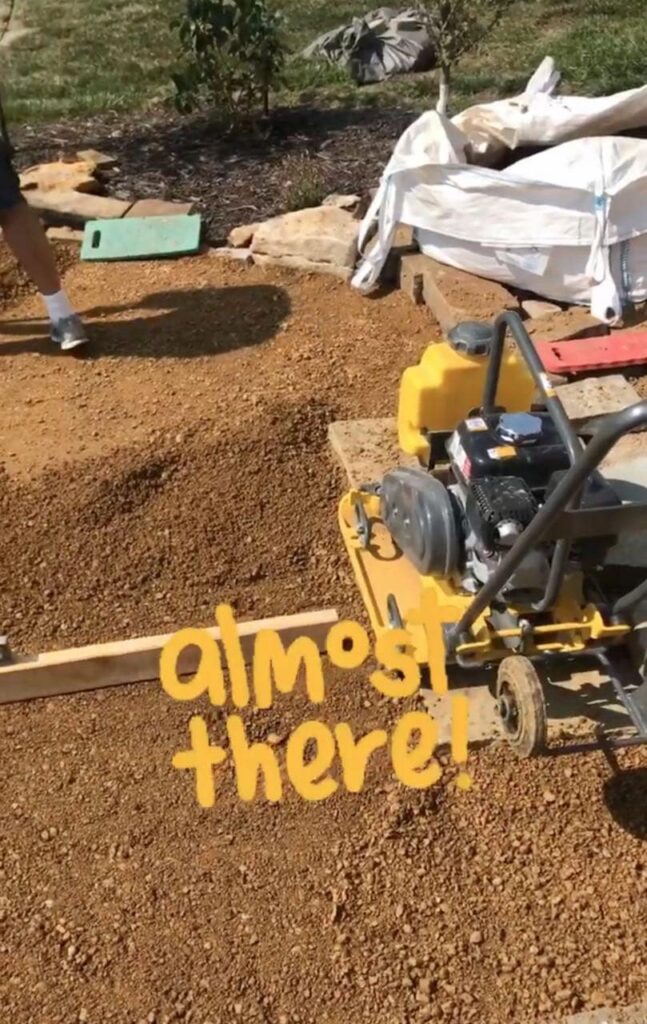
Compact Your Base Layer-

Can you see the difference!!! On the left, the road fill has not been compacted. On the right it’s finished and a very solid base.
We rented a vibrating plate compactor from Home Depot. For the Base, we rented the larger of the two options they had. It was extraordinarily heavy and very difficult to get in and out of our SUV.
TIP: if your patio will have “easy access”, you could save time and money doing the base and the DG on the same day or two days back to back. One delivery fee from your stone supplier and one rental fee on the compactor.
We already had trees planted in the berm, so we did not have space to line 4 bulk bags along the patio edge.
Add the First Layer of Your Decomposed Granite-
First Layer? Yes, you want to add your DG in multiple layers, compacting between each layer.
We did ours in 2 layers. The more layers, the better is what the pros told us.
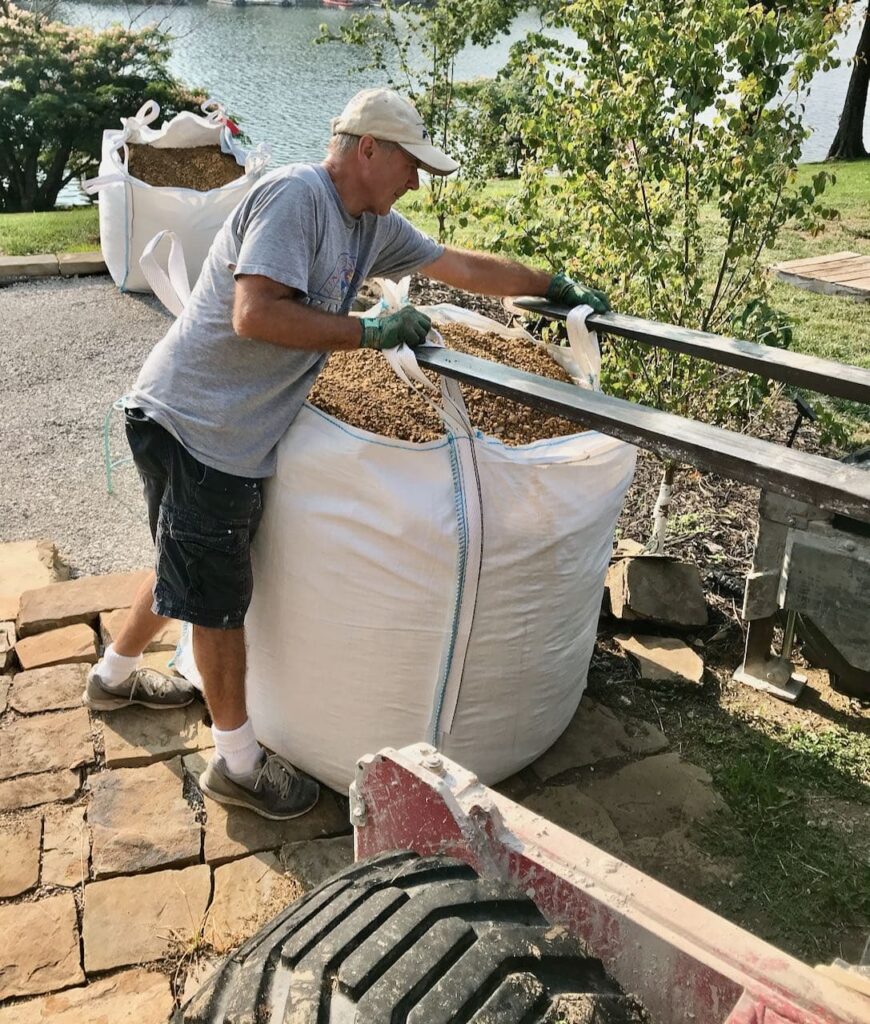
We are so grateful to Semco Outdoor, our partner on this project. They double bagged the DG for delivery this time.
And our delivery driver did an amazing job working the forklift around planting and stacks of stone to get the DG bags on two different corners of the patio. Each bags held well over a ton.
But because of how they were sitting, we were able to empty and spread a bag in maybe an hour tops.
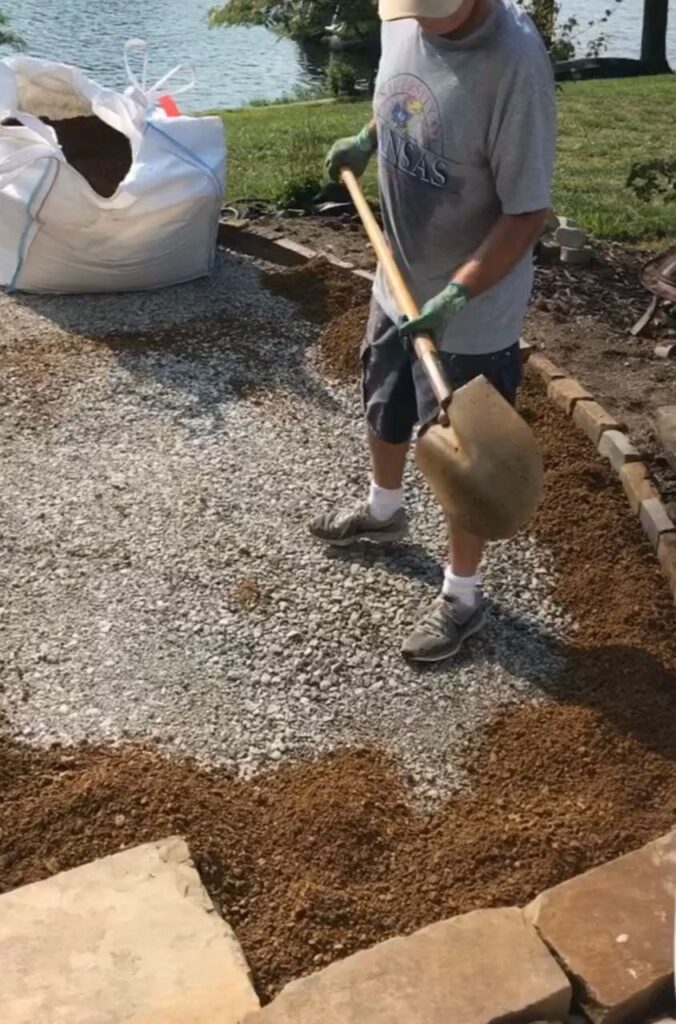
As with the base, level and then compact.
IMPORTANT: We ordered our DG with a stabilizer additive. Check with your supplier, you absolutely want it.
Everything I read warned that you want the one that is added at the quarry or at the stoneyard, not an after product that you add manually on site.
Because of the stabilizer we gently sprayed the DG with water and then compacted. We were told that the water helps to activate the stabilizer.
The above paragraphs were written based on our experience and the prevailing information in 2021.
Four years later, I understand great strides have happened with stabilizers. Your supplier may suggest using a consumer spray that you add after installation.
Semco Outdoor, my partner on this project recommended The Alliance Gator Stone Bond available in 1-gallon and 5-gallon buckets.
TIP: We learned from the base layer. This time we rented the smaller of the compactors from our Home Depot. It cost a bit less and it was easier to get in and out of our vehicle. And it really didn’t take much more time.
Now Add Your Final Layer to Your Decomposed Granite Patio-
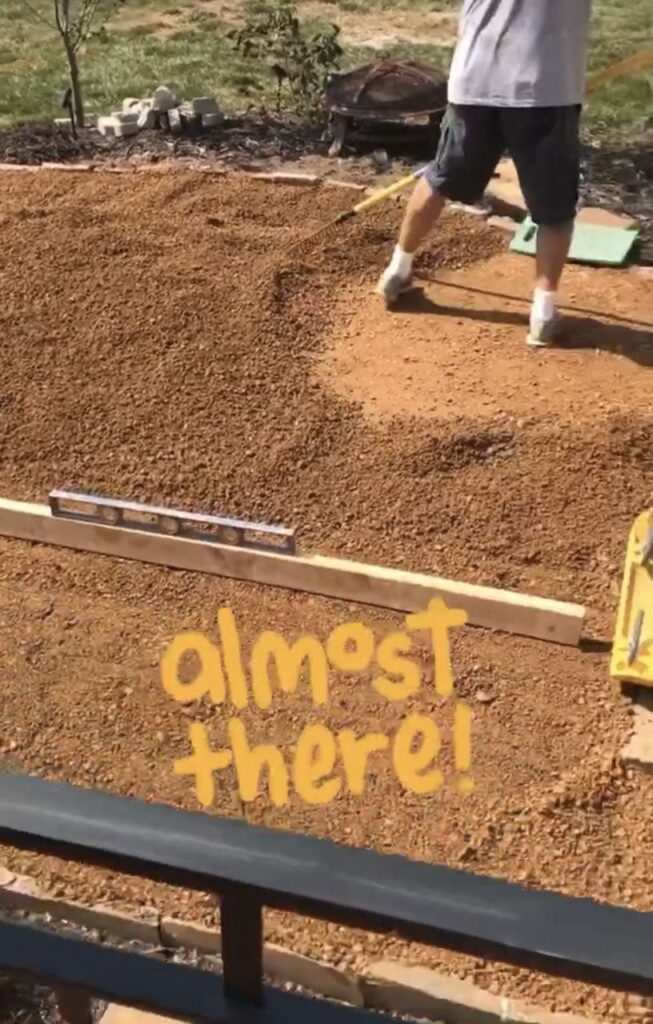
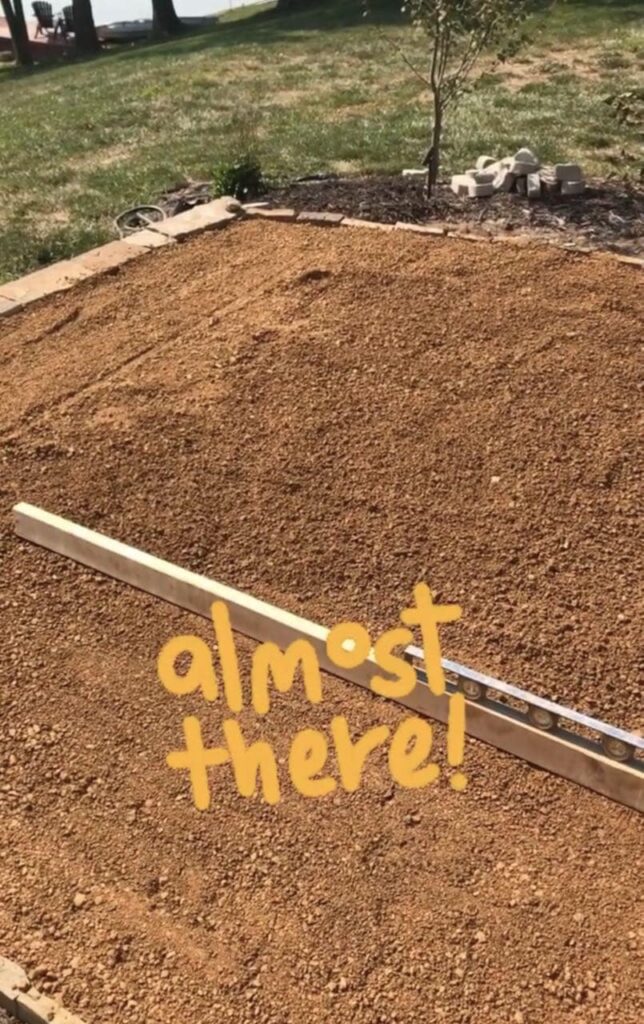
With this final layer, you want to take more care with leveling.
Spread your final layer of DG and rake it smooth.
Then level it beyond “just eyeballing it”, see below.
Then gently water and compact.
Beyond “Just Eyeballing It”-
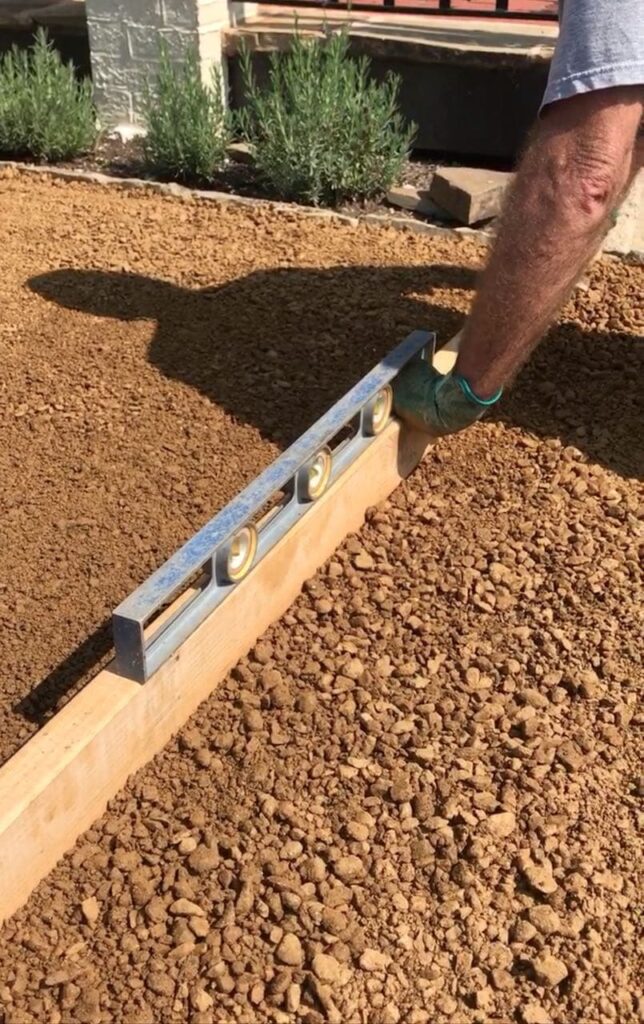
Before running the vibrating plate compactor on the DG layers, we used a level resting on a straight 2 x 4 and pushed this across the patio scraping down high spots and filling in low spots as we went.
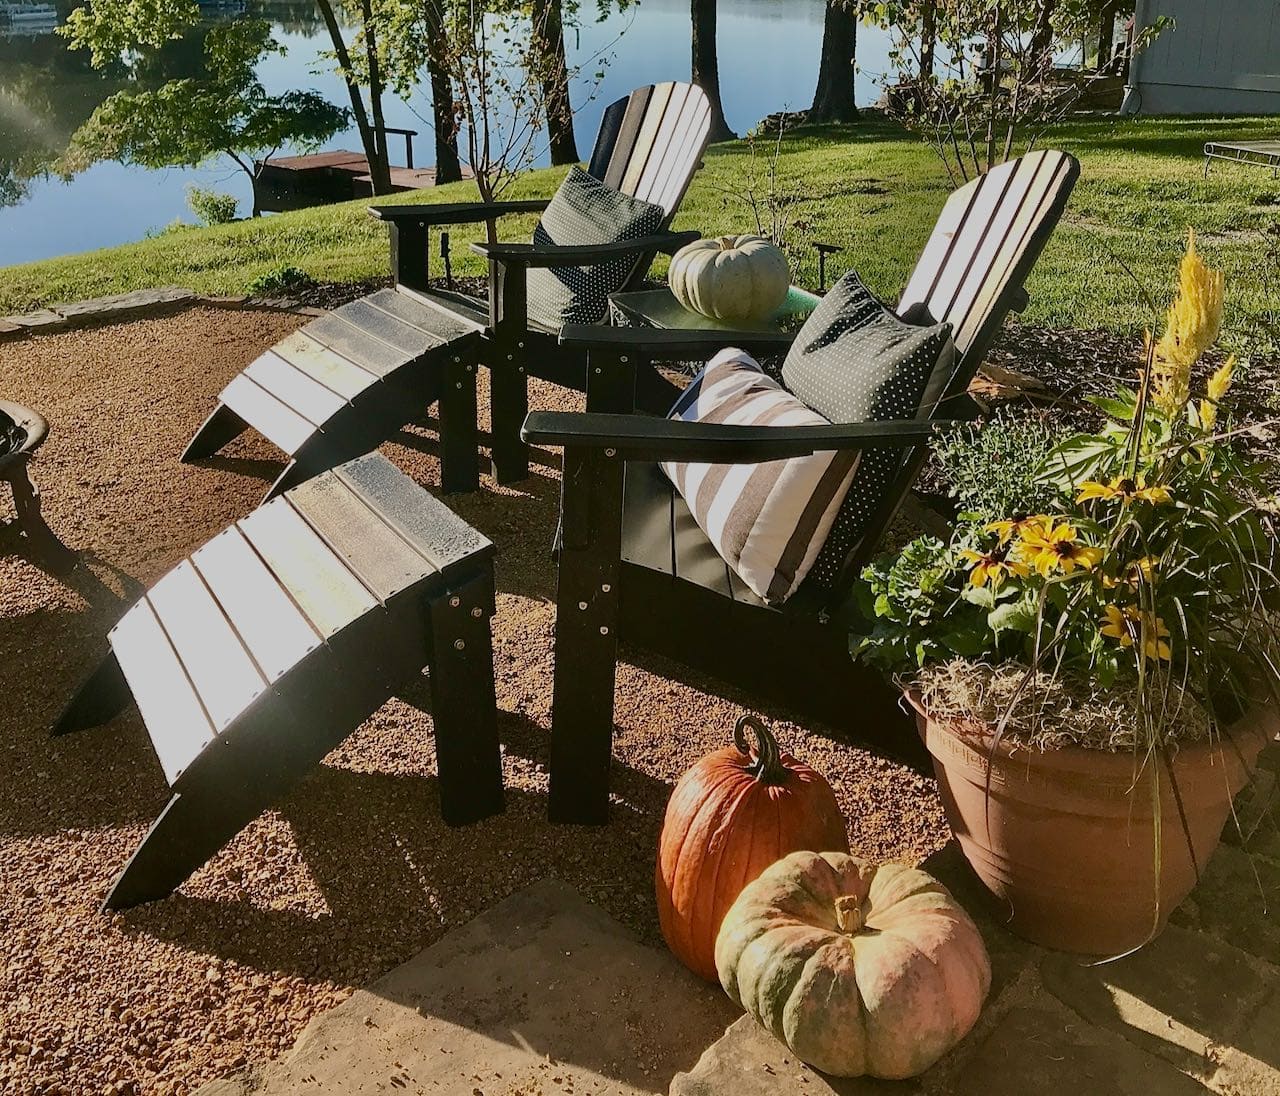
Required! Bask in Your Success-
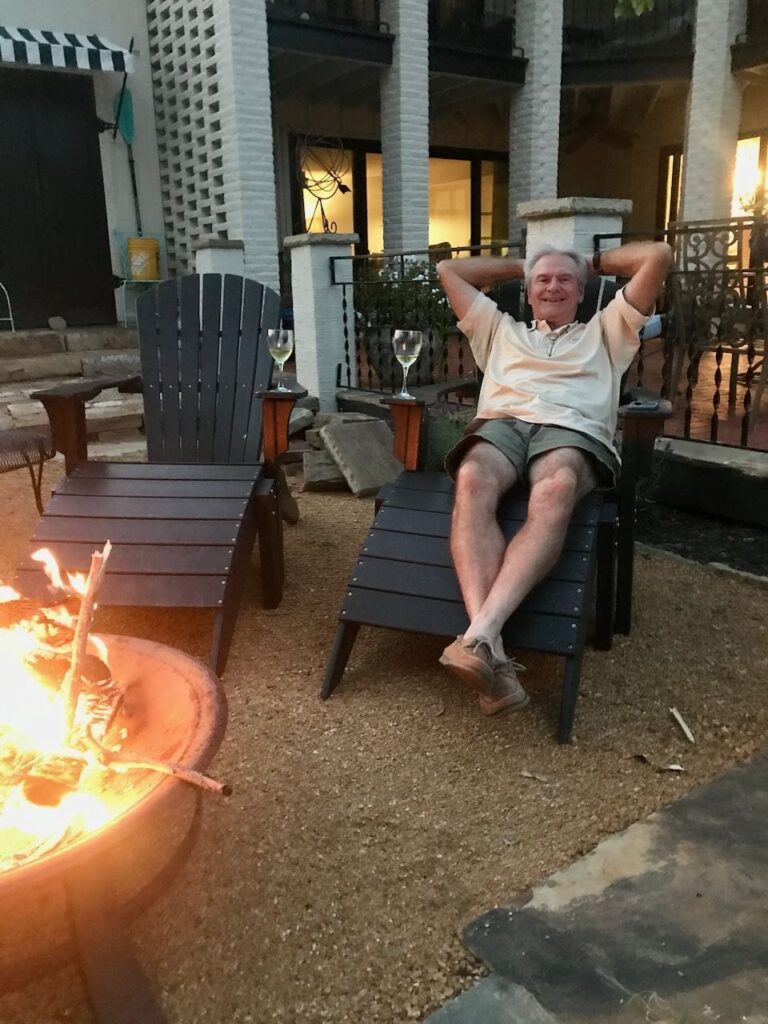
Ot new favorite hangout spot!!!
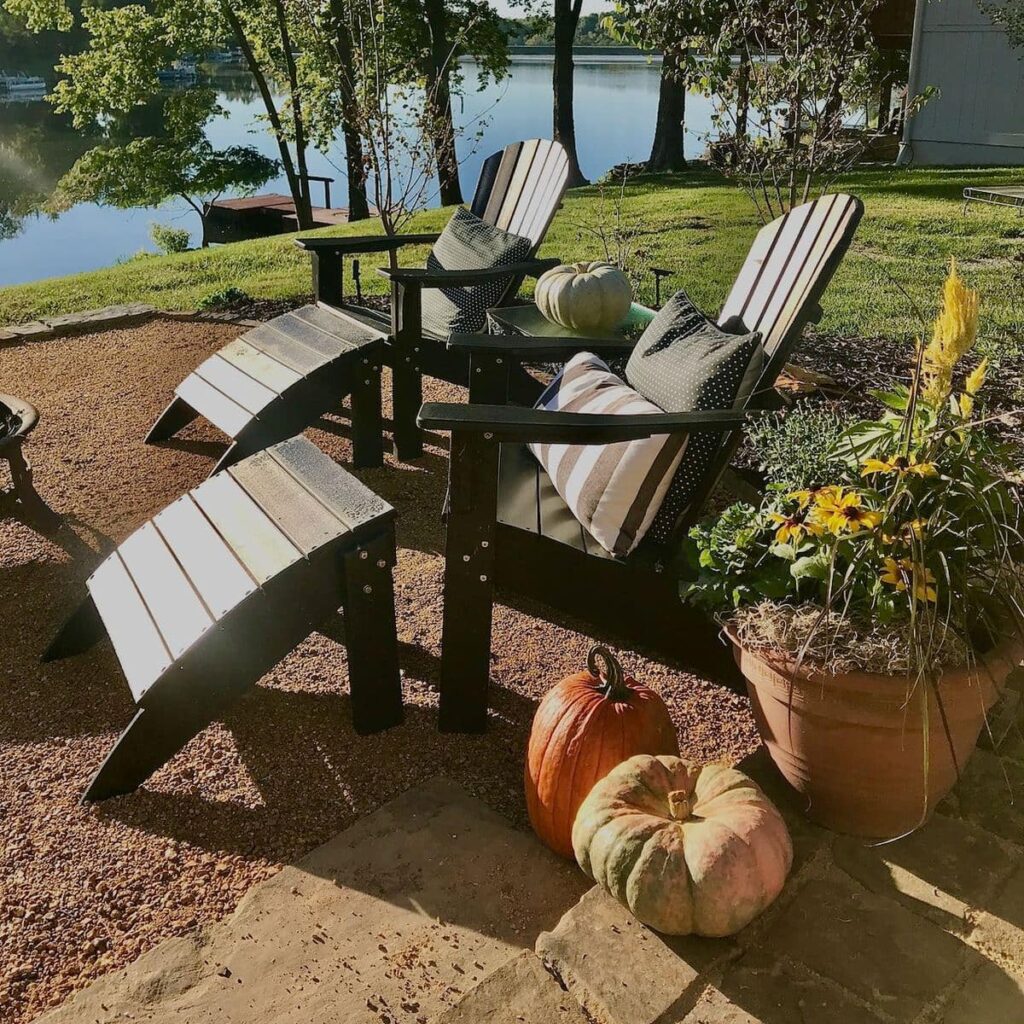
There are few projects that have given us as much satisfaction as this!
Adding on this relatively modest sized patio has transformed how we relax and how we entertain in this house.
Do you have a poorly designed outdoor space? You have quantity of space, but it’s just not configured for how you live and want to use the space? That was us!
Plenty of outdoor square footage, but no place to put a conversation grouping and our fire pit.
Be sure to pin this on your:
Backyard board
Outdoor Spaces board
Patio Makeover board
Landscaping board
Make the Neighbors Jealous board
Or wherever you know you’ll be able to find it again.
I hope this has inspired you to rethink how your outdoor space is configured. And empower you to realize you can make changes yourself.
NOTE: This is a sponsored post. That means I was compensated for featuring a product or service. Please note that all opinions and words are honest and mine! I will never recommend a product or service that I do not stand behind!
And Our Backyard Makeover Series is not through yet! Stay-tuned.

You guys did an amazing job! Do you hire out now?
Ha! Ha! Now we just need to get you here to visit!
I wish that I would have known about the DG stabilizer. My DG drives me nuts.
Oh no!!! I’m so sorry to hear that! I have a friend who used pea gravel and she regrets that. Crushed or decomposed granite with stabilizer and a compactor is the only way to go. I wonder if you should think about trying the on site stabilizers with a compactor to see if it would resolve your issues.
YOU ARE LUCKY TO HAVE A HANDY GUY AROUND.
I’m lucky to have that guy around!!! We are learning together! Both novices. I’m the go get ’em DIYer and now that he’s retired, he’s jumping in more. He’s a great partner to have!
Ahhhh – he looks so relaxed! I hope you went and joined him after the photo – I see your glass of wine waiting for you! 🙂 A beautiful patio Diane – and thanks for sharing all the ins and outs!
Yes, my wine was right there! One of those quirky last warm days. We enjoyed about three of those before winter set in. So looking forward to a full season of warm weather out there!
We are of installing decomposed stabilized granite. Wondering if you had any issues with moss? Is landscape cloth a must to prevent weeds or tree roots?
Hi Galina, I LOVE our DG patio. As easy and as relatively inexpensive as landscape cloth is, I would recommend using it. I can’t speak to tree roots and the trees by patio are all new. The previous owner was a sun worshipper and we had no trees to speak of. It does not take care of all of the weeds, particularly milkweed, because that is spread on the surface by the wind and birds. But they are easy to pull because their roots can’t really dig down and get a hold. So far, and it’s now been a year, we have no signs of weeds coming up through the cloth and patio.
I can’t speak to moss as our patio is in full sun. Sorry, I wish I could help you on that one.