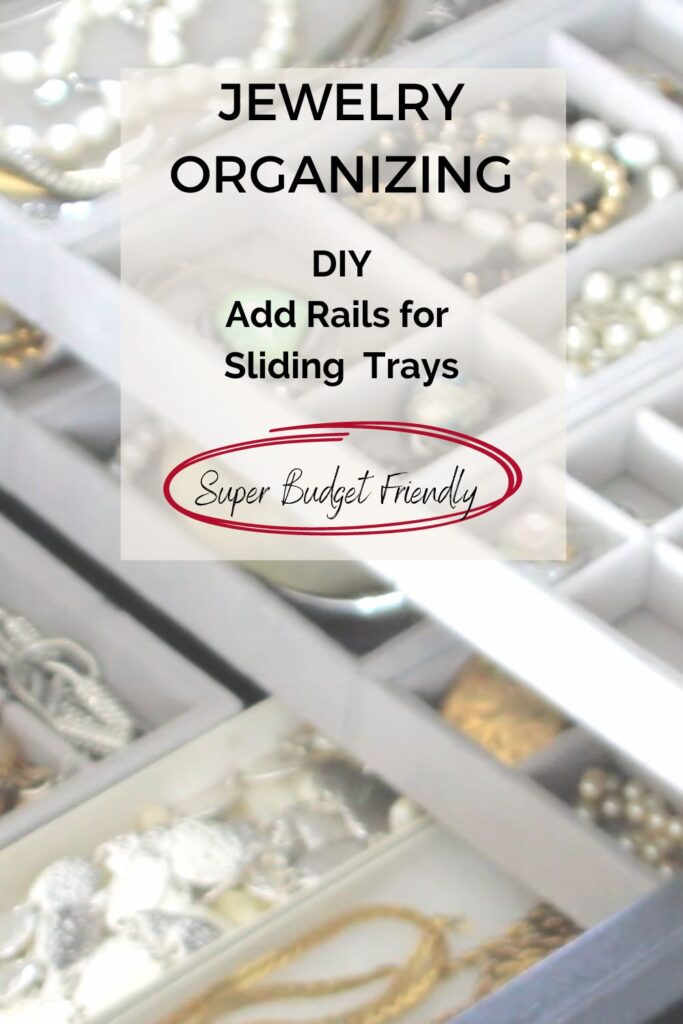
Easy Hack for Jewelry Drawer Organizer With Sliding Trays!
We all want to keep our jewelry protected, organized and easily accessible. Here’s a simple DIY jewelry drawer organizer hack that will do all that AND double your space!
Jewelry can be quite valuable — sentimentally and financially.
Our jewelry can run the gamut from the pearls passed down from Grandma, to a diamond ring from spouse, to a handmade clay bead necklace from our 2nd grader, to the fun bauble we bought ourselves at the thrift store.
Whether fine jewelry, costume jewelry or handmade sentimental pieces, we seem to accumulate a lot of jewelry!
And just like other areas of our lives, it’s best if we can keep them organized and stored properly.
Think about it. Our spice cabinets are organized so we can see and find everything. And parsley and dill are hardly expensive, unique or sentimental gifts.
Let’s give our jewelry the love, respect and organized storage it deserves!
And this easy diy jewelry organizer is the perfect way to keep them all safe, organized, clean, but accessible AND it’s super budget-friendly!!!
Table of Contents:
This jumbled mess will be gone forever!
- No more tangling
- No more frustration
- No more unnecessary damage.
This post focuses on a DIY Jewelry drawer organizer as the best way to organize and store for your fine jewelry items, your favorite jewelry and your everyday jewelry. You know, those pieces you wear on a daily basis.
Sort and Organize
Like every organizing project, to do this right, we have to start with the sorting.
I know, I know, it not that much fun! But in this case, instead of finding a third bottle of basil, I promise you will discover a few fun vintage treasures or sweet handmade delights you had forgotten all about.
Like every organizing project, to do this right, we have to start with the sorting.
I know, I know, it’s not much fun! But in this case, instead of finding a third bottle of basil, I promise you will discover a few fun vintage treasures or sweet handmade delights you had forgotten all about.
So think of this as a trip down memory lane and enjoy the journey!
You know how this sorting drill works:
- Gather all your jewelry
- Now gather some boxes (small this time, yippee)
- Mark the boxes
- Fix
- Give Away/Donate
- Clean
- Keep
Let’s pause here at marking your boxes/piles. Your “Keep” pile can get quite large and varied, so save some time while you’re sorting and further divide the Keeps into;
- Fine Jewelry
- Everyday
- Keepsakes
- Bulky Costume
- Dress-up Costume
Your names may vary from mine. Of course, use whatever names make the most sense for you.
- Fine jewelry for me, means the pieces that are gold, sterling, platinum and real gemstones. And includes the pieces I inherited from my mother and grandmothers, even though those are also keepsakes.
- Everyday, I’m using for those pieces that I tend to wear the most. My go-to pieces.
- Keepsakes, I’m using for those handmade treasures, and maybe a souvenir of occasions or travels, like my high school charm bracelet.
- Trendy Costume, if I wore the fabulous dangle earrings that are so hot right now, this is where I would put them, or great statement necklaces
- Dress-up Costume, the outrageous carved parrot necklace that I pull out for Luau parties would go here. Or the super long necklaces of fake pearls for 20’s parties. If you have little peeps who like to play dress-up, this might be the pile for them. If you’re up to donating them, local theaters or your high school drama department might appreciate larger, showier pieces.
Sub divide as much as works for you. This also helped me realize just how much I’m hanging onto and that I don’t really need to keep all of these.
While doing this, I also divided the Fine Jewelry and Everyday pieces (these are the ones that will live in this jewelry drawer) into “type” piles:
- rings
- bangle style bracelets
- stretchy bead bracelets
- stud earrings
- dangle earrings
- etc.
This helped me know the styles of divided trays I would need.
The rest of this post, I am focusing on the Fine and Everyday jewelry. These make up the specific jewelry collection that means the most, that needs the best care, and I want easily accessible.
Jewelry Drawer vs. Jewelry Box vs. Jewelry Cabinet
Now that you can see how much you have in each group, you can plan for the right jewelry storage solutions for you.
I don’t have a jewelry box — haven’t since I was 13. I quickly realized that a jewelry box takes up premium horizontal surface space, whether it’s on top of a dresser or a dressing table. And jewelry boxes just don’t hold enough.
And a jewelry cabinet its just not my style. They always seem a bit awkward a room.
Rather, I’ve used a drawer as my jewelry box.
The advantages of shallow drawers to store jewelry:
- more capacity
- easier to see
- easier accessibility
- generally, less expensive
- one less thing to dust
- frees up dresser top space
And now, now it even looks like a jewelry box — a huge jewelry box — that hides away. That means a tidy, neat dresser top that I really appreciate.
But Where?
In our last house, I upcycled a shallow drawer fitting it with dividers and covering them with velvet. This shallow drawer rested inside a large drawer in the primary bathroom vanity.
Perfect for that house with good lighting and a mirror right there.
A large walk-in closet is another ideal spot for a jewelry drawer. Next to all your other accessories and in your dressing area.
In our current home, we have a much smaller bathroom and a small hardly walk-in, more like step-in, closet. So my fine and everyday jewelry needed to go in a dresser drawer, right above my drawer of scarves. Again lighting and a mirror are right there.
In a pinch, a bedside table could be an alternative. Or perhaps a small side table of drawers next to a reading chair in your bedroom could be your jewelry’s designated place.
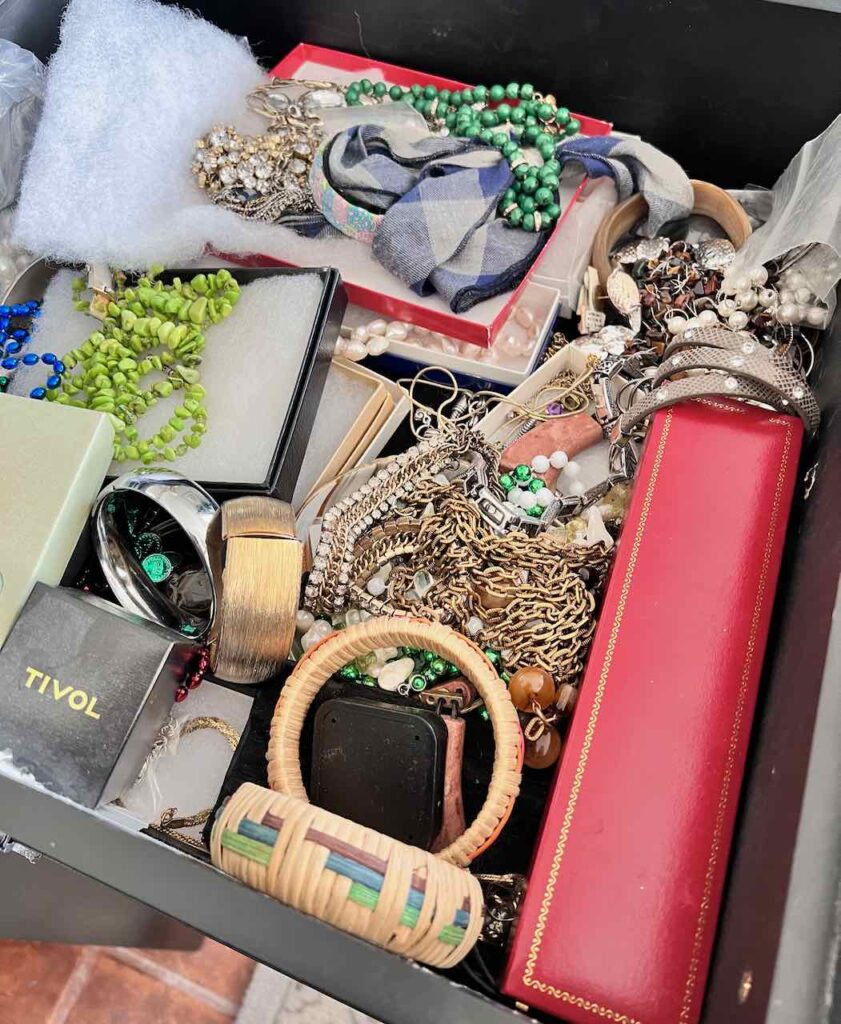
Since moving in, for the last 3 years, I’ve been using an assortment of little jewelry boxes in this deep drawer.
Seriously, what was I thinking?
I was thinking, I’d get to it as soon as we finish more critical renovations and DIY’s that had to happen with this house first.
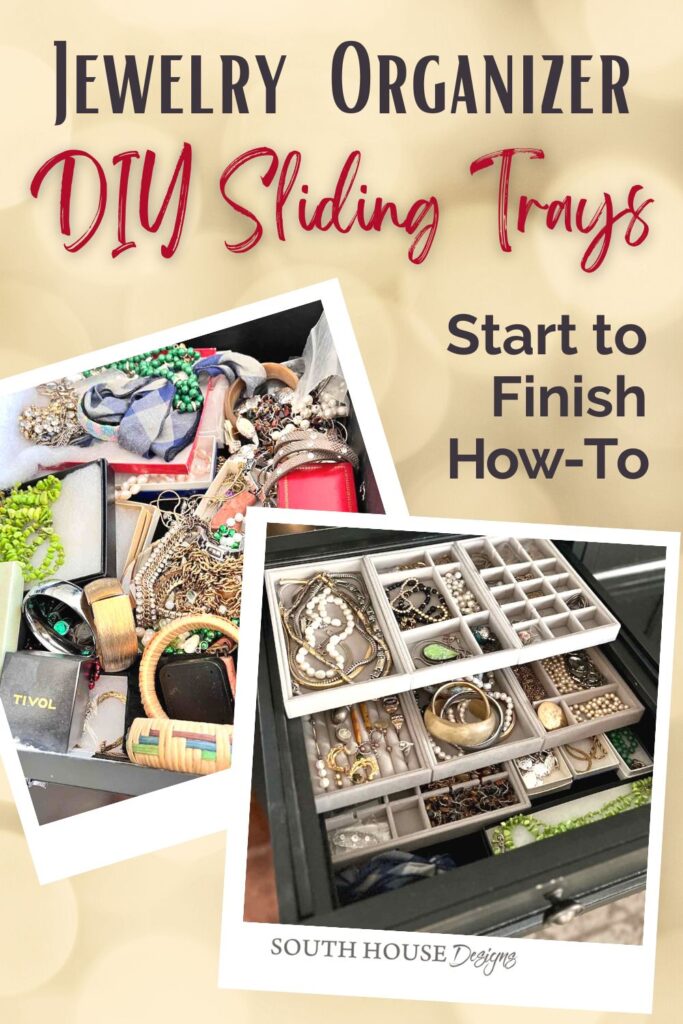
My jewelry drawer has become one big mess! The day has finally come!
And the best part? I have the coolest way to dupe those super expensive sliding jewelry valet trays in custom closets without the crazy price tag.
Jewelry Storage Ideas
After visiting container stores, Ikea and extensive online searches, I realized jewelry professionals know what’s best — dedicated jewelry trays like a jewelry store uses was the perfect fit for my needs.
- different compartments keep everything organized
- the soft velvety texture protects the delicate items
- and eliminates sliding around every opening and closing of the drawer
- plus my treasures look great against that common backdrop and makes my heart happy
However, as perfect as velvet jewelry trays are, the drawer they were going in was not!
I remember salivating over a stack of sliding valet tray drawers in a super expensive show house closet.
If I could make a stack of velvet jewelry trays slide in my drawer, well now, that would be perfect!
Video Option
NOTE: If you prefer video content, check out the You Tube video I made of all this too!
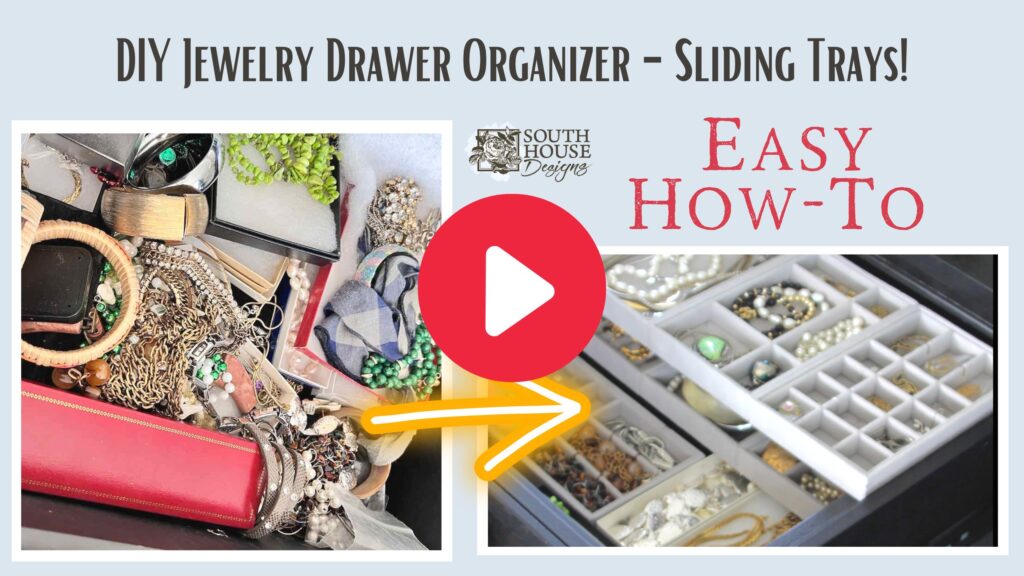
DIY Jewelry Drawer Organizer
Let’s Double Our Organizing Drawer Capacity
With Layers of Sliding Jewelry Trays
Materials and Supplies:
- Velvet jewelry trays, these are my exact trays
- Heavy Adhesive, I used E6000
- Mending plate of metal brace, this is mine
- Trim wood
- Screws or brads
- Paint or stain, optional
- yardstick or tape measure
- Drill or nail gun
- Long clamps, or substitute
This post may contain affiliate links. I truly appreciate you using these links when possible. You do not pay a penny more, but I may receive a small compensation. Know that I will never recommend a product I do not trust.

Interested, but don’t have time right now?
Totally get that!
Here’s a pin to save so you can find this info again.
Step 1) Measuring & Planning-
Like most projects, accurate measurements and good planning makes all the difference!
There are a lot of different size jewelry trays available. Make a combination of trays will fit inside your drawer with the least amount of wiggle room.
When I started out, I thought I’d have one layer of sliding trays, but I discovered that some of the trays are just 1-inch in height where it seemed like most were closer to 1 1/2-inches in height.
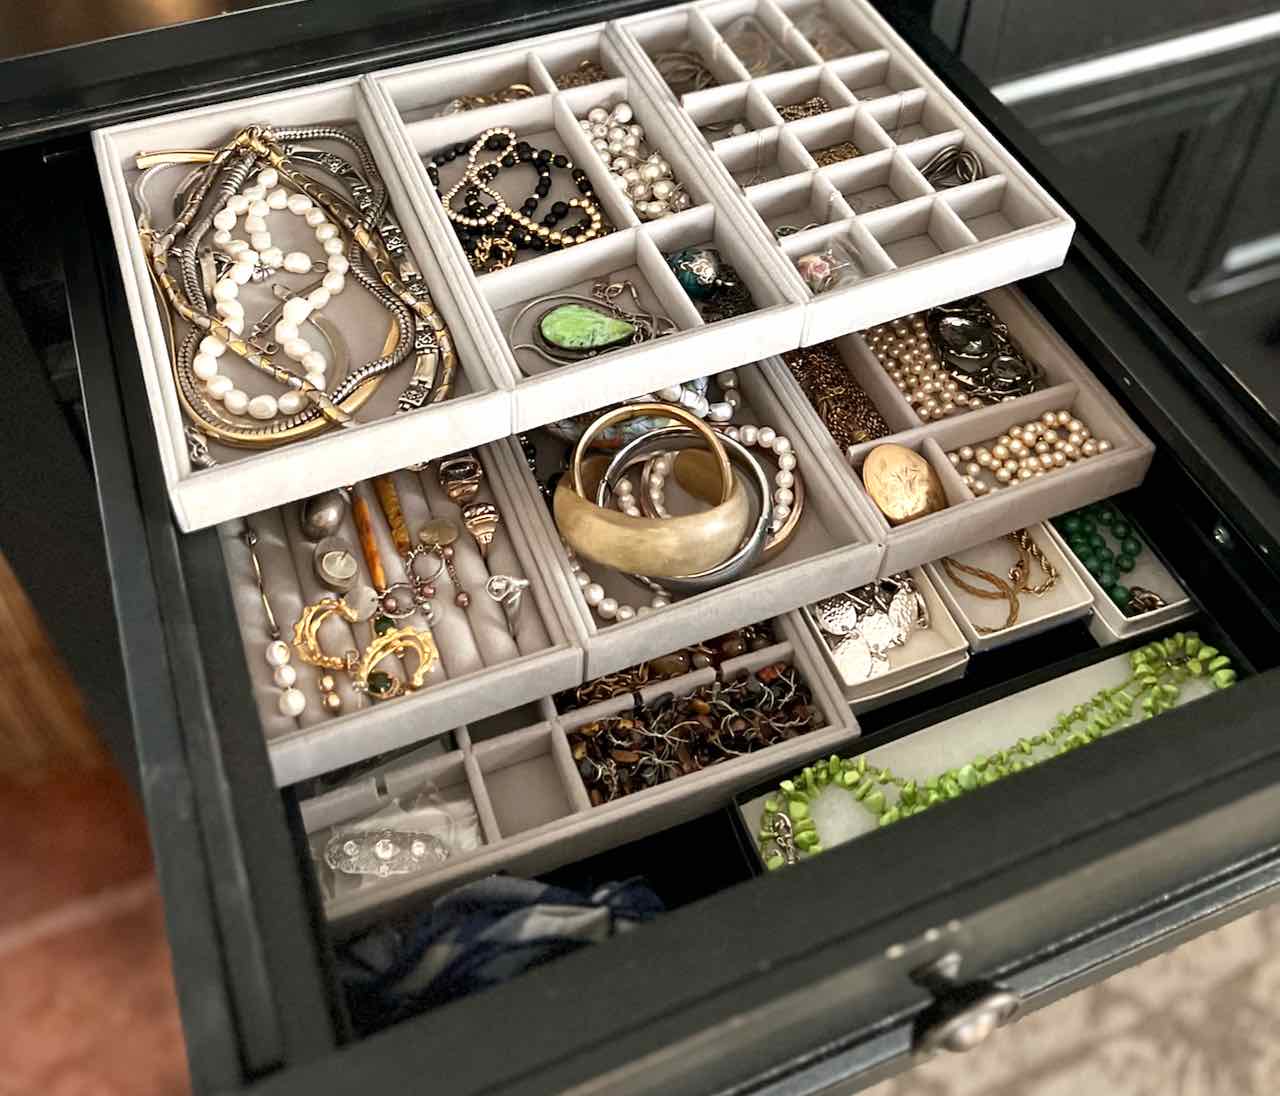
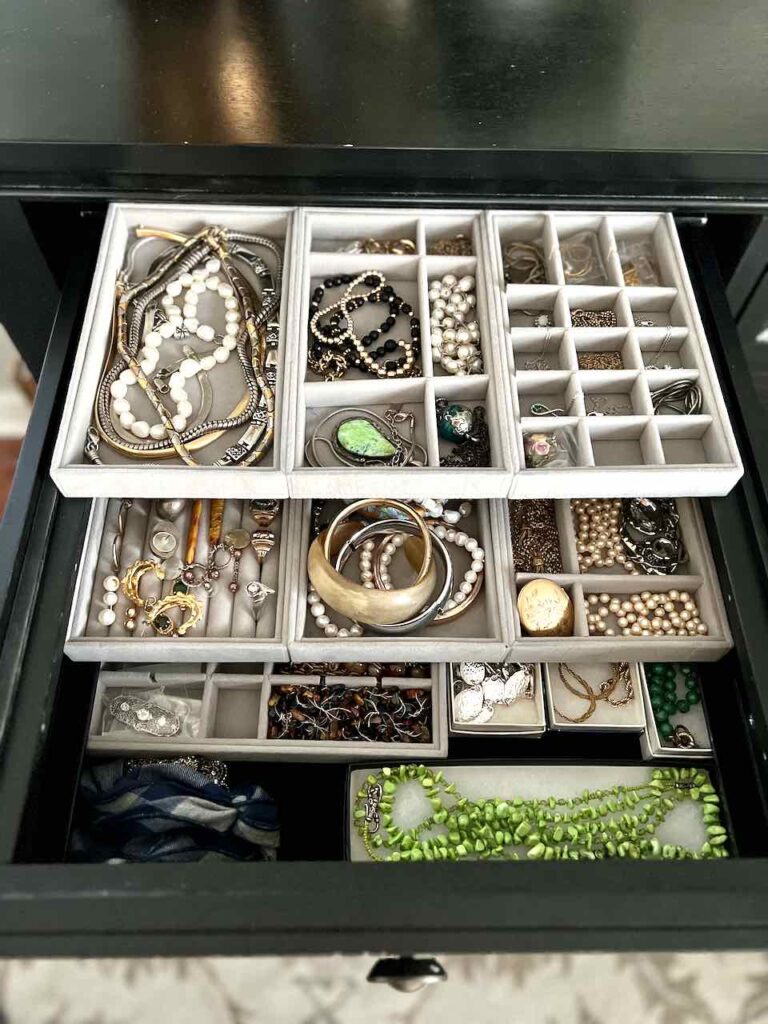
It doesn’t sound like much, but for my drawer, it was enough of a difference that I could comfortably have two tiers of sliding trays plus the drawer base — three layers!
The other measurement to be concerned with is the drawer front to back. You want to keep your trays close to half that front to back measurement. If you extend too far past the halfway mark, there will be spots in the drawer base in particular that will always be hidden from view.
My trays extend about an inch beyond the halfway mark, but I store larger pieces in that area, so at least some of each piece is visible to me.
Three trays across make up each of my sliding layers. The remaining two trays from my set of eight, will help organize the base of my jewelry drawer along with some extra pieces that I keep in their own special boxes.
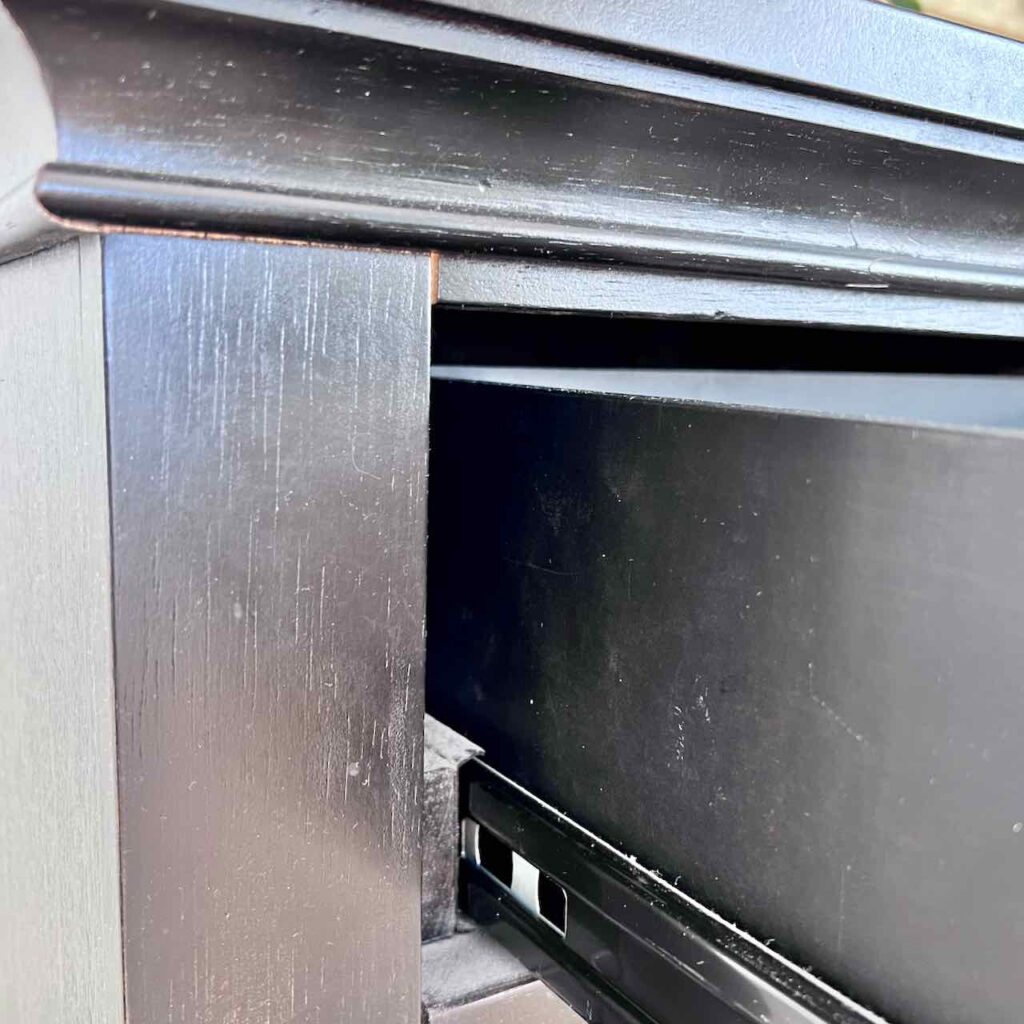
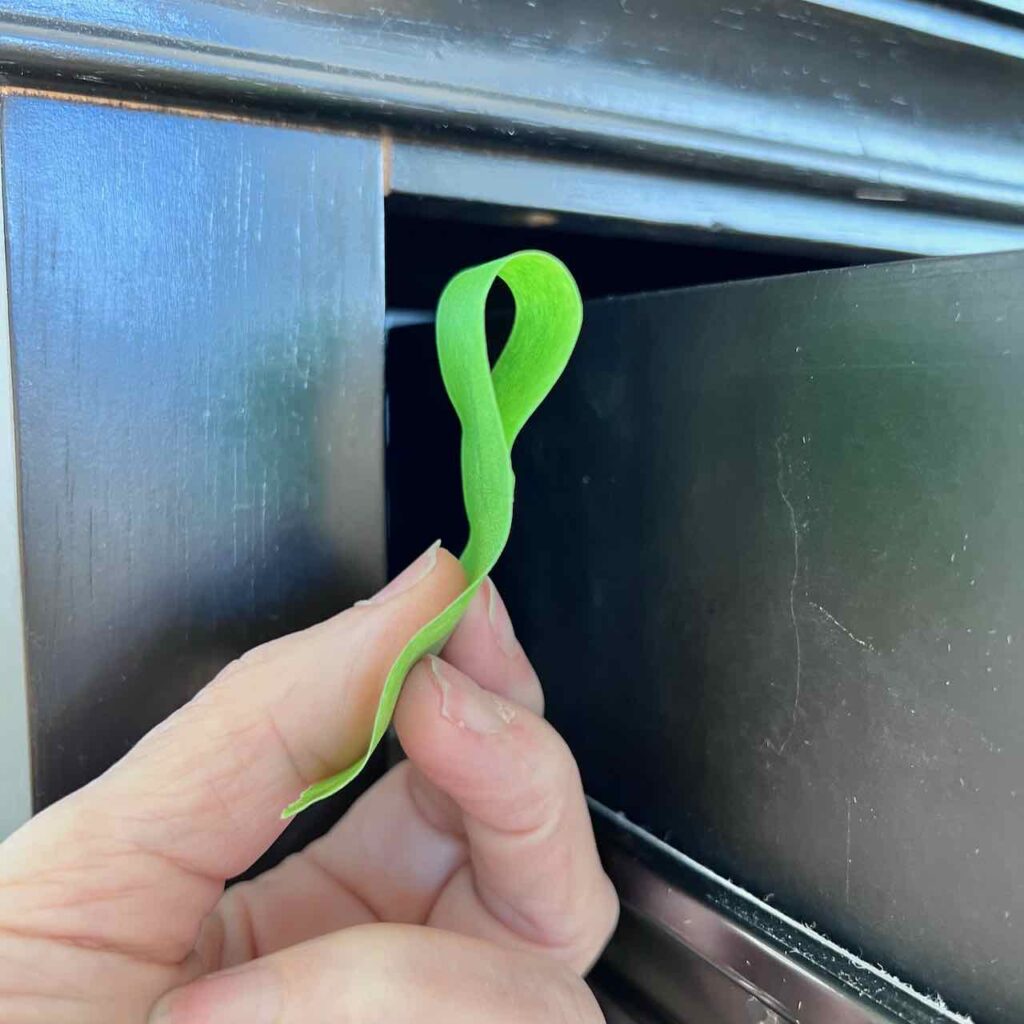
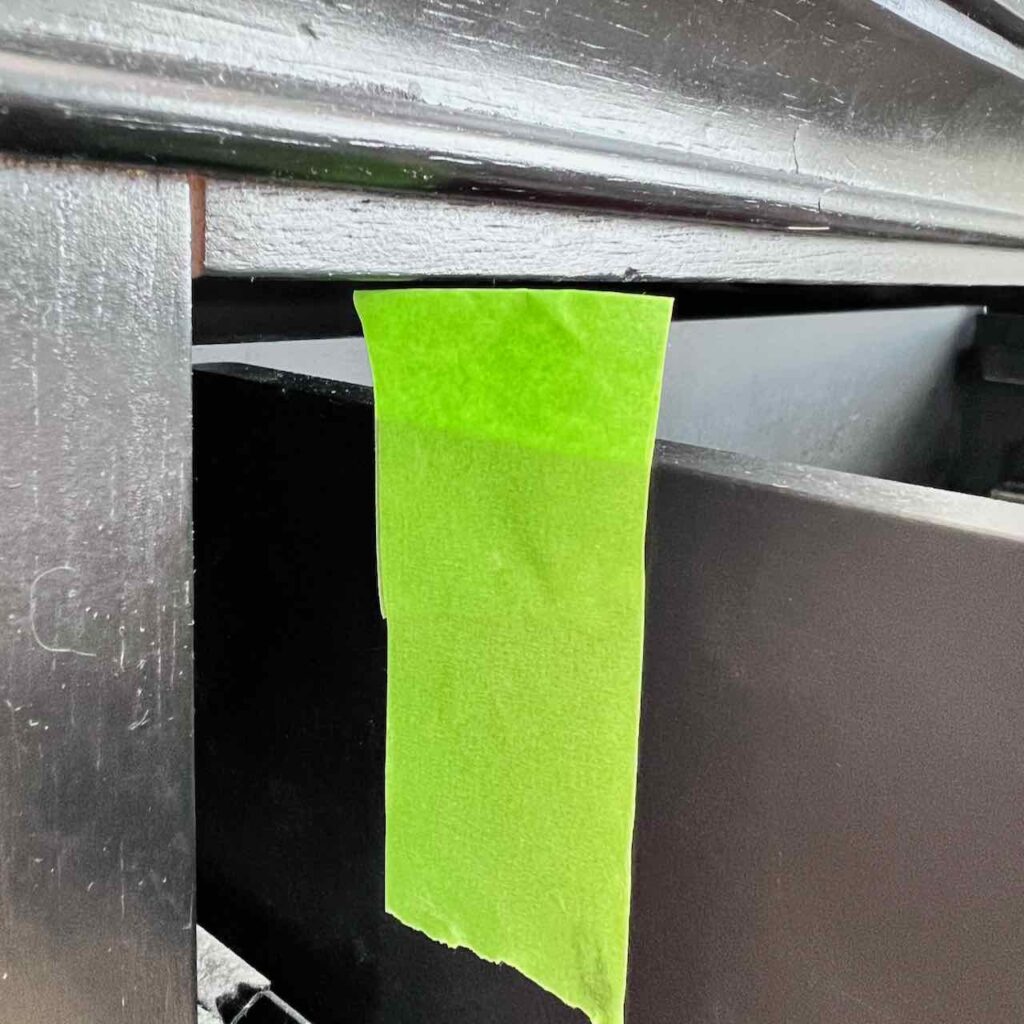
Like many dressers, the box of my drawer is not as deep as the drawer face. And the dresser top hangs over the dresser frame quite a bit so I wasn’t confident in my measurement between the top of the drawer box and the frame it slides into.
It’s not a lot of space. But every little bit counts, right?
To help me determine how high my top layer of trays could sit, I did this little trick:
- slide out drawer a bit
- Fold over the top inch or so of a length of painters tape
- Flatten the painters tape and apply to the side of the drawer so it just clears the opening, opening and closing to test
I left that tape on until the rails were installed as a visual reference.
Step 2) Combine Trays-
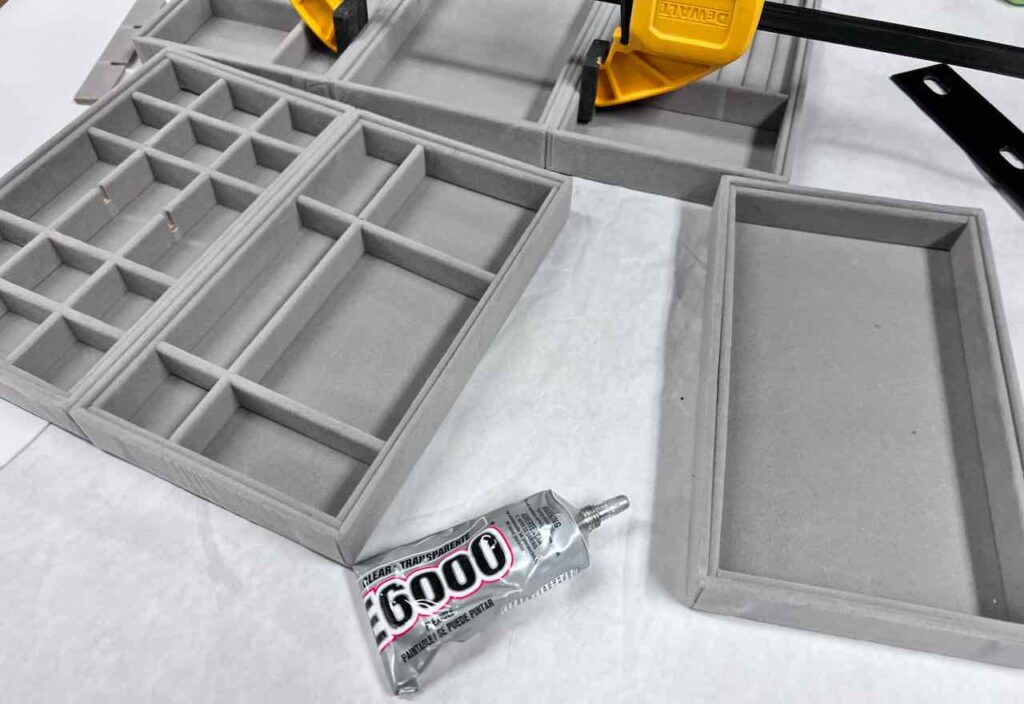
Easy peasy. I used E6000 glue (with my respirator since it’s February when I’m doing this project).
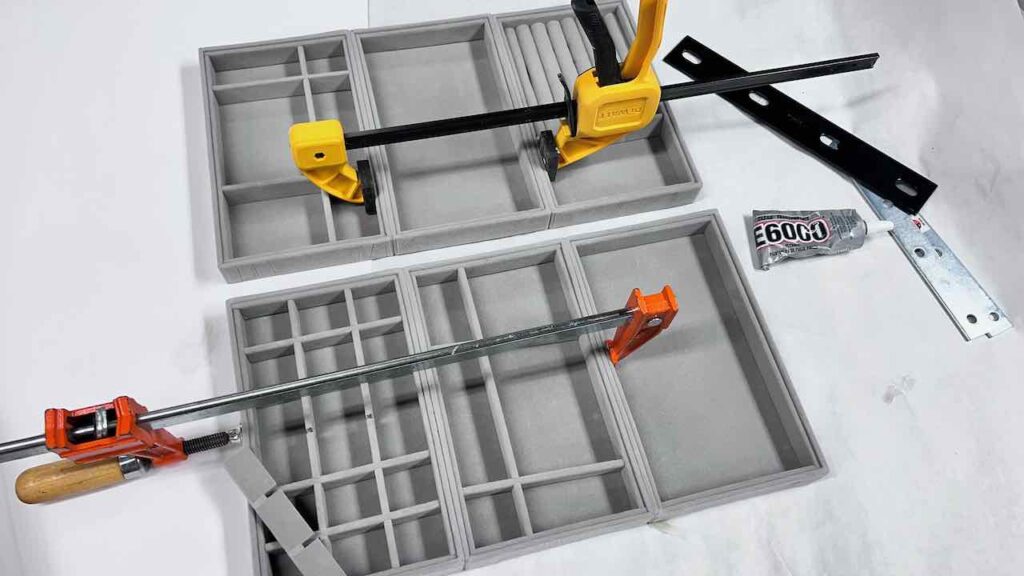
As you can see I used long clamps to hold them overnight. You can substitute bookending them with something heavy on each side and a weighted board on top.
Can we take a quick pause so I can ask if you have already subscribed to my website? If not, and you are enjoying this post, please consider. YOU determine what is the right amount for YOU.
Thanks bunches. Now on with our project!
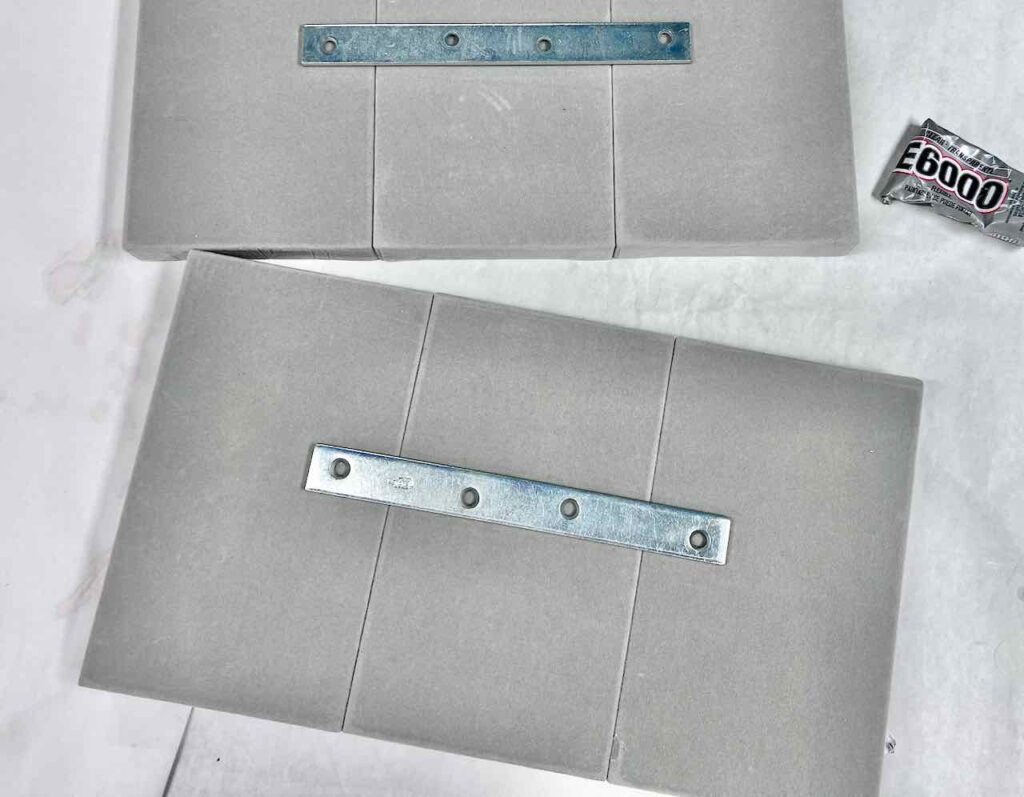
Next day, flip them over and glue the mending plate or brace across the seams for extra support. If your drawer is wider, multiple plates might be a good idea. Then I held the plates in place with hand weights while the glue set up.
TIP: If you plan on taking your trays out and setting them on your dresser top, consider covering the metal brace with a thin piece of flannel to protect your wood finish.
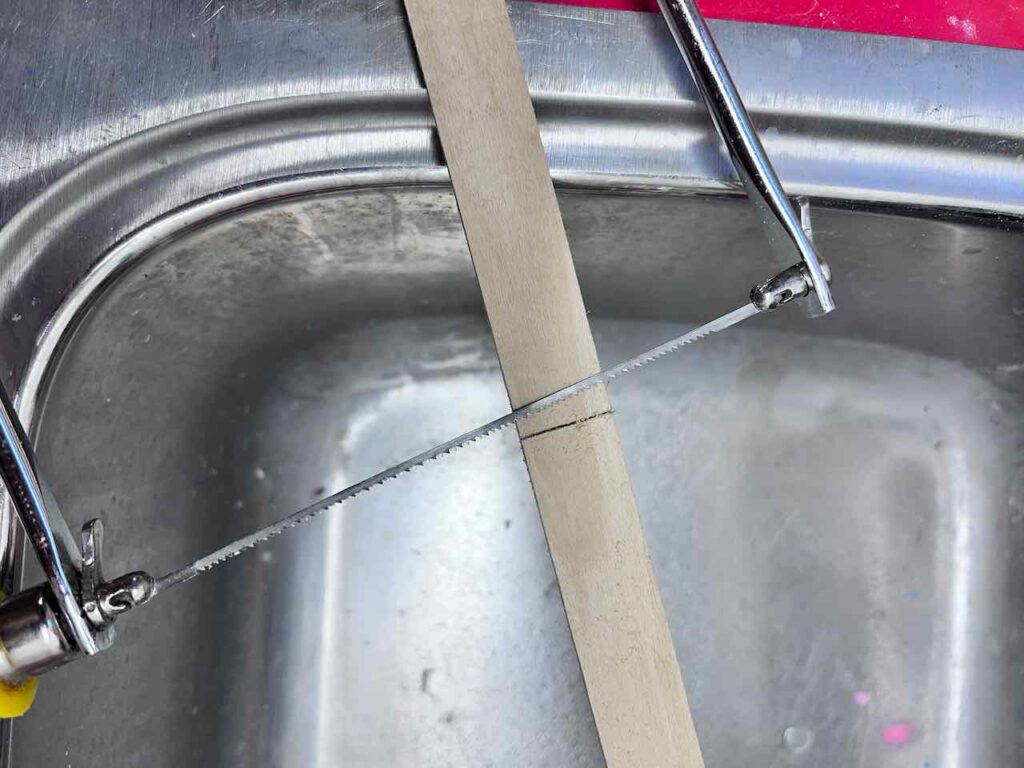
Step 3) Cut Your Rails-
Experiment with different types of trim that you might have on hand or at Home Depot, Lowe’s or the like.
I was planning to use the corner trim for all four rails, but then I had to go and complicate things just a bit. I realized that they were just barely too wide for me to be able to remove the middle tray if I should ever want to.
Would I need to down the road? I’m not sure. But since we’re talking custom, I might as well factor that in, just in case. There is a narrower corner trim, but it was so narrow that the trays could fall between.
In my stash of scrap wood, I found this piece of wood that was perfect for the top tray. The bottom tray could be pulled out past it at a slant.
I needed to add a length of narrow square dowel rod to the side to prevent the top tray from being able to slip down between these slightly narrower rails.
Cut them to length. Typically trim pieces are easy enough to cut with a hand saw.
Step 4) Paint or Stain, Optional–
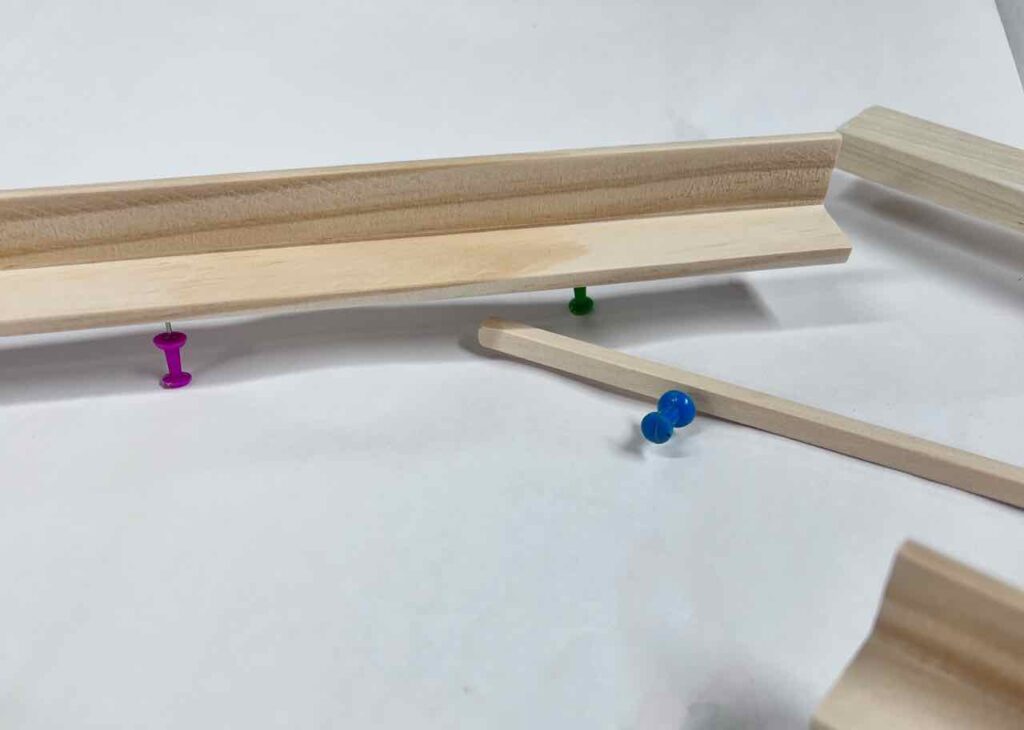
TIP: Push pins make great little risers to lift light wood off the paper for easy painting.
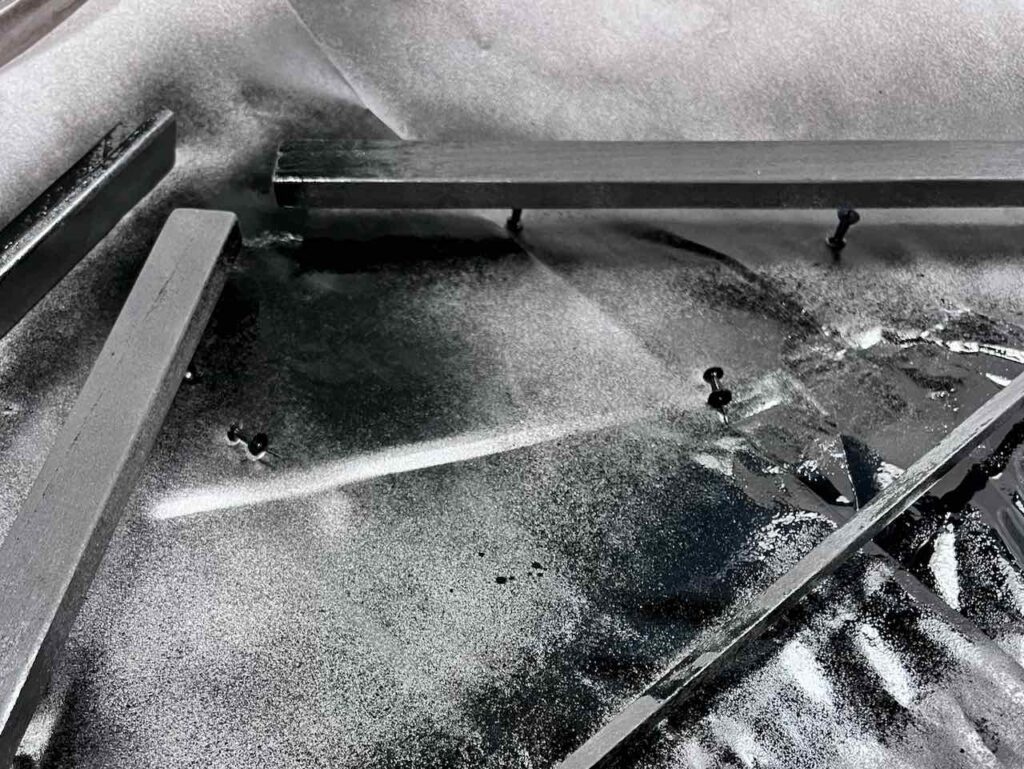
I used black spray paint that was left over from another diy project. Two light coats with a gentle sanding with 220 grit paper followed.
The goal is a smooth finish for the velvet trays to slide easily and smoothly. And now on to the last step.
Step 5) Attach Rails-

For my lower rails, I used one of the loose trays as a jig to make sure all was lined up straight.
And I used short wood screws on the vertical side of the corner trim.
TIP: If your drawers are NOT solid wood (probably particle board), start with pilot holes and then use a Phillips head screwdriver to add the screws by hand.
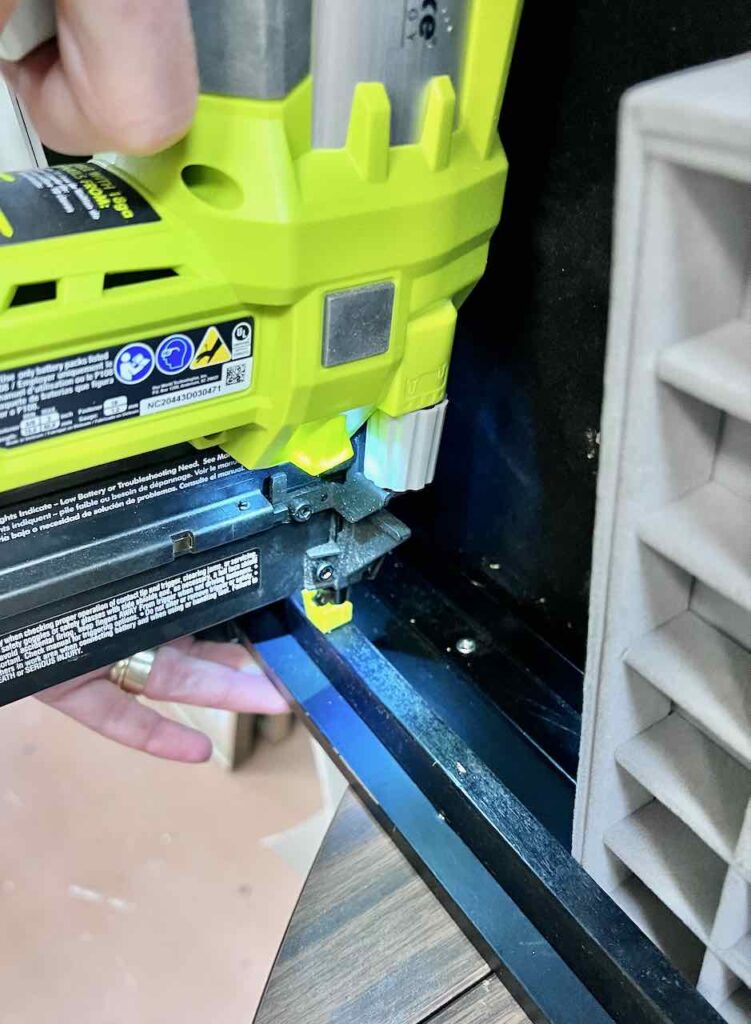
For my top rails, again I used the jewelry tray between the vertical side of the bottom rail and the top rail.
I used our nail gun. Worked like a charm! (Oh how I love that tool — so empowering!)
The Jewelry Organizing Results
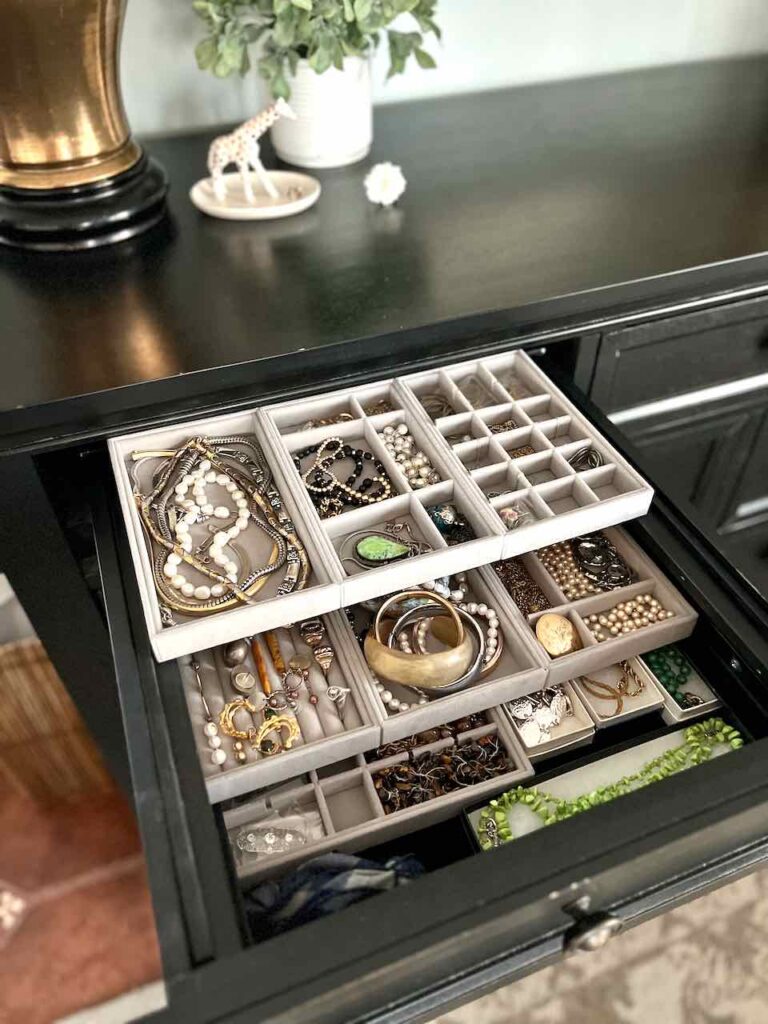
Besides my treasures being protected, organized and easily accessible, I LOVE having a clean uncluttered dresser top!
Bulky Costume Jewelry Storage
There are many creative diy jewelry organizer ideas, particularly for trendy costume jewelry. However most of these are a wall-mounted organizer with an occasional diy table top jewelry organizer.
Most of these feature a lot of small hooks, like cup hooks or chicken wire in a vintage frame and maybe some wood dowels.
But in all these cases, the jewelry is out on display and the necklaces are hanging.
My style is just more stream-lined. I find our master bedroom much more restful when everything is tucked away.
And I’ve heard many times not to hang necklaces long term. Of course any potential damage is dependent on the style, and the weight, etc.
If you’re not into DIY, but still need some jewelry organizing, I’ve pulled together a few options that I thought looked viable depending on your space.

Interested in more Organizing Ideas? Here are a few of my most popular Organizing Posts:
Forgive me, but I couldn’t resist another chance to Pin this project.
I am so excited about this project and how much positivity it has brought to my morning routine.
If you’ve been wanting to dip your toe in the DIY pool — this is a great project for that!
I’m a resource for you! Do not hesitate to reach out with any questions. And I truly love your suggestions and feedback.
I read every one of them and certainly respond as quickly as possible.

Brilliant Diane! I’ve been wondering what to do with my jewelry and this might just be the thing! I love your DIYs – you’re always so clear and the pictures are so helpful! Thanks for another wonderful project with such beautiful results!
Oh, Barbara, you are the sweetest! I so appreciate your kind words! Should you do this? Absolutely!!! I just wish I had done this earlier. It makes me smile every time I wasl by our dresser — it’s so neat and tidy now and then when I open the drawer. Holy smokes, I shouldn’t be so taken with it, but I am!
This is fabulous! Now I just need you to come do it for me. Lol
Wow! Such a great idea! Pinning now because I would love to do this someday! Thanks for sharing your amazing creativity with us!!
I love when everything has a place, and everything is in it’s place. I especially like when the organizing is DIY, thank you for sharing your inspiration with Whimsy Home Wednesday Diane. You always have such creative ideas to incorporate into your home.
Wow. Thank you for such detailed, doable instructions. My jewelry needs organized in the worst way–thanks for showing that there really IS a way to accomplish it!
Thanks so much for joining the Grace at Home party at Imparting Grace. I’m featuring you this week.
Such a simple yet brilliant idea to double your jewelry drawer space.
It has to be one of my favorite organizing and storage hacks of all time!
Thank you for this tutorial, the steps are very clear! Did you find the trays to be easy to clean in spite of all the different slots?
Super easy. They don’t really get dirty because they are inside a closed drawer, so not dusty. But after two years, I did empty them and reassess all my “jewels” and which ones do I still love and wear frequently. At that time, I used a nozzle on the vacuum cleaner and they looked brand new.