How To Decorate Candles The Simple Way: With Amazing Results!
The easiest way to decorate plain candles without glue or Mod Podge. Heat fusion means simple supplies, stunning results, and zero mess!
Hey there, my crafting pros and crafter-wannabes!
Today I’m sharing all my tricks and shortcuts for turning boring, plain candles into true premium masterpieces. It’s my not-really-decoupage-but-actually-way-better candle decorating technique.
Forget everything you know about traditional decoupage because we’re throwing the rule book (and the Mod Podge — and glue) right out the window!
The Magic? Heat Fusion!
That’s right – no glue, no Mod Podge, no messy adhesives whatsoever.
Just beautiful napkins, candles, and a little heat magic.
The results? Stunning candles with zero wrinkles that look professionally decorated. Your friends will be begging to know your secret!

Seriously, they look like the artwork is part of the candle.
For good reason, because it actually is!!!
With this heat fusion, the art is embedded in the top layer of wax.
I mean, this is seriously crazy cool!
TABLE OF CONTENTS:
The links in this post may include affiliate links, which means if you purchase anything using these links, you pay no extra, but I may receive a small commission that helps keep this blog running. I truly appreciate you using affiliate links whenever possible. Please know that I will never recommend a product I do not believe in!

Let’s Decorate Some Candles!
There are all kinds of crafters in this fun crafting world. And I’ve got you all covered.
If you prefer to jump on the “Crafting Express”, check out this How-To card.
But is you’re more give me the “Deep Dive Details” kind, keep scrolling for all the
best tips, tricks and details you’ll need or want.

The Magic of Heat to Transform Boring, Plain Candles
Take plain candles up to custom designer level with this super easy method -- no mess, no fuss!
Materials
- Straight-sided Candles, Pillar or "Tapers" (NOTE: flameless candles work if they have a real wax coating)
- Decorative Napkins
Tools
- Heat gun, or equivalent substitute
- Sharp Scissors
- Iron
- Exacto knife or equivalent
- Tweezers, optional but helpful
Instructions
Step 1) Prep Your Napkin
Step 2) Separate Those Layers
Step 3) Press Your Napkin
Step 4) Position Your Napkin
Step 5) Bring the Heat!
Step 6) Clean Up the Edges
Notes
Scroll down for all the details and tips!
The Full Step-by-Step
(For Those Who Like a Little Hand-Holding)
Materials and Supplies-
- Pillar or straight “taper” candles (white or color-matched to napkin background)
- Decorative paper napkins
NOTE: You can even decorate flameless candles if they have a real wax coating — which may do.
- Sharp scissors
- Heat gun (preferred) or alternative heat source. This is mine — Love it!
- Iron
- Exacto knife
- Tweezers (optional but helpful)
Difficulty: Easy-peasy! Perfect for craft newbies and pros alike
Time: 15 minutes per candle
Step 1) Prep Your Napkin-
Cut your chosen napkin to fit your candle.

You can either go for full coverage or cut out specific elements for a medallion effect.

If you opt for full napkin coverage, cut your napkin about 1/4-inch wider and longer than your candles diameter and height.

PRO TIP: Avoid those perforated edges whenever possible! If you absolutely must use them, position them at the very bottom where they might be hidden by a candle holder.
Yes, this is precisely why I started with this short pillar candle. To discover the “details” as well as any shortcuts, so you can learn from my trials!
I had hoped that maybe the perforations wouldn’t show once embedded in the wax. We both know that was hopeful dreaming.
Also check out my notes about scale. As in any design project, scale plays a role. don’t overlook that.
May we take a quick pause in the action to ask if you are enjoying this post. Are you a subscriber? If to, please join use to make sure to don’t miss a thing and will receive exclusive tips and more:
Thanks bunches!!! ow back to our candle decorating:
Step 2) Separate Those Layers-

Napkins typically have 2-3 plies. We only want that top decorated layer—it’s whisper-thin and perfect for our technique.
PRO TIP: Don’t toss those blank layers! Save them for companion candles. I used mine to create gorgeous striped candles that complemented my floral ones (more on that below).
Step 3) Press Your Napkin-

I know, I know—technically optional, but trust me, those 20 seconds with an iron make ALL the difference in application ease and final appearance.
Step 4) Position Your Napkin-
This is your no-second-chances moment! Place that napkin exactly where you want it on your candle.

For cut out medallions, I plan out their general placement. I hold each one at a time while it embeds.
For new candles with sharp top edges, I align the napkin right at that edge.
For previously burned candles with melted, rounded tops (like the bunny pillar), I gently tear the napkin’s edge (no harsh cut lines!) and position it over that rounded rim.
PRO TIP: Many tutorials will tell you to add parchment paper over your napkin during application. I found it not necessary and skipping that step actually makes the process way easier!
Step 5) Bring the Heat!
Fire up your heat gun—my tool of choice for this project. This is the one I ordered and I am thrilled with it.
Alternatives to a heat gun include blow dryers on high. However, I tried multiple blow dryers with zero success. So my advice: don’t waste your time there!
An old iron can work in a pinch, but controlling it on a round surface and maintaining a consistent curve is rather tricky. And with an iron, you’ll need to add the parchment paper (or wax paper) back into the mix.

Hold the heat gun about 3 inches from the candle’s surface and keep it moving.
On these tapers, I aligned the top edge nice and straight and then started applying the heat on one of the long vertical edges. Then work my way around the candle as I move up and down the length.
As you work, you’ll notice the napkin’s colors intensify and a shine develops as the outer layer as wax melts and soaks into the paper. Keep smoothing and adjusting as you go.


When you reach the overlapping edge, use your exacto knife to slice through both the warm wax and overlapped paper. Peel away the excess and apply heat to smooth that seam into candle-decorating perfection.
For individual medallions, simply apply heat where you’ve positioned them, but keep the gun moving to avoid a flat spot.
WARNING: Be sure to protect your work surface with something you don’t mind discoloring. Red splotches, anyone?
Step 6: Clean Up the Edges

Make sure the top edge is embedded in the wax and is smooth.
For the bunny rabbit, I used a partially burned pillar candle so the top was rounded, I tore the top napkin edge for a soft feathered edge that easily disappeared into the heated wax.
SIDENOTE: are you wondering about those darling bunny napkins? I bought them last year at Home Goods to make this pet food mat. Isn’t it the best?

For the candle bottoms, I gently tear away excess paper (tearing creates softer edges than cutting) and then apply heat to embed those edges into the wax.
Some crafters fold the excess napkin over the bottom of the candle and melt the end to hold it. I found that more difficult and time consuming to get a clean edge. But it is an option if that is what works best for you.

Polished, professional, perfect finish every time! Just as I prefer!
The Results Speak For Themselves!

Plus a Few Takeaways For the Quickest Route to Success
My first experiment was on a short pillar candle (the blue and white one) —perfect for getting my feet wet with this technique. I suggest starting with a short to moderate pillar candle for dipping your toe in hot wax.
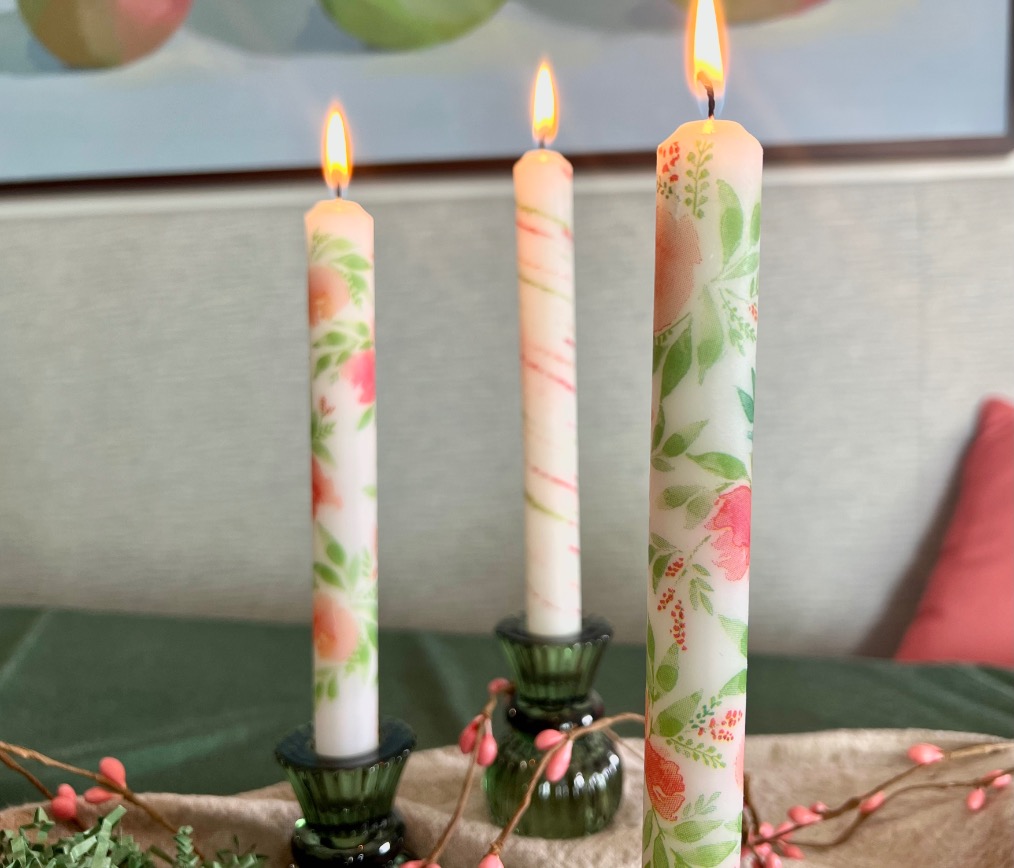
Then I graduated to those 8-inch non-tapering “tapers” where I tried both full coverage and individual cut-out elements.
Between us, the all-over application is faster and slightly easier, but both approaches look amazing!
Mixing It Up: Creating Companion Candles-
Remember those blank napkin layers I told you to save? Here’s where they shine!


I created gorgeous subtle, striped candles by:
- Layering those blank plies
- Mixing craft paint to match my floral candles’ colors
- Using an old credit card dipped lightly in paint to draw thin, random lines across the napkins
- Letting everything dry, pressing, and choosing my favorite layer (I went with the bottom one where the paint had seeped through for a beautifully subtle effect)

Scale Matters, People!

Make sure your napkin’s pattern scale works with your candle size.
That bunny-in-field design I used on my partially burned larger pillar? Perfect example of matching scale to surface area. The image needed room to breathe!
PRO TIP: Some napkins have the majority of their design around the edges — which is where all those perforations live, so I have learned to avoid these napkins.
Those perforations may not bother you. And that’s okay.
Me? They drive me nuts, but I’m known for being rather persnickety about the little details.
The Golden Rule-
Generally, you want your napkin background to match your candle color—white backgrounds on white candles, cream on off-white candles.
There are exceptions. I covered a white taper with blue napkin with all over white vines and florals and it worked well. But matching backgrounds gives the most seamless look.
Are you loving these as much as I am? Then you know you best save this pin to find it again:

These Make THE BEST Gifts

A pair of custom made candles wrapped in parchment paper and and a sweet bow are perfect for:
- Hostess gifts that blow store-bought wine out of the water
- Party favors that guests actually want
- “Favorite Things” party contributions
- Galentine’s Day surprises
The best part? They look like you spent big bucks when really, you just spent a fun crafternoon!
Have you tried this technique? Drop me a comment with your results or questions. I’m absolutely obsessed with this project and can’t wait to see what you all create!
These are some of my favorite decorative napkins available on Etsy so you don’t have to buy a whole pack for just one or two:


So simple but so beautiful! Thank you for the step-by-step directions. Very easy to understand. Can’t wait to try this!
Thanks so much Debbie! I have to say, this is one of the most fun and satisfying crafts I’ve done in quite a while. I can’t wait to make more!!!
These candles are adorable Diane!
Awww, thanks Amy! You and GiGi need to make these together!
I agree, Diane, these candles would make an awesome gift! You picked perfect napkins, love the bunny one! Jan
Oh, Jan, that’s so kind of you to say! And that bunny!!!! Let me know how it works for you.
Diane, these candles are beautiful! Your step by step directions are well appreciated. Can’t wait to try!
So glad to hear this Pat. And I can’t wait to see the pictures, you’ll be sending, right? 😉