
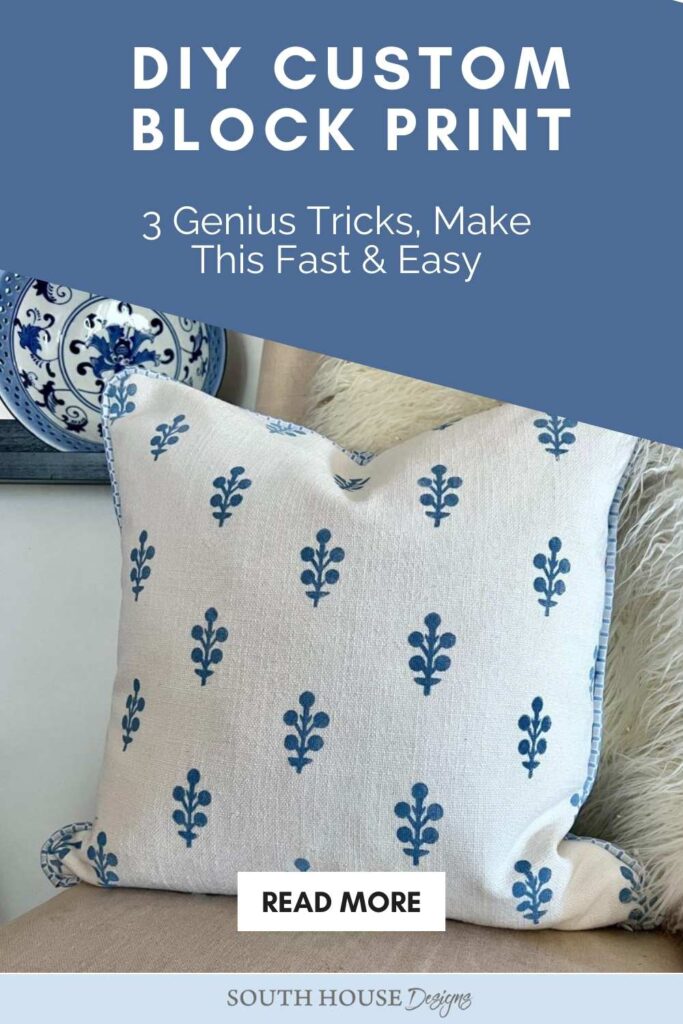
Make a Charming Block Print the Easy (and Cheap) Way!
Humble craft foam is the key to this charming printed linen pillow. Here’s how to print just about anything and even as a 2-tone pattern.
It’s the first Tuesday of the month, which means it’s Handcrafted Society Challenge Day! Yippee!!!
This month our talented group was inspired by one of the biggest decorating trends happening right now — and honestly, it deserves every bit of the buzz.
Block printing plays well with almost every style. Farmhouse? Yes. Cottage? Absolutely. Transitional, traditional, even modern? You bet. That kind of flexibility is pretty hard to find in a trend.
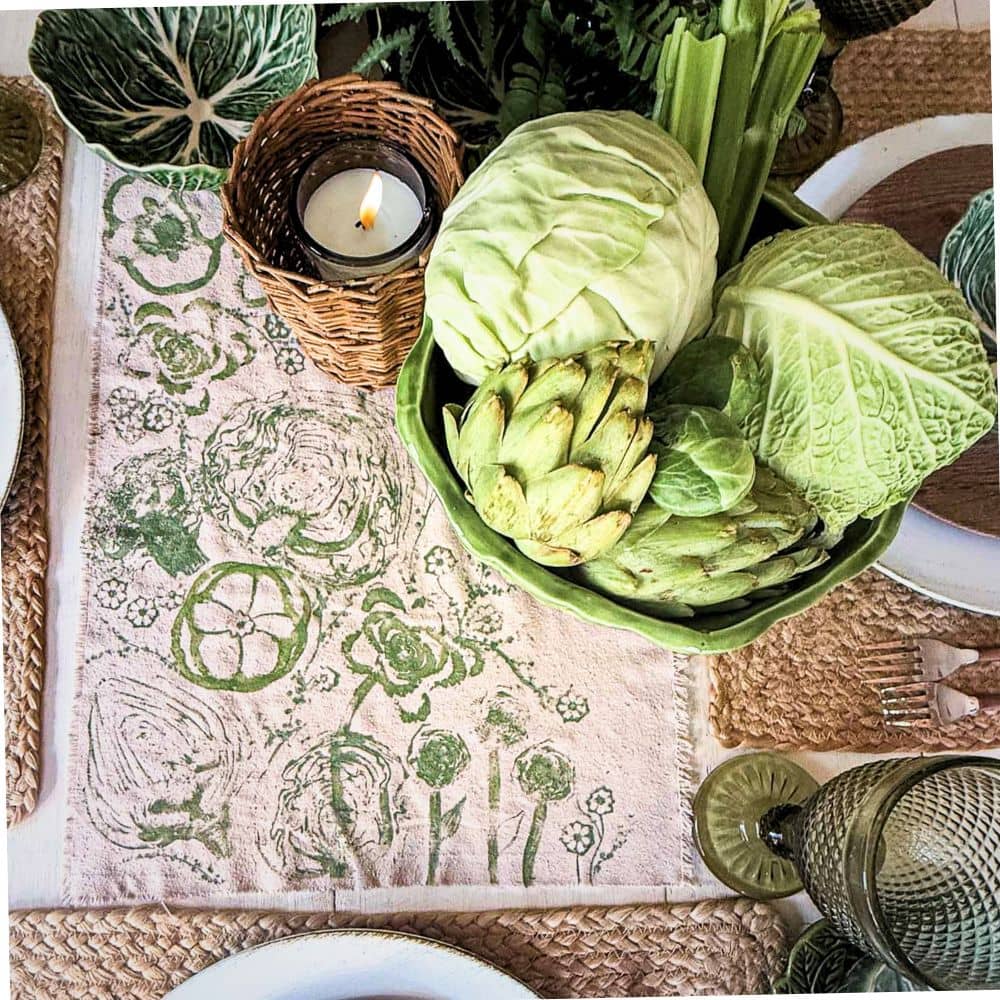
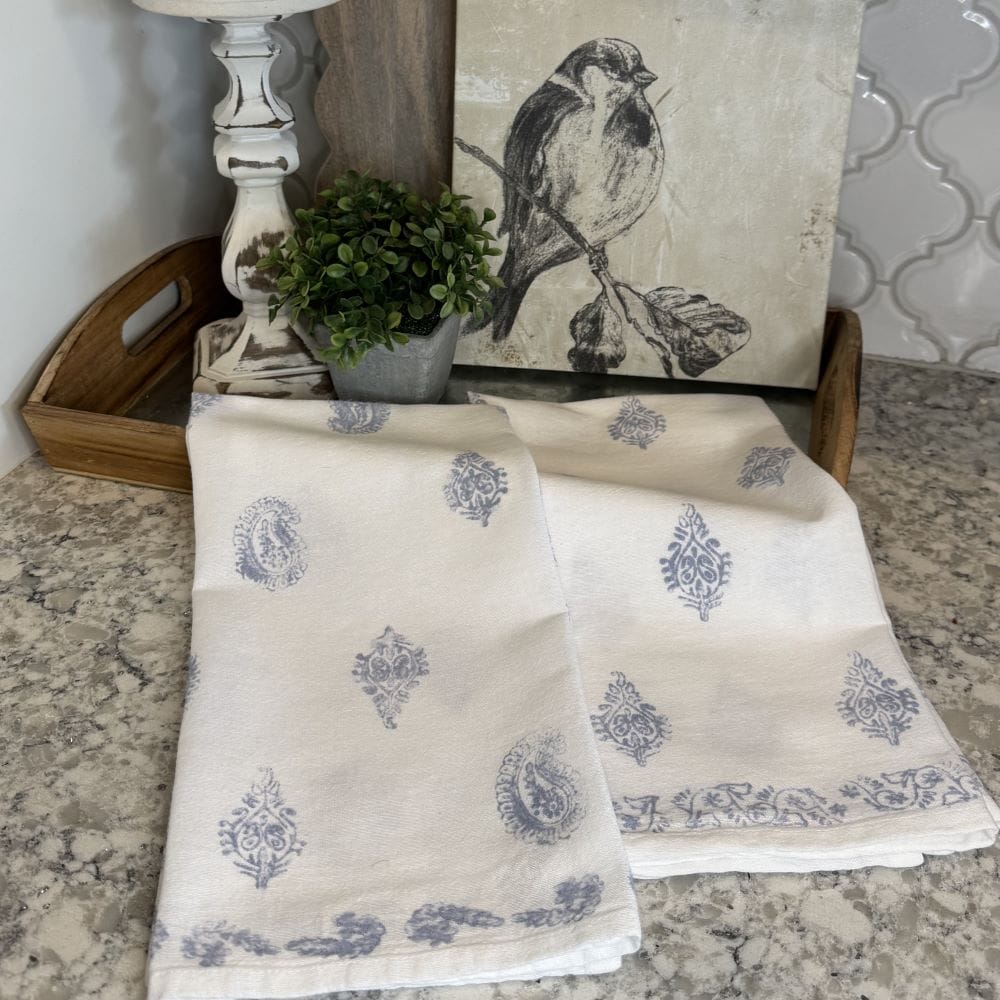
And the applications? Oh, the list is long and lovely — tea towels, table linens, pillows, framed artwork, stationery, wood trays, flower pots, wood boxes… basically, if you can put paint on it, you can block print it.
The original old-world block prints were carved by hand into wood — a gorgeous but seriously skilled craft.
Today’s printmakers usually reach for a linoblock (linoleum mounted on wood) or one of the softer rubber alternatives like Speedball Speedy-Carve or Blick E-Z-Cut. Those are great options — but they do require carving tools and a bit of a learning curve.
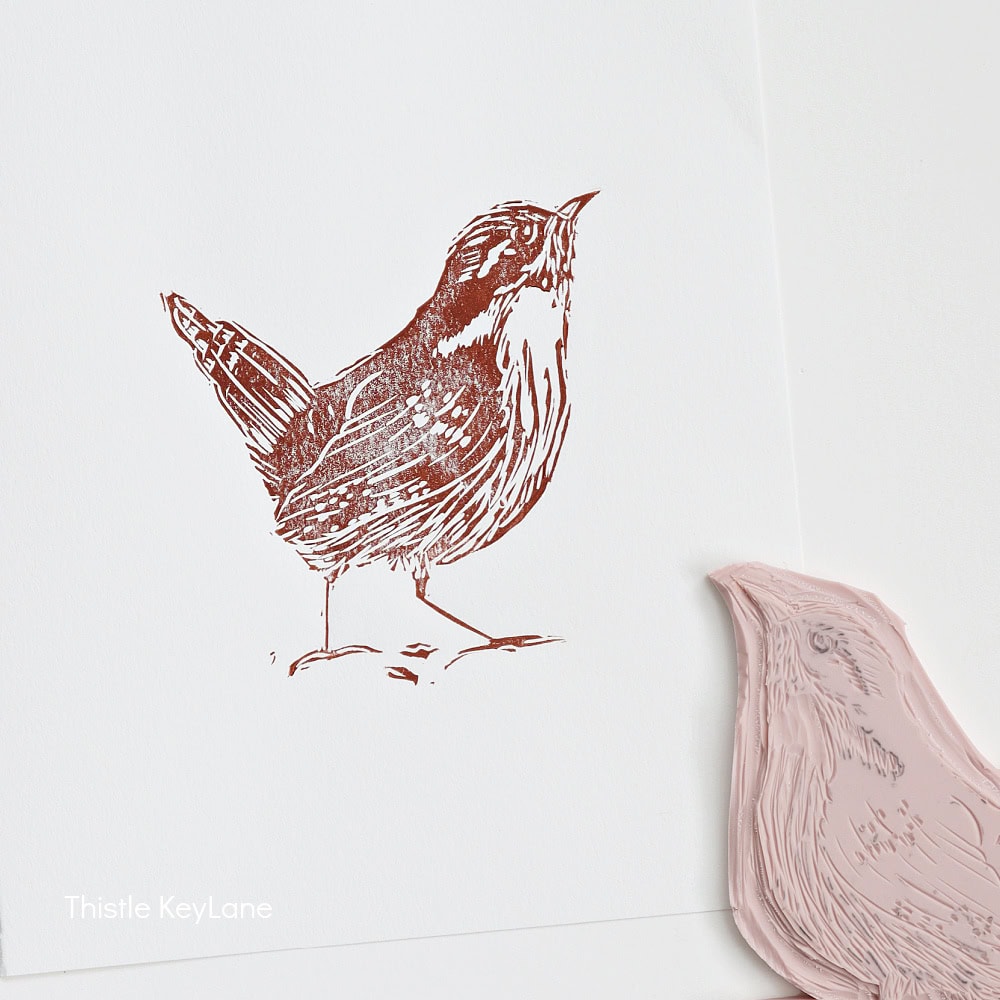
Here’s my little secret: craft foam. It’s cheap, it’s easy to cut with tools you already own, and the results are genuinely charming.
Add a piece of clear plexiglass as your block base and you’ve got a printing setup that’s surprisingly smart — the clear base lets you see exactly where you’re placing your print. Game changer.
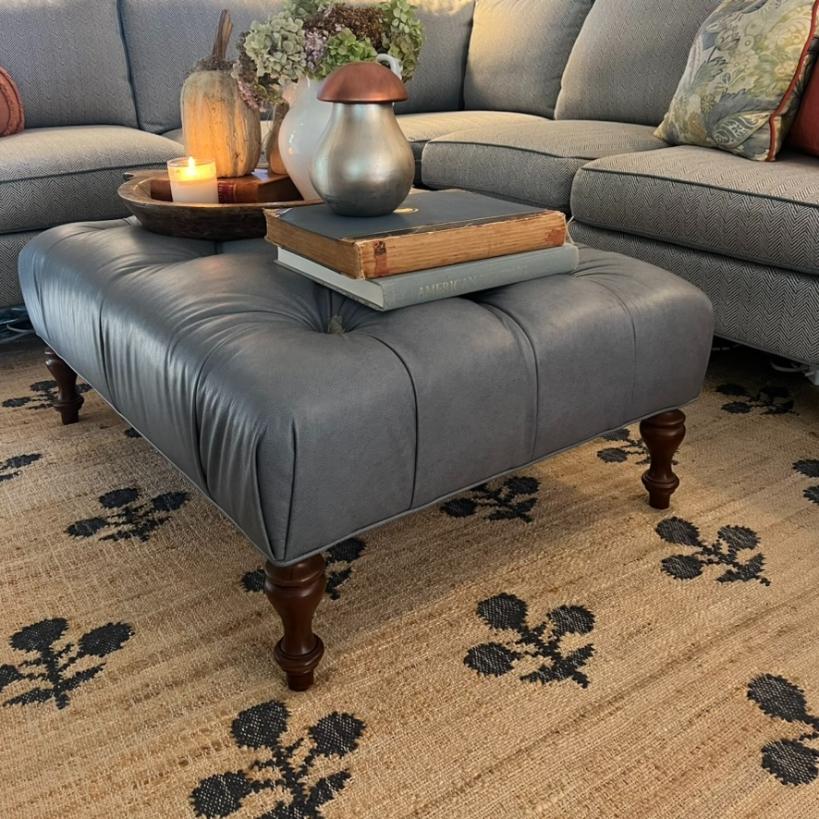
And inspiration? It’s literally everywhere. The design I’m sharing today was inspired by this adorable pattern I spotted in a rug at my friend Wendy’s (@ WM Design House) house. More on finding your own inspiration when we get to the detailed steps.
The links in this post may include affiliate links, which means if you purchase anything using these links, you pay no extra, but I may receive a small commission that helps keep this blog running. I truly appreciate you using affiliate links whenever possible. Please know that I will never recommend a product I do not believe in!
Ready to jump right to it?
Here’s a Quick How-To Card for Confident Crafters
If you’d rather feel like I’m right by your side, stepping you through it — no problem, keep scrolling.

How-to Create a Custom Block Print Using Inventive Materials
Three non-traditional materials are true game changers! This is the easiest way to block print just about anything.
Materials
- Craft foam (sticky-back is easiest)
- Pencil and paper
- Clear acrylic/plexiglass piece
- Glue (if foam is not sticky-back)
- Tissue Paper, optional
- Acrylic craft paint
- Your printing surface: fabric, paper, wood, etc.
- ** If printing on fabric, add: a layer of felt or soft padding
- Polycrylic sealer, brush-on or spray (for wood)
Tools
- Cutting tools: scissors, X-Acto knife, leather hole punch
- Piece of glass for a paint palette — frame glass works great; cover rough edges with painter's tape
- Sponge stencil or flat paint brush
- Iron and pressing cloth (for heat setting fabric)
Instructions
- Sketch a simple design on paper.
- Flip the paper over, lay it on the craft foam, and rub pencil lead over the back to transfer the design.
- Cut out your design with scissors, X-Acto knife, or hole punch. Add texture with pointy tools if you like.
- Glue foam pieces to plexiglass.
- (Optional) Map your print placement with a tissue paper guide.
- Load your sponge brush and print!
- Finish your print: heat set fabric with iron and pressing cloth; seal wood with polycrylic; paper needs nothing at all.
Notes
Keep Scrolling for full details and my tips and hints for project success!!!
Detailed How-To With All my Block Printing Hints and Tips:
What You’ll Need-
You likely have most of this on hand already — that’s part of the beauty of this project.
- Craft foam — sticky-back makes life easier, but regular foam + craft glue worked just fine for me
- Pencil and paper — for sketching your design
- Cutting tools — scissors for smooth curves, X-Acto knife for details, and a leather hole punch, or a hollow punch is perfect for clean circles (more on that in a sec!) Small crewel or cuticle scissors work great for all the tiny bits
- Clear acrylic or plexiglass — your block base; the clear material lets you line up your prints perfectly
- Glue — if your foam isn’t sticky-back. This is the one I use.
- A piece of glass for your paint palette — the glass from an old picture frame is ideal; just cover any rough edges with a strip of painter’s tape so you don’t nick yourself
- Acrylic craft paint — regular craft paint works great (rebel tip below!)
- Foam stencil brush or a flat sponge brush will also work — key for beautiful, even coverage
- Your printing surface — pillow covers, fabric, paper, wood… whatever you’re making
- Printing on fabric? Add a layer of felt or soft padding to your supply list
Finding Your Inspiration
Before you ever pick up a pencil, let yourself look around. Inspiration for block print designs is hiding in plain sight.
I found mine in a rug — a beautiful geometric pattern at a friend’s house that I just couldn’t stop thinking about. A quick phone photo for reference and I was ready to sketch.
Other great places to look: tile patterns, embroidery motifs, gift wrap, wallpaper, nature (leaves, botanicals, simple florals), even the shapes in a piece of fabric you love. The key is to look with “block print eyes” — what reads as a clean, graphic shape?
Design tip: Simple is your friend here. Block printing loves bold, clear forms. If this is your maiden voyage into block printing, avoid anything that requires tiny detail or interior cutouts — those are tricky to cut cleanly.
For circles, reach for your leather hole punch or a hollow punch that’s sometimes referred to as gasket punches — it gives you a perfect circle every time and is incredibly satisfying to use.
If you want any text in your design, it must be cut in mirror image so it prints correctly. For your first project, skip the letters and fall in love with the process first.
Quick pause: Are you enjoying this post? Want more? Be sure to subscribe:
Thanks bunches. Now back to our block printing:
Step 1) Sketch Your Design-

Draw your design on regular paper with a pencil. Keep it loose — this is a handmade print and part of its charm is that it looks like one. Don’t stress about perfect lines.
Think in simple shapes: a stem, a leaf, a circle, a triangle.
My design is a branching botanical — just a simple stem with small branches and circle “berries” at the tips.
Step 2) Transfer to Craft Foam-
Here’s a clever little trick that makes the transfer easy:


Flip your sketch over so it’s face-down. Lay it on top of your craft foam. Hold it in place and rub the side of your pencil lead firmly across the back of the paper, covering the whole design area.
The graphite transfers right onto the foam, giving you a clean, reversed image ready to cut. No tracing, no fussing.
Step 3) Cut Out Your Design-
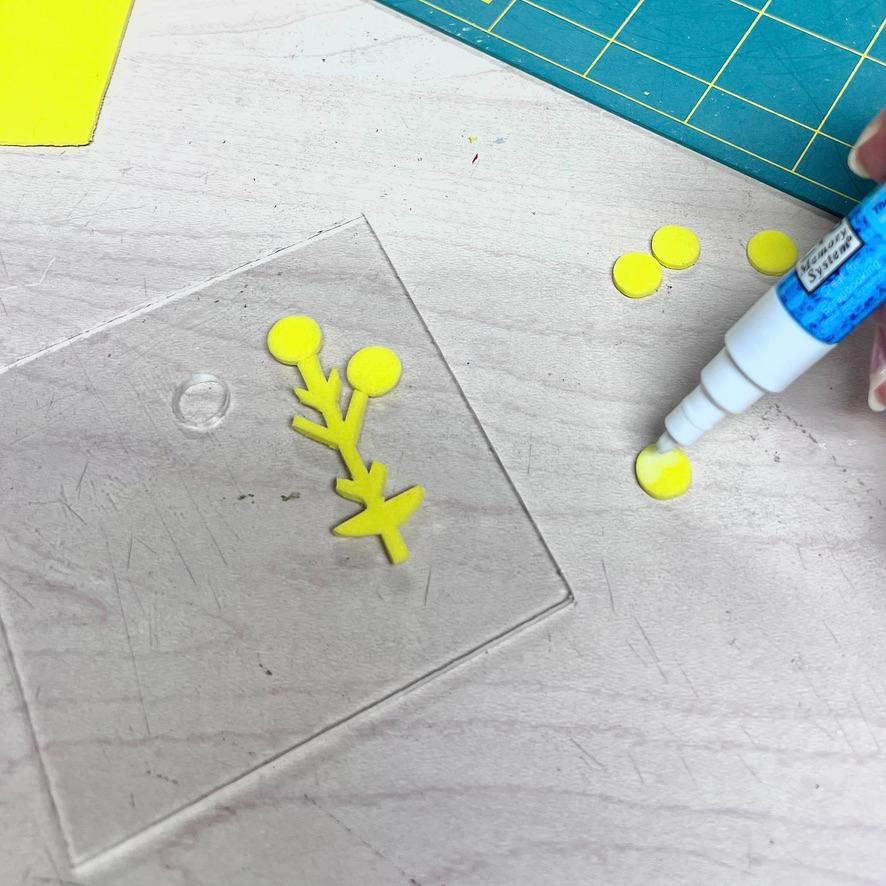
Now for the satisfying part! Use whichever tool makes sense for each element:
- Scissors for smooth curved shapes and larger pieces
- X-Acto knife for clean straight lines and detail work
- Leather or gasket hole punch for perfect circles — seriously, don’t skip this if your design has dots or berries
You can also use any pointy tool to press texture into the foam surface — a toothpick, a skewer, the tip of a pen cap. Pressed lines and dots add beautiful character to your print.
Step 4) Build Your Block-
Peel the backing off your sticky foam (or apply glue) and press your cut pieces onto the plexiglass in your design arrangement. Press firmly and let it set.
PRO TIP: Place your designs square to the sides so you can use the straight edge to help align your prints.
The clear base is your secret weapon — when you go to print, you can see right through it to position your block exactly where you want it. No guessing, no misaligned prints.
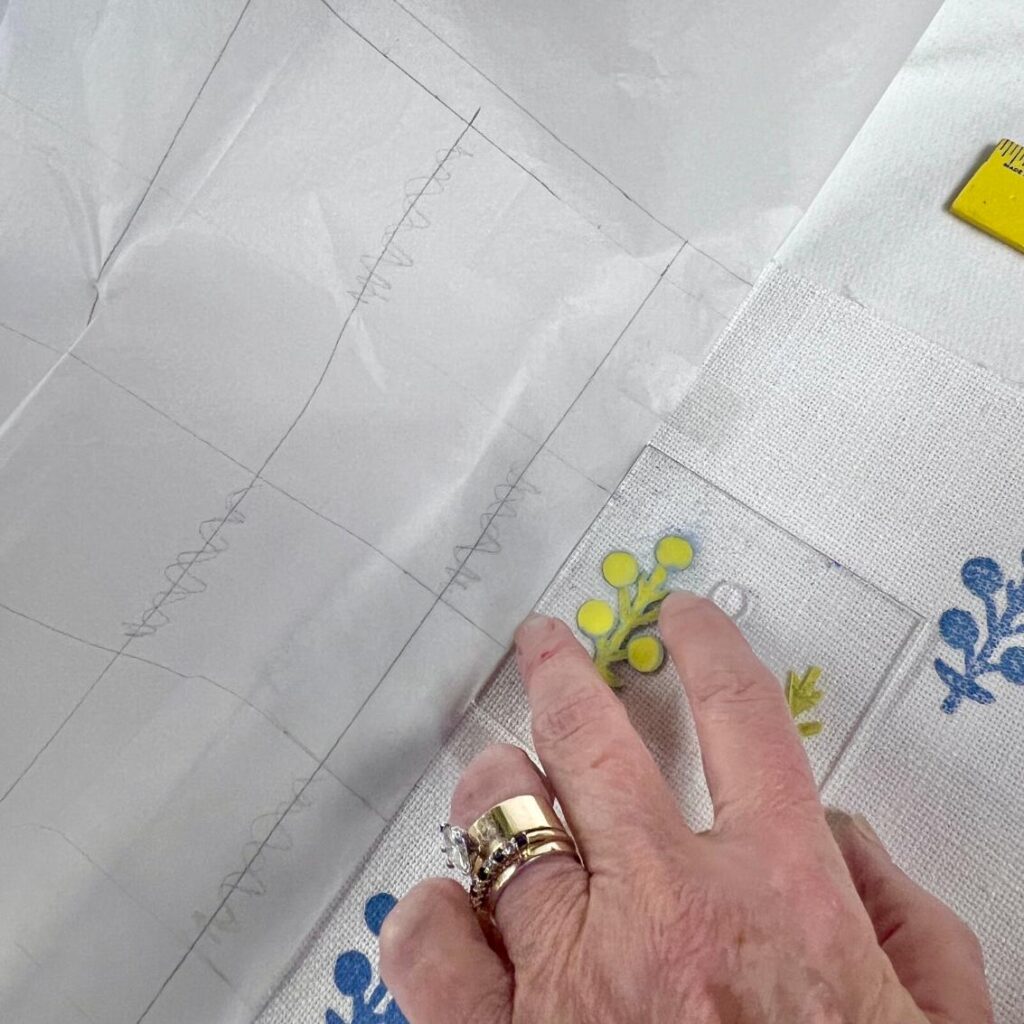
Step 5 (Optional but Highly Recommended!): Map Your Placement with Tissue Paper
Okay, I’ll own it — I am a detail-obsessive soul.
I started by cutting up all my sample, trial and error prints and arranged them as the first two rows to get an idea of how closely I wanted them to be.
Once I had my vision, I made myself a tissue paper placement guide. Here’s how it works:


Cut a piece of tissue paper to the size of your fabric. Fold and mark it into a grid that maps out where each stamp will land — spacing and columns all planned in advance. I marked the lines on the tissue paper where the wood blocks are to go with squiggly lines.
Pin the tissue paper in place over your fabric. Just one row of pins is needed. I started at the halfway point.
Fold the tissue back to expose just your first column. I carefully measured how far the fold should be from the line on the paper. For my design, 1-inch worked perfect. Then tape that folded edge in place.

I lined up my inked block so the edge was right next to the folded edge.
Stamp those prints. Roll the tissue back to your second column, stamp those. Repeat until the whole piece is done. Even spacing, perfect vertical columns, no math-in-your-head required.
Of course, if the freeform nature of block printing is calling your name — skip all of this and just go for it. That’s a beautiful choice too. 😊
Step 6) Load Your Brush and Print-
Can we talk about how I landed on this technique? Because it took a little trial and error to get here!
The traditional tool for loading a block print is a brayer — a small rubber roller. But brayers really work best on larger blocks, think bigger than 5×7 or so. On my small foam pieces, it was a total fail.
So I switched to artist brushes. Also a fail! I ended up with paint on the edges of the foam and seeping into every little crack and crevice — which is exactly what we don’t want.
What I really needed was an ink stamp pad — but I didn’t have one in any of the colors I wanted. As I was digging around looking for something to mimic that function, I spotted my jar full of sponge brushes. I grabbed a flat one and gave it a try… and it worked!
Then I stepped up to a round stencil-style sponge brush and that gave me even more control. Problem solved — with tools I already had!
Here’s the technique–
If you’re printing on fabric, press it first so you’re not fighting creases and wrinkles. Then lay your felt or soft padding underneath before you do anything else. That little cushion makes a big difference in getting full, even contact across your foam pieces.


Spread a small dollop of paint on your glass palette.
Pounce the round base or wide flat side of your sponge brush straight down into the paint — up and down, not dragging. You’re looking for light but solid coverage on the brush. Now pounce that onto your foam design pieces.
Look closely and make sure all the details are lightly coated. You do not want paint pooling along edges or settling into cracks and crevices.
PRO TIP: Keep a damp paper towel handy to wipe any stray paint off your plexiglass before you print.

Now turn your block over, line up your placement, and gently lower it straight down onto your surface. No slipping, no sliding. Press firmly and lift straight up.
REBEL TIP: I used regular acrylic craft paint — and skipped the textile medium on purpose. Textile medium thins the paint, and for stamping you actually want it thicker for clean, crisp coverage.
Do a few test prints on scrap paper first. You’ll quickly get a feel for how much paint you need and how much pressure works best. The inconsistencies from print to print? Those aren’t mistakes — they’re the whole point. They’re what makes this handmade and human and beautiful.
Step 7: Finishing Your Print
Printing on fabric? Once your paint is completely dry, heat set it with an iron. Place a pressing cloth over the printed area and press. Flip the fabric over and repeat on the back side. This locks the paint in and makes it washable.
Printing on wood? Give your finished piece a protective coating of polycrylic — available in both brush-on and spray versions. Let the use of your piece guide how much protection you need. A decorative box sitting on a bookshelf? A quick, light spray coat should do nicely. A printed tabletop? You’ll want to apply several coats for real durability.
Printing on paper? You’re done! Lucky you. 😄

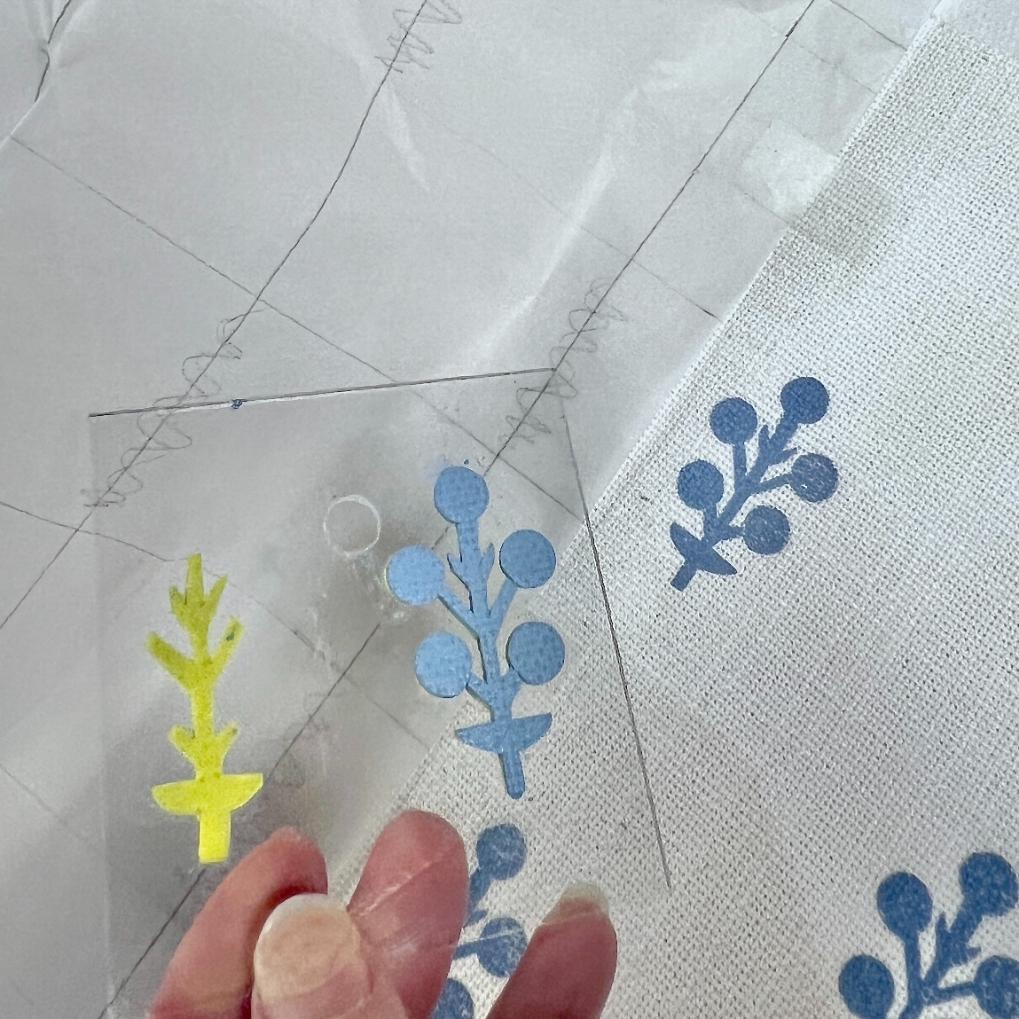
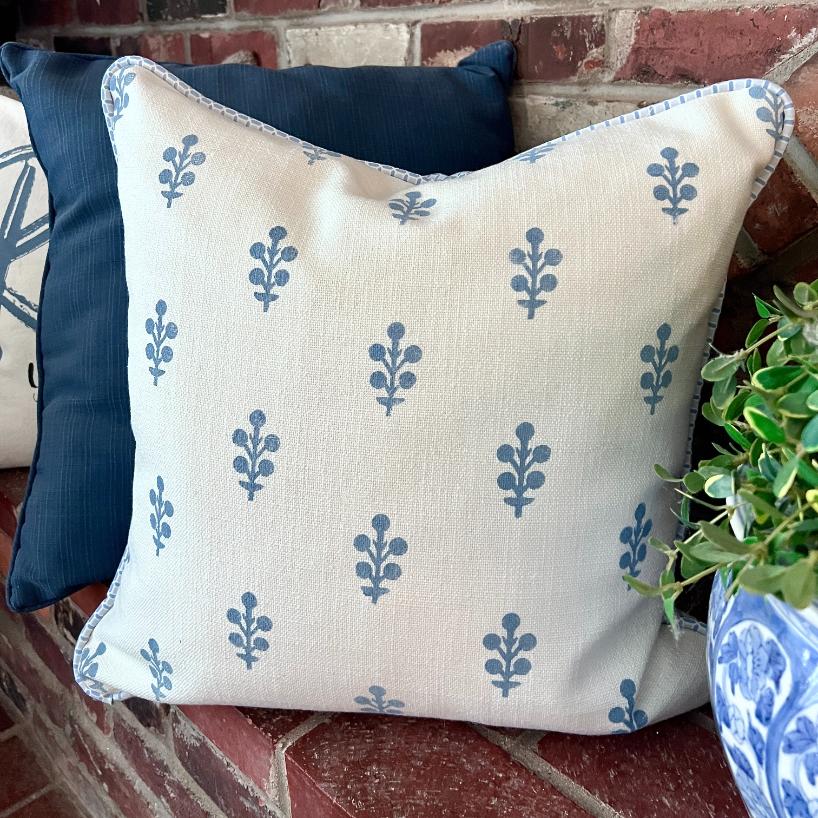
The Two-Color Version: Planning Your Design in Layers
Once you’re comfortable with a single-color print, the two-color version is a gorgeous next step — and it’s really just a little advance planning.
For my botanical design, I cut two separate blocks:
- Block 1 — the same stem and branches as the monocolor design, but with slightly longer branch tips (and it shares an acrylic block with that original design
- Block 2 — the five round “berries
This is where the clear plexiglass block really pays off.
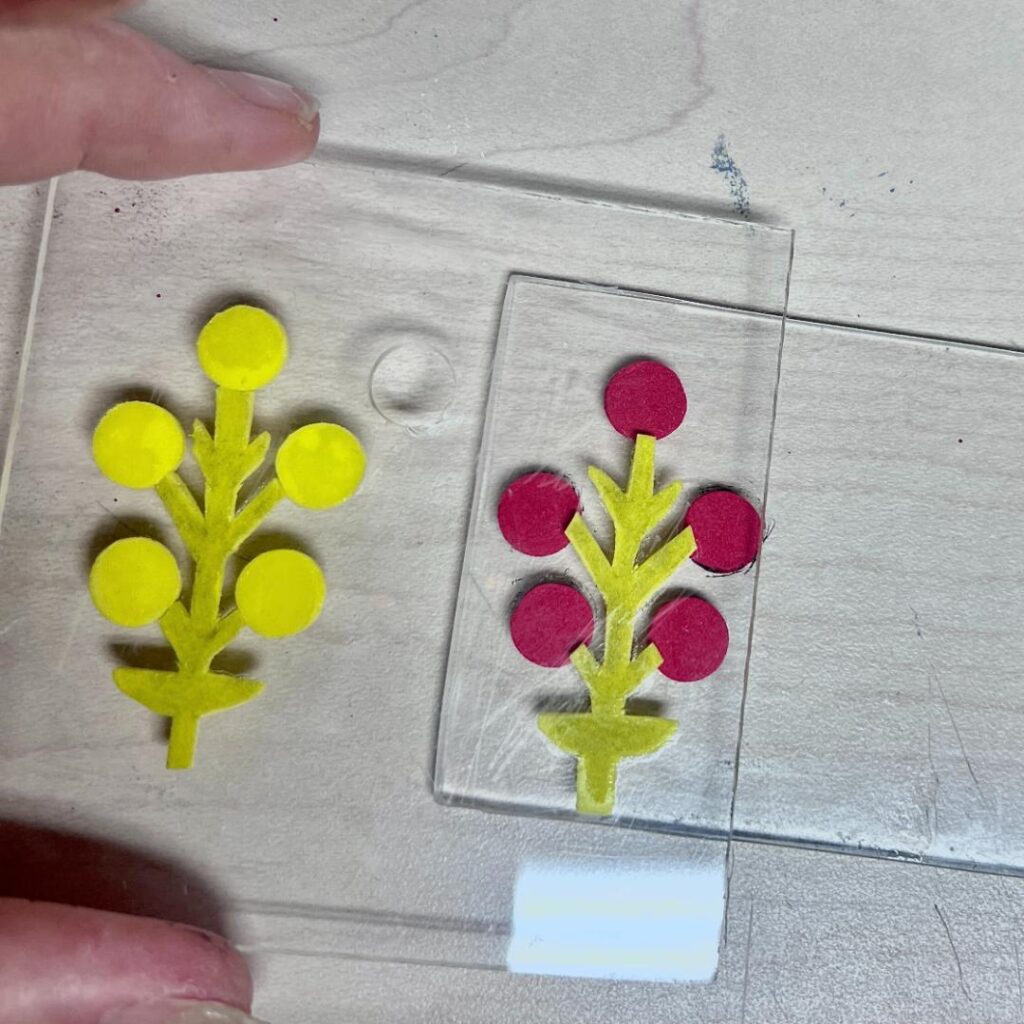

First I glued my slightly modified stem to the acrylic block shared by the original monocolor design.
Then I punched 5 circles with a leather hole punch that will be placed on Block 2.
I laid the stem on Block 1 on top of the empty block 2 positioning the top three berries so they would land right, slightly overlapping the ends of the longer branch tips. I carefully marked where these berries needed to be. and then glued them in place, double-checking while the glue was still wet so they could be moved slightly if needed. Then repeat with the last two berries.
Here’s an even easier way! Why I didn’t think of it first, is a mystery – much more straightforward. Set the empty 2nd acrylic block on top of the first block. Position the berries slightly overlapping the branch tips and glue in place. That’s it! Easy peasy!

To print in two colors, print the empty stem on Block 1 first in one color. Let it dry.
Then align Block 2 — your clear plexiglass makes this so much easier — and print in your second color. The longer branches extend just beyond the edge of the circles, and the berries now float over the tips in a fresh color.
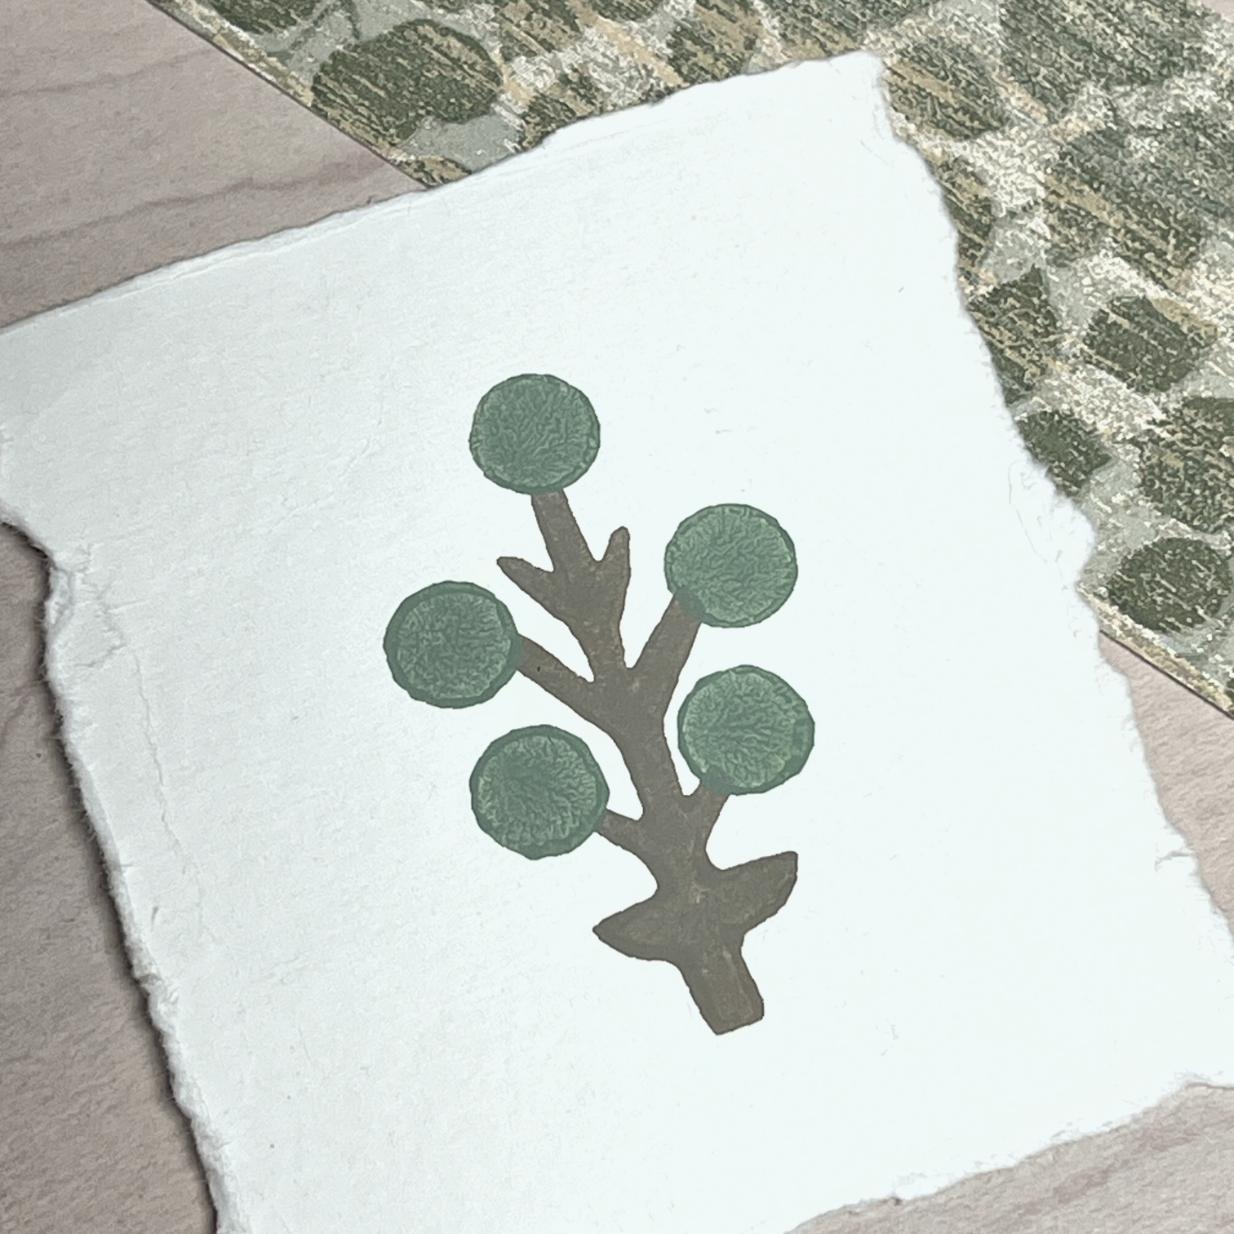
The result looks planned and intentional, but it’s actually very forgiving to execute. The slight variations just add to the handcrafted quality.
What I Made: Two Projects, One Block Print
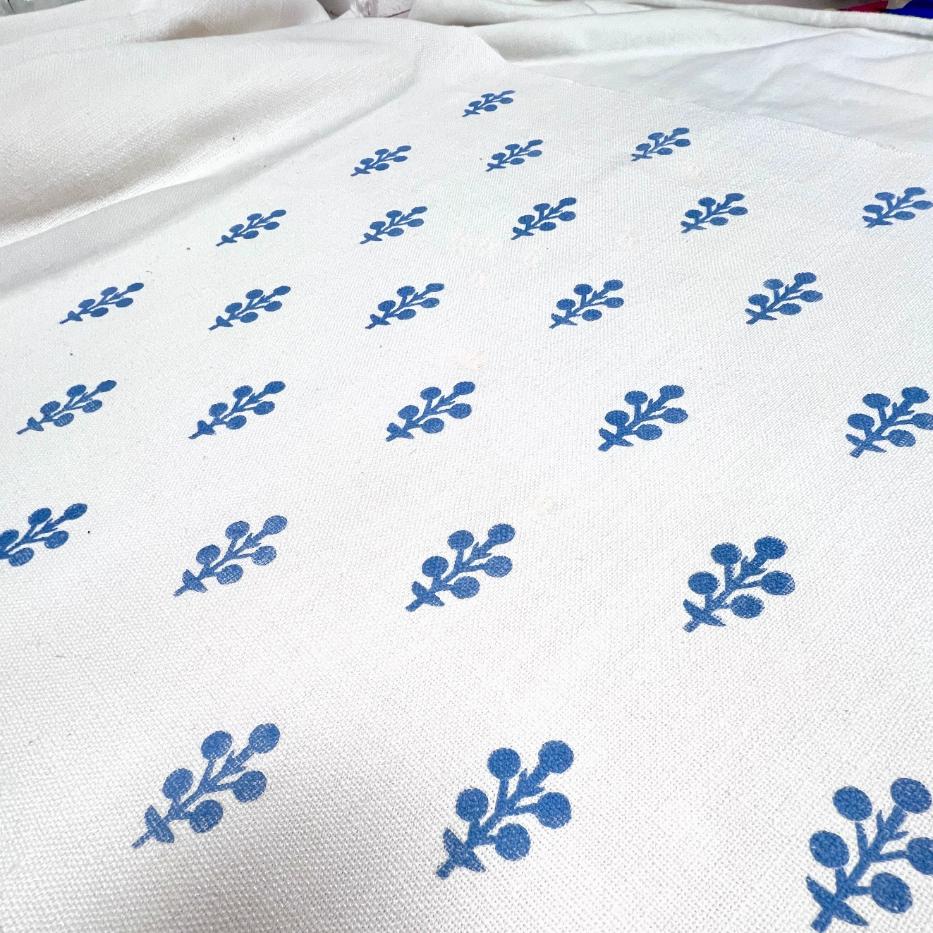
The Pillow

I used my single-color block to print a repeat pattern on white linen — and the result is exactly the kind of thing you’d pay way too much for in a boutique home store right now. By using a tissue paper guide, the repeat is pretty close to perfect.
But if that’s not your style to obsess spacing, no worries! It looks handmade because it is, and that’s entirely the point.!
I sewed my pillow from scratch, but if sewing isn’t your thing, a blank pillowcase, like these from IKEA or these from Amazon, work perfectly.
Just be sure to slide a piece of wax paper or plastic sheeting inside before you print to prevent the paint from seeping through to the back layer.
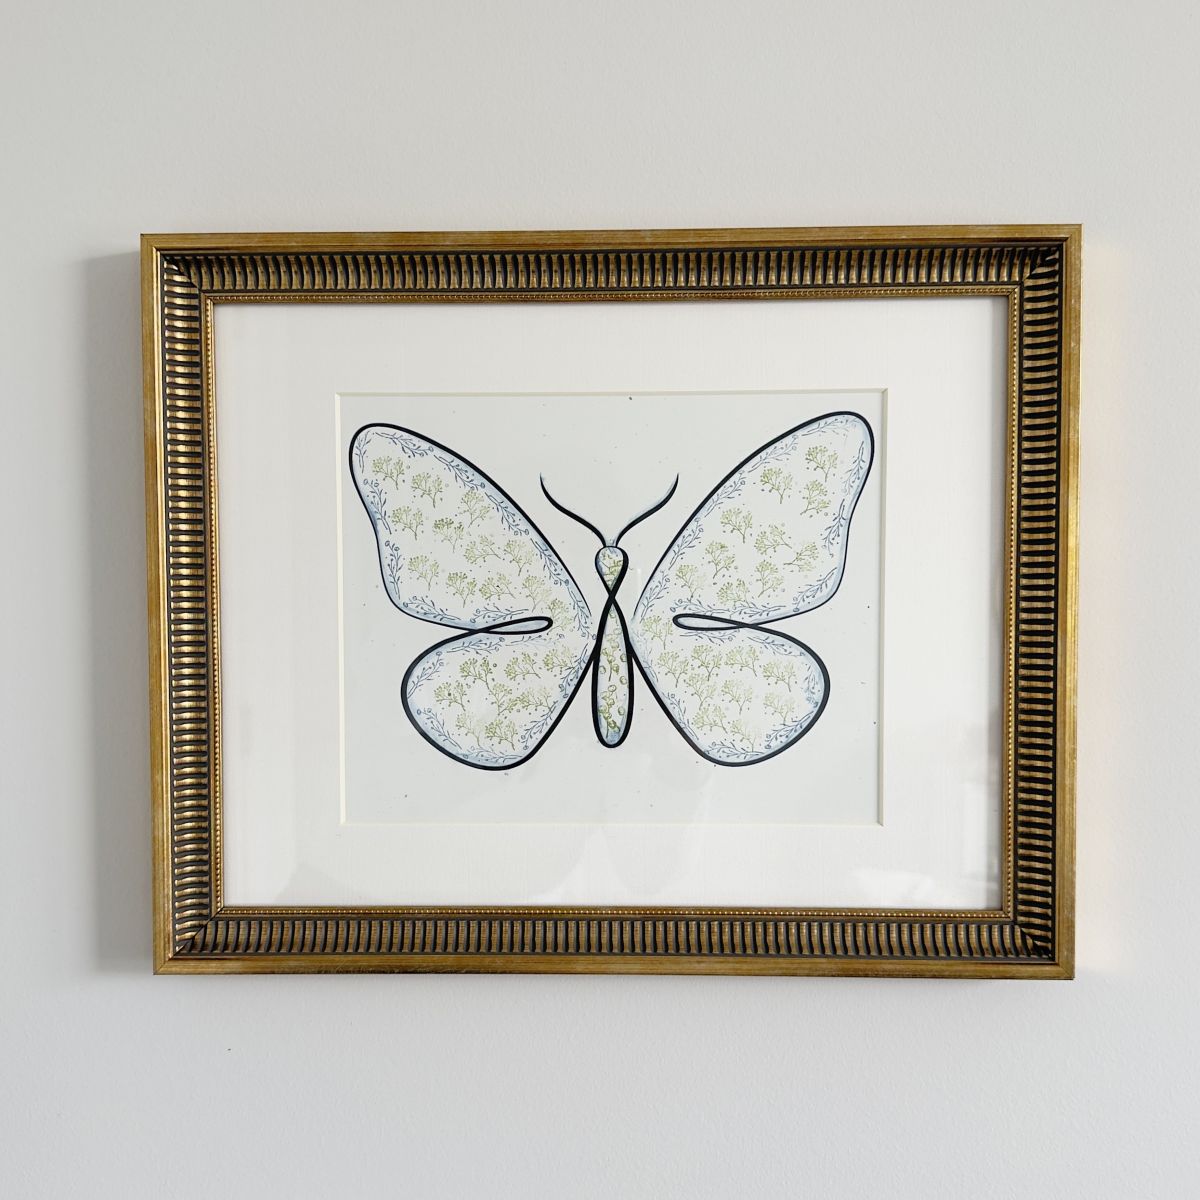
The Framed Art

For the two-color version, I printed on a scrap of heavy watercolor paper. Once dry, I mounted it on a piece of old wallpaper cut to fit a thrifted frame. The wallpaper adds color and texture as a mat — and costs next to nothing. The whole piece looks collected and intentional, which is the best kind of handmade.
A Note on the Beauty of Imperfect Prints

You know I love handcrafted!
Anything homemade — whether made by me, by a dear friend, or even an artist I’ve never met — makes my heart lighter and happier. And block printing is a perfect celebration of that.
Handcrafted quite literally means it includes the hand of the creator. A hand that is warm, human and unique — but not perfect.
Every print in a run will be just a little different — a slightly uneven edge here, a soft spot in the ink there. In a world full of machine-perfect everything, that variation isn’t a flaw. It’s the whole point. Lean into it.
Handcrafted Society
One quick peek and you’ll see block printing takes loads of forms. It is always so fascinating to see how each of my crafting buddies is inspired by the same instructions. Wildly different and all wonderful! Check them out:
I hope you have enjoyed this project — as much as I have. I know you will be seeing more and more block printing from me. I am crazy about the process and all the possibilities.
I hope that you give it a try! It is so fulfilling and therapeutic.

More Projects to Enjoy

Excellent tutorial Diane with your tips on using foam for a stamp! What a gorgeous pillow you made too. You never cease to amaze me with your sewing skills. I love the framed block print too with the wallpaper background. Very clever my friend!
Oh thanks Michelle. It is always amazing, what we can come up with when a deadline is looming and I don’t have the exact supplies on hand. Improvise and it usually works out. It sure did this time!
OK girlfriend, you rocked this project! I love this pillow and it certainly belongs on that couch in your inspiration image, LOL What an incredible post with such great details of how one an accomplish this look for so much less then you would pay in a store.
I had such fun with this one, despite my frustration with supplies. But it all turned out even better with the substitutions.I’m so glad we did block printing. I may have a new obsession.
Well, I think your ‘imperfect” prints look pretty perfect, Diane! I love your creativity in making such clever block patterns. Brilliant and budget-friendly! Well done, my friend!
So sweet of you my friend!!!
I love your pillow and the fabric you used to back it. Stunning!
Thanks bunches Tammy! This was a fun one!!! (can’t wait to try your butterfly)
Hi Diane! Your pillow looks so perfect, I thought it was store-bought! Your sewing skills and creativity never cease to amaze me! I love that you got the idea from Wendy’s rug and that you made the stamps yourself! Now I want to make a pillow! Pinning now!