Blue and Brass Beauty
[et_pb_section fb_built=”1″ _builder_version=”4.7.7″ _module_preset=”default” global_colors_info=”{}”][et_pb_row _builder_version=”4.5.3″ custom_margin=”0px||||false|false” custom_padding=”0px||||false|false” global_colors_info=”{}”][et_pb_column type=”4_4″ _builder_version=”4.4.9″ global_colors_info=”{}”][et_pb_image src=”https://southhousedesigns.com/wp-content/uploads/2021/07/Blue-Brass-Hero.jpeg” alt=”Title image of the top row of drawers painted bleu, glazed and with shiny bras drawer pulls” title_text=”Blue Brass – Hero” _builder_version=”4.10.7″ _module_preset=”default” hover_enabled=”0″ global_colors_info=”{}” sticky_enabled=”0″][/et_pb_image][et_pb_text admin_label=”Blog Post Title” _builder_version=”4.7.7″ text_font_size=”65px” text_line_height=”1.2em” header_font=”Crimson Pro|600|||||||” header_text_color=”#6d6965″ header_font_size=”61px” background_color=”#f1edeb” text_orientation=”center” width=”63%” max_width=”100%” module_alignment=”center” custom_margin=”-100px||||false|false” custom_padding=”25px||25px||false|false” global_colors_info=”{}”]
Blue and Brass Beauty
Before & After
[/et_pb_text][et_pb_text admin_label=”Text” _builder_version=”4.7.7″ _module_preset=”default” text_font_size=”10px” width=”58%” module_alignment=”center” global_colors_info=”{}”]
It’s a stunning transformation to blue and brass with oodles of texture. How? Very simply: Rust-Oleum spray paint and Frog tape. Follow Along.
[/et_pb_text][et_pb_text _builder_version=”4.7.7″ _module_preset=”default” global_colors_info=”{}”]
Don’t you just love a happily ever after story?
And when that story includes gorgeous color, stunning shine, oodles of texture . . . . no, we are not talking a great hair treatment. Although, you know I’d share it with you if I had that miracle treatment. We’re that kind of friends.
Here, I’m also talking great legs, the perfect size AND hard-working storage in our hangout room!
I’m all about this Blue & Brass dresser that we use in our entertainment area — filled with games, puzzles and DVD’s.
[/et_pb_text][et_pb_image src=”https://southhousedesigns.com/wp-content/uploads/2021/07/Rustoleum-Final-from-Right.jpeg” alt=”View of painted wicker chest with added legs and shiny brass pulls” title_text=”Rustoleum – Final from Right” _builder_version=”4.7.7″ _module_preset=”default” global_colors_info=”{}”][/et_pb_image][et_pb_text _builder_version=”4.7.7″ _module_preset=”default” global_colors_info=”{}”]
Isn’t she gorgeous?
But you’d never guess it from her humble FB marketplace beginnings.
[/et_pb_text][et_pb_image src=”https://southhousedesigns.com/wp-content/uploads/2021/07/Blue-Brass-Before.jpeg” alt=”Before image of a sad golden brown faux wicker, faux bamboo chest” title_text=”Blue Brass – Before” _builder_version=”4.7.7″ _module_preset=”default” global_colors_info=”{}”][/et_pb_image][et_pb_text _builder_version=”4.7.7″ _module_preset=”default” global_colors_info=”{}”]
I know, truly sad!
I would never have bought it if we hadn’t lived in a small town where the options were really limited and I needed a chest to hold a new flat screen NOW!
It was so sad, I didn’t even take a picture of it’s original form. That horizontal frame sat flat on the floor. Short and squat with no air beneath. And that color! And all the faux-ness — faux wicker, faux bamboo, faux wood, almost everywhere.
But those pulls saved the day and I was rather smitten with the grid effect of the nine identically sized drawers.
And it was the perfect width for between our porch doors and for the critical TV.
And oh, did I mention I was desperate?
When I later ran across three interesting wood balusters at the Habitat ReStore, I knew I could take care of the whole squatty-no-air-below thing.
And that faux-ness? Why paint, of course! Chalk paint to stick to anything. Spray preferable for all that texture.
[/et_pb_text][et_pb_image src=”https://southhousedesigns.com/wp-content/uploads/2021/07/Paints.jpeg” alt=”Two cans of Spray Paint and one jar of homemade glaze on the area rug by the chest” title_text=”Paints” _builder_version=”4.7.7″ _module_preset=”default” global_colors_info=”{}”][/et_pb_image][et_pb_text _builder_version=”4.9.10″ _module_preset=”default” width=”84%” global_colors_info=”{}”]
Rust-Oleum to the rescue!
No, this is not a sponsored post — just sharing products and brands I use and believe in!
Here are the exact spray paints I used. And in response to requests, here is my area rug (much more the colors shown in the 4th and 5th pictures). These are affiliate links, meaning it costs you nothing more, but I may receive a small commission if you use these links.
[/et_pb_text][/et_pb_column][/et_pb_row][et_pb_row column_structure=”1_3,1_3,1_3″ _builder_version=”4.9.10″ _module_preset=”default” global_colors_info=”{}”][et_pb_column type=”1_3″ _builder_version=”4.9.10″ _module_preset=”default” global_colors_info=”{}”][et_pb_code _builder_version=”4.9.10″ _module_preset=”default” global_colors_info=”{}”][/et_pb_code][/et_pb_column][et_pb_column type=”1_3″ _builder_version=”4.9.10″ _module_preset=”default” global_colors_info=”{}”][et_pb_code _builder_version=”4.9.10″ _module_preset=”default” global_colors_info=”{}”]
[/et_pb_code][/et_pb_column][et_pb_column type=”1_3″ _builder_version=”4.9.10″ _module_preset=”default” global_colors_info=”{}”][et_pb_code admin_label=”Code” _builder_version=”4.9.10″ _module_preset=”default” global_colors_info=”{}”]
[/et_pb_code][/et_pb_column][/et_pb_row][et_pb_row _builder_version=”4.9.10″ _module_preset=”default” global_colors_info=”{}”][et_pb_column type=”4_4″ _builder_version=”4.9.10″ _module_preset=”default” global_colors_info=”{}”][et_pb_text _builder_version=”4.7.7″ _module_preset=”default” global_colors_info=”{}”]


How I Transformed This Sad Orphan into My Blues and Brass Beauty:
Step 1) All the Prep
Started with removing all the hardware
Then I cleaned the drawers and frame thoroughly.
[/et_pb_text][et_pb_text _builder_version=”4.7.7″ _module_preset=”default” text_text_color=”#6881a8″ custom_margin=”||||false|false” custom_padding=”|150px||150px|false|false” global_colors_info=”{}”]
HINT: With wicker (or caning or similar) I always use a strong vacuum and a can of spray air to clean out all thee nooks and crevices.
[/et_pb_text][et_pb_text _builder_version=”4.7.7″ _module_preset=”default” global_colors_info=”{}”]
Even though I used chalk paint that reputes to not need sanding, I sanded all the smooth areas with 60 grit paper and block for a bit f extra insurance. This chest gets a lot of use and I want this paint to cling like crazy!
Lastly, I taped everything off. I’m partial to Frog Tape. I know there are other brands out there, just make sure you use painters tape.
Step 2) Bust out the Paint
Stating the obvious, I sprayed the cabinet frame and all the drawer fronts with the Rust-Oleum Spray Chalk Paint in Coastal Blue. Always use two thin coats, NOT one heavy coat. And be sure to use an even sweeping motion across the entire width of your project.
[/et_pb_text][et_pb_text _builder_version=”4.7.7″ _module_preset=”default” global_colors_info=”{}”]
Step 3) Glazing or Antiquing
I grew up with upcycled furniture. It wasn’t cool then to a lot of people, but I thought it was! My sister and I had bedrooms on the top floor of the house. The only ones that saw these rooms were our friends. Our brothers’ bedrooms were down a floor, where guests might venture, so they had store-bought matching suite bedroom furniture.
For us girls, Mom bought used pieces at garage sales, sanded them down, painted them a common color, “antiqued” them and sealed them. It was a glorious process for me to watch. Except, my sister’s was white (antiqued with black) and mine was avocado green (antiqued with black). I was rather jealous of hers.
Yeah for Mom being so far ahead of her time — by four decades or so. Although, she did conform to the matching bedroom suite ideal of that era.
[/et_pb_text][et_pb_video src=”https://youtu.be/yZQts_c9P8c” _builder_version=”4.7.7″ _module_preset=”default” global_colors_info=”{}”][/et_pb_video][et_pb_text _builder_version=”4.7.7″ _module_preset=”default” global_colors_info=”{}”]
Anyway, today, for glazing I like to mix my own using remnant paints and Benjamin Moore Acrylic Glaze. I mixed 1 part black acrylic paint with 4 parts Acrylic Glaze.
And once my drawers and cabinet were dry, I set out on the antiquing part — perhaps the most intimidating, but actually the easiest — pinky swear!
I even made this short video to prove it to you.
[/et_pb_text][et_pb_video src=”https://youtu.be/7iCl6O05F60″ _builder_version=”4.7.7″ _module_preset=”default” global_colors_info=”{}”][/et_pb_video][et_pb_video _builder_version=”4.7.7″ _module_preset=”default” global_colors_info=”{}”][/et_pb_video][et_pb_text _builder_version=”4.7.7″ _module_preset=”default” global_colors_info=”{}”]
Once the paint had sat for 48 hours (again, extra insurance), I added a protective coat of clear furniture wax on all the smooth surfaces (not the wicker part). Then we hauled it in, set it up and then my IG followers convinced me that the feet needed to be gold like the handles . . . . sigh!
[/et_pb_text][et_pb_image src=”https://southhousedesigns.com/wp-content/uploads/2021/07/Rustoleum-Blue-Chest-Gold-Feet.jpeg” alt=”Closeup of one leg with the foot painted shiny, metallic gold sitting on a area rug with brick floor behind” title_text=”Rustoleum Blue Chest – Gold Feet” _builder_version=”4.7.7″ _module_preset=”default” global_colors_info=”{}”][/et_pb_image][et_pb_text _builder_version=”4.9.10″ _module_preset=”default” global_colors_info=”{}”]
So back out it went, and I taped off the feet, protecting those great curvy leges, I used a metallic spray paint from Rust-Oleum that is loaded with shine and matched the pulls perfectly.
[/et_pb_text][et_pb_text _builder_version=”4.9.10″ _module_preset=”default” text_text_color=”#6881a8″ custom_margin=”||||false|false” custom_padding=”|150px||150px|false|false” global_colors_info=”{}”]
HINTS: Use a wooden skewer to dig in and seal the tape in the corner where a vertical edge (like the legs) meets a horizontal edge (like the top horizontal edge of the feet). This helps to prevent bleeding under the tape.
And ALWAYS, remove the painters tape while the paint is still wet. This helps to prevent peel the fresh paint off with the tape.
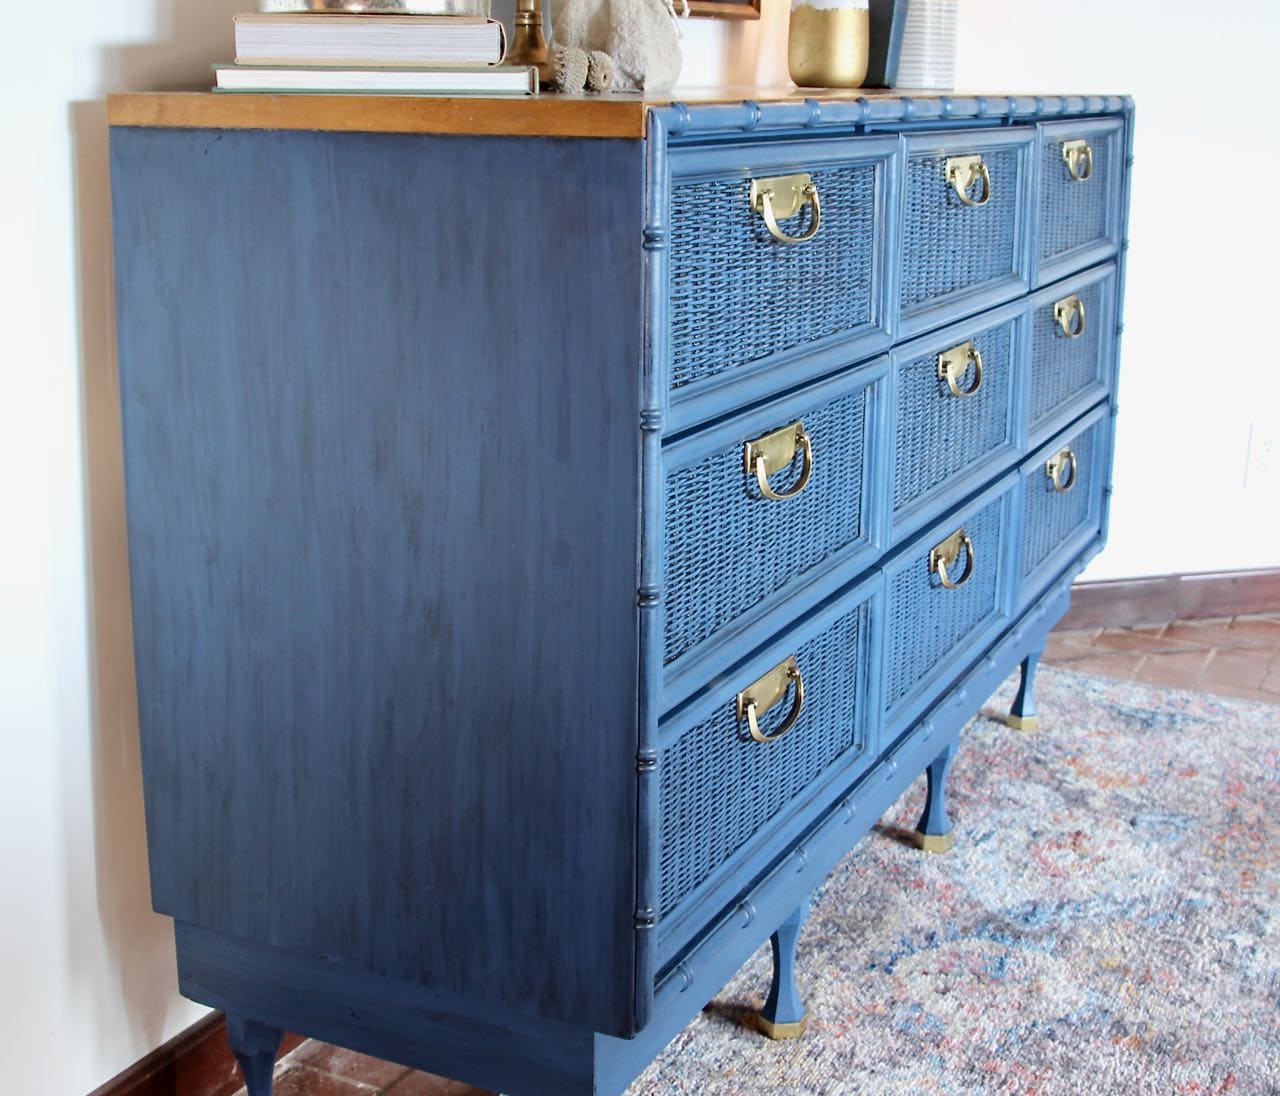
[/et_pb_text][et_pb_image src=”https://southhousedesigns.com/wp-content/uploads/2021/07/Rustoleum-Blue-Chest-Thumbnail.jpeg” alt=”view of the side of the blue chest with the golden brown wood top showing” title_text=”Rustoleum Blue Chest – Thumbnail” _builder_version=”4.9.10″ _module_preset=”default” global_colors_info=”{}”][/et_pb_image][et_pb_text _builder_version=”4.9.10″ _module_preset=”default” global_colors_info=”{}”]
And look at the extra depth the glazing, or antiquing, gave the flat sides! It’s these little extra details that really make a piece stand out!
[/et_pb_text][et_pb_image src=”https://southhousedesigns.com/wp-content/uploads/2021/07/Rustoleum-Chest-Drawer-Closeup.jpeg” alt=”closeup of a wicker drawer painted blue and then glazed with black, the shiny brass handle and the brown wood top” title_text=”Rustoleum Chest – Drawer Closeup” _builder_version=”4.7.7″ _module_preset=”default” global_colors_info=”{}”][/et_pb_image][et_pb_text _builder_version=”4.7.7″ _module_preset=”default” global_colors_info=”{}”]And the detail of taping around the faux bamboo curves.
[/et_pb_text][et_pb_image src=”https://southhousedesigns.com/wp-content/uploads/2021/07/Rustoleum-Chest-Final.jpeg” alt=”Front view of the blue chest with brass detailing, wood top and styled with a large picture, blue and white lamp, books, a green plant and a pair of burnished brass candlesticks” title_text=”Rustoleum Chest – Final” _builder_version=”4.7.7″ _module_preset=”default” global_colors_info=”{}”][/et_pb_image][/et_pb_column][/et_pb_row][et_pb_row column_structure=”1_2,1_2″ _builder_version=”4.7.7″ _module_preset=”default” global_colors_info=”{}”][et_pb_column type=”1_2″ _builder_version=”4.7.7″ _module_preset=”default” global_colors_info=”{}”][et_pb_text _builder_version=”4.7.7″ _module_preset=”default” global_colors_info=”{}”]
I know, you’re busy right now!
I get it. But you also want to have these tips and hints when you are ready for your next furniture makeover.
So pin it to your “Decor” board,
or to your “Pretty Painted Stuff” board,
or to your “Blues” board.
Or to whatever Pinterest Board makes sense to you.
[/et_pb_text][/et_pb_column][et_pb_column type=”1_2″ _builder_version=”4.7.7″ _module_preset=”default” global_colors_info=”{}”][et_pb_image src=”https://southhousedesigns.com/wp-content/uploads/2021/07/BluesBrass-Pin.jpg” alt=”Pinterest pin, showing three small images (a before picture, the end of the chest, the foot) above a full finished image of the chest of drawers, with the title Goodbye Drab, Hello Gorgeous!” title_text=”Blues&Brass Pin” _builder_version=”4.7.7″ _module_preset=”default” global_colors_info=”{}”][/et_pb_image][/et_pb_column][/et_pb_row][et_pb_row _builder_version=”4.7.7″ _module_preset=”default” global_colors_info=”{}”][et_pb_column type=”4_4″ _builder_version=”4.7.7″ _module_preset=”default” global_colors_info=”{}”][et_pb_text _builder_version=”4.7.7″ _module_preset=”default” global_colors_info=”{}”]NOW, she’s a beauty, isn’t she? My blue and brass beauty!
I hope she inspires you to see beauty in a piece you already have or that you come across wherever you roam. With a bit of time and dililgence, you can turn her into a joyful piece.
[/et_pb_text][/et_pb_column][/et_pb_row][et_pb_row column_structure=”1_2,1_2″ _builder_version=”4.7.7″ _module_preset=”default” global_colors_info=”{}”][et_pb_column type=”1_2″ _builder_version=”4.7.7″ _module_preset=”default” global_colors_info=”{}”][et_pb_image src=”https://southhousedesigns.com/wp-content/uploads/2020/08/LargerHeres-to-Joy-filled-Living.png” alt=”Here’s to Joy-Filled Living, Diane” title_text=”LargerHere’s to Joy-filled Living” _builder_version=”4.7.7″ _module_preset=”default” global_colors_info=”{}”][/et_pb_image][/et_pb_column][et_pb_column type=”1_2″ _builder_version=”4.7.7″ _module_preset=”default” global_colors_info=”{}”][et_pb_image src=”https://southhousedesigns.com/wp-content/uploads/sub.png” title_text=”sub” url=”/subscribe” url_new_window=”on” show_bottom_space=”off” align=”right” _builder_version=”4.5.6″ _module_preset=”default” max_width=”400px” module_alignment=”right” custom_margin=”0px|0px|0px|0px|false|false” custom_padding=”0px|0px|0px|0px|false|false” global_colors_info=”{}”][/et_pb_image][/et_pb_column][/et_pb_row][/et_pb_section]
Omgosh how I love your finished project! It is PERFECTO and thanks for sharing.
I would also like you to share the rug that it is sitting upon. Fabulous colors
that would look so good in many homes. Could you sure where you purchased
it please?
Julie, thanks so much for your kind words!!! It’s a Safavieh, Bristol Collection. Here’s a link to that one: https://amzn.to/3kgsPsT (*affiliate)
All I can say is that it is gorgeous! Thank you for sharing this treasure. Could
you share where you purchased the run from, that it sits upon? It could go
with so many homes and mine too! Loving your Blog : -)
I am always amazed how much things change with a little paint! Wow! Love the transformation!
Thanks bunches Melba! Glad to have you dropping in.
This is very pretty. The color adds a glamorous and character
What a great makeover. I love the blue.
That’s a great makeover! I love that blue and how easy you made it look!
Thanks so much! Super easy thanks to spray chalk paint! I guess that’s what i was waiting for all this time.
Wow! What a gorgeous makeover! I love the blue and how easy you made it look. Great job!
Cheers!
Shelley
Thanks Shelley! It was surprisingly easy. Spray paint makes such a difference with all that texture. And now that you can get chalk paint in spray form — well, it’s a game changer!
Loving the blue and brass, it looks great! I have always been drawn to navy with brass… this is a nice change for me. I have never used chalk paint before, but spray paint? That changes things…
Exactly! And it went really, really well. So far it has held well with no problems. I’m very pleased with it. And soooo easy!
Diane … this is fabulous! Blue and brass are two of my favorite things … and when combined … wowza! I’m constantly amazed by the wonderful treasures found on FB marketplace … as well as well as the talents of savvy DIYers like you who transform them. And, those feet are the icing on the cake! xo
Thanks so much Juliet! I appreciate all your kind words. Hope you are having an amazing day!
What a beautiful transformation! Love the attention to details you did.
Really appreciate your kind words, Corine! Happy weekend!
Oh I love this piece!!! Brass is just my favorite right now! The little brass at the bottom of the feet makes it look so high end!!!
Thanks bunches, Danielle! Yes, I’m glad I went for the little gold feet. Our IG followers usually know best, don’t they?
You have turned that bureau into an absolutely gorgeous piece of furniture!!!!
That is the perfect color blue and I am so glad so see all of that brassy goodness!
Thanks for sharing the tutorial for this as we all need a great bureau!!
My pleasure Maria. I’m so glad you like it. Hope you are having an awesome day!
You transformed that bureau into a stunning piece of furniture!
I absolutely love the color and am so glad to see all of the brassy goodness!
Thanks for the tutorial:)
The color combo you chose is gorgeous! The texture of the drawers is a nice touch. Great find!
Thanks so much Marie!
I have a similar wicker dresser, although smaller. My first major furniture purchase when I was a “grown-up” was a wicker bedroom set. I still love wicker 40 years later. And I still have the dresser. 😆. I have been on the fence about painting it. This post has convinced me that it can be done and look good! Thanks for all of the info.