Ditch Tissue Boxes – Instead Make Easy DIY Clay Tissue Holders
Join the trend of stylish alternatives to ugly boxes. This step-by-step guide creates Instagram-worthy tissue holders using just air-dry clay and doilies.
Let’s talk about that elephant in the room—you know, those hideous cardboard tissue boxes covered in weird floral prints that somehow always clash with EVERYTHING in your home?
Yeah, those! We’ve all been there, strategically hiding them under decorative covers or shoving them into drawers when company comes over.
Well, folks, there’s a new trend sweeping through home decor circles, and I am HERE for it!
People are ditching those eyesore boxes and displaying their tissues in everything from vintage pottery to sleek ceramic vessels.
But why stop at repurposing? Why not create something custom that perfectly matches your style?
That’s exactly what I decided to do when I spotted this month’s Handcrafted Society Challenge theme: doilies!
Suddenly, it all clicked. Those delicate lace patterns… air dry clay… tissues needing a prettier home… BOOM! A craft project was born!
And yes!!!

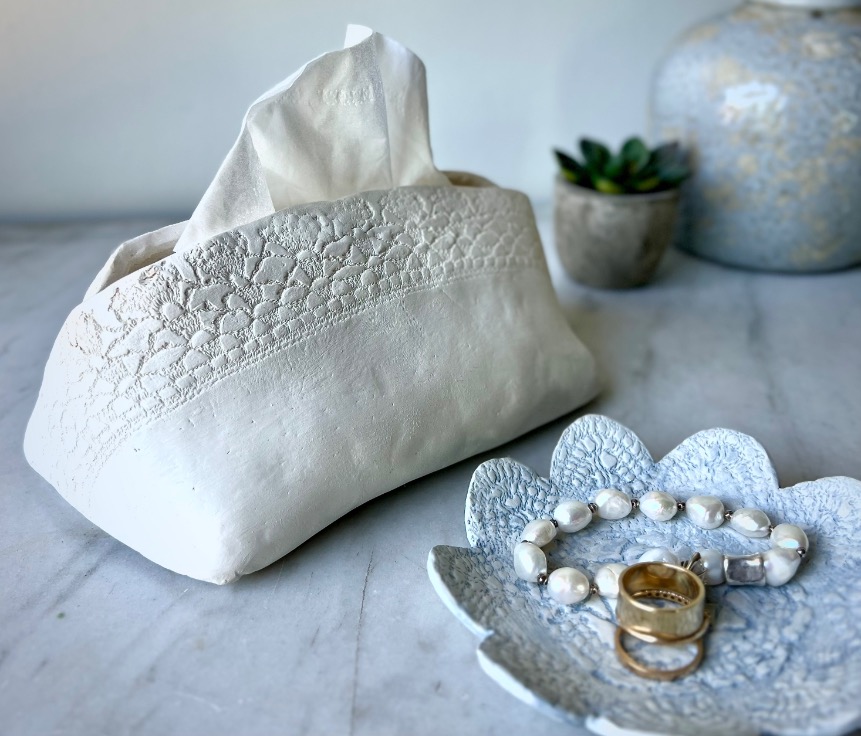
After some serious trial and error, I created these gorgeous tissue holders that look like flowing fabric with delicate lace edges—all thanks to the magic of doilies as texture tools.
These beauties not only function perfectly but also double as conversation-starting decor pieces. And the best part? They’re WAY easier to make than they look!
TABLE OF CONTENTS
- At a Glance How-To
- Detailed Step-by-Step Guide: Let’s Get Our Hands Dirty!
- Materials and Supplies-
- Preparations (The “Trust Me, This Makes Everything Easier” Phase)
- Project Steps (Where the Magic Happens)-
- Step 1) Condition and Roll Out the Clay-
- Step 2) Cut Clay Using Template-
- Step 3) Add That Gorgeous Doily Texture-
- Step 4) Create Reinforcement Logs-
- Step 5) The Great Flip-
- Step 6) Score the Fold Lines-
- Step 7) Prepare Your Support System-
- Step 8) Create First Side Wall-
- Step 9) Support Side A-
- Step 10) Create Second Side Wall-
- Step 11) Monitor and Adjust During Initial Drying-
- Step 12) Sand and Polish-
- Step 13) Add Color (Optional)-
- Step 14) Seal (Optional)-
- Final Step) Enjoy and Show Off!
- Customization Options: Make It Uniquely Yours!
- Bonus Project: Adorable Doily Ring Dish
The links in this post may include affiliate links, which means if you purchase anything using these links, you pay no extra, but I may receive a small commission that helps keep this blog running. I truly appreciate you using affiliate links whenever possible. Please know that I will never recommend a product I do not believe in!
At a Glance How-To
(for those brimming with crafting confidence)
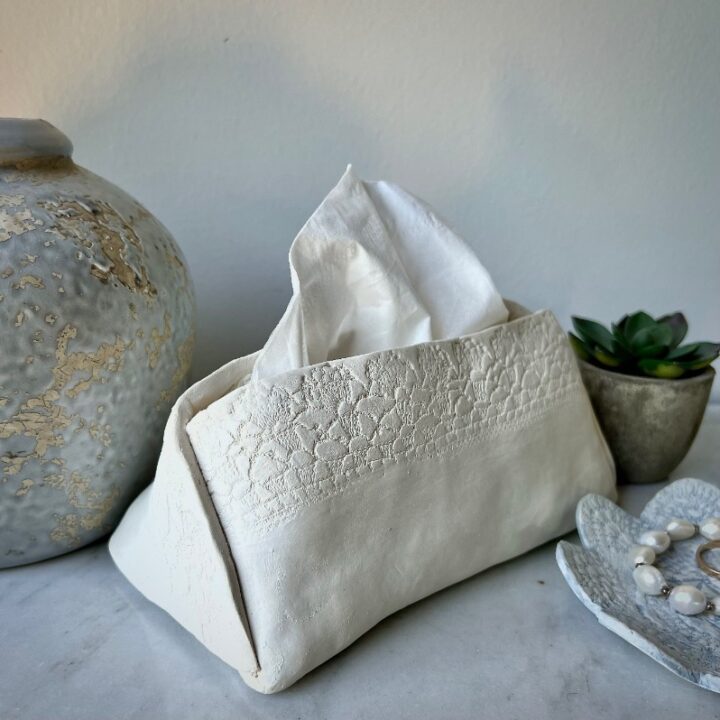
Stylish Alternative to Ugly Tissue Boxes
Join the trend and ditch those ugly tissue boxes. Here we craft an air-dry clay option with lace trim for a fresh, organic style.
Materials
- Air dry clay (white or colored)
- Freezer paper or parchment paper
- Scrap paper or newsprint
- Acrylic paint, optional
- Clear sealer, optional
Tools
Instructions
Preparations-
Project Steps-
Step 1) Condition the clay and roll out to 1/4-inch thickness
Step 2) Using free template, cut clay to size and shape, including the bottom opening
Step 3) Press doily or crocheted lace into clay using rod, brayer or rolling pin
Step 4) Roll out three thin logs of clay six inches long to reinforce the corners in step 8
Step 5) Gently turn the imprinted clay upside down by picking up the freezer paper and turning it over onto the second piece of freezer paper. Peel off the original paper.
Step 6) Score the fold lines, refer to the template.
Step 7) Wad up newsprint into several moderately tight balls. You will need to be able to pul them out of the opening in the base
Step 8) Fold curved side A along the score line on the base so it stands upright and the two short wings will fold around the base on the two short ends. Seal these short ends by scratching and then dampening the surface where they will meet. Fold in the two short wings, press together, add a clay log along inside of that seam and up the vertical corner. Smooth with fingers. Trim any excess length of logs off.
Step 9) Position the wads of paper to support this side standing fairly upright.
Step 10) Repeat Step 9 with the curved front side B adding the supporting log to the vertical corner before you seal the short ends. Scratch and dampen the wings where they will overlap. Press together firmly, but lightly so as not to distort the shape or spoil the doily imprint
Step 11) Wait! Check on your tissue holder after an hour or two. If the long sides are showing any signs of sagging, shore them up with more paper
Depending on the clay you use and the temp and humidity it may take 48 hours to thoroughly dry. You can speed this up with my tips in the detailed steps below
Step 12) Once dry, it's time to sand and polish your tissue holder
Step 13) Optionally, add some color or highlights with a thin wash of acrylic paint or ink
Step 14) Optionally, seal your tissue holder
Notes
NOTE: Keep scrolling for all details and tips.
Now, for those of you who want the full scoop with all my tips, tricks, and lessons learned, keep reading! I promise it’ll be worth it.
Detailed Step-by-Step Guide:
Let’s Get Our Hands Dirty!
Materials and Supplies-
- Air dry clay (white or colored) * See note below
- Freezer paper or parchment paper
- Newsprint or scrap paper
- Acrylic paint, optional
- Clear sealer, optional
*Air Dry Clay Note – I used Crayola brand air dry clay in white. It worked fine, but I do think I prefer Das Air Dry Clay. The Das is whiter and easier to incorporate paint into it. I tried this for the ring dish with the Crayola brand (that’s why I’m wearing gloves for the ring dish), but it didn’t work as well.
- Crocheted doily
- Acrylic Roller, craft brayer, rolling pin or wine bottle with label removed
- Exacto knife or clay cutting tool
- Misting bottle, this is mine (that I cannot craft without)
- Micro sander and 220 sand paper, this is mine (and another indispensable craft supply for me)
- Nail file
Preparations
(The “Trust Me, This Makes Everything Easier” Phase)
1. Download and Print the Template

First things first—grab my free template from my Resource Library available free to all my subscribers and followers. Reminder: the password is above my signature in all the emails I send you.
Print it at 100% scale (no “fit to page” shenanigans). This template took me an embarrassing number of attempts to get right, so save yourself the heartache and just use mine. You’re welcome!
There are two pages to print. Overlap so the centerlines on each match up, tape in place and you’re ready to go.
Wait, what? You still need access to my resource library? By all means, Subscribe now, and you are off and running with so many great templates and prints:
Many thanks! N0ow back to our clay:
2. Set Up Your Workspace
Tape a large piece of freezer paper (shiny side UP) to a smooth work surface. The freezer paper is your BFF in this project—clay won’t stick to it, and you can reposition things easily. Have a second piece ready for when we flip our clay.
And yes, parchment paper works too.
Project Steps (Where the Magic Happens)-
Step 1) Condition and Roll Out the Clay-
What the quick guide doesn’t tell you is that air-dry clay straight from the package can be stiffer than your grandma’s holiday fruitcake. To condition it:
- Break off a chunk larger than you think you’ll need (trust me on this)
- Knead it in your hands for 3-5 minutes until it feels like soft playdough
- If it’s cracking, add a FEW drops of water and continue kneading
- Once it’s smooth and pliable, form a ball
PRO TIP: If your hands get too dry and the clay starts sticking, wet them SLIGHTLY. Too much water = clay soup!
Now for rolling:
- Place your clay ball on the taped-down freezer paper
- Press it into a disc with your palm
- Use your rolling tool of choice to roll it out to 1/4-inch thickness
- For even thickness, I use square dowels as guides on either side of the clay
MISTAKE I MADE SO YOU DON’T HAVE TO: The first time I did this, I rolled my clay too thin and the whole thing collapsed when drying. Quarter-inch thickness is your sweet spot!
Step 2) Cut Clay Using Template-
- Place your printed template on top of the rolled clay
- Using an X-Acto knife, carefully cut around the template outline
- Remove the template and peel away all the excess clay (save the cutaway pieces. They’re great for testing th embossing and paint wash options)
- Don’t forget to cut out the bottom opening where you’ll add the tissues
PRO TIP: Cut straight down, not at an angle. Clean, vertical cuts make for cleaner folds later!
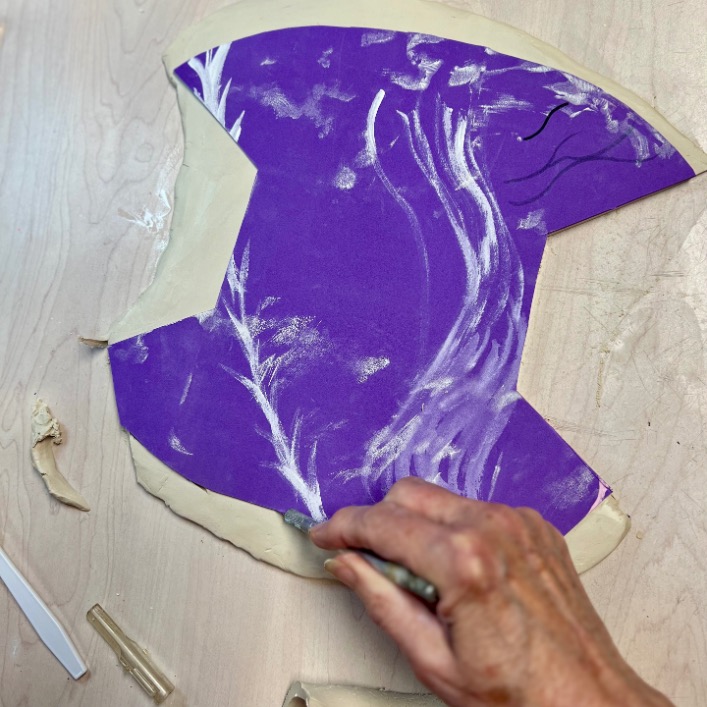
NOTE: Don’t be confused — that purple is a piece of old craft foam I used to create the original pattern. At this point point I did not have the hole in the base cut out. But go ahead and cut yours now.
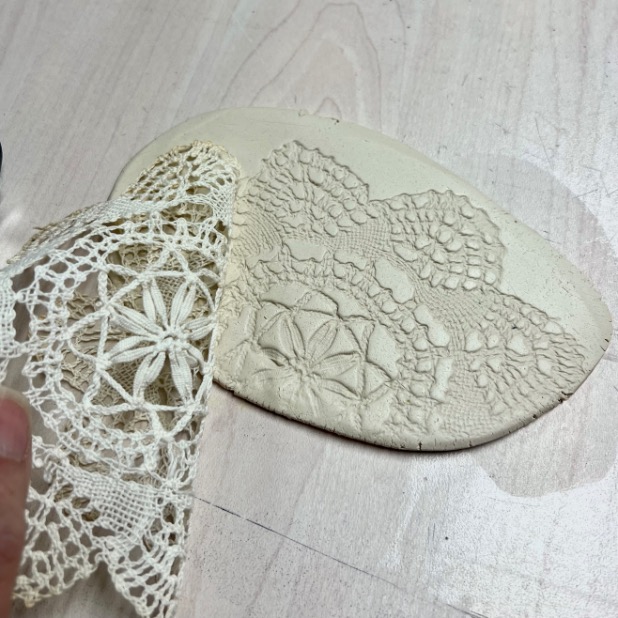
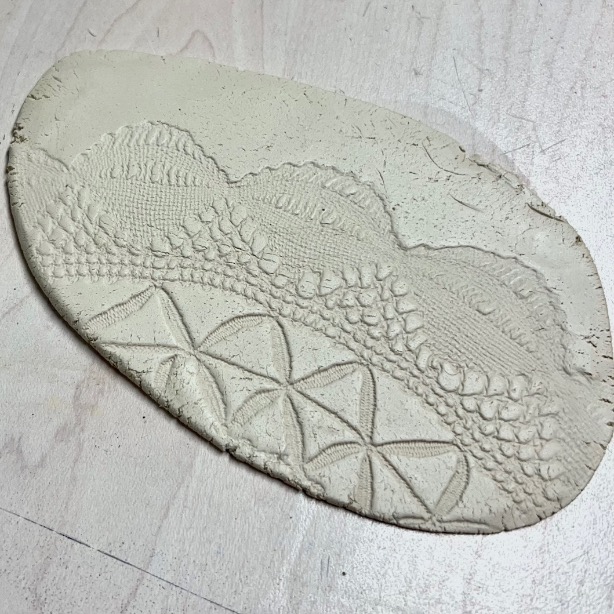
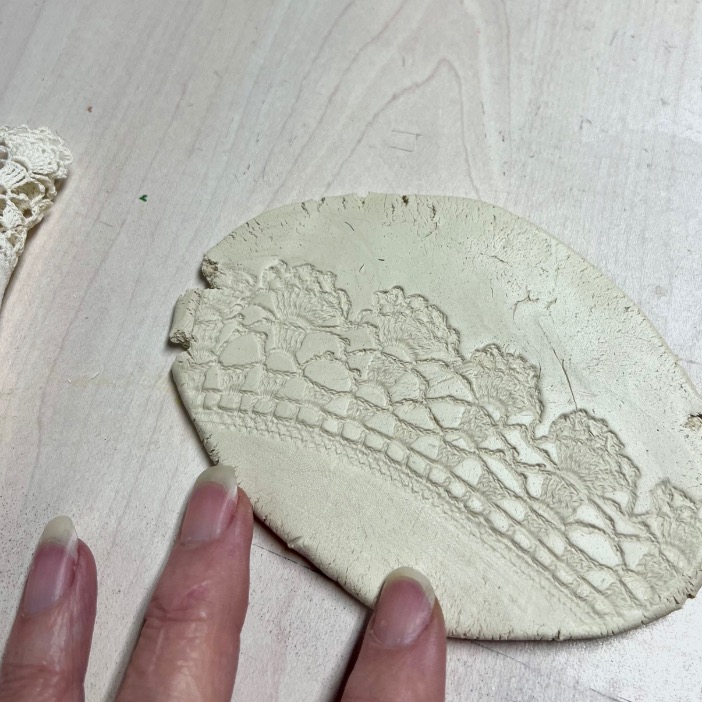
Step 3) Add That Gorgeous Doily Texture-
This is where your project goes gets its pizzazz!
HINT: Use some of those cutaway clay pieces to test out your doily or lace embossing. Then let these pieces dry and use them again to test any coloring wash or rubs.
If you have a collection of vintage doilies and lace, it’s fun to try out several to find the look you like best.
PRO TIP: Iron your doily first! This is CRUCIAL for getting all those delicate curves and details to lay flat and point the way you want them to
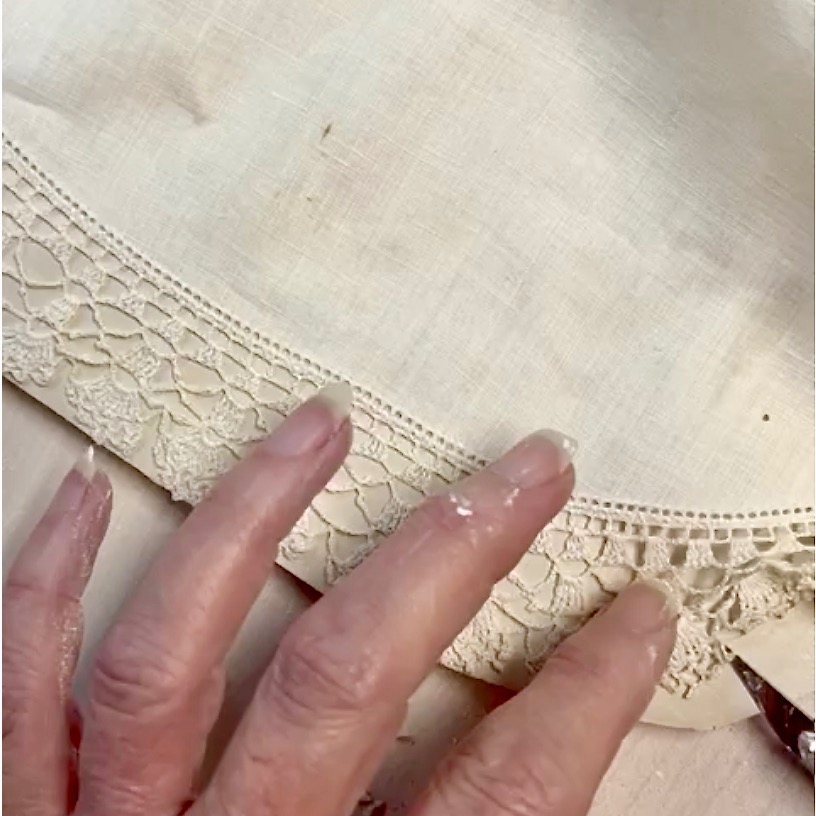
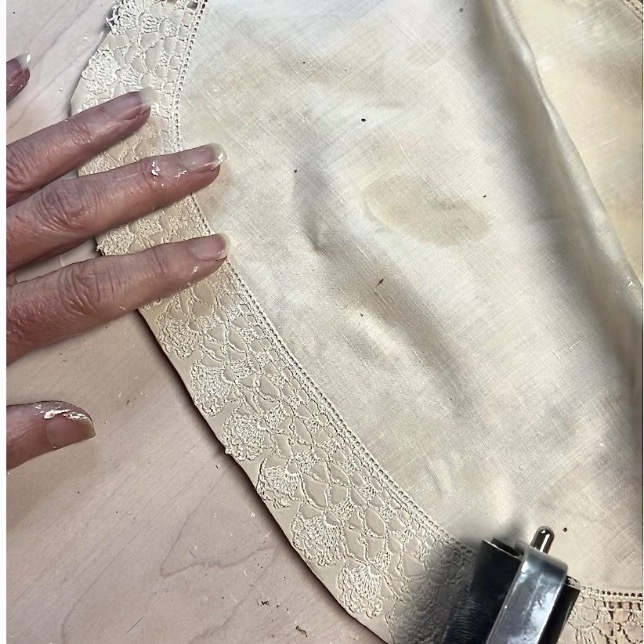
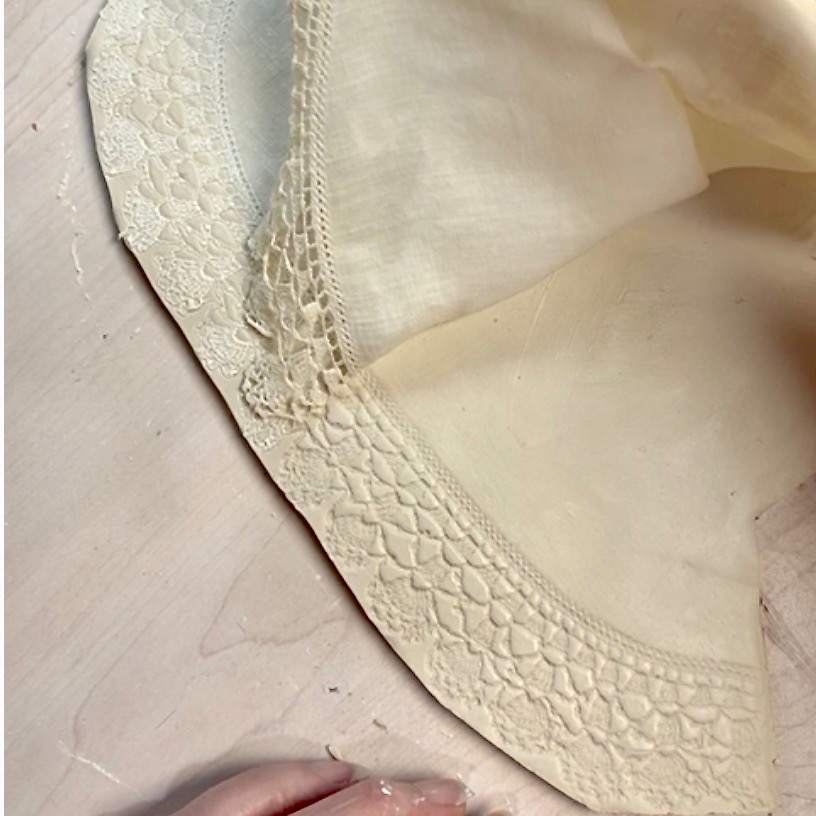
- Position your doily along the edge where you want the pattern (I did about a 1-inch border along the curved edges)
- Gently lay the doily right where you want it. I used the tip of a exact knife to get it all laying just so.
- Use a clay roller, brayer or rolling pin to firmly press the doily into the clay—don’t overthink this, it’s really amazingly easy.
- Carefully peel the doily away from the clay to reveal the pattern
ALTERNATE APPROACH: If you want an all-over doily design instead of just edges, impress the doilies into your clay FIRST, then place your template and cut out.
TRULY SORRY!: I didn’t get pictures of the actual forming process. It’s definitely a two-handed job and sadly I thought my video was recording — it wasn’t.
Step 4) Create Reinforcement Logs-
Those corners need some love for strength and to prevent cracking during drying:
- Take some of your leftover clay and roll out three thin logs (about pencil thickness) each roughly six inches long
- Set these aside (maybe cover with plastic wrap if your room is dry) until we need them in Step 8
- These will act as internal support beams for your tissue holder’s corners
PRO TIP: If your logs are getting too dry, dampen your fingers slightly before working with them. This is where I can’t do clay (or painting) without my misting bottle.
Step 5) The Great Flip-
This is the part where I hold my breath, and then after, relish how easy it really was and how much time and effort it saved — every time:
- Place your second piece of freezer paper on top of your cut and impressed clay
- With one swift, confident motion, flip the whole sandwich over
- Carefully peel off the original piece of freezer paper from what is now the top
If this seems a bit intimidating to you, I totally get it!!! We could all use a bit of extra support now and then — and this ,might be your time.
EXTRA SUPPORT: Before you flip your freezer paper and clay sandwich, enclose it with pieces of cardboard or rimless baking sheets on each side (on top of the top freezer paper and below the bottom freezer paper). Hold them together and flip.
CRISIS CONTROL: If your clay tears during flipping, don’t panic! Press the torn edges back together, smooth with a SLIGHTLY damp finger, and carry on. Air dry clay is very forgiving.
Step 6) Score the Fold Lines-
Straight lines matters here:
- Using your template as a guide, lightly mark the fold lines on your clay using the back (non-cutting) edge of your X-Acto knife
- Don’t cut all the way through—just create a slight indentation that will guide your folds
- Double-check against the template to make sure your score lines match up
PRO TIP: Scoring too deeply can weaken the clay. Think of it as suggesting to the clay where to fold, not forcing it!
Step 7) Prepare Your Support System-
This step saved me from the dreaded “saggy tissue holder syndrome”:
- Tear several pieces of newsprint (regular printer paper works too)
- Wad them up into moderately tight balls of various sizes
- These will support your clay walls as they dry and prevent collapse
- Make sure these will fit through the bottom opening so you can remove them later!
PRO TIP: Don’t use colored paper or newspaper with heavy ink—it might transfer to your wet clay!
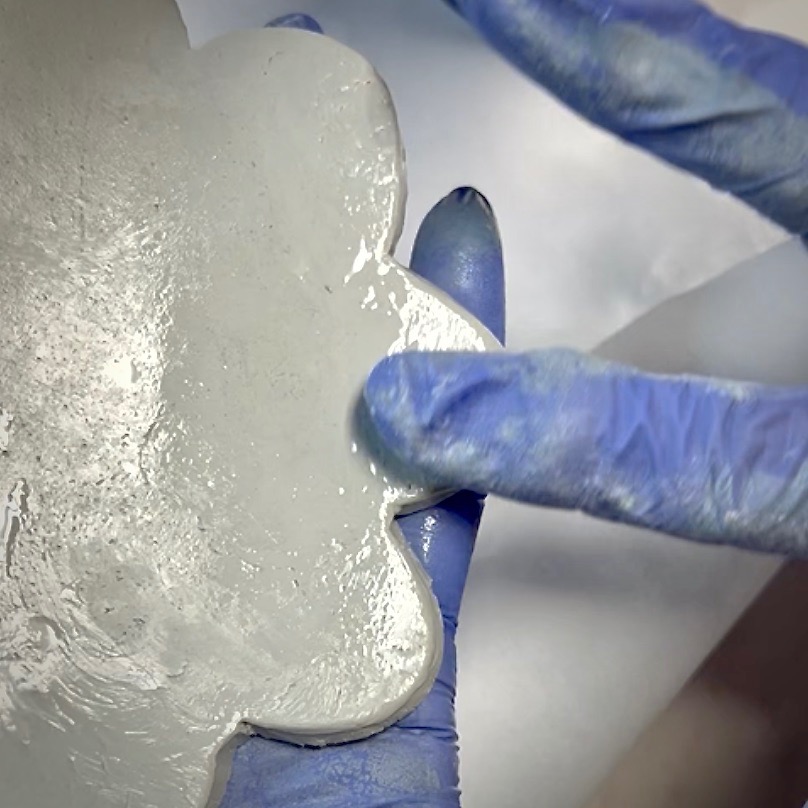
Step 8) Create First Side Wall-
Now the sculpture takes shape:
- Identify curved side A on your template/clay piece
- Gently fold this section up along your score line so it stands a bit beyond vertical
- The two short wings should extend out along the sides of the base
- Using a toothpick or clay tool, scratch a crosshatch pattern on the inside edges where the wings will meet the base edges
- Lightly spritz these scratched areas with water (or brush on water)
- Fold in the short wings so they butt up against the base, press together firmly
- Place one of your clay logs along the inside of each vertical corner fold and along the seam with the base
- Smooth with your fingers to blend the log into both walls, reinforcing the corner
- Trim off any excess length of the logs
PRO TIP: The “scratch and wet” technique creates a clay slip that works like glue. Don’t skip this step or your seams might separate when drying!
Step 9) Support Side A-
Your tissue holder is at its most vulnerable right now:
- Position your paper wads inside to support the wall you just created
- Adjust them until the wall stands at a fairly consistent angle and stable
- The support should be firm but not pushing so hard it distorts your clay
Step 10) Create Second Side Wall-
Almost there!
- Identify curved side B on your piece
- Before folding up, add your reinforcement logs to what will become the inside corners, trimming off any excess
- Fold this section up along the score line to form the opposite wall
- Scratch and dampen the wings where they will meet and overlap with the existing structure
- Press together firmly but gently to avoid distorting your doily impression
- Smooth the seams with a slightly damp finger for a clean finish
HINT: Texture can be smoothed out after the clay is dry, but shape cannot be changed. Now is the time to make sure you have the shape just as you want it. And a damp fingertip with a gentle touch can smooth over many imperfections and rough spots now.
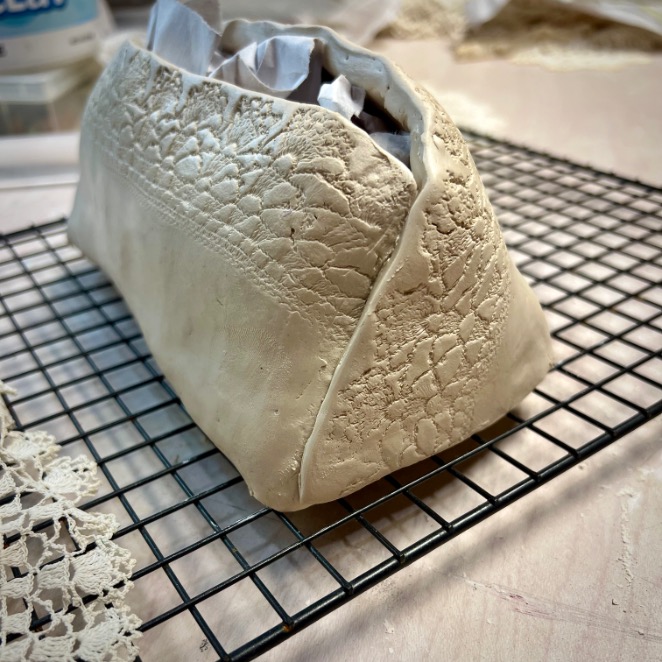
This is how it should look while drying. Flaps overlapped and wads of newsprint inside keeping the clay from collapsing as it dries.
NOTE: I thought elevating it on my craft room drying rack would help it dry faster. It just caused ridges in the base. Let it sit on a smooth table instead.
Step 11) Monitor and Adjust During Initial Drying-
Babysitting clay is a real thing:
- Check on your tissue holder after 1-2 hours
- If you notice any sagging or leaning, add more paper supports
- Rotate the piece gently every few hours for even drying
- Depending on your climate, drying may take 24-48 hours (I’m in [your climate], and it took me [your time])
DRYING HACKS: To speed up drying time:
- Use a fan on low setting nearby (not directly on the clay)
- If you have a food dehydrator with a removable tray, you can place the piece inside on the lowest setting
- Place in a warm (not hot) area of your home
- NEVER use a hairdryer directly on wet clay—I tried this and created more cracks than the Grand Canyon!
- If you have a convection oven, set it on freezer paper or parchment paper on a baking dish in the cold oven. Heat to the lowest setting and leave it be for several hours.
When it is even colored and solid (no pliable give to it), your piece is dry. Depending on your clay, it can take a full 72 hours to be fully cured.
Step 12) Sand and Polish-


The finishing touches:
- Once completely dry (test by pressing gently—no “give” means it’s dry), inspect for any rough edges
- Use fine sandpaper (220-320 grit) to gently sand any uneven areas — it doesn’t take much!
- Pay special attention to the top opening and dispensing hole edges
- A nail file is the best for getting in all the hard to reach nooks and crannies
- Wipe away all dust with a soft cloth
HINT: If you have a fine crack or a troublesome spot, lightly mist with water and gently rub to smooth out that spot.
PRO TIP: A micro sander is soooo much easier on your hands and results in a consistent finish. Our handcrafting hands deserve the love!
Step 13) Add Color (Optional)-

HINT: Remember guinea pig samples you set aside? Now is where you are really going to appreciate them. Test to get your paint wash to right level. Do you like highlighting there raised or the impressed areas?


This is where your tissue holder gets a touch of customization:
- Mix a small amount of acrylic paint with water to create a thin wash (about 1:3 paint to water ratio)
- Using a soft brush, apply the wash over the entire piece or just in the recessed areas
- Immediately wipe away excess from raised areas with a paper towel for a highlighted effect. Don’t be alarmed that the color of your clay is different eve where you rubbed it off. The moisture in the wash will darken the clay utility it dries again.
- Let dry completely
Step 14) Seal (Optional)-
For longevity:
- If you’ve painted your tissue holder, a sealer will protect the finish
- Apply a thin coat of matte or satin clear sealer with a soft brush
- Let dry according to the product instructions (usually 24 hours)
- Apply a second coat if desired
PRO TIP: Test your sealer on a scrap piece first to make sure it doesn’t yellow or change the color of your paint!
Final Step) Enjoy and Show Off!

- Load your fancy new tissue holder with tissues
- Grab a handful of 20-ish folded tissues (keeping them folded into each other)
- Loosely fold the bundle in the middle lengthwise, pulling the edge of the top one free as your starter
- With your starter edge on top, squeeze this bundle into your new stylish tissue holder.
- Reach through the top opening ad pull the full width of the starter edge out of the top
- Position in a place of honor in your home
- Wait for the inevitable “OMG, where did you get that?” questions
- Smugly reply, “Oh, I made it!” and watch jaws drop
KEEPING IT REAL: While this project does require some patience, it’s actually much easier than it looks. The end result is so worth it—I now have people asking if I sell these! (Hmm, maybe I should?)
Please Pin This ⬇️

Customization Options: Make It Uniquely Yours!
The beauty of these clay tissue holders is how customizable they are. Here are some of my favorite ways to take yours from “Oh, that’s nice” to “I NEED THAT IN MY LIFE RIGHT NOW”:
Highlighting Techniques
Option 1: Highlight the Recessed Area
This is perfect for making that doily pattern pop:
- Mix a thin wash of acrylic paint with water (1:3 ratio)
- Apply liberally over the entire textured area
- Quickly wipe away from raised surfaces with a paper towel
- What remains in the recessed areas creates beautiful definition
- Let dry completely before handling
PRO TIP: Typically you’ll see this “antiquing” with black or burnt umber, but it works beautifully with jewel tones like sapphire blue, emerald green, or deep burgundy.
I used dusty blue on the little trinket dish and nearly cried at how pretty it looked!
Option 2: Highlight the Raised Areas
For a more subtle, sophisticated look:
- Use a nearly-dry brush technique (dip brush in paint, then dab most of it off)
- Lightly brush over just the highest points of your texture
- The raised areas will catch the color while recesses remain the base clay color
- This creates amazing dimension and looks hand-painted
PRO TIP: Any color works, just remember to use minimal paint on your brush with a very light hand.
Metallic Magic
Nothing elevates handmade clay like a touch of metallic:
Gold or Silver Edges
- Add metallic gold or silver to the top 1/4-inch thick rim following the curve down to the base.
- Use a fine detail brush to paint with metallic paint, or even easier, I like to use a metallic marker, running the side of the tip on the edge.
- This creates a luxe “dipped in gold” effect that looks so expensive
Rub-n-Buff Accents
This is my secret weapon for instant elegance:
- Put a TINY amount of Rub-n-Buff on your fingertip
- Gently dab onto raised areas of the doily pattern
- A little goes a very long way—start sparse!
- Let dry for 24 hours, then buff with a soft cloth
- The result is a gorgeous, authentic-looking metallic patina
PRO TIP: The absolute easiest is to use a metallic marker on run the side of the nub over the edge. This work also on decoupage shells and the rims of just about anything.
FAVORITE COMBO: Antique Gold Rub-n-Buff on the raised details of a holder with pale blue wash in the recessed areas—it looks like something from a Parisian boutique!
Texture Variations
Why stop at doilies? Try these texture alternatives:
Natural Elements
- Pressed leaves create beautiful organic patterns
- Small ferns make incredible fossil-like impressions
- Burlap or textured fabric gives a rustic, woven appearance
Found Objects
- Vintage buttons pressed in a pattern
- Old jewelry for Art Deco vibes
- Textured wallpaper samples for consistent patterns
Finishing Touches
Layered Sealants
- Apply matte sealer to textured areas
- Use gloss sealer on smooth sections
- The contrast between finishes adds subtle but sophisticated dimension
Custom Feet
- Add small clay balls to the bottom corners as feet
- This elevates your holder literally and figuratively!
- Hint: tiny gold-painted feet look super luxe
Remember, there are no rules here! The beauty of handmade is that each piece is unique. I’ve made several of these now, and no two look alike—that’s exactly how I like it. Each one reflects a different mood or space in my home.
What started as a simple challenge project has turned into my favorite way to elevate everyday objects. Who knew that the humble tissue could become such a statement piece?
Not me, but I’m definitely not complaining about having the prettiest tissues on the block!
Bonus Project: Adorable Doily Ring Dish
While we’re on a roll with the doily-impressed clay technique, I just have to share this adorable companion project I made! If you’ve already made your tissue holder and are looking at your leftover clay thinking, “What else can I make?”—I’ve got you covered!
PRO TIP: Unlike the tissue holder, this project is super forgiving since there’s no construction involved—just impress, cut, and curve! You can lay it over an inverted bowl for the outside to be embossed.
This charming ring dish uses the exact same technique but in a simplified form, making it perfect for:
- A quick gift (hello, last-minute birthday present!)
- Using up leftover clay from your tissue holder
- Testing your doily impression skills before tackling the larger project
- Creating a coordinated set of handmade decor pieces
How To Make A Doily-Impressed Ring Dish
Materials:
- Air dry clay (leftover from your tissue holder project is perfect!)
- Crochet doily (smaller than the one used for your tissue holder)
- Small bowl
- Plastic wrap
- Exacto knife or clay cutting tool
- Fine sandpaper
- Acrylic paint for wash
- Sealer (optional)
Quick Steps:


- Roll out clay to about 1/4-inch thickness
- Press doily firmly into the clay to create impression
- Cut around the impression following the doily’s edge pattern
- While clay is soft, smooth out any rough edges (a fine mist of water, helps this a lot
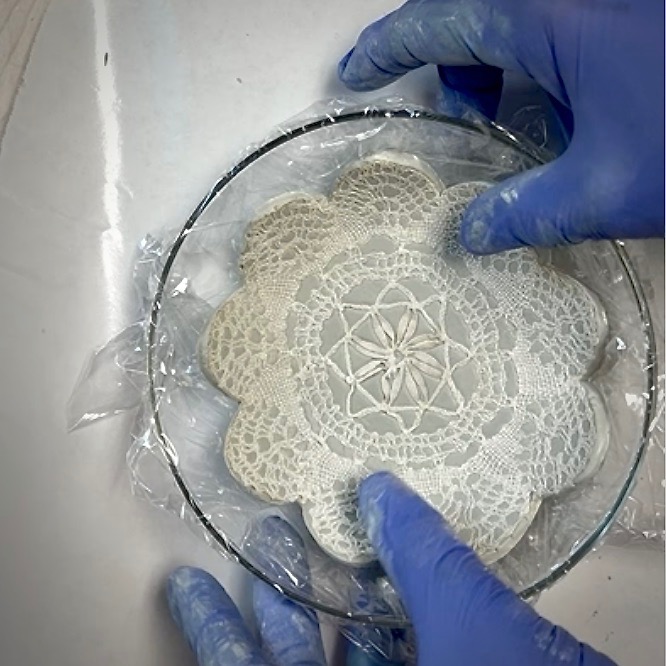

- Line a small bowl with plastic wrap
- Place your clay disc embossed-side UP in the bowl to create a gentle curve
- Remove the doily
- Let dry completely (usually 24 hours or more)
- Sand edges smooth
- Apply a color wash (I used a dusty blue)
- Seal if desired
Where To Use Your Ring Dish
These little beauties are surprisingly versatile:
- Bedside table for nightly jewelry removal
- Bathroom counter for rings while washing hands
- Entryway table for keys or pocket change
- Office desk for paper clips or thumb tacks
- Kitchen counter for garlic skins or small food scraps while cooking
I originally made mine to hold my rings while washing dishes, but it’s migrated all over my house for different purposes. It’s that perfect little “catch-all” that somehow looks intentional rather than cluttered.
The best part? When placed near your tissue holder, they look like a deliberate decor set that you spent big bucks on! Talk about crafting win-win!
And now comes the time for me to send you on to my crafting buddies who joined me for this month’s crafting challenge of doilies.
Let’s see what they came up with, shall we? (Okay, confession, I had a sneak peek and there are some pretty awesome ideas)


Hi Diane, you are so talented and creative! I can’t believe you made a tissue holder from air-dry clay! It’s so fun and unique! The doily added the perfect texture and made the piece so special! And the ring dish with the scalloped edges turned out so cute! Pinning now so I can try this sometime!
Yea Donna! I can’t wait to see how you make it yours. Because, I know you, it will be unique and fab!
So much love and care went into these fabulous pieces, Diane. I love how they turned out! Thanks for sharing all your best tips and tricks along the way. I’ve used the crayola brand several times and you definitely have to be careful about the thickness before drying. I’ve never made anything larger than ornaments or ring dishes though so I’m excited to try your tissue holder. It’s super creative! Hugs, CoCo
Thanks CoCo. I bought that tub last Christmas thinking I was buying Crayola Model Magic. So it didn’t work for the Christmas idea, so it’s been sitting in the craft room patiently waiting for the right project. It worked, but I don’t like it as well as Das (just being honest).
A beautiful tissue holder from clay and using the doily to press into the edges. A unique holder for tissues. Love one-of-a-kind items!
Thanks Tammy. Yes, you are a one of a kind devotee and that makes you so relatable and wonderful! I always look forward to seeing what you make — and your doily “windows” did not disappoint!!!
Wow, so impressive, my friend! I love how creative you are. This certainly does make a statement, and I love how the design of the doily makes an imprint on the clay. The flower is super cute too. Way to go girl.
Thanks bunches my friend!!! It was a bit of a challenge to come ups with a shape and size that worked without being too complicated. But I do love how it turned out.
You never cease to amaze me with your creativity. This is such a genius idea for Kleenex boxes! I’m always inspired –
Awww shucks, Lynn! You are the best. I’m hoping for sourdough bread come June 😉.
Diane – Holy moly girl! You pulled out ALL the stops for this project! Thank you for all the “Tips” and “Hints”. I also like DAS air dry clay. As always, you come up with the most creative ideas. You could make multiples of these and give them as gifts during the holiday. Always fun participating in the HCS with you. Pinned.
Oh Anna, that is so sweet of you to say. I do love how it turned out and I have a gazillion different versions dancing in my head, but alas, more projects are calling my name!
Wow, Diane, this is amazing. You are so creative! I love the colors you used as well. I love clay projects so I need to add this to my list!