Surprisingly Simple Way to Make Fabulous DIY Witch Hat Decor
Easy DIY witch hat decor you can make from a basket! No-sew Halloween craft idea for stunning, boho-inspired witchy decorations.
I’m beyond honored to be the August guest for Thrifting With the Gals — thrifting alongside these amazingly creative friends is a real treat.
If you’re new here, a big hearty welcome!
Around here, we’re all about making life more joy-filled. How? Through creative problem-solving. When we smooth out the little snags and friction points in our lives, we make room for joy to come waltzing in.
And we do it by flexing our creativity muscle — not through complicated art theory, but through crafting, DIY, and clever projects that make our homes and lives sparkle with personality.
On my latest thrift trip, I stumbled into what I can only call a basket bonanza.
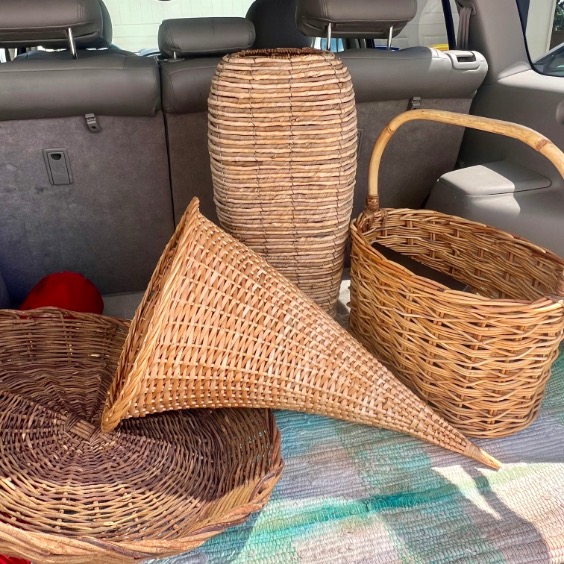
It’s funny how treasures often seem to appear in themed clusters. This time, it was baskets galore — but four of them were so unusual, I couldn’t leave them behind.
The star of the day? The cornucopia. (You’ll have to come back for the others’ star treatments.)

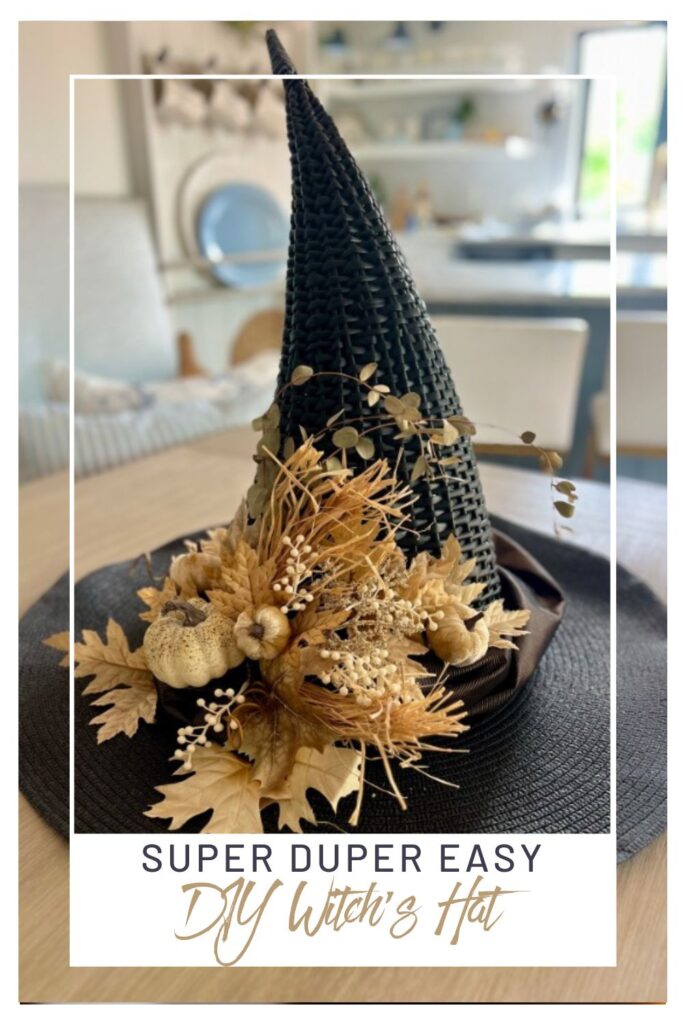
But here’s where the fun begins: turn that cornucopia upside down, and suddenly it’s not a horn of plenty anymore… it’s the perfect crown for a witch’s hat.
And that’s the best part of our creativity journey — looking at things differently, from new angles, through a fresh lens. Sometimes, all it takes is literally turning something on its head to discover a whole new kind of magic.
TABLE OF CONTENTS
The links in this post may include affiliate links, which means if you purchase anything using these links, you pay no extra, but I may receive a small commission that helps keep this blog running. I truly appreciate you using affiliate links whenever possible. Please know that I will never recommend a product I do not believe in!
Turning a Cornucopia into a Witch’s Hat Decoration
This one’s almost too easy — but the effect? Pure magic

If you prefer to jump on the “Crafting Express”, check out this How-To card.
But is you’re more give me the “Deep Dive Details” kind, keep scrolling for all the
best tips, tricks and details you’ll need or want.
Crafting Express How-To Card

Quick DIY Witch Hat Decor Steps
(No-Sew, Easy, and Totally Customizable)
Materials
- Cornucopia basket
- Wide brim straw hat, (see the tips in detailed Step 2)
- Ribbon or fabric for hat band
- Spray paint - flat black
- Assorted embellishment
Instructions
1. Spray paint the cornucopia black —
inside and out, using thin coats from multiple angles to hide all the wicker color.
2. Pick the perfect brim —
choose a large black straw hat sized to fit your cornucopia’s scale. (more notes on this are in the detailed step 2)
3. Assemble your hat —
simply set the cornucopia over the crown of the hat.
4. Dress it up —
wrap the joint between brim and crown with ribbon, fabric, or seasonal accents.
Then add a few embellishments and your DIY witch hat decor is ready to enchant your porch, mantel, or Halloween table.
Notes
Tip: This is a no-sew witch hat craft — the brim and cornucopia aren’t attached, so you can reuse that fabulous sun hat later.
Now For the Deep Dive Details
What You’ll Need:
- Cornucopia or Horn of Plenty
- Flat black spray paint
- Large straw brimmed hat, see notes in step 2
- Ribbon, tulle, or torn fabric
- Fall flowers, pumpkins, leaves, spiders or other accents
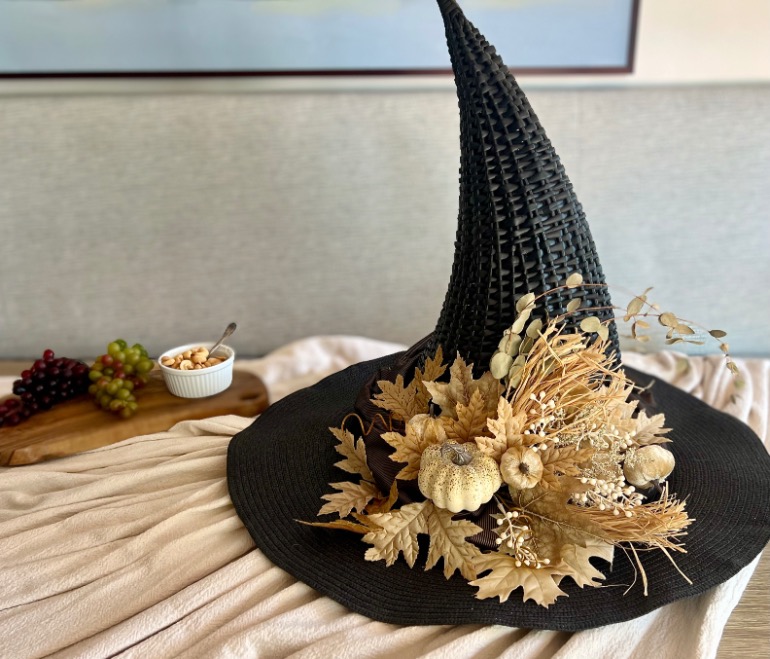
Step 1) Paint it black –
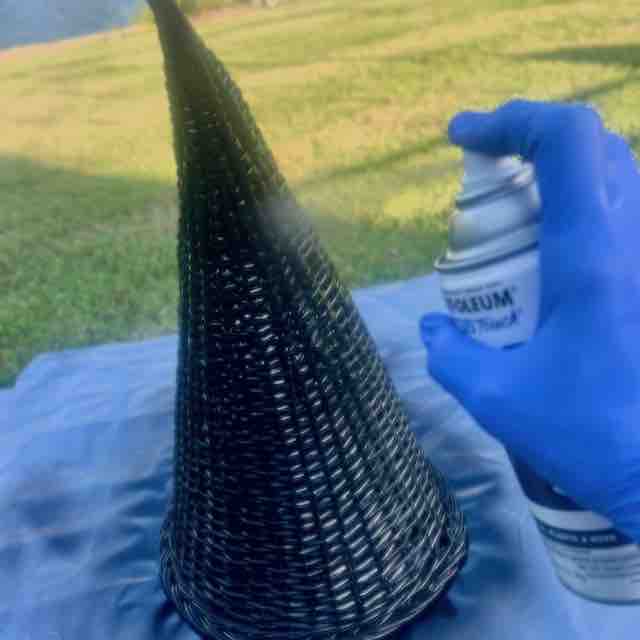
Give the cornucopia a full coat of flat black spray paint — inside and out. Wicker can be a little stubborn to cover, so go slow and use thin coats, hitting it from multiple angles until every bit of that caramel color is history.
Step 2) Find your brim-
For mine, I used this very large-brimmed black straw hat I ordered from Amazon. Because my cornucopia is huge, I needed a big brim to match. Seriously, it’s 22-inches tall and 14-inches across.
Size Tip: The hat size depends on your cornucopia’s opening. A brim that’s 5 inches wide from a woman’s hat isn’t the same as 5 inches from the wider circumference of the cornucopia. Measure before you buy!
So if you use this cornucopia, which measures 7-inches across and approx. 12-inches tall, I’d suggest this hat
Step 3) Instant hat assembly –

This may be the easiest “crafting” step you’ll do all year — simply set the cornucopia over the crown of your straw hat. That’s it. Hat made.
Bonus: No sewing or gluing required. And since the brim and cornucopia aren’t attached, that fabulous sun hat is still ready for your next cruise.
Step 4) Dress it up –
You could stop here… but why would you?
A little decoration goes a long way.
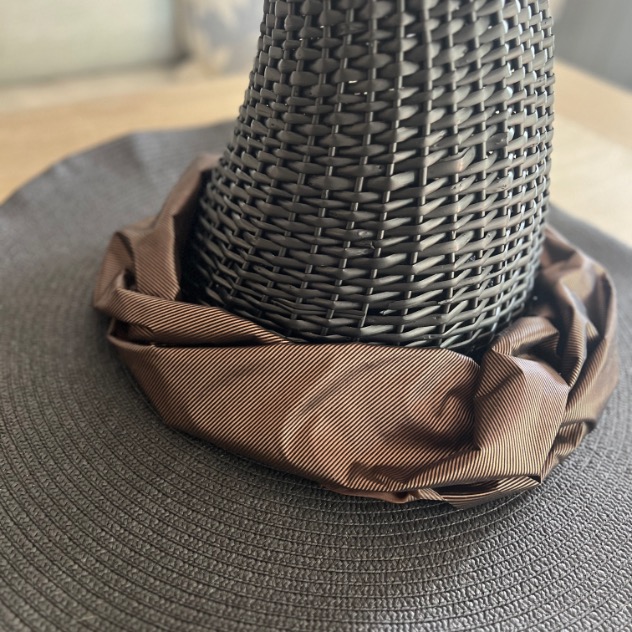
A band between the wicker and straw makes for a great transition between the two textures.
I used a pinstripe of black on a deep bronze taffeta. But if I was adding dried florals, I’d go with a washed linen or tea-stained muslin band.
Once again, you could stop here. But seriously, why?!?!
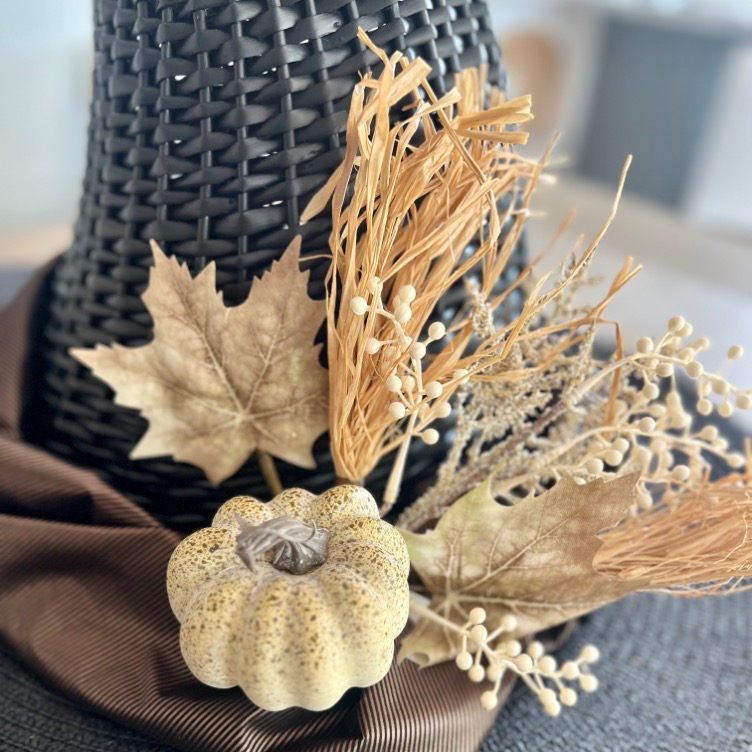
The simplest is to start with a seasonal floral pick like I did.

Then I filled it out a bit more with a few velvet pumpkins I took off a longer stem and a generous handful of neutral leaves. And a few sweeping dried eucalyptus branches finished it off with style
But there are seriously so many ways to decorate this witch’s hat to coordinate with your style
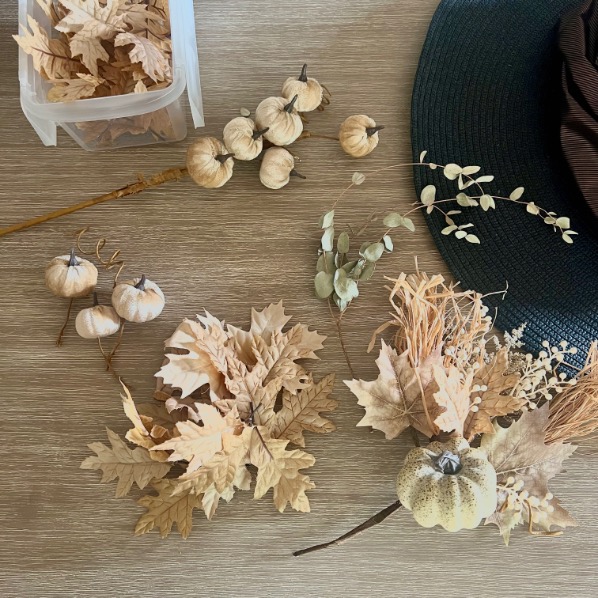
This is what I used:
- One floral pick
- Three small velvet pumpkins with one coil
- Handful of neutral leaves
- One set of three dried eucalyptus branches
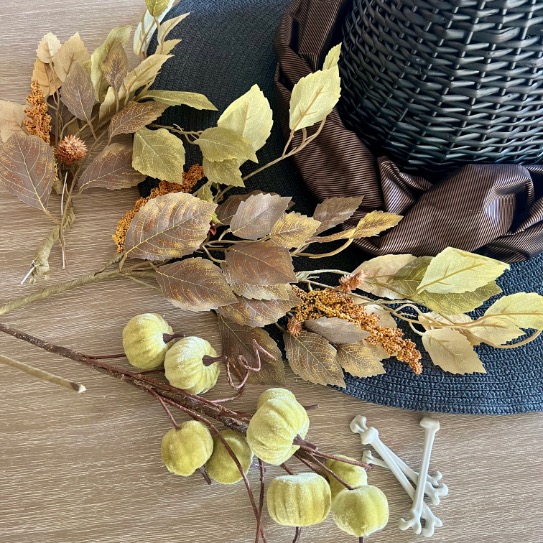
But if you crave a bit more color and and find yourself in your sage green era, you might opt for a combination like this, tossing in a few bones for a touch of Halloween creepiness.
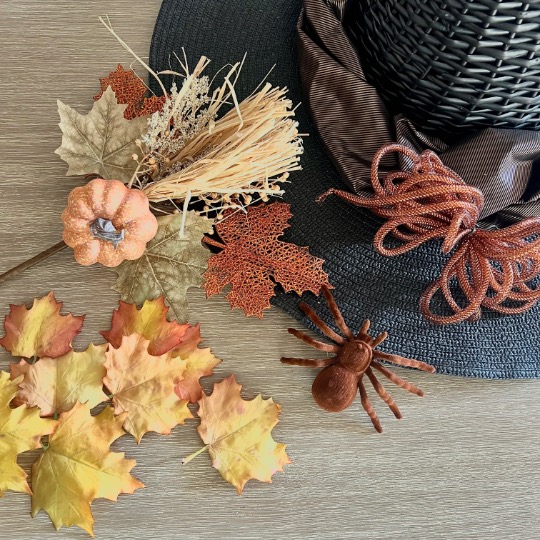
And if you are more of a Halloween traditionalist, embrace the orange. Choose a pick with an orange pumpkin, more colorful leaves, some muted orange mesh ribbon, a few glitter leaves and velvet spider from the Dollar Tree.
Or of course, you can go for the bright orange!
Or black and white and grey!
No limits here!
Don’t forget to save this pin. It helps both of us!
Wrap-Up: The Magic of a New Perspective
And there you have it — a cornucopia turned fabulous DIY witch hat decor with nothing more than paint, a brim, and a bit of flair.
But the real magic isn’t just in the hat.
It’s in the way we looked at something ordinary — a thrifted harvest basket — and imagined it as something entirely different.
That’s the heart of what we do here: we flex our creative muscles, see things from fresh angles, and turn “everyday” into “extraordinary.”
Whether it’s a cornucopia, a coffee mug, or a scrap of fabric, there’s joy in reimagining it into something that makes you smile.
And when we fill our homes with those joyful little transformations, we make space for even more joy to sneak in.
If you’d like to be on the inside track to more like this, plus all my exclusives, be sure to subscribe for inbox joy to come your way each week:
Thanks Bunches! Now back to Thrifting With the Gals:
And while we’re talking joyful transformations, you won’t believe what the other Thrifting Gals have in store for us:

Ann – Dabbling & Decorating!
Just look at the Jenny Linn bed!!! Wow, what a find. And check out how she gave it makeover.
Lora – Lora Bloomquist
The most extraordinary collector. Actually, visionary!!!
Rachel – The Ponds Farmhouse
Rachel’s sharing her favorite fall finds and how she styled them — always a great source of inspiration!!!
Robyn – Robyn’s French Nest
Robyn always has our back with budget-friendly top of mind, but somehow they never look that way. You don’t want to miss her tips for sliding into fall with budgets in tact.
I hope you’ll be back often and join me in flexing your creativity so it grows stronger and stronger.

Such a cute idea Diane!! Love this!
Thanks Michele! I was so lucky to find that large cornucopia!
This is the cutest! so adorable and creative!
I’m pretty smitten with her, I must say! Thanks for stopping in.
Such a fun way to personalize decor. Very creative! Thanks for joining us today!
Oh thanks Robyn! I was absolutely thrilled to join this great band of thrifting ladies.
Such a fun, easy DIY for Halloween! And now is the best time to score those thrifted cornucopias;) So glad you could join us today, Diane!
Oodles of thanks for inviting me Lora. You gals are the best!!!
Diane, this is the cutest idea, I’m definitely going to try and make one if I can find a cornucopia and hat, fingers crossed, thanks for joining us!
I sure hope you score a cornucopia!!!
Thanks so much for this opportunity to thrift with you gals — the best!
Really cute. I thought at first the hat brim was a placemat. Might be another alternative.
Thanks Teddee! So funny you say that about a plaacemat, it was actually my first try. But I couldn’t find one large enough for the size of my cornucopia. But it would be great for a smaller one!