Make Unique Hanging Garden Planters from Vintage Fishing Nets
Looking for unique planter ideas? Here’s how to upcycle old fishing nets into fun hanging planters with this step-by-step DIY project
Welcome, lake lovers, gardeners, crafters and DIY enthusiasts!

It’s time for our April Pinterest Challenge, where bloggers across the country take the same inspiration image and transform it to suit their own unique style and home.
If you are new here, I’m thrilled you made your way here, where we are all about creative thing and doing to make our homes and lives more joy-filled.
This month’s challenge? This charming trio of vintage metal bins stuffed full of beautiful flowers, and hung on a distressed antique door. The original image is courtesy of Laura over at Dishfunctional Designs, and it quite possibly could make my knees weak.

While I loved the rustic charm of those planters, living lakeside inspired me to put my own spin on the concept.
Taking Inspiration – Giving it a Lake Living Twist
Instead of vintage tubs, I turned to something that speaks directly to our waterfront lifestyle: old fishing nets!
By lining these weathered treasures with coco mats and filling them with lush greenery, I created vertical planters that perfectly complement our patio bar area—a spot that gets plenty of bright, indirect sunlight throughout the day. As well as, plenty of neighborly fun throughout the warm evenings.
In today’s post, I’ll walk you through how I transformed these forgotten fishing nets into eye-catching garden planters that celebrate our lake house aesthetic while giving new life to items that might otherwise have been discarded. It’s a perfect blend of function, sustainability, and lakeside charm!

TABLE OF CONTENTS:
The links in this post may include affiliate links, which means if you purchase anything using these links, you pay no extra, but I may receive a small commission that helps keep this blog running. I truly appreciate you using affiliate links whenever possible. Please know that I will never recommend a product I do not believe in!

Let’s Make a Unique Vertical Garden!
There are all kinds of crafters in this fun crafting world. And I’ve got you all covered.
If you’re full of confidence and prefer to jump on the “Crafting Express”,
check out this How-To card.
But if you’re more Give-me-the -“Deep-Dive-Details” kind, keep scrolling for all the
best tips, tricks and details you’ll need or want.

Turning Vintage Fishing Nets Into a Vertical Garden
Transform old fishing nets into charming vertical planters for your patio or garden! This lake-inspired upcycling project turns forgotten fishing gear into eye-catching plant displays. Perfect for patios, lake houses, or any area needing a touch of nautical charm.
Materials
- Old fish nets (various sizes)
- Coco Liners (14 and 20-inch)
- Curtain rod holders and nylon clamps
- Quality potting soil
- Plants of choice
- Dried moss
Tools
- Household scissors
- Drill and bits
- Fishing Line and needle
Instructions
Step1) Preparing the Coco Liners for Your Fishing Nets
- Select appropriate sized coco liners for each net (14-inch for small net, 20-inch for larger nets)
- Make deep vertical cuts in the liners from edge toward center
- Trim excess liner material if needed so it doesn't show above the net
- Form the cut liner to fit the shape of each fishing net
Step 2) Hanging Your Fishing Net Planters
- Hang empty nets before planting (they get heavy when filled)
- Use three anchor points per net: two along the handle and one at the top rim
- Secure with curtain rod holders and nylon clamps
- Position nets for proper spacing and to avoid wall contact
Step 3) Planting Your Fishing Net Containers
- Add a plastic layer with drainage holes at the bottom of each line
- Fill with quality potting soil
- Arrange and plant your selected greenery
- Top with dried moss to minimize soil runoff and retain moisture
- Water thoroughly but gently after planting
Notes
Scroll down for Deep Dive Details and Tips
The Full Step-by-Step
(For Those Who Like a Little Hand-Holding)
Materials and Supplies-
- Vintage fishing nets (various sizes)
- Coco liner sheets (14″ and 20″)
- Curtain rod holders and/or Nylon clamps (1″ and smaller)
- Thin plastic sheeting
- Quality potting soil
- Plants of choice
- Dried moss
- Household Scissors
- Drill and bits, or screwdriver
- Fishing line and needle
Difficulty: Moderate
Time: 2 hours
Step 1: Preparing the Coco Liners for Your Fishing Nets
Let’s start by transforming standard coco liners to fit our uniquely shaped fishing nets.
The challenge here is that fishing nets are typically deeper than they are wide – quite the opposite of most pre-formed planter liners you’d find at a garden center.
For my smallest fishing net, I used the smallest liner, 12-inch.
The two larger nets required 20-inch coco liners to provide adequate coverage.
Here’s how to modify the liners to fit properly:
First, take your household scissors and make several deep vertical cuts from the edge of the liner inward, stopping where you want the base to begin rising upward. These cuts create flexible “flaps” that will form the sides of your planter.
Once you’ve made your cuts, you’ll notice the flaps naturally overlap as you shape the liner to fit the net.
For my small net, I made five deep cuts into the liner creating flaps. These flaps overlapped each other bringing the circumference in to match my net.
The tight weave of this small net prevents it from stretching into wild shapes. So I was able to slip the liner down into it and the overlapping flaps were held tightly in place.
I trimmed some of those flaps to allow more room for potting soil. And I also needed to trim some excess from the top to prevent it from peeking out above the net’s edge.
Don’t be fooled by the stability of the little one. Because the weave of the large nets allow for maximum stretch and reshaping, the net alone is not enough to hold the shape of the liner once you have cut for the flaps.
Instead, use fishing line threaded through a large needle to make a number of concealed stitches up the length of the overlapping flaps. This secures the shape you want. Take your time with this step – these stitches ensure your planter maintains its form once filled with soil and plants.
PRO TIP: Conceal the majority of each stitch inside the liner keeping what shows on the outside to a minimum.
You’re going for a circumference close to the size of the net frame.

PRO TIP: Large binder clips are the answer. Use them to hold your liner where you want it to sit.

After securing your liner flaps, gather all excess netting tightly against the back of the liner and tack it in place with more fishing line. This gathering technique is perfect because once hung against a wall or fence, no one will see the gathered portion – they’ll only notice your beautiful, perfectly sized
May we take a quick pause in the action to ask if you are enjoying this post. Are you a subscriber? If to, please join use to make sure to don’t miss a thing and will receive exclusive tips and more:
Thanks bunches!!! Now back to our nets:
Step 2) Hanging Your Fishing Net Planters-
An important lesson learned in this project: always hang your nets before planting! While it might be tempting to arrange your plants first, these planters become surprisingly heavy once filled with soil and greenery.
For each net, I established three strategic connection points to ensure stability:
- Two connection points along the handle to distribute weight evenly
- One connection point at the top of the net’s rim to prevent tipping
I repurposed various curtain rod holders from my craft stash for this project as well as some nylon clips I picked up at Lowes.

For the smallest net, I used two decorative holders that extend far enough from the wall to allow the basket to hang straight without touching the wall. This net was positioned horizontally level for a balanced look.
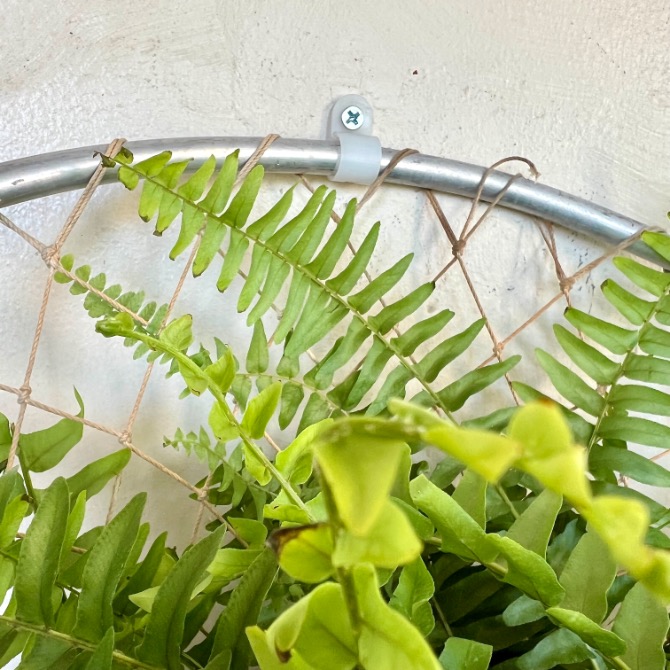
The two larger nets required a slightly different approach. Each received:
- One angled curtain rod holder
- A 1-inch nylon clamp toward the end of the handle for additional support
- Smaller nylon clamps around the lip of the net rim to prevent movement
This varied hardware approach provided both the necessary support and maintained the casual, rustic aesthetic of the overall display. By securing the nets first, I could then position my plants with confidence, knowing the structure was stable and properly spaced from the wall.
PRO TIP: If you are mounting on board and batten siding like I did, be sure all your connections are on a batten where the base is more substantial.
Step 3) Planting Your Fishing Net Containers-

Now for the fun part – bringing your fishing net planters to life with greenery! This step is fairly straightforward, but I’ve learned a few tricks that make a big difference in how well these planters perform over time.
First, I added a thin layer of plastic at the bottom of each coco liner with just a few strategic drainage holes. This simple addition helps regulate moisture and prevents the planters from drying out too quickly, which can be a common problem with coco liners, especially in warm weather or breezy conditions.
After filling the base of the liners with quality potting soil, I arranged my pre-selected plants, considering how they would grow and cascade over time. For the larger nets that I installed with a slight slope, I paid particular attention to plant placement to create a balanced, natural look.
One final touch that made a significant difference was adding a layer of dried moss across the top of the soil. This serves multiple purposes:
- Prevents soil from washing away during watering
- Helps retain moisture in the planter
- Creates a finished, polished appearance
- Adds another layer of natural texture to complement the nets
The moss layer was especially important in the larger planter that I positioned at an angle, as it prevents soil erosion when watering.
After planting, I gave everything a thorough but gentle watering, allowing the plants to settle into their new homes. The combination of the plastic layer and moss topping creates an ideal environment where the plants receive consistent moisture without becoming waterlogged.

The Joy of Repurposing:
Why These Fishing Net Planters Matter
(But Won’t Catch Any Fish)
There’s something downright magical about transforming forgotten junk—er, I mean “vintage treasures”—into something that makes guests say, “Wait, those used to be WHAT?”
These fishing net planters aren’t just pretty faces on our patio; they’re proof that sometimes the best decorating ideas come from refusing to throw perfectly good stuff away.
Happy sidenote: they (our fellas) can learn new tricks! The Hubs actually brought one of these nets home from a dog walk where he found it on a neighbor’s curb).
By repurposing these nets, we’ve created conversation pieces that tell a story.
Each one carried its share of fishing tales before retiring to a cushier job of holding plants instead of perch.
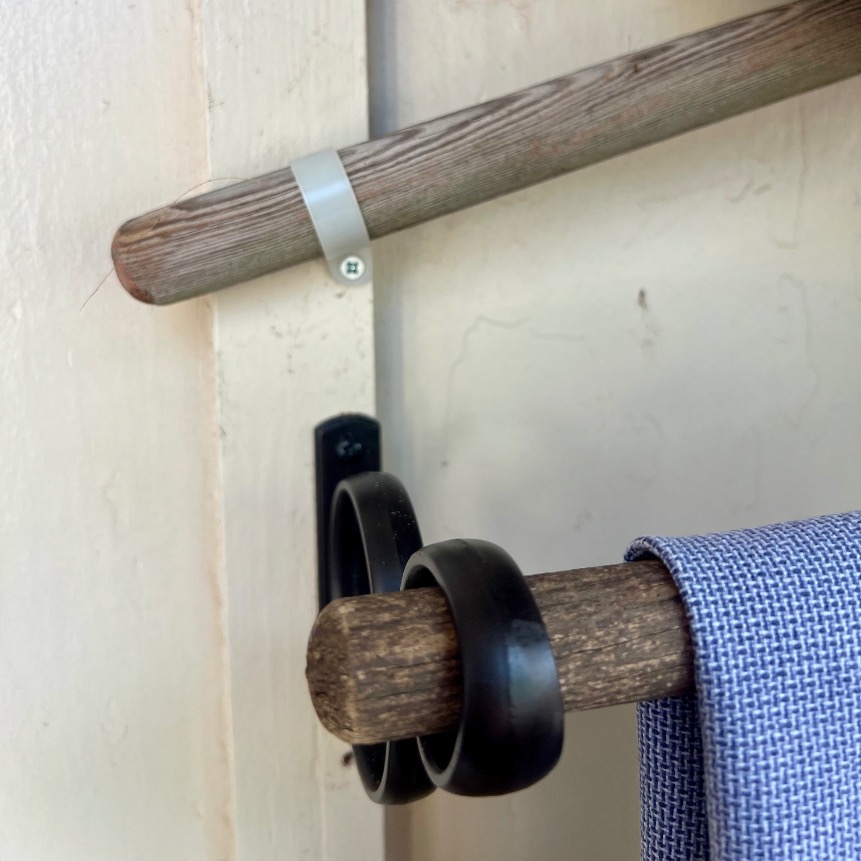
And I have to confess—that horizontal handle on the smaller planter has become the unofficial bar towel holder during our patio gatherings.
Talk about a happy accident! Nothing says “we thought this through completely” like discovering your plant hanger doubles as cocktail-hour infrastructure.
The benefits of this “one person’s trash is my patio’s treasure” approach go beyond just looking cool:
- Sustainable decorating: Mother Nature high-fives you for keeping stuff out of landfills
- Budget-friendly: Your wallet stays happily fatter than if you’d hit the fancy garden center
- One-of-a-kind results: No awkward “we have the same planter” moments with neighbors
- Personal connection: Each scuff and weathered spot tells a story (unlike that mass-produced planter from the big box store)
- Creative satisfaction: The smug feeling of saying “Oh, I made those” is worth every minute spent wrestling with coco liners
I dare you to wander around your garage, attic, or local thrift shop with your DIY goggles on.
- That rusty watering can? Fairy garden!
- Grandpa’s old tackle box? The world’s most interesting succulent planter!
- That ladder that’s slightly too wobbly for actual climbing? The most Pinterest-worthy blanket display ever!
These fishing net planters remind me daily that with a little imagination (and occasionally some fishing line and questionable scissor skills), we can transform the forgotten into the unforgettable. Plus, they’re a heck of a lot lighter than the cast iron bathtub planter I was considering.
Of course, before you leave, I have to remind you to pin this — and maybe share it with a plant momma friend:

And here are the rest of my talented blogging buddies (yes there are fewer of us this month, due to Easter being last week): I hope you hop to each one and marvel at how the same image inspired them too.
Hope you have a wonderful filled with more April showers, but plenty of warm sunshine too!

Such a clever way to display plants! Even your idea for attaching to the wall is clever! You always amaze me, Diane with your great ideas!
So kind of you Missy. You know what they say about desperation. Okay so maybe desperation is a bit strong for hanging fish net planters, but it’ that mindset that kicks in to help me come up with a solution.
What a great idea, Diane, and so perfect for your lakeside home. You are always so creative and full of fun ideas. Now I need a lakeside house so I can make one of these.
Thanks bunches Wendy! Now the true test is if I can keep them alive. Hoping to set up a irrigation system for the balcony planters, maybe I ca feed a hose down to these too.
Are you kidding me?! I want to do this something awful! Even if we don’t live at the lake anymore. They look fantastic and I can’t imagine anything else hanging on that wall. Seriously amazing. And to have an unofficial bar towel to boot is the best! Thank you for great instructions and a great post. pinned
Oh, you are just the sweetest Cindy! Thank you so very, very much! You are always so encouraging and patient in organizing this group of creatives. Ad we know what keeping Creatives focused and on schedule ca be like. 🤭
LOL, Kittens come to mind. 😉
Diane you always come up with the most creative ideas and projects! I love the fish net idea, and I bet you neighbors will probably want something just like it! Great post my friend!
HaHa! Especially because all three nets came from our neighbors. Two from their trash out at the curb and the third in reply to my request on the Lake FB page. One man’s trash . . . .