How To: Sweet Handmade Heart Crafted From Old Frames
Transform old picture frames into a heartfelt piece of decor!
Perfect for Valentine’s Day, home styling, or a meaningful handmade gift.
Have you ever stumbled upon a Pinterest inspiration photo that initially left you feeling… stuck?
This month’s Pinterest Challenge image features three textured mixed-media hearts arranged in a vintage frame, my creative brain didn’t instantly spark – in fact, it stalled completely.

For several days, I stared at the image, feeling uninspired.
The hearts and their style just didn’t resonate with me.
But then something magical happened. I took a step back and stripped the concept down to its bare essentials: hearts and a frame.
Suddenly, a tiny seed started to sprout. What if I could reimagine this concept entirely?
What if, instead of working with the image as presented, I could flip the entire idea on its head?
Cue the crafting lightbulb moment!

This tutorial is all about transforming those forgotten picture frames stacked in your closet or lurking in thrift store bins into something absolutely heartwarming (pun totally intended).
We’re going to take those wooden frames and jigsaw them into gorgeous, unique heart shapes that will make people stop and say, “Wait, those used to be frames?”
Get ready to upcycle, create, and fall in love with a craft that turns inspiration into something totally unexpected.
Grab your tools, clear some workspace, and let’s turn those frames into something extraordinary!
TABLE OF CONTENTS:
The links in this post may include affiliate links, which means if you purchase anything using these links, you pay no extra, but I may receive a small commission that helps keep this blog running. I truly appreciate you using affiliate links whenever possible. Please know that I will never recommend a product I do not believe in!
A Quick Note About This Project:
You know how I love solving puzzles!
Well, these frame hearts were quite the creative challenge to figure out.
But now that I’ve worked out all the kinks (and sacrificed a few frames in the process 😉), you get to skip straight to the successful method!
Following these steps, you can have several hearts cut and ready for finishing in an afternoon.
How much time you spend on painting and finishing is up to your creative vision.
Fair warning though – while this isn’t the most complicated project you’ll ever tackle, I’d call it more of a medium-skill endeavor.
If you’re comfortable with power tools and have some basic DIY experience under your belt, you’ll do great!

What You’ll Need to Make Our Hearts
Materials
- Assorted wood frames (see important notes below)
- Scrap board larger than your cut corner frames
- Wood glue
- Thin nails or tacks
- Micro Sander and sandpaper (This is my favorite crafting tool!!!)
- Assorted paints, stains, waxes of your choice
- Thin Wire, optional for hanging
Tools
- Ruler
- Drill with fine bit
- Hammer
- Jigsaw and scrolling blade
- Clamps
Safety Equipment
- Safety Goggles
- Mask or respirator (Safety First!!!)
Important Notes About Frame Selection

Best Choices:
- Solid wood frames are ideal
- 5×7 inches is the minimum size (you’ll get two usable corners from these)
What to Avoid or Use with Caution:

- Metal and plastic frames (not suitable for this project)
- Resin frames can be problematic:
- May get gummy when cut with a jigsaw
- Require proper respiratory protection due to potential toxic fumes
- Often have poor corner stability, especially with cardboard reinforcement
- Deep frames that slope toward the back Like pictured above (difficult to match with other frames)
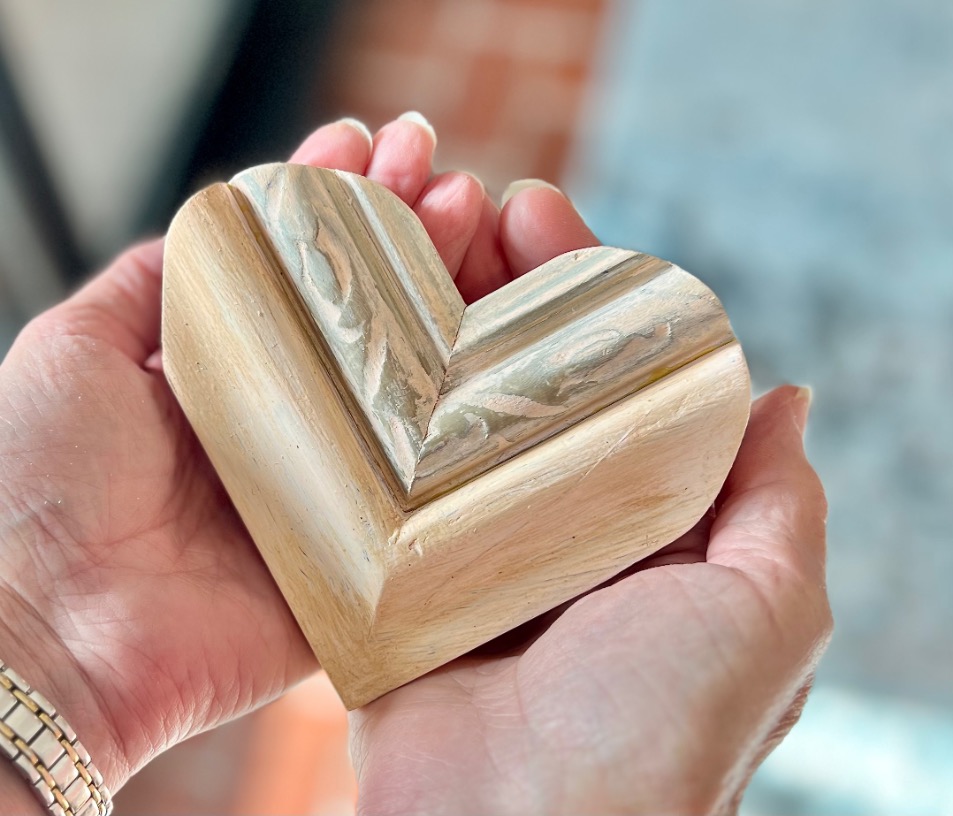
Making Hearts From Frames
Step 1) Cut Your Frames–

Cut each side of your frame, roughly in the center so you have 4 corner pieces.
Yes, I actually used painter’s tape to mark the middle. Don’t bother with that. Totally not necessary, and really, not even helpful.
PRO TIP: For a 5×7 frame cut close to the sides of diagonally opposing corners. So you’ll have two useable corners with sides between 4 1/2 and 6 1/2-inches long.

Step 2) Plan Your Frame Stacks-

Determine how you want to stack the individual frames to make one heart.
A few of mine are cut from just the one wide frame.
Some are two frames stacked and some are three.


As you are stacking them, notice how they will overlap or butt together making sure there is enough surface contact for wood glue to hold them securely together.
The left one where the two frames are butting against each other would not be good. There is very little contact.
However the right version is great with two flat sections of the same frame overlapping for better contact.
HELPFUL TIP: use painters tape to number each frame in a stack. If you’re doing a bunch of frame that are all different, it’s very helpful, to avoid second guessing and the old W-W-W bit. You know, What Went Where!
Step 3) Create Your Pattern–

With them stacked, measure the diagonal corner from the outside edge (the point of your heart) to the inside point (the top indent of your heart).
Use the editable hearts template I have in my printables and resource library.
Grab the red line down the center of the heart and expand or contract it to your measurement.
Now grab a corner of the heart box and expand or contract it to meet the size of your center red line.

This is your heart pattern. Print and cut it out.
PRO TIP: If you want to make your own pattern, just know that the bottom point of your heart needs to be 90-degrees.
You can also measure up the length of the sides the same amount and freehand the top curves to the center point.
Step 4) Transfer Pattern–
Transfer heart pattern to the stacked frames by tracing around it with a pencil or pen on the face side.
It’s easiest to do this with clamps or a second set of hands to hold them together while you trace.
Step 5) Prepare for Cutting–
IMPORTANT: Do Not glue your frame pieces together yet!

Grab that piece of scrap wood or the backing board and attach your pieces in their stacked pattern. (That busy blue and gold board above? That is the artwork that came in the wide white frame). Here, the frames are lying upside down with the backer board on top.
I drilled and then nailed through the backing board into the back of the frames to hold them tight while cutting.
Of course, you want to nail into the thickest part of the frame and with nails that won’t protrude out the top of the frame.
If your backing board is difficult to nail through:
- Drill holes through the backing board where the thickest part of the frame is
- Line up stacked frame pieces over one corner of the board
- Secure all frame parts in multiple places away from cutting line
- Clamp board securely to supporting surface
- Ensure frame corner is supported but not in cutting line
A little problem-solving:

Ideally, your stack of frames will all rest on the backing board like above.


But in reality, sometimes the backs of your stacked frames will not be even, like above left.
In that case, I padded the gap between the frame and the backing board with some scrap balsa wood (above, right). Once the cutting is done, that padding goes away.

(And yes, that’s snow on the ground. It’s January and I don’t have an indoor wood shop)
Please note: The angle of the picture makes my fingers look much closer to the saw than they really were! Always, always use extreme caution when using power tools — especially those with blades!
Hold your jigsaw as flat as possible, cutting from one side to the center and then over to the other side.
Don’t stress about the tiny curves next to the heart indent. We’re taking care of them next.
Step 6) Sand and Finish–
- Remove frame pieces from backing board
- Sand smooth curves at center indent in particular
- Smooth rough wood edges

Here’s where you get to let your creativity shine!
Maybe you want to embrace that vintage vibe with chalk paint and dark wax.
Or go bold with vibrant colors for a modern pop.
Love metallics? A coat of gold or copper paint could be stunning.
The beauty of these hearts is that each one can tell its own story through color and texture. And don’t worry if your finish isn’t perfect – those little imperfections add character and charm!
Step 7) Add Hanging Hardware (Optional)–

For hearts you might want to hang:
- Drill tiny holes on each side of the indent on inside lip
- Wrap thin wire around two tacks
- Leave about 1/2-inch between tacks
- Apply wood glue to tack ends
- Insert in holes and tap down with small hammer


PRO CRAFTER TIP: Use a twist tie wrapped around ribbon as a needle pulling it under the wire and out through the indent.
Step 8) Final Assembly–
- Apply thin line of wood glue where pieces will meet
- Spread glue smoothly
- Clamp for 20 minutes
- Add third frame if using three
- Glue and clamp again
Making These Hearts Extra Special
You know what makes these hearts even more magical?
They’re perfect for celebrating life’s special moments! Consider making them for:
- Wedding decor (imagine them hanging from vineyard posts or nestled in centerpieces!)
- Bridal shower favors (paint them in the wedding colors)
- Baby shower decorations (soft pastels would be adorable)
- Teacher appreciation gifts (who wouldn’t love a one-of-a-kind heart?)
- Birthday surprises for friends and neighbors
- Valentine’s Day tokens of friendship
- Anniversary celebrations
The best part? Each heart carries your thoughtfulness and creativity – making them so much more meaningful than anything store-bought!
Before we get distracted with all the great ways to style these hearts, be sure to save this several boards to be sure you can find it when the time is right:

Where and How to Use Your Frame Hearts
So many options! Where to begin?
Wall and Display Areas

- Suspend within a wreath for added dimension
- Temporarily replace artwork in your gallery wall for seasonal changes
- Position on the back of built-ins or hutch for seasonal decor
- Create an asymmetrical trio of different-sized hearts
- Layer with vintage architectural pieces

Shelves and Surfaces

And look, they work with whatever your style!

- Style on picture ledges like these or open shelving
- Incorporate into kitchen open shelves for unexpected charm
- Use as unique bookends on console tables or within bookshelves
- Incorporate in a mantel display

I absolutely love how this blue heart adds a punch of unexpected color to my kitchen shelves!
Grouped Displays

- Arrange to greenery in a vintage basket
- Add to a decorative tray display
- Fill a dough bowl with hearts of varying sizes
- Add to a tiered tray grouping
- Style within a coffee table vignette with natural elements
- Lay on top of a stack of coffee table books next to a candle
Trust me, these hearts tucked into a dough bowl with some greenery? Pure magic!

Seasonal Touches

- For Valentine’s Day: Pair with vintage postcards or love letters
- Spring: Combine with fresh or faux flowers
- Year-round: Group with family photos or meaningful objects
- Winter: Incorporate with pine branches and white candles
Hanging Options
- Suspend with ribbon
- Hang using jute twine
- Attach with raffia for a rustic look
- String along a length of jute twine for a garland
These hearts are versatile enough to work as both hanging art and freestanding decor pieces.
Their substantial construction and rustic charm make them perfect for year-round display, with endless possibilities for seasonal updates.
And here are all the creative gals participating in this month’s challenge:
I hope you enjoy this project. Please share how you would use or style these hearts and of course send pics when you do make them.

Hail! O Queen of Creativity! These are AMAZING! I’ve never seen anything like this. You’ve knocked it out of the ballpark, my friend!
That’s so sweet of you! I hadn’t either and that’s why it took me an entire day (an several sacrificed frames) to figure out the “How”. But now it’s very doable!!! Thank goodness!
Diane this is such a brilliant project. I love the creativity and gorgeous textures!
What a brilliant idea Diane! I have a ton of frames that I could make this project with! Pinned~
Diane, wow!!! This was an ambitious project! I love how these stacked frame hearts turned out. They are wonderful as bookends. Really fun! Can’t wait to share these to Pinterest when I get home today.
Happy almost Valentine’s Day,
Barb 🙂
Diane, as someone who is math challenged, I’m so impressed with this project! Thanks for figuring out out lol! I absolutely love this sweet idea and pinned it so Mr DIY can make me some 😉😘
You and I both were completely uninspired by this month’s photo and stared at it for weeks! But look at us coming up with something we both enjoyed later. Yours was much more work and is a fantastically stunning idea! Love how you broke it down. Glad you joined us instead of saying no altogether for lack of enthusiasm.
Honestly, you should sell those! pinned
Diane, your wood hearts are so gorgeous and expensive looking. If I were to see one in a boutique I would definitely appreciate the creative work involved in making them and buy one! Love!
Diane, these wood hearts are absolutely adorable! Pinning now so I can make them sometime! I’m going to share this post tomorrow in our Seasonal Sentiments Monthly Rewind Newsletter!
Diane, I am so glad you posted on Share Your Style last week so I could happily share your hearts at this week’s SYS #451 for you. <3 I pinned many of your photos, too. I still can't believe how you came up with this idea ~ it's genius! Enjoy your hearts and Happy Valentine's Day!!!
Hugs,
Barb 🙂
Oh my goodness Barb! You are just the best at boosting a girl up! Thanks so much for the feature, for the pins and for all your kind words and enthusiasm! Hope you are having the best day!
This is such a stunning idea, I love your hearts. They will be a feature at Handmade Monday this week 🙂
Oh Julie! Thanks so very much. I love how they turned out and I have so many more ideas. I just can’t wait for warm weather so I’;m not standing in snow next time I break out the jigsaw.