What to Do With Old Maps? Make These Quick, Fun Butterflies!
Old road maps? Turn them into easy origami style butterflies! Quick tutorial plus 5 stunning ways to style them for parties, decor, and gifts.
You know that stack of old road maps tucked away in your closet or garage?
The ones from family road trips, cross-country moves, or that epic summer adventure you still talk about?
They’re too full of memories to toss in recycling, but let’s be honest – when’s the last time you actually unfolded one?
Here’s the thing: those memory-laden maps are absolutely perfect for scratching that wanderlust itch we all get. Lucky for all of us, this is a Handcrafted Society Challenge!!!
Yes, today, I’m thrilled to be sharing map related elevated craft projects from some of my very favorite bloggers. All the links are at the bottom of this post. Prepare to be wowed!
TABLE OF CONTENTS:
The links in this post may include affiliate links, which means if you purchase anything using these links, you pay no extra, but I may receive a small commission that helps keep this blog running. I truly appreciate you using affiliate links whenever possible. Please know that I will never recommend a product I do not believe in!
Whether you’re planning a bon voyage dinner for someone heading off on their next adventure, creating a meaningful tablescape for a retirement celebration, or adding some “explore the world” vibes to a graduate’s send-off party, I’ve got the perfect project for you.
Today, I’m sharing how to transform those nostalgic maps into the most fun origami-esque butterflies – plus five completely different ways to style them.
And then I have the rest of the Handcrafted Society links.
Trust me, by the end of this, you’ll see every old atlas and road map as pure craft gold just waiting to take flight!
How to Make Map Butterflies: Step-by-Step Tutorial
Materials and Supplies:
The Essentials:
- Old maps (the more interesting the roads and text, the better!)
- Cutting tools: My favorite paper cutter makes this a breeze, but a rotary cutter and mat work great too. In a pinch? Ruler, scissors, and a steady hand will do the trick.
- Adhesive: I’m team permanent tape runner for this one – it’s clean and quick. But a tiny dab of craft glue or even super glue works if that’s what you’ve got on hand.
- Binder Clips: to hold it together while adhesive sets up
For the Fancy Styling:
- Ribbon or thin webbing to tie your butterfly in place
- Pin or needle to start the hole for the wire
- Tape to hold the wire in place
- Wire: I used black 26-gauge wire for the centerpiece and individual stems – it’s sturdy enough to hold the butterflies but flexible enough to bend into swooping shapes.
That’s it!
Seriously, this might be one of the most supply-friendly projects I’ve ever shared. No special tools, no trips to three different craft stores, no “Oh great, I need THAT too” moments. Just maps that are begging for a second life and stuff you probably already have floating around your craft space.
Quick How-To Card
For Experienced Crafters Ready to Flutter Ahead:
Quick DIY Map Butterfly Tutorial
Transform old road maps into delicate origami butterflies with this simple folding technique. Perfect for travel-themed decor, party centerpieces, or meaningful gifts.
Materials
- Old maps or atlas pages
- Cutting Tool, I prefer a paper cutter
- Adhesive, I prefer permanent tape runners
- Binder Clips, just little guys for this one
- For Additional Styling Options:
- Ribbon or thin webbing
- Pin or needle
- Tape
- Black craft wire
Instructions
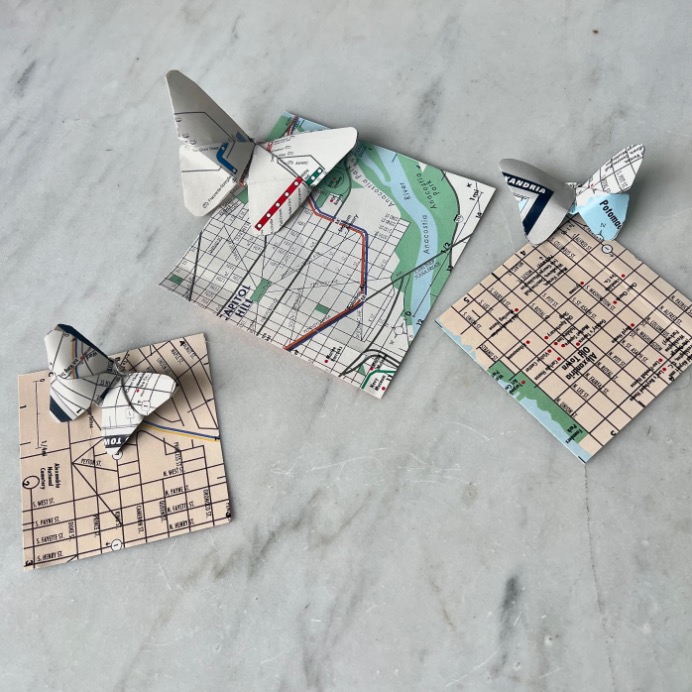
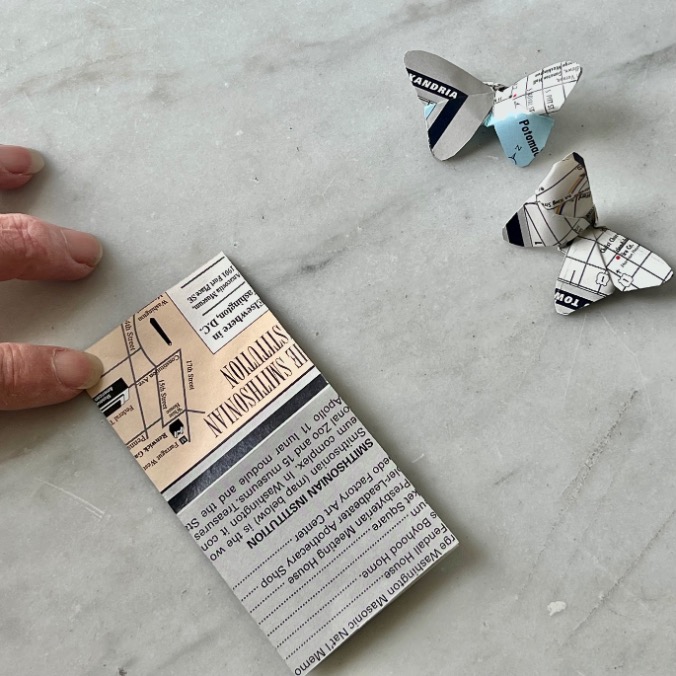
1. Cut maps or atlas pages into perfect squares – precision here really pays off! Any size works. My smallest was about 2¾ inches (7 cm) with the largest at about 6 inches (15 cm).
2. Start by folding the square in half both ways. Turn over and fold diagonally both ways. So the half folds are valleys and the diagonal folds are peaks. Unfold completely.
3. Form a four-pointed star by lifting the center point with diagonal folds as peaks and straight folds as valleys.
4. Fold so the four triangles stack on top of each other, then round off the loose corners with scissors.
5. Shape the wings by opening the stack and folding the top triangles on each side up and slightly outward.
6. Secure the butterfly by flipping it over, folding the bottom triangle up to overlap the wings, adding adhesive, folding the point over the wings at the center fold and clamping with a binder clip for 10-15 minutes.
Optional: Add ribbon (between steps 5-6) for napkin rings or gift ties, or add wire stems for arrangements.
Notes
If you'd like more details and pictures to help, keep scrolling.
Confident in your folding skills? Skip ahead to the styling section to see five gorgeous ways to display these beauties – from shadow boxes to swooping centerpieces!
Need the detailed walkthrough? Keep scrolling for all the easy steps and my tips to make your butterflies absolutely perfect.
Steps To Folding a Butterfly

Step 1) Cutting-
Cut maps or atlas pages into perfect squares – precision here really pays off! Any size works, but stick to one shape: squares only.
My smallest was about 2¾ inches (7 cm) with the largest at about 6 inches (15 cm).
Step 2) Fold the square in half–
Start with your map square face-down. Bring one edge to meet the opposite edge, creating a clean, sharp crease. Don’t worry about getting the map text perfectly aligned – the random roads and place names actually add character to your finished butterfly!
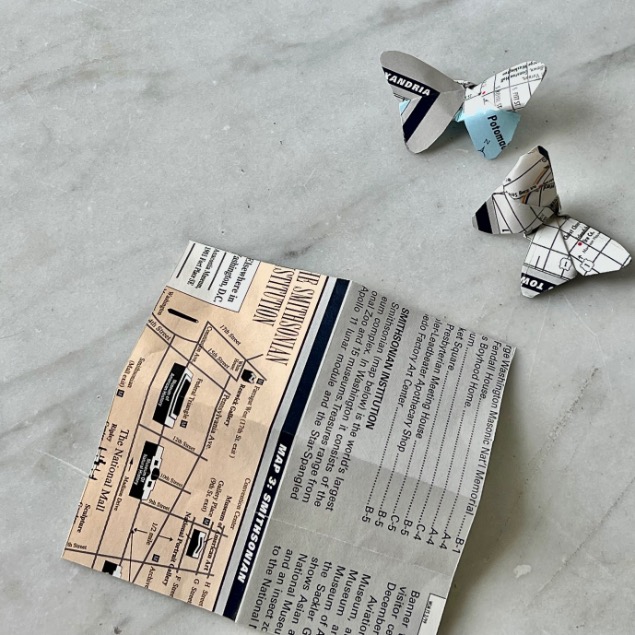
Step 3) Second half fold-
Open up that first fold and rotate your square. Now fold it in half along the opposite direction. When you unfold this one, you’ll have four neat quadrants with crossing crease lines.
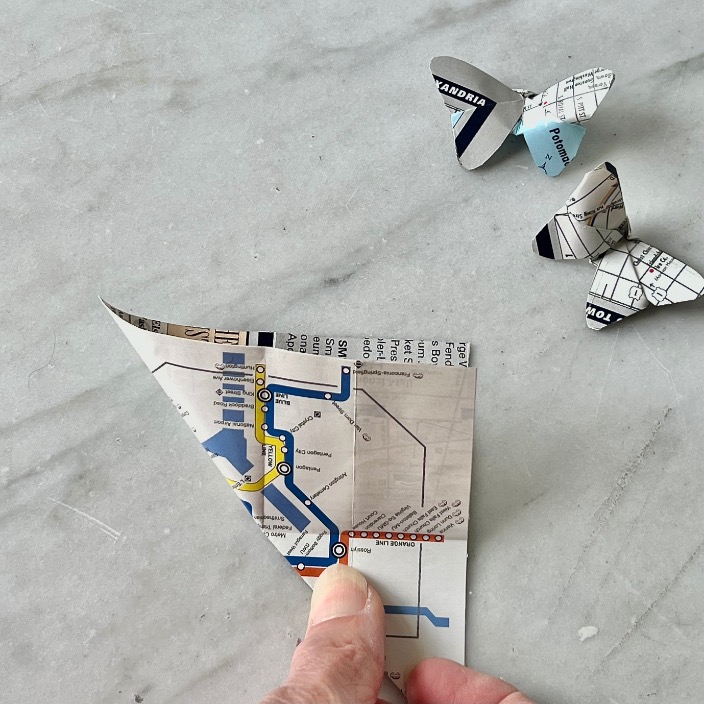
Step 4) Diagonal folding-
This part is so fun! Make sure your previous folds are creased upward (peaks). Now bring one corner to the opposite corner diagonally, creating a triangle. Press that crease firmly.
Step 5) Second diagonal fold-
Unfold and fold the other opposite corners diagonally. Open up and repeat with the other diagonal – corner to corner the opposite way. You now have a grid of crease lines that looks like a tic-tac-toe board with an X through it.
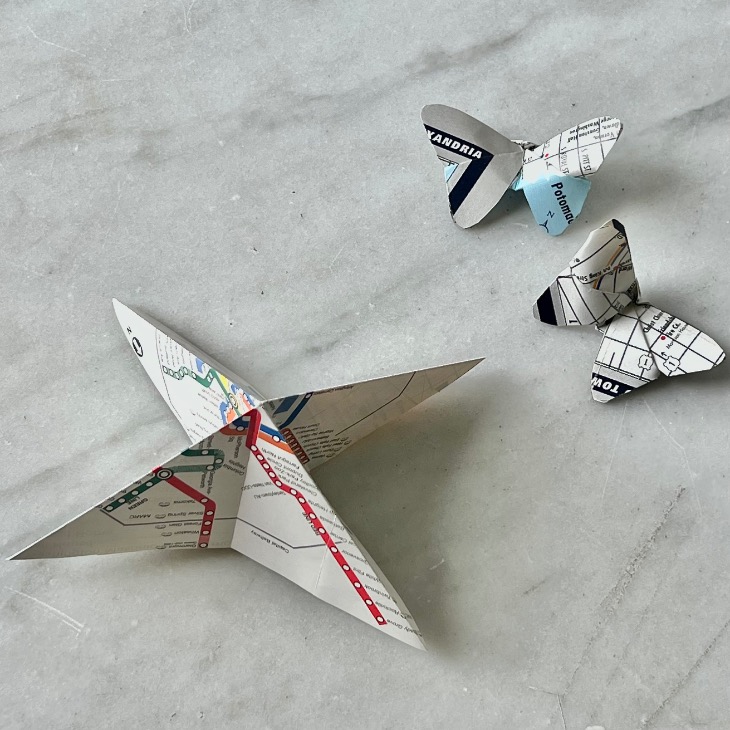
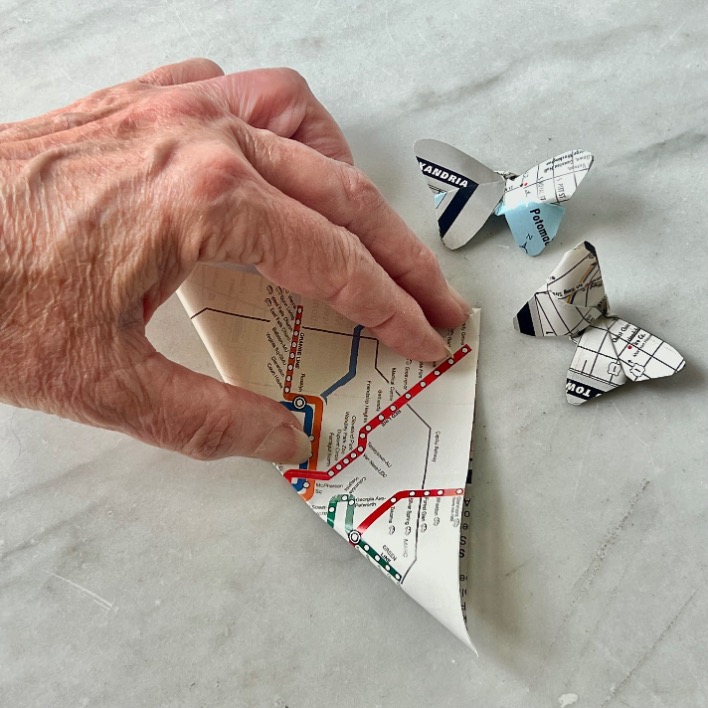
Step 6) Make four-point star-
This is the magic moment! Position your square so the diagonal creases point upward and the straight creases dip down. Gently lift the center and watch your flat square transform into a dimensional four-pointed star shape.
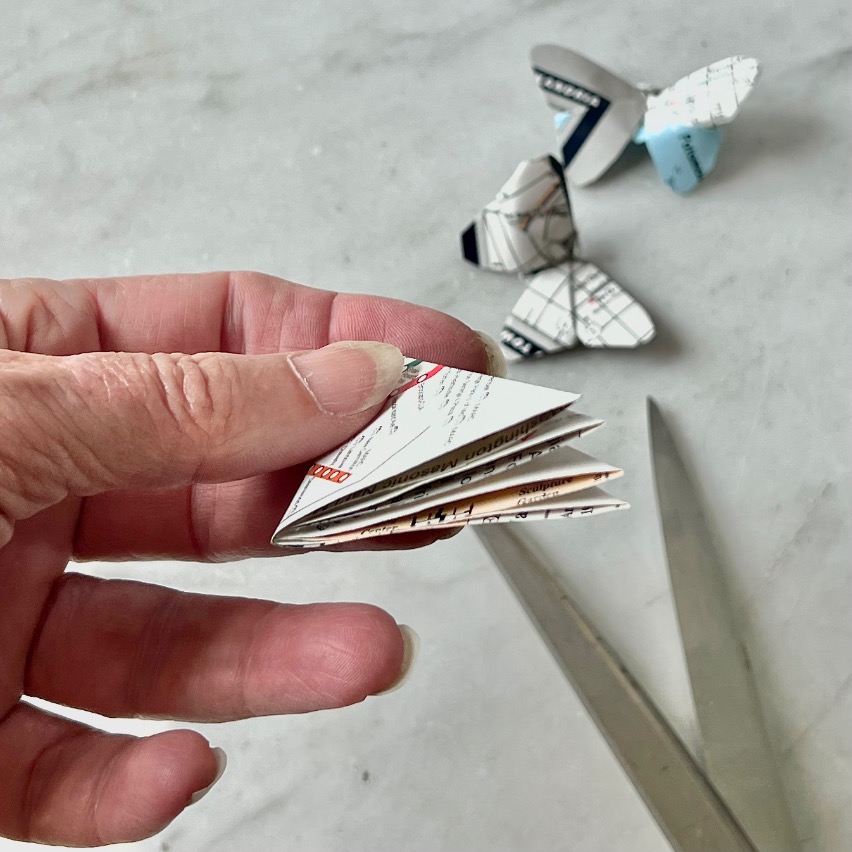
Step 7) Turn star into one thick triangle-
Gently collapse your star shape by bringing the points together. You’ll end up with what looks like a thick triangle with all four points neatly stacked. This is your butterfly body taking shape!
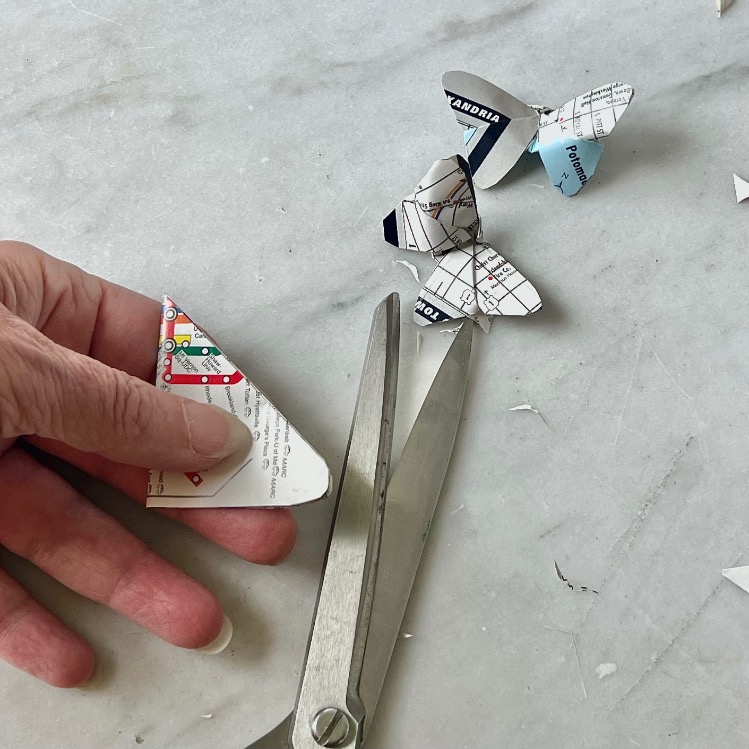
Step 8) Round the wing tips-
Here’s where those scissors come in handy! Carefully trim the pointed ends in a gentle curve – but be sure you’re only cutting where the four triangles are separate, not through the folded center. This creates the soft, rounded wing tips that make your butterfly look more realistic.
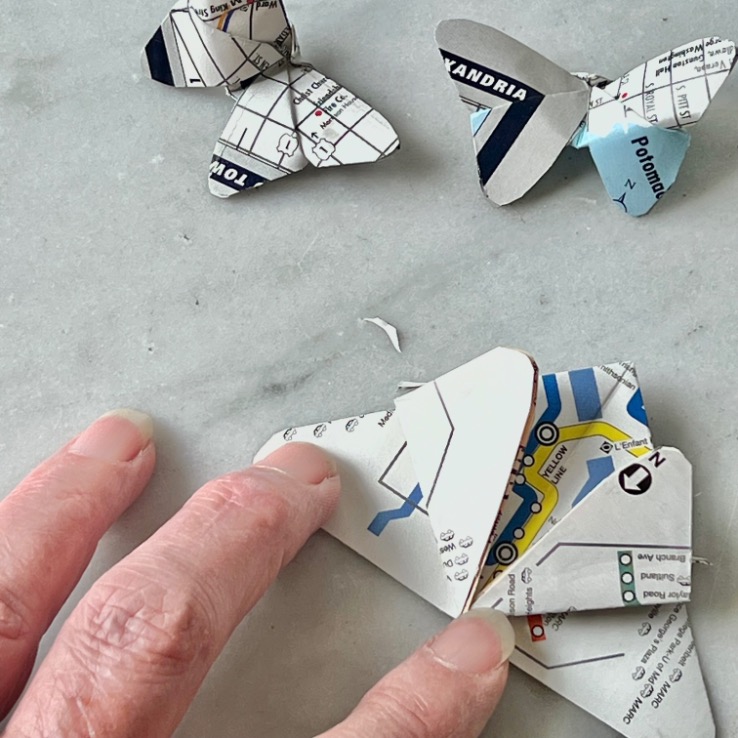
Step 9) Fold first pair of wings-
Open the stack of triangles so you have two points on each side of the center fold line. Now fold the top triangle on each side up and slightly outward, not letting them meet at the center line. They should angle off to the sides a bit (reference the picture).
NOTE: It’s this offset that makes these different than most others — and I think really sells them as butterflies!
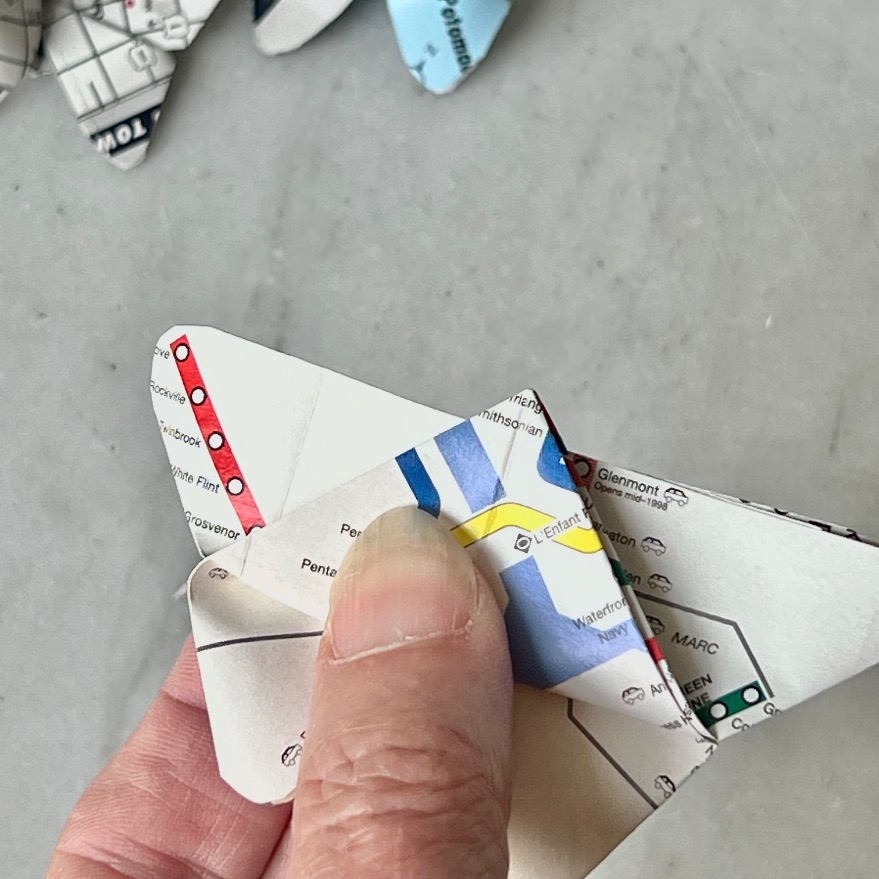
Step 10) Second pair of wings-
Flip your butterfly over. What looks like one triangle from this side should be folded up so it slightly overlaps the folded straight edge of the butterfly wings. This creates the butterfly’s body and helps lock everything in place.
NOTE: How much you overlap, determines how much 3D effect the butterfly body has.
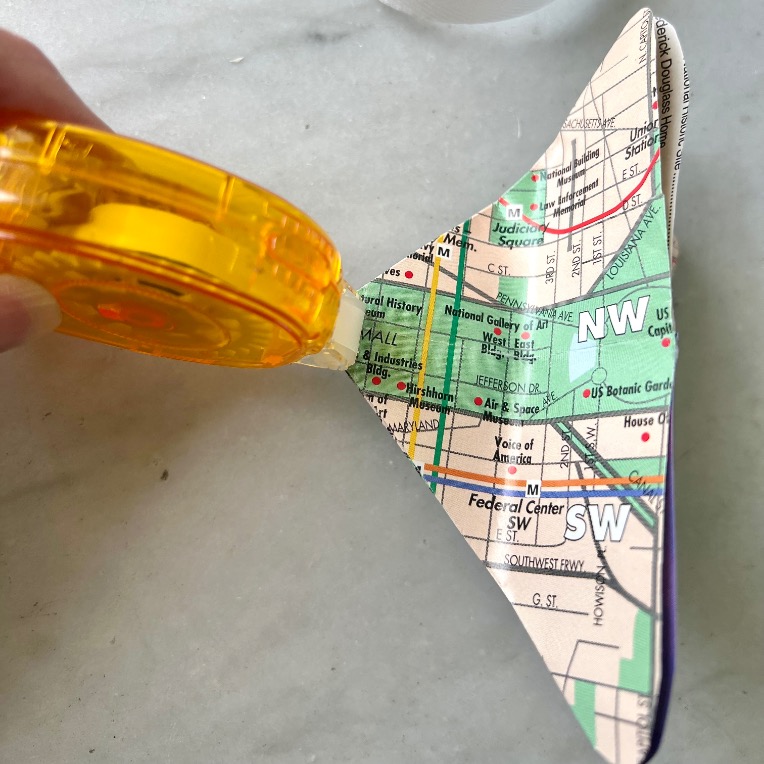
Step 11) Adhesive to hold it all together-
Add your tape runner or glue to that extended triangular point, then fold it over the long edge.
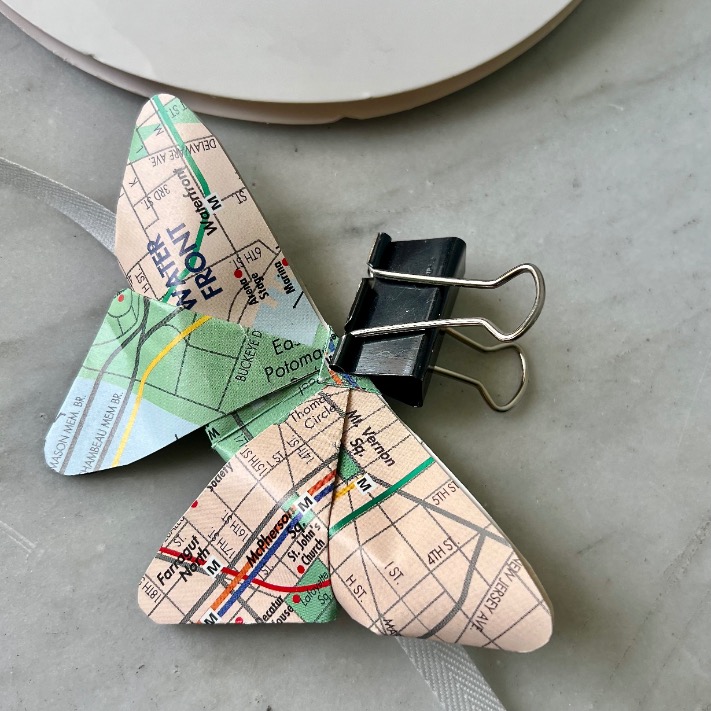
Step 12) Let the adhesive set-
Use a small binder clip to hold that tiny triangular point in place while the adhesive sets – about 10-15 minutes should do it!
Optional Add-Ons for Extra Styling
Before we dive into the five gorgeous ways to display these beauties, let me share two quick tweaks that’ll give you even more decorating options:
Option 1) Add a Ribbon for Napkin Rings or Gift Ties-

Want to tie your butterflies around napkins for an elegant table setting? Or maybe around a bottle of wine or bubble bath as a gift accent? Easy!
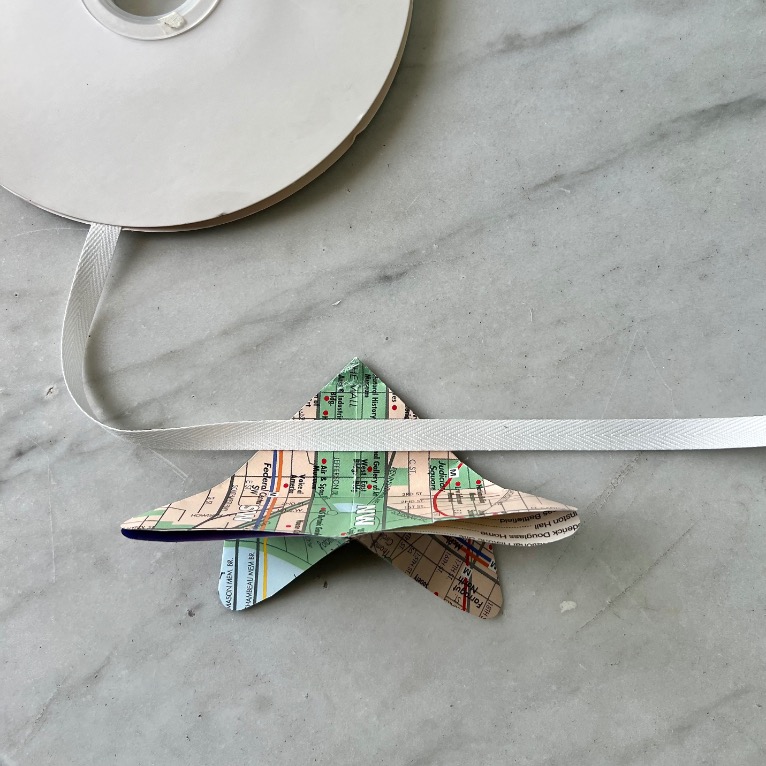
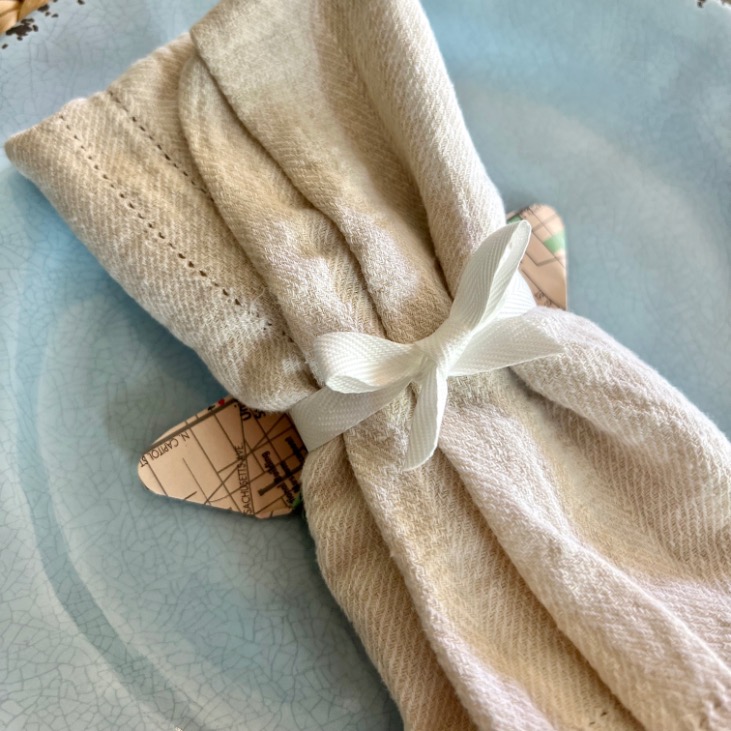
Just slip a ribbon between steps 10 and 11 (as shown in the picture). The ribbon gets caught when you fold over that final triangular point, creating a perfect little loop for tying. So simple, but it opens up a whole world of gift-wrapping and table-setting possibilities!
PRO TIP: Easiest if you add the ribbon before closing with the adhesive. But you can also slip the ribbon through a finished butterfly — and easily remove the ribbon by just pulling it out one side.
Option 2) Add Wire Stems for Arrangements-
This is where things get really fun!
Use a pin or needle to poke a tiny hole through just the back side of the wings. Gently push the wire through and tape in place. Now you can make that last fold and glue the butterfly to hold it all together.
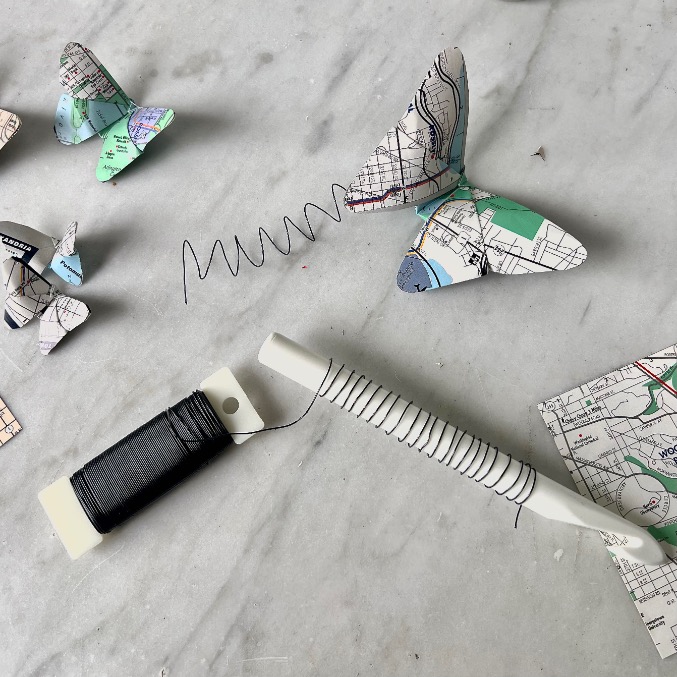
You can keep the wire straight for clean, modern arrangements, or make it springy by wrapping it around something cylindrical – I used a thick crochet hook, but a chunky marker works great too.
These wire-stemmed butterflies are perfect for floating above gift bows or adding movement to flower arrangements.
PRO TIP: Add the wire BEFORE Step 11, so you know where your folds are and you can hide the tape in the final fold.
Before we dive into styling options, why not save this pin so you can find it again when you find your stack of old maps:
5 Gorgeous Ways to Style Your Map Butterflies
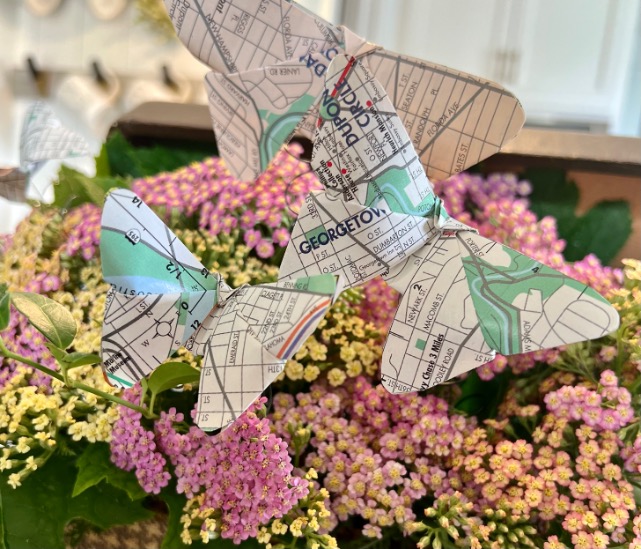
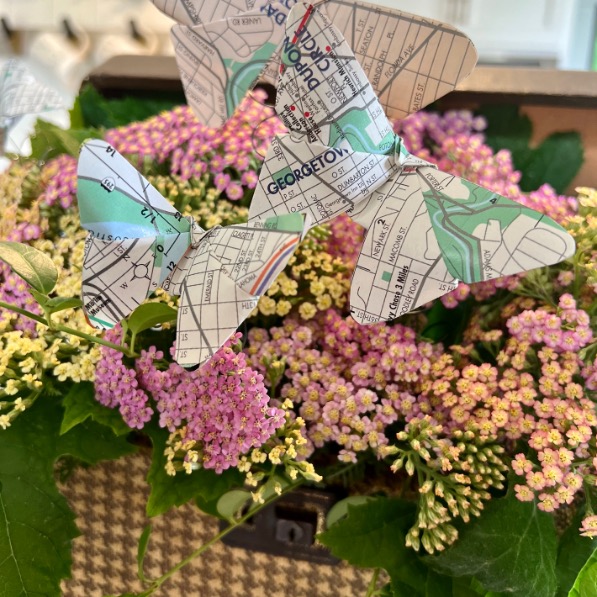
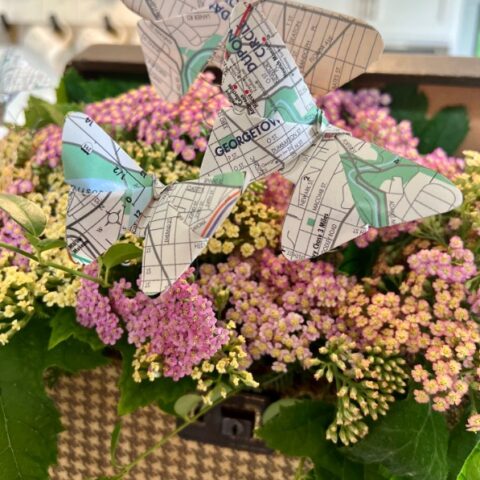
1) Fresh Flower Centerpiece with Travel Flair-
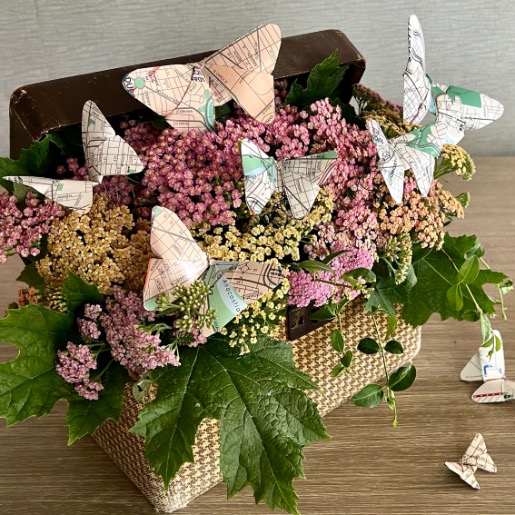
I absolutely love this one!
I arranged fresh garden flowers in a vintage train case-style suitcase and tucked wire-stemmed butterflies throughout the arrangement.
It’s perfect for a reception welcome table, console display, or dinner table centerpiece.
The butterflies add movement and whimsy while the suitcase screams “adventure awaits!”
This works beautifully for retirement parties, bon voyage dinners, or any time you want to celebrate someone’s next chapter.
2) Mini Butterfly Garden in a Map-Covered Container-
Sometimes simpler is better!
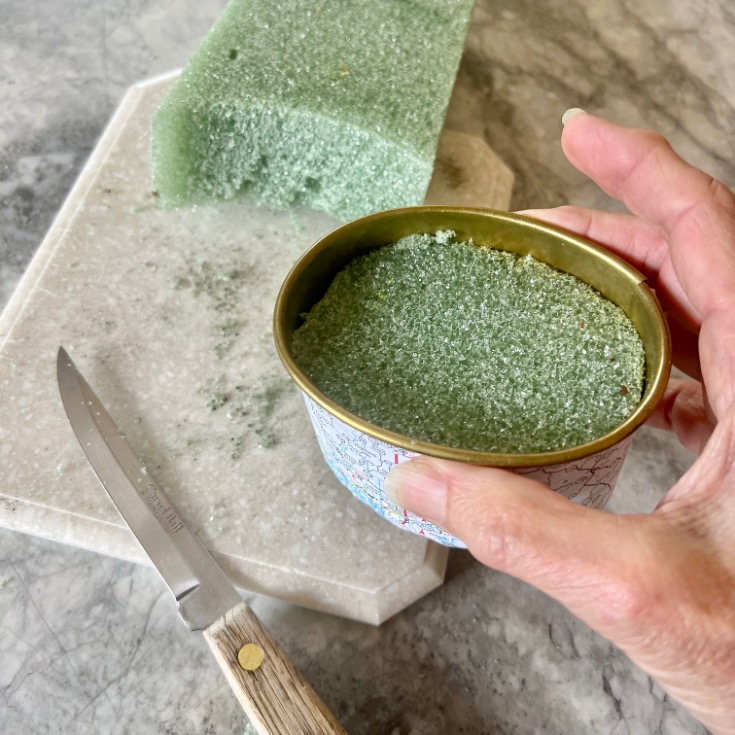
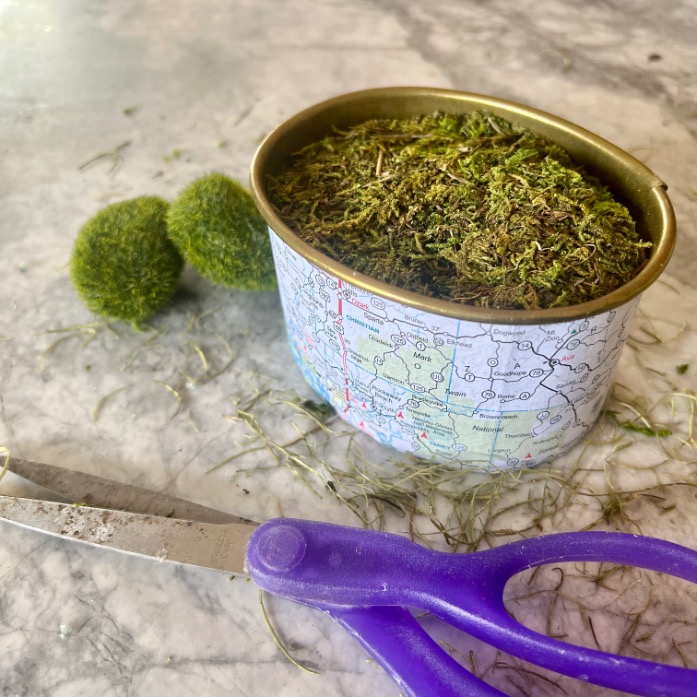
I covered an old brass container with a map (hello, double map action!), filled it with florist foam, topped with moss and a few moss rocks, then added butterflies on springy wires.
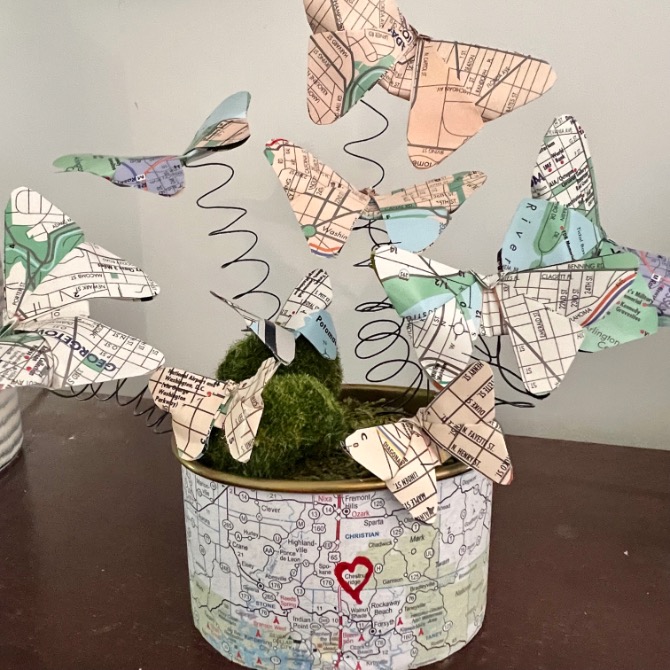
The result? A charming little butterfly garden that captures pure wanderlust vibes.
Pro tip: Mark a special location on the map covering the container – maybe where they’re headed or a favorite memory spot!
3) Papier-Mâché Picture Frame Send-Off-
This one’s perfect for a gap year send-off party!
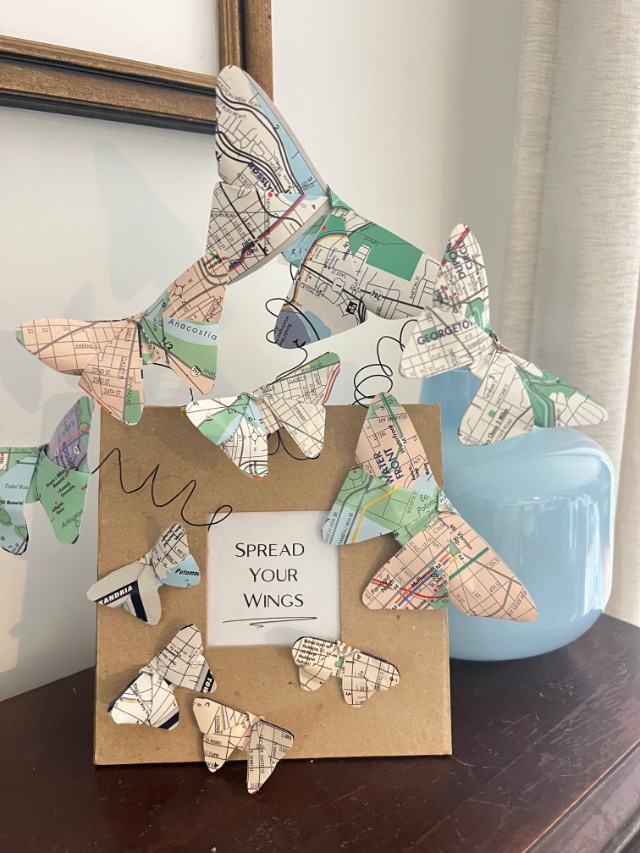
I decorated a papier-mâché picture frame with a meaningful message inside, then added butterflies both glued directly to the frame and floating away on springy wires. It’s like capturing the moment of “spreading your wings” – literally!
The mix of anchored and floating butterflies creates such beautiful movement.
4) Gift Package Bow Accent-
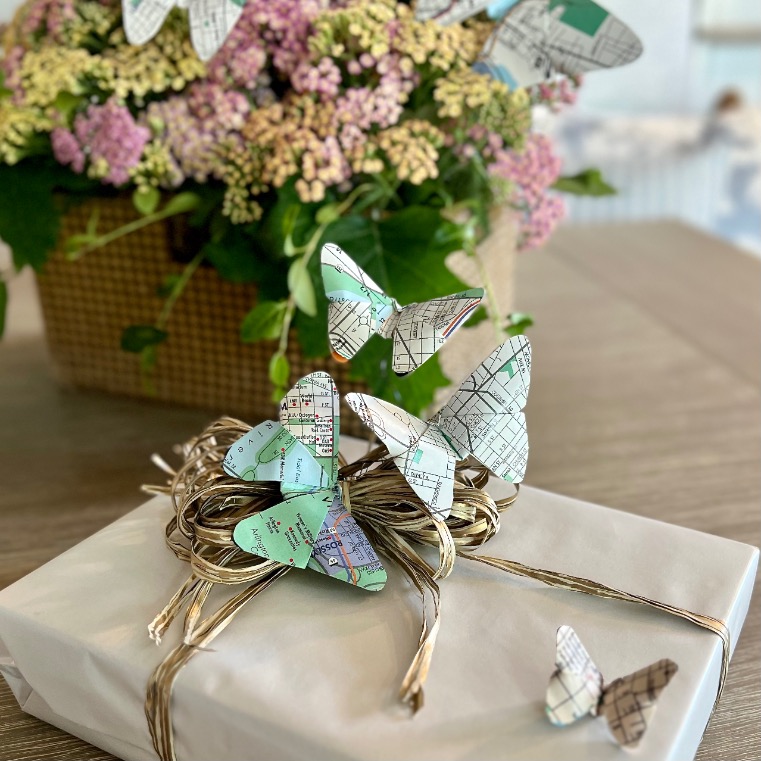
Want to make any gift extra special? Add a few butterflies to the bow on your wrapped package! It transforms even the simplest present into something that says “adventure awaits inside.”
Perfect for graduation gifts, retirement presents, or anything travel-related.
5) Elegant Map Butterfly Napkin Rings-
For your wanderlust-themed dinner party (whether it’s retirement, bon voyage, or moving celebration), these napkin rings are absolutely perfect!
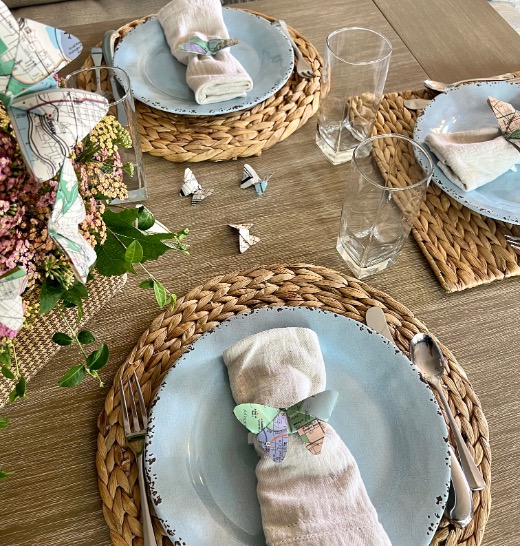
The ribbon-tied butterflies look so elegant around cloth napkins, and scattered smaller butterflies down the center of the table tie the whole look together. Your guests will be talking about these long after dessert!
Each of these styling options captures that “places to go, people to meet” feeling while being totally doable with supplies you probably already have. The best part? You can mix and match these ideas for one amazing celebration!
Ready to Give Your Maps Wings?
There’s something magical about taking those memory-filled maps and giving them a completely new purpose, isn’t there?
Whether you’re celebrating someone’s next adventure, creating meaningful decor for your own space, or just finally doing something beautiful with that stack of maps you couldn’t bear to toss, these butterflies are such a perfect way to honor both the journeys you’ve taken and the ones still ahead.
Speaking of adventures and exploring still ahead. Wouldn’t these be adorable as a mobile or nursery wall decor that whispers “adventure awaits” to our littlest explorers.
And the best part? I have seven more amazing bloggers to send you to. Each one of these gals has a map project waiting for you to explore. You don’t want to miss a single one:


I’d love to see your map butterflies in action! Share your creations and tag me – there’s nothing I love more than seeing how you make these projects your own.

Beautiful, creative, nearly free of cost and unique! Thank you for directions that are so easy to follow!
Thanks so much Sheryl for taking the time to leave this comment! I read every one and appreciate you for them!
Such a creative idea. You could use them as magnets, attached to hair pin, in a wreath. Love it!
Of course! I never thought of magnets and hair clips, but you are sooo right! Isn’t it fun when creative minds get together?!?
Map origami! What a fabulous idea! I love all of the ways that you displayed them, but my favorite is your gorgeous centerpiece. From map to butterfly…a poetic transformation! Pinned!
Awwww thanks, Missy! It has been such fun to make more and more of these butterflies!
What a super fun project!!! SO many great possibilities! As a fully addicted traveler I’m loving all 7 of these other projects too! I almost always pickup a map or two when traveling to a new city or country. They live in a file drawer just waiting for my kids to toss them when I die 🤷♀️😂 Every one of these ideas would be a much better use of my maps!!!
You make me laugh — even before my morning Diet Coke! You’re so right they are all great and would make such good use of all those great maps you’ve been harboring away.
These paper butterflies are so sweet, and I enjoyed seeing so many different ways to use them! Your creativity is boundless! It’s so hard to pick a favorite, but I adore the “Spread Your Wings” frame! Pinning now so I can try this sometime!
Diane this is a delightful project! I love the process of making them, and seeing them in action with your creative uses. So fun! I’m going to start looking for old road maps, so I can make some too! Pinning!
Diane, this is such a creative way to use your maps—I love all the unique display ideas you’ve shared! I’ll definitely need to put my folding skills to the test and try a few myself
Diane – You are so talented and creative. I always love your unique ideas and projects. This one is no exception. The butterflies are charming and can be used for so many things. How cute would these look integrated into a wedding??? Thanks for the clear instructions. Pinned!