Easy How To: Transform Old Sweaters into Cozy DIY Coasters
Upcycle old wool sweaters into cozy DIY coasters! A budget-friendly fall craft that doubles as the perfect hostess or holiday gift.
Yippee! It’s time for typically my favorite post of the month! It’s Handcrafted Society Challenge Day. This is where some of my favorite bloggers challenge ourselves with a shared common theme. It’s always so fun to see what each other comes up with.
September’s Handcrafted Society challenge is all about sweaters and boots. Boots were tempting, but sweaters? Well, sweaters practically beg to be transformed.
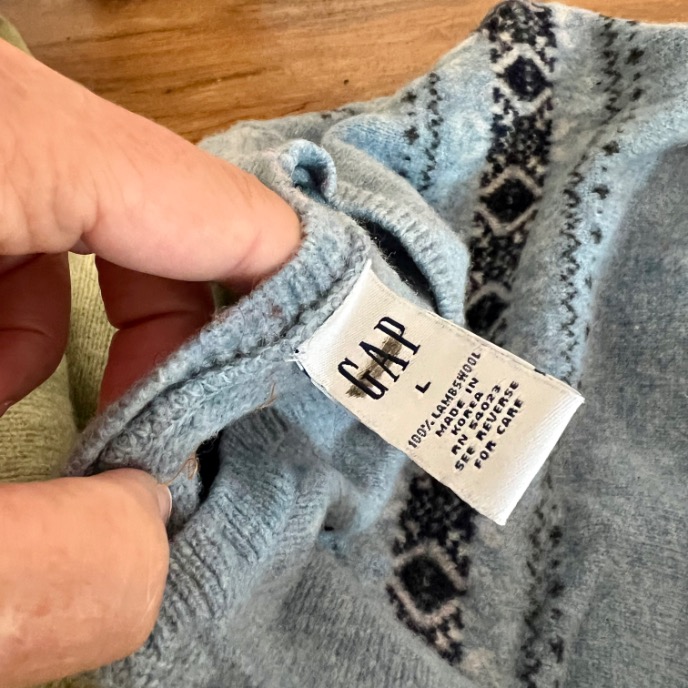
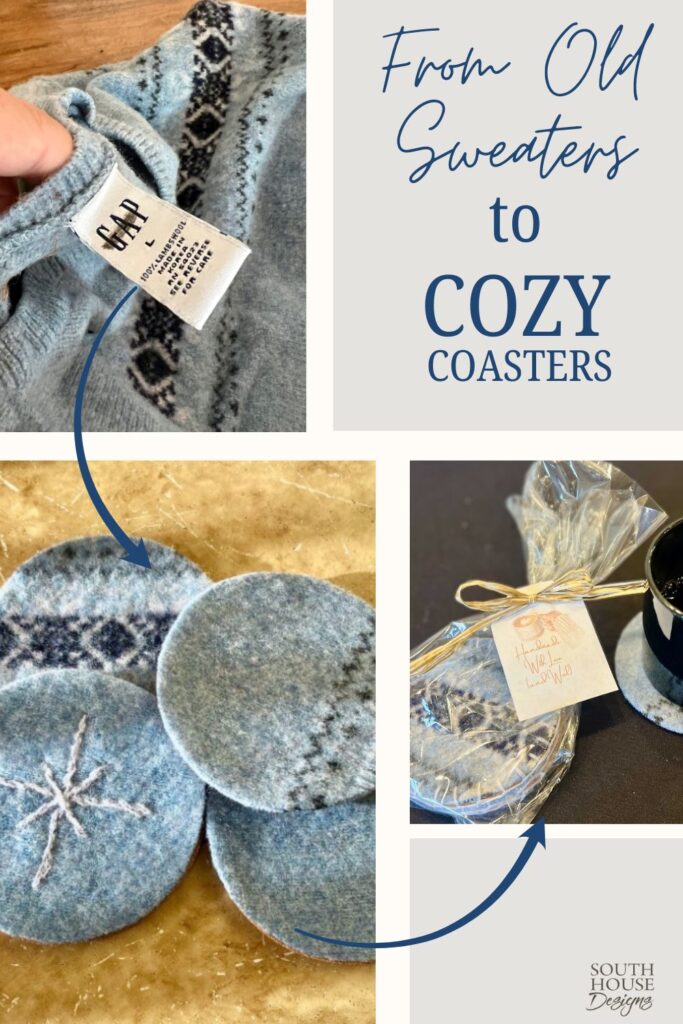
At my favorite thrift store, I scooped up a few 100% wool sweaters—each sporting that magic phrase on the care tag: dry clean only. Translation: “please felt me into something fabulous.”
So I did what every crafter secretly loves to do: tossed them in hot water with detergent, cranked the agitation, then straight into the dryer on high heat.
Shrinking sweaters on purpose feels a little rebellious, don’t you think? (Also handy if you’ve ever had that “oops” laundry moment.)
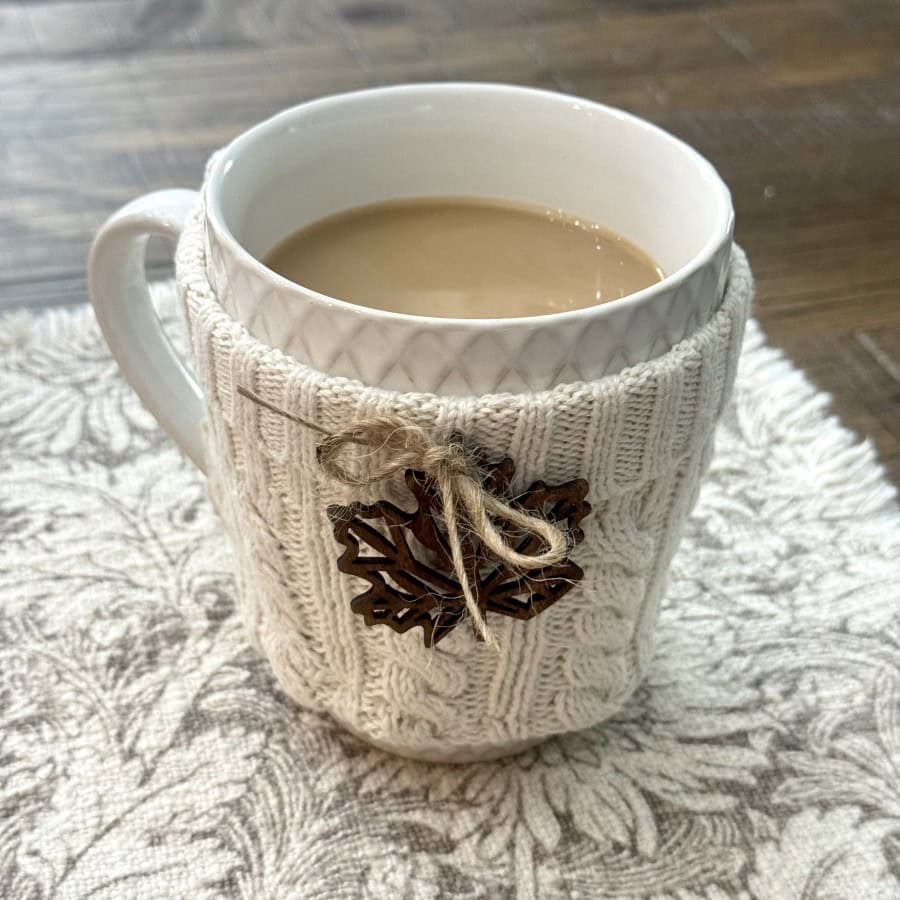
And the result? Cozy, felted fabric just begging to be turned into fall crafts. I decided to start with coasters—because nothing says sweater weather like wrapping your hands around a mug of something warm and setting it down on a soft, woolly landing pad.
Best part? These coasters are ridiculously easy, practically free, and cute enough that I’m making piles for holiday gifting.
Instead of showing up with a plate of cookies (which everyone loves, but probably doesn’t need), I’ll be surprising neighbors with a bundle of handmade sweater coasters—maybe even tied up with a jar of mulled spice mix.
Sharon, Debi, Chris, Louisa, Linda, Teddi … just act surprised, okay?
TABLE OF CONTENTS:
The links in this post may include affiliate links, which means if you purchase anything using these links, you pay no extra, but I may receive a small commission that helps keep this blog running. I truly appreciate you using affiliate links whenever possible. Please know that I will never recommend a product I do not believe in!

DIY Sweater Cozy Coasters – Quick How-To
Transform wool sweaters into cozy coasters! This quick DIY is eco-friendly, budget-smart, and perfect for gifting this holiday season.
Materials
- 100% wool sweater (“dry clean only” is best)
- Cork, by sheet or tiles
- Glue, spray glue preferred
Tools
- Scissors
- Print out pattern, or old coaster for tracing
- Needle and thread or sewing machine, optional
- Felting needle and foam, optional
- Wool punch needle yarn, optional
Instructions
Step 1) Felt It:
Wash sweater hot with detergent + agitation, then dry on high heat. Repeat if needed until dense and shrunken.
Step 2) Cut It:
Trace a coaster or cut freehand circles/squares
Step 3) Combine It, three ways:
- Glue cork to the back
- Stitch cork to the back
- Sandwich vinyl between two sweater pieces and stitch together
Step 4) Finish It, customize it your way:
- Edge with a blanket stitch
- Whip stitch edge
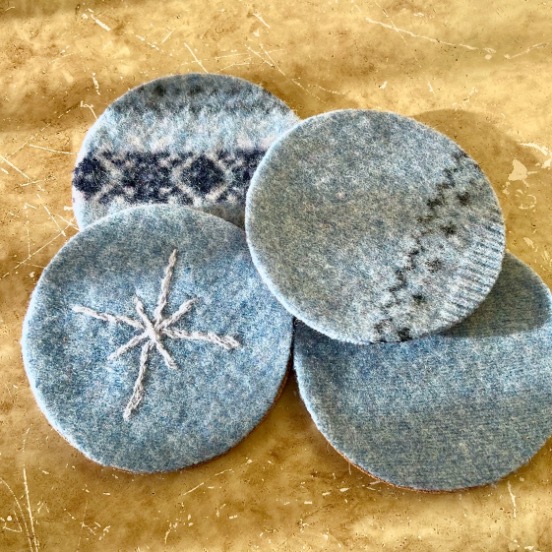
- Add simple embroidery
- Needle felt accents
Step 5) Bundle It:
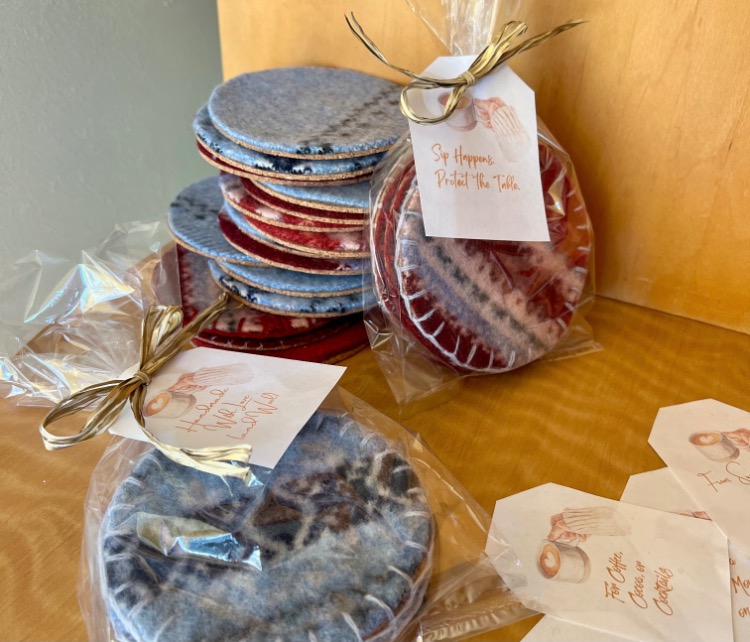
Tie 4–6 coasters with twine or ribbon → instant cozy gift.
Sweater Science (Don’t Worry, It’s Fun)
When wool shrinks, it isn’t just getting smaller—it’s felting.
Wool fibers are covered in microscopic scales. Add hot water, detergent, and plenty of agitation, and those scales open up, grab onto each other, and lock down tight.
The result? A fabric that’s smaller, denser, and won’t fray when you cut it—perfect for crafting.
Quick Tips for Wool Felting Success:
- Check the tag: “Dry Clean Only” usually means untreated wool that will felt beautifully.
- Avoid imposters: Superwash wool and acrylic blends are designed not to shrink, so they won’t work.
- Expect shrinkage: Sweaters can lose inches in every direction, so start larger than your final project size. This particular small project, you can even use kids’ sweaters!
- Not all sweaters felt the same: Tight knits give you thick, dense felt, while looser weaves may need a few cycles through the wash and dryer.
Once felted, your sweater is basically transformed into craft fabric—dense, stable, and ready for scissors without fear of unraveling.
NOTE: My two basic wool crew neck wool sweaters made more than forty coasters.
How to Make DIY Sweater Coasters
Materials and Supplies:
Materials:
- Wool sweaters
- Cork backing, tile or sheets. I used this 1/8-inch thick cork.
- Adhesive, spray recommended. I used this Gorilla spray glue.
- Embroidery wool or floss, optional
- Pattern Printable. or custom pattern
Supplies:
Step 1) The Prep, Felting-
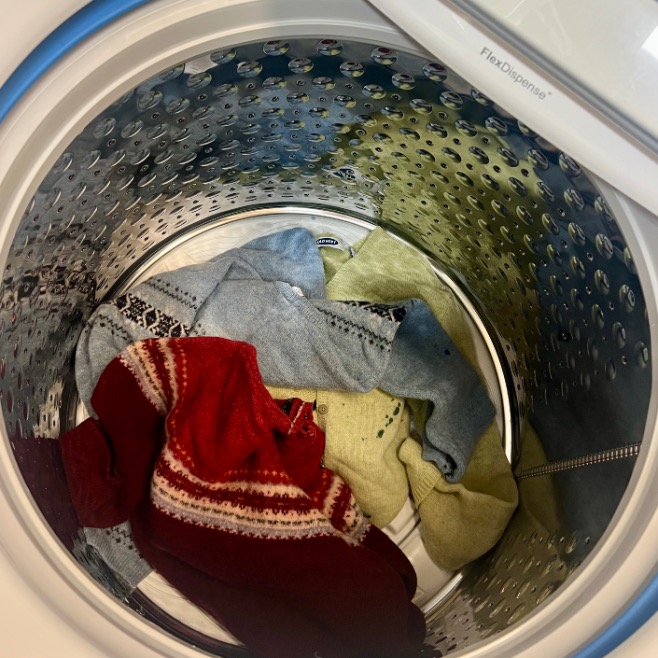
Wash your sweater on hot with a bit of detergent and plenty of agitation. Then dry it on high heat.
Repeat the wash/dry cycle if the fabric still feels stretchy—you want it dense and felted.
Now that your sweaters are felted and ready, it’s time for the fun part—cutting and finishing!
Step 2) Cut Your Shapes-
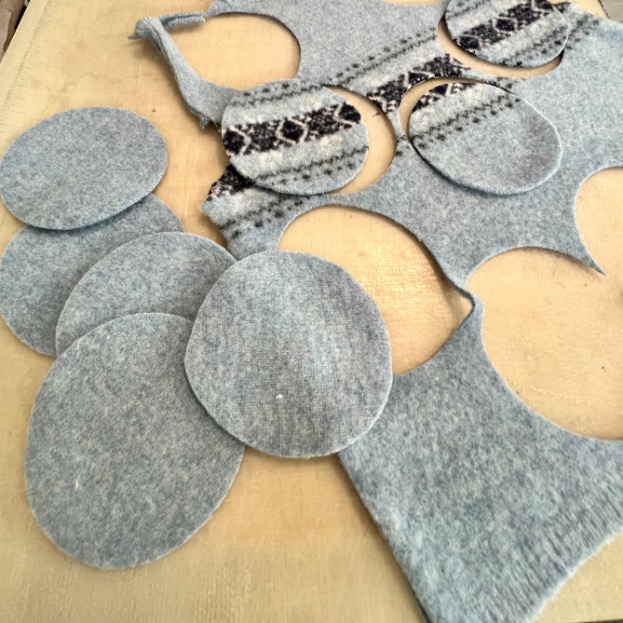
Trace an existing coaster, or freehand simple circles or squares. Don’t stress about perfection—the cozy, handmade look is part of the charm.
Cut a cork backing to match each sweater topper.
Alternatively, cut the sweater into pairs for a double sided coaster and cut a piece of vinyl to sandwich between the two sweater pieces.
Step 3) Combine Your Coasters- Three ways:
- Cork Backing (Glued): Cut cork to match your sweater shape and glue together. Quick and sturdy.
- Cork Backing (Stitched): Same as above, but sew the cork to the sweater for a polished look.
- Double-Layered: Instead of cork backing, sandwich a piece of vinyl between two sweater cutouts and glue or stitch around the edges.
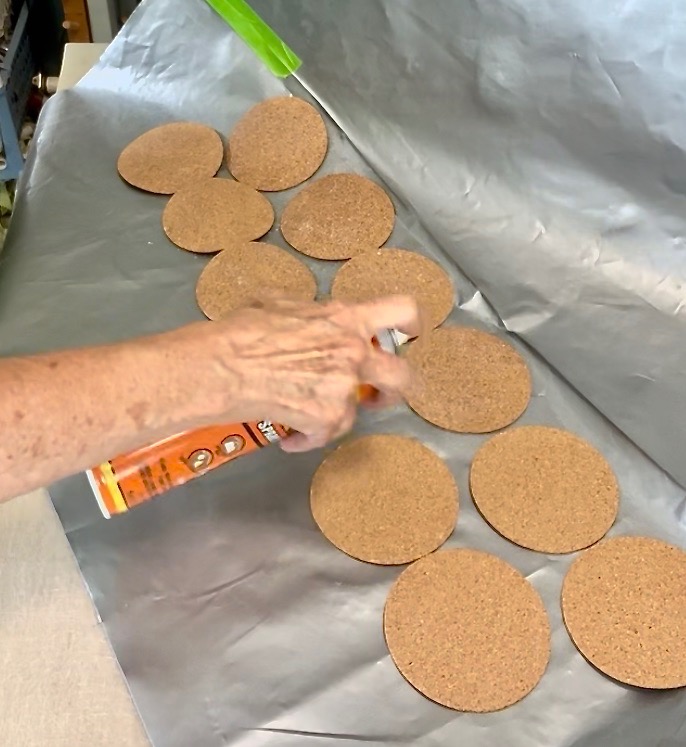
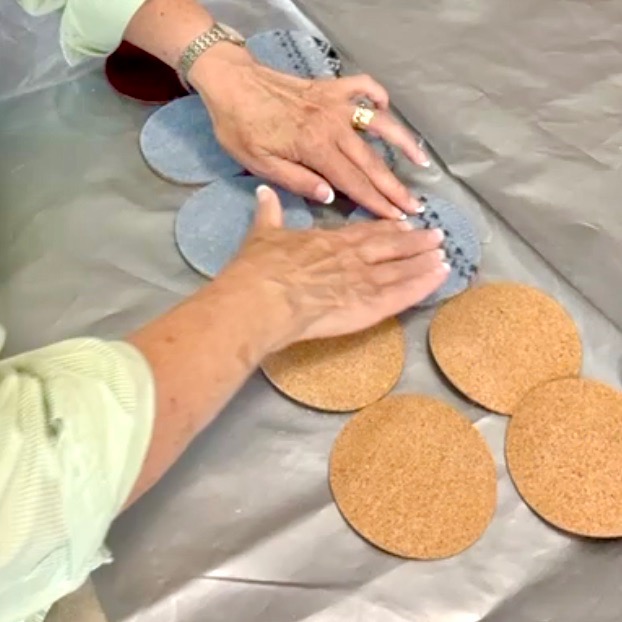
Protect your work surface and spray the cork backings and the backside of the sweater layer.
Lay the sweater on top of the cork, sticky sides together.
PRO TIP: For best adhesion, roll over them, using firm pressure and the side of the glue can or a empty wine bottle.
Step 4) Customize Your Way-
Your coasters can be as simple or as fancy as you like. Here are just some of the fun options:
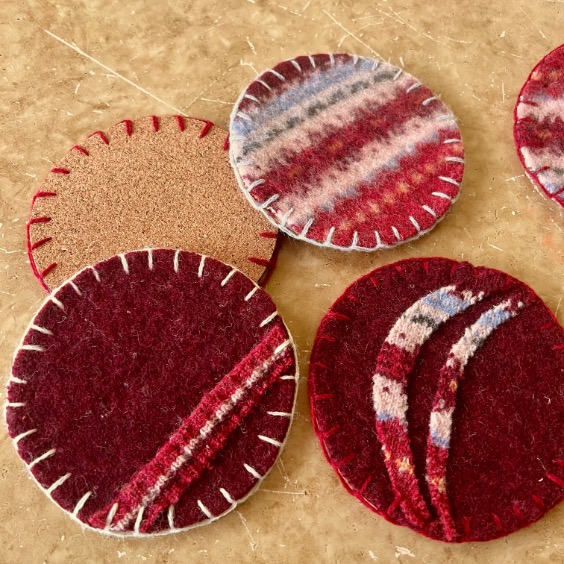
Style Upgrades:
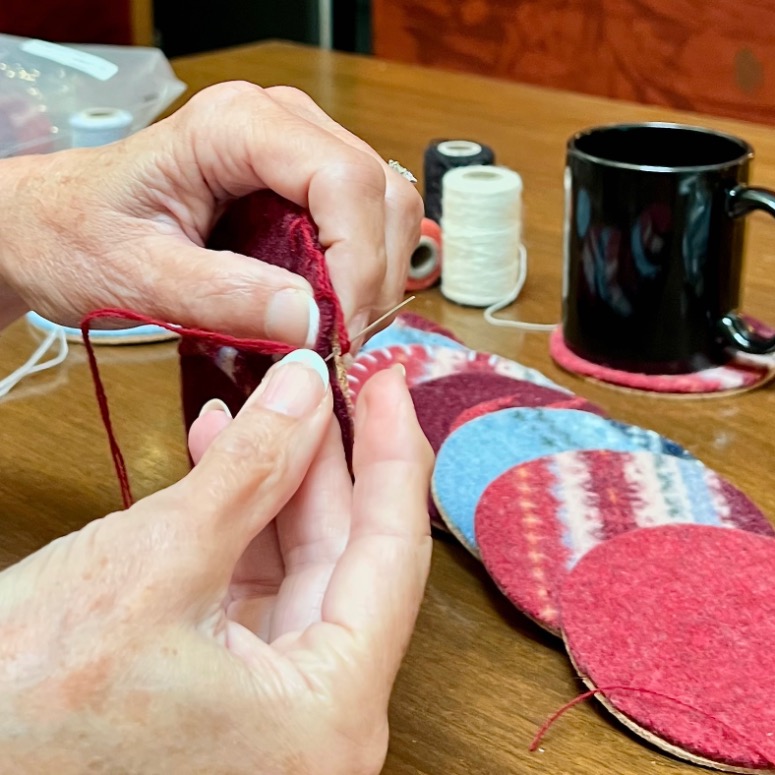
- 1. Blanket Stitch Edge: Even with cork backing, finish the edge with a blanket stitch using wool yarn (the type used for crewel or punch needle). It adds charm and durability.
- 2. Simple Whip Stitch Edge: Finish the edge with thin leather lacing, silk embroidery ribbon or chunky, cozy yarn.

- 3. Layered Felting: Before attaching cork, use a felting needle to swirl on a pop of color or add a snippet of Fair Isle trim. Instant custom design!
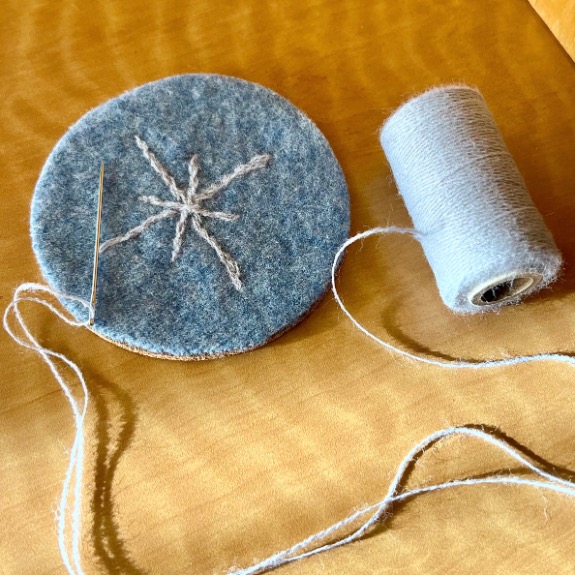
- 4. Embroidered Accents: Add simple embroidery (snowflakes, initials, little motifs) to a solid color coaster before gluing on the cork.
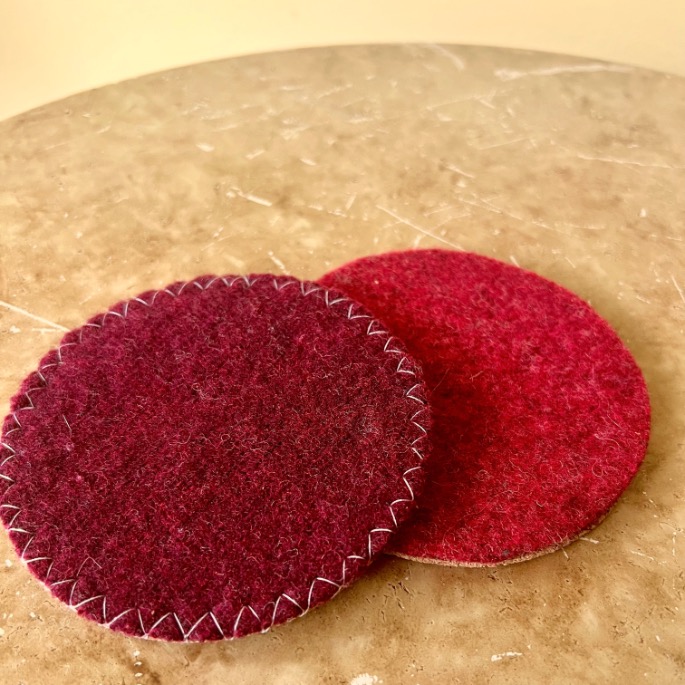
- 5. Machine Stitched Edge: Use a zigzag or decorative stitch on your sewing machine to finish the edge through all layers—quick, sturdy, and decorative.
Step 5) Bundle and Gift-
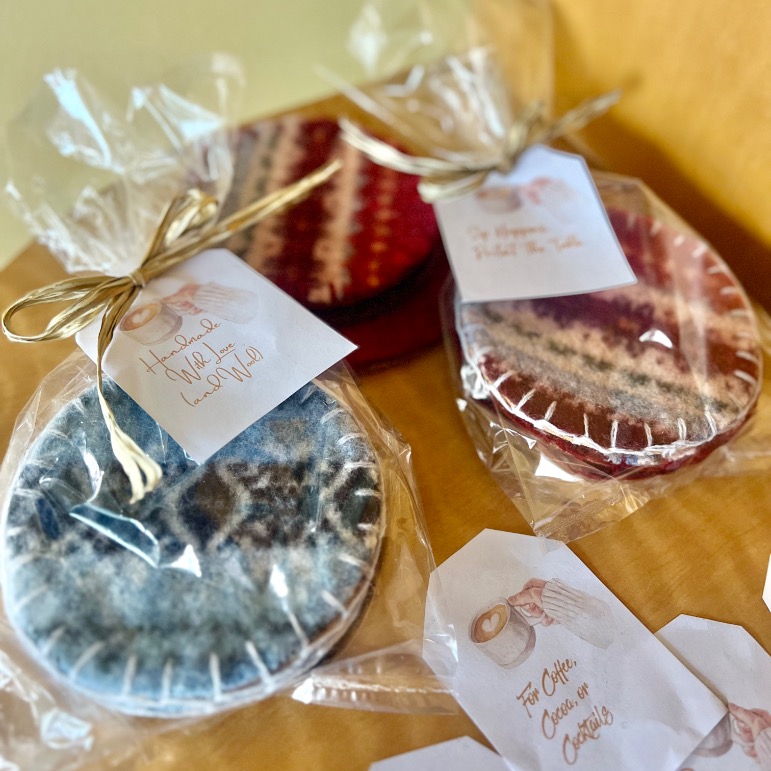
Tie a stack of 4–6 coasters with twine or ribbon. Instant gift! Add a tag, and maybe pair with hot cocoa mix or mulling spices for a thoughtful touch.
Do yourself, and me, a favor and save this pin:
Gift-Giving Magic
Sure, you could show up with a plate of cookies (again). But these cozy little coasters are the kind of gift people will actually use long after the sugar rush fades. They’re practical, calorie-free, and way more memorable than another box of chocolates.
Oh, and fun & economical to make.
Seriously you can upcycle two old sweaters into 40+ cozy coasters!
How they work as gifts:
- Perfect Hostess Gift: Pair a bundle with a bottle of wine or a spice mix for mulled cider.
- Teacher / Neighbor / Coworker Love: A thoughtful, handmade gesture that feels special without being over the top.
- Holiday Gifting: Tie up a stack in ribbon, pop into a mug, or tuck in a gift basket.
And let’s be honest—these are so quick and budget-friendly, you’ll want to make extras for yourself too. Cozy season deserves cozy coasters.
And to make gifting even easier, I’ve created a sheet of gift tags for you. Just print, sign, cut and add to a cello bag. You’ll find the printable in my subscriber’s free resource library.
Wait! What? You’re not a subscriber yet? Well, let’s take care of that right now:
Thanks bunches! Now back to our cozy coasters:
Wrap-Up
And there you have it—cozy coasters born from “oops” sweaters (or thrift store treasures) that are practical, giftable, and just plain fun to make. I’ll be whipping up stacks of these for neighbors, teachers, and, let’s be honest… myself. Because sweater weather deserves sweater coasters.
But don’t stop here! The Handcrafted Society is full of creative women who each took September’s Sweaters & Bootstheme in their own direction. From clever upcycles to fresh seasonal décor, you’ll find a whole lineup of inspiring projects waiting for you.


👉 Go check them out, and let me know which one you’re itching to try first!

Such a fun and festive way to celebrate the season, Diane. I love that you can use these at home or to gift as well. Honestly, they would be super cute as ornaments on a tree too. I can’t tell you how many times I’ve ruined sweaters on accident and never thought to do this. Love your creativity lady. Big hugs, CoCo
You’re right CoCo, they would make fun ornaments! And they are so dang easy and fun to make! So next ruined sweater, you’ll be set for cozy coasters!
Diane, I’m so thrilled to know what felted means! I feel like I’ve been living under a rock LOL! I’m sure we have some old wool sweaters that we don’t wear anymore, and I would love to give this project a try! Your coasters look absolutely darling, and I especially love the ones from the fair isle sweater! Pinning away!
Yippee Michelle! Isn’t it the best to learn little tricks like felting. That then usually spawn a whole new area of crafting, like needle felting. I would love to see your style in needle felting
These are just adorable Diane and so creative!!!!! I love the added stitching, it adds so much to the design. You are one creative gal.
Thanks bunches my friend! I’m a sucker for the edge trimming too. Waiting for some thin leather lacing to see what that looks like as a whip stitch.
Love the wool that you found for the coasters. A great project.
Oodles of thanks Tammy! Super easy and kind of addicting to do. My kind of easy craft to do during football season.
This is such a good idea. How lucky was I to see these gems in person! You are my DIY crafting muse!
Hi Diane! I’m so excited you made these cute coasters and explained all about felting! I’ve heard of it, but I’ve never tried it, and now I’m eager to create something using this technique! I love that you’re giving these as gifts! I bet it feels great to have this done already! Bring on the holidays!
Thanks so much Donna. They are one of those addicting projects, where you may or mayn’t know where to stop.