Wooden Holiday Buoys Add Coastal Christmas Decor
Fun diy wood Christmas buoys add a splash to Coastal Christmas Decor. Unique, charming, and customized for your family, home and holidays
[/et_pb_text][et_pb_text _builder_version=”4.12.0″ _module_preset=”default” global_colors_info=”{}”]
Welcome to Day 11 of our 12 Days of Christmas Making. Today I am sharing such a fun Christmas craft — wooden buoys for a Coastal Christmas or Nautical Christmas theme.
Did you catch yesterday? Lynn gave us some great tips for hosting a stress-free holiday gathering.
And Day 9, if you missed it, I shared how to turn old ice skates into charming Christmas-Holiday-Winter decor accents.
[/et_pb_text][et_pb_image src=”https://southhousedesigns.com/wp-content/uploads/2021/11/Day-11.jpg” alt=”Title Graphic for the Series of 12 Days of Christmas Making” title_text=”Day 11″ _builder_version=”4.12.0″ _module_preset=”default” global_colors_info=”{}”][/et_pb_image][et_pb_text _builder_version=”4.12.0″ _module_preset=”default” global_colors_info=”{}”]
I am thrilled to be sharing one of this year’s mantel and wreath stylings that garnered the biggest surprise response. If you are new here, I’m Diane and I spend a good portion of my year dreaming, planning and then making Christmas stockings and tree skirts.
I spend each Summer photographing the stockings for the coming season. That means making my displays and completely redecorating our fireplace wall and mantel for each group. Ten groups in 2021.
[/et_pb_text][et_pb_text _builder_version=”4.12.0″ _module_preset=”default” global_colors_info=”{}”]
Most years, I offer a Coastal or Beachy Christmas themed group. These are your typical seafoam and soft grey blues in very soft and tranquil patterns.
But this year? This year I was inspired by some postcards and pictures of the Maine shoreline and boathouses decked out with all the riotous colors and patterns of the iconic wooden lobster buoys. They just captured my imagination. (Perhaps I was really missing traveling! We all have been, right?)
[/et_pb_text][/et_pb_column][/et_pb_row][et_pb_row column_structure=”1_3,1_3,1_3″ _builder_version=”4.12.0″ _module_preset=”default” global_colors_info=”{}”][et_pb_column type=”1_3″ _builder_version=”4.12.0″ _module_preset=”default” global_colors_info=”{}”][et_pb_image src=”https://southhousedesigns.com/wp-content/uploads/2021/11/1.jpg” alt=”old faded painted exterior wall of a boat house with two wooden buoys hanging off centerg” title_text=”1″ _builder_version=”4.12.0″ _module_preset=”default” global_colors_info=”{}”][/et_pb_image][/et_pb_column][et_pb_column type=”1_3″ _builder_version=”4.12.0″ _module_preset=”default” global_colors_info=”{}”][et_pb_image src=”https://southhousedesigns.com/wp-content/uploads/2021/11/Maine-Buoys.jpg” alt=”The side of a weathered building on the ocean with many many old wooden buoys piled up and hanging on one side of the house” title_text=”Maine Buoys” _builder_version=”4.12.0″ _module_preset=”default” global_colors_info=”{}”][/et_pb_image][/et_pb_column][et_pb_column type=”1_3″ _builder_version=”4.12.0″ _module_preset=”default” global_colors_info=”{}”][et_pb_image src=”https://southhousedesigns.com/wp-content/uploads/2021/11/3.jpg” alt=”pile of old wooden buoys with lots of faded colors and rope handles” title_text=”3″ _builder_version=”4.12.0″ _module_preset=”default” global_colors_info=”{}”][/et_pb_image][/et_pb_column][/et_pb_row][et_pb_row _builder_version=”4.12.0″ _module_preset=”default” global_colors_info=”{}”][et_pb_column type=”4_4″ _builder_version=”4.12.0″ _module_preset=”default” global_colors_info=”{}”][et_pb_text _builder_version=”4.12.0″ _module_preset=”default” global_colors_info=”{}”]
The fabrics for this group of stockings came together from the colors and attitude I remembered from the pictures I had once seen.
My plan for the mantel display was not far behind.
[/et_pb_text][et_pb_image src=”https://southhousedesigns.com/wp-content/uploads/2021/11/Wood-Buoys-Full-fireplace.jpeg” alt=”full view of the fireplace with six Coastal Christmas stockings hanging from a wood mantel with a wreath above with two Christams buoys in it and a third sitting on the mantel with rattan hurricane candleholders and skinny woodland trees and pinecones” title_text=”Wood Buoys – Full fireplace” _builder_version=”4.12.0″ _module_preset=”default” global_colors_info=”{}”][/et_pb_image][et_pb_text _builder_version=”4.12.0″ _module_preset=”default” global_colors_info=”{}”]
SIDENOTE: Aren’t those the cutest name tags. All the name tags I use in my styling come from Amazing (and sweet, and kind, and generous) Jane of Southern Calligraphy. When she included fish and starfish this year, I knew that the parent’s needed fish and the kids and pets needed the starfish. Afterall, we are the “big fish’ of our ponds right? But we also all know that the kids and pets are the true “stars” of the show. Click here, to see all of her great name tags.
[/et_pb_text][/et_pb_column][/et_pb_row][et_pb_row column_structure=”1_2,1_2″ _builder_version=”4.7.7″ _module_preset=”default” global_colors_info=”{}”][et_pb_column type=”1_2″ _builder_version=”4.7.7″ _module_preset=”default” global_colors_info=”{}”][et_pb_text _builder_version=”4.10.7″ _module_preset=”default” global_colors_info=”{}”]
I get it!
You’re busy right now.
And you need to gather your supplies.
So maybe pin this to your Crafts board
Or to your Christmas Crafts board,
Or to your Coastal Christmas board (if you have one of those),
Or your Nautical Decor board.
Or to whatever board makes sense for you, so you have it handy when you’re ready to get started.
[/et_pb_text][/et_pb_column][et_pb_column type=”1_2″ _builder_version=”4.7.7″ _module_preset=”default” global_colors_info=”{}”][et_pb_image src=”https://southhousedesigns.com/wp-content/uploads/2021/11/Buoys-Pin-3.jpg” alt=”Pin showing two images of styled Wood Christmas Buoys with the title reading %22Coastal Christmas Wood Buoys%22″ title_text=”Buoys – Pin 3″ _builder_version=”4.12.0″ _module_preset=”default” global_colors_info=”{}”][/et_pb_image][/et_pb_column][/et_pb_row][et_pb_row _builder_version=”4.10.7″ _module_preset=”default” global_colors_info=”{}”][et_pb_column type=”4_4″ _builder_version=”4.10.7″ _module_preset=”default” global_colors_info=”{}”][et_pb_text _builder_version=”4.12.0″ _module_preset=”default” global_colors_info=”{}”]
Here’s How We Made our Christmas Wooden Buoys
[/et_pb_text][et_pb_text _builder_version=”4.12.0″ _module_preset=”default” global_colors_info=”{}”]
Materials & Supplies Needed to DIY Wood Buoys:
- Wood – we used a 4 x 4 post
- Paint – I used some leftover chalk paint and several colors of craft paints
- Tape measure or ruler
- Compound Miter saw
- Safety glasses (yep, keep it safe)
- Drill and drill bits
- Sander and Sandpaper (sandpaper alone will work, just takes longer)
- Painters Tape
- Stencils
- Paint brushes
- Rope
[/et_pb_text][et_pb_text _builder_version=”4.10.7″ _module_preset=”default” text_font_size=”11px” global_colors_info=”{}”]
The following links are affiliate links, which means if you purchase anything using these links, you pay NOTHING extra, but I may receive a small commission. Please know that I will never recommend a product I do not believe in!
[/et_pb_text][/et_pb_column][/et_pb_row][et_pb_row column_structure=”1_4,1_4,1_4,1_4″ _builder_version=”4.12.0″ _module_preset=”default” global_colors_info=”{}”][et_pb_column type=”1_4″ _builder_version=”4.10.7″ _module_preset=”default” global_colors_info=”{}”][et_pb_code _builder_version=”4.10.7″ _module_preset=”default” global_colors_info=”{}”][/et_pb_code][et_pb_code _builder_version=”4.12.0″ _module_preset=”default” global_colors_info=”{}”][/et_pb_code][et_pb_text _builder_version=”4.12.0″ _module_preset=”default” global_colors_info=”{}”]

My very favorite drill. This bundle is complete and right at $100 — Can’t beat it!
[/et_pb_text][/et_pb_column][et_pb_column type=”1_4″ _builder_version=”4.10.7″ _module_preset=”default” global_colors_info=”{}”][et_pb_code _builder_version=”4.12.0″ _module_preset=”default” global_colors_info=”{}”][/et_pb_code][et_pb_code _builder_version=”4.12.0″ _module_preset=”default” global_colors_info=”{}”][/et_pb_code][et_pb_text _builder_version=”4.12.0″ _module_preset=”default” global_colors_info=”{}”]

This is our amazing sliding compound miter saw! (12-inch cut — great for those pantry shelves)
[/et_pb_text][/et_pb_column][et_pb_column type=”1_4″ _builder_version=”4.10.7″ _module_preset=”default” global_colors_info=”{}”][et_pb_code _builder_version=”4.12.0″ _module_preset=”default” global_colors_info=”{}”][/et_pb_code][et_pb_text _builder_version=”4.12.0″ _module_preset=”default” global_colors_info=”{}”]

CORDLESS sander – and it uses the same battery as the drill! Simplify and save money!
[/et_pb_text][/et_pb_column][et_pb_column type=”1_4″ _builder_version=”4.10.7″ _module_preset=”default” global_colors_info=”{}”][et_pb_code _builder_version=”4.12.0″ _module_preset=”default” global_colors_info=”{}”][/et_pb_code][et_pb_text _builder_version=”4.12.0″ _module_preset=”default” global_colors_info=”{}”]

LOVE my Cricut!
This is a newer model at a great price. I’d trade up, but really mine does everything I could want.
You’ll also see lots of Cricut bundles that might be cost effective.
[/et_pb_text][/et_pb_column][/et_pb_row][et_pb_row _builder_version=”4.12.0″ _module_preset=”default” global_colors_info=”{}”][et_pb_column type=”4_4″ _builder_version=”4.12.0″ _module_preset=”default” global_colors_info=”{}”][et_pb_text _builder_version=”4.10.7″ _module_preset=”default” custom_margin=”|||-13px||” global_colors_info=”{}”]
Now that you have all your supplies,
Let’s get started Making Wooden Christmas Buoys
[/et_pb_text][/et_pb_column][/et_pb_row][et_pb_row column_structure=”1_3,1_3,1_3″ _builder_version=”4.12.0″ _module_preset=”default” global_colors_info=”{}”][et_pb_column type=”1_3″ _builder_version=”4.12.0″ _module_preset=”default” global_colors_info=”{}”][et_pb_image src=”https://southhousedesigns.com/wp-content/uploads/2021/11/Wood-Buoys-Cut-4-x-4.jpeg” alt=”4 x 4 post shown cut into shorter lengths” title_text=”Wood Buoys – Cut 4 x 4″ _builder_version=”4.12.0″ _module_preset=”default” global_colors_info=”{}”][/et_pb_image][/et_pb_column][et_pb_column type=”1_3″ _builder_version=”4.12.0″ _module_preset=”default” global_colors_info=”{}”][et_pb_image src=”https://southhousedesigns.com/wp-content/uploads/2021/11/Wood-Buoys-Drilling-Holes.jpeg” alt=”Woman’s left hand holding the buoy, braced with a block under the smaller top, and drilling the rope hole in the top with her right hand” title_text=”Wood Buoys – Drilling Holes” _builder_version=”4.12.0″ _module_preset=”default” global_colors_info=”{}”][/et_pb_image][/et_pb_column][et_pb_column type=”1_3″ _builder_version=”4.12.0″ _module_preset=”default” global_colors_info=”{}”][et_pb_image src=”https://southhousedesigns.com/wp-content/uploads/2021/11/Wood-Bouys-Ready-for-Paint.jpeg” alt=”wood Buoys all cut, drilled and sanded ready for paint” title_text=”Wood Bouys – Ready for Paint” _builder_version=”4.12.0″ _module_preset=”default” global_colors_info=”{}”][/et_pb_image][/et_pb_column][/et_pb_row][et_pb_row _builder_version=”4.10.7″ _module_preset=”default” global_colors_info=”{}”][et_pb_column type=”4_4″ _builder_version=”4.10.7″ _module_preset=”default” global_colors_info=”{}”][et_pb_image _builder_version=”4.10.7″ _module_preset=”default” global_colors_info=”{}”][/et_pb_image][et_pb_text _builder_version=”4.12.0″ _module_preset=”default” global_colors_info=”{}”]
Step 1) Cut the Buoy Height From the Post
(Left Picture) We bought a four foot post and cut three buoys, 11-inches, 10-inches, and 9 1/2-inches. Yes, we have lots of post left for more buoys!
Step 2) Angle Cut the Top
On each buoy, decide how long you want your angle to be and how far in you want it to come at the top.
For example, our tallest one (Peace), I ended the angle cut 3-1/4-inches from the top and I wanted the peak to come in 3/4-inch on all sides. So I marked 3-1/4 inch down at all four edges and then on the top, I marked 3/4-inch in from the corners. Then connect each pair of dots with your ruler and that is your cutting line.
HINT: Try to get those first marks as accurate as possible and then the lines should line up. If you have trouble with the cuts meeting perfectly, don’t sweat it too much. A good sanding should camouflage some “discrepencies”. Embrace it as character and vintage charm.
Step 3) Drill the Rope Hole
(Center Picture) Now time to drill the rope hole. They wouldn’t be buoys without the rope, so don’t skip this step!
HINT: Use a block of scrap wood under the peaked top to support it so you can drill vertically. Also, take it slow starting with a smaller bit and working you way up to the size you need for your rope. I finished with a 3/8-inch bit.
Step 4) Sand Your Buoy Thoroughly
(Right Picture) Don’t skimp on this sanding. Be sure to soften all the sharp edges, disguise andy mismatched cuts a bit and get your buoy ready for paint.
Oh, and keep the sandpaper handy. You’ll be using it again.
[/et_pb_text][et_pb_image src=”https://southhousedesigns.com/wp-content/uploads/2021/11/Wood-Buoys-Paint-tape.jpeg” alt=”Three buoys on a table. All have their base coat of paint and two have their colorful stripes. The third one has the stripes painted and the painters tape is partially removed” title_text=”Wood Buoys – Paint tape” _builder_version=”4.12.0″ _module_preset=”default” global_colors_info=”{}”][/et_pb_image][et_pb_text _builder_version=”4.12.0″ _module_preset=”default” global_colors_info=”{}”]
Step 5) Color blocking Your Nautical Christmas Buoys
The colorful lobster buoys of Maine are known for their distinctive colorblocking. Each trapper or fishing crew has their own color combination. This is how they identify their traps.
Pick your colors — mine were determined by the Coastal Skies Christmas Stockings I was making them for. I also knew that I wanted to add the Christmas text instead of coordinates or a family name or address. So I planned for that when I planned my colorblocking.
Start with your base coat. I used some leftover whire chalk paint for my base and gave them two light coats back to back. By the time I finished the first coat on the third buoy, I went right back to add the second coat to the first one. That was plenty of time between coats.
Let that dry thoroughly before applying painters tape for your color blocking.
HINT: Just like with stenciling, use a pouncing motion with your sparsely loaded paintbrush, rather than a swiping potion with a heavy loaded paintbrush for crisp, clean lines of color blocking.
Step 6) Add Christmas Text
And stencils will do. I used my Cricut to custom cut my stencils. I used stencil standard font and sized my words, loaded my vinyl and ste it to cutting,
HINT: If you might use these as part of a tablescape, think about adding text to multiple sides.
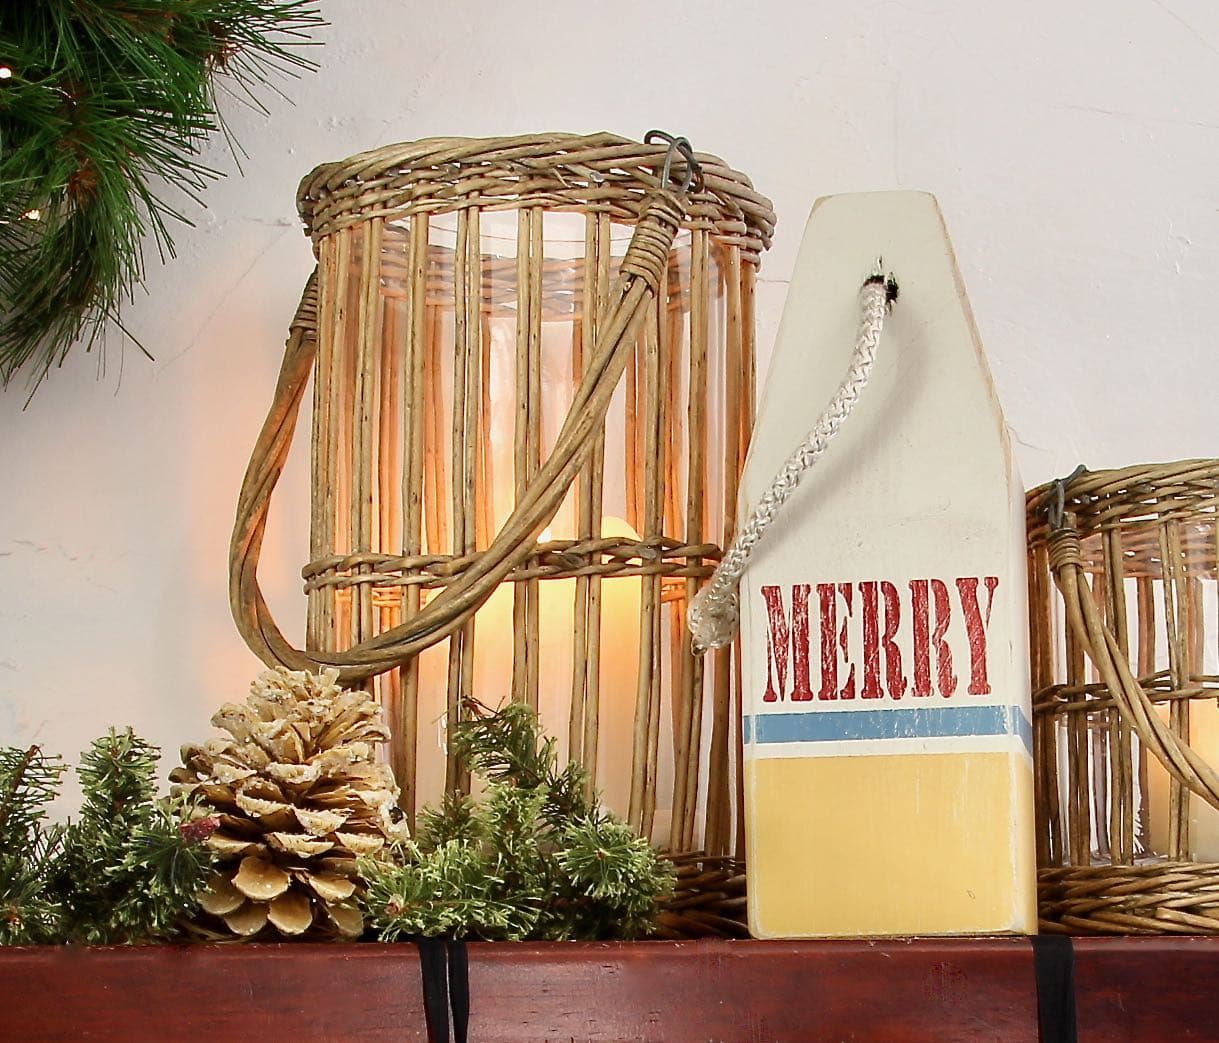
[/et_pb_text][et_pb_image src=”https://southhousedesigns.com/wp-content/uploads/2021/11/Christmas-Buoys.jpeg” alt=”a %22Merry%22 wooden buoy on a wood ledge flanked by candles in glass jars in rattan baskets and pinecones in front” title_text=”Christmas Buoys” _builder_version=”4.12.0″ _module_preset=”default” global_colors_info=”{}”][/et_pb_image][et_pb_text _builder_version=”4.12.0″ _module_preset=”default” custom_padding=”||1px|||” global_colors_info=”{}”]
Step 7) Final Sanding
This step never seems like it will make much difference, but oh, does it ever!!! Take a high grit (200+grit) sandpaper to your dry paint particularly on corners and edges to give it purposeful aging. Do as much or as little as you like for the look you like.
Step 8) Add the Rope
As we said before, it wouldn’t be. a buoy without the rope. I started with 18-inch lengths. Once it is threaded through the drilled hole, Tie a square knot at the length you like and trim off extra.
HINT: I wrap one end with a small piece of tape bringing the tape to a point. Use this as a needle to thread it through the hole.
[/et_pb_text][et_pb_image _builder_version=”4.12.0″ _module_preset=”default” global_colors_info=”{}”][/et_pb_image][/et_pb_column][/et_pb_row][et_pb_row _builder_version=”4.12.0″ _module_preset=”default” global_colors_info=”{}”][et_pb_column type=”4_4″ _builder_version=”4.12.0″ _module_preset=”default” global_colors_info=”{}”][et_pb_text _builder_version=”4.12.0″ _module_preset=”default” global_colors_info=”{}”]
Where To Use Your Wood Christmas Buoys?
[/et_pb_text][et_pb_image src=”https://southhousedesigns.com/wp-content/uploads/2021/11/Wood-Buoys-Mid-Front-Door.jpeg” alt=”%22Merry%22 and %22Joy%22 wood buoys hanging from a burlap bow with greens on a painted carved wood front door” title_text=”Wood Buoys – Mid Front Door” _builder_version=”4.12.0″ _module_preset=”default” global_colors_info=”{}”][/et_pb_image][et_pb_text _builder_version=”4.12.0″ _module_preset=”default” global_colors_info=”{}”]
How about hanging two or three with a bow and bit of greens on your door to welcome the season, your family and guests?
Hang them from a swag of greens.
Include them with drift wood and candles as part of your holiday buffet table display.
Incorporate them with some pinecones and green picks on a coffee table or console table vignette
Hang them in a wreath.
And on and on.
[/et_pb_text][et_pb_image src=”https://southhousedesigns.com/wp-content/uploads/2021/11/Wood-Buoys-closeup-Merry-with-pinecone.jpeg” alt=”Closeup of %22Merry%22 buoy on corner of wood mantel with a small fir tree behind one side and a bleached pinecone in front on the other side” title_text=”Wood Buoys – closeup Merry with pinecone” _builder_version=”4.12.0″ _module_preset=”default” global_colors_info=”{}”][/et_pb_image][/et_pb_column][/et_pb_row][et_pb_row _builder_version=”4.10.7″ _module_preset=”default” global_colors_info=”{}”][et_pb_column type=”4_4″ _builder_version=”4.10.7″ _module_preset=”default” global_colors_info=”{}”][et_pb_image _builder_version=”4.10.7″ _module_preset=”default” global_colors_info=”{}”][/et_pb_image][et_pb_image _builder_version=”4.10.7″ _module_preset=”default” global_colors_info=”{}”][/et_pb_image][et_pb_image _builder_version=”4.10.7″ _module_preset=”default” global_colors_info=”{}”][/et_pb_image][/et_pb_column][/et_pb_row][et_pb_row column_structure=”1_2,1_2″ _builder_version=”4.7.7″ _module_preset=”default” global_colors_info=”{}”][et_pb_column type=”1_2″ _builder_version=”4.7.7″ _module_preset=”default” global_colors_info=”{}”][et_pb_image src=”https://southhousedesigns.com/wp-content/uploads/2020/06/Pin-It-Now-MC.png” title_text=”Pin-It-Now-MC” _builder_version=”4.10.7″ _module_preset=”default” global_colors_info=”{}”][/et_pb_image][/et_pb_column][et_pb_column type=”1_2″ _builder_version=”4.7.7″ _module_preset=”default” global_colors_info=”{}”][et_pb_image src=”https://southhousedesigns.com/wp-content/uploads/2021/11/Buoys-Pin-2.jpg” alt=”Pin showing two images of styled Wood Christmas Buoys with the title reading %22Coastal Christmas Wood Buoys%22″ title_text=”Buoys Pin 2″ _builder_version=”4.12.0″ _module_preset=”default” global_colors_info=”{}”][/et_pb_image][/et_pb_column][/et_pb_row][et_pb_row _builder_version=”4.12.0″ _module_preset=”default” global_colors_info=”{}”][et_pb_column type=”4_4″ _builder_version=”4.12.0″ _module_preset=”default” global_colors_info=”{}”][et_pb_text _builder_version=”4.12.0″ _module_preset=”default” global_colors_info=”{}”]
As always, please don’t hesitate with any questions, comments, feedback, etc.
I truly appreciate you following along on our 12 Days of Christmas Making series! What? You missed the series. No worriesm, friend! I’ll put together a recap this weekend.
[/et_pb_text][/et_pb_column][/et_pb_row][et_pb_row column_structure=”1_2,1_2″ _builder_version=”4.7.7″ _module_preset=”default” global_colors_info=”{}”][et_pb_column type=”1_2″ _builder_version=”4.7.7″ _module_preset=”default” global_colors_info=”{}”][et_pb_image src=”https://southhousedesigns.com/wp-content/uploads/2020/08/LargerHeres-to-Joy-filled-Living.png” alt=”Here’s to Joy-Filled Living, Diane” title_text=”LargerHere’s to Joy-filled Living” _builder_version=”4.7.7″ _module_preset=”default” global_colors_info=”{}”][/et_pb_image][/et_pb_column][et_pb_column type=”1_2″ _builder_version=”4.7.7″ _module_preset=”default” global_colors_info=”{}”][et_pb_image src=”https://southhousedesigns.com/wp-content/uploads/sub.png” title_text=”sub” url=”/subscribe” url_new_window=”on” show_bottom_space=”off” align=”right” _builder_version=”4.5.6″ _module_preset=”default” max_width=”400px” module_alignment=”right” custom_margin=”0px|0px|0px|0px|false|false” custom_padding=”0px|0px|0px|0px|false|false” global_colors_info=”{}”][/et_pb_image][/et_pb_column][/et_pb_row][/et_pb_section]
3 Comments