
How To Make Fun Wood Buoys For Year Round Lake Decor
Here’s a fun, easy way to make wooden buoys for your home decor. Whether you’re celebrating lake life, beach life or decking out your front porch, — these DIY wood buoys are endlessly customizable and always get compliments..
Here’s a fun, surprisingly easy way to add a little nautical decor to your home. Whether you’re celebrating lake life, styling a beach house porch, or looking for a unique handmade gift — these DIY wood buoys are endlessly customizable and always get compliments.
Why I Love These DIY Wood Buoys
I’ll be honest — my love for these buoys started with function just as much as style.
Buoys are incredibly versatile. They hang. They stand. They lay on their sides in a vignette. They work with so many other decorative pieces — tucked in with plants and lanterns on a porch, propped on a mantel, or as part of a centerpiece. They can go big and bold with bright color blocking, or quiet and neutral to blend into a more understated space.
They also make genuinely unique gifts — think a housewarming for a new lake house, a retirement gift for someone finally buying that boat, or a send-off for a friend heading out on a big sailing adventure. Add their name, coordinates, or a meaningful word and you’ve got something nobody else is giving them.
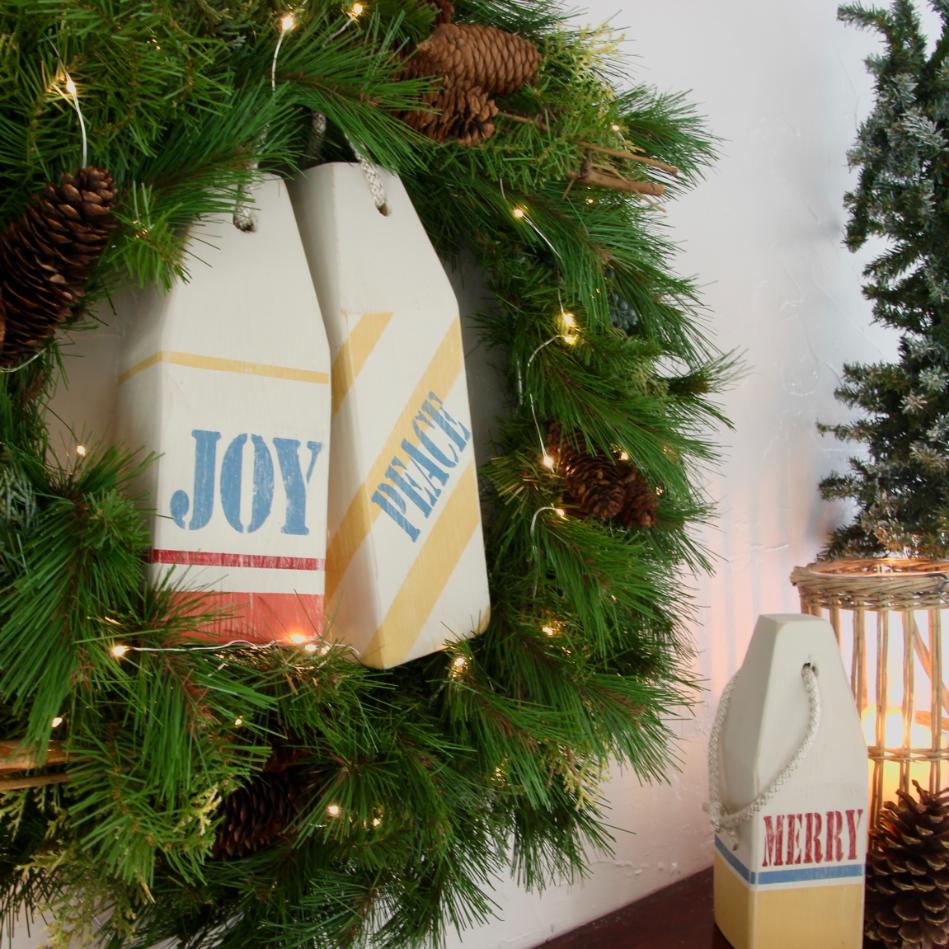
I made my first set for a Christmas mantel — inspired by those lobster buoys you see hanging on the sides of old fishing shacks in Maine. That set is still getting compliments.
This post’s summer version?
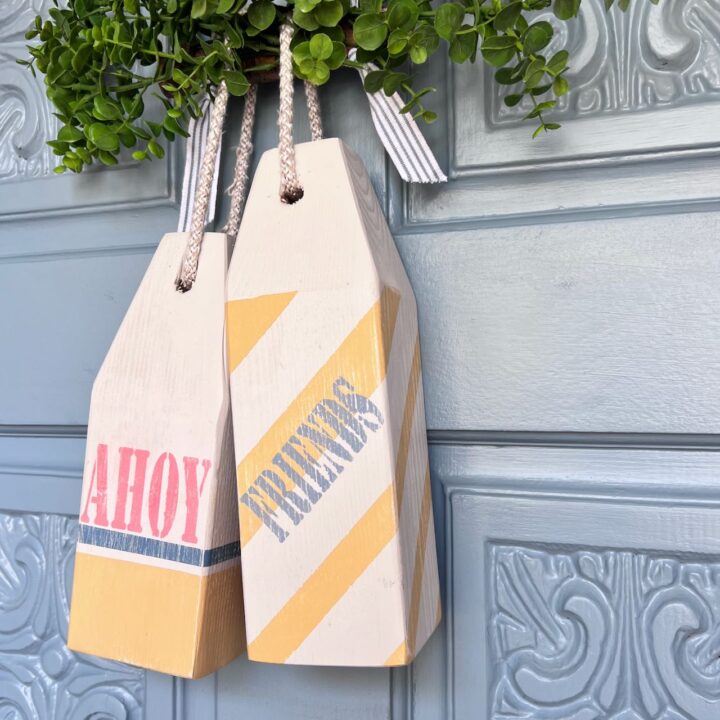
Same buoys. I just flipped them to the blank side, cut new stencils on my Cricut, and swapped “Merry / Peace / Joy” for “Ahoy Friends.” Now they’re hanging on my front door instead of the mantel.
That right there is what I love most about this project. You’re really making a set — one that works across seasons just by rotating the text.
The links in this post may include affiliate links, which means if you purchase anything using these links, you pay no extra, but I may receive a small commission that helps keep this blog running. I truly appreciate you using affiliate links whenever possible. Please know that I will never recommend a product I do not believe in!
Ready to jump right to it?
Here’s a Quick How-To Card for Confident Crafters
If you’d rather feel like I’m right by your side, stepping you through it — no problem, keep scrolling.
Easy DIY Decorative Wooden Buoys
Fun, easy to make wood buoys to use in your decorating in any season. Great housewarming gift too!
Materials
- 4 x 4 wood post (cedar or pine work well)
- Chalk paint or craft paint — base coat color
- 2–3 accent colors for color blocking
- Painters tape
- Nautical or sisal rope
Tools
- Sandpaper or orbital sander
- Compound miter saw
- Drill + drill bits (work up to a 3/8" bit)
- Stencils OR Cricut (for custom text)
- Stencil vinyl (if using Cricut)
- Paint brushes
- Safety glasses
Instructions
- Cut buoy heights from the 4 x 4 post
- Angle-cut the top of each buoy
- Drill rope hole through the peaked top
- Sand thoroughly — edges, top, all sides
- Apply base coat — two light coats
- Color block with painters tape and accent paints
- Add text — stencil or Cricut-cut vinyl stencil
- Thread rope and finish
Notes
Keep scrolling for all the details and my tips.
Now for all the details and my best tips to help you along if your prefer:
Let’s Make Some Nautical Wood Buoys — The Full Tutorial
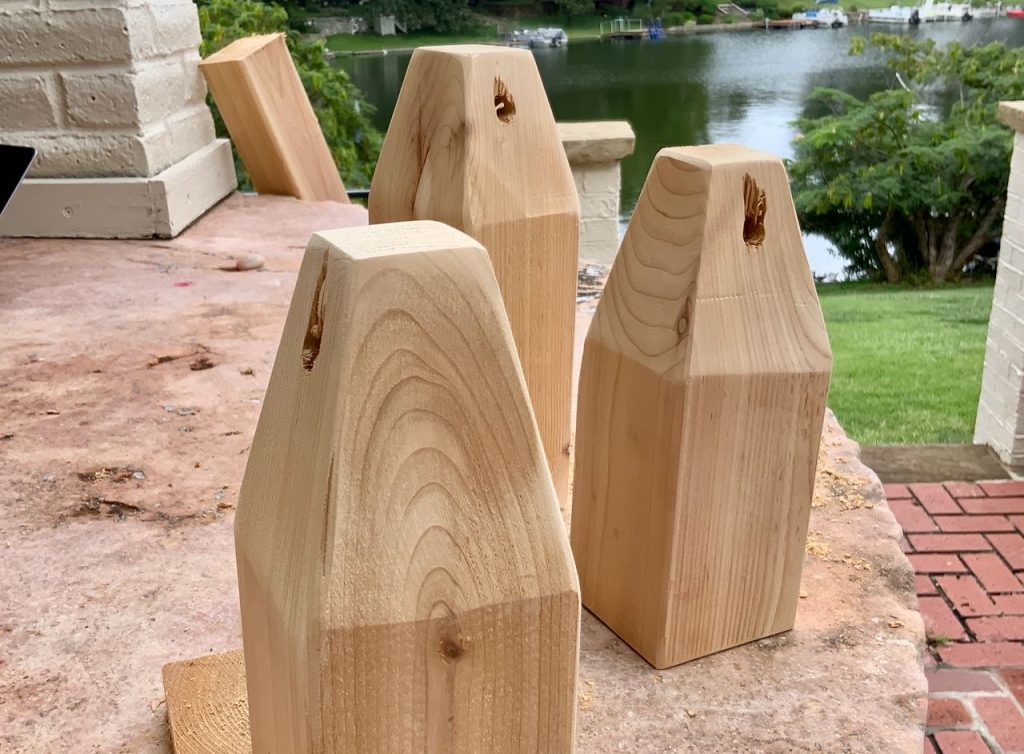
Step 1 — Cut Your Buoy Heights-
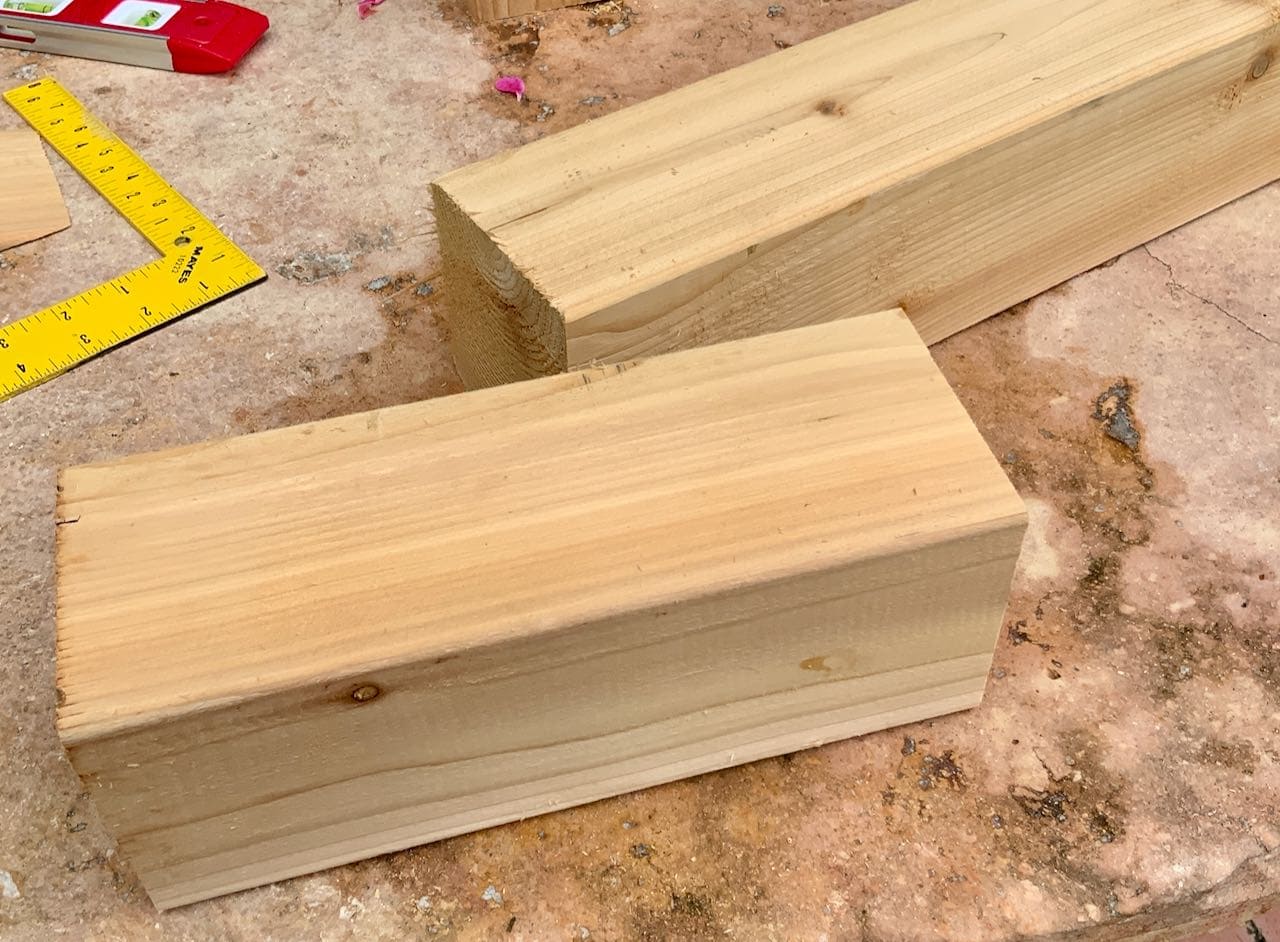
Start with a 4 x 4 post. We bought a four-foot post and got three buoys out of it: 11 inches, 10 inches, and 9½ inches tall. That slight variation in height is part of what makes them look great grouped together — and yes, there’s plenty of post left over for round two.
Use a compound miter saw for clean, square cuts.
Step 2 — Angle-Cut the Top-
This is the step that gives them that classic buoy silhouette, and it’s easier than it looks.
Decide how long you want the angled taper to be and how much you want it to come in at the peak. For our tallest buoy, I ended the angle 3¼ inches from the top and brought the peak in ¾ inch on all sides. Here’s how to mark it:
- Measure down from the top on all four edges and mark your line
- On the top face, mark ¾ inch in from each corner
- Connect each pair of dots with a ruler — that’s your cut line
PRO TIP: Keep the thickness of your blade in mind as you cut.
Those first measurements are everything. Get them accurate and the lines will line up.
Don’t stress if the cuts don’t meet perfectly at the peak — that’s what sanding is for, and a little character isn’t a bad thing.
Step 3 — Drill the Rope Hole
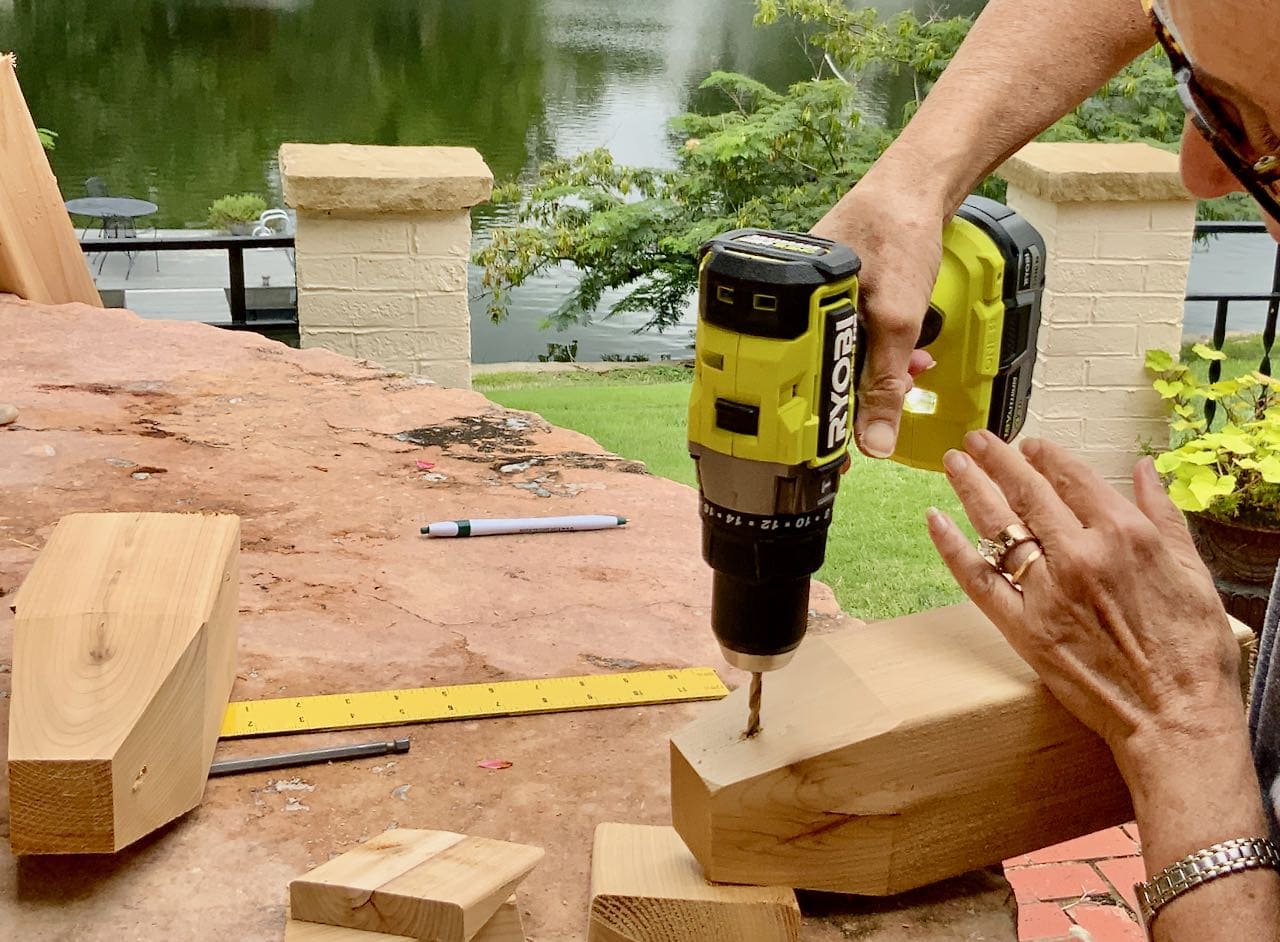
No rope hole, no buoy! Drill straight down through the peak of the angled top.
PRO TIPS: Place a small block of scrap wood under the peaked top to keep it stable and help you drill vertically. Start with a smaller bit and work your way up to a 3/8-inch bit — this gives you more control and a cleaner hole.
Step 4 — Sand Thoroughly
Don’t rush this step. You want to:
- Soften all the sharp edges
- Smooth out any mismatched cuts at the peak
- Get a good surface for paint adhesion
Keep the sandpaper nearby — you’ll come back to it between coats.
Step 5 — Apply Your Base Coat
I used leftover white chalk paint for my base and gave each buoy two light coats back to back. By the time I finished the first coat on the third buoy, the first one was ready for coat two. No waiting around.
Let everything dry fully (like overnight) before you reach for the painters tape.
Step 6 — Color Block
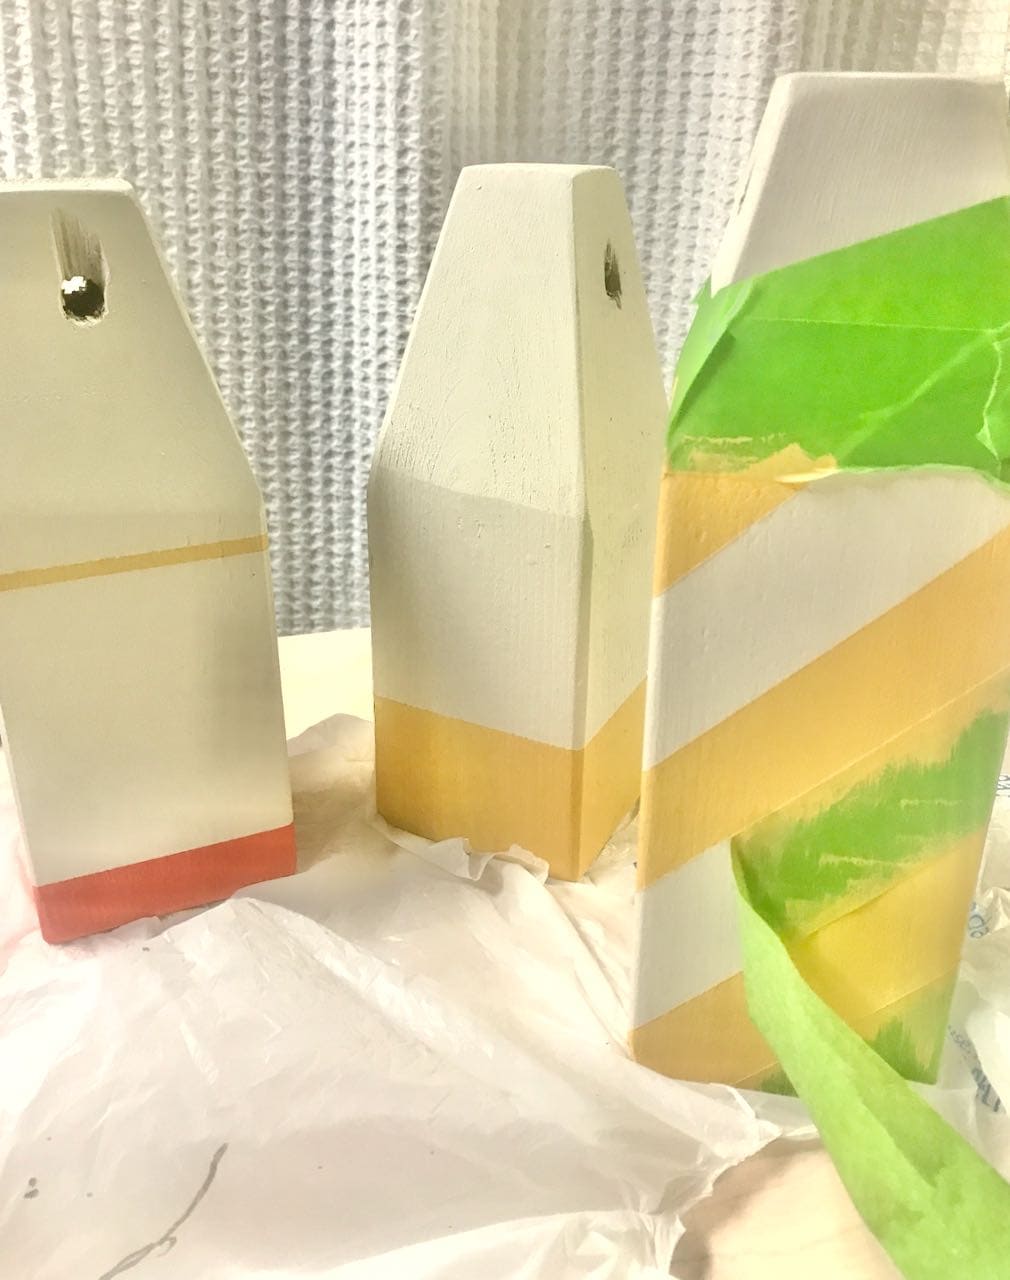
The colorful lobster buoys of Maine are famous for their distinctive color blocking — each fishing crew had their own combination so they could identify their traps. That’s the look we’re going for here.
Pick your colors and plan your blocking before you tape. Think about where your text will go and make sure you have a good contrast area for it.
PRO TIP: For crisp edges, use a pouncing motion with a lightly loaded brush rather than swiping. Same principle as stenciling — less paint, more control.
PRO TIP: If you plan to use these outdoors, reach for exterior-grade craft paint to minimize fading.
Step 7 — Add Your Text
This is where the personality comes in. A few options:
- Pre-made stencils work great for coordinates, simple words, or house numbers
- Cricut-cut vinyl stencils are what I use for custom text — I design my words in Design Space using a stencil-friendly font, cut from adhesive vinyl, and apply directly to the buoy. Peel away after painting while the paint is still slightly tacky for the cleanest edges.
PRO TIP: If you’re planning to use these for multiple seasons, add text to opposite sides of each buoy. My Christmas version says “Merry / Peace / Joy” — flip them around and the summer side says “Ahoy Friends.” Two sets in one!
Step 8 — Thread the Rope and Finish
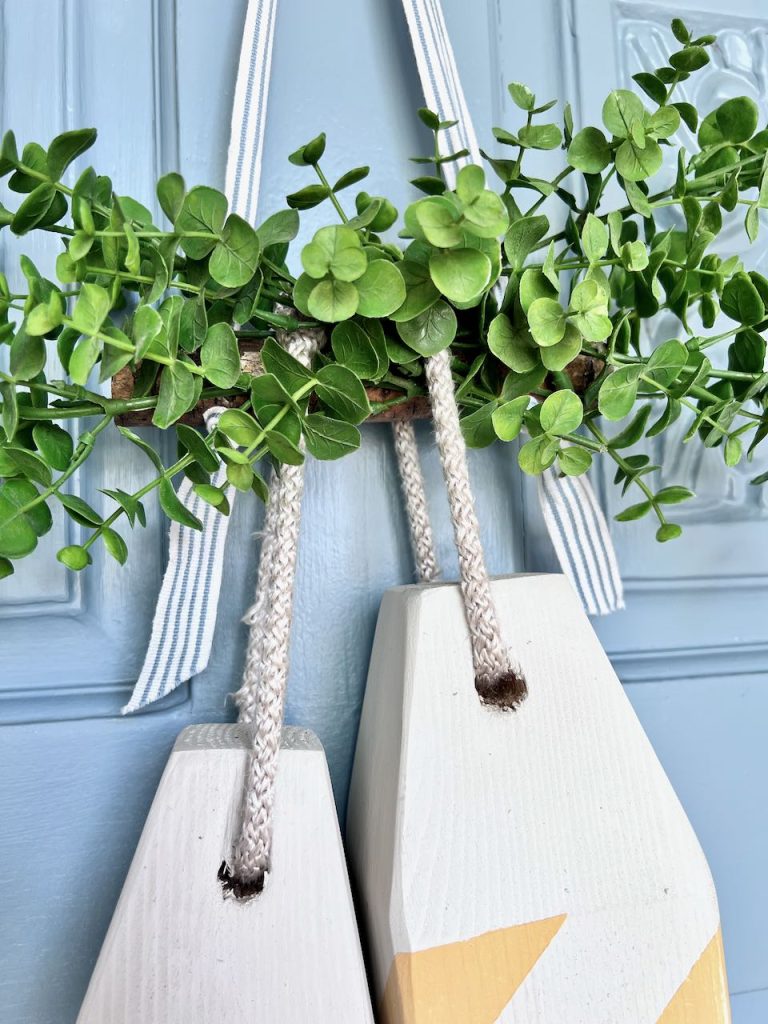
Thread nautical or sisal rope through the drilled hole and knot it. The length depends on how you’re displaying them.
To hang multiple buoys together (like on a door or branch): Drill two small holes in a sturdy stick — I used a 6-inch stick from the yard. Slip the buoys onto the stick and thread ribbon through the holes to hang. A few sprigs of faux boxwood wired onto the stick finishes it off beautifully.
Need to thread wide ribbon through a small hole? I have a trick for that — read it here.
Ways to Display Your Wood Buoys
These are heavier than they look, so they’re stable outdoors and won’t blow over in a light breeze. They play well with so many other decor pieces — books, candles, lanterns, trays, potted plants, you name it.
Outdoor display ideas:
- Front door (in a wreath or hung from a branch or stick with ribbon or rope)
- Front porch grouped with plants and lanterns
- Hung on a fence
- Outdoor bar cart or buffet table
- Outdoor centerpiece
Indoor display ideas:
- Mantel vignette
- Bookshelf styling
- Table centerpiece
- Buffet table at a nautical-themed party
- As table numbers for a large event
Functional ideas:
- Address numbers
- Significant Geo Coordinates
- Welcome sign (“Ahoy Friends,” “Welcome,” “The Smiths”)
- Seasonal swaps — rotate text for each holiday or season
These are just darling Diane! And perfect for your lake house.
Those are so cute!!
These are too cute Diane! I have been looking for something with a nod to the ocean for our foyer, and these would be perfect.
Exactly, a nod is perfect. I’ve never been one for a full blown theme.
Diane these are adorable! Now I just need a beach house! Lol. Thank you so much for sharing at my Weekly Link Party! I’m happy to be featuring you this week! https://www.ourtinynest.com/2023/05/31/weekly-link-party-350/
I so appreciate the share Nicolle. And YES, yes, indeed, you need a lake (or beach) house!!!!!
These are beautiful, thank you so much for sharing with us at Handmade Monday 🙂