The Best DIY Float Mount Art: Professional Framing at Home
Create the illusion of floating artwork with this simple DIY technique. Use shadow effects to showcase special pieces and freshen your art.
Have you ever been to one of those fancy galleries where the artwork seems to magically float above its background?
You know the look I’m talking about—that on-trend, “I paid a professional way too much money for this” vibe? Well, guess what?
You can totally create that same high-end look at home without breaking the bank!
I’m talking about distance float mounting—the cooler, more dramatic cousin of regular float mounting.
While standard float mounts (where artwork just hangs from the top) have been trending for years, a distance float mount kicks things up a notch with that gorgeous shadow between the art and backing.

The result? Straight-up gallery magic that will have your friends thinking you’ve got connections in the art world.
Plus, I’ll show you how I used this technique to rescue a water-damaged print with a controlled tear that turned my “oops” moment into an “oh wow” design feature!
Quick Guide: DIY Distance Float Mount
for you DIYers who just need a push in there general direction:
If you want a bit more hand-holding and guidance, like a craft party for two, keep scrolling:

Floating Mount Framing
How to frame your art in the trendinig Distance Floating Mount way.
Materials
- Artwork
- Frame, specific shadowbox or a deep profile frame
- Mat board for backing
- Foam core
- acid-free, archival tape
Tools
- Long straight edge, square is preferable
- Rotary cutter or box knife
- Cutting mat
Instructions
1. (Optional) Create controlled tear edges if desired
2. Use frame back to but mat board to fit frame
3. Cut a foam core piece 1-inch smaller than artwork
4. Attach artwork to foam core
5. Mount foam core to backing
6. Assemble frame, adding spacers if needed.
Notes
More details and tips below in Detailed Instructions

DIY Float Mount Detailed Instructions
Materials and Supplies-
- Artwork
- Frame, specific shadow box frame or a deep profile frame
- Mat board for backing
- Foam core for floating
- Frame Spacers, if using a traditional frame
- Acid-free archival adhesive
- Large carpenter’s square or yard stick
- Box knife or rotary cutter
- Cutting mat
Step 1) Optional – Create Controlled Torn Edges–
Got a damaged print like mine or just want that artsy torn-edge look?

A controlled tear is your new best friend! It creates that beautiful, organic edge that screams “I meant to do this” rather than “my toddler/cat/coffee cup got to it.”
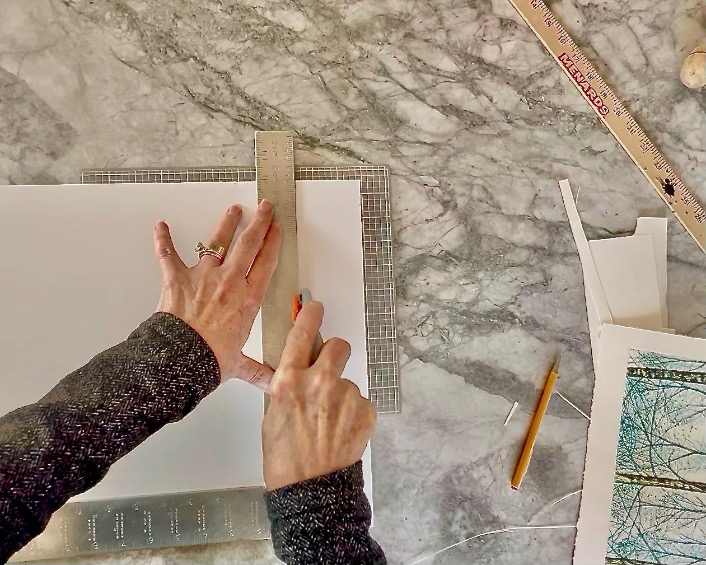
- Figure out where you want your edge to be
- Position your straight edge along that line (carpenter’s square works great here)
- Hold that straight edge down like it owes you money
- Tear the paper upward against the straight edge with a firm, even pull
Keep in mind there are two general ways to do this and each will give slightly different results. So test how it looks with your straight edge on the front side or the art vs. on the back side of the art.
PRO TIP: Do a practice run first on the “margins” that will be torn off. Papers tear differently!
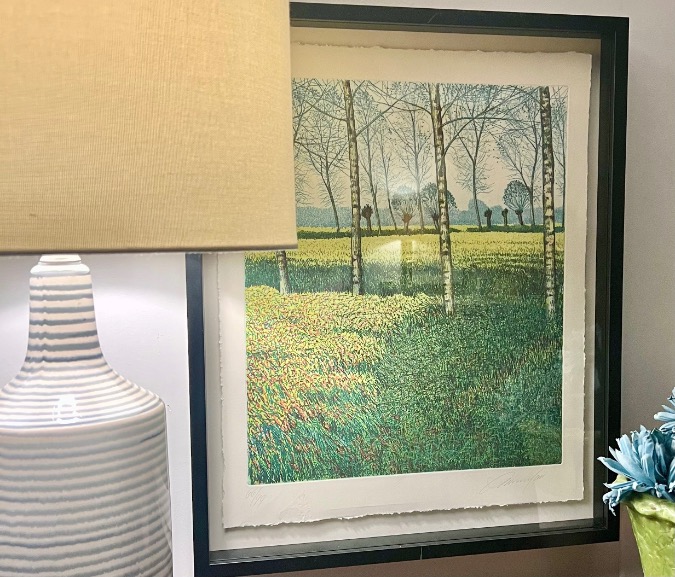
For thick watercolor paper like mine, I discovered that tearing with the straight edge on the back side (the artwork turned upside down) gave me that dreamy, feathered edge that looks intentionally artistic I was after — the top 2/3 of the edge shown above.
The bottom 1/3 of that edge with the sharp fold line next to the tear, that was done with the top side facing up.
Step 2) Prepare Your Backing-

Here’s a easy shortcut: just use the frame’s backing board as your template. Trace around it on your mat board and cut. Boom—perfect fit guaranteed!
PRO TIP: Go lighter with your backing color if you want those shadows to really pop!
Dark colors like black tend to swallow shadows rather than showcase them.
My frame came with a black backing board (because of course it did), but I swapped it for a cream color that matched my watercolor paper.
The result? Shadow drama that deserves its own Oscar!
NOTE: Many shadowbox frames come with a soft backing designed for pinning items on it, as did mine. Do NOT use this backing.
My workaround for the pinboard backing:


- Pried the black fabric and foam core off the frame back board, saving it for another use (well, of course).
- Cleaned the board and cut a fresh foam core backing.
- Cut a fresh black of cream art paper to match my artwork.
- (not shown) Applied to face of backing with acid-free archival tape.
Step 3) Create The Foam Core Mount-
Cut a single piece of foam core about 1 inch smaller in both length and width than your artwork. This keeps the foam core ninja-level hidden while still supporting your piece.
PRO TIP: Want a more dramatic shadow? Stack multiple layers of foam core for extra depth.
Just make sure there’s still clearance between your artwork and the glass when you put it all together.
Nobody wants their masterpiece smooshed against the glass like a kid’s nose on a bakery window!
Step 4) Mount Artwork to Foam Core-
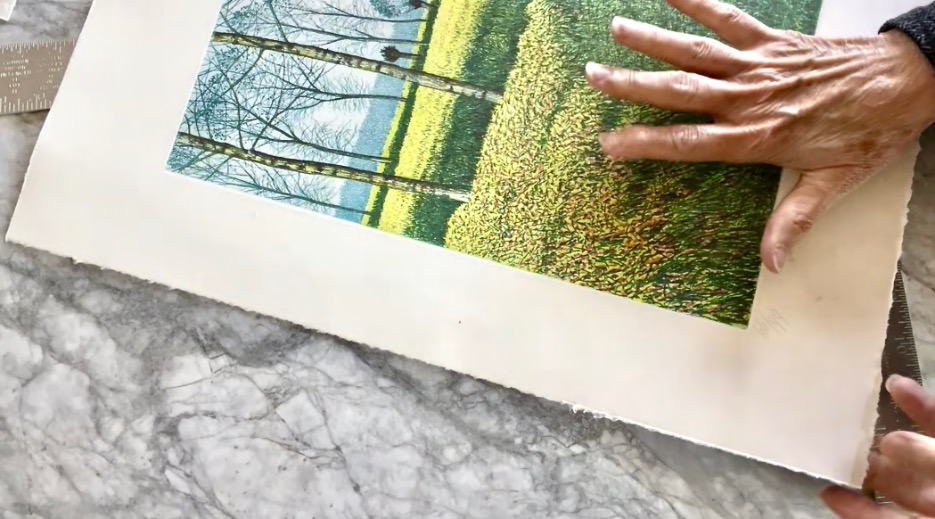
- Center your artwork on the foam core. Just eyeball it like you’re setting up the perfect Instagram shot. There should be about a 1/2-inch inset all around.
- Secure it with acid-free archival tape (your artwork will thank you later)
- Keep that tape hidden where no one will ever see it (tape should be like good plastic surgery—doing its job without anyone knowing it’s there)
Step 5) Attach Foam Core to Backing-

- Center your foam core (with artwork attached) on the backing board. This time make sure it is straight and centered just the way you want it.
- Secure it with tape or adhesive of your choice
- Since this connection isn’t touching your precious artwork, feel free to break out the strong stuff if your piece is on the heavier side
PRO TIP: Double-sided tape or craft glue works like a charm here.
Just be sure you’ve got your positioning absolutely perfect before you commit—kind of like getting a tattoo, repositioning can be…complicated.
Step 6) Frame Assembly-
- Place your floating artwork creation into the frame, adding spacers if needed
- Secure everything according to your frame’s specific design
- Stand back and admire your handiwork while feeling smugly artistic
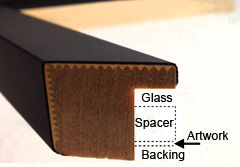
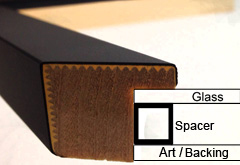
NOTE: Spacers force airspace between the back board and the glass front. Space for your art to breathe and look sophisticated and fancy. Shadowbox frames have a built in rabbet.
But if you’re using a traditional frame with a deep enough profile, you’ll need to add your own spacers. You can order some from the link below or usually you can buy some from a local framing shop.

Here’s a great resource for frame spacers.
Optionally, you can cut thin strips of leftover mat board, glue several together for depth and then glue this bundle inside the frame below the glass. You can also glue thin dowels (painted to match the inside of your frame) inside the frame or stick those little adhesive plastic “jelly buttons” (you know, the ones used for protecting surfaces or softening cabinet door closings) around the inside edges. All you need is a stealth way to create the clearance your artwork needs.
Where This Works So Well

Distance float mounting is absolutely perfect for:
- Artwork with edges too pretty to hide
- Handmade papers with those gorgeous deckled or torn borders
- Your grandma’s tattered recipe cards (complete with authentic food stains)
- Preserving the 3D awesomeness of textured artwork
- Making people think you spent way more on framing than you actually did
In my case, what started as a panicked “oh no, my print got wet!” moment turned into a happy accident. The controlled tear technique transformed damage into a design feature, and the distance float mount made the whole thing look intentionally artistic and expensive.
This approach is perfect for showcasing items where the edges are part of the story—like those well-loved recipe cards with worn edges that testify the kitchen is the heart of the home and the best memories are made at the table.
Key Takeaways
- Distance float mounting creates that fancy gallery look without the fancy gallery price tag
- The technique shows off and preserves those beautiful edges
- You can totally do this without professional equipment—just basic crafting supplies and a steady hand
- Controlled torn edges can turn “damaged goods” into “artistic statement”
- The shadow effect adds depth that flat mounting just can’t match
- Lighter backing colors make those shadows pop like they’re in a shadow puppet show
Final Key Takeaway: This Pin! Take and save this to help you find this info when you’re ready to float mount some artwork or your own.


While we’re on the subject of frames, did you see these sweet hearts I made from old thrift store frames?
They are not the easiest make. But now that I have the how figured out for you, an afternoon could yield quite a few if you don’t count how involved you want to get in your fancy finishes, waxes, sealants, etc.
Have you tried float mounting any of your special pieces? What creative framing hacks have you discovered? Drop your projects in the comments—I’m always looking for new tricks to try!

This turned out Beautiful Diane! I love the turn edge look!
Thank you so much for sharing! I can’t wait to see how it turns out.