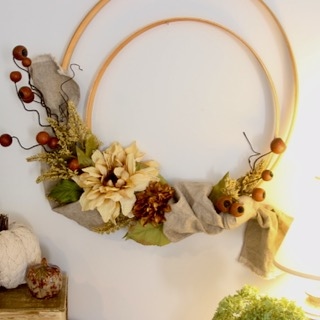
Sharing a modern Fall hoop wreath diy — using washed linen a few dramatic flowers and two embroidery hoops. Stunning! (And so very easy)
[/et_pb_text][et_pb_text _builder_version=”4.9.10″ _module_preset=”default” global_colors_info=”{}”]
I am quite smitten with minimalist hoop wreaths.
You too? If not, no worries. I’ve got you covered there too — and with so much fabulous Fall inspiration. At the bottom of this post, check out the additional 11 Fun Fall Ideas from bunches of my blogger friends.
As much as I love minimalist hoop wreaths, somehow they intimidated me. They don’t look very forgiving to make. At least to me.
Let me tell you, friend, I was soooo wrong! This was the most fun wreath I have ever made!!!! Particularly easy since I used two hoops. This created a space to tuck all the bits and pieces of stem ends, etc.
And I think it turned out to be hugely successful.
So what got me started was an extra-large embroidery hoop I found at the thrift store for $5! AND I and five other bloggers challenged each other to see how we would each use the same skinny washed linen table runners that I used to make and sell. (Sorry, they are sold out and I cannot get more of that wonderful fabric).
Being a textile nerd, I never make a wreath without including some kind of textile element.
With my hoop being extra-large, my ribbon or textile accent needs to be extra large. I knew my washed linen skinny table runner would be perfect.
But let’s back up and start with the hoops. I wanted two.
[/et_pb_text][/et_pb_column][/et_pb_row][et_pb_row column_structure=”1_3,1_3,1_3″ use_custom_gutter=”on” gutter_width=”2″ _builder_version=”4.5.6″ _module_preset=”default” global_colors_info=”{}”][et_pb_column type=”1_3″ _builder_version=”4.5.6″ _module_preset=”default” global_colors_info=”{}”][et_pb_image src=”https://southhousedesigns.com/wp-content/uploads/2020/08/Hoops.jpeg” title_text=”Hoops” _builder_version=”4.9.10″ _module_preset=”default” global_colors_info=”{}”][/et_pb_image][/et_pb_column][et_pb_column type=”1_3″ _builder_version=”4.5.6″ _module_preset=”default” global_colors_info=”{}”][et_pb_image src=”https://southhousedesigns.com/wp-content/uploads/2020/08/hoops-original.jpeg” title_text=”hoops-original” _builder_version=”4.9.10″ _module_preset=”default” global_colors_info=”{}”][/et_pb_image][/et_pb_column][et_pb_column type=”1_3″ _builder_version=”4.5.6″ _module_preset=”default” global_colors_info=”{}”][et_pb_image src=”https://southhousedesigns.com/wp-content/uploads/2020/08/hoops-stained.jpeg” title_text=”hoops-stained” _builder_version=”4.9.10″ _module_preset=”default” global_colors_info=”{}”][/et_pb_image][/et_pb_column][/et_pb_row][et_pb_row _builder_version=”4.5.3″ _module_preset=”default” global_colors_info=”{}”][et_pb_column type=”4_4″ _builder_version=”4.5.3″ _module_preset=”default” global_colors_info=”{}”][et_pb_text _builder_version=”4.9.10″ _module_preset=”default” global_colors_info=”{}”]
Like I said, I scored the larger embroidery hoop at a thrift store for $5. Then I purchased the inner hoop at JoAnns for $4.19 (after my coupon of course!).
[/et_pb_text][et_pb_text _builder_version=”4.9.10″ _module_preset=”default” global_colors_info=”{}”]
The new hoop is slightly thinner and lighter in color — no worn patina.
The size is no problem, as it’s going to nestle inside the larger one anyway. And I took care of the patina with some swipes of several different leftover stains.
[/et_pb_text][/et_pb_column][/et_pb_row][et_pb_row column_structure=”1_3,1_3,1_3″ use_custom_gutter=”on” gutter_width=”2″ _builder_version=”4.5.6″ _module_preset=”default” global_colors_info=”{}”][et_pb_column type=”1_3″ _builder_version=”4.5.6″ _module_preset=”default” global_colors_info=”{}”][et_pb_image src=”https://southhousedesigns.com/wp-content/uploads/2020/08/thriller.jpeg” title_text=”thriller” _builder_version=”4.5.6″ _module_preset=”default” global_colors_info=”{}”][/et_pb_image][/et_pb_column][et_pb_column type=”1_3″ _builder_version=”4.5.6″ _module_preset=”default” global_colors_info=”{}”][et_pb_image src=”https://southhousedesigns.com/wp-content/uploads/2020/08/Filler.jpeg” title_text=”Filler” _builder_version=”4.5.6″ _module_preset=”default” global_colors_info=”{}”][/et_pb_image][/et_pb_column][et_pb_column type=”1_3″ _builder_version=”4.5.6″ _module_preset=”default” global_colors_info=”{}”][et_pb_image src=”https://southhousedesigns.com/wp-content/uploads/2020/08/Trailer.jpeg” title_text=”Trailer” _builder_version=”4.5.6″ _module_preset=”default” global_colors_info=”{}”][/et_pb_image][/et_pb_column][/et_pb_row][et_pb_row _builder_version=”4.5.3″ _module_preset=”default” global_colors_info=”{}”][et_pb_column type=”4_4″ _builder_version=”4.5.3″ _module_preset=”default” global_colors_info=”{}”][et_pb_text _builder_version=”4.9.10″ _module_preset=”default” global_colors_info=”{}”]
I took the larger hoop and the runner to Hobby Lobby and tried out many combinations of florals, and finally landed on these.
For my wreath, I applied the same “Thriller-filler-and-spiller” principle that is commonly applied to windowboxes and planters.
So after exploring a lot of options, I settled on this one large “Thriller”, a number of “Fillers” and then two “Trailers” instead of “Spillers”. I wanted them to not spill down but rather be malleable and leggy to trail along the shape of the hoop, one up and one sideways.
[/et_pb_text][et_pb_image src=”https://southhousedesigns.com/wp-content/uploads/2020/08/WireHoopsTogether.jpeg” title_text=”WireHoopsTogether” align=”center” force_fullwidth=”on” _builder_version=”4.5.6″ _module_preset=”default” global_colors_info=”{}”][/et_pb_image][et_pb_text _builder_version=”4.9.10″ _module_preset=”default” global_colors_info=”{}”]
I started by wiring the outer hoop of the largest set with the inner hoop of the smaller set.
BONUS: you have another outer and inner left. Enough structure for another wreath. Hellp Spring, or Christmas, or winter . . . . Oh, the possibilities!
[/et_pb_text][/et_pb_column][/et_pb_row][et_pb_row column_structure=”4_4,1_2″ _builder_version=”4.5.6″ _module_preset=”default” global_colors_info=”{}”][et_pb_column type=”4_4″ _builder_version=”4.5.6″ _module_preset=”default” global_colors_info=”{}”][et_pb_image src=”https://southhousedesigns.com/wp-content/uploads/2020/08/ClipFlorals.jpeg” alt=”Floral stems cut shorter and flowers separated.” title_text=”ClipFlorals” force_fullwidth=”on” _builder_version=”4.9.10″ _module_preset=”default” global_colors_info=”{}”][/et_pb_image][/et_pb_column][et_pb_column type=”1_2″ _builder_version=”4.5.6″ _module_preset=”default” global_colors_info=”{}”][/et_pb_column][/et_pb_row][et_pb_row _builder_version=”4.5.3″ _module_preset=”default” global_colors_info=”{}”][et_pb_column type=”4_4″ _builder_version=”4.5.3″ _module_preset=”default” global_colors_info=”{}”][et_pb_text _builder_version=”4.5.6″ _module_preset=”default” global_colors_info=”{}”]
Then, I used wire cutters and shorten your stems and cut apart the bunches.
For my “trailers”, there were enough stems in the bunch that I only needed one bunch. I carefully separated that bunch into one main group that will go up the left side and two smaller bunches that will go to the right side. I tried not cut the “Fillers” and “Trailers” into a whole bunch of separate stems as that just means more wiring.
[/et_pb_text][/et_pb_column][/et_pb_row][et_pb_row column_structure=”1_3,1_3,1_3″ use_custom_gutter=”on” gutter_width=”2″ make_equal=”on” _builder_version=”4.5.6″ _module_preset=”default” min_height=”300px” global_colors_info=”{}”][et_pb_column type=”1_3″ _builder_version=”4.5.6″ _module_preset=”default” global_colors_info=”{}”][et_pb_image src=”https://southhousedesigns.com/wp-content/uploads/2020/08/StartWithLinen.jpeg” title_text=”StartWithLinen” _builder_version=”4.5.6″ _module_preset=”default” custom_margin=”||23px|||” custom_padding=”|0px|25px|||” global_colors_info=”{}”][/et_pb_image][/et_pb_column][et_pb_column type=”1_3″ _builder_version=”4.5.6″ _module_preset=”default” global_colors_info=”{}”][et_pb_image src=”https://southhousedesigns.com/wp-content/uploads/2020/08/WireKnot.jpeg” alt=”Linen Slip knot wired to left of bottom enpander of embroidery hoops” title_text=”WireKnot” _builder_version=”4.5.6″ _module_preset=”default” custom_margin=”||-28px|||” custom_padding=”|18px|0px|||” global_colors_info=”{}”][/et_pb_image][/et_pb_column][et_pb_column type=”1_3″ _builder_version=”4.5.6″ _module_preset=”default” global_colors_info=”{}”][et_pb_image src=”https://southhousedesigns.com/wp-content/uploads/2020/08/WireScrunch.jpeg” alt=”linen runner bunched and wired around outer hoop on left top ” title_text=”WireScrunch” _builder_version=”4.5.6″ _module_preset=”default” global_colors_info=”{}”][/et_pb_image][/et_pb_column][/et_pb_row][et_pb_row use_custom_gutter=”on” gutter_width=”2″ make_equal=”on” _builder_version=”4.5.6″ _module_preset=”default” global_colors_info=”{}”][et_pb_column type=”4_4″ _builder_version=”4.5.6″ _module_preset=”default” global_colors_info=”{}”][et_pb_text _builder_version=”4.5.6″ _module_preset=”default” global_colors_info=”{}”]
Now that I had my florals assembled, I started wiring with the washed linen runner as it would serve as the backdrop for my florals.
I started with the linen runner by tying a loose slip knot in one end.
Then I laid the runner out so I could determine where I wanted it to lie around my hoop. I wanted the lower left side of the hoop to be my arrangement.
I threaded a length of wire through the folds of the knot and wired around the hoops. I positioned it just to the right of the hoop expander piece (what are they really called?)
Then I scrunched up the other end. Wrapped it tightly with a piece of wire and tied it off to the outer hoop up high. Notice it is not taut as I want to be able to add a third wire and twist and puff out the linen between the florals.
[/et_pb_text][/et_pb_column][/et_pb_row][/et_pb_section][et_pb_section fb_built=”1″ _builder_version=”4.4.9″ global_colors_info=”{}”][et_pb_row _builder_version=”4.4.9″ global_colors_info=”{}”][et_pb_column type=”4_4″ _builder_version=”4.4.9″ global_colors_info=”{}”][et_pb_image src=”https://southhousedesigns.com/wp-content/uploads/2020/08/StartWiring.jpeg” title_text=”StartWiring” force_fullwidth=”on” _builder_version=”4.5.6″ _module_preset=”default” global_colors_info=”{}”][/et_pb_image][et_pb_text _builder_version=”4.9.10″ _module_preset=”default” global_colors_info=”{}”]
Now, it’s time to add the florals. I started with my “Thriller”. Wired her in tight where I wanted her and I added a bit of filler at the same time.
I worked my way out in both directions. This is when I wired in the “Trailers”, pulling and puffing the linen as I went. You might wire the linen in another spot with you “Fillers” also.
[/et_pb_text][et_pb_image src=”https://southhousedesigns.com/wp-content/uploads/2020/08/WireBackside.jpeg” alt=”backside of hoops with stems wired around and between the wooden hoops” title_text=”WireBackside” force_fullwidth=”on” _builder_version=”4.5.6″ _module_preset=”default” global_colors_info=”{}”][/et_pb_image][et_pb_text _builder_version=”4.5.6″ _module_preset=”default” global_colors_info=”{}”]
Here’s the backside of the wreath, you can see how the space between the two hoops also serves as a great reservoir to hide the stems and wires.
These hoop wreaths have a clean, modern aesthetic that doesn’t require a lot! So you can go minimalistic or you can go all out.
[/et_pb_text][et_pb_image src=”https://southhousedesigns.com/wp-content/uploads/2020/08/55C95623-A73E-428E-922E-57ED00A6BE96_1_105_c.jpeg” title_text=”55C95623-A73E-428E-922E-57ED00A6BE96_1_105_c” _builder_version=”4.5.6″ _module_preset=”default” global_colors_info=”{}”][/et_pb_image][et_pb_image src=”https://southhousedesigns.com/wp-content/uploads/2020/08/CD97DF25-1392-45E9-B70A-C763B213C248_1_201_a.jpeg” title_text=”CD97DF25-1392-45E9-B70A-C763B213C248_1_201_a” _builder_version=”4.5.6″ _module_preset=”default” global_colors_info=”{}”][/et_pb_image][et_pb_image src=”https://southhousedesigns.com/wp-content/uploads/2020/08/Addfillerandtrailer.jpeg” title_text=”Addfillerandtrailer” force_fullwidth=”on” _builder_version=”4.5.6″ _module_preset=”default” global_colors_info=”{}”][/et_pb_image][et_pb_image src=”https://southhousedesigns.com/wp-content/uploads/2020/08/063C6046-DE9F-4861-B547-B82B7D0FF1B7_1_105_c.jpeg” title_text=”063C6046-DE9F-4861-B547-B82B7D0FF1B7_1_105_c” force_fullwidth=”on” _builder_version=”4.5.6″ _module_preset=”default” global_colors_info=”{}”][/et_pb_image][et_pb_text _builder_version=”4.9.10″ _module_preset=”default” global_colors_info=”{}”]
As you can tell this runner is more about styling a table, than protecting a table. And she’s also great at styling a wreath and styling a ladder and styling so much more!
If you want to see how the other five blogging buddies used this same runner, you can check them out here.
[/et_pb_text][/et_pb_column][/et_pb_row][et_pb_row column_structure=”1_2,1_2″ _builder_version=”4.5.6″ _module_preset=”default” global_colors_info=”{}”][et_pb_column type=”1_2″ _builder_version=”4.5.6″ _module_preset=”default” global_colors_info=”{}”][et_pb_image src=”https://southhousedesigns.com/wp-content/uploads/2020/06/HorizontalPin-It-Now-SoHo-copy.png” title_text=”HorizontalPin-It-Now-SoHo-copy” align=”center” _builder_version=”4.9.10″ _module_preset=”default” width=”73%” global_colors_info=”{}”][/et_pb_image][/et_pb_column][et_pb_column type=”1_2″ _builder_version=”4.5.6″ _module_preset=”default” global_colors_info=”{}”][/et_pb_column][/et_pb_row][et_pb_row column_structure=”1_2,1_2″ _builder_version=”4.5.6″ _module_preset=”default” global_colors_info=”{}”][et_pb_column type=”1_2″ _builder_version=”4.5.6″ _module_preset=”default” global_colors_info=”{}”][et_pb_image src=”https://southhousedesigns.com/wp-content/uploads/2021/08/Fall-Wreath-Pin.jpg” alt=”Pinterest Pin showing the finished double wood hoop wreath on a brick wall” title_text=”Fall Wreath Pin” _builder_version=”4.9.10″ _module_preset=”default” width=”89%” global_colors_info=”{}”][/et_pb_image][/et_pb_column][et_pb_column type=”1_2″ _builder_version=”4.5.6″ _module_preset=”default” global_colors_info=”{}”][et_pb_image src=”https://southhousedesigns.com/wp-content/uploads/5961A7E3-81D6-4A1B-8A81-182472DE94D9_1_105_c.jpeg” title_text=”5961A7E3-81D6-4A1B-8A81-182472DE94D9_1_105_c” align=”center” _builder_version=”4.5.6″ _module_preset=”default” width=”66%” custom_margin=”|||80px|false|false” global_colors_info=”{}”][/et_pb_image][et_pb_text _builder_version=”4.5.6″ _module_preset=”default” global_colors_info=”{}”]These skinny table runners are really more skinny style runners. Skinny but mighty.
If you want more details, just click here and you’ll have all the details and can place an order if you’re ready to join the stylin’ fun.[/et_pb_text][et_pb_button button_url=”https://southhousedesigns.com/products/skinny-table-runners/” url_new_window=”on” button_text=”I Want One” button_alignment=”center” _builder_version=”4.5.6″ _module_preset=”default” custom_button=”on” button_text_color=”#000000″ button_bg_color=”#d0e1f7″ button_border_color=”#d0e1f7″ button_border_radius=”9px” global_colors_info=”{}”][/et_pb_button][et_pb_image src=”https://southhousedesigns.com/wp-content/uploads/sub.png” title_text=”sub” url=”/subscribe” url_new_window=”on” show_bottom_space=”off” align=”right” _builder_version=”4.5.6″ _module_preset=”default” max_width=”400px” module_alignment=”right” custom_margin=”0px|0px|0px|0px|false|false” custom_padding=”0px|0px|0px|0px|false|false” global_colors_info=”{}”][/et_pb_image][/et_pb_column][/et_pb_row][et_pb_row _builder_version=”4.5.6″ _module_preset=”default” global_colors_info=”{}”][et_pb_column type=”4_4″ _builder_version=”4.5.6″ _module_preset=”default” global_colors_info=”{}”][et_pb_text _builder_version=”4.9.10″ _module_preset=”default” custom_padding=”||0px|||” global_colors_info=”{}”]
Hope this little share gets you inspired to make a Fall wreath of your own.
[/et_pb_text][et_pb_text _builder_version=”4.9.10″ _module_preset=”default” global_colors_info=”{}”]
Did I get you in the Fall mood?
Great, “cause I have more Fall comin’ at you!!! Here are links to 11 more Fun Fall Ideas that I am thrilled to share with you. So grab a favorite beverage, put your feet up for a few minutes and explore all this Fall inspiration.
[/et_pb_text][et_pb_code _builder_version=”4.9.10″ _module_preset=”default” global_colors_info=”{}”]
Thank you for joining the Harvest Hop 2021
xox Juliet
I’ve never made a wreath with embroidery hoops, but have always admired them. I like that you doubled the hoops and added that pretty linen runner! Great hoppin’ with you!
Oh, Diane! I am in love with this wreath. I love the wooden look of the embroidery hoops and that you can get two wreaths from 2 hoops. Genius! Beautiful job of selecting your fall flowers for this one. Stunning! As always, I loved hopping with you!
Diane, what a pretty fall wreath. I’ve never used two hoops at once to make a wreath. It’s a great idea to give more substance to a wreath. I have a ton of burlap ribbon I could use. Thanks for sharing on the blog hop.


Diane, your wreath is BEAUTIFUL – 🧡🍁🍂 Thank you for joining the Harvest Hop
Thanks Juliet! And a HUGE thanks to you for herding us bloggers. I know we can be rather cat like.
I’ve never made a wreath with embroidery hoops, but have always admired them. I like that you doubled the hoops and added that pretty linen runner! Great hoppin’ with you!
Thanks bunches, Marie!
I struggle with making wreaths – thank you for great instructions and the wonderful idea to use two embroidery hoops!
Two is always better than one, right? And it sure made it easy, too!
Ok now I need to make one for fall!
YES! You do!
Diane that second hoop is totally unexpected and I absolutely love it! I’ll be trying this!
Thanks so much Sue! I think the second hoop is what made it so easy.
Oh, Diane! I am in love with this wreath. I love the wooden look of the embroidery hoops and that you can get two wreaths from 2 hoops. Genius! Beautiful job of selecting your fall flowers for this one. Stunning! As always, I loved hopping with you!
Thanks so much for the wreath love! Fun hopping together, yet again!
Diane, what a pretty fall wreath. I’ve never used two hoops at once to make a wreath. It’s a great idea to give more substance to a wreath. I have a ton of burlap ribbon I could use. Thanks for sharing on the blog hop.
Such a cute wreath! I shared this tutorial in my weekly All Things Vintage round up!
This is so pretty, Diane! I love the look of using a double hoop! It is so much fun to hop with you!