Make a Fun Kids Felt Nativity Set: Free Printable
Create a child-friendly felt nativity set that grows with your family. Free printable patterns for an interactive Christmas tradition!
Were you like me growing up?
We had a beautiful nativity set filled with all the standard cast — shepherds, wise men and angels along with cows, a donkey, sheep and camels.
I loved that set. It was displayed across the top of the upright piano in the living room. A room you only went into for your daily piano practice.
I didn’t much like piano practice, but I loved that nativity set. The very set we weren’t allowed to touch!
I think that’s why, for years, I’ve been dreaming of making a creche and figures specifically for children. I wanted to write a book recounting this miracle. A book that would evolve as the children grew with new details and new supporting characters adding more richness each succeeding year.
The 2025 Expansion Set can be found right here.
Becoming a new Grandma propelled my decision to take on this long-dreamt-about project . . . finally!
Are you also looking for a meaningful Christmas craft that brings the nativity story to life for your little ones?
This easy DIY felt nativity set tutorial will help you create an interactive story board that little ones can use to retell the Christmas story again and again.
Perfect for families, Sunday schools, or as a special holiday gift, this durable felt nativity scene will become a cherished part of your Christmas season.
More Holiday Ideas for Our Young Kiddos
You’re in luck! I have joined three of my favorite bloggers who are also grandmas. We are each sharing a kid-friendly activity for the holidays. These three companion posts are all listed at the bottom of this post, and each is a real treat!
TABLE OF CONTENTS:
The links in this post may include affiliate links, which means if you purchase anything using these links, you pay no extra, but I may receive a small commission that helps keep this blog running. I truly appreciate you using affiliate links whenever possible. Please know that I will never recommend a product I do not believe in!
Why Make a Felt Nativity?
- Interactive way to teach the Christmas story (And Jesus was the master of teaching by stories!)
- Durable, child-safe alternative to breakable sets (Can I get an Amen?)
- Grows with your family year after year (like the height chart on the door frame, but more Biblical)
- Versatile display and storage options
- Perfect for travel and visits to relatives (Isn’t that the goal, to have Jesus with us everywhere?)
- Creates meaningful holiday traditions
Pick Your Display Style
(Because One Size Does NOT Fit All!
The Classic Route, W/ or W/O a Board-
Think of it as your kids’ Biblical play mat:
- Flat felt background (simple but effective)
- W/O a board, rolls up for storage (way better than that giant inflatable Santa does)
- Perfect for floor play (and easy to vacuum around!)
The Pinterest-Worthy Frame Display-
For when you want it to look grown-up but stay kid-friendly:
- Hangs on the wall (safe from the family dog!)
- Enshrines the kids’ creche as the masterpiece it is (you know, like hanging the fingerpainting on the fridge)
- Kid-height accessible (no more lifting little ones for a better look)
- Doubles as actual charming Christmas decor (look at you, being all efficient!)
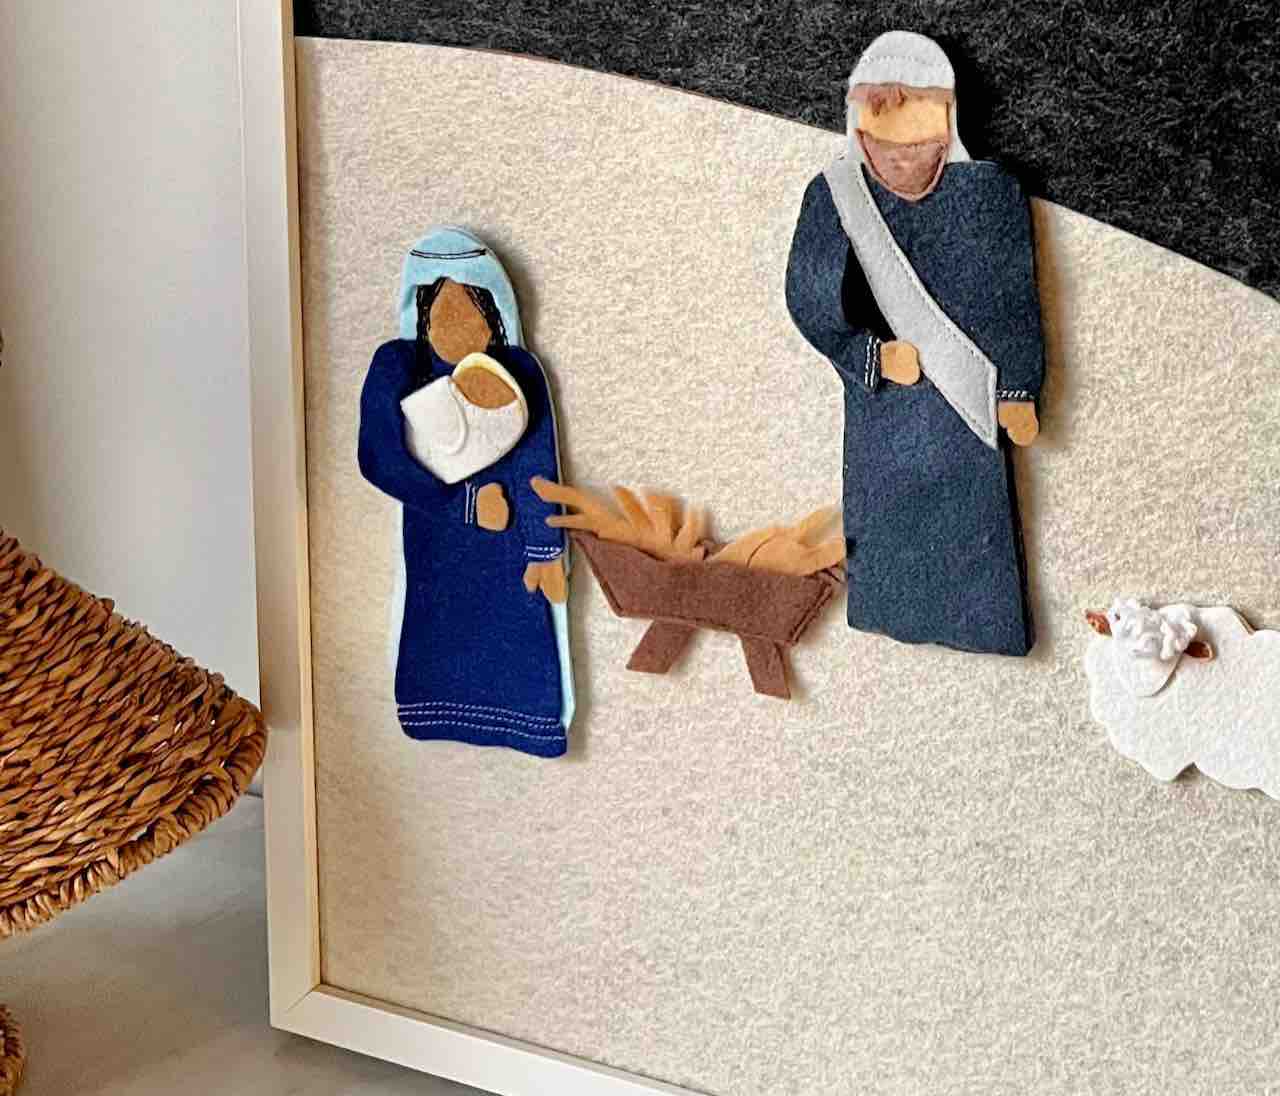
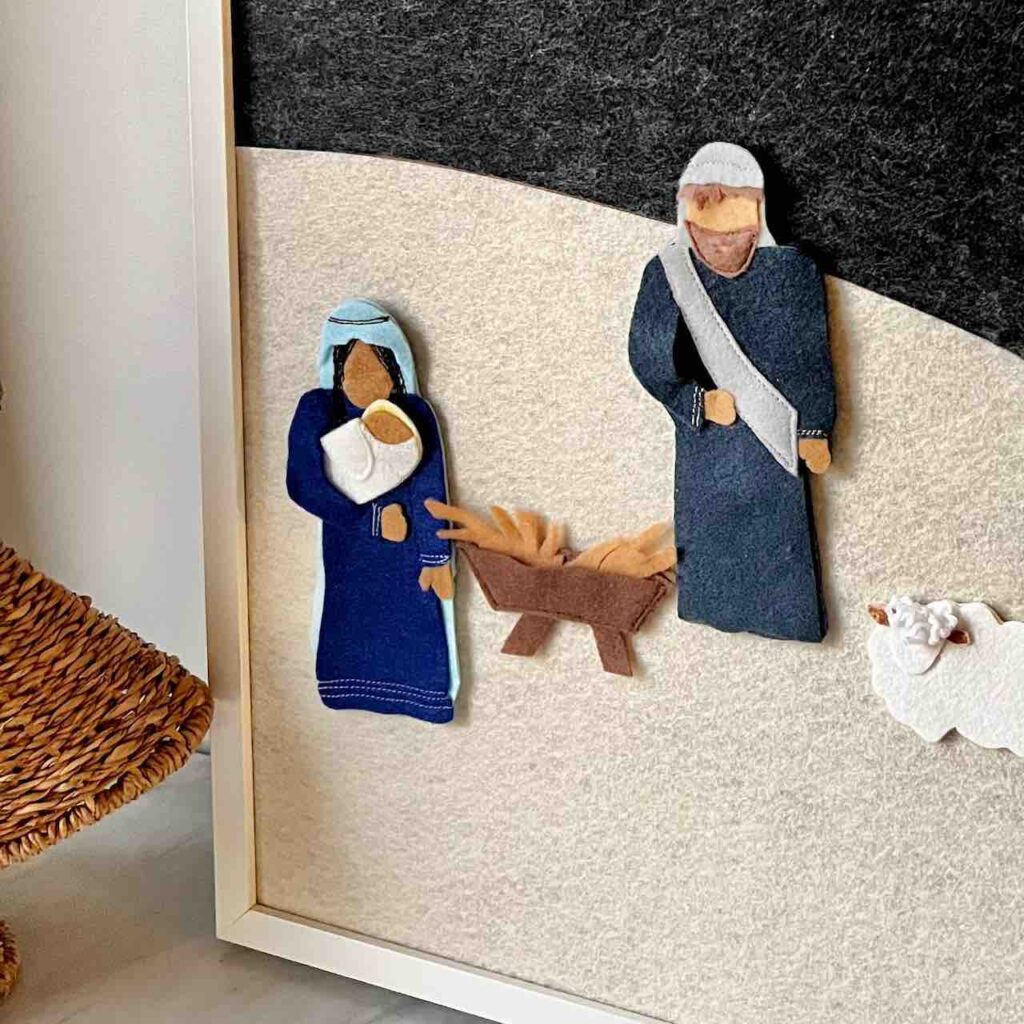
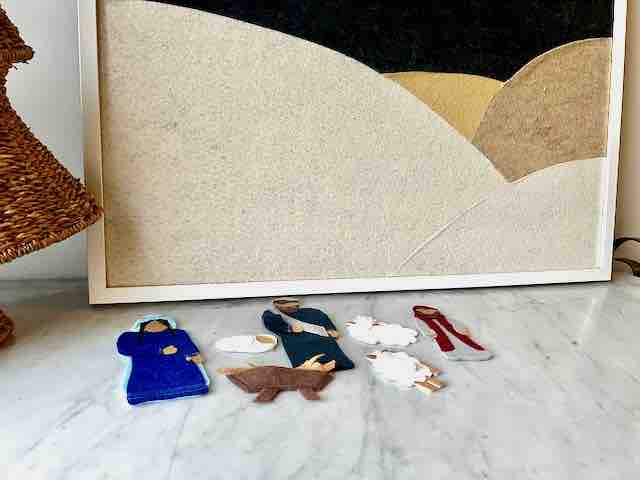
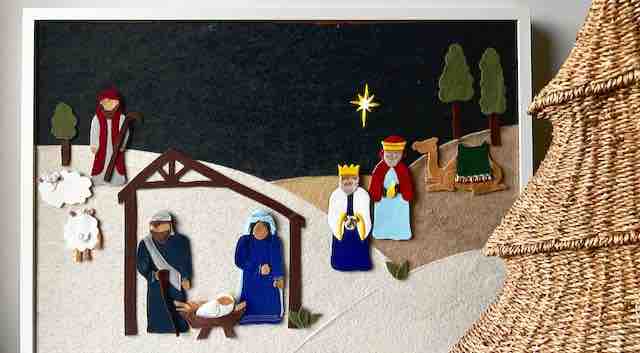
Note, I used a 20 X 28 frame from IKEA that I had on hand. The sky and hills are attached to the frame backing with spray Gorilla Glue.
Great Alternative I’m Converting To-
What can I say? Sometimes you just have to get into a project (neck deep this time) before the best solution presents itself:
- Still presents as a masterpiece
- Requires no floor space
- Still doubles as charming Christmas decor
- Any height you choose
- Any size you choose. Mine will be larger — just saying.
- Portable — easy to lay on the kitchen table, or take to Grandma’s
- Rolls up for easy storage
My backdrop of night sky and hills is going to be displayed as a large banner hung with two dowels. This way it still presents as “artwork” that hangs on the wall, but I can achieve a larger surface.
This new tapestry style backdrop is now live and can be seen here along with three new cast members.
The Road Trip Ready Version-
Because sometimes you need Jesus to be portable:
- Tri-fold board that stands up (like a science fair project, but holier)
- Folds flat for travel (unlike that Christmas tree you tried to strap to your car roof)
- Perfect for visits to Grandma’s (and she’ll be so impressed!)
Interested when the blog post for the new banner style background along with new figure patterns? Subscribe and you won’t miss a thing:
Thanks bunches! Now back to out Creche Crafting:
Choose Your Creche Crafting Adventure
Beginner Mode: Keep It Simple-
For when you just can’t with the Pinterest perfection:
- Basic shapes glued together
- Minimal details
- Still totally adorable
- Done in one nap time (hopefully!) Okay, a couple of nap times
Level Up: Add Some Pizzazz–
When you’re feeling crafty:
- Hand-stitched details
- Fun textures
- More detailed figures
- The Mary and Joseph you wish you’d made first time around
Pro Mode: Go All Out–
For the crafting overachievers (we see you!):
- All the fancy stitches
- Multiple outfit layers
- Intricate details
- Warning: may cause crafting envy
Let’s Get Started! What You’ll Need:
- The backbone of your chosen background
- Large piece of felt for the background (I went with charcoal sky and hills of sand)
- Spray Glue, if you are adding sky, hills etc for backdrop and don’t want to stitch them in place
- Assorted colored felt pieces for figures and scenery (I used what I had in my stash, but here is a great general purpose assortment or these richer colors)
- Heat n’ Bond (the one I use and trust) or similar fusible fabric adhesive
- The hook part of velcro, optional (well, not really, you want this)
- Sharp fabric scissors, actually small embroidery scissors are best, these are mine
- Freezer paper, this is what I use
- Pattern templates offered as a Free Printable to all my subscribers (provided below)
- Basic crafting supplies (needle and thread, markers, snippet of yarn, a scrap of iron-on interfacing (you know, those kinds of things)
Step-by-Step Instructions
Step 1) Creating Your Story Board Background-
First, we’ll create the basic scene where your nativity story will unfold. This becomes your children’s stage for creative storytelling.
- Lay out your large background felt piece or pieces
- Create a simple stable structure, optional
- Add background elements like stars and hills, maybe the outskirts of Betlehem in the distance
I used a 20 X 28 Ikea frame that I had on hand. Removed the plexi and spray glued the large sweeping hills below the dark felt sky.
I chose to keep the stable loose so the story can change with the whims of the kiddos, but my felt is soft felt, not stiff. A young child would probably struggle with placing it, so I bonded two layers together for an easier to handle stable.
PRO TIP: For long wispy elements (stable, staffs, etc,) consider bonding two layers together.
Step 2) Making the Nativity Figures-
Each character in our nativity scene is designed to be child-friendly and easy to handle.
Making the figures is the most involved (and satisfying) part. But once you have the steps down, they go pretty quickly, so please don’t be intimidated. I added pictures of each step to eliminate frustration and encourage you to give it a go.
Remember this is a Choose Your Own Adventure project. Feel free to simplify the figures — or add even more detail if that’s how you roll.
General Instructions
Start by finding the Felt Nativity set in my Free (to subscribers) Resource Library. In the library find the Felt Nativity Set and click the link that will take you to a Google Drive folder that contains the twelve pages. Double click each page you want and then proceed
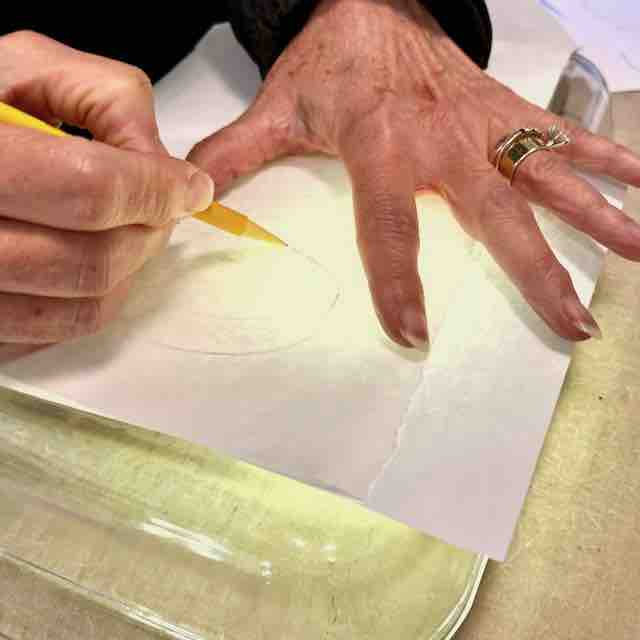
- Download the printable patterns
- Trace all the elements onto the paper side (NOT the glossy side) of freezer paper
PRO TIP: Use an inverted clear baking dish over a cell phone flashlight as a light table
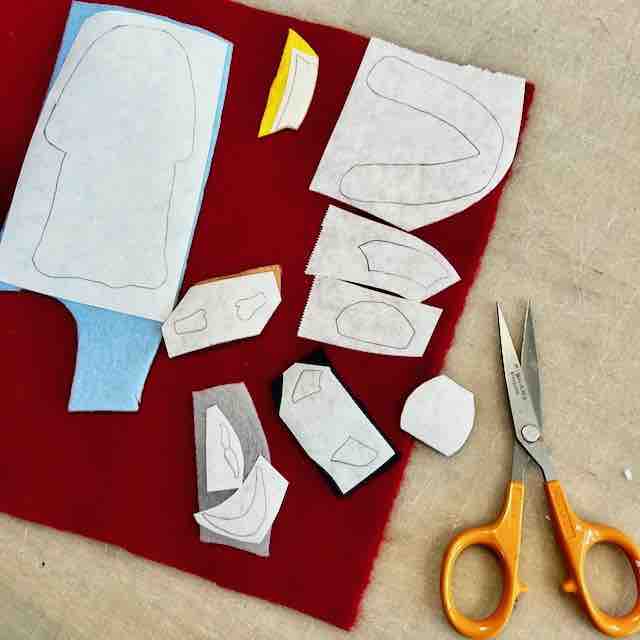
Cut the elements apart and iron on to your choice of felt colors
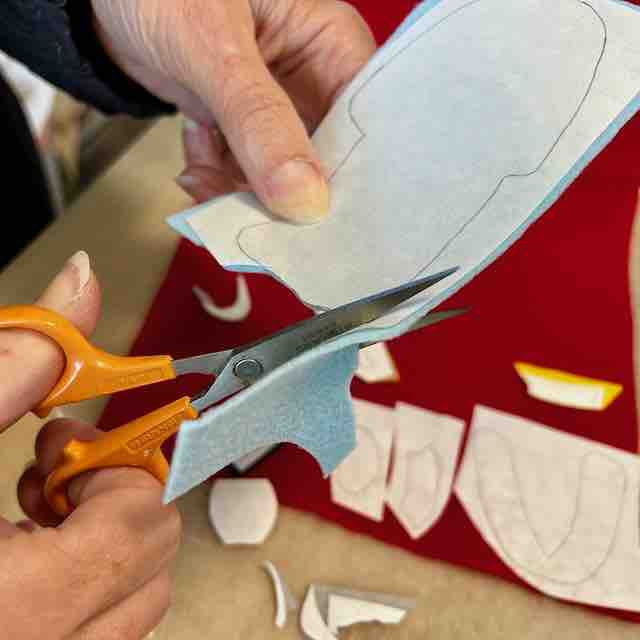
- Cut out
- Remove the freezer paper
- Layout which layers overlap each other and where

If two elements meet as a butt edge (rather than overlapping), use a piece of iron-on interfacing to hold them together.
Don’t worry, it will be reinforced in the future steps.
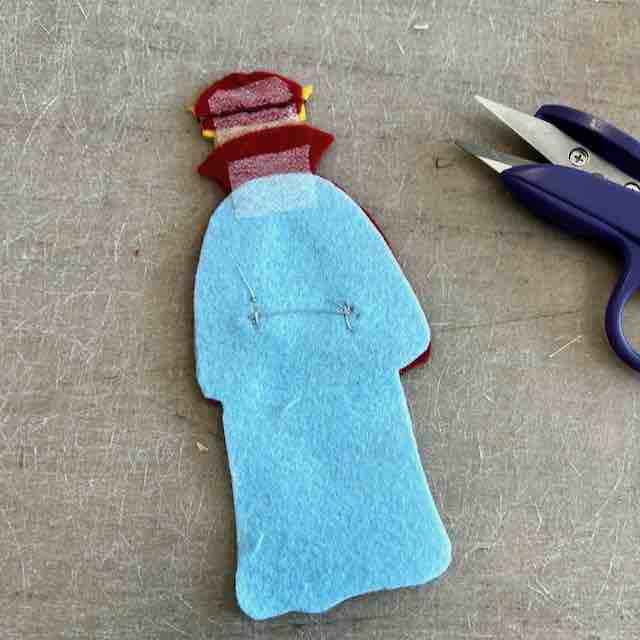
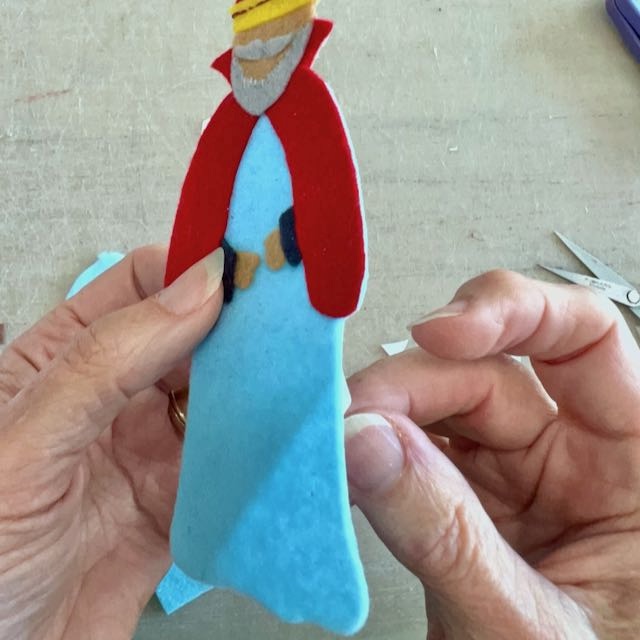
Here, interfacing is holding the cloak collar to the robe.
Note the layers of the head.
For the small details like beards, mustaches, hands, cuffs, I find it easiest to use a needle and thread to tack them in place.
In this example, the dome of the crown is held with interfacing to the top of the head.
Then the gold band is held attached to the crown with a bit of hand stitching.
I laid the sides of the red cloak in place to determine the placement of the cuffs and hands. Then I tacked them in place where I knew the stitches would not show.
PRO TIP: Cut the threads longer than usual. They’ll be caught in between with the adhesive helping to prevent kiddos pulling at them.
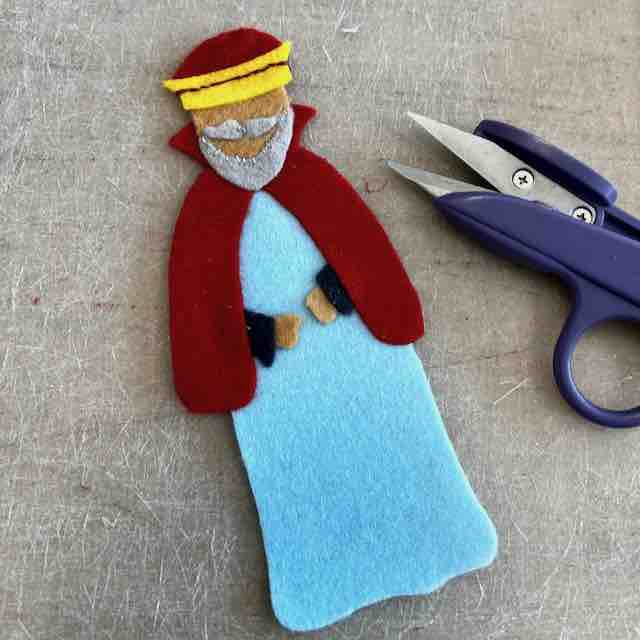
Once the hands and cuffs were tacked in place, I applied the cloak front with Heat ‘n Bond adhesive.
Then when all the details of the head were finished, It was applied with Heat ‘n Bond, overlapping the cloak and collar.
NOTE: Any details you might want to add such as decorative stitching, ribbon or beads, need to be added before any adhesive between layers.
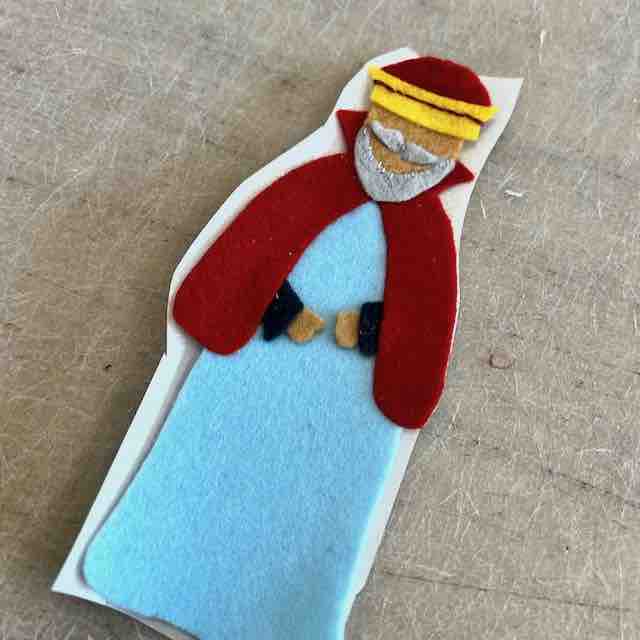
Now that the detailing is done and the wiseman is assembled, we need to add his backing.
Rough cut a piece of your chosen adhesive sheet to fit your figure.
Iron the adhesive piece to the backside of the front of your figure. Be sure to follow manufacturer’s instructions.
Mine specified a dry iron at silk setting for 2 seconds.

Trim off the excess adhesive paper.
Remove the paper backing.
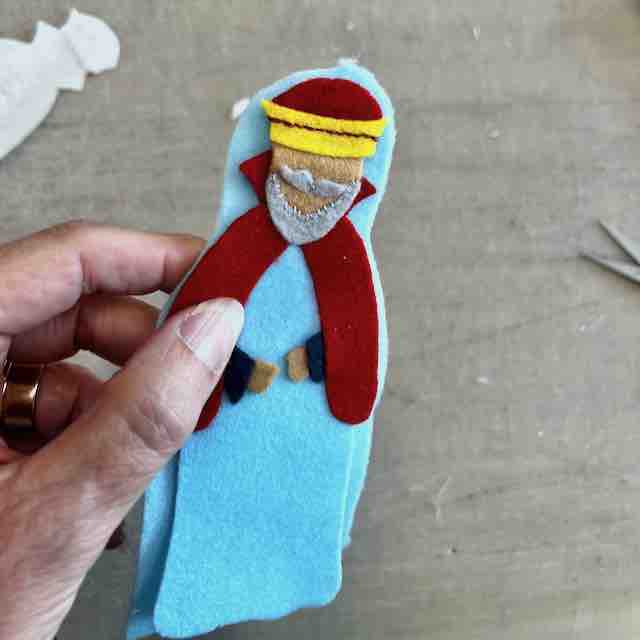
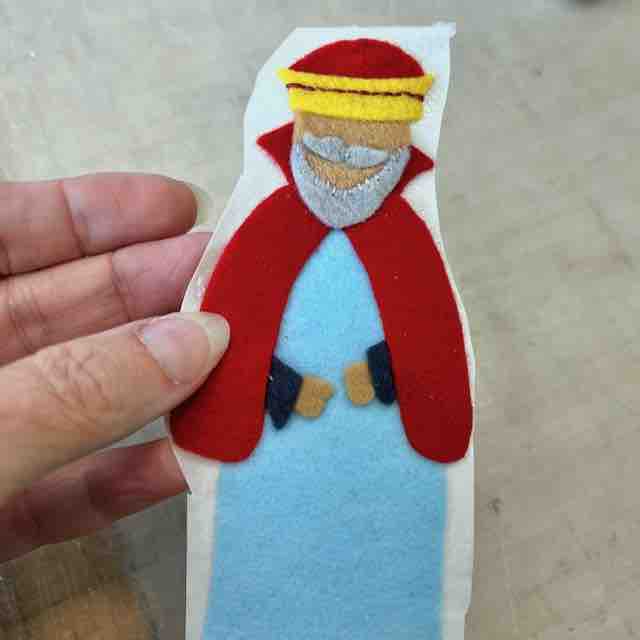
Rough cut a backing out of your chosen color of felt.
PRO TIP: Add a piece of hook side of velcro to the back.
Single layer elements hold fine.
But the figures with multiple layers and detailing could use the extra support to hang on the felt background.
Press the backing in place.
Trim any excess and to cleanup the edges.
And this wise man is ready to follow a star!
NOTE: It’s hard to notice in “real life”, but based on the photos, I will go back and trim up the light blue peeking out behind the red cloak. It’s a super easy fix!
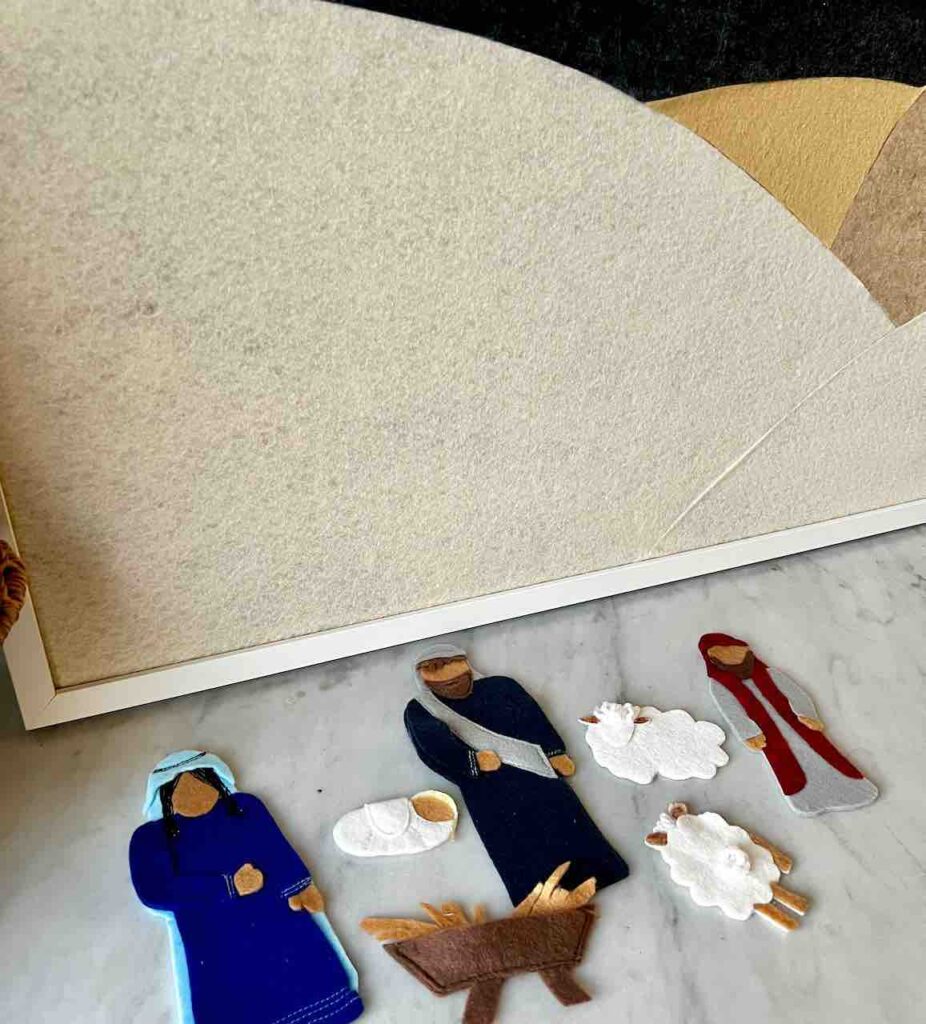
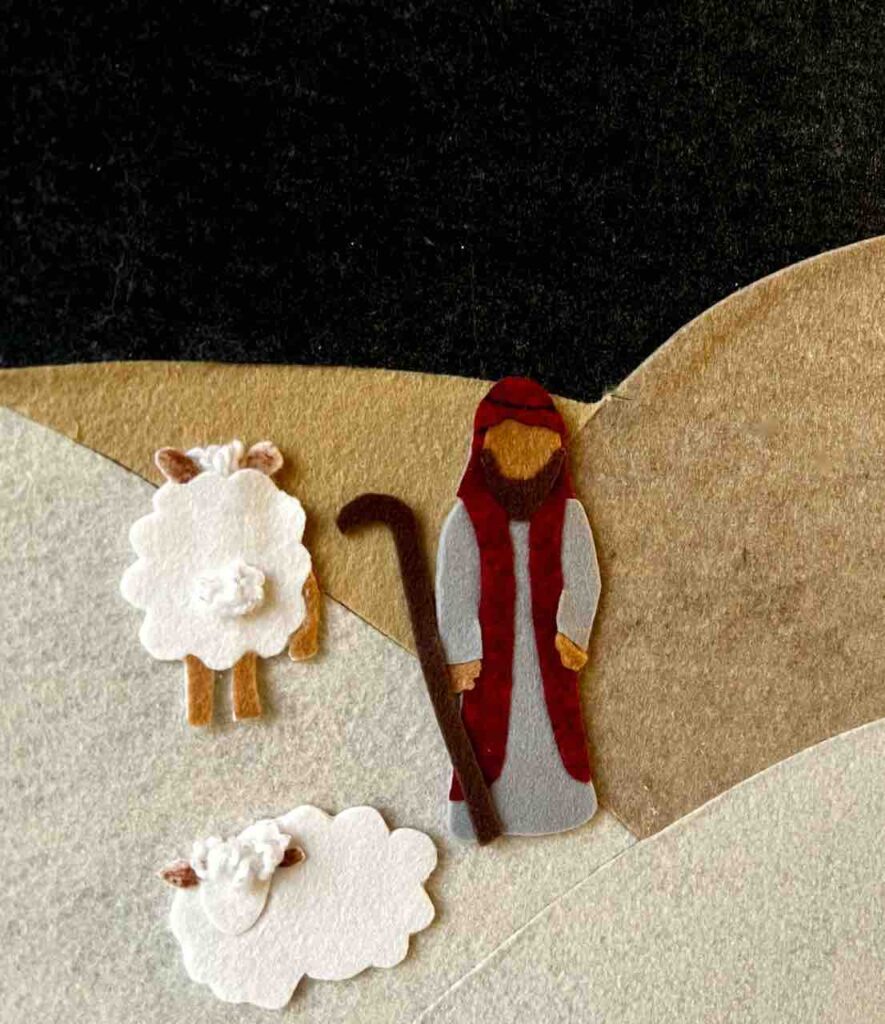
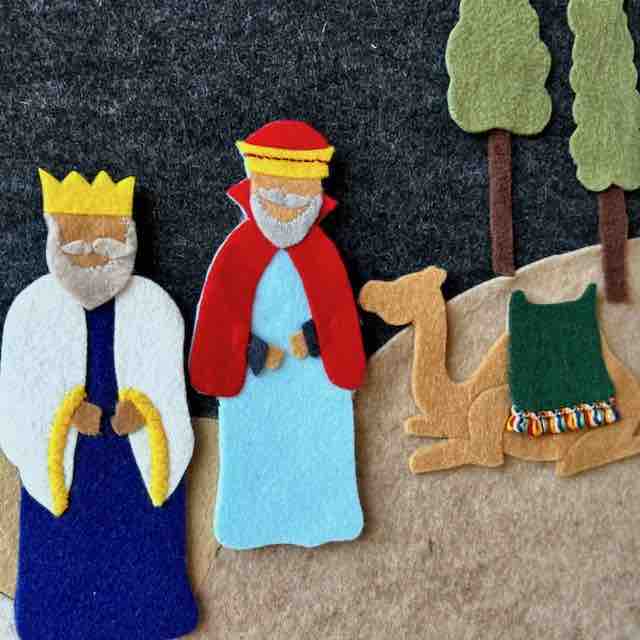
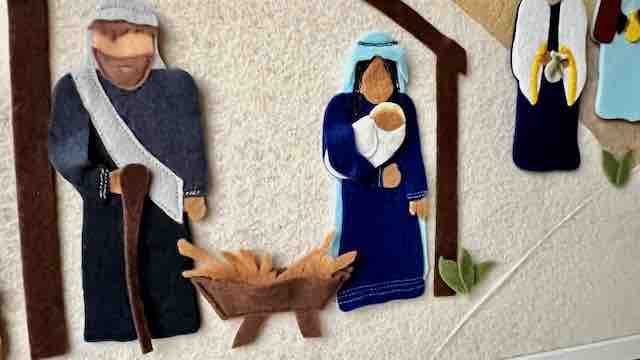
Key Characters Include:
- Baby Jesus in the manger
- Mary and Joseph
- The Three Wise Men
- Shepherds
- Angels
- Animals (sheep, donkey, camel)
Step 3) Adding Special Details-
Make your nativity set beautiful and engaging with these special touches:
- The Star of Bethlehem (with template)
- Cypress trees and greenery
- Little details like gifts from the wise men and shepherds’ staff
- Simple animal features
Free Printable Templates
Go to my Free (to all subscribers) Resource Library. Scroll to find the Felt Nativity Set. Click and it will take you to a Google Folder that contains all the patterns. Pick and download all the ones you want.
- Stable template
- Character patterns
- Animal shapes
- Star and decoration templates
Tips for Success
- Use contrasting felt colors for visual appeal
- Make pieces large enough for small hands
- Add some details separately for more imaginative play (staff, the gifts, the eastern star, etc)
- Consider adding simple embellishments for texture
- Store pieces flat
- Only introduce the little elements, such at the Magi’s gifts, when your kiddos are old enough
Variations and Ideas
- Create a larger outdoor nativity scene using these patterns
- Add Velcro backing to heavier, more layered figures for better grip
- Make multiple sets for Sunday school classes
- Design a travel-sized version
- Do you have a bit older grand who would love to learn some simple embroidery? The robes and cloaks would be a great canvas for running stitches and daisy chains or maybe adding some beads.
Growing Your Nativity: The Long Game
Think of it as a Christmas story that gets better every year:
- Start with the Holy Family (because, priorities!)
- Add characters as kids grow (like a Biblical collector’s set)
- Spark conversations (“What do you think the innkeeper’s wife was thinking?”)
- Let kids help choose new additions (“Who should join the story this year?”)
- Watch their understanding grow with the collection
You can find the 2025 additions here.
Conversation Starters
(Because Kids Say the Darndest Things)
- “Why didn’t the innkeeper make room? Was he having a bad day?”
- “Did the shepherds bring their lunch?”
- “How many sheep should we make? One hundred?”
- “Did Mary get to ride the donkey, or did she have to walk?”
Remember: There’s no wrong way to create your nativity set (unless you forget Baby Jesus – that would be awkward).
The goal is to make something your family will love and use for years to come, whether it’s Pinterest-perfect or charmingly homemade.
And please, PLEASE, let me know how your set turns out. And I’d love to see any pics, especially with your kiddos!!!
What figures did you start with? What other figures or items should I add next?
Now don’t forget to join the other Grandmas for their best holiday ideas for celebrating with Grands.
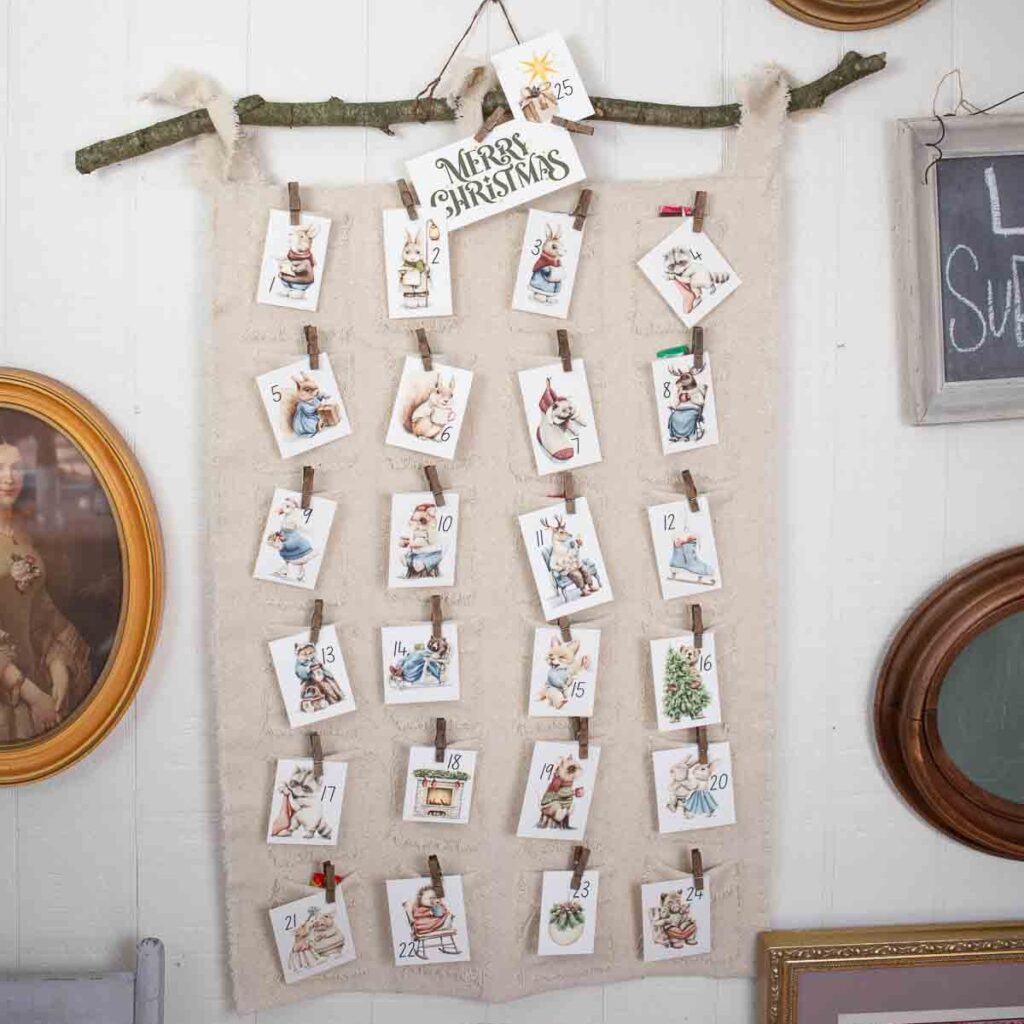
How To Make A Diy Advent Calendar (With Free Printables)
Cindy at Reinvented Delaware is always so clever!!! Today is no exception.
Look at this charming Advent calendar she made. The kids with love this one!
Getting Crafty with the Grand Kids: Fun Ideas for Homemade Christmas Gifts
Don’t miss all Lynn’s, from Living Large in a Small House, clever ideas for our precious time with our grands!

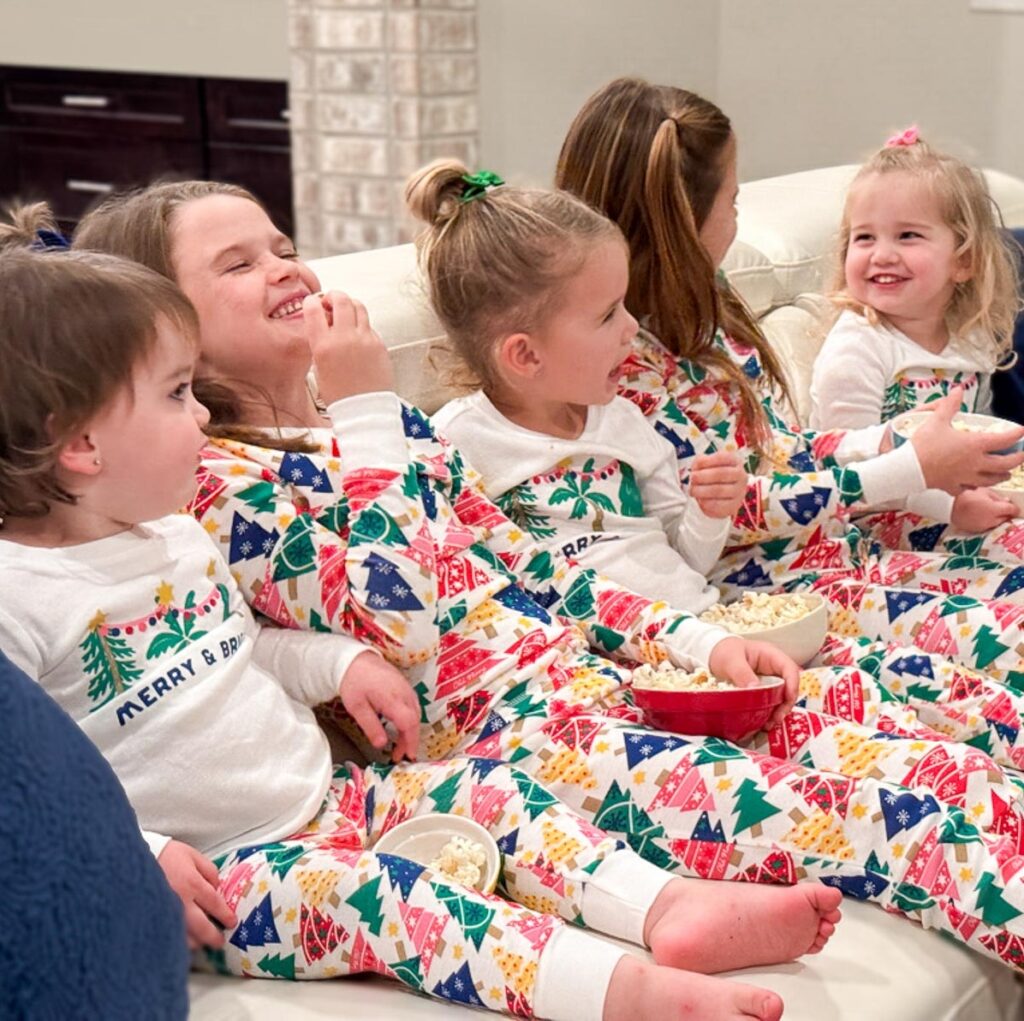
Creative Christmas Pajama Party Ideas for Your Grandkids
Gathering the grands is so special. Watching and listening to all these cousins sharing special time together is the real meaning of Christmas.
Wendy, from WM Design House, obviously knows what she’s doing — just look at those faces!!!
I do hope you’ll check back soon, giving me input on which characters I should add next to our nativity sets.

I tried to subscribe, hoping to get the nativity for the kids to work on. Thank you.