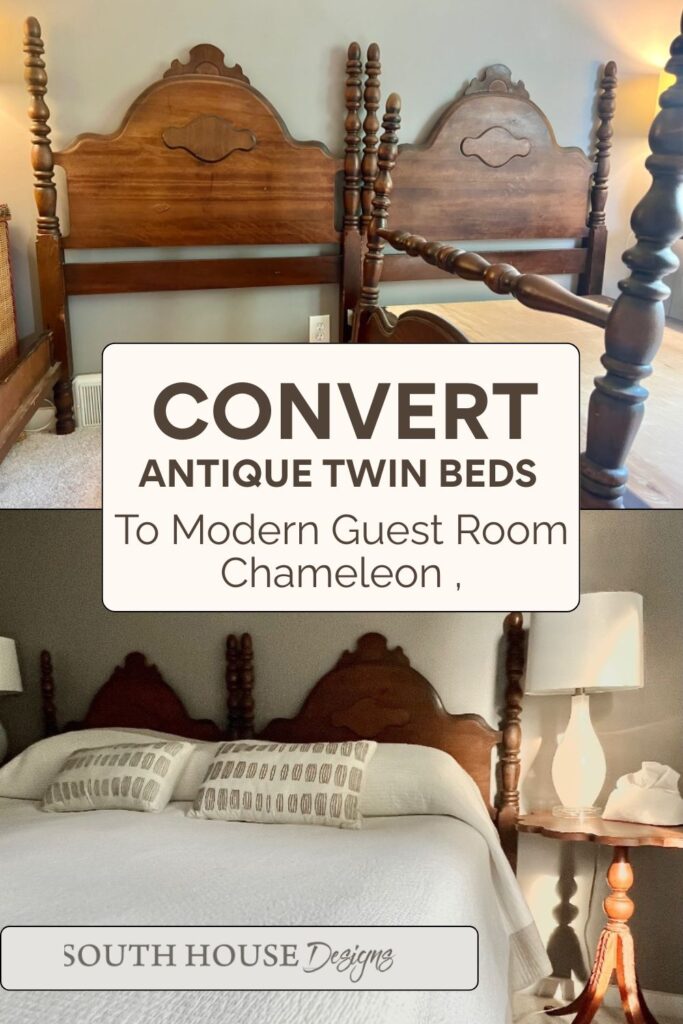
Easy DIY: Turn Vintage Twin Beds Into X-Long Twins or a King
Heirloom twin beds get new life: convert them into X-Long twins that quickly turn into a king. Smart, stylish, and simple for any guest room.
Tucked away in storage, I had two twin beds that once belonged to my great-grandmother.
Beautiful old wood frames, but they weren’t serving any purpose.
With our kids grown and living out of town, I needed our guest room to work harder — comfortably sleeping two adults in XL twin beds (for tall kids and grown kids) or quickly converting into a king bed when a couple visits.
Turns out, with a few clever tweaks, you really can bring vintage twin bed frames into modern guest-room duty. And the best part? It’s surprisingly simple!
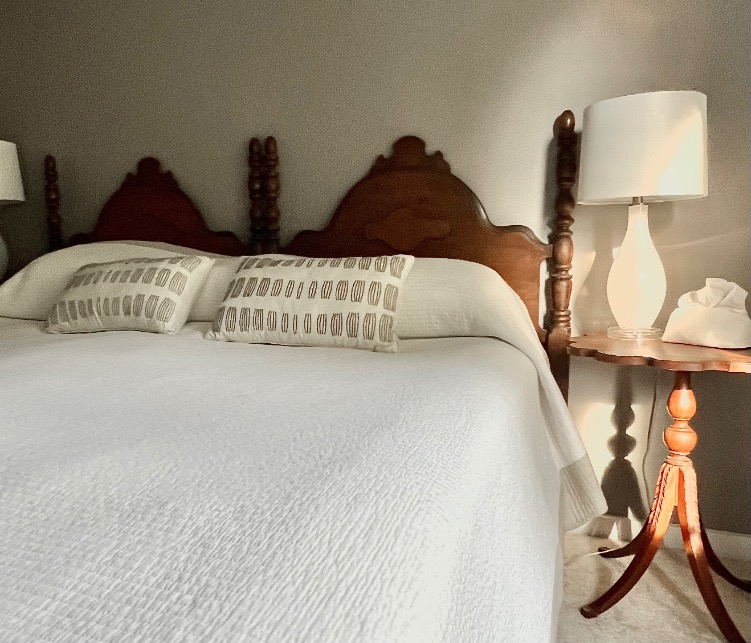
TABLE OF CONTENTS:
The links in this post may include affiliate links, which means if you purchase anything using these links, you pay no extra, but I may receive a small commission that helps keep this blog running. I truly appreciate you using affiliate links whenever possible. Please know that I will never recommend a product I do not believe in!
Why Convert Vintage Twin Beds?
If you’re lucky enough to have inherited a pair of vintage twin beds, you know the tug between nostalgia and practicality. They’re too charming to give up — the craftsmanship, the patina, the family history — but sometimes they don’t quite fit the way modern life calls for.
That was exactly my dilemma with the beds that belonged to my great-grandmother. They were tucked away, unseen and unused, while our guest room was crying out for flexibility.
The win-win solution? Converting those vintage twins into XL twin beds. Not only does this give tall guests the legroom they need, but it also lets us push them together with a simple king conversion kit whenever a couple visits.
It’s like having a guest-room chameleon — always ready to change with the situation, without sacrificing the vintage charm.
Add my vintage stair spindle luggage racks and your guest room will own the boutique hotel vibes!
Understanding Standard Sizes
Before diving into sawdust and hardware, it helps to know what we’re working with. Bed frames, like jeans, come in sizes — and sometimes those sizes are closer than you think.
- Standard Twin: 38″ wide × 75″ long
- XL Twin: 38″ wide × 80″ long
- King: 76″ wide × 80″ long
Notice something? Two XL twins placed side by side = one king. Exactly the same dimensions. That’s why hotels and guest rooms often use them.
So to make our vintage twins guest-ready, the real adjustment is adding just five inches of length to those old twin frames. Five inches is all that stands between “too short for lanky teenagers” and “a flexible, grown-up setup.”
The Adjustments We Made
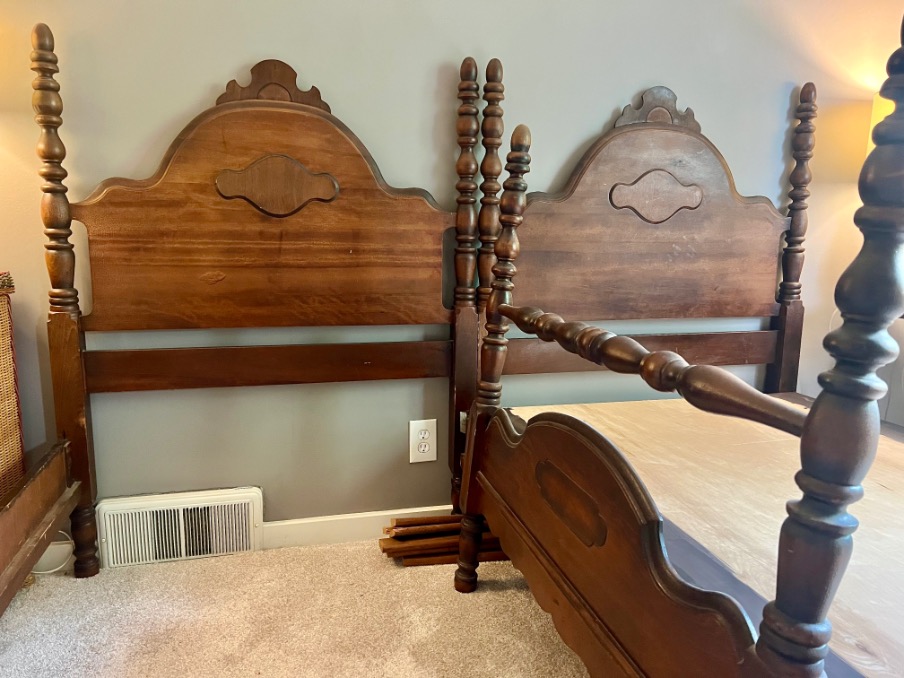
Because of our guest room layout, we only used the headboards and side rails from my great-grandmother’s beds. The footboards? They’re safely in storage, waiting for their next starring role someday.
We also opted to ditch the old slats in favor of a modern platform. With new memory foam mattresses, there was no need for bulky box springs. And bonus — the new system still uses the original side rail hardware, so no struggle finding those.
Here’s how we stretched those vintage twins into XLs:
Quick Overview Converting Vintage Twin Beds
to XLong Twins

Convert Antique Wood Twin Bed Frames to Twin XL Beds
It's surprisingly simple to convert a twin bed frame into a X Long twin bed. Here's a quick overview of the steps. Keep scrolling for full details
Materials
- Per bed:
- 2 lengths of 2×4 (cut to the width of the bed frame)
- 2 steel mounting plates (for legs)
- 2 carved wood legs (or legs of your choice)
- ¾-inch maple-clad plywood (platform base)
- 1×2 boards (for securing platform)
- Wood screws
- Wood glue
- Brad nails (or finish nails)
- Black wood wash or paint (optional, for visible edges)
- Pan head wood screws
Tools
- Skill saw or table saw
- Jig saw
- Brad nailer (or hammer and nails)
- Drill and bits
Instructions
1) Mini Footboard:
Build a simple “footboard” from two 2×4s attached in an L shape. This holds the side rails with the original hardware.
2) Legs & Plates:
Attach steel mounting plates to the underside of your new footboard, then measure and cut legs to the exact length (accounting for the plate thickness). Screw legs into place.
3) Platform Base:
Cut ¾-inch plywood to fit snugly across the rails, rounding the corners at the foot. Trim 1" shorter than the mattress length.
4) Secure the Platform:
Glue and nail 1×2 strips along the edges so the platform fits neatly inside the rails without shifting.
5) Finish:
Stain, paint, or do a quick black wash along visible edges and on the legs. Done!
Notes
Keep scrolling for in-depth details and tips.
Now for the Detailed Version
(You’ve Got Questions. I’ve Got Answers)
Materials and Supplies –
Per Bed:
- 2 lengths of 2×4 (cut to the width of the bed frame)
- 2 steel mounting plates (for legs)
- 2 carved wood legs (or legs of your choice)
- ¾-inch maple-clad plywood (platform base)
- 1×2 boards (for securing platform)
- Wood screws
- Wood glue
- Brad nails (or finish nails)
- Black wood wash or paint (optional, for visible edges)
- Pan head wood screws
- Skill saw or table saw
- Jig saw
- Brad nailer (or hammer and nails)
- Drill and bits
Step 1) Build a mini replacement “footboard” –
Instead of reinstalling the original footboards, we made short, hidden substitutes. Using two 2×4s, we attached them together in an L shape (one vertical, one horizontal). These pieces are strong, simple, and since they don’t show once the bed is made, perfectly practical. The original side-rail hardware slips right over screws in the vertical piece of this mini-footboard.
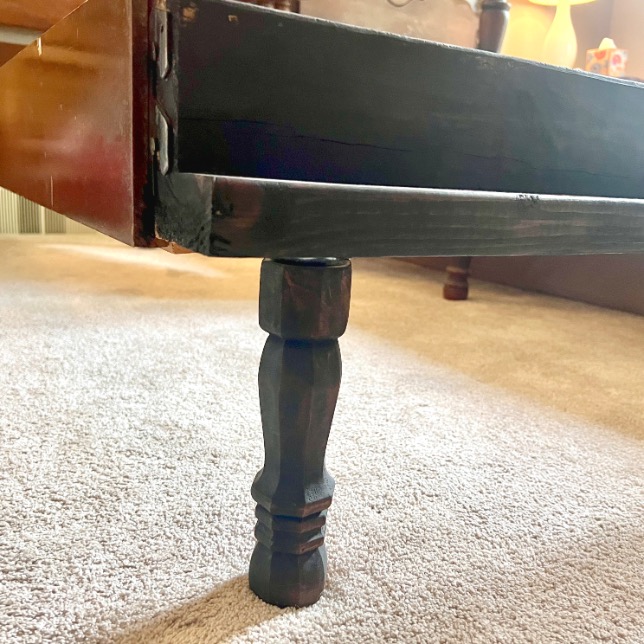
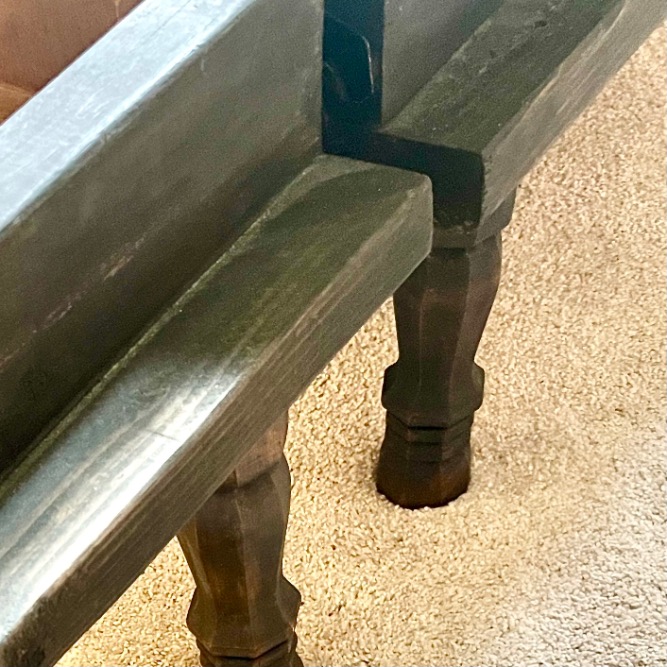
Step 2) Add new legs (the right way around) –
Each new footboard needed legs for proper height and stability. We used four carved wood legs (two per bed), attached with steel mounting plates. Here’s the sequence that matters:
- First, attach the mounting plates to the underside of your new mini-footboards.
- This way you know exactly how much thickness the plate adds (ours added nearly ¼”).
- Make sure the plates are centered and square so your legs won’t angle awkwardly.
- With plates in place, hook the side rails onto the footboard and headboard, then set a level across the rails.
- Measure from the floor to the underside of the mounting plate to get the true leg length you need.
- Cut the legs to that exact length, then screw them into the plates.
The extra quarter inch from the plates may not sound like much, but if you skip adjusting for it, you’ll end up with a bed that sits slightly off-level — and nobody wants a guest with blood rushing to their heads.
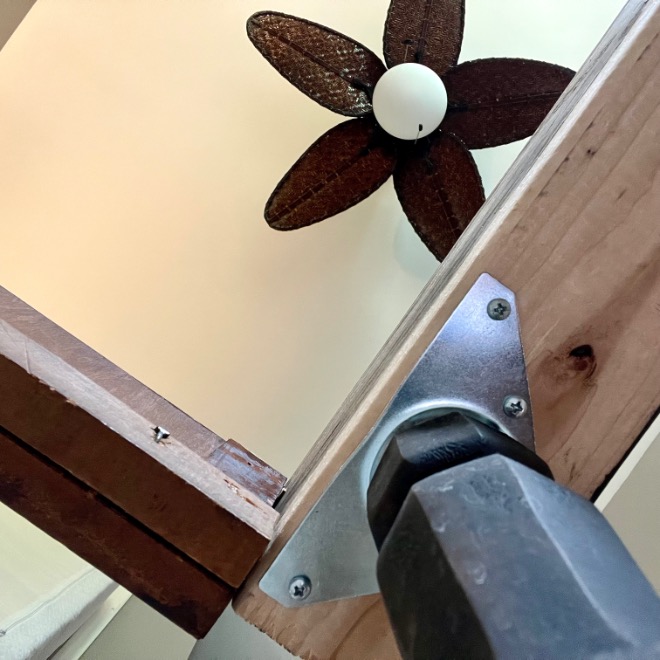
Step 3) Create the platform base –
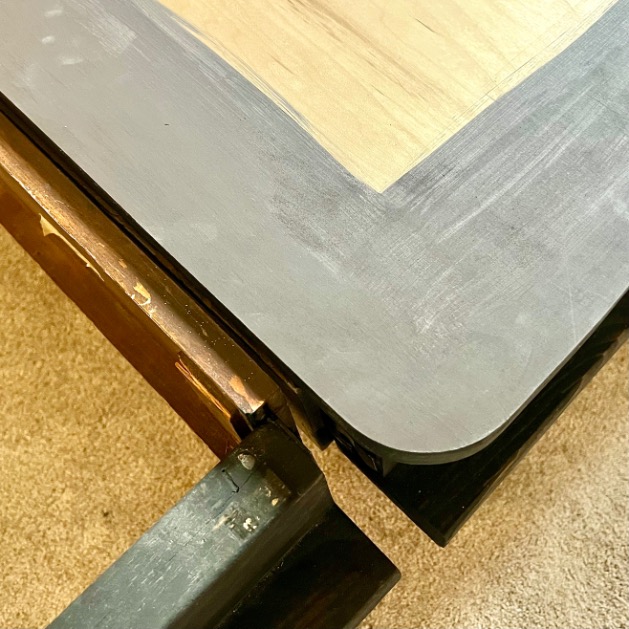
We cut ¾-inch maple-clad plywood to fit snugly across the rails, outside-to-outside. Each platform was cut one inch shorter than the mattress length, and we rounded the corners at the foot for comfort (and to save shins).
NOTE: the angle of the camera makes it look like the base 2 x 4 sticks out beyond the platform. Its doesn’t. All the visiting shins are save.
Step 4) Secure the platform in place-

To prevent the platform from sliding, we added a 1×2 strip of wood down each side. Wood glue and brad nails did the trick, and the strips fit neatly inside the side rails to lock everything in place.
Step 5) Finish it off (the fast way)-
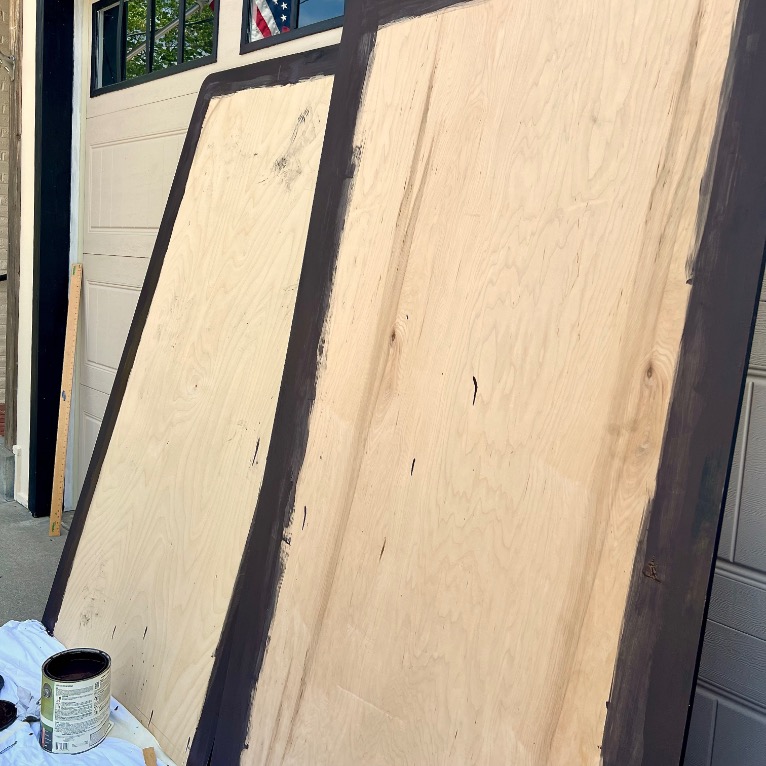
Since the mattresses would cover most of the platform, I went with a quick black wash just along the visible edges (about 4–6 inches) plus on the 2×4 footboard pieces and the legs. It was the lazy solution, but one that looks perfectly polished once the beds are dressed.
Be Aware: One caveat-
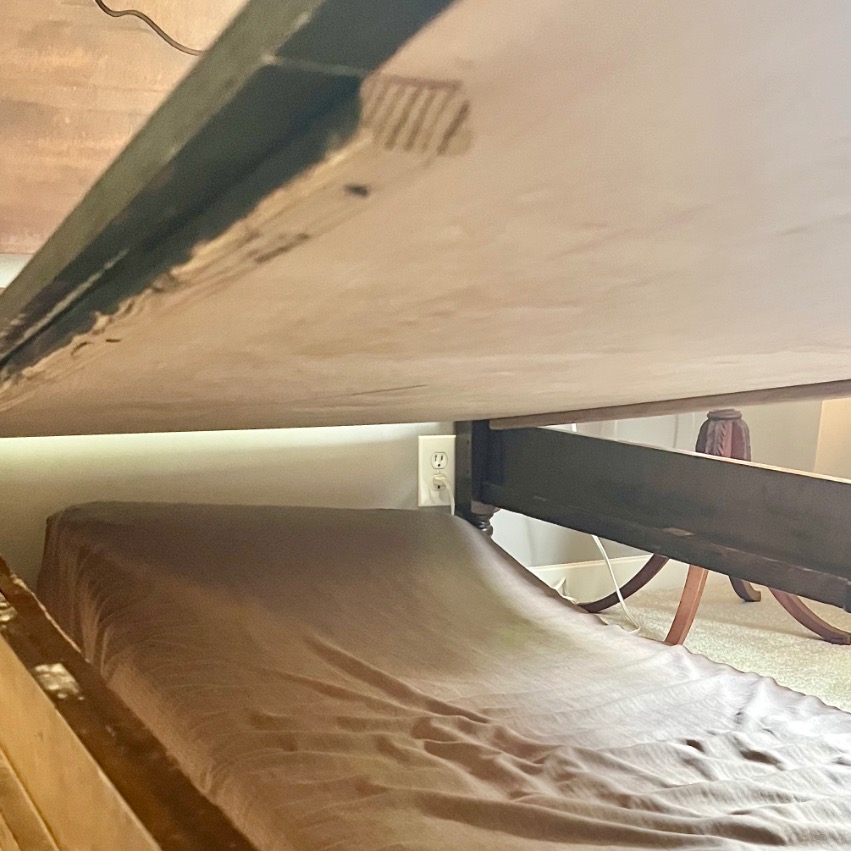
Vintage beds were generally designed for slats, which means box springs and mattresses sit inside the side rails.
Our platform method makes the base stick out slightly wider than the mattress.
If that bothers you, you can still use the same short footboard replacement, but instead build a platform box that rests on the original slat ledge. This mimics a box spring so the mattress sits neatly on top, inside the rails.
Save this post for yourself and share with a friend who is storing treasures out of sight rather than using them:
Mattress Solutions
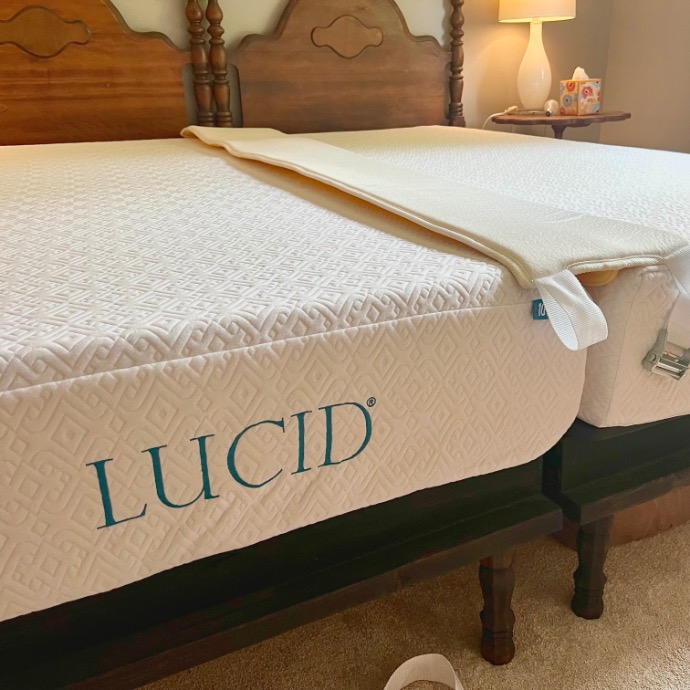
Once your frames are stretched to XL twin size, the rest is easy: just add XL twin mattresses. Each one measures 38″ × 80″, which gives tall guests plenty of room.
Memory foam or hybrid mattresses are ideal since they don’t need box springs — just set them directly on your new platform base. This also keeps the beds lighter and easier to move when you’re converting them into a king.
This is the new version of the 10-inch Lucid mattress we went with, paired with this king mattress topper, our guests make rested and refreshed.
The King Conversion
Here’s the magic of XL twins: two side by side = one king.
No math gymnastics, no custom carpentry. Just slide them together, and you’re done.
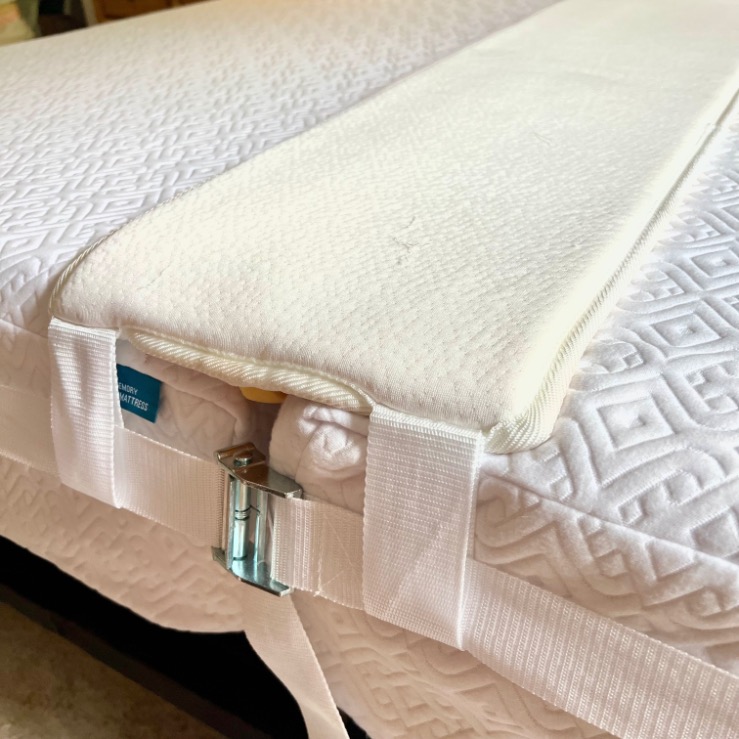
💡 Quick King Conversion Tip
- Slide the two XL twins snugly together.
- Add a bed bridge or foam gap filler to smooth the middle.
- Use a strap or connector kit if you want the frames locked tight.
- Dress with a king-size mattress topper as I did, then a fitted sheet, top sheet, and bedding. Voilà — instant king!
It’s a five-minute flip that makes your guest room versatile enough to welcome anyone — couples or singles — without compromising comfort.
Style and Finish
The beauty of this project is that you don’t lose the personality of those old frames. The original headboards give the beds their soul, while the streamlined new bases make them practical for modern use.
A quick polish or touch-up stain can refresh the wood, or leave the patina if you love the lived-in look. Pairing vintage headboards with crisp white linens or patterned duvets strikes the perfect balance of classic and current.
⚠️ Heads Up:
Some tutorials suggest replacing both headboards with one large, custom piece to unify the look when the beds are pushed together.
But in real life, in our home, these beds will often be used as two XL twins. Swapping in and out a giant headboard would turn a simple slide-together conversion into a significant chore.
Keeping the original twin headboards is not only more charming, it’s also far more practical. Just pull them apart and slide a small dresser with two lamps between when you need the twin setup.
Have you enjoyed this project? Please subscribe, so you won’t miss a thing — plus have full access to my Printable Resource Library:
Thanks bunches!
Final Thoughts
What started as two heirloom twin beds tucked away in storage became the perfect guest-room solution: two flexible XL twins that transform into a king at a moment’s notice.
The project took only a few simple adjustments — mostly adding length and updating the support system — but the payoff is huge. We preserved a piece of family history, gained a versatile setup for any guest combinations, and did it all without sacrificing ease or style.
So if you’ve got vintage beds gathering dust, consider giving them new life. With just a weekend’s worth of work, they can become the hardest-working pieces in your guest room.

What an amazing idea! It looks so fabulous in your guest room. I can’t wait to try it out on my next visit.
Great idea, great post and great instructions on how to do it!!! Thank you! It makes me smile with relief to know I’m not the only one who buys great furniture finds with no immediate use (and stack it up in a spare bedroom in my house)! I’m such a fan of older furniture! It’s often significantly better quality and provides a more unique, custom look than most of the new furniture available today. Unless you have an unlimited budget for super high end, sleuthing out great older furniture is the way to go!!!
100% Michelle! I absolutely love finding (or inheriting) treasures and then figuring out how they cn be modified to work in our current, busy lifestyle and home.