Built-in Closet Wall Using IKEA, Not Fancy Carpentry. You Can Too!
Custom closets are expensive. Uneven old-house floors are free (annoyingly). Here’s how IKEA Pax, a lot of shims, and some trim tricks built the function & the looks. Without the price tag.
Our kids’ home gym is becoming the sweet nursery for our newest granddaughter, L, and that meant making room for something a gym never needed: serious, functional storage. A real closet, with real capacity, that could grow with her.
We had two options: pay custom-closet money, or get creative.
Home Gym to Sweet Nursery Series:
- The Plan — planning the transformation
- IKEA Pax Closet Wall — turning wasted closet space into real storage (you are here)
- Mini Attic Storage Space — claiming the space most people leave empty
- Decal + Paint Accent Wall — adding a playful “watercolor” touch to a simple decal
- MCM Dresser to Changing Table — a vintage dresser gets new purpose
- Peekaboo Stenciled Drawers — a surprise hiding inside the changing table
- X & O Drawer Pulls — oversized, playful, and made by hand
- Scalloped Roman Shades — solving light and privacy in style
- The Nursery Reveal — the whole room, start to finish
Since we’re keeping this project budget-friendly, we went creative. Obviously.
This wasn’t our first rodeo, either. We’ve built a wall of IKEA Billy bookshelves before in Katie’s very first DC condo, and I used them in The Hubs’ office in KC almost eight years ago. Both times, IKEA plus a little stubbornness got us something that looked like it was born in place, not bought at a big blue store. So we had a hunch IKEA Pax could do the same trick.
Spoiler: they did!!!
But not without a few “well, THAT’S not level” moments along the way.
Because here’s the thing: this is a historic DC rowhouse, which is a very charming way of saying that nothing is level, nothing is square, and every single wall has opinions of its own.
Your Turn: Before you fall in love with a built-in look, take stock of your own walls, floors, and corners. Are they cooperating, or are they going to make you earn it like ours did? Either way, keep reading. We made it work, and you can too. Let’s just say it up front: our house does not believe in right angles.
The links in this post may include affiliate links, which means if you purchase anything using these links, you pay no extra, but I may receive a small commission that helps keep this blog running. I truly appreciate you using affiliate links whenever possible. Please know that I will never recommend a product I do not believe in!
What You’ll Need:
(Click to Expand)

The Space (and the Corner That Complicated Everything)
Before any building happened, a contractor demoed the old closet. It functioned, but it was not what we’d call space-efficient. A lot of wasted air for not a lot of storage.
Once the wall was open, we measured. And measured again. Here’s what we were working with:
- 80½” across the front of the closet space
- 69″ across the back, because of a floor-to-ceiling bump-out in the corner
- 27½” of depth on one side
- 23 1/16″ of depth on the other, thanks to that same bump-out
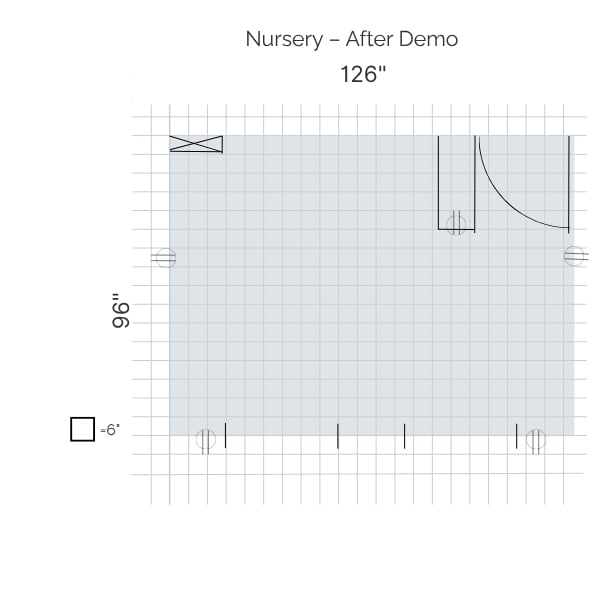
That bump-out was, without question, the villain of this project’s first act. Every measurement, every unit choice, every “should we push it back or pull it forward” conversation traced back to that one corner.
Your Turn: Grab your own graph paper (or a graphic app, if you’re not as old-school as us) and sketch your actual space, warts and all. Don’t sketch the closet you wish you had. Sketch the one you’re standing in.
The Easiest Decision of the Whole Project: Going Shorter
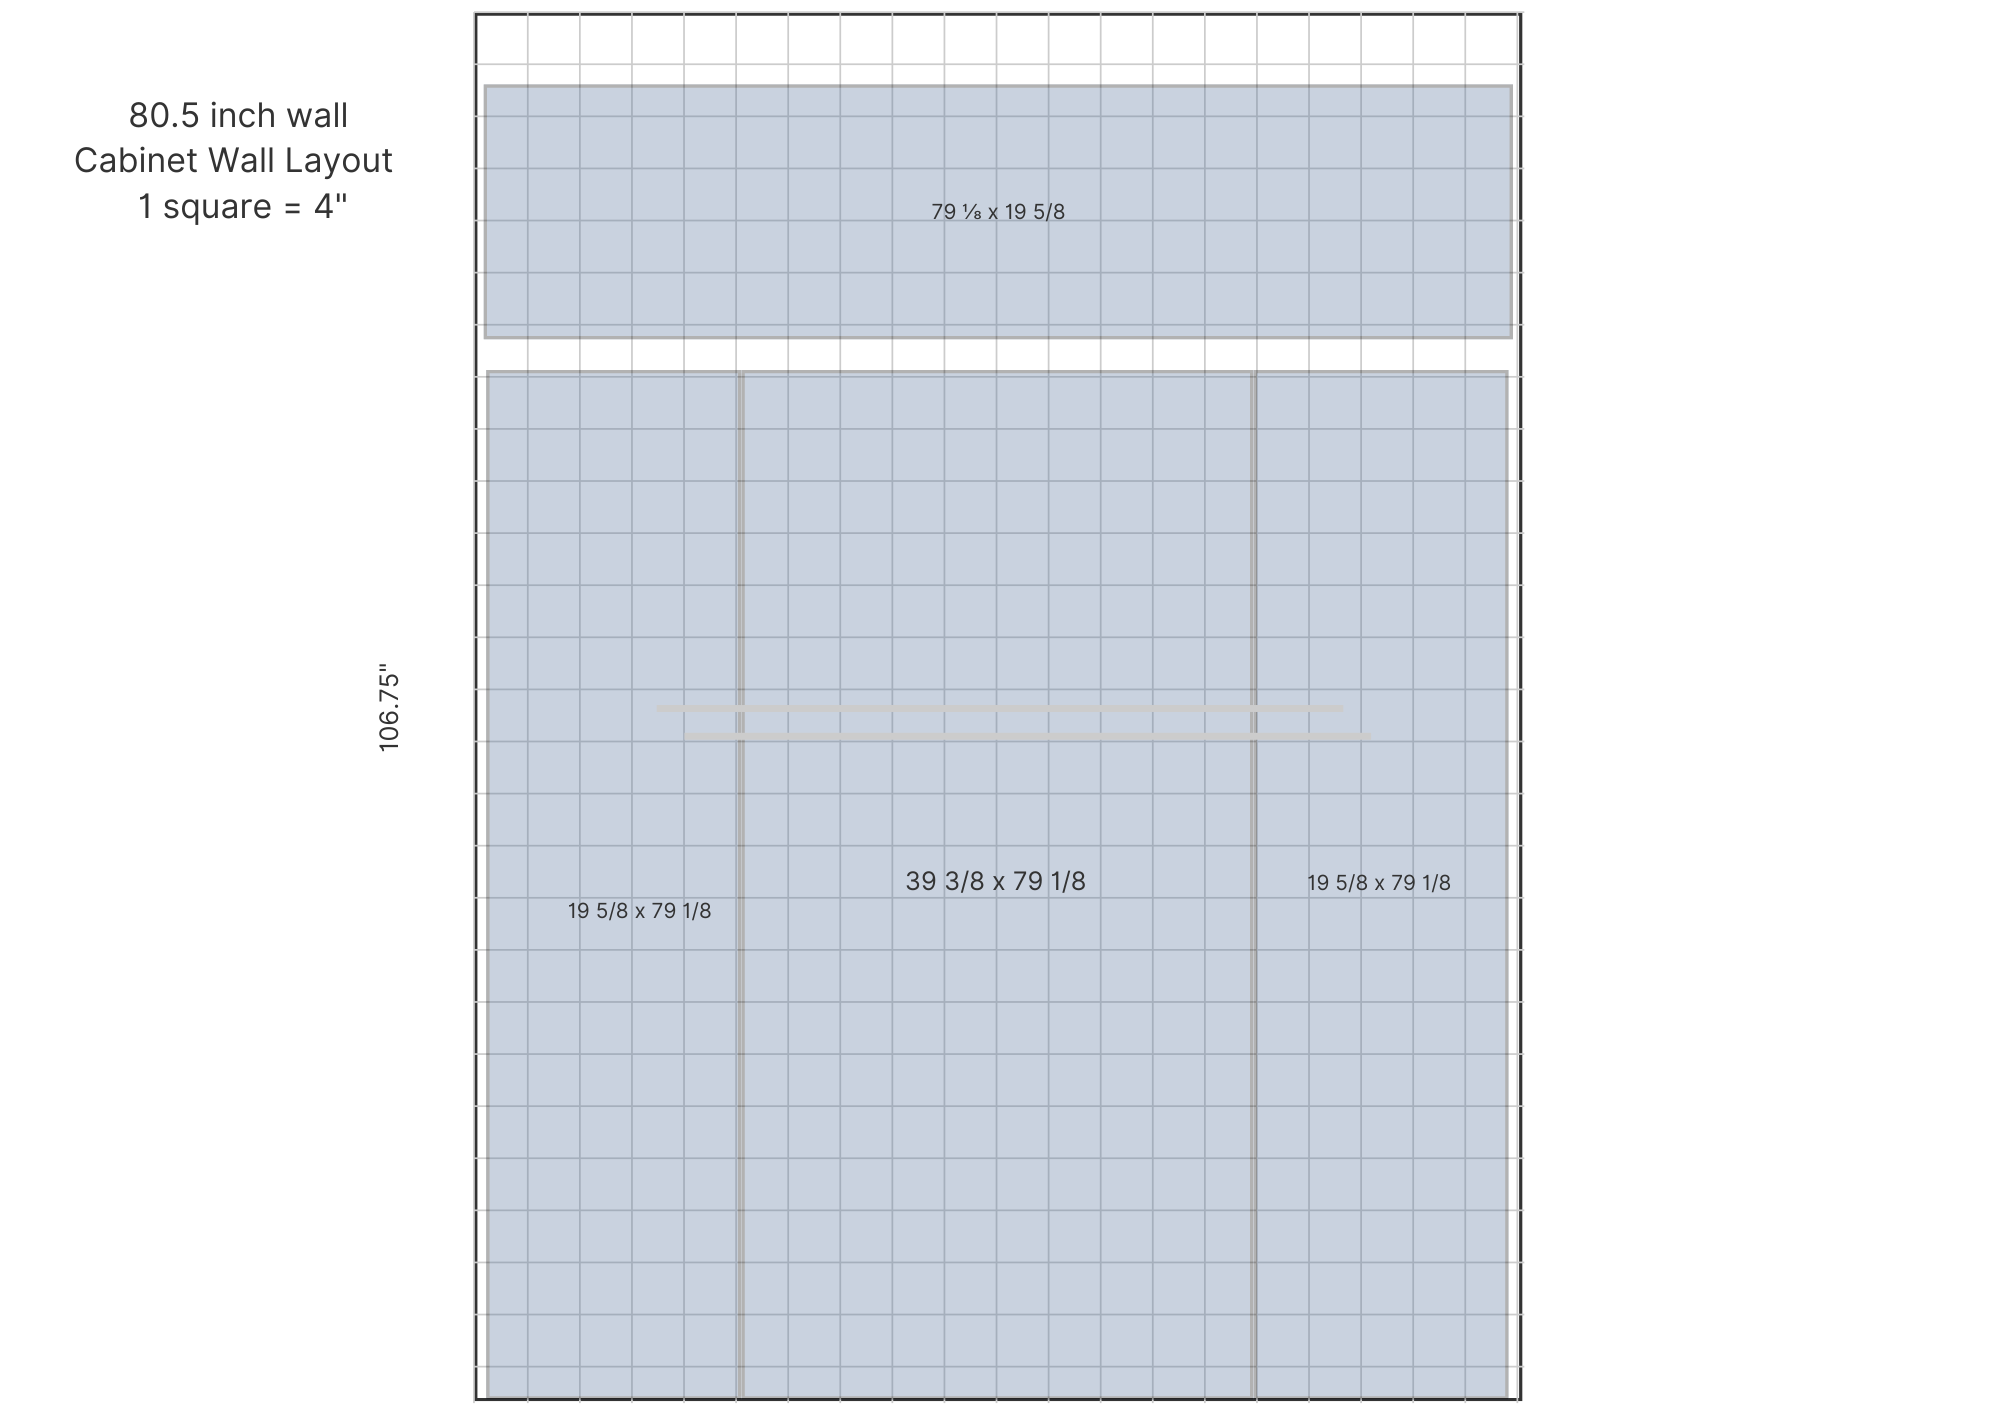
PLOT TWIST: when you desperately need storage, your instinct is to go tall. We did the opposite.
The taller Pax units would have given us a laughably small 8¾” of closed storage up top. The shorter, 79⅛” units? A full 22⅜” of closed storage above them. That’s not a typo. Going shorter got us nearly three times the storage.
Once we ran that math, there was nothing to debate. Shorter units, more storage, and, bonus much needed family storage. All in a design that would grow with L from nursery years on.
Pro Tip: Before you assume “taller equals more storage,” actually measure the leftover space above a shorter unit. Sometimes the math surprises you, and this was one of those times.
Getting It All Home (A Tip I Learned the Hard Way. Twice.)
We ordered everything online for delivery, but IKEA had no delivery window that worked for us, so we drove over and picked it up.
Great backup plan, except the boxes were about two inches too long for the car.
The first time this happened, back with the Billy bookshelves and Katie’s little car, we ended up unpacking every single piece on the loading dock to make it all fit. We had an audience. Wagers were placed. But the skeptics had no idea who they were dealing with. Ha!
This time I remembered the secret, a little late. The boxes are quite a bit longer than the pieces inside them.
Pro Tip: Toss a utility knife in your bag before you head to IKEA. If the boxes won’t fit, carefully slice off one end of the box and trim away some of the extra packaging inside. The panels themselves are shorter than the box, so they’ll tuck right into your car. (We forgot the knife and used a car key. It worked. I do not recommend it.)
The Bump-Out Tradeoff: Every Renovation Has One
With our short units chosen, we still had that corner bump-out to deal with, and two ways to handle it:
Option A: Push the center double unit and right unit flush to the back wall, then use a shallow (just under 14″) shelf-only Pax unit to bridge the bump-out. This would’ve gained us a little floor space, but it also would’ve exposed the crooked hardwood transition, cost us some closed storage in that unit, and shrunk our future “attic” storage above.
Option B: Pull all three units forward to line up with the little entrance sidewall instead.
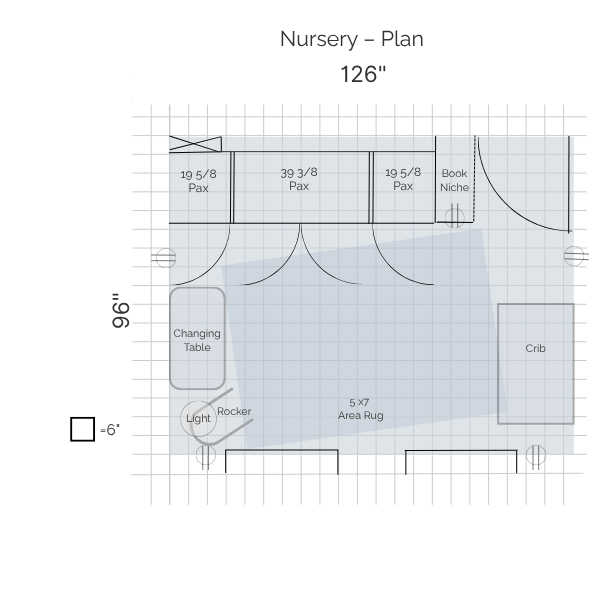
We went with Option B. It meant a slightly more awkward trim transition where the closet meets that sidewall (more on that later), but everything else about it won.
Full closed storage — check!
Functional mini-attic storage — check!
No wonky floor transition on display — check!
Renovations are basically just an endless series of tradeoffs, and this was ours. We picked the option that made the room work harder for us, even if it made one corner of trim work a little harder for me.
Your Turn: When you hit your own “pick your battle” moment, ask yourself what you’ll actually notice every day: storage, or a perfectly flush corner. That answer usually makes the decision for you.
Building (and Leveling) the Base
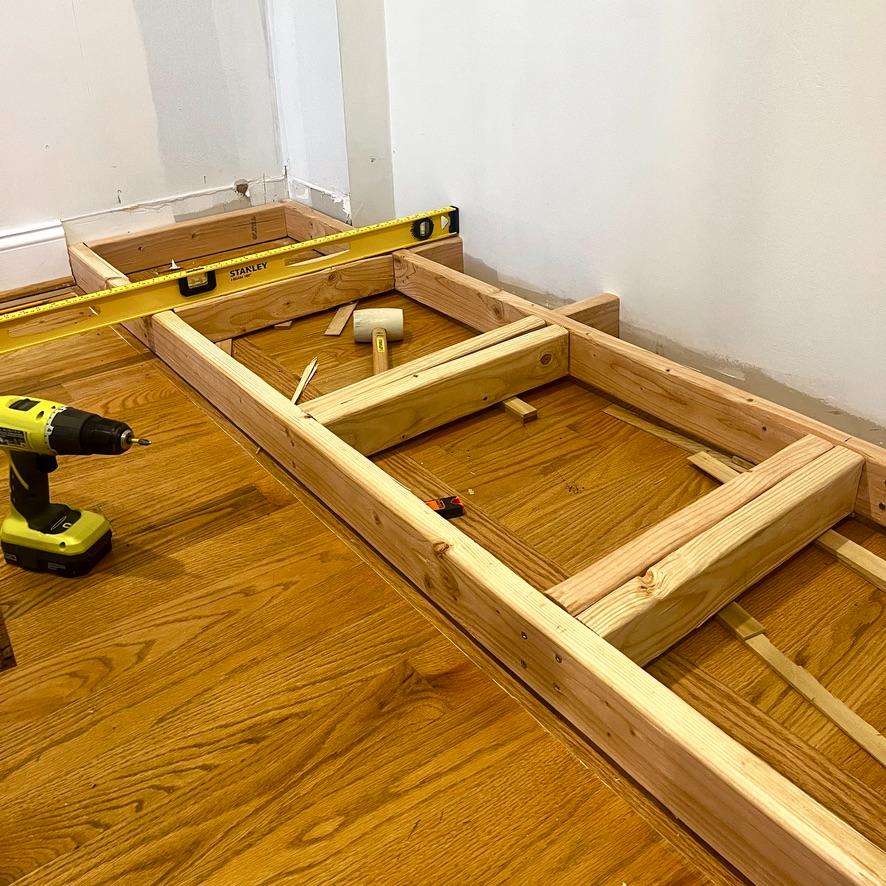
Because we wanted these units to look truly built-in, we didn’t just set them on the floor. We built them a base to sit on, out of structural 2x4s. Not decorative trim-grade lumber. Actual structural 2x4s, because this base needed to hold real weight and stay put for years.
We started following the line where the contractor’s hardwood flooring had been pieced in, until we realized that line wasn’t square with the walls, and the floor underneath wasn’t as level as we’d hoped either. (See above, re: nothing in this house believing in right angles.)
That meant a quarter-round shoe would be doing double duty later: hiding the floor transition and the shims tucked under our base.
Always start by cutting away any trim. The easiest is using a multi-tool. This was my first time using one, this one.
Once I talked myself off the intimidation ledge, it was surprisingly easy to get a clean cut! (I used it multiple times on this project and now I need to own one)
Rather than build three separate little bases, I built one long base for all three Pax units combined, with an extra front-to-back support added where the units will meet. That one decision saved me from agonizing over exactly where each of those seams would land or how leftover space would get divided up with filler strips.
We leveled that base carefully in both directions, side to side and front to back, secured it to the walls, and added blocking in the void behind it so nothing could shift.
Pro Tip: Build one continuous base for multiple units instead of separate bases per unit. It’s less fussy math, fewer seams to babysit, and easier to level the whole shebang.
Setting the Outer Units (and Skipping a Step on Purpose)
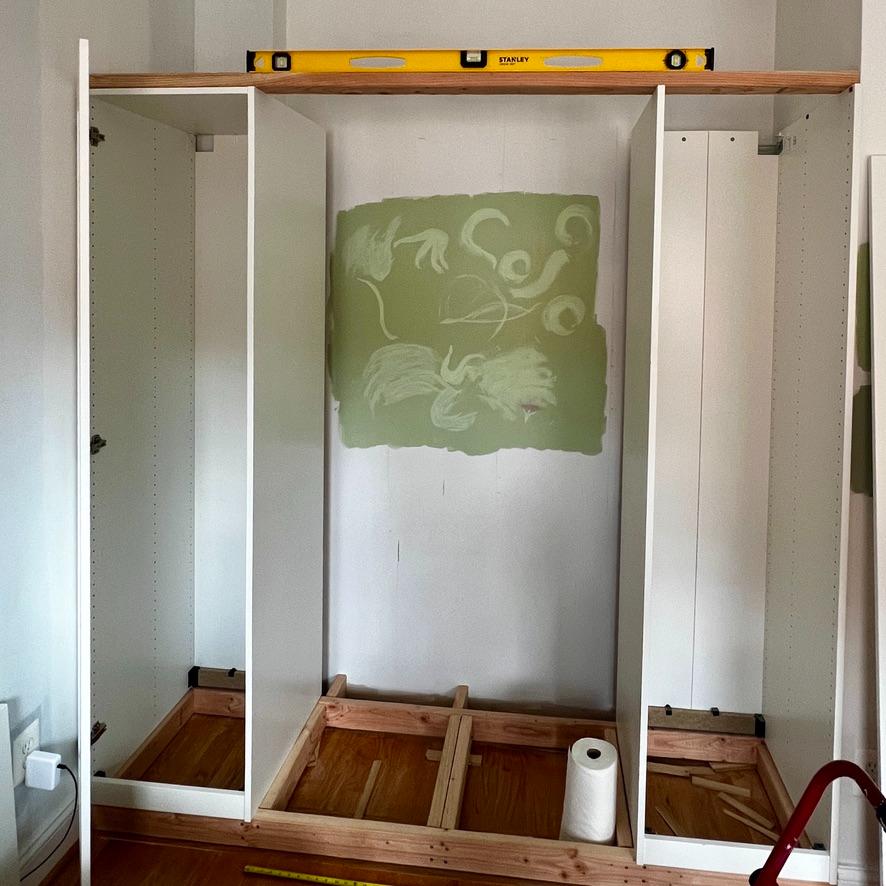
With the base level and secure, we assembled and set the two outer Pax units first.
Normally, Pax units get a metal anti-tip brace anchoring them to the wall behind them, but ours don’t sit against a back wall, so I skipped the whole brace steps in the Pax instructions.
We weren’t worried, though, because we had another anti-tip plan already in the works. (Patience, it shows up next.)
Building the “Attic” While We Still Could
With the two outer units up and the center still wide open, we had a golden window. Room for a ladder and clear sightlines straight up. That’s the only reason this step happens now, and not after the closet is finished.
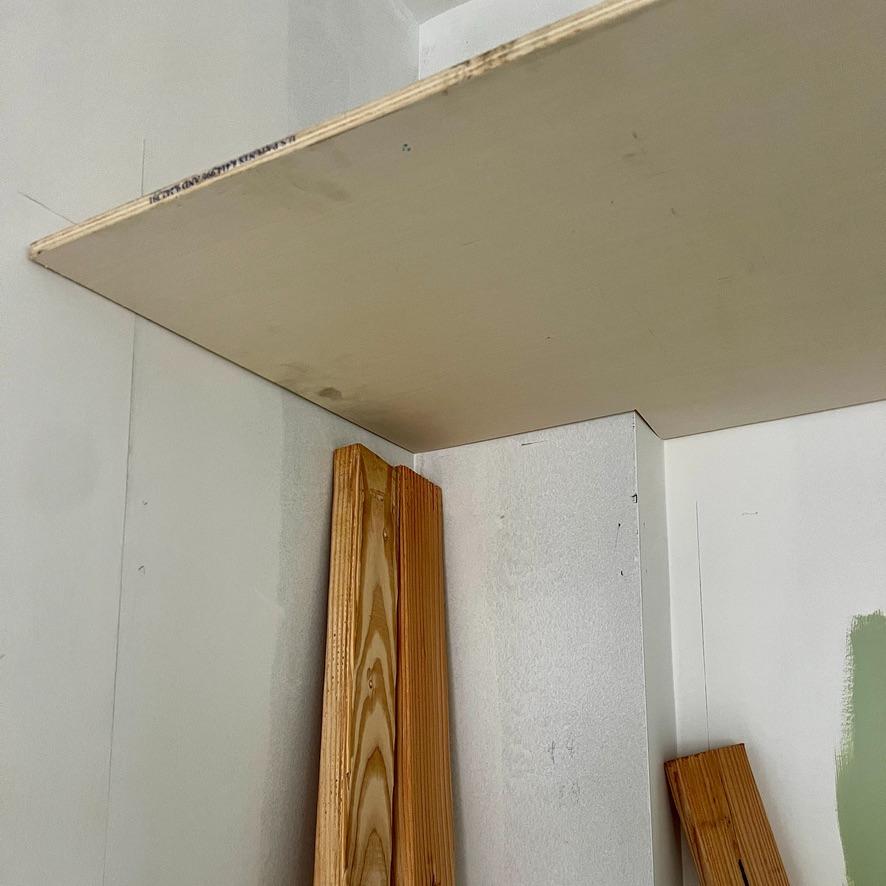
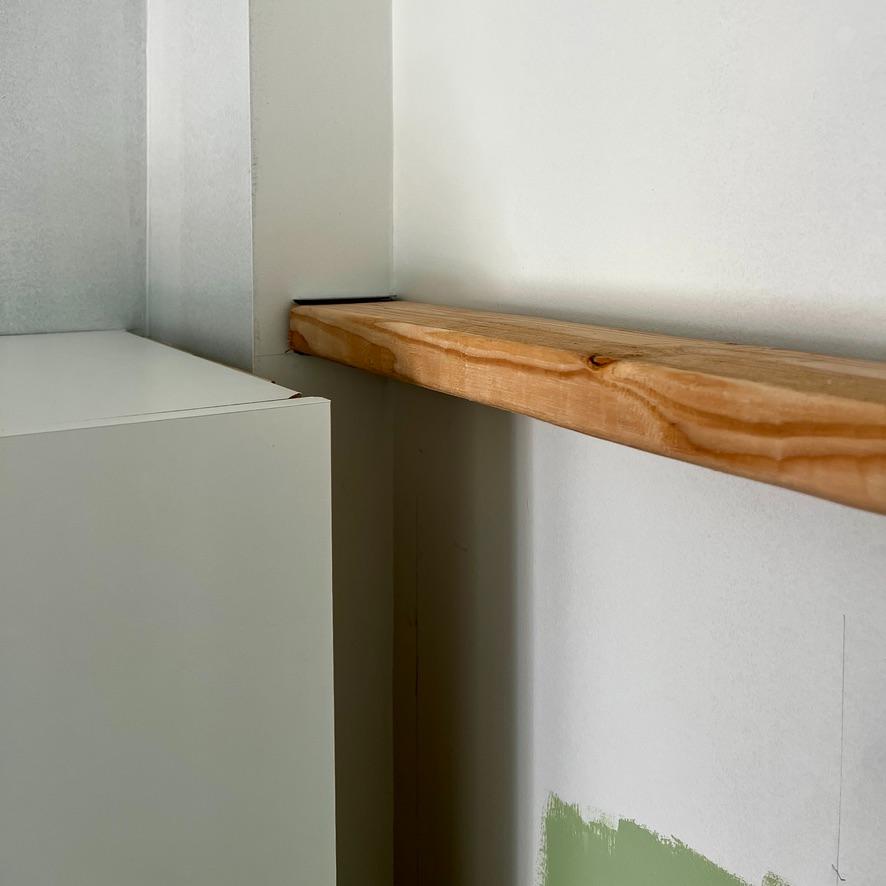
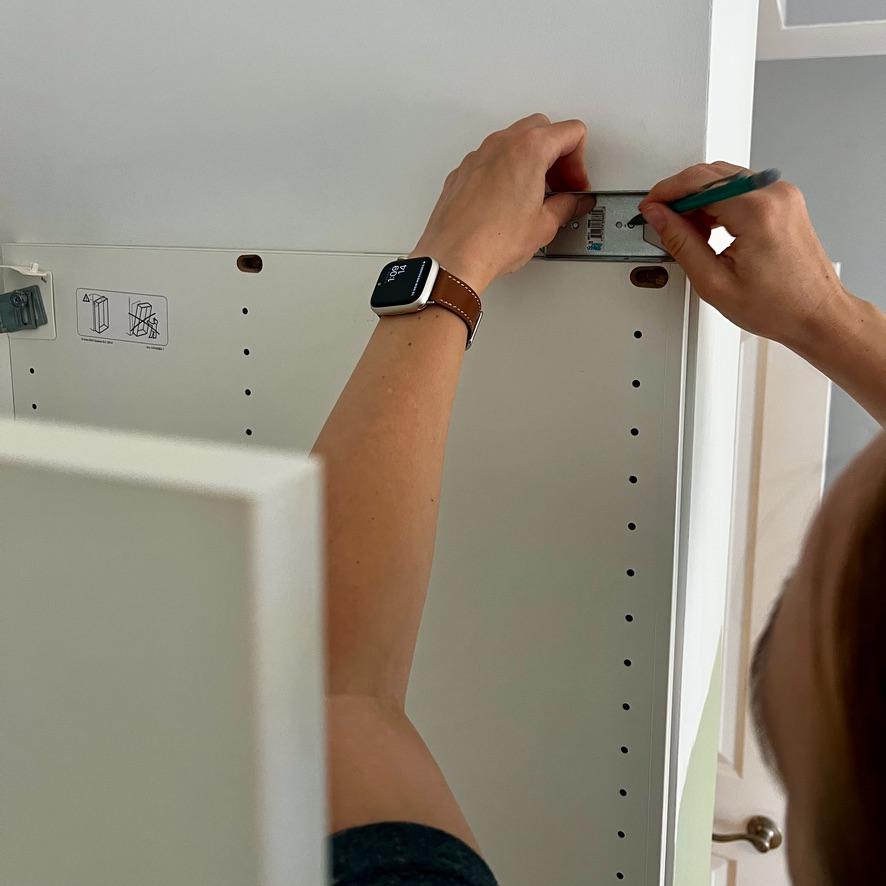
We measured, cut, and dry-fit a ½” veneer plywood platform for our overhead storage. We also cut three 2x4s to span the closet wall and installed them with joist hangers, so they’d only eat up 1½” of overhead space. They also do a second job: they graze the top of the Pax units and prevent them from tipping forward.
That’s the short version. The full story of building out that overhead space, including one very unglamorous ceiling-screw trick I’m still proud of, is in the next post: Mini Attic Storage Space. You’re going to want to see it.
Adding the Center Unit and Solving the Trim Puzzle
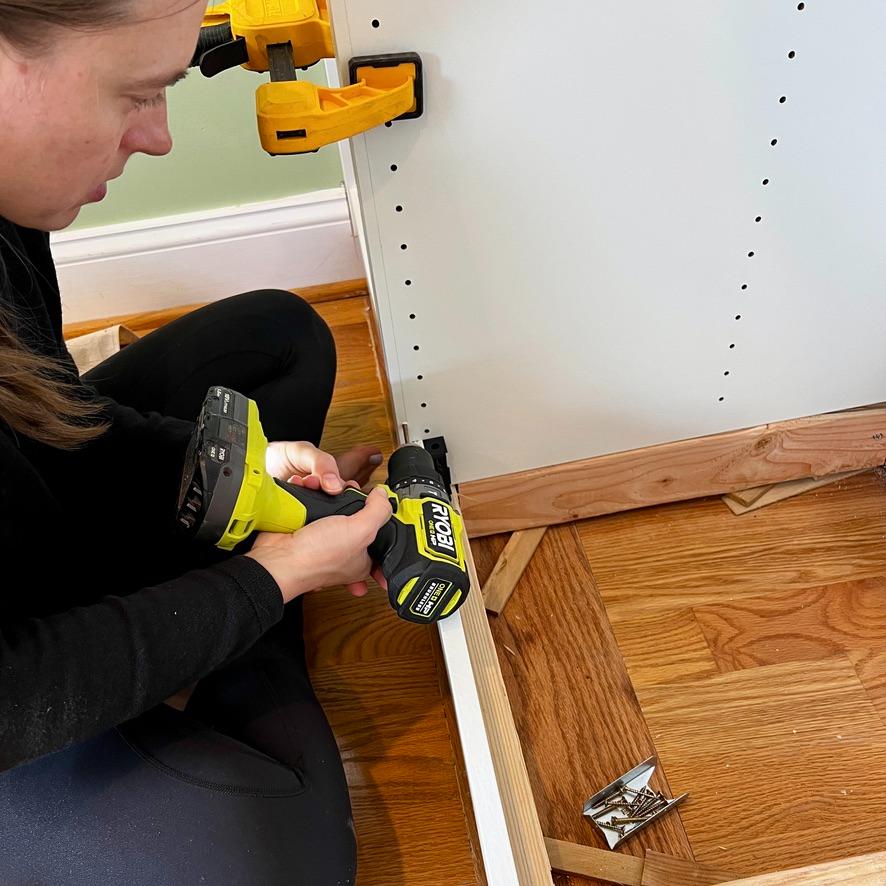
Next came the center double unit, along with the finicky part: making everything visually connect.
The left unit butted right up against the wall. It is held fast with wood screws.
We added a ¾” filler strip on each side of the center double unit. We held these tight by wood screws coming in from each side, through the filler piece and then into, (not through) the other Pax unit side.
PRO TIP: Make sure the screws are clear of where your door hinges will be.
Then quarter round on the right side bridges the mismatch between the Pax units’ plane and that little entrance sidewall, the exact awkward transition we signed up for back when we chose Option B.
Here’s the trim logic, if you’re curious. Normal wall baseboard sits flush against the wall. Cabinet-style baseboard usually sits back a bit, like a toe-kick under kitchen cabinets. Ours needed to do both at once. We solved it by keeping the “baseboard” face of our cabinetry (really just veneer plywood, doing extra duty as the front of our cabinertry and hiding the 2 x 4 infrastructure) on the same plane as the wall baseboard, with the quarter rounds lining up too. The actual Pax cabinets sit slightly forward of that line, and that strip of vertical quarter round handles the handoff between the cabinet face and built-out wall of the book niche on the right.
Is it a textbook-perfect transition? No. Is it smooth, intentional-looking, and something only a very picky person (yes, hello, that’s me) would clock? Also no. I mean, yes. You know what I mean.
⚠️ Safety Tip: Even with the 2x4s at the top keeping the Pax units from tipping forward, we didn’t want little hands or future roughhousing to be able to push the units backward into the void behind them. The extra blocking closes that gap completely. It’s a small step now that means one less thing to worry about later.
Just before the center unit slid into place, I added blocking behind the side units and the wall. Right now, L can’t even hold her own bottle. But we know exactly how fast that changes.
Finishing the Trim
With all three units set, level, and secured with screws through the filler strips, it was time to make it all look intentional.
The borrowed multi-tool made quick work of trimming out the existing wallboard and moulding to fit the new configuration. I cut the new trim to match, attached everything with my favorite tool of this entire project (my brad nailer, obviously), caulked every seam for a clean look, then sanded and painted it all to match the Pax units.
A Peek Inside — What Really Counts
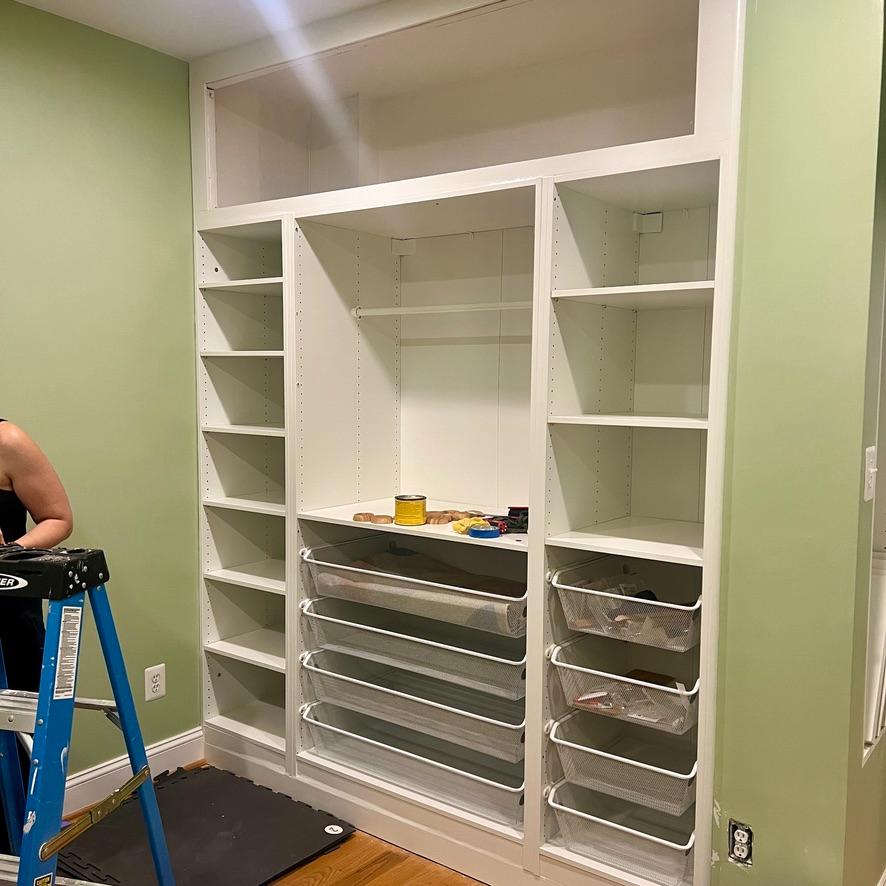
This is where the PAX really shine! There are soooo many options to outfit your closet to fit you, your lifestyle, your needs! And you can mix and match and add and delete as your needs change, or your child grows.
We already see that we should have a shelf above the rod in the large center section.
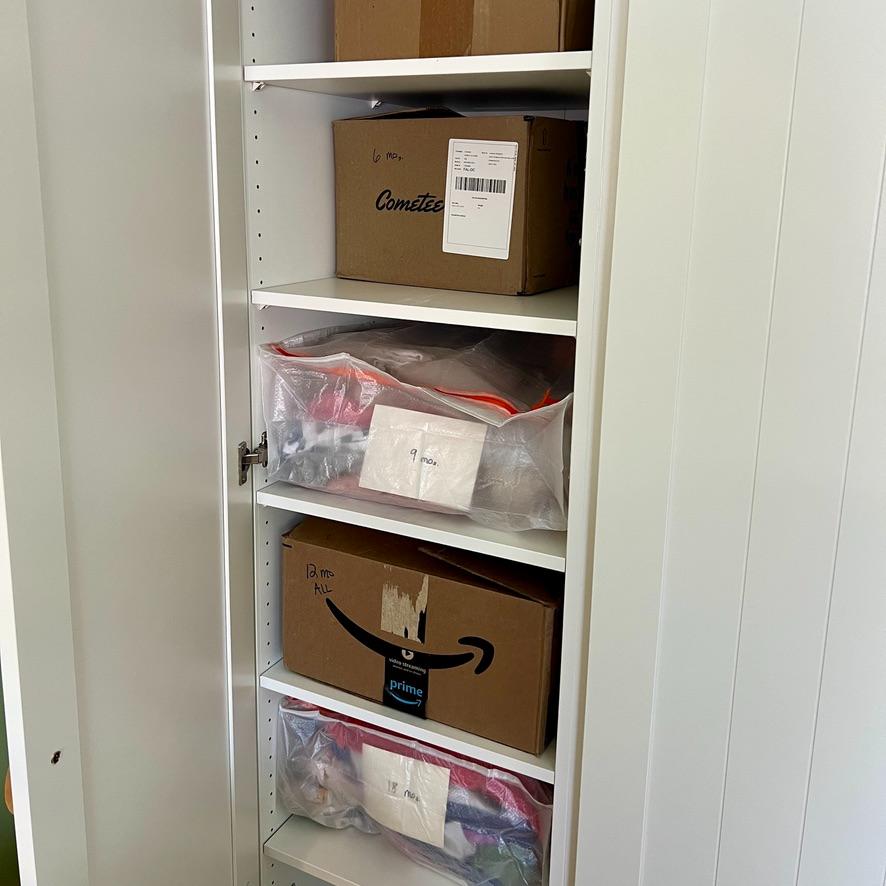
The left cabinet is just shelves. Those hold the hand-me-downs from E, the elder sister that L is waiting to grow into.
Currently they are in boxes by size. But I found these amazing zippered bags at IKEA (just $1.99 each, but only available in store) that fit perfectly. We need to go back and get more of them to replace all the boxes.
The center cabinet is fitted with a rod and four huge sliding mesh baskets for all current clothes, shoes, accessories, bedding and such.
Then the right cabinet is planned for all the parts and pieces of baby equipment not currently being used in the top and four more smaller sliding wire baskets at the perfect height for toys, stuffies and a little girl’s treasures.
PRO TIP: It’s easier to add the interior organization before you hang the doors. But some specifc peg holes are needed for the door hinges. Hold a door in place on one unit, mark the hinge placement and transfer to all hinge Pax walls to place your shelves and drawers right the first time!
Doors, Handles, and the Parts That Made It All Click
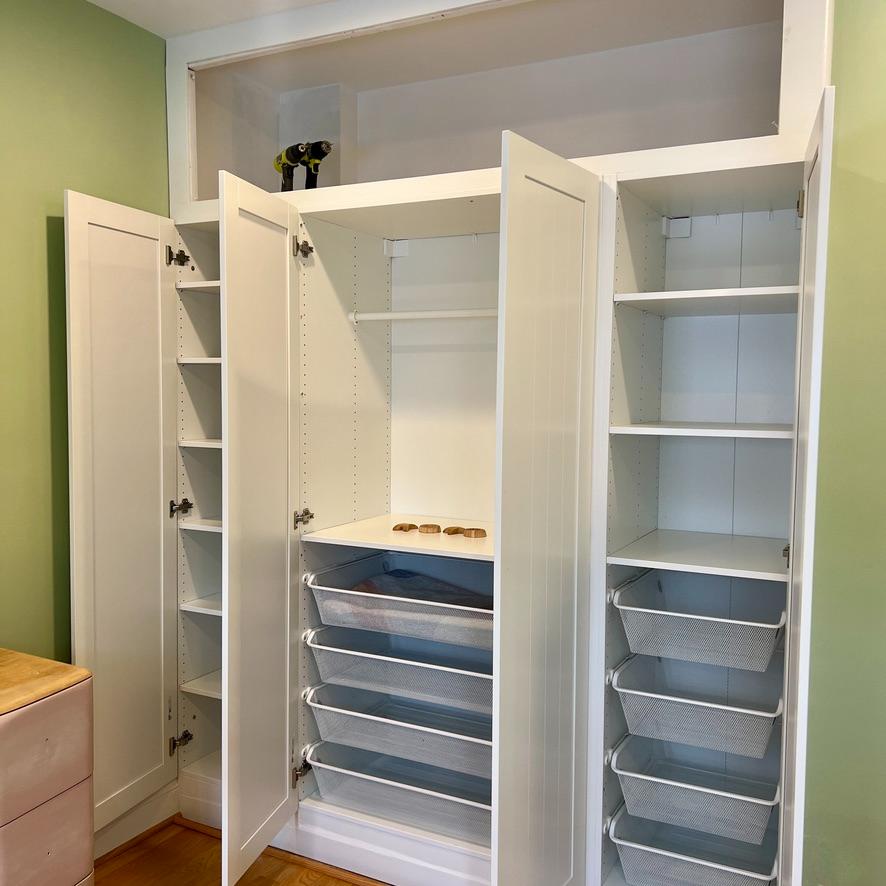
And then, doors. This is the moment a pile of wood officially becomes a closet.
This was the burning question we could not find a definitive answer to: Can units sit right up against a wall or each other and still open easily, or do hidden hinges need extra clearance for the door thickness?
Nope, no problem at all! Modern cabinet hinges are basically magic. One of our units is butted directly against the wall, and the door swings open with zero issue. The only thing you actually need to plan around is the depth of whatever handle you choose.
Speaking of handles, it took a few attempts to actually make what we’d dreamed up into reality. But the final handles are fun, one-of-a-kind, and completely, unapologetically this family. More on those soon, because they deserve their own moment in the spotlight.
Once the doors and interior organization were in, the whole thing came together in a way that made every shimmed, leveled, caulked minute worth it.
Your Turn: If you’re eyeing a built-in project of your own, don’t let hinge anxiety talk you out of it. The hardware has your back. Plan for your handle depth, and the rest takes care of itself.
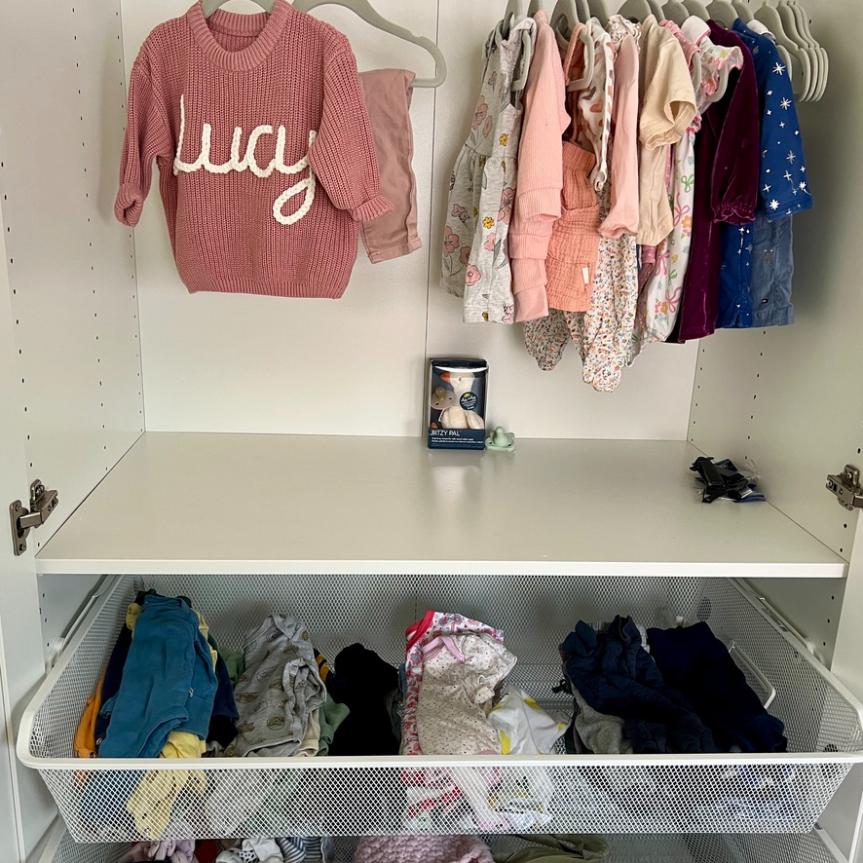
This really was our crash course in all things Pax. Between plumb lines, oversized levels, those handy adjustable feet, and more shims than I’d like to admit, we got three units, a run of custom trim, and a corner bump-out to all line up like they were made for each other.
Next up: what’s hiding in that “attic” space above the closets. Honestly, you’re going to love it.
Questions? Don’t hesitate to ask: I’m here to help!

More Projects from the Kids’ Home