
Easy to DIY Feature Wall
This EASY Feature Wall to DIY gives drama and modern style to any room. Easy to customize to any size wall, easy to install.
Who loves a good before & after?
Of course you do. And I have a great one for you.
It’s the story of a sad, woe-begotten “room” that was long forgotten by the previous owners.
And now? Just wait for it . . . it’s soooo good!
Before they even made an offer on the house, they first checked in on whether we could shelve their large living room wall for their books, and maybe another project or two.
They’re talking this mother’s love language. How can I say “no”?
You’re right! I can’t.
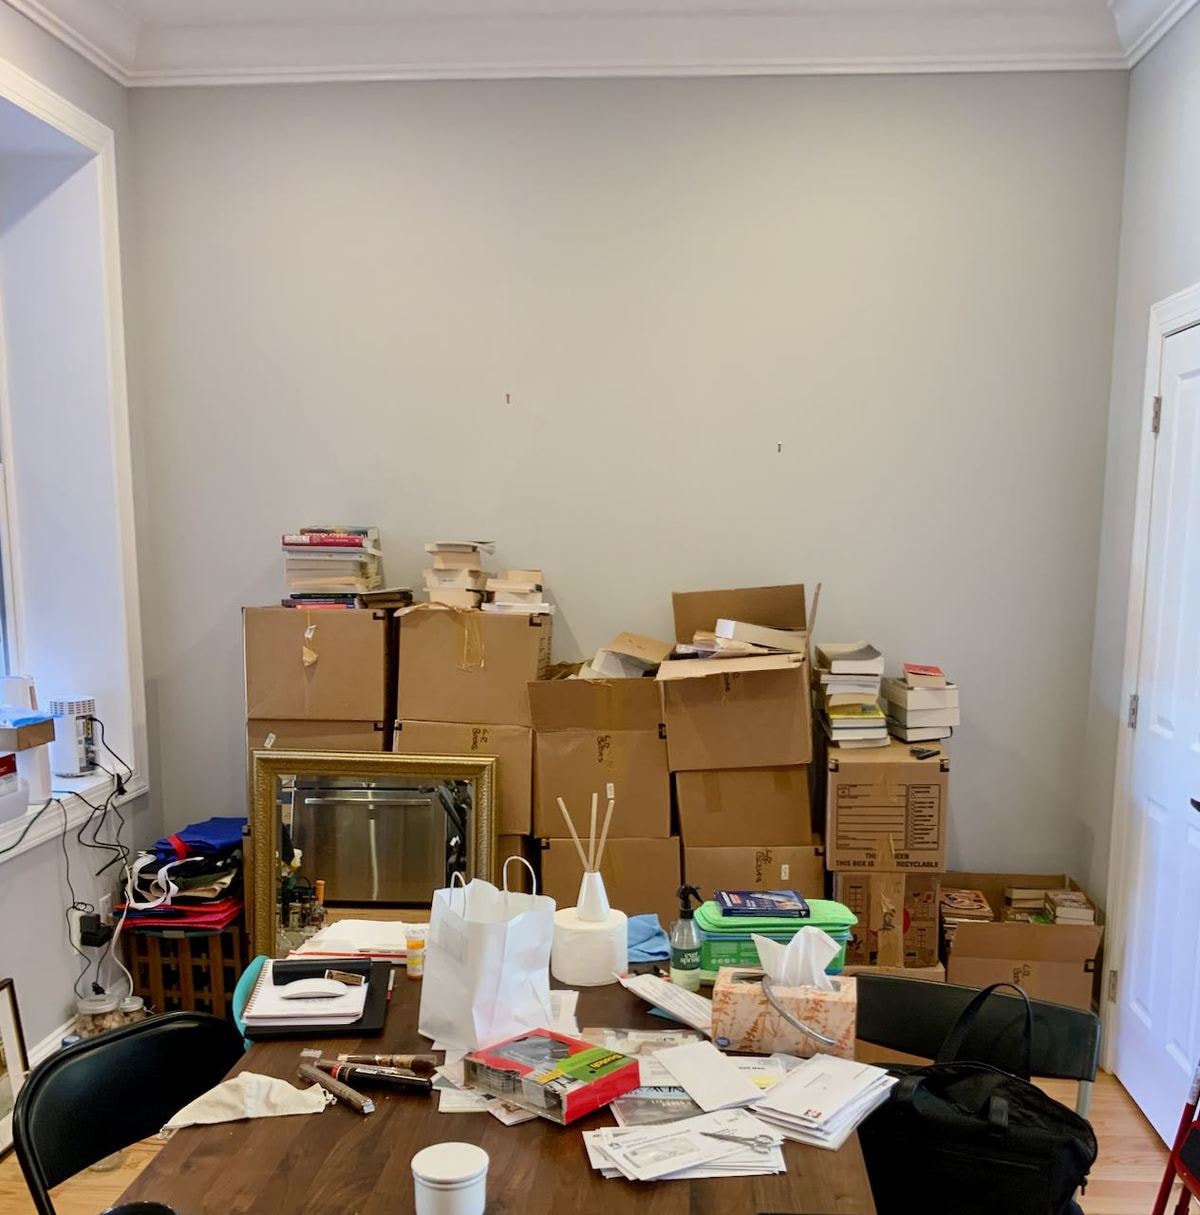
Every good Before and After begins with the Before, right?
I warned you!
Okay, this is a month after the kids closed on their historic DC rowhouse and moved. Holy smokes, they have a lot of books and no furniture!
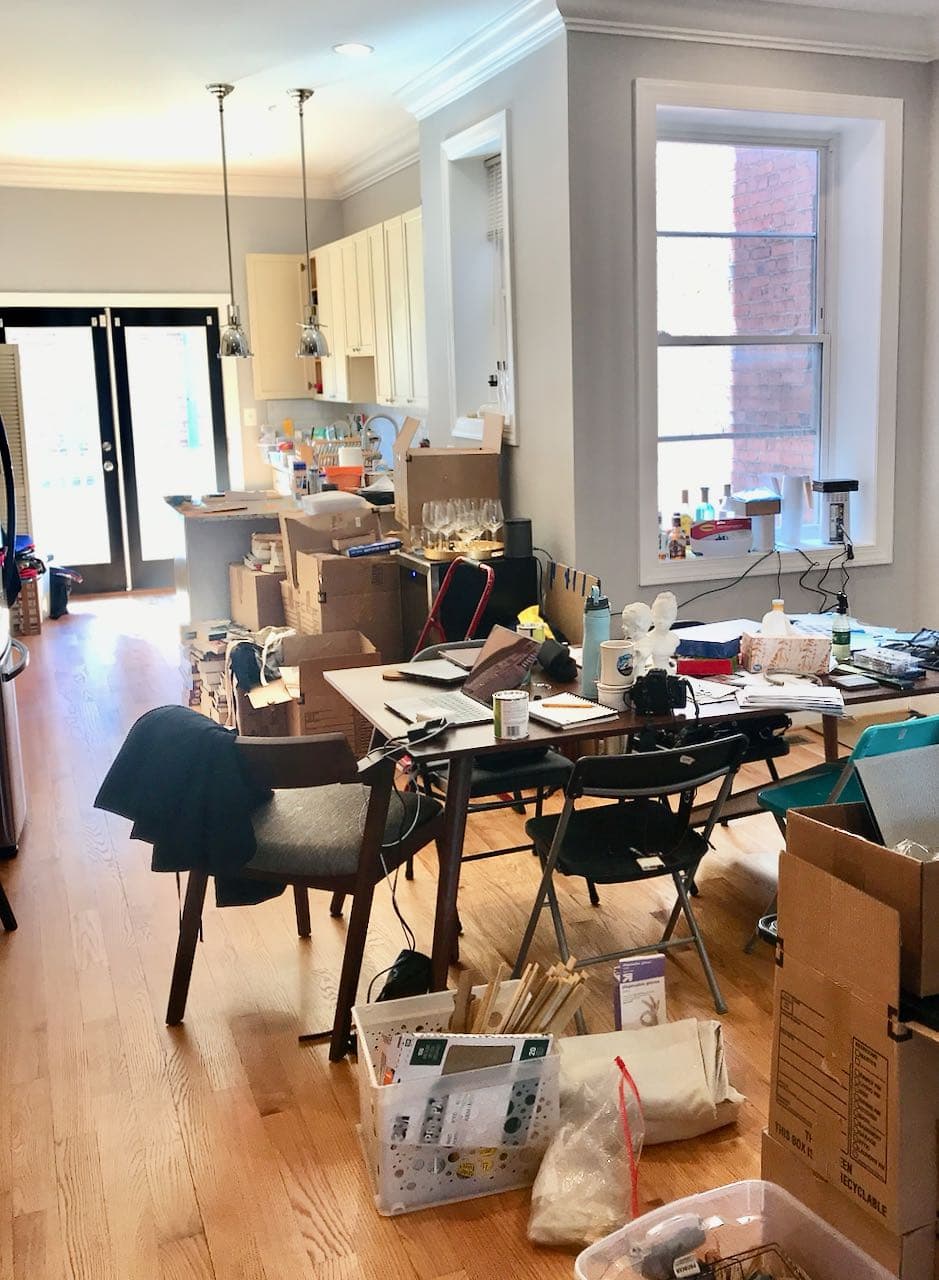
The dining room table and two of the chairs arrived before we did. But that’s about it. So boxes, literally everywhere!
That is a whole ‘nother post that will be following right behind this one.

Here, I am standing almost at the foot of the stairwell for all four floors of this house. The door straight ahead goes to the basement that is a whole finished apartment if they choose to rent it out at some point. To the right is the front door. It’s the long grey wall where the TV is now that will become wall to wall floating shelves.
And to the left is this picture with the dining room to the right, with a powder room around the corner, and then the kitchen with french doors out to a deck and bricked courtyard and parking spot off the alley.
After the library wall (yes, the floating shelf library wall — who’s heard of such a thing?), Katie thought the small powder room might be a good place to inject a bit of personality.
Well, I agree, but I know these kids.
They LOVE to entertain!
They love nothing more than to have family and friends over for game night, for an outrageous dinner or even her traditional Christmas cookies and wine party.
They needed that afterthought of a dining nook to become a real dining room, to have their personality out there, front and center.
Powder room moved a bit further down the list. Update: it’s actually completed now and you won’t believe the transformation.
The links in this post may include affiliate links, which means if you purchase anything using these links, you pay no extra, but I may receive a small commission that helps keep this blog running. I truly appreciate you using affiliate links whenever possible. Please know that I will never recommend a product I do not believe in!
How to Plan a Geometric Accent Wal
Remember, Katie and Jon live in DC. We live in KC. So this is all planned long distance.
We started where a lot of my decor projects start, with two of my favorite tools, Pinterest and Canva.
In Pinterest I made a board of 20+ accent walls to narrow down what they might like. (I’m pleased to say, I kind of knew going in which one they would like the most). This is the one they liked, but in a color beyond grey since they entire house is painted the a pale grey. They are not afraid of color!
So now that Pinterest helped us solve that, I turned to Canva. If you are not familiar with Canva.com, you need to be. You can do a ton of stuff with the free version, so give it a try. It’s the same tool I used when planning this cabinet refresh. And Canva is really what made planning their “library wall” at a distance possible.
How To Use Canva to Plan an Accent Wall?
- sign into Canva.com
- make your canvas the same dimensions as your wall but in inches (10ft x 15 ft becomes 10 X 15 Inches)
- Go to Elements (left side bar of canva)
- search for graph paper
- Pick the one you like and stretch it to fill your wall
- Back to Elements and search for a line
- Drag the line onto your canvas
- Adjust your line: When you click the line, the top tool bar should have a color cube on the left and then a series of three horizontal lines, click on those lines and you can change the weight (or thickness) of the line to reflect the width of your lumber. You can change the color now too, by clicking on the color cube.
- Now that you have the right thickness and color, make many many copies. Click on the line and at the top toolbar (not the little one right above the canvas) you will see two overlapping squares with a + (right side next to the trashcan) click on that and a duplicate will be made.
- Arrange your lines: When you click on a line on the graph you will see a button of two circular arrows, turn that button to turn the line. To shorten or lengthen each line drag the white buttons on each end.
Have fun moving the “pieces of wood” around until you get the look you want.
Now It’s Color Time!
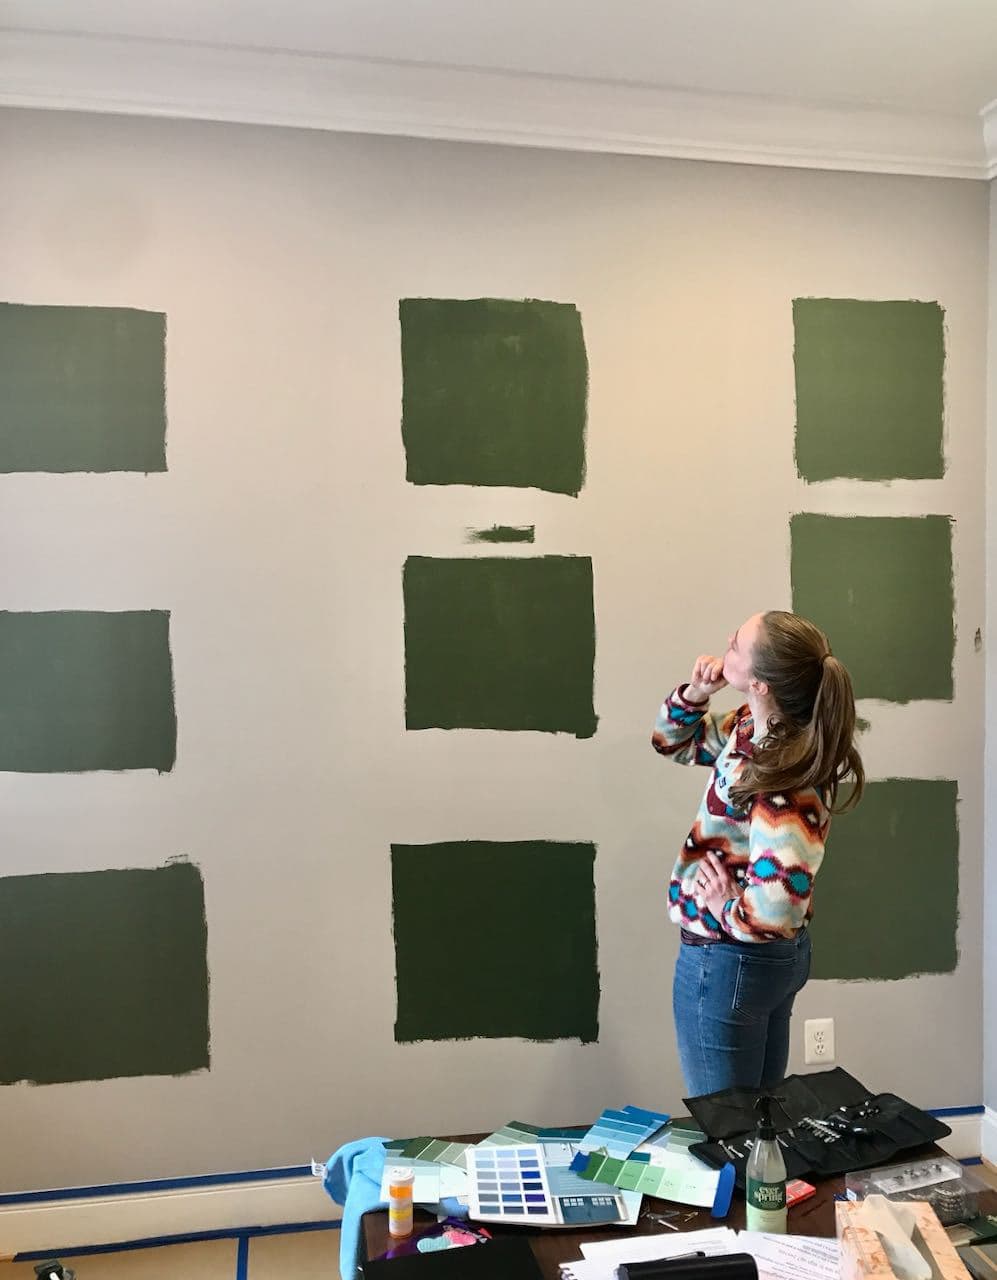
The kids pretty much knew they wanted a green, but with grey undertones to play nice with the rest of the grey throughout the house.
We picked up a sample can of each of three colors they narrowed it down to.
It may seem like overkill, but my hubby painted three boxes of each so they could see how they change in the different lights — down by the floor with minimal light , up high where the recessed lights would mimic artificial light and then in the middle with their large window and it’s natural light.
My IG followers voted and a group of Katie’s friends voted. The middle row was eliminated immediately. And the left was declared the winner. It’s Farrow & Ball Green Smoke.
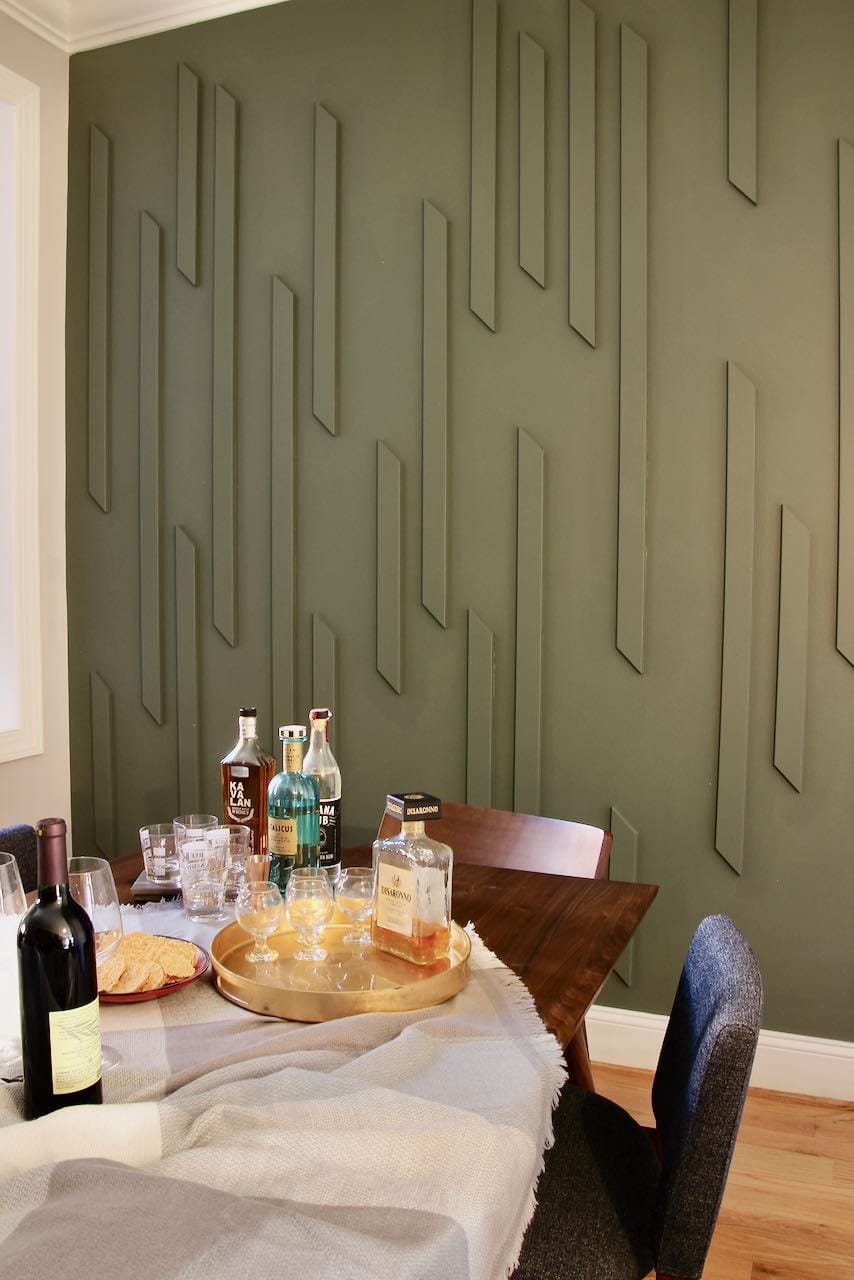
Paint the Green Accent Wall
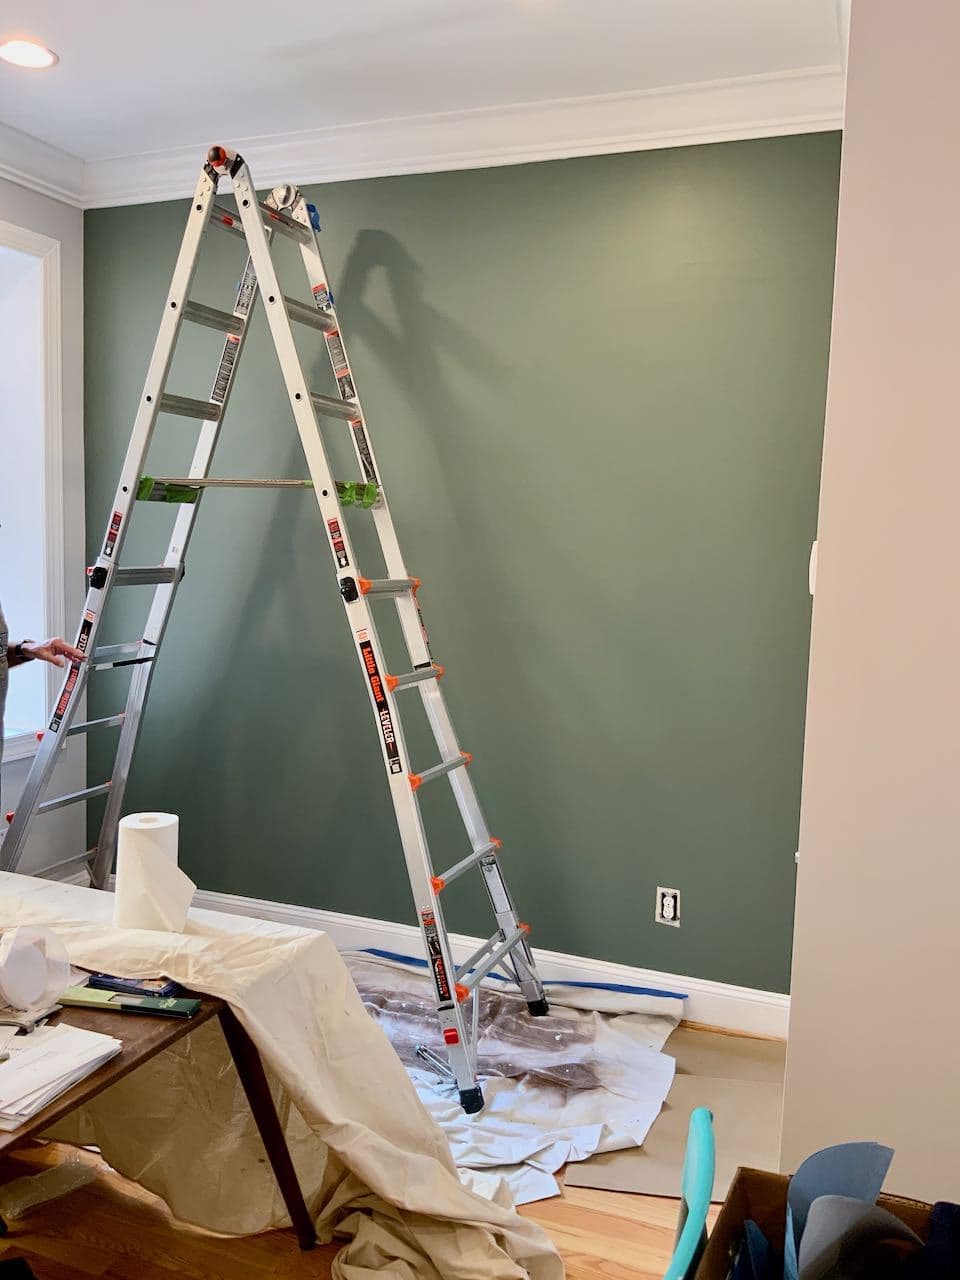
Isn’t that a gorgeous color!!!!
Time to Cut Some Wood
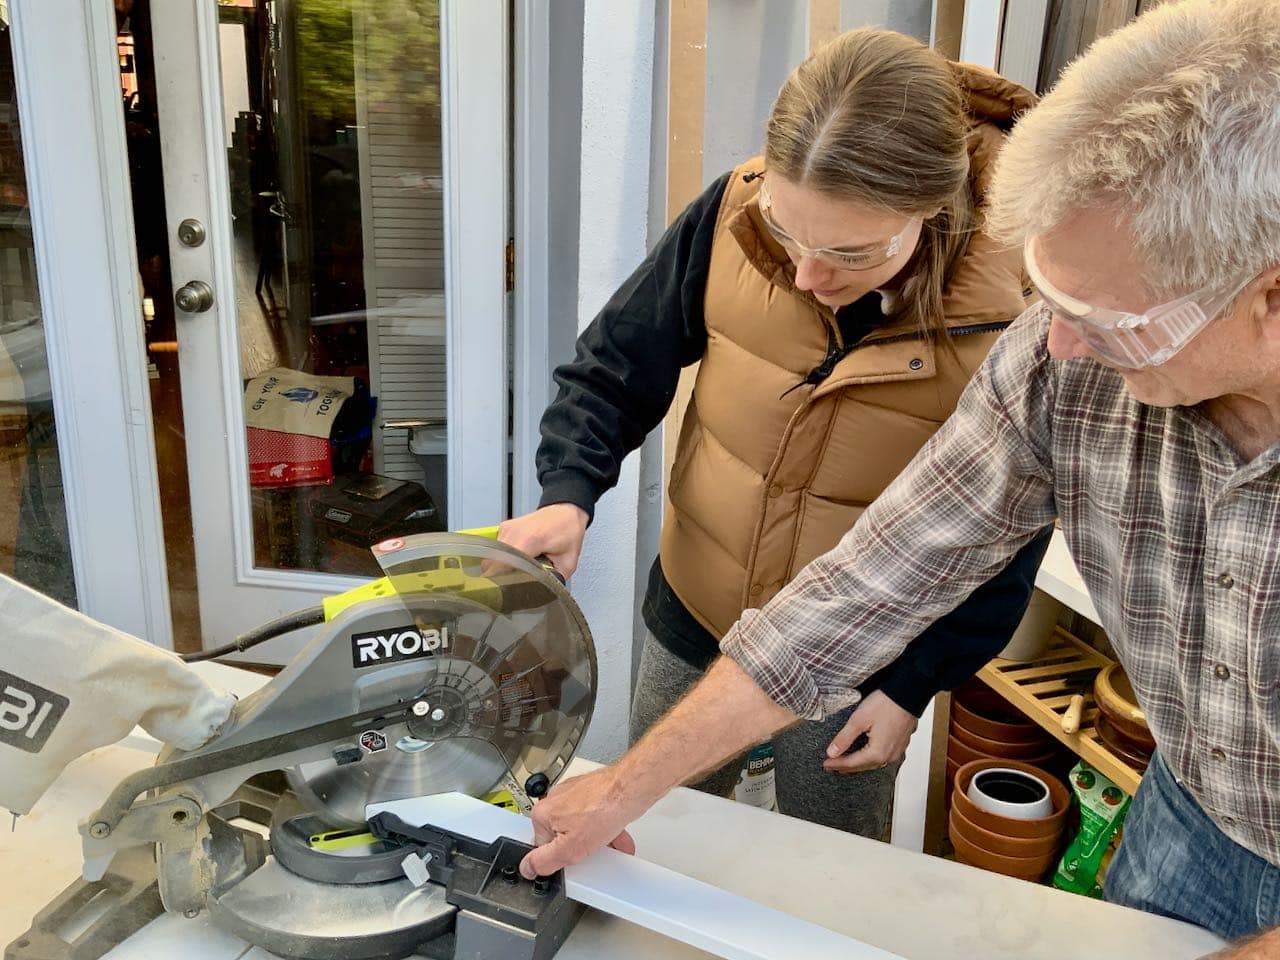
We used pre-primed 1 x 4’s.
The Father-Daughter duo did a great job cutting the boards to length with a consistent 45-degree angle on both ends. And oh my, that Ryobi miter saw was amazing (borrowed from a friend of theirs).
BUT, then . . . . whomp whomp whomp!
We realized that the thickness of the boards was not going to look good butting up to the curved edges of their base and crown moulding.
Be Ready to Adapt & Pivot
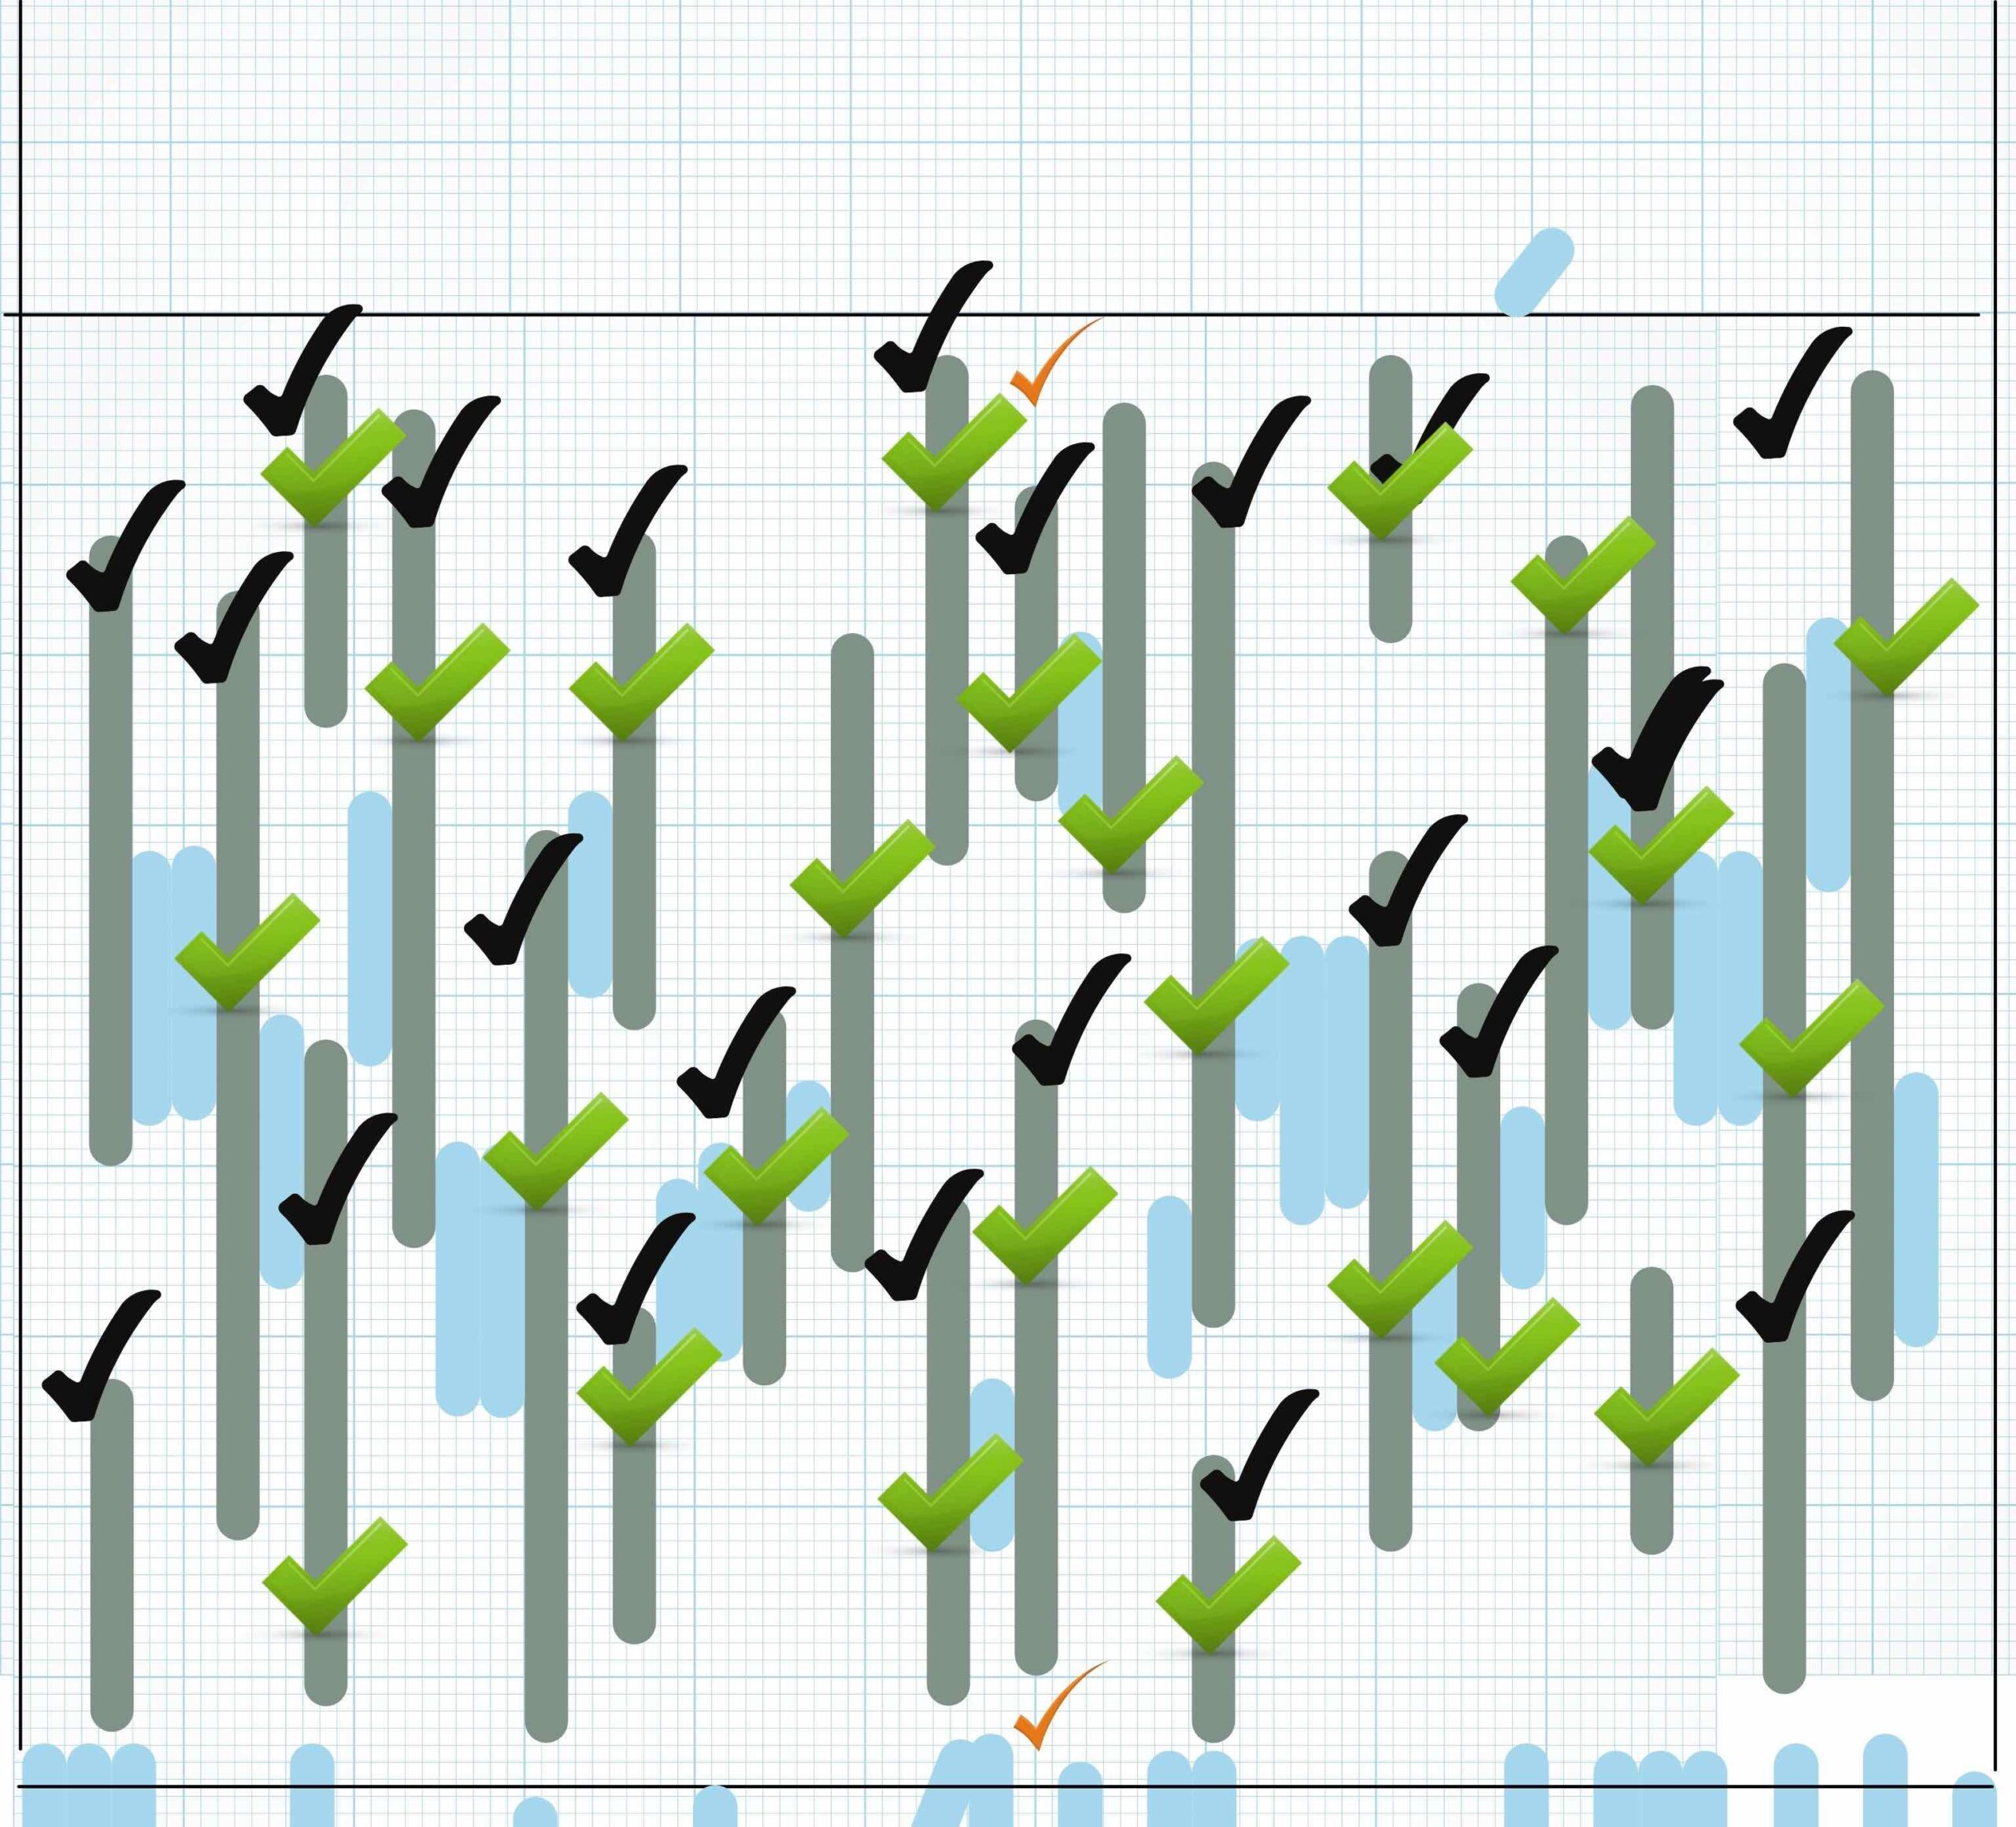
So we returned to Canva and redid our wall design with the wood slats not touching the base or crown, but rather floating.
Here I did not take the time to make the ends angled. We had already agreed that all the angles would be going the same direction.
We knew we wanted to use remnants of the cut boards as our jigs during installation. So the light blue lines are the same boards and represent our spacing between.
Working from my ipad, each line received a black checkmark when it was cut.
The orange check marks represented our starting point of install, the center of the wall.
And the green indicated it was up.
Back to Installing a Dining Room Feature Wall
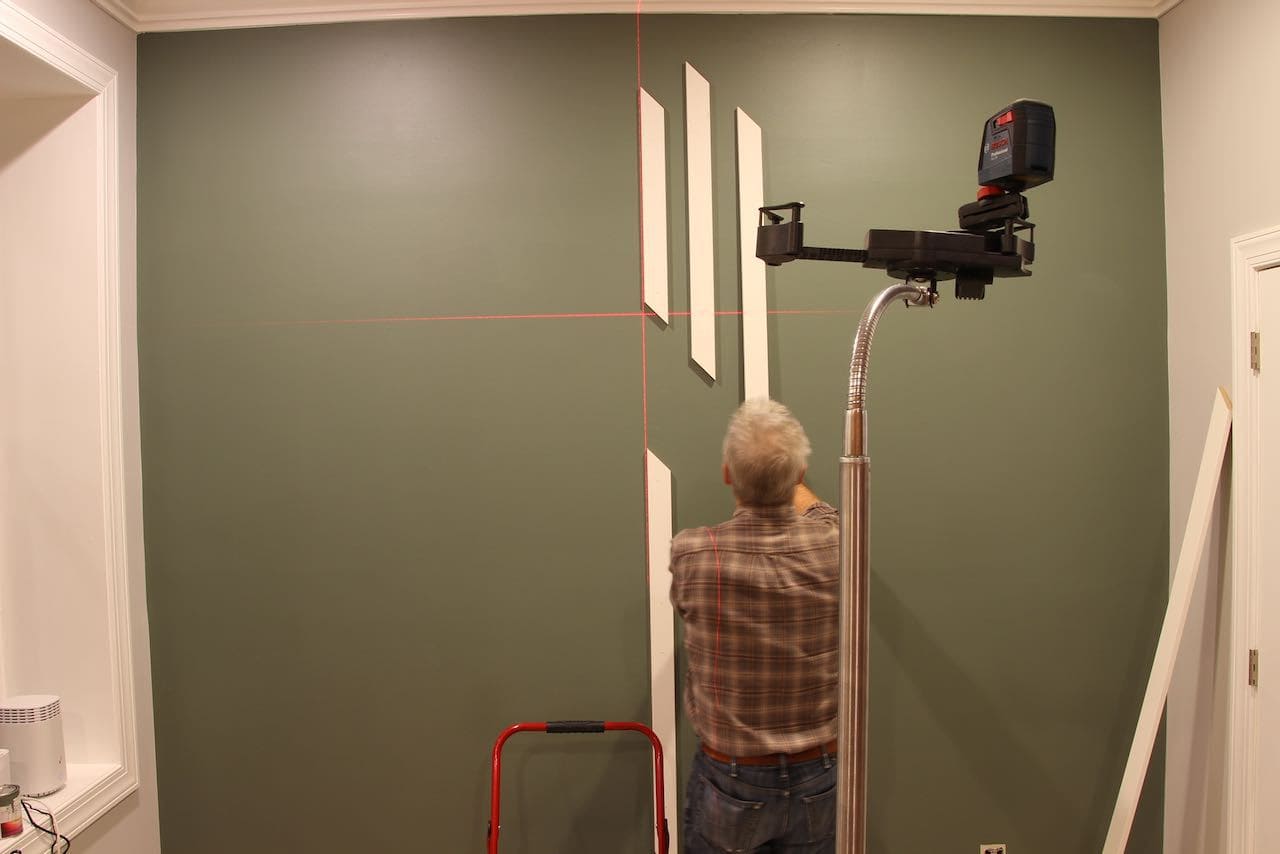
Starting at the center point, we used a laser level to get that first board perfectly straight.
Katie stood back with my iPad and directed us as to board placement once we had the first one up. As we went along, she marked them off with the green checkmark.
It was so easy. “Okay, next board is over two widths and the top is about three inches higher than the last one”. We held it up and she would adjust a bit up or down or say that it looked great. We’d fire the nails and then onto the next board.
Doug, Jon and I rook turns holding boards and manning the nail gun. Oh my!!! Is that a fun tool!
Lets’ pause for a minute and talk tools. We bought the nail gun when we were in DC. We picked the Ryobi for a number of reasons, but a big one was that we hoped we would not have to buy a battery because Katie’s drill was a Ryobi and supposedly their battery will work across all their tools. But Katie’s drill was five years old, so I had my doubts.
Wow! Katie’s battery worked great with it. I was converted — Ryobi’s newest cheerleader!
Between Katie’s 5 year old Ryobi drill and battery, our new Ryobi nail gun and the Ryobi miter saw we borrowed, we had the trifecta of Ryobi power tools. Nothing could stop us now!
Note: this is NOT a sponsored post. There are some Ryobi sponsored posts coming because like I said I am now a Ryobi convert and I have been collaborating with them after using some of their tools we purchased ourselves. I will only endorse products I truly believe in!!!
Next Step, Paint!
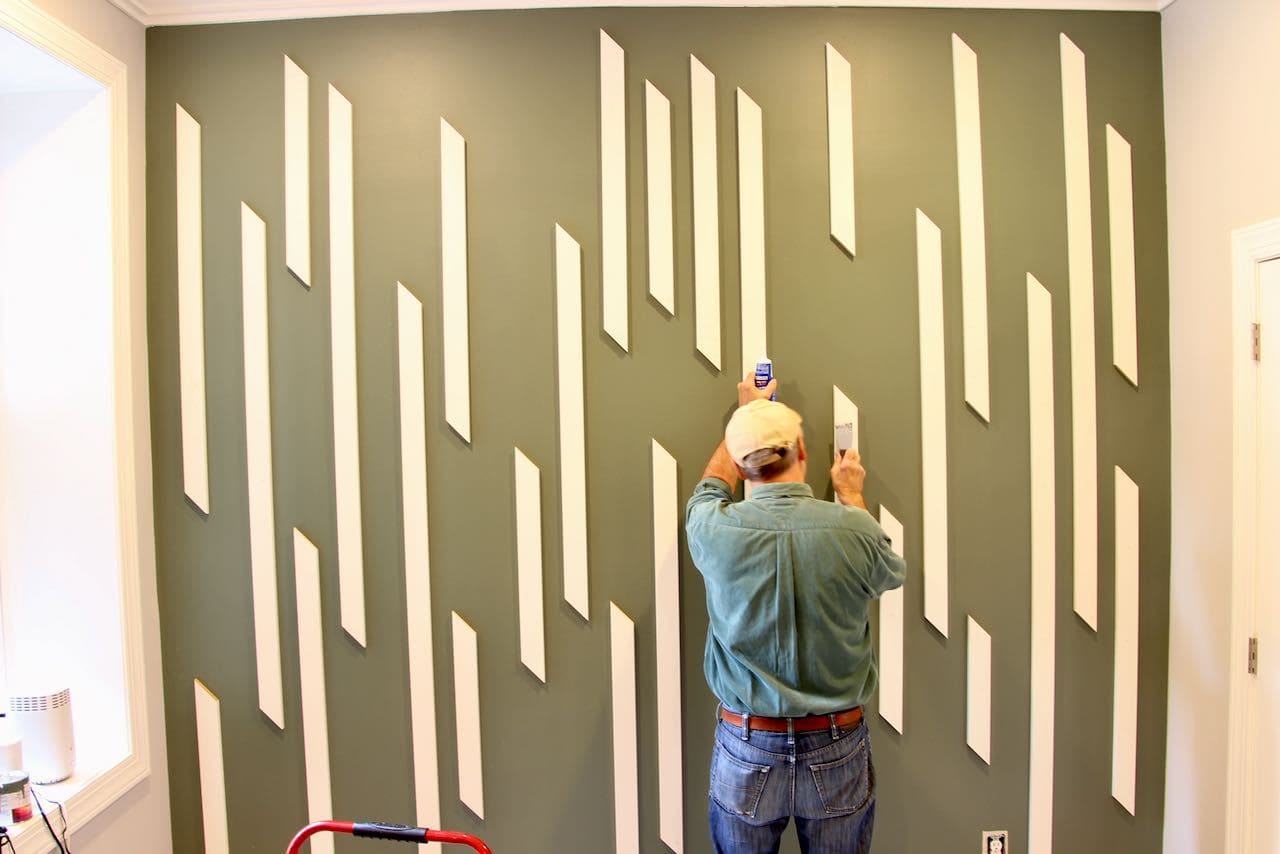
Next is the easy but rather tedious task of filling all those nail holes and sanding them smooth.
We were also expecting to have to caulk, but it really didn’t need it. I think the nail gun held everything so tightly and with the darker color paint, it just wasn’t necessary.
That’s a big win.
And the results . . . TA DA!!
Time to celebrate!

This is now reflective of our kids’ style and personality. Everything their first home together should be.
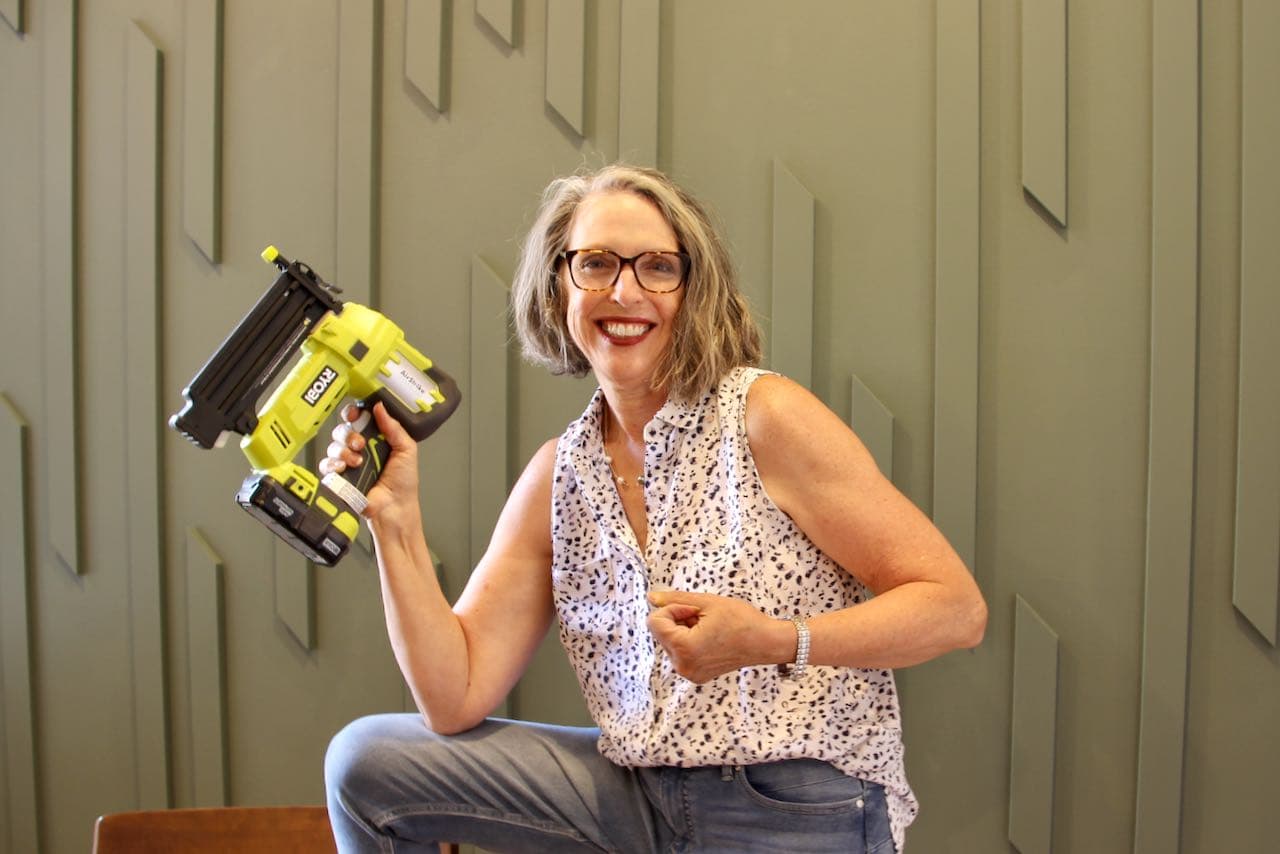
This is by far the tool that made the difference!
I’m including links to some of the products we used in making this happen down below. As always don’t hesitate to ask any questions.


I’m curious about how you attached the strips to the wall. You mention that you were using a nail gun, but what are you nailing to? Are they just going into drywall, for some at least? Thanks
I was planning to use some wood glue along with the brads, but honestly these grabbed right tight without the glue. It’s been two years and none are showing any popping. I’ve been wondering if that might be due to this being an historic rowhouse. At this point, there doesn’t seem to be any more shifting or settling. The first hundred years took care of that. And this wall is not exposed to temperature changes. Glad hat we didn’t have to completely destroy the wall board with glue.
Surprisingly, we didn’t even need to caulk around them. Just filled the holes and lightly sanded everything. That’s one of the big advantages of the dark color the kids chose — any shadow gaps disappear in the dark color.
Hello there. What is the thickness and width of the wood?
Thanks Stacey! I should have that in there! Huge oversight on my part. They are 1 x4’s, so they are slightly thicker than 1/2-inch and about 3-1/2-inches wide.