WOW! Our Dining “Hallway” is now an Amazing Dining Room
See an amazing dining room makeover! DIY built-in long banquette flanked by a floor to ceiling plate rack and dry bar.
If you’ve been following along, I know you’re saying — “It’s About Time”!!!
Guess what, I’m thinking the very same thing. And for the record, This is 5 weeks past the close of the Spring ’23 One Room Challenge.
(Sometimes life happens — not the way we want it to).
But we persevered. We’re Done.
And we LOVE it!!!
(I hope you do too)
Let’s Take a Quick Refresher of Where We Started
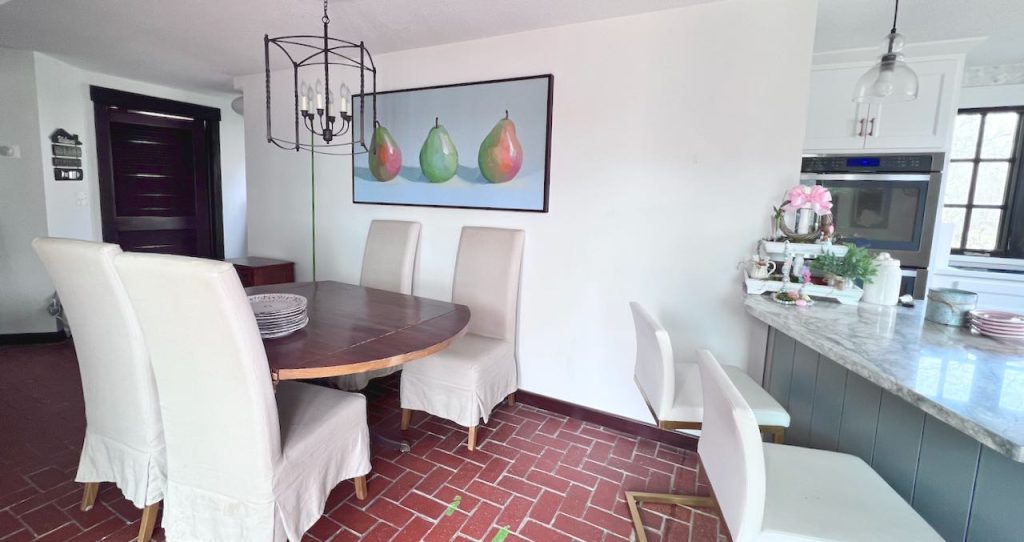
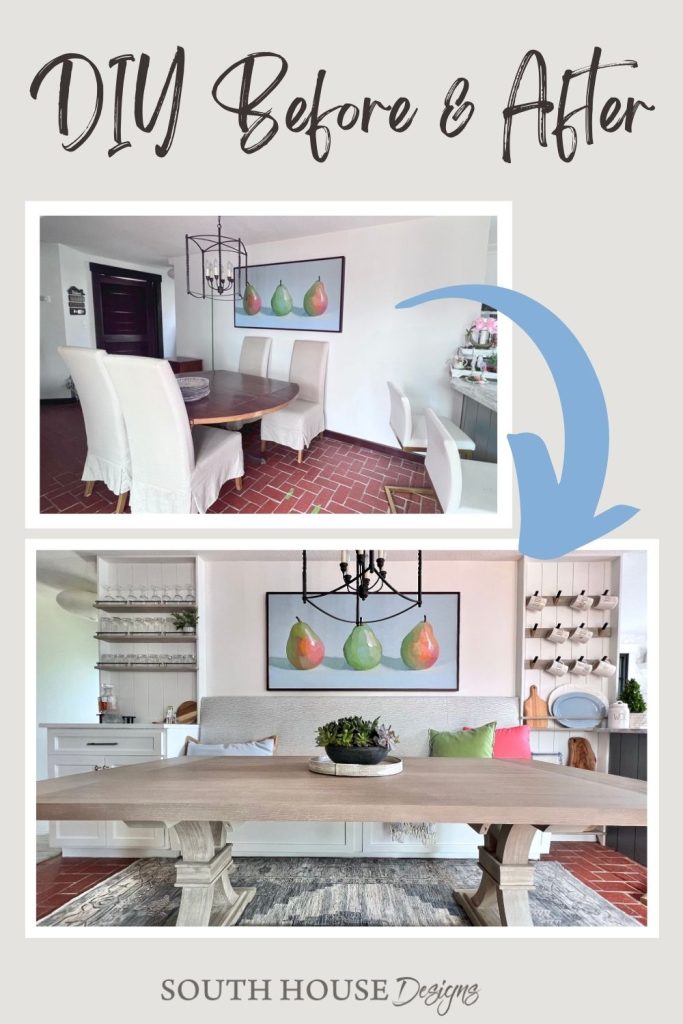
This is not even close to where it really started. Check this out for what this space looked like when we took possession. You won’t believe the difference!!!
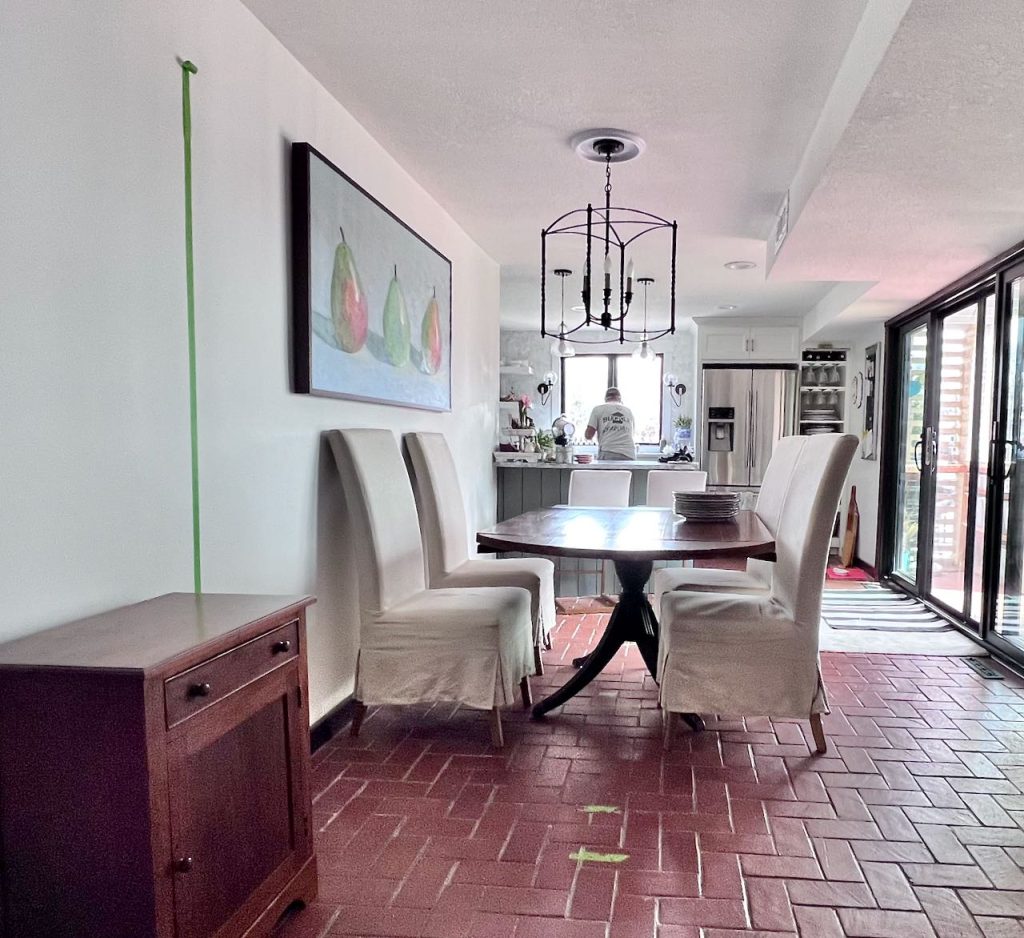
Our Casual Dining Room is not a great shape!
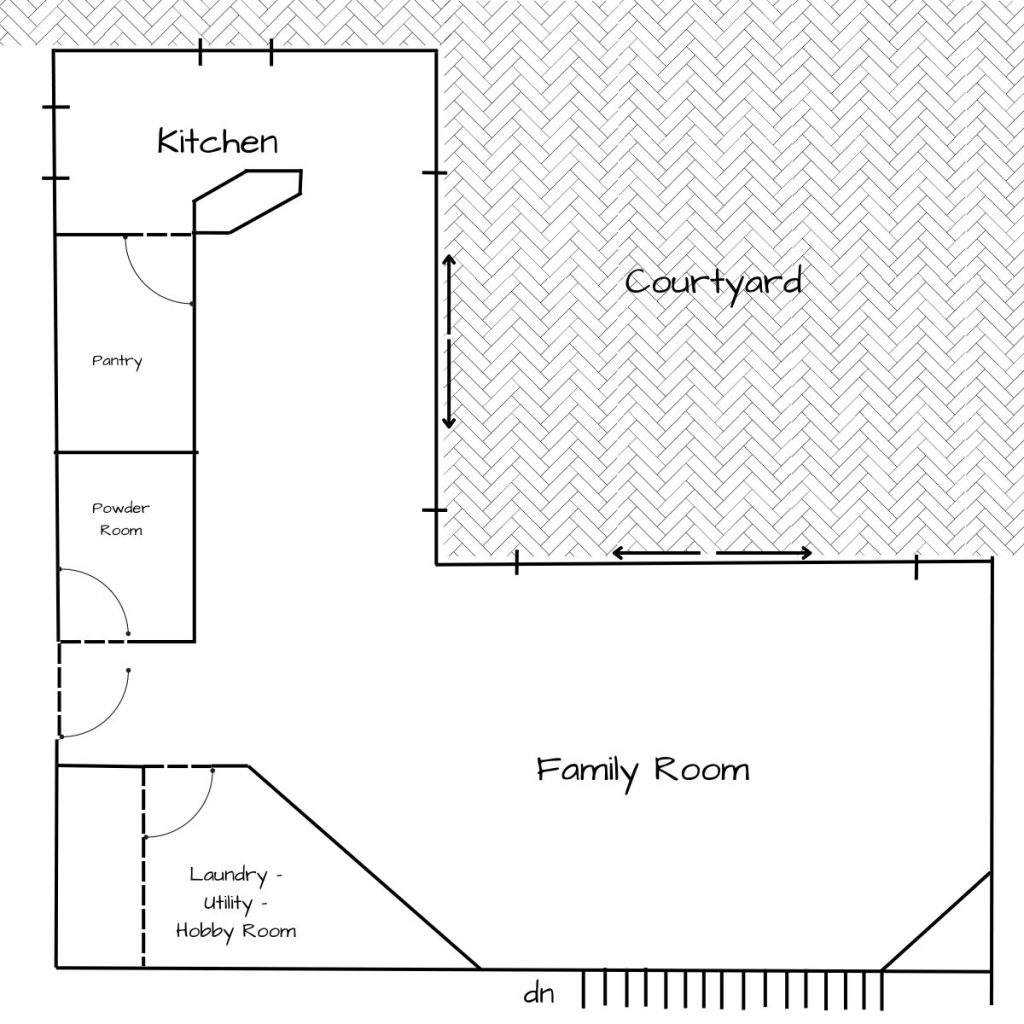
The main entertaining area of our home is the downstairs. It’s an L-shaped space that wraps two sides of the large brick courtyard that overlooks the lake.
It was really more of a really wide hallway joining the two legs of the downstairs — the kitchen and the family room.
But it’s the space I have, so I’ve got to make it work.
The Pain Points
Feels Like a Really Wide Hallway Rather Than a Room
Yes more of a wide hallway connecting the kitchen and the family room.
Need to Seat More People
Like a built-in banquette and a long table to match the long room.
Not inviting
Rather dark, no real personality beyond one awesome painting.
Seems Like an Afterthought
We added the chandelier and that helped, but we we needed much more!!!
And even an area rug will make a big difference!
Need More Storage
We have a great pantry, but our kitchen work area is very small, so we eliminated upper cabinets to make it feel light & airy and get rid of the boxed-in claustrophobic feel.
Need More Serving Area
When we are entertaining, the beverages tend to spread out all over the kitchen island/peninsula. That space is needed for the food prep or food spread, not the drinks.
Project Goals
Seat Up to Ten Comfortably
(Twelve if squooshed a bit)
We are a game-loving family. Plus we love to gather around the dinner table with our neighbors and friends and chat and laugh for hours.
Seating more people and seating them comfortably typically are contradictory. But I knew there had to be a creative way to make both happen!
Give the Space Purpose and Intentionality
If we reworked the entire space, I knew we could create a new dining room.
An area rug and new light fixture can make a huge difference. But I admit, we needed wayyyy more than that!
We didn’t want or need a formal dining room in this house. But we wanted a new space with new built-in furniture pieces that added the function we needed, but with a fresh new look, a modern look.
Make the Space Feel Inviting
Small spaces can feel very inviting, particularly if they are fresh and bright, have a moderate amount of pattern and a fun pop of color, or two.
I also like to add something with a charming or whimsical element.
Add More Storage
Who doesn’t need more storage — especially in a house. built in the 60’s!
My pantry is full! And I’m a sucker for fun dishes. I’d love to incorporate more space for my local thrift store treasures.
Get the Alcohol Out of the Pantry
We have a rather small kitchen island (actually a peninsula) that we use for serving drinks and food. If we could move the drinks somewhere else it would be a huge help for our larger gatherings.
All the liquor is currently kept in plastic crates on the floor of the pantry. It is not accessible to our guests. Plus I’d love to reclaim the pantry floor for something special — like maybe more dishes.
Please note: This post may include some affiliate links. That means if you purchase something using one of these links I may receive a small commission. Please know that I only link to products and companies I know and trust. All opinions are honest, fair and solely mine.
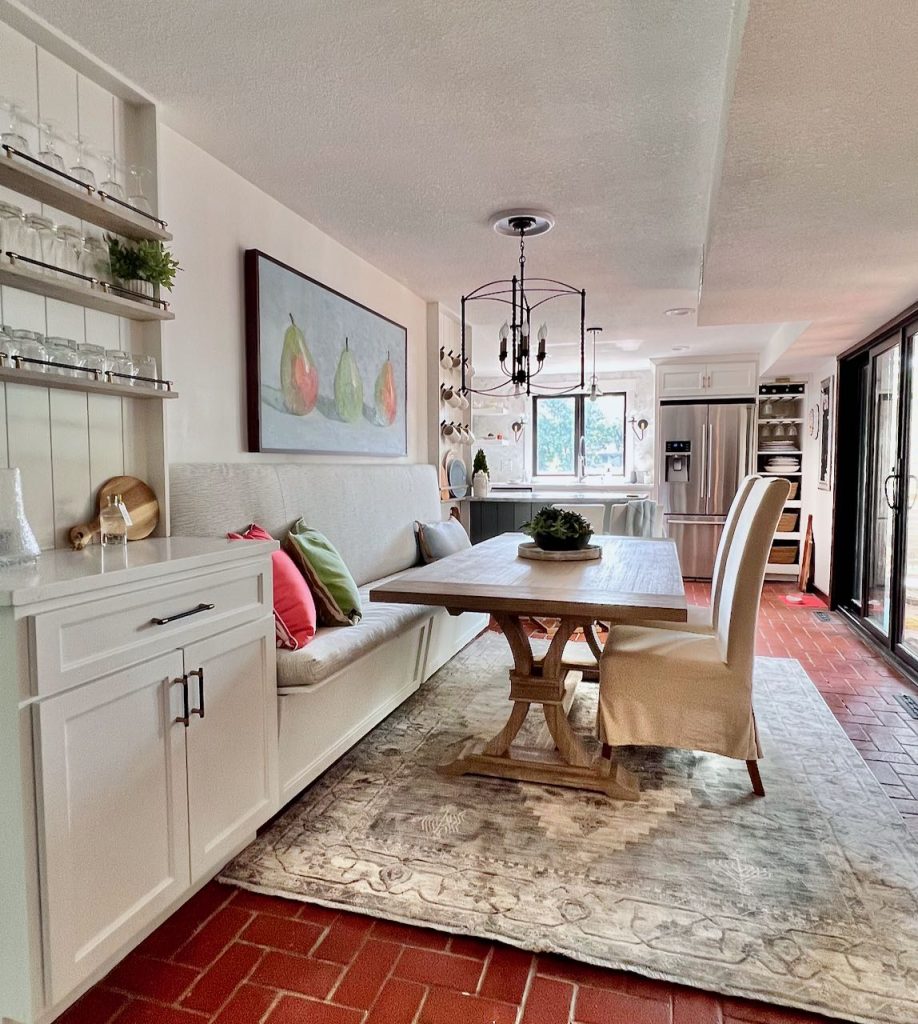
The After
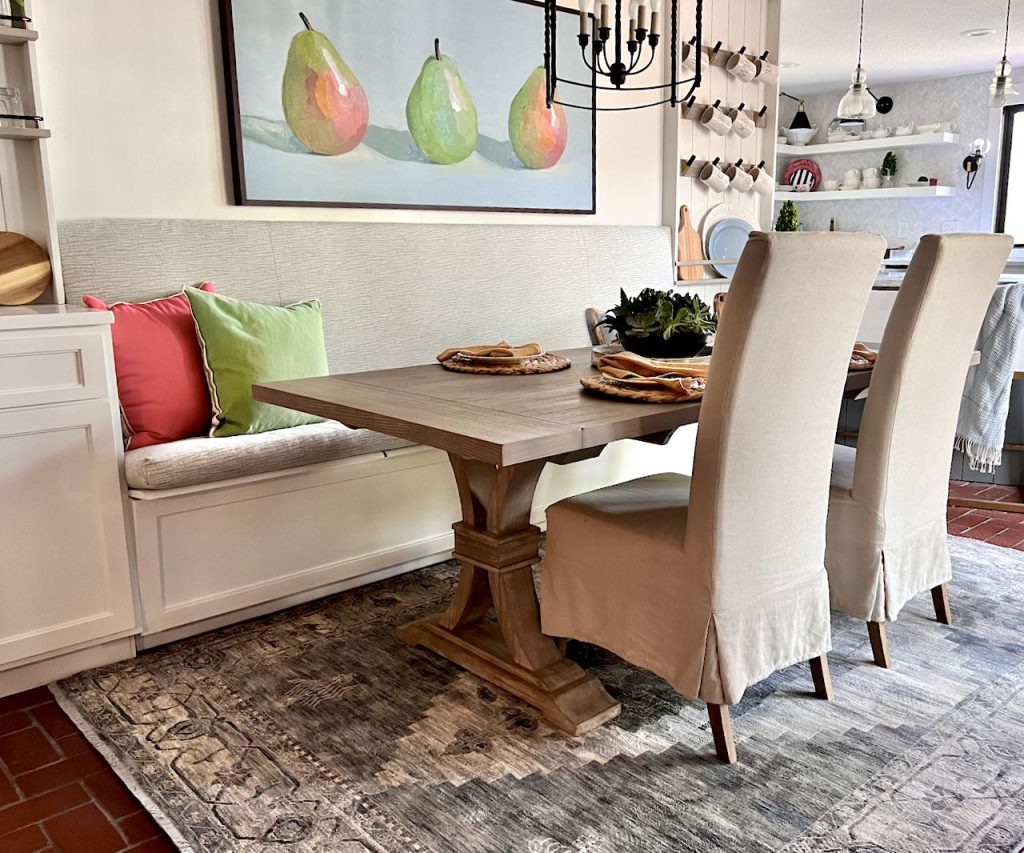
It all started with the Banquette (w/ Storage)
Our starting point was the table we brought from our last house.
It was the perfect kitchen table for that house. A square pedestal table that sat four, but each side had a curved leaf that folded up to make an oval for six or a round for eight.
And we had a formal dining room in that house that allowed us to seat ten if we wanted.
You can probably see from the floorplan that a square/round table did not work in this house.
To maximize seating without using the entire width of the room — it is still the bridge between the family room and kitchen — a banquette was the only solution.
And a flashback to the before:
(I’m a bit embarrassed to admit the tingle I get when I scroll up and down seeing the difference!)
Our oldest son is an architect (and tall) and he really did not like the idea of a banquette. He thinks they are uncomfortable and he doesn’t like skooching across the seats and having to get up if someone in the middle wants to get out.
I get that! All of that!
But it really was the best solution for this house, our family and how we like to entertain.
So I was determined to build a banquette that’s super comfy!!! The seat everyone will want!
I can’t wait to hear him say, “You were right Mom, this is a great solution”.
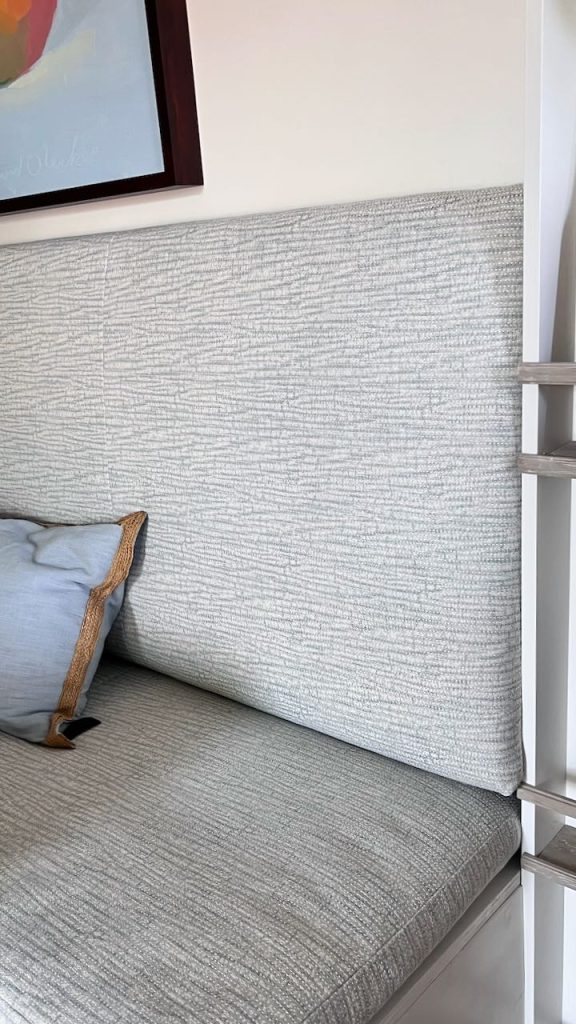
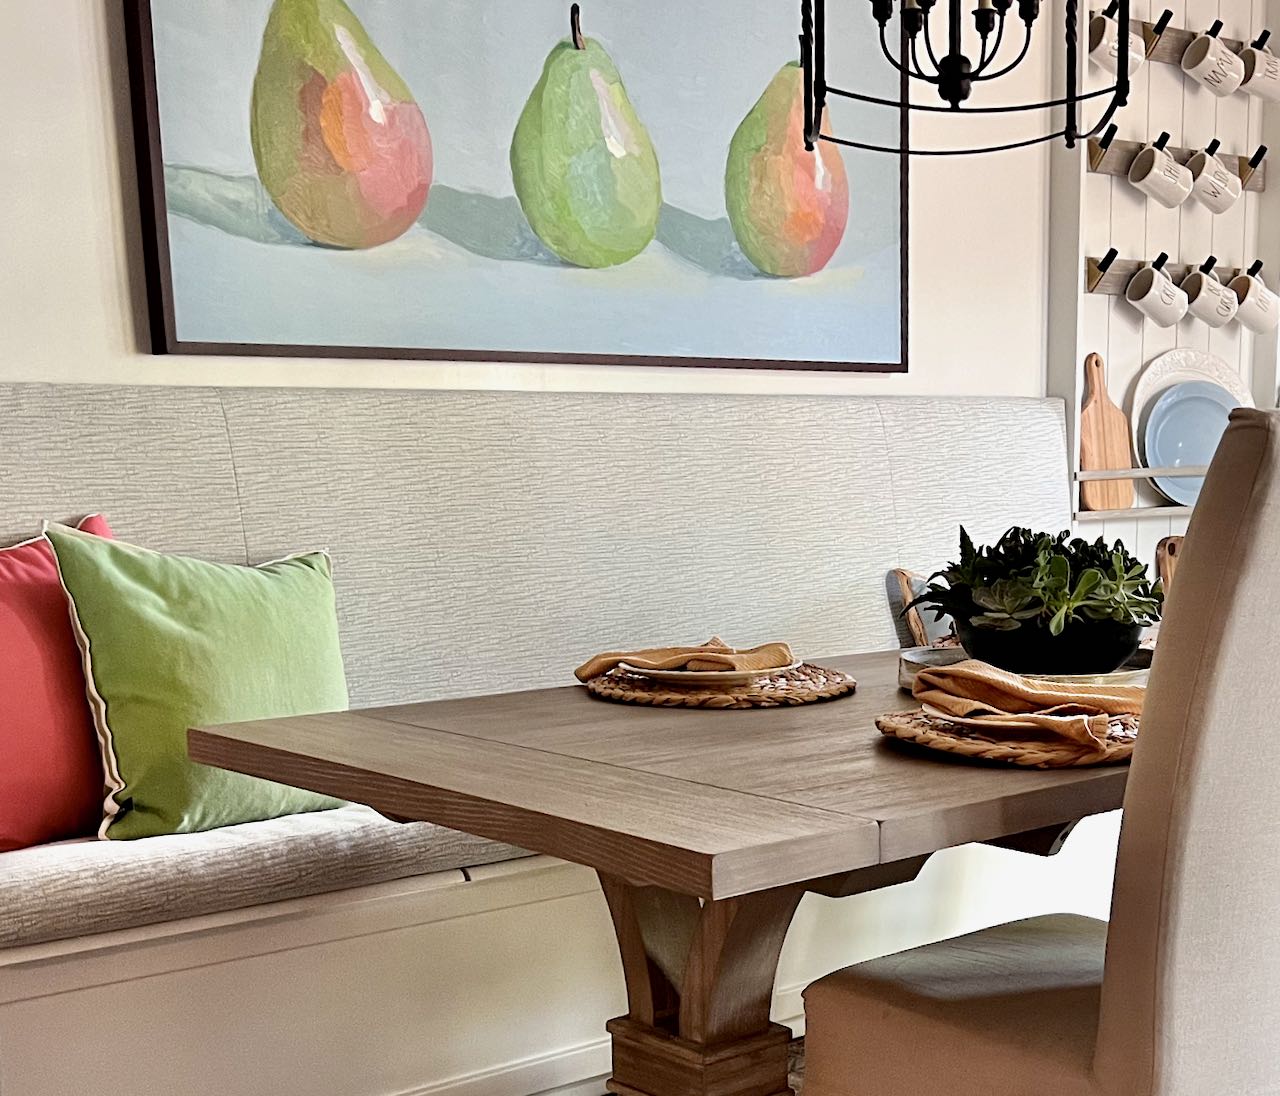
Beyond building the banquette with ergonomic dimensions and design, I made a super comfy cushion and a padded wall hung backrest with lumbar support.
And under the seat cushion, the seats lift up for valuable storage space!
I’ll be sharing all the how-to details very soon.
Then Came the Transitions on Each End (w/ Storage)
Also on Ryan’s (the architect son) gripe list about banquettes are the transitions!
Where and how does the banquette end? Abrupt ends look awkward and this poor room has been awkward since 1962.
I planned the entire wall as an intentional custom built-in.
It needed to be an addition to the kitchen that also serves the family room. Finally uniting the entire entertaining hub of the house (including the large courtyard patio that has the same brick floor).
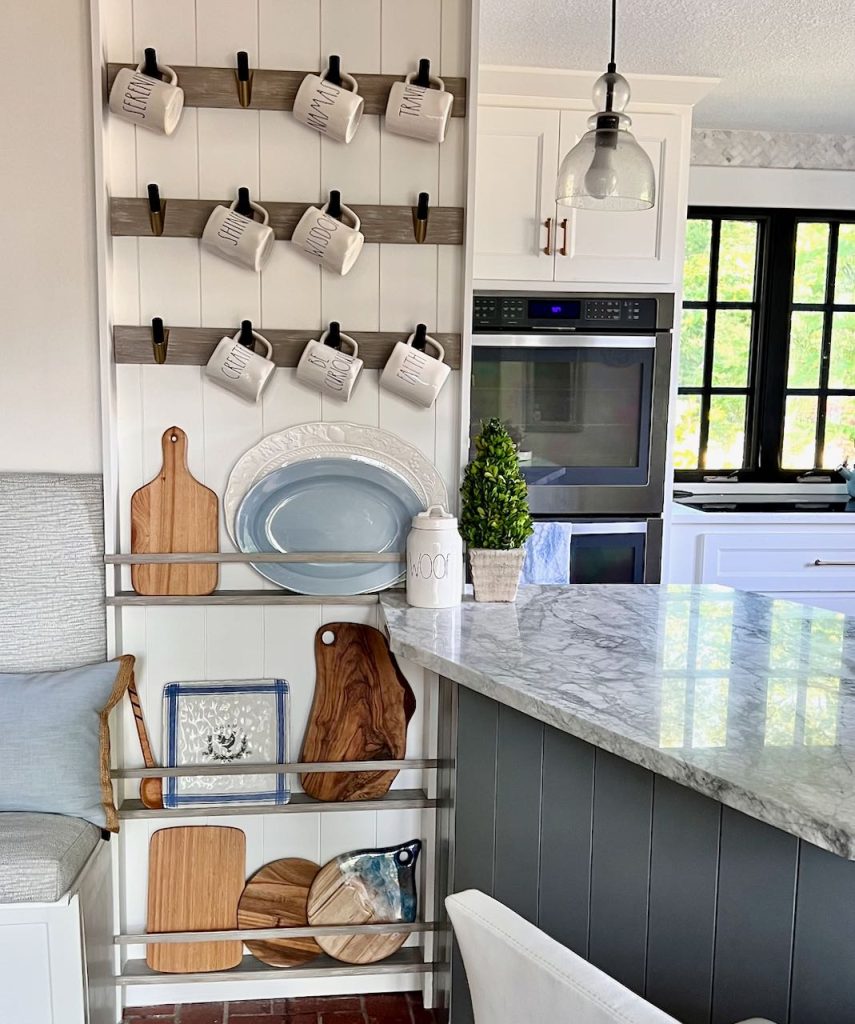
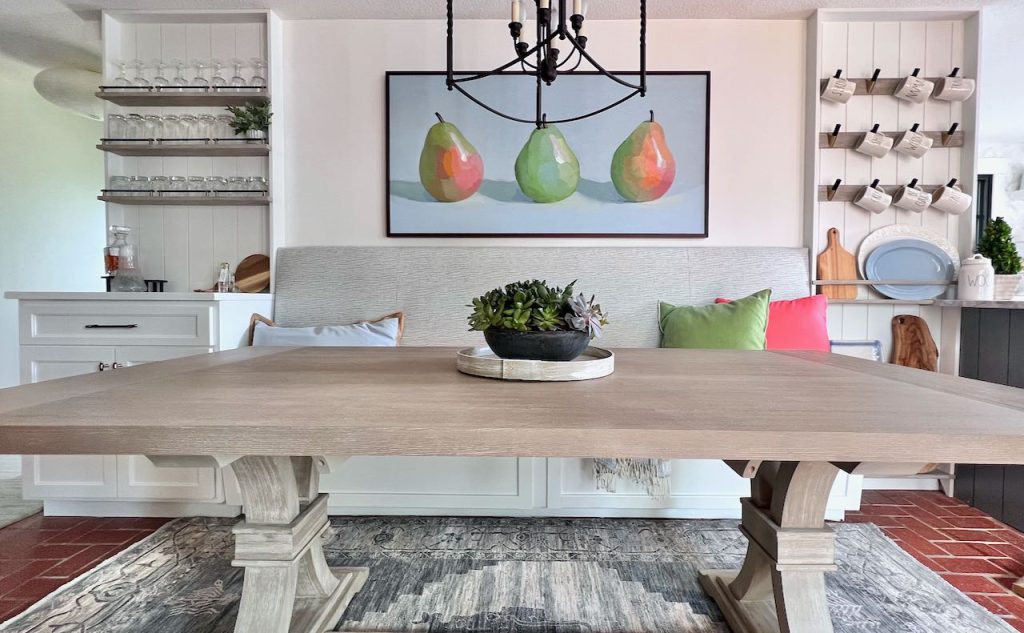
The kitchen side of the banquette has a floor to ceiling plate rack and my modern interpretation of a bottle drying rack or peg rack. (Wait till you see that hardware up close . . . happy sigh!)
I was inspired by the vertical shiplap on our kitchen island, but also this one by Nicole at Simply Aligned Home. Nicole demonstrates that a plate rack is not just for farmhouse and vintage style.
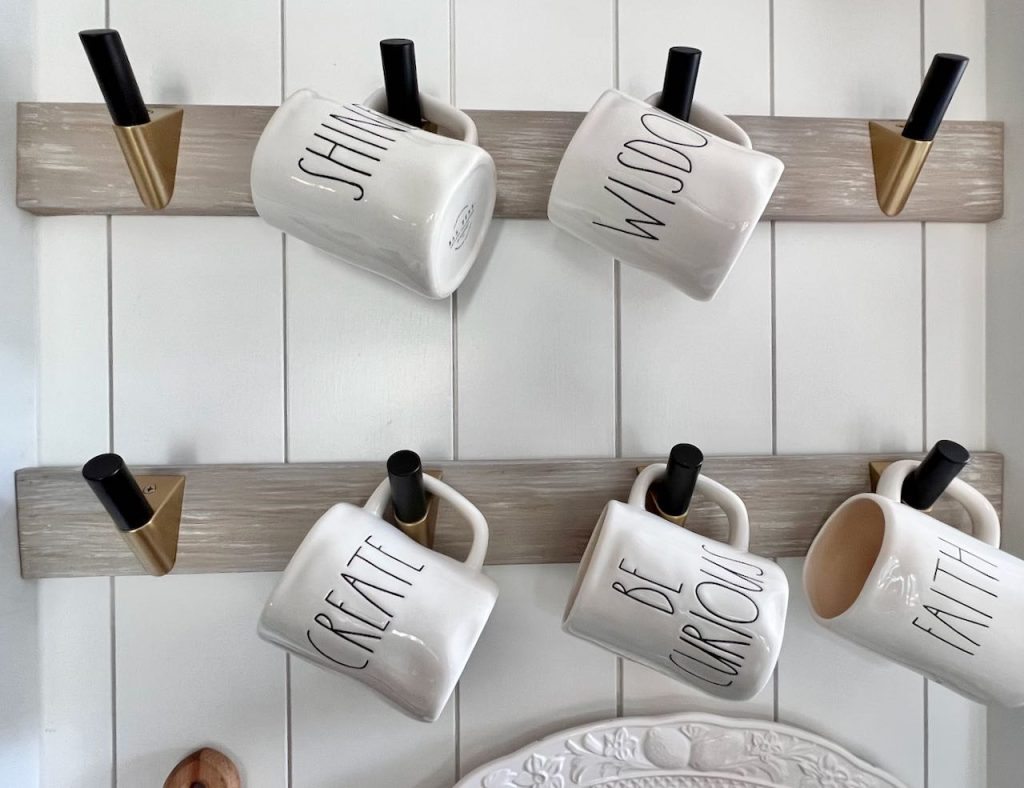
And that is when it occurred to me that if I was reinterpretting a plate rack, I could also reinterpret the function and charm of a vintage bottle rack into a modern, contemporary version.
Aren’t these hooks fabulous! They are from Amerock Hardware. I am crazy about them. You can find them here.
They work well directly on the shiplap, too. I chose to add the wood strips behind them as a way of mirroring the three glassware shelves on the other side.
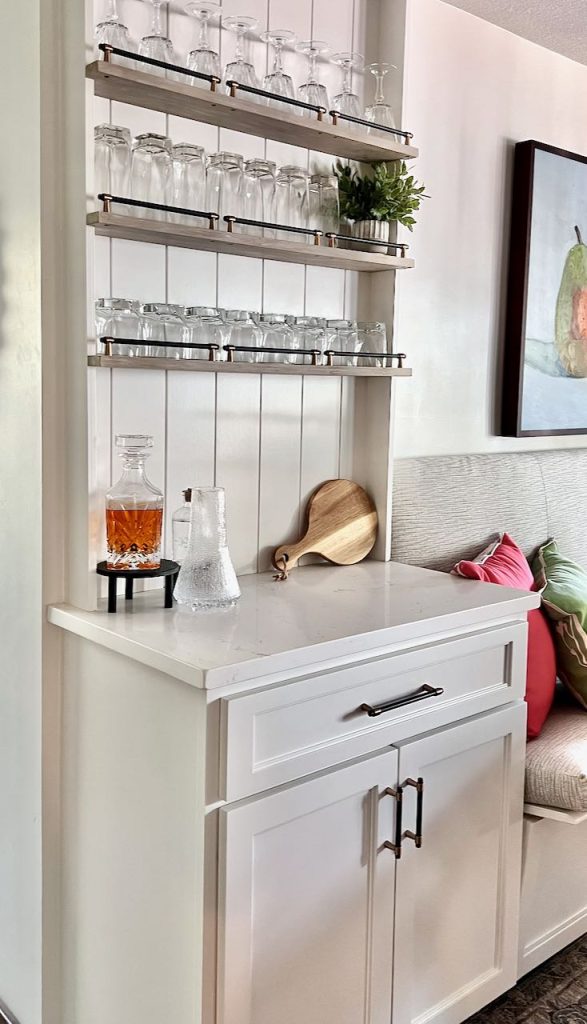
The family room side of the banquette ends with a small dry bar for beverage service.
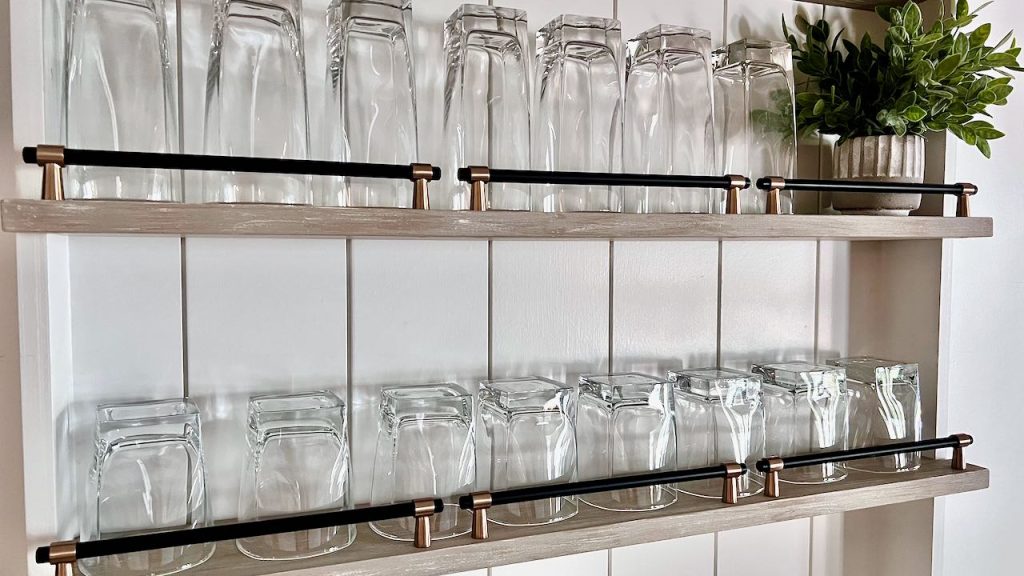
And the hardware again!!! Yes, Amerock Hardware. These are the Mergence pulls. Three of their longest (8 13/16-inch) pulls filled each shelf perfectly.
I used one of the 6 5/16-inch version for the drawer and two of the smallest (3 11/16-inch) version for the cabinet doors.
Bonus: Both transitions help offload storage from the kitchen and pantry, yippee!
QUICK PAUSE: Are you enjoying this renovation? There are so many posts and pictures still to come — be sure to subscribe so you don’t miss them:
Thanks bunches! Now back to the action —
You may have noticed that on my mood board I planned to paint all the carpentry to match the island. It looked great on paper.
But in the room, as we were constantly assessing our style and how we use this space, I knew the grey would be much too dark. I played around with a lot of lighter blue greys, but it really came down to white.
Our original goal included this space being an extension of the kitchen and service the family room too. The kitchen has white cabinets, the family room has white walls. This wall and cabinetry wanted and needed to be white. And I am so glad we listened to it. I
It feels so perfect this way.
Yes, that is a lot of cabinetry. And yes, you’re right, there is not a brush stroke to be found.

That’s because Wagner Spray Tech sent me a Flexio 3500 paint sprayer. Spraying is definitely the way to go on cabinetry like this!!! And the Flexio 3500 was light weight and easy to handle. And I truly appreciate how easy it is to clean up!
Then a Long, Expanding Trestle Table of Dreams
Why a trestle table?
FUNCTION FIRST: Banquettes require a pedestal or trestle style table!
I am shocked at the number of images in magazines and Pinterest that show beautiful rooms with banquettes or bench seating that have a typical 4-legged table. Those rooms were decorated for the magazine, not for life!!!
When the table is pulled up to the bench, if there are table legs close to the corners of the table, you have to crawl across the seat to get your legs under the table.
All along I planned to makeover a thrifted table. But after 5 months of actively searching, nothing was found that had two pedestals or a trestle plus leaves to expand.
There was one that was the perfect size and a really cool trestle style leg. But the apron and expansion mechanisms were so deep that I couldn’t sit comfortably under it and cross my legs.
If you’ve been around here for any length of time, you know that I preach FUNCTION FIRST!!! I advocate that with creative problem solving we can make anything stylish.
As we went along, we decided this room was turning out too good to compromise on the table.
We ordered our dream table, this one from ZGallerie.
It can seat up to eight comfortably! With two leaves added, we can seat twelve!!!
I intentionally wanted the banquette to be longer than the table on both ends. This makes it really easy to get in and out. You can sit and then skooch. No twisting and skooching at the same time, unless the leaves are installed.
And if the leaves are installed, and some have to twist and skooch, well they won’t mind because it means we’re having a big, old party and loads of fun!
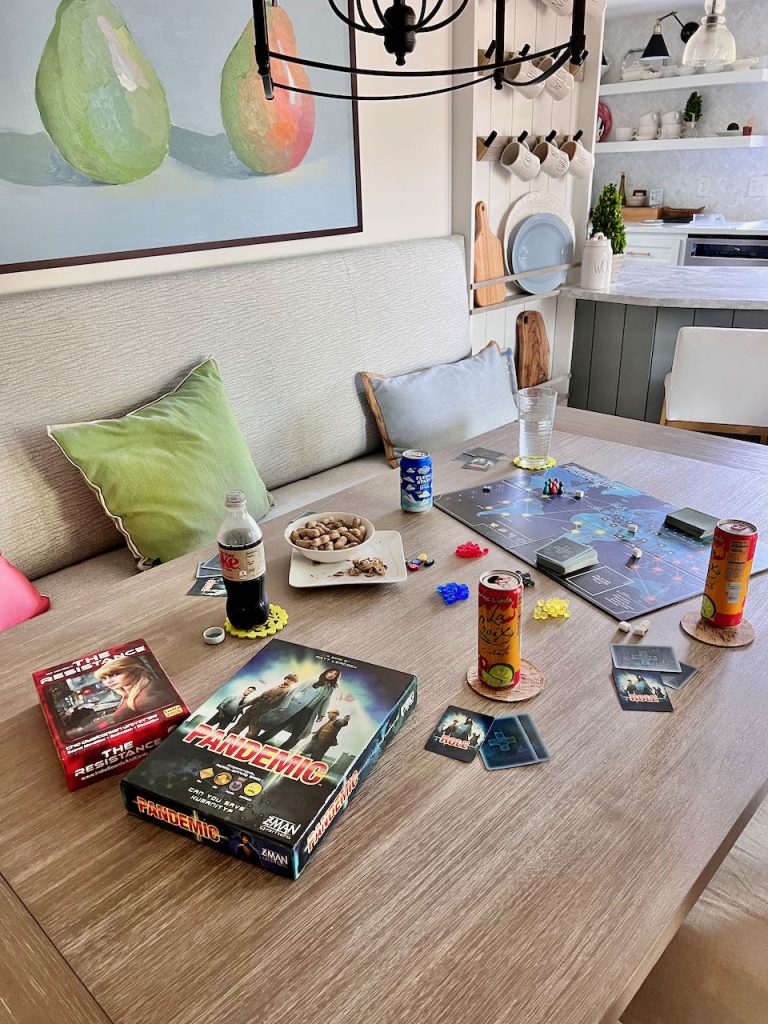
Beyond meals, it is super comfy for game time!
Sidenote: Yes, Pandemic is a favorite of ours. (and yes, we had it years before . . . ) It’s a cooperative game where we are all working together to save the world from the spread of a deadly disease. Sound familiar?
I’ve never shared our favorite games. Let me know in the comments if this is something you’d like.
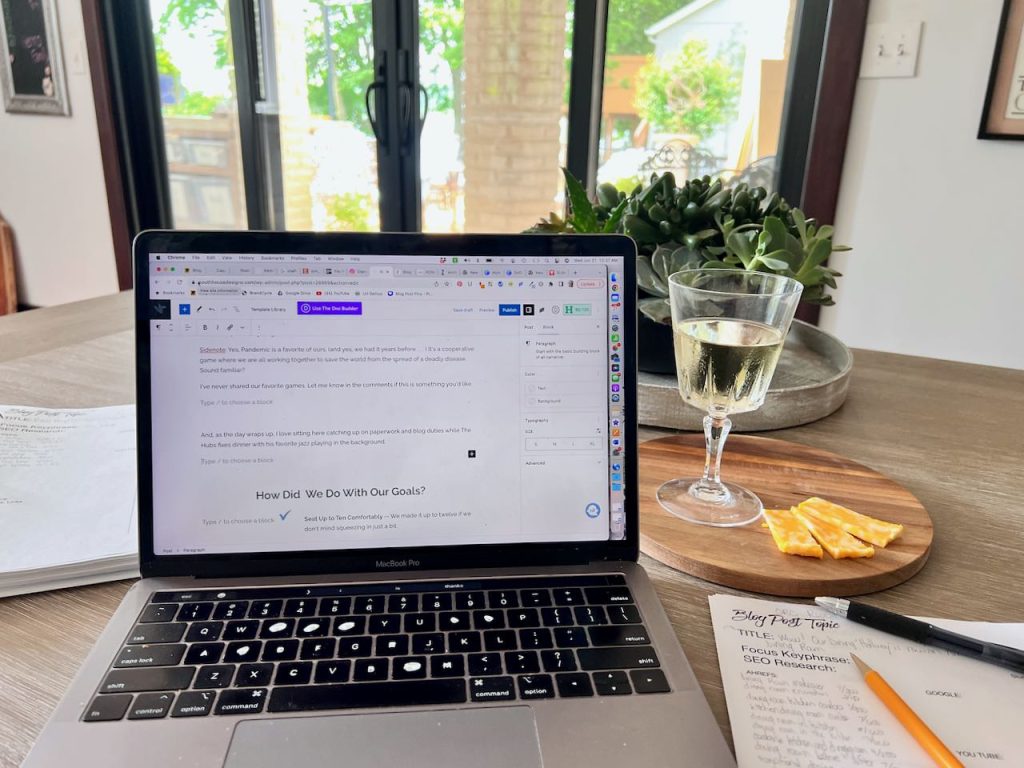
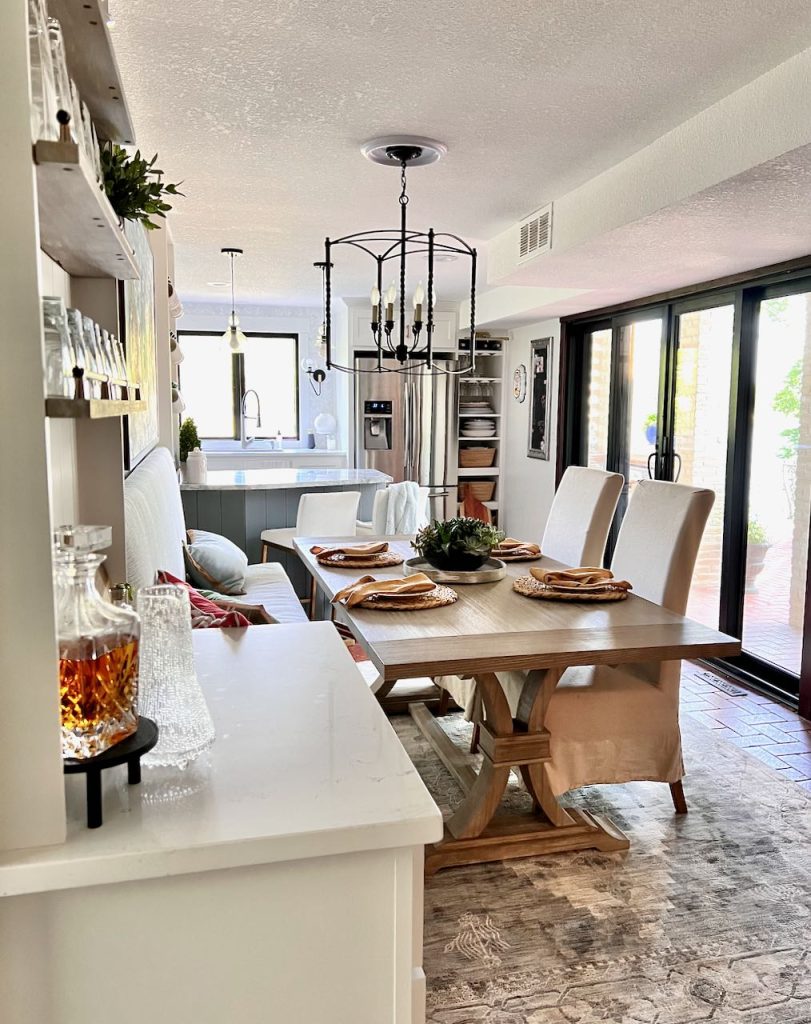
And, as the day wraps up, I love sitting here catching up on paperwork and blog duties while The Hubs fixes dinner with his favorite jazz playing in the background.
Yes, this picture is the very post you are reading right now.
And how about that plush area rug!!!

It’s from Boutique rugs, one of my great sponsors. And they are offering an additional 5% off when you use the code: SOUTHHOUSEDESIGNS.
The gorgeous rug, above, is this one. It feels sooo soft and it has all the blues and greys with just a touch of the russet color of our brick floors.
If this rug isn’t right for you, don’t worry they have such an extensive assortment that is easy to navigate with their really well-designed filters. And they are at such good prices with free shipping AND returns!!! Don’t forget to use my discount code for a bit more savings.
How Did We Do With Our Goals?

Seat Up to Ten Comfortably — We made it up to twelve if we don’t mind squeezing in just a bit.
Give the Space Purpose and Intentionality — Now, clearly a dining room, gathering space with the long banquette and long table.
Make the Space Feel Inviting — Comfy upholstery, throw pillows, bright artwork, plush area rug and a glass or mug at the ready, all say “come sit and stay a while”.
Add More Storage — Storage under the banquette is for all the kitchen holiday items and more. All the bread boards and mugs freed up even more valuable kitchen space.
Get the Alcohol Out of the Pantry — all the liquor moved from the pantry to the bar cabinet and we emptied two shelves in the kitchen glassware cabinet
I am over the moon about our transitional dining room makeover! It came together better than I had dared to dream! If you are just looking for an accent wall to update your dining room, see what we did at our daughter’s home.
If you enjoy a good before and afters, you should see our first One Room Challenge when we renovated the powder room (right next to this dining room).
Blog Posts For Each Component of the Makeover
The Bad, The Goals and The Ugly, Plus the Plan
The Dining Rom Makeover Reveal (You’re Here Now)
Building an Ergonomic, Comfortable Banquette
DIY Padded Wall Hung Backrest and Bench Cushion
Small Cabinet Bar with Open Shelves Above
I’d love to hear your thoughts? Did I miss something you would have done? Do you have a question I missed in these posts?
Please consider sharing this post with your friends.

You can see a visual slide show of our new casual dining room right here.
I so appreciate you being a part of my growing little community! Hope to see you back again real soon.

Your dining room looks great. What a beautiful transformation.
Thanks so much Renae! We am still pinching myself! I couldn’t be happier.
Hi Diane,
You were right!! It looks awesome. Love the table and I love banquette seating as well.
Yall did a great job, everything looks very inviting and very efficient as well.
Happy Eating, gaming and blogging!!
Blessings,
Nellie
So cool and calm! The rug is lovely! All the dust and work was worth it 100%.
Oh you’re so sweet!!! We are loving it. Finished last night so we haven’t had out first meal on it yet. But our lake besties are coming tomorrow night to celebrate with us.
Diane – WOW!!
It turned out so good. You ticked all of your boxes and have a stunning new space. I love it!
We are thrilled. I’m so glad I went with the white — thanks for weighing in on that.
WOW – excellent!! I totally DO love before and afters, and this one is fabulous!! Thanks for sharing all the inspiration, and here’s to lots of great dinners and parties and games!
Thanks Barbara!!! We are so ready to be able to host a boatload of friends in comfortable style! Tonight’s the inaugural dinner party.
That is an amazing transformation!
Awww Shucks! Thanks Susan
GreaT job Diane. The dining room looks fantastic. I love the table and your beautiful cabinetry. This was a lot of work, and it shows.
Your space looks so good! What a great transformation!
Thanks bunches Kim! I can’t believe it is finally done and how much we love it.
Wow! Everything turned out beautifully! You rocked this challenge. Love how you used the drawer pulls for the shelf edging. We’re planning to share this in our Sunday roundup!
Thanks so much Anne! I love all the hardware so much. It’s the great accessories that make the outfit!
WOW Diane this looks amazing! What an incredible transformation! Sharing on our weekly round-up Sunday.
Thanks so much AnnMarie!!! And super thanks for the share. Really appreciate it
Absolutely beautiful! It’s such fun to see a complete before-and-after. I like the way you let the house talk to you and then work within its constraints to make a space both beautiful and functional.
Thanks so much for joining the Grace at Home party at Imparting Grace. I’m featuring you this week!
Oh Richella! Thank you so very much. I truly appreciate the feature and your kind words.
Yess! You are right, the house sometimes knows best and we need to listen to what it wants and needs.
What an amazing transformation! My brain doesn’t work like yours and couldn’t have thought of this. I love every decision you made. Thank you for sharing it with us on Farmhouse Friday too. Featuring it tomorrow. pinned
Oh Cindy! You are so kind!!! It was really a matter of analyzing the problem areas and then employing what I am most passionate about — creative problem solving.
Thanks so much for the feature. I truly appreciate it!!!
It looks STUNNING, Diane!! What an amazing transformation..the room doesn’t even look like it came from the same spot!! That built in dining is fabulous! Thanks so much for sharing!!!
Diane, you did an amazing job with this space!Thanks for pointing out the benefits of a pedestal table in this kind of situation. The table legs would be a huge pain! Well done my friend!
That so kind of you Cindy! Thanks for stopping in. I really appreciate your comments.
It’s genius!! I have the same problem in an old house I am remodeling right now for a bunch of college kids. Can I ask what measurements are of the room?
Hi Jackie, so glad you found this. It sure has solved a world of woes for how our family lives and shares time in this house!
The space is a 7′ 10″ across and 13′ 7″ long.
It hope that helps! Don’t hesitate if you need more specifics or help.
That’s just awesome! I am in the middle of building and have deliberately added a 7ft 4in wide hallway which is to be our multi-purpose “room” – including using it as a dining room when we have a full house. I’m so happy to see that the width will work with a banquette and a trestle table.