
How to Make the Best Mug and Plate Rack Wall
The function and charm of plate racks and bottle racks is not only for farmhouse style. See how to custom built racks can be fresh and modern.
A wall plate rack or platter rack can be a great way to add efficient storage and also bring your personal style to your home whether on a kitchen wall or in a dining room.
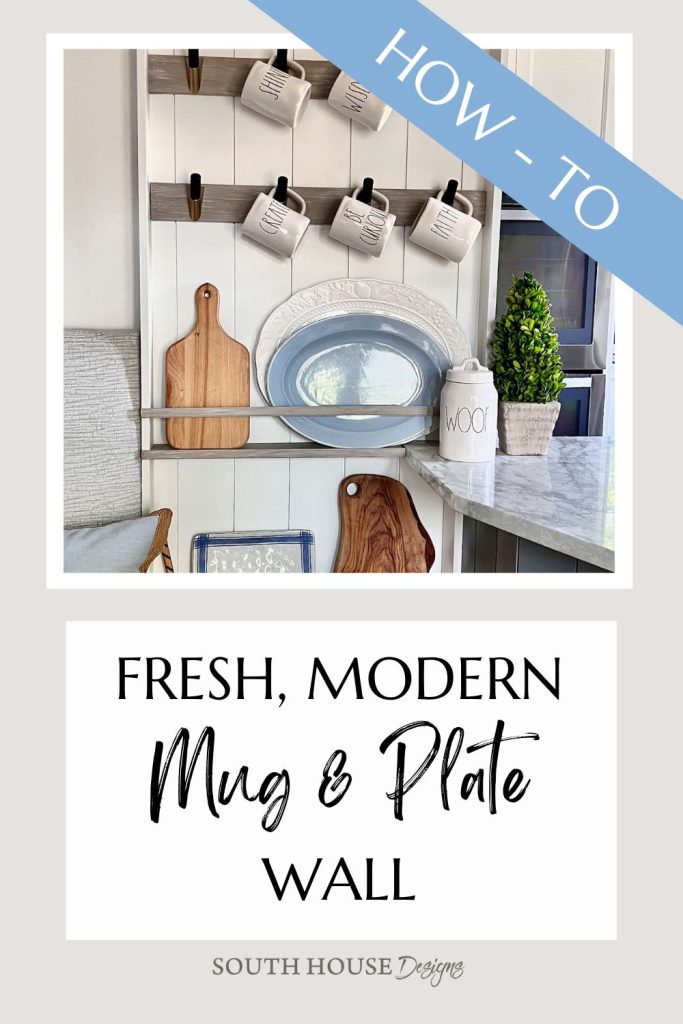
Add a mug rack for your favorite mugs, in my case my Rae Dunn mugs, and you’ll add even more storage and style.
A wall-mounted plate rack and farmhouse style mug rack is nothing new in the world of cottage, vintage or farmhouse style.
By I’m here today to share how, with some minor style changes, that same storage advantage and personality display can work in many other decor styles too.
I’m a farmhouse and vintage fan, but they just don’t work in our current home. Our house is Mediterranean style.
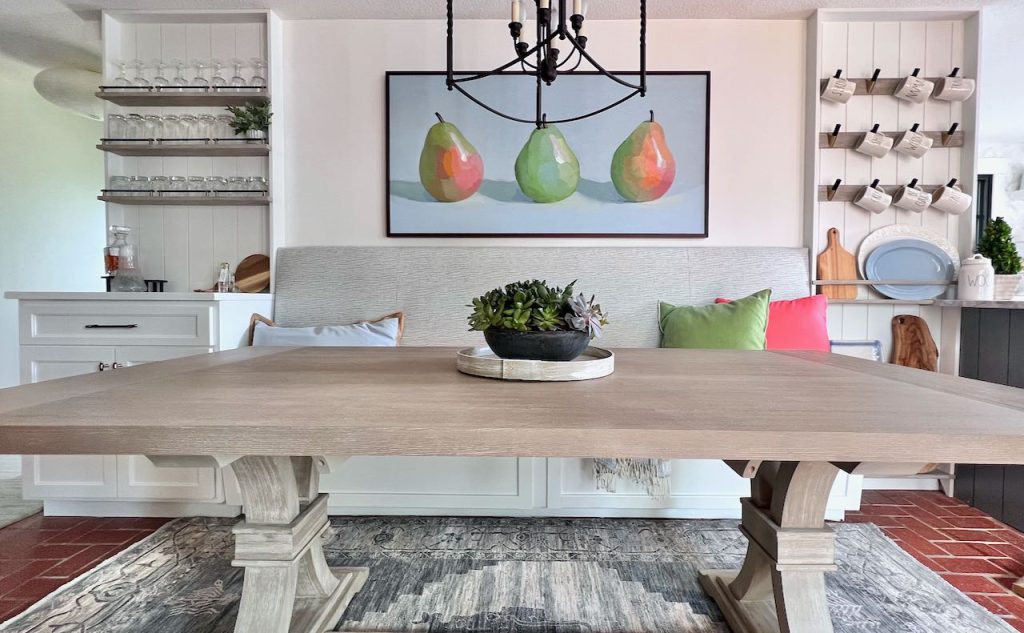
We desperately needed to rework our dining space. I hesitate to call it a Dining Room as it really was more of a wide hallway connecting the Kitchen and family room that wrap two sides of a brick courtyard.
This makeover was our recent entry in the One Room Challenge. You can see the starting point right here. And then, Spoiler Alert: the reveal is here.
We had several goals for this makeover:
- Add seating while improving traffic flow
- give the space purpose and intent
- Be an extension of the kitchen, while also serving the family room
- Add storage space
- make the space comfortable and inviting
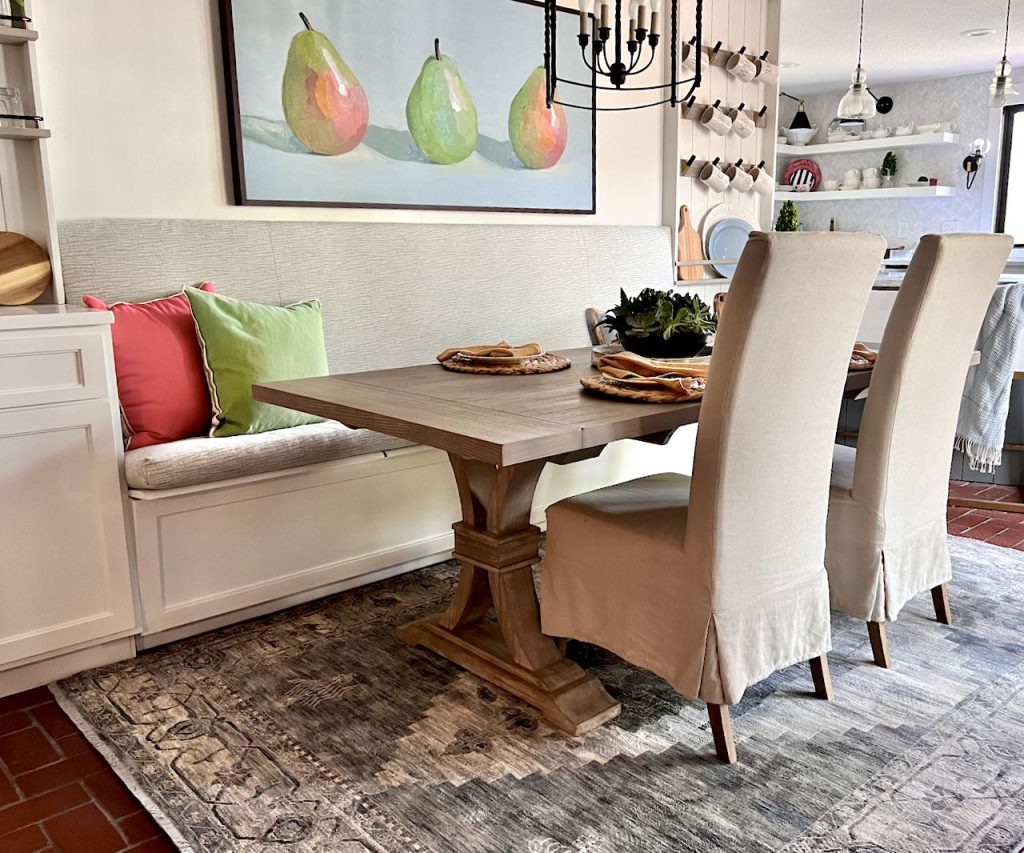
For the seating and traffic flow issues, we opted for a custom built-in banquette with a new long trestle table. (Tutorial to come — stay tuned!)
Once that was determined, I knew I had blank wall space on each side of the banquette.
I wanted to extend the built-in cabinetry to fill the wall giving the space purpose and intent while also eliminating the awkward transitions created when a banquette just ends suddenly.
I am ALL ABOUT function first — and then we make it stylish!!!
So the ends of the built-in need to add storage and make it feel like an extension of the kitchen and also the serving needs of the family room.
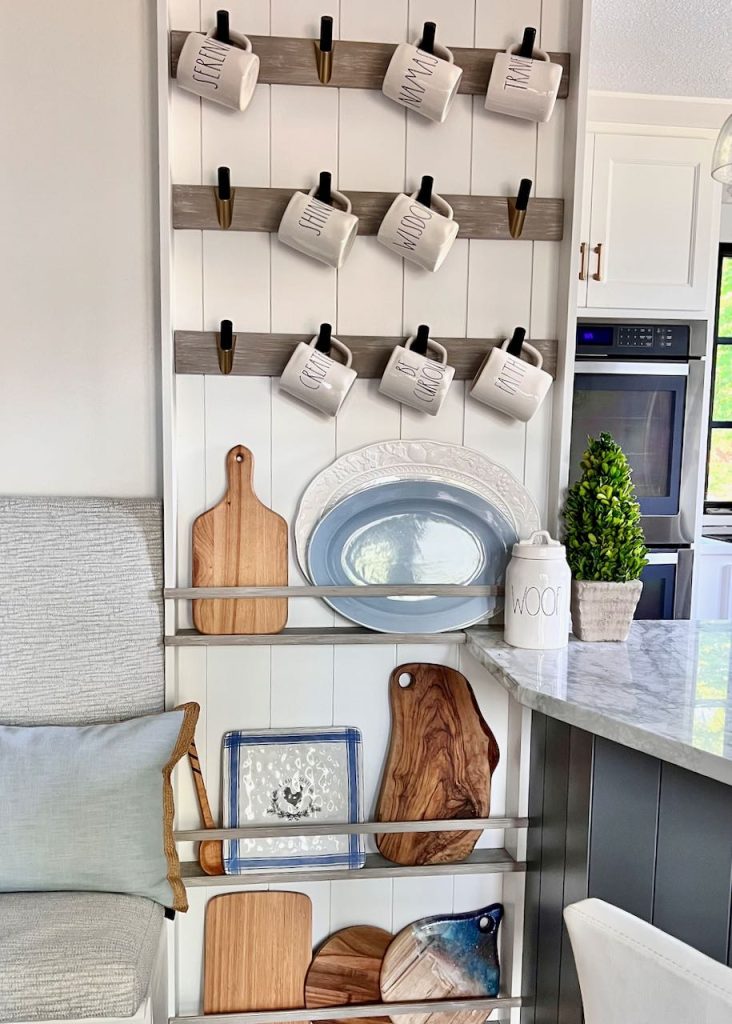
On the kitchen side, whatever I would add needed to be shallow so it would not interfere with the bar stools at the kitchen island/peninsula. This would be the perfect spot for the diy plate rack I always wanted for my charcuterie boards, bread boards and a large platter or two.
However all the ones I had seen didn’t seem to fit our aesthetic. That is until I saw Nicole’s plate rack at Simply Aligned Home.
Once I saw hers, I knew I could make it work in our home, with a more sleek, modern style.
Our kitchen is small with no upper cabinets to keep it light and airy feeling! Chunky coffee mugs do not stack well, so I’ve had to devote the top shelf of precious little cabinet space to our mugs.
It would be perfect if I could add a mug rack above the plate and platter rack!
Remember, I’m a function first evangelist! So now I just need to make it work for our style.
I’m rather taken with the clean lines of vintage bottle drying racks that have been used lately for mugs. This took me in the direction of a metal mug rack.
Having one custom made to fit our space was not budget friendly. Cup hooks and s hooks were not what I was after. Shaker pegs were not the right look. I wanted a sleek, stylish metal hook.

Once I had that narrowed down, with Amerock Hardware as an amazing sponsor, it was easy for me to find the perfect hardware. They have such an incredible selection of high quality hardware!!!
Now the kitchen side of the banquette will have much-needed wall storage, all with great style.
And you can do this too, adapting just as I did for the perfect style to match your home and family’s style. Follow along and you’ll see.
Blog posts for all the other components of the makeover are linked towards to end of this post
Can we catch our breath a minute while I ask if you are enjoying this project. Please subscribe so all my. projects will come straight to you. You decide how much is right for you:
Thanks Bunches! Now back to the DIY mug and plate wall.
How to Build Your Own Plate and Mug Wall
Your supplies will vary based on the style you choose. But this is what we used.
Materials:
- Shiplap, hung vertically
- 1 x 4 pine, for outside frame
- 1 x 4 pine, for shelves and behind hooks
- Trim, for front of shelves and shelf rails
- Hooks, I used these from Amerock
- Paint or stain of choice
Supplies:
- Compound miter saw, this is mine that I love! This one is great too, just a bit smaller.
- Circular saw with jig or table saw, If I didn’t have my Dad’s old one, this is the one I would buy.
- Brad Nailer, with brads, this is mine that I love!
- Drill with Phillips drill bit or screwdriver, this is the set I have and love them!
- Stud finder, I need a better one. This is the one I want, moderately priced and highly rated>
- Level
1) Backdrop:
I used vertical shiplap for our backdrop because the adjacent kitchen island/peninsula is backed with vertical shiplap..
Initially, I planned to paint the island and the entire new dining room cabinetry the same dusty blue color so this would read as one piece. But as we got further into it, the wall of built-in cabinetry really wanted/needed to be white like the rest of the kitchen.
DESIGN TIP: It’s best to start with a fully flushed out plan, but even better to be flexible to pivot and adjust midstream.
Mark your stud placements. Measure for your backdrop carefully. Be sure to subtract the width of your framing wood for around the outside edges.
The framing needs to sit outside the shiplap to best attach to the shiplap.
Measure and calculate again.
Now, cut your backdrop based on your wall’s calculations.
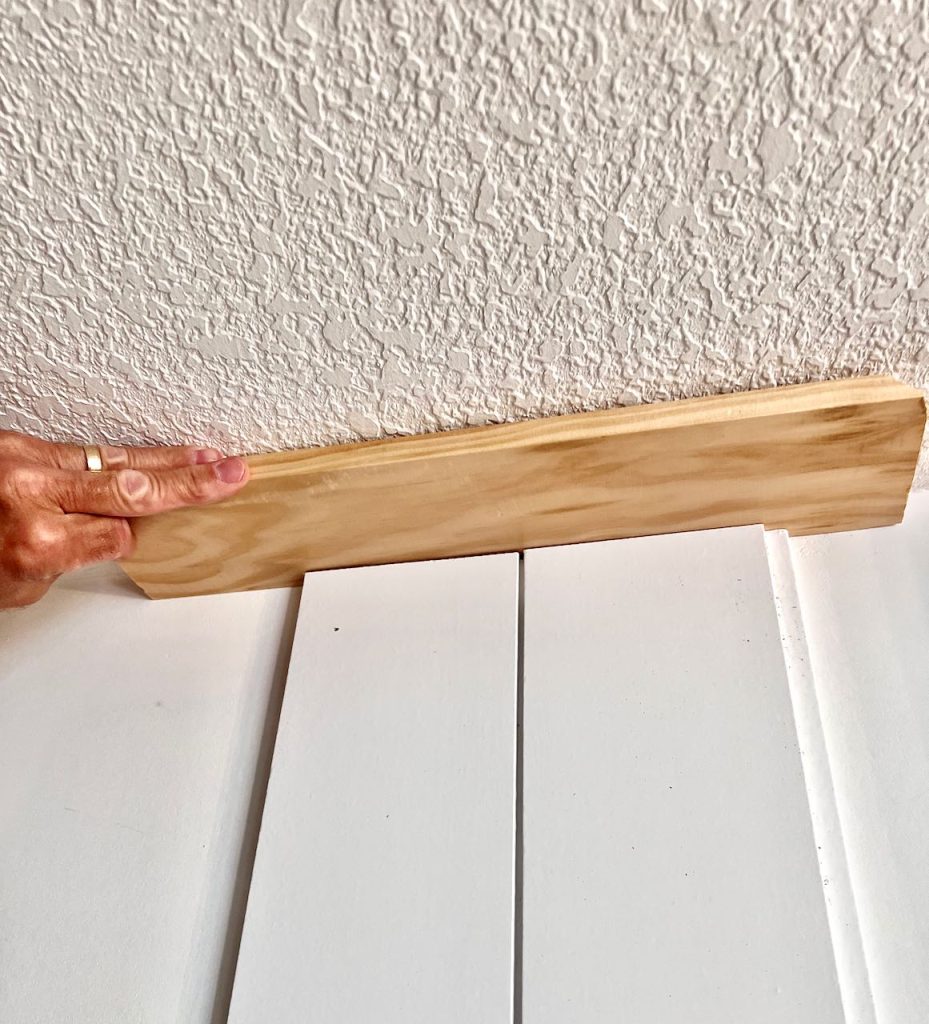
HINT: Before nailing, hold in place and fit a sample of your frame wood around the edges to make sure the cuts and placement is correct.
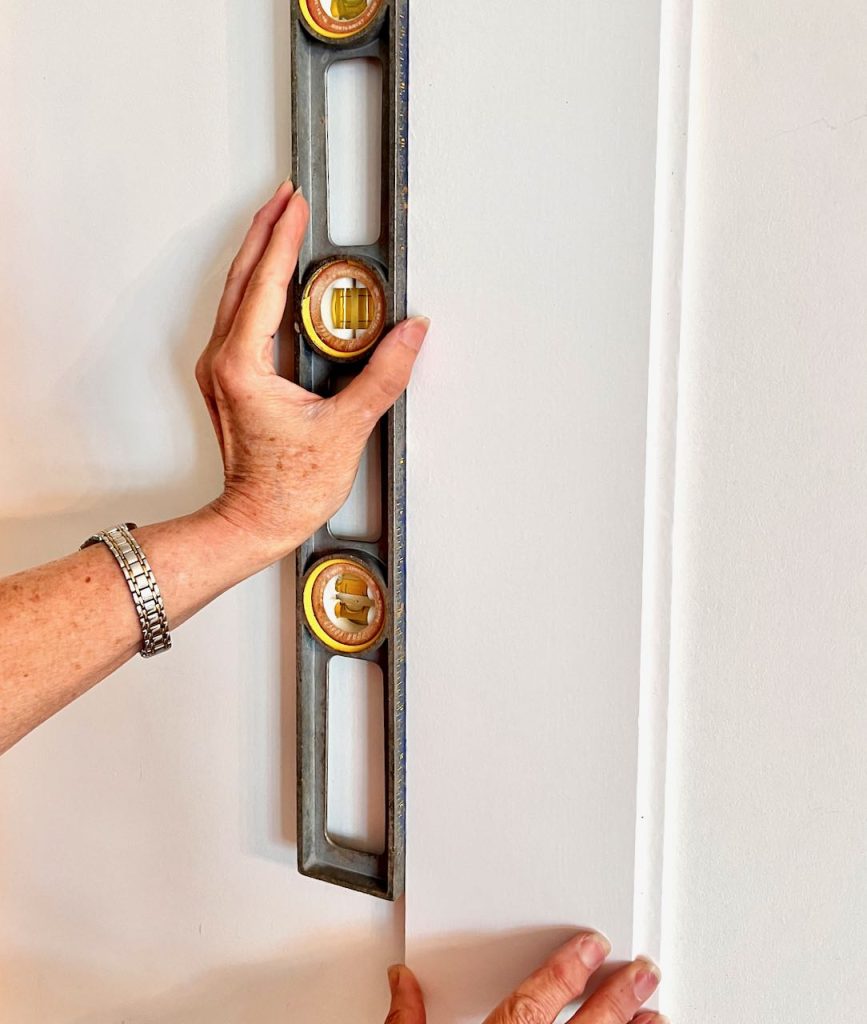
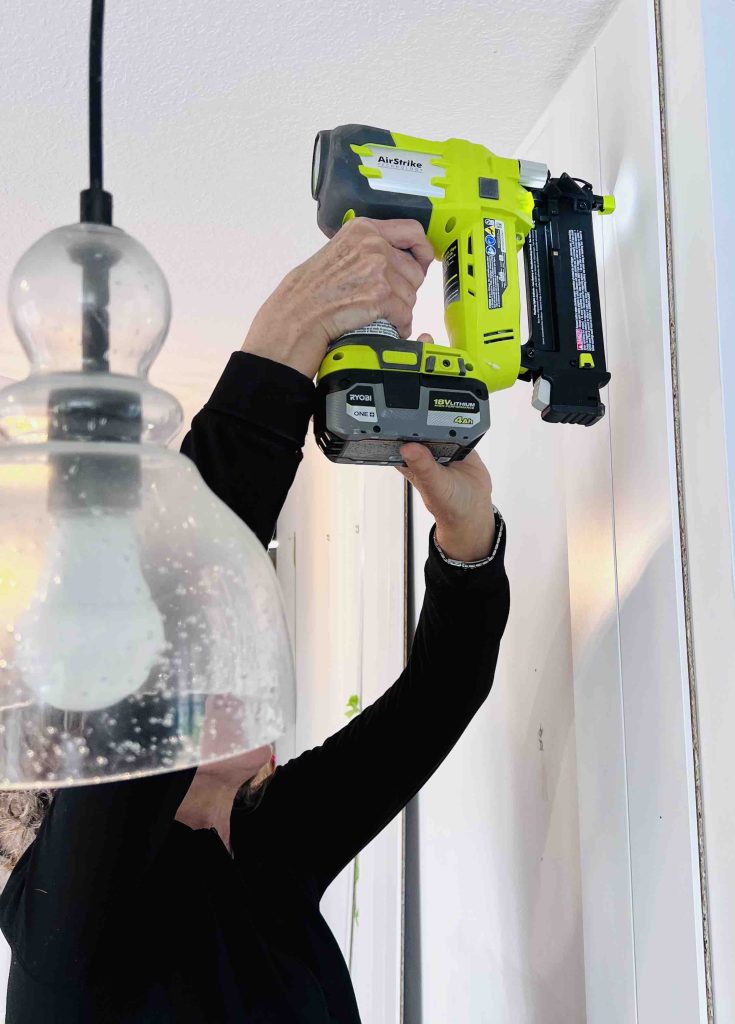
Check with a long level to make sure you are truly vertical. Then attach with brads using your nail gun, hitting studs as much as possible.
If it all lines up, and it’s all vertical, hammer away!
HINT: Transfer the stud placement markings onto painters tape so that you have them later when installing the shelves and hooks.
2) Frame:
Measure and measure again. Then cut your framing wood to the proper length.
I really wanted to use this project to challenge myself to up my building game. So I cut miter corners for the frame at the top.
I attached the sides first by nailing into the side of the ship lap. Then at the top, I also nailed through the mitered corners towards the front to hold everything tight. Later, once the banquette was built (hang tight, that post is still to come), the left side was also nailed into it for more stability.
NOTE: If your shelves, rails and hook boards are going to be a different finish from the cabinetry. Use wood filler, sand, paint/stain now and then proceed with steps 3 & 4.
3) Shelves and Rails:
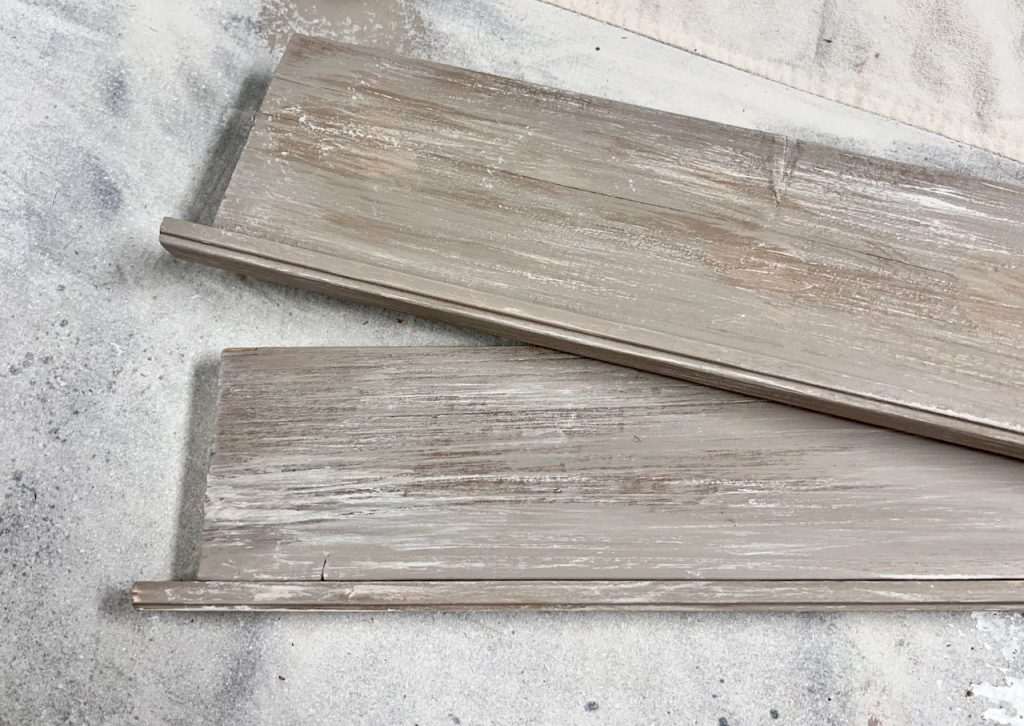
Most plate racks use dowel rails. But I wanted a fresher more modern take so I chose flat trim with just a bit of detailing.
If you go with the traditional dowel rods, you’ll drill a hole sized for your dowel in each side and either wood glue in place or add a little wood cap to the end of your dowel so it can’t slip out.
I wanted my shelves to sit fully inside the frame, but to have a trim piece extend across the front of the frame to give the illusion of the shelf wrapping around the frame. Two reasons: 1) I liked the clean look of all the horizontal lines being the same and 2) this will better mimic the shelving of the dry bar that will be on the opposite end of the banquette.
So I decided to finish the front of our shelves with a piece of trim that is slightly wider than our shelves are thick. I attached this trim piece to the front of the shelf even at the bottom and extending a bit at the top to provide a tiny lip. I repeated this same trim as the rail for each shelf.
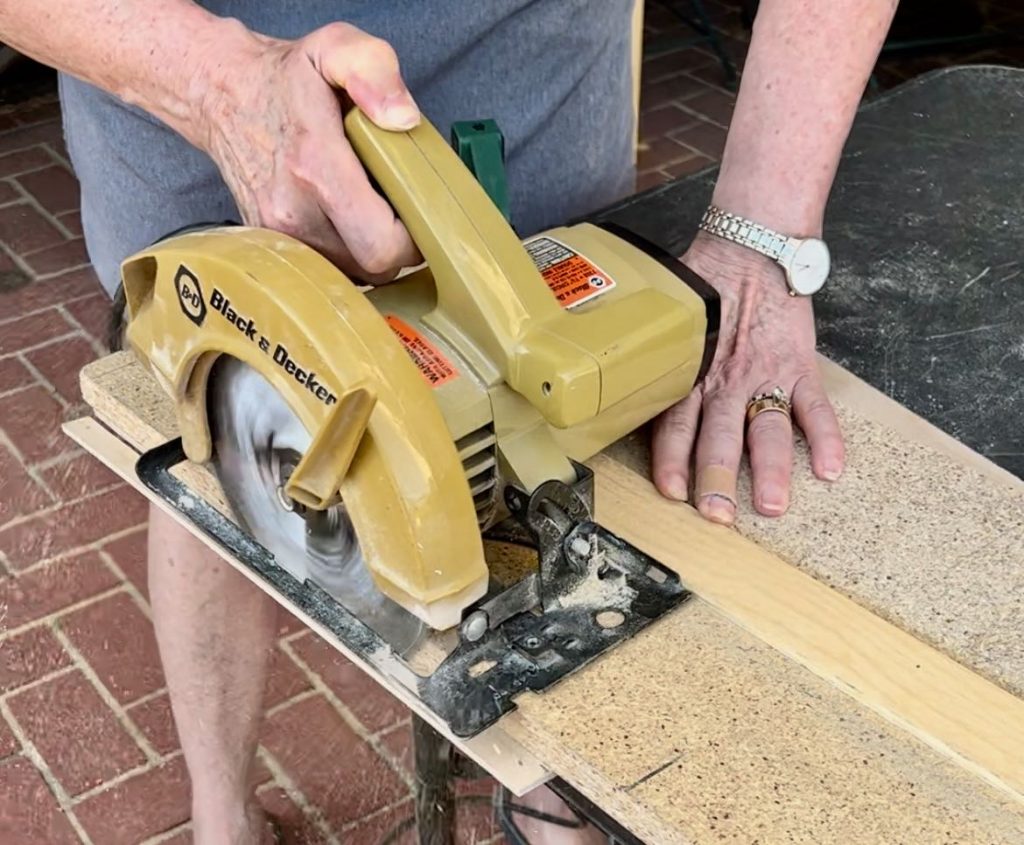
Because the shelves need to sit inside the frame, we needed to trim off the thickness of the ship lap. If you are doing the same, use a table saw or a circular saw with a jig, like above (another blog post coming on that soon).
I determined my shelf height and then measured across the inside of the frame for the shelf, and measured again. Then I measured from the two outsides of the frame for the front lip, and measured again. Have you caught on to this recurring theme?
And here, you may want to also check the inside corners. Are they a true 90-degrees?
Ours on the left side are slightly off 90. So when I cut the shelves, I cut the left sides at 93-degrees and they lined up perfectly.
If your walls are wonky or your boards are slightly twisted, this can happen. If you prefer, you can always caulk any gaps.
Once all the shelves and rails are cut, sand them and attach the rails to the front of the shelves as described above. If your plan it for these shelves and rails to be a different finish than the backing and frame, don’t install them until you have them painted or stained.
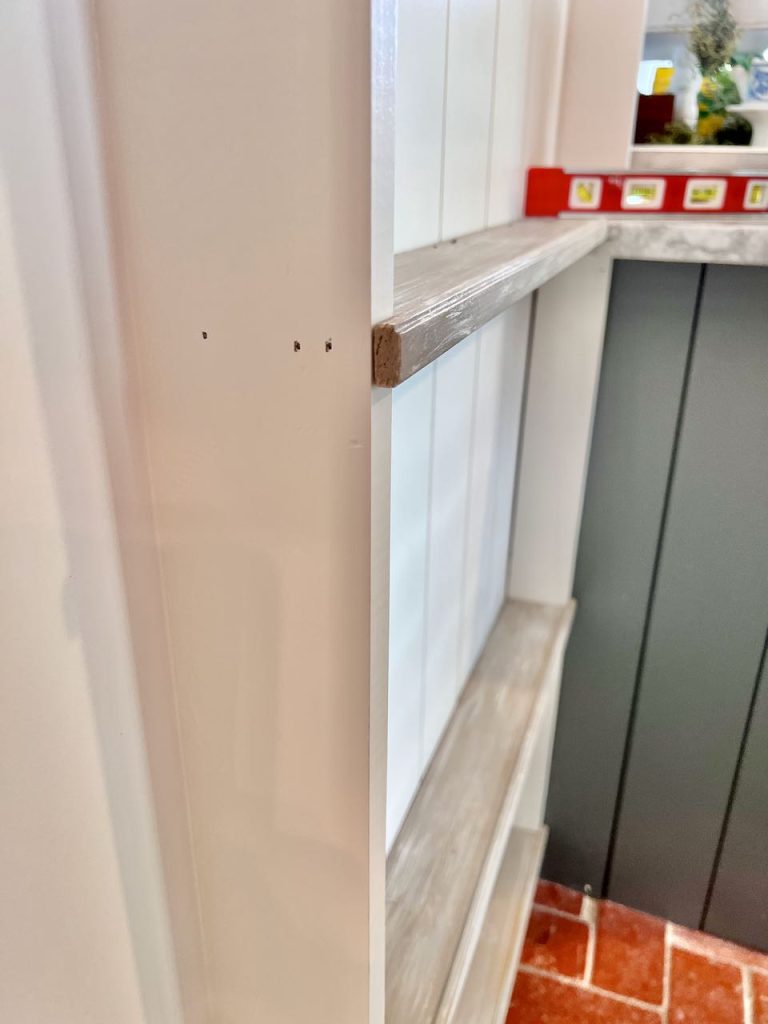
With a level on each shelf, attach them by nailing through the outside frame. You can also use a brad at an angle attaching the shelf to the back.
TIP: If your shelf if above eye level, nail at an angle from the top, down into the back. If below eye level, nail from the bottom, up into the back.
Notice, our top shelf is level with the kitchen peninsula. So there is no way to attach to the side. Instead, we drop nails from the bottom up into the back.
4) Mug Hooks:
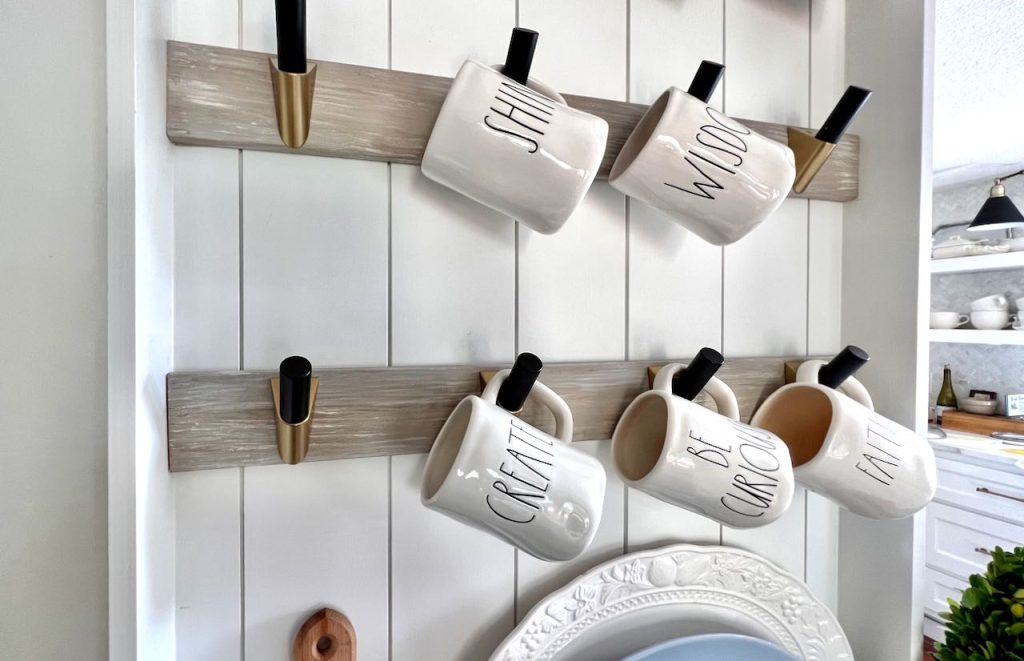
I wanted three rows of hooks for my mug rack diy to mimic the three rows of glassware I have planned for the family room side of the banquette. This is for continuity and balance.
DESIGN TIP: Remember, for good design, strive for continuity and balance! This does NOT mean absolute symmetry and mirror images.
My plan included installing the mug hooks on three boards faux painted to match the other shelving (and coordinates with our new table). This is another way to tie the two flanking floor to ceiling display walls together.
The shelves above the dry bar are painted like these boards and will have hardware that coordinates with these hooks.
At the height of each row, measure the width inside the frame at the back wall, and measure again, double checking your first measurement.
Cut your boards to that length.
Paint or stain your boards.
Determine the placement of your hooks on these boards. Make a template so they are all in straight lines
Mark for placement, double check! Be sure the hooks are level across with each other, but also vertical individually.
Install your hooks on the boards, then attach to the backing to the wall. Using a level to make sure they are level.
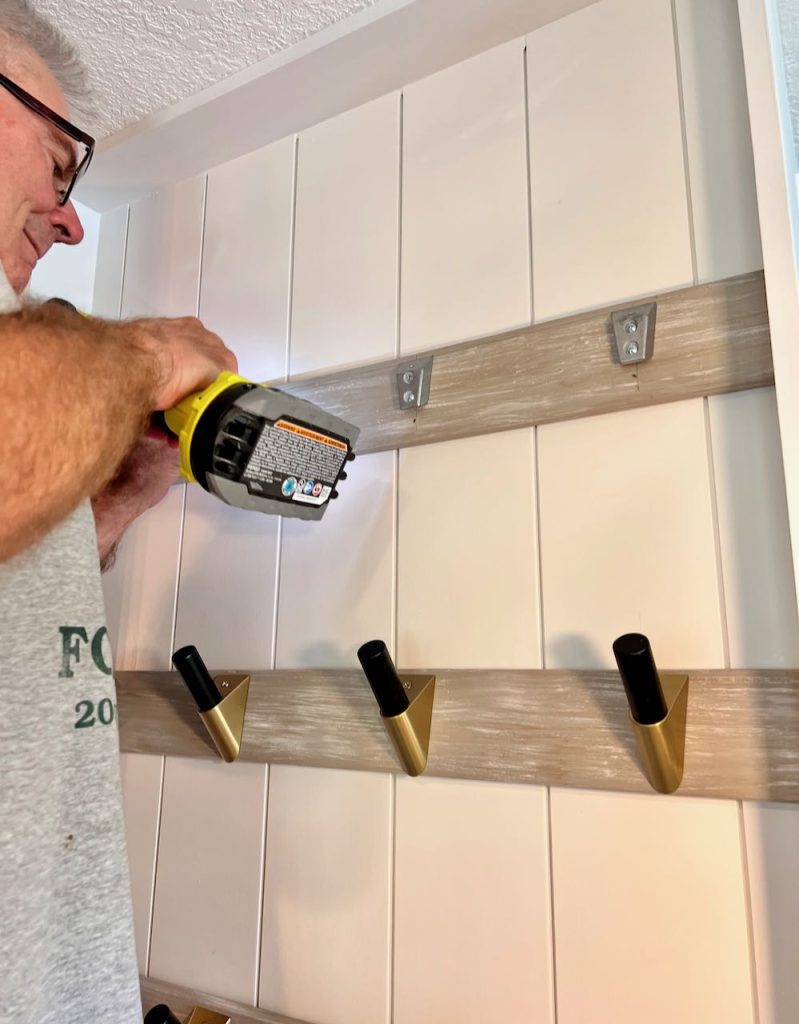
In the picture above it looks like we are installing the hook when the board is on the wall. No, we installed the silver brackets while they were laying down. It is so much easier this way. Then we brad nailer the boards in place, with brads right below the brackets. This way the hooks will cover the brads.
And then we added the those actual gorgeous hooks as the very last thing.
The Fun Part —
Time to break out and display some of your favorite things.
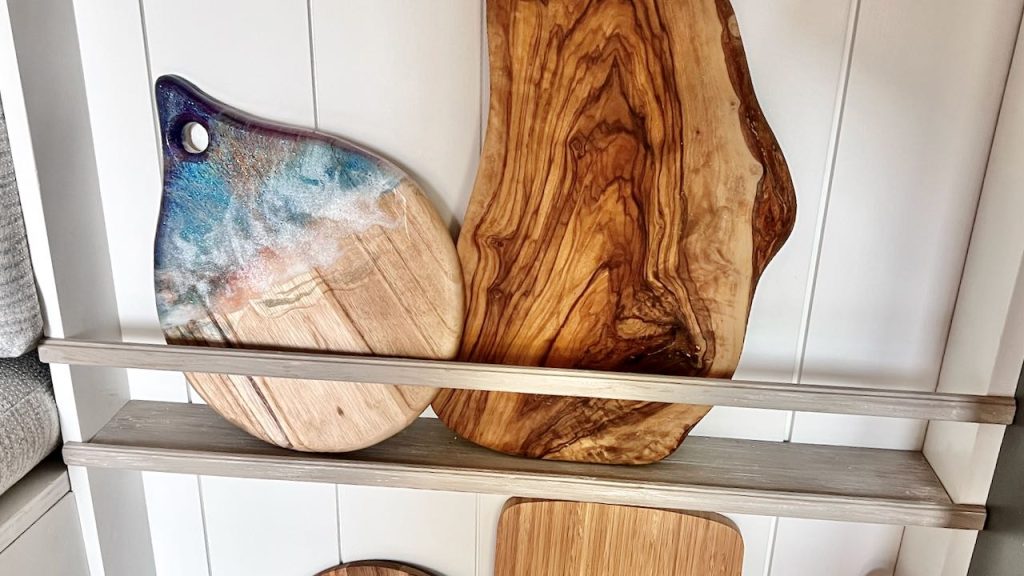
You can fill the plate shelves as much as you prefer or go minimalist. I tend to be rather middlist.
Your wall plate rack is a great place to store and display:
- charcuterie boards
- breadboards
- cutting boards
- rolling pins
- large platters
- cookbooks
- shallow bowls
- even fun art
And your mug rack can be for more than mugs, depending on your style:
- Rae Dunn mugs of course
- tea cups
- charming linen tea towels
- small seasonal wreaths
- bundles of drying herbs
- a small basket with handles
This custom built-in mug and plate wall has been the perfect solution! Actually 1/3 of the perfect solution to our dining room/kitchen/family room dilemma.
Blog Posts For Each Component of the Makeover
The Bad, The Goals and The Ugly, Plus the Plan
The Dining Rom Makeover Reveal
The Mug & Plate Rack Wall (You’re Here Right Now)
Building an Ergonomic, Comfortable Banquette
DIY Padded Wall Hung Backrest and Bench Cushion
Small Cabinet Bar with Open Shelves Above
And I’ve posted a short video on You Tube.
Please leave your thoughts and questions in the comments below.

Truly amazing my friend! You did a great job. I love the details of the plate rack and your dry bar as accents on each end of your banquette.
Thanks Wendy! It sure was fun to dream up something so “out there”and have it turn out so perfect for our room! Makes such a difference for entertaining!