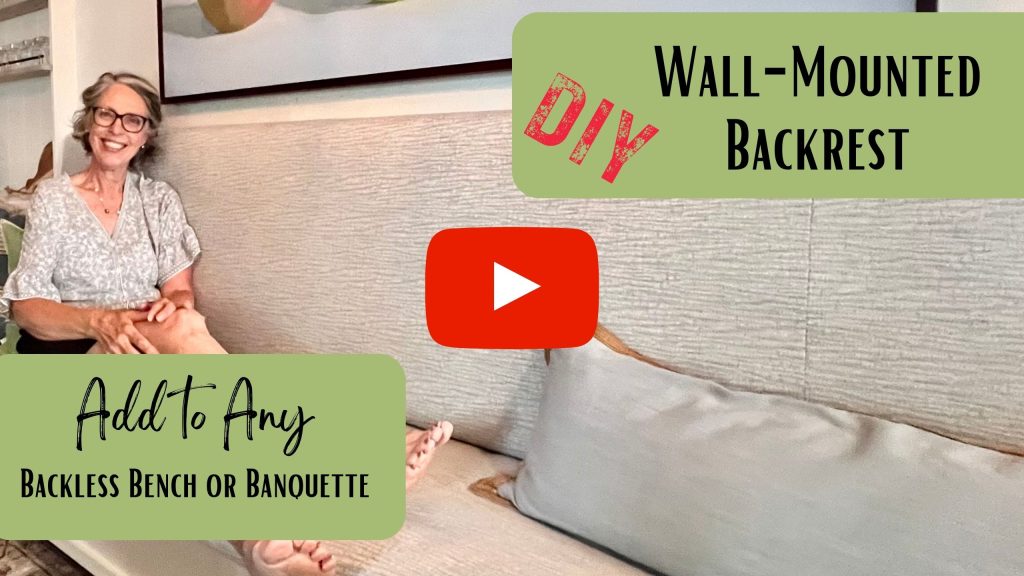
Easy DIY: Best Wall Hung Backrest And Custom Bench Cushion
Time to make our banquette super comfy! By adding a DIY bench cushion and a padded, back rest. Follow along for all my easy tips!
Banquettes or built-in benches are a great seating alternative to maximize your space and seat more people in a tight dining nook, eat-in kitchen or even a challenging dining room (like ours).
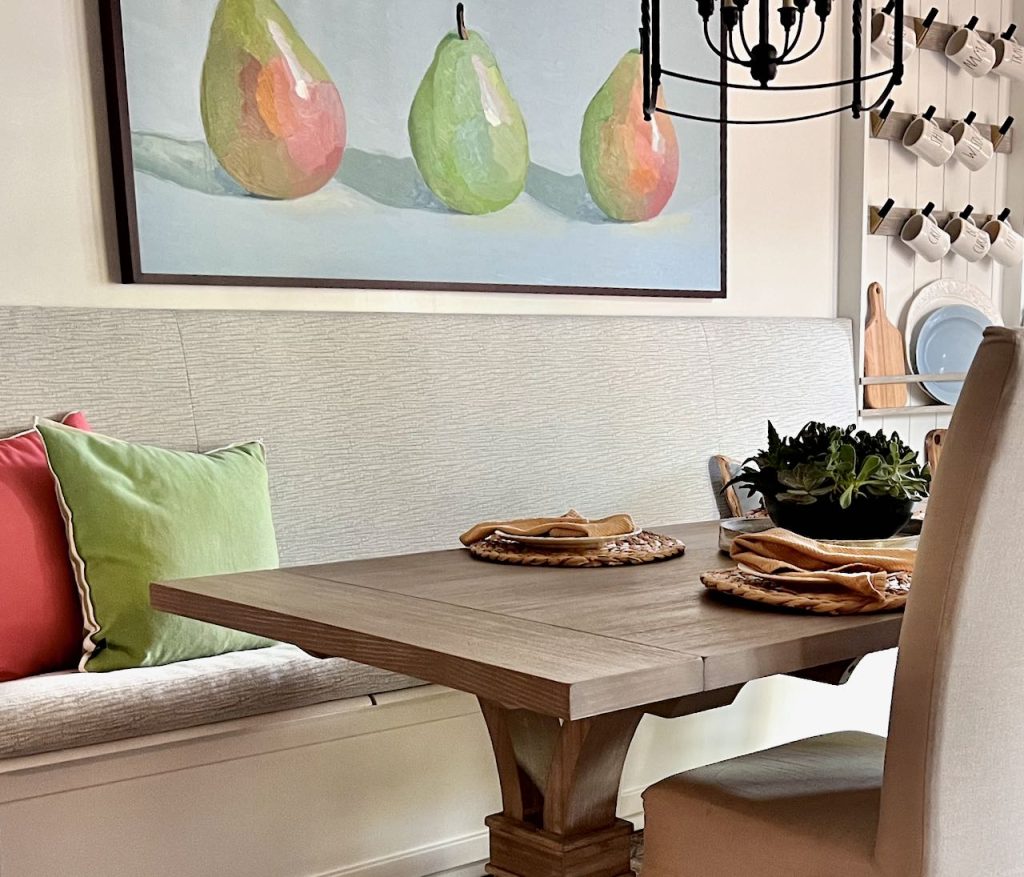
For our entry in the One Room Challenge, we made over our dining “hall” into a dining area extension of our kitchen with an entire wall makeover that included a built-in banquette bench designed and painted to match our kitchen cabinets.
This custom banquette is flanked on one end with a wall plate and mug rack that wraps the kitchen island. And on the other end by a dry bar that serves the adjoining family room.
This dining room makeover checked our boxes of:
- improved traffic flow
- more seating
- table that fits the space
- more storage
- more serving counter space
Once we determined that banquette seating was our answer to the above list of goals, there was concern that bench seating would not comfortable!
I want our family and guests to really, really want to sit there for hours and each, visit, play games, make memories!
So maximizing the comfort of our bench seating was now my highest priority! And that’s what we’re going through here today.
TABLE OF CONTENTS:
- How Do You Make Banquettes Comfortable?
- What is the Best Fabric For Banquette Seating?
- How to Cover Seat Cushions
- Supplies and Materials–
- Cover a Box Cushion via Video Tutorial
- Step 1) Prepare Your Foam and Dacron–
- Step 2) Calculate and Cut Your Fabric Pieces–
- Step 3) Piece Your Fabric for Your Cushion Size–
- Step 5) Attach Gussets to Cushion Cover Top
- Step 6) Attach Cushion Cover Bottom to Gussets–
- Step 5) Stitch and Trim Corners–
- How to Upholster a Wall Hung Backrest
- Blog Posts For Each Component of the Makeover
- Interested in the Rest of the Dining Room Transformation?
The links in this post may include affiliate links, which means if you purchase anything using these links, you pay no extra, but I may receive a small commission that helps keep this blog running. I truly appreciate you using affiliate links whenever possible. Please know that I will never recommend a product I do not believe in!
How Do You Make Banquettes Comfortable?
To make banquette seating comfortable include
- Ergonomic design for the bench frame
- Add bench seat cushion or upholstery
- Add an upholstered backrest
1) Ergonomic Design of the Bench Frame-
I covered this extensively in this blog post about designing and building a custom banquette. This post is all about the upholstery.
2) Add a Bench Seat Cushion or Upholstery–
No one wants to sit for hours on a flat wood surface!
There are two main categories for your seat cushions:
- Loose cushion
- Upholstered seat (material stretched of the seat and stapled on the underside
So let’s just agree that every tush needs some cush. And the best way to get that cush, or cushioning, is with foam.
Yes, you can have feather and down filled cushions, but they are very pricey and not practical for dining room application. So I am eliminating them from this discussion.
Upholstery foam comes in different thicknesses, but also in different levels of firmness.
I advise a minimum of 2-inches for thickness, and I went with medium firmness.
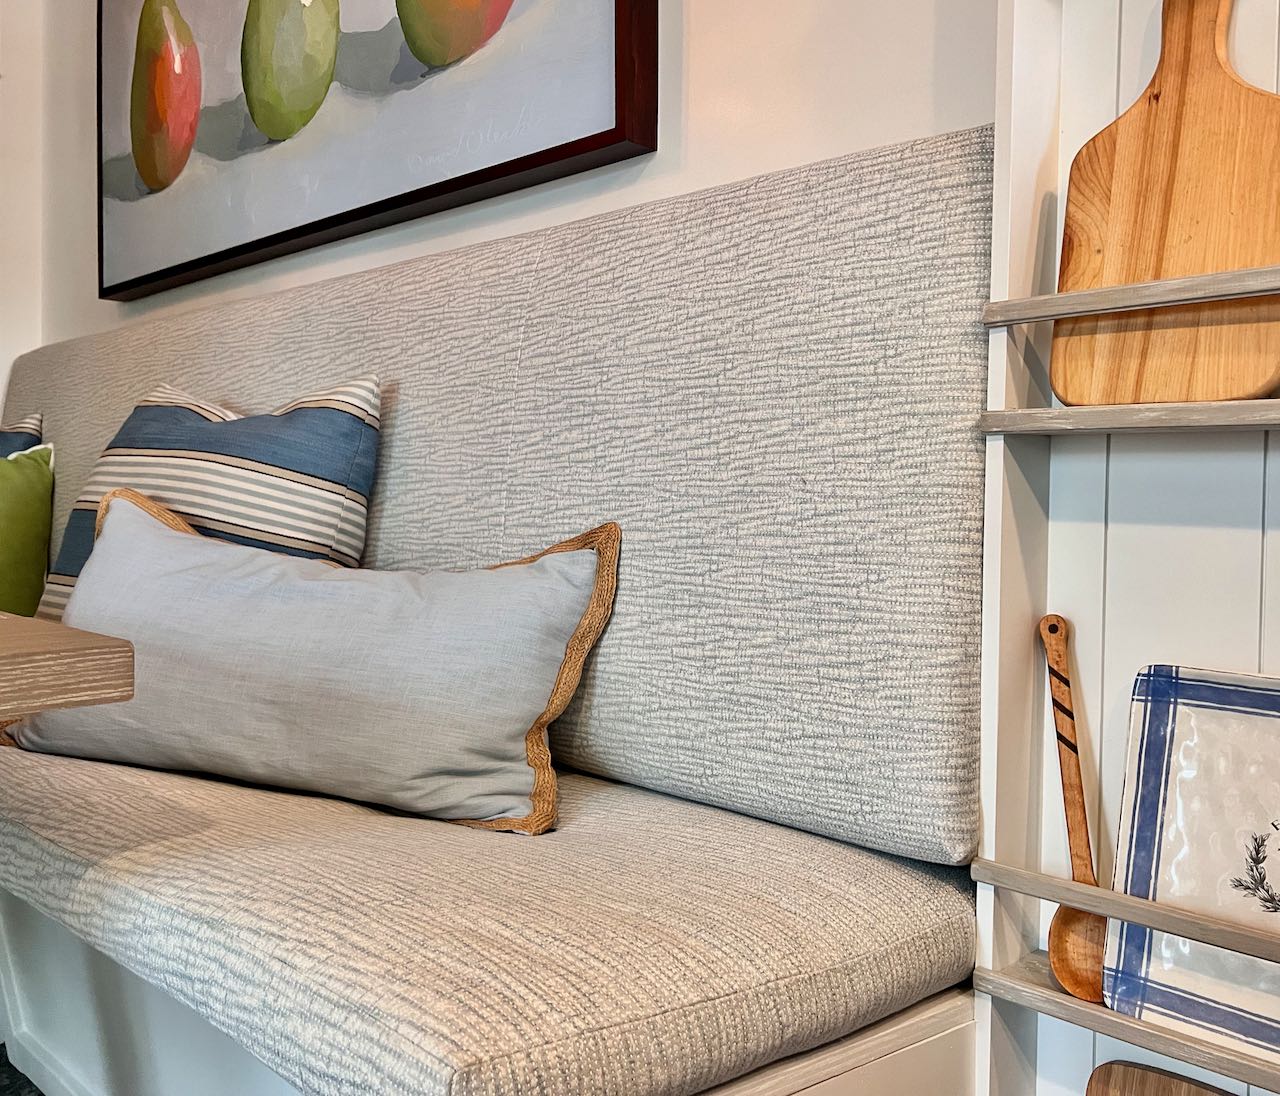
I always, wrap my foam with Dacron batting (1 inch). This softens the edges of the foam, creates the desirable crowning effect, and gives a professional, high-end look.
Plus it’s more comfortable!
I opted for a loose cushion because:
- This is our only dining area and when I am hosting a more formal dinner, the loose cushion looks a little less institutional.
- It gives me twice the wear and soiling as I can flip it over
- It makes accessing my under seat storage easier
If you do not sew, or don’t want to sew, an upholstered seat could be perfect for you. The only sewing that would be needed is if you choose fabric has a pattern that requires piecing for the pattern to run the way you want it to look.
In my case, I wanted the subtle stripes to run horizontally. Since the stripes were woven horizontally across the fabric, I had to piece it.
If they had been running down the length of the fabric, I could have just cut one length for the backrest and two lengths for the seat cushion.
If you are happy with the width of the fabric running down the length of the seat, then you don’t need to sew at all.
In that case you would use these steps to upholster a fixed banquette seat:
- Glue your foam in place on the banquette seat
- Wrap Dacron batting over the foam and the sides, pulling taut and stapling in place
- Stretch the fabric over the batting, centering it and stapling the back in place.
- Pull the fabric tight, wrapping over the top, down and under the seat.
- Staple in place
- Repeat with each side pulling tightly and evenly, folding the corners neatly.
The process I used for my loose cushion is a little bit further along in this post, and there’s a video too!
3) Add an Upholstered Backrest–
As discussed in the post about designing and building the banquette, not every situation requires a backrest. But if you have the space and the comfort of adults, or older kids is a priority for you, you’ll want to add it. And preferably padded and upholstered.
There are two broad categories of backrests for benches:
- Built into the back of the bench
- Wall mounted backrests
And both versions can be made as a straight back or with an ergonomic, slanted back.
I’m not judging anyone, but I do want to throw out that it is not much harder to make a slanted back version, particularly with a wall hung backrest.
So why not take that little extra step for all the extra comfort? It is sooo worth it in my opinion!!!!
I chose to go with a wall-mounted backrest because:
- I thought it would be easier to build (and it was!)
- It offers a bit easier access to my under seat storage
- I can change the fabric or clean it easier
- Saved a couple of inches of distance from the wall for traffic flow
The process I used in making the backrest is detailed a bit further along in this post.
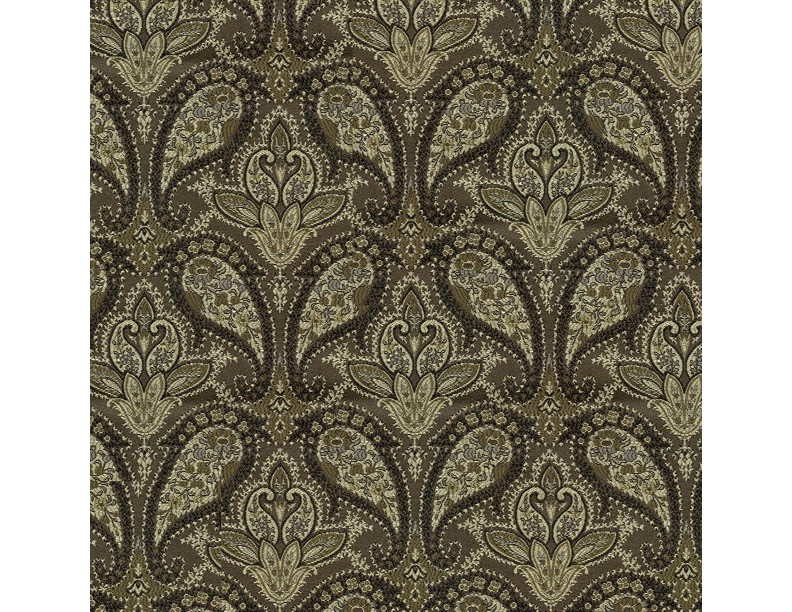
What is the Best Fabric For Banquette Seating?
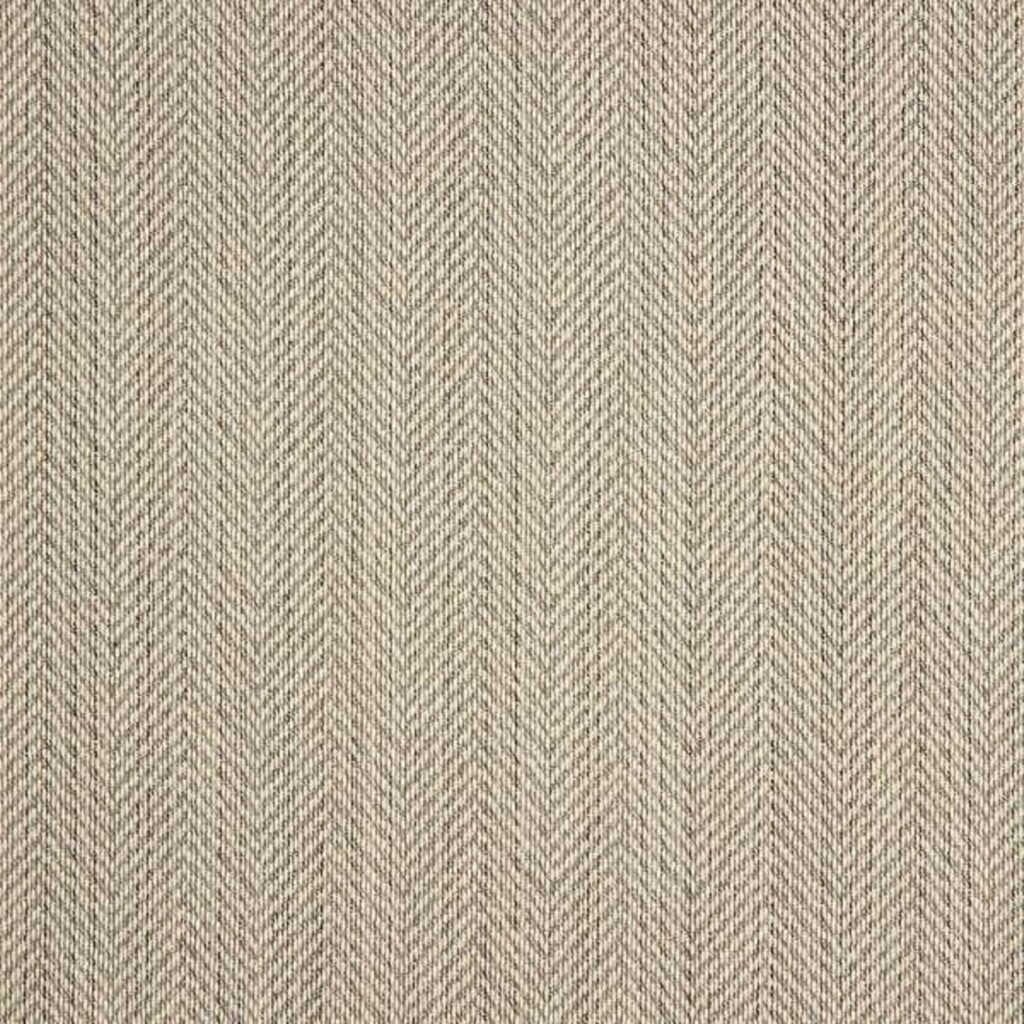
You definitely want fabric that is rated as upholstery fabric.
Sometimes, fabric might be designated as the broader category of Home Decor fabrics. But that Home Decor category will also include drapery fabrics, which for the most part are not suitable for upholstery.
This is not where you want drapey fabric, or any stretch or anything delicate like embroidery (save that for throw pillows)
I would take it even further and say you should be looking for a performance fabric.
Performance fabrics started with the commonly known Sunbrella fabrics. The original Sunbrella outdoor fabrics are not the most comfortable. So don’t limit yourself to just those. Most larger upholstery fabric mills also produce their own line of performance fabrics today.
What is a Performance Fabric?
Stating the obvious: Performance fabric for upholstery is not the same as performance fabric for athletic wear!
Upholstery performance fabric has been engineered to be extremely durable making it ideal for furniture that receives lots of daily use. It stands up to wear and tear from kids and pets plus it’s stain resistant, water resistant, odor resistant, and easy to clean.
My fabric is from Crypton. Unfortunately, it is discontinued so I can’t give you a link to it. But they have a lot of wonderful fabrics.
When deciding on fabric, keep in mind the comfort on the back of the legs for those wearing shorts or a short skirt.
Also your guests and you will be skooching across the fabric, so something with a lot of texture that will cause friction making it harder to slide across.
Keep in mind, the seat and back do NOT need to be the same fabric.
If you like the look of leather but do not want leather seat cushions due to potential spills, you could always make a faux leather back cushion and pick a complimentary performance or outdoor fabric for the seat cushion.
While you’re purchasing fabric, also remember to purchase upholstery thread, specifically! It will hold up to all the skooching back and forth across your cushions.
Also, pay attention to any pattern repeat when calculating how much fabric you need.
Quick Break: Are you finding some nuggets of inspiration or an aha!? Please consider subscribing so you don’t miss a thing. You say how much is right for you.
Thanks Bunches!
Jump Ahead To:
How to Cover Seat Cushions
As I mentioned earlier, I opted for a separate cushion.
Next, I needed to decide on how many cushions, just like a couch.
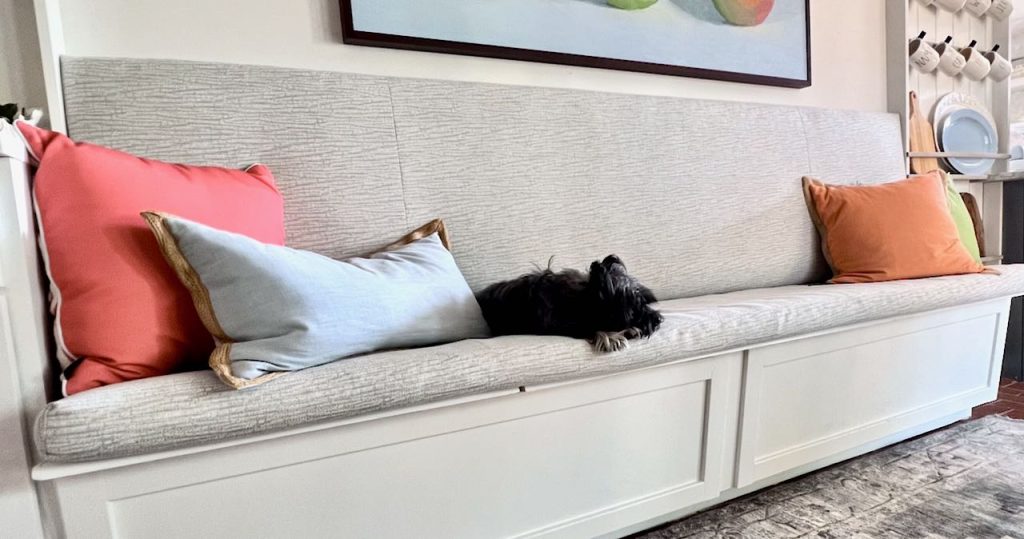
I opted for one long cushion.
There will be many times that we will be seating 3 on each side and if I had two cushions, someone would be sitting on the seam. There will be times that we have two on each side and if we went with three cushions, two people would be sitting on seams.
A division in cushions translates to a division in seating. So I opted for no divisions and made just one giant, long cushion.
I opted to add a long zipper (100-inch) to the back edge of my cushion. This will make it easier to insert the foam and Dacron and it will be easier to take off for cleaning purposes. I find a longer zipper is actually easier to inset than a short zipper, so don’t be intimidated by the length.
I chose not to add any piping or welting in my seams. Primarily for comfort. I always add welting to pillow covers, but I rarely add it to seat cushions.
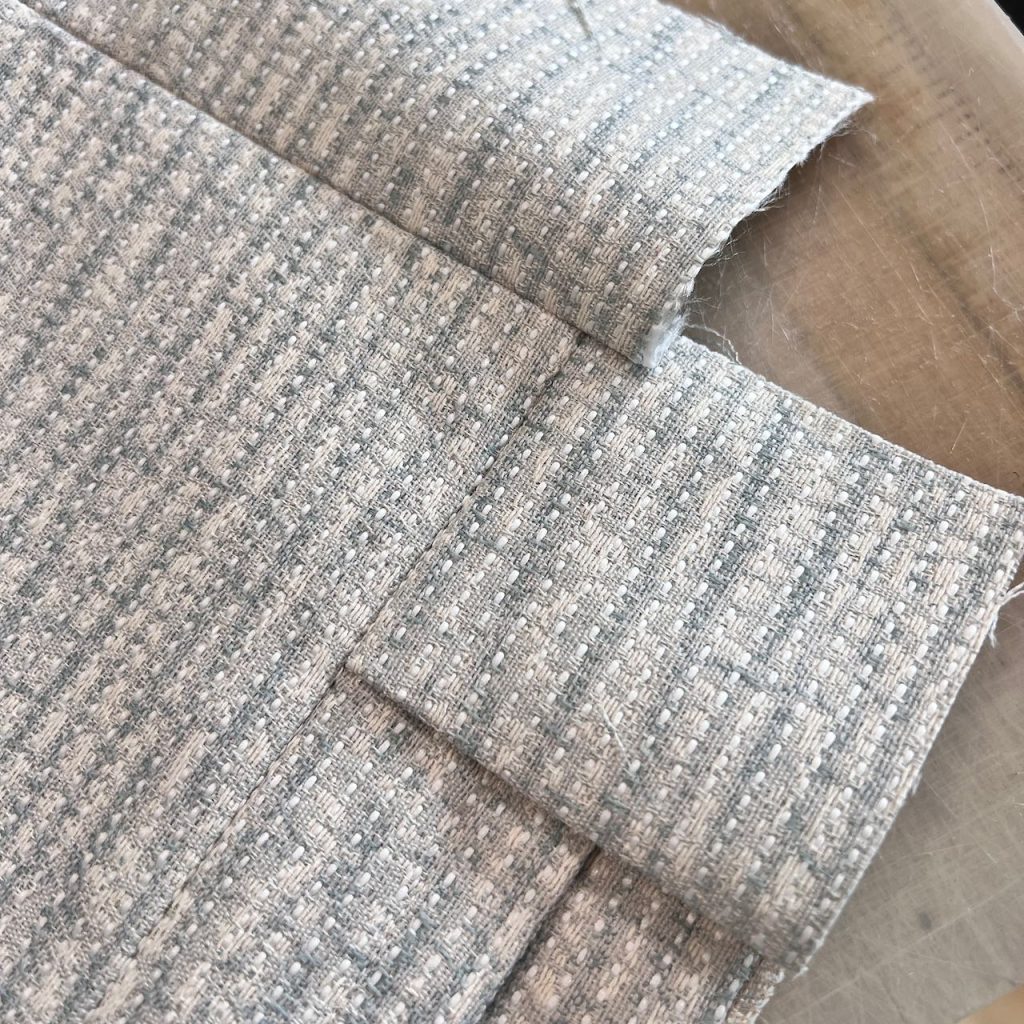
Another decision is how to piece the cover pieces together. I opted for a separate side gusset on all four sides. I think this is a more polished and professional look.
You can also make your cushions with the top and bottom and the front gusset as one piece that wraps around the cushion. I did that for my outdoor cushions, mainly because there would be no seam under your legs (a bit more comfort since so much of the time we are in shorts or swimsuits out on the patio). Plus the front seams don’t hold the rainwater in, so the cushions tend to dry out faster after rainstorms.
Please not this post contains a few affiliate links. If you purchase something after clicking through one of these links, I may receive a small compensation. You will pay nothing more. I truly appreciate your use of my links whenever possible.
Supplies and Materials–
- Fabric of choice
- Foam
- Dacron batting
- Upholstery Thread
- Zipper by the foot
- Curved Upholstery Needle
- Upholstery web style spray glue
- Sewing Machine
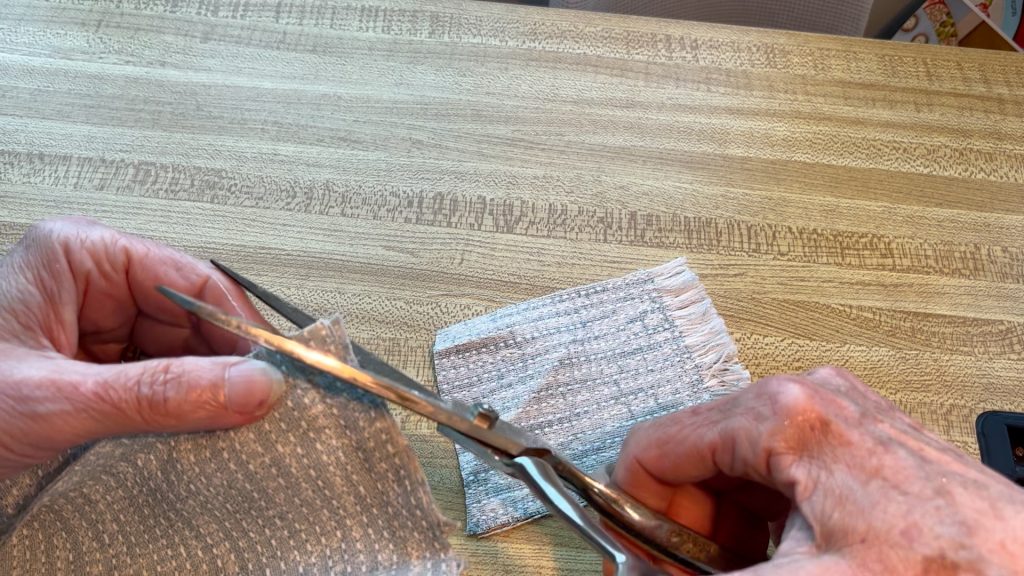
- Scissors
- carpenter’s or quilter’s square
Some of My Favorite Decor Performance Fabrics
(Click on the image to see all the details)

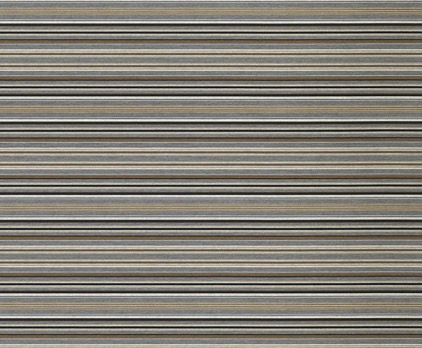
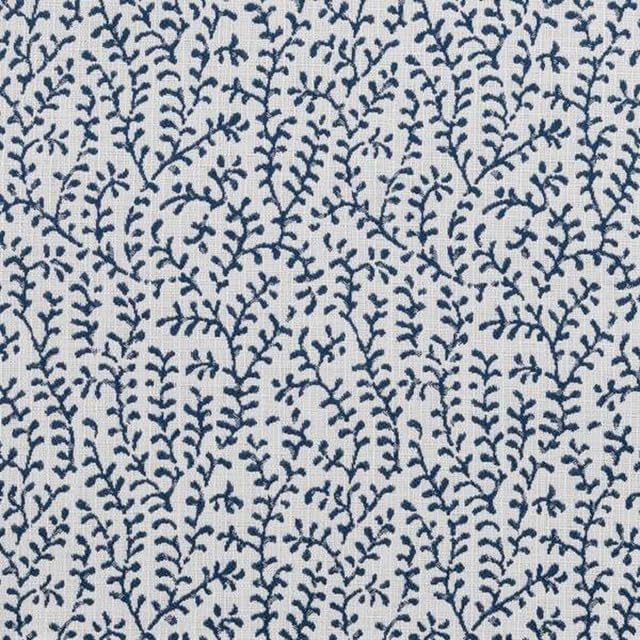


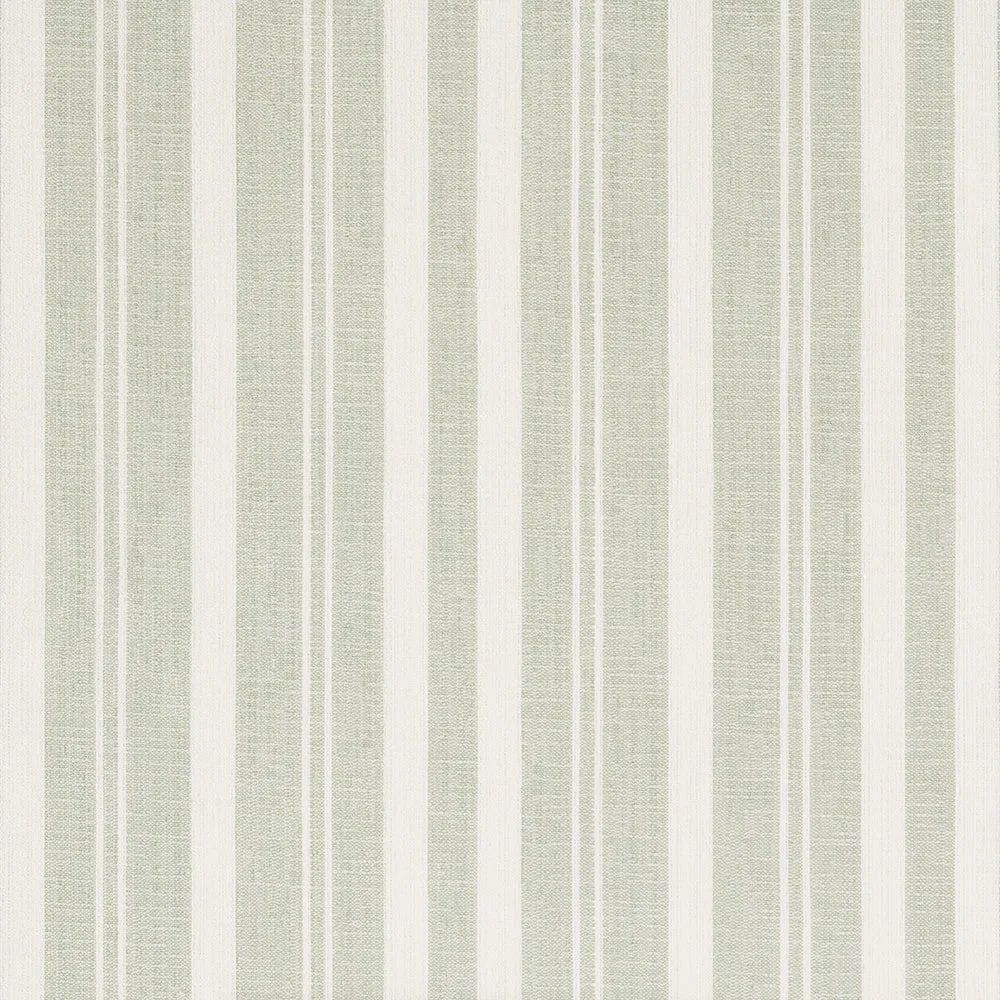


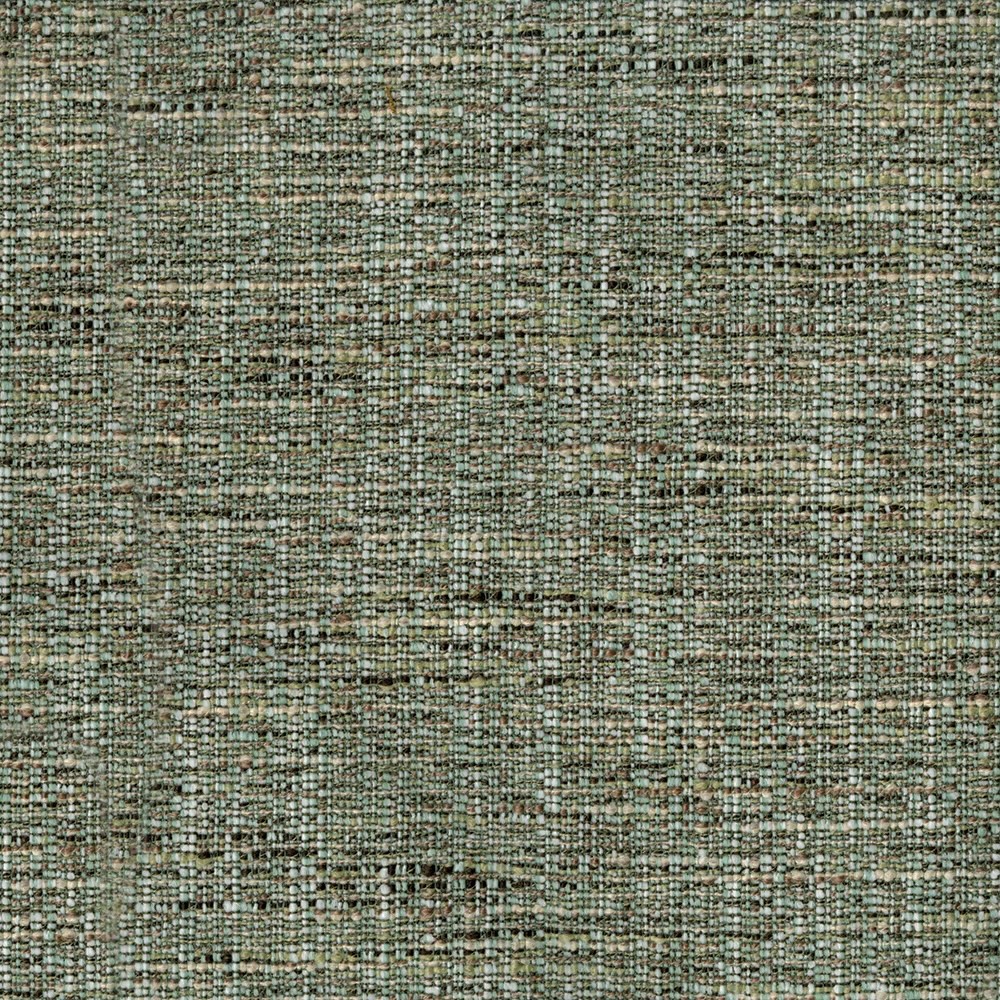
PRO TIP: Consider purchasing a sample to check color, weight and feel.
Just Click Below if You’d Rather Learn to
Cover a Box Cushion via Video Tutorial

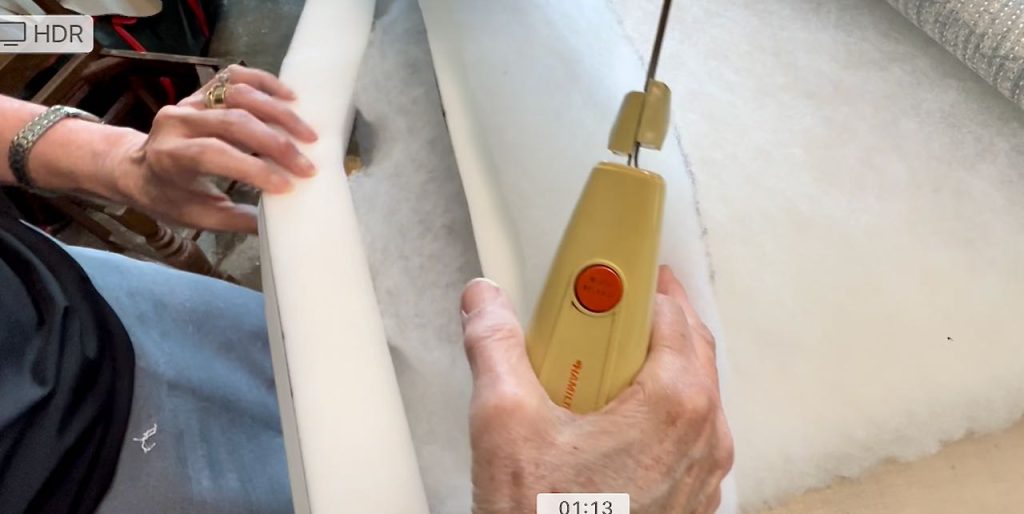
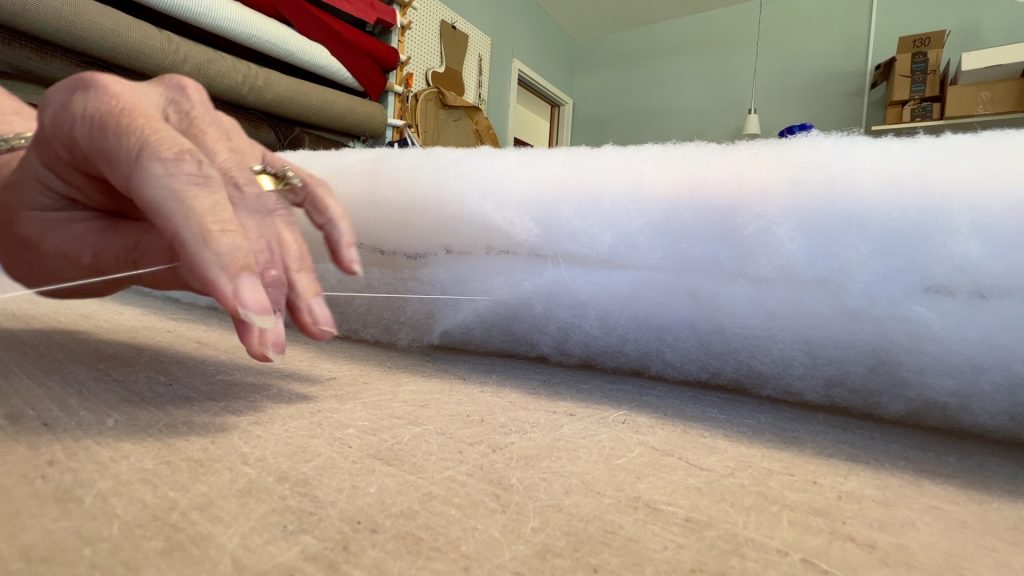
Step 1) Prepare Your Foam and Dacron–
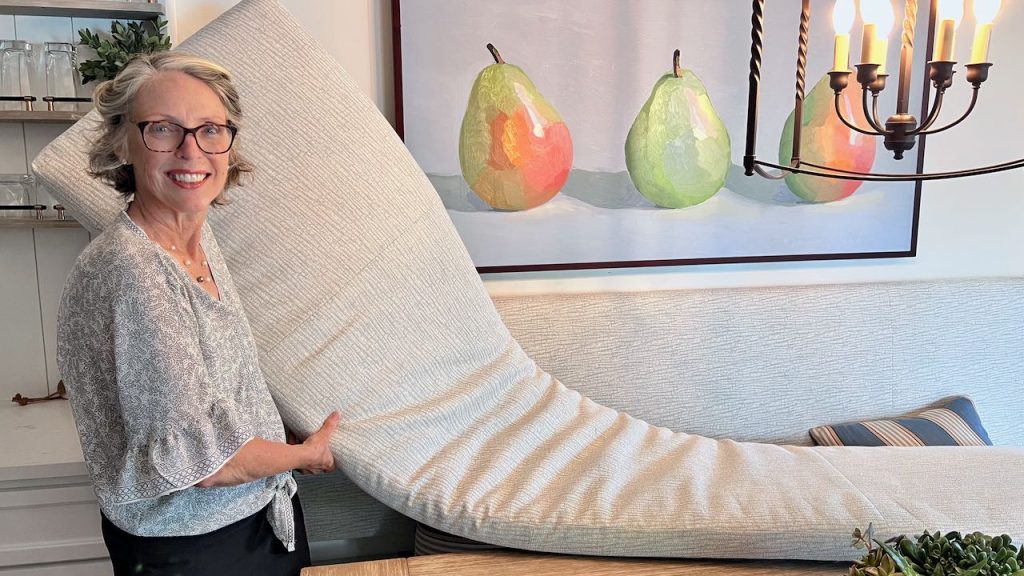
Our bench seat is 101-inches long. My foam piece is 103-inches.
I ordered my seat foam to be 2 x 23 and 103-inches long because I’d rather cut it down than have it be a bit short.
With dense foam, and because my cushion will fit snuggly between two built-in cabinets, if the foam is too long, then my cushion will buckle and not lay nice and flat. So here I actually trimmed off close to the 2-inches.
I added extra Dacron on the two short ends to assure the cushion cover is plump and filled all the way into the corners. (A saggy corner is one of my pet peeves)
My foam supplier had this cut and pieced for me. But it is very, very easy to cut foam with an electric carving knife. Just like Butta!
Next time you see an electric knife at the thrift store, pick it up and add it to your crafting toolbox. I use mine so often!
If your cushion so long you need it to be pieced, I strongly suggest ordering it custom made for you. No shame in that. In case you need to piece your own cushion together:
PRO TIP: Just like in woodworking don’t use a butt joint, but rather cut two adjoining edges at 45-degree angles and overlap them using upholstery glue.
It’s a little tricky, but very doable and worth the effort.
Now you want to cover the foam with a covering of the Dacron batting.
There are several ways to do this. And no real wrong way, just ways that are best for the style of cover you’re making.
Because I am not adding any welting in my seams, I want a really smooth rounded edge to my filling. A sharp edge created by adding a gusset of batting could bunch up and show.
So, I covered my foam with one large piece of batting and hand-stitched around it.
For my super long cushion, I glued the Dacron over the long length, over one of the short sides and back under the long length and back up to meet at the other short side.
Along one side of the foam, I arranged the Dacron so the two long ends would meet halfway up the thickness of the foam. On the other long side, I trimmed a bit of the Dacron so the edges would again meet at the halfway point in the thickness.
At the folded short end, I started whip stitching the two sides of Dacron together so my stitching was down the middle of the foam thickness. Worked my way around the short end and back down the other long edge.
You can see just how this went at the 1:32 mark in the video I made for you.
It sounds like a huge chore, right? But it’s really not. It goes very fast and is simple to do.
There is a little trick to it, so be sure to watch that part of the video to get that nice smooth front.
Step 2) Calculate and Cut Your Fabric Pieces–
Measure your Cushion.
Mine is 23-inches front to back, 101-inches long and 2-inches deep. I used 1/2-inch seam allowances and added an extra 1/4-inch allowance for the dacron batting.
Note: before cutting anything, be sure to read my notes about naps below.
Top & Bottom Pieces–
You will need two identical large pieces for the top and bottom of the cushion.
Because my cushion is so long, I will need use two pieces for the top and two for the bottom. So I am cutting four full widths of fabric that are each 24.5-inches top to bottom. (23″ + 1″ for 2 seam allowances + 1/2″ for dacron allowance).
Gussets–
For the gusset, I prefer a separate gusset for each side of the cushion, seamed at the corners. Sounds more involved, but truly it’s the easiest and looks so polished!
I used 3 1/2-inch gusset pieces: 2 (2-inch foam) + two 1/2-inch seams, + 1/2-inch allowance for the Dacron.
For the hidden zipper gusset, you will want two lengths of gusset. One for each side of the zipper. One is 3-inches wide and one is 1 3/4″ wide. Then two more small pieces (3 1/2 x 5 -inches) that cover the ends of my zippers (we’ll get to that in a moment).
TIP: Test the widths of your two back gusset pieces with your zipper and make sure you’ll end up with the final gusset width you need. If in doubt go wider, you can always trim some off.
PRO TIP: I tend to cut the long gussets longer than needed and trim off the excess when I trim the corners.
So in total, for gussets, you will need:
- one long gusset for the front (mine: 3.5 x 104-inches)
- two shorter gussets for the two cushion sides (mine: 3.5 x 24.5-inches)
- two different width gussets for the zippered back edge (mine: 3 x 104-inches and 1 3/4 x 104-inches)
- two plackets to cover zipper ends (mine: 3.5 x 5-inches)
Is This Making You Nervous?
I get that — totally.
When in doubt, I make a sample fit.
A partial version of just one end. This tests my measurements so I know I will end with the fit I wanted.
You’ve got this!!! Remember, we’re just using rectangles and stitching straight lines.
Dealing With Naps
First thing, it’s important to determine if your fabric has any nap. With a nap, it’s critical that your cut pieces are all going the same direction.
Many Home Dec fabrics have some kind of nap. It may be very subtle and it doesn’t show — until hanging in different light where it becomes very obvious. UGH!
TIP: If there is any shine to it or if any of the threads within the pattern have a shine, it’s safest to assume there is a nap.
Home Dec sewing includes lots of rectangles and it’s easy to become confused as to which end was up when you cut it.
Sometimes you can tell the top because of the selvedge edges or there is a distinct pattern.
PRO TIP: Use “directional” pins. I find it easiest to place a “directional pin”, straight or safety pin, at the top of each piece before I even cut it. (otherwise sometimes I forget. What can I say? I’m easily distracted!) This way I always know they are oriented in the same direction.
Step 3) Piece Your Fabric for Your Cushion Size–
Depending on the size of your cushion and the direction of your fabric, you may not need to piece your fabric.
If that’s you, great! Skip on down to step4.
If you do need to piece your fabric, be aware that there is a definite way you want to do this. And fortunately it’s not difficult.
Piecing: Do NOT Center the Seam
TIP: For professional looking sewing, you want one complete panel in the center with a smaller panel seamed on each side.
It’s not hard to do with this easy trick:
–With right sides together, pin two pieces together, matching any patterns along the side seams. Make sure both directional pins are at the top.
–Using upholstery thread in your needle and bobbin, stitch those two vertical seams.
–You’ll have a large tube of fabric. Press the two seams open. Now stack these two seams right on top of each other.
–Take the width of your cushion, add an inch (for two 1/2-inch seams). Divide that measurement in half. Now cut that distance from one of the folds.
Repeat for the other side of the cushion.
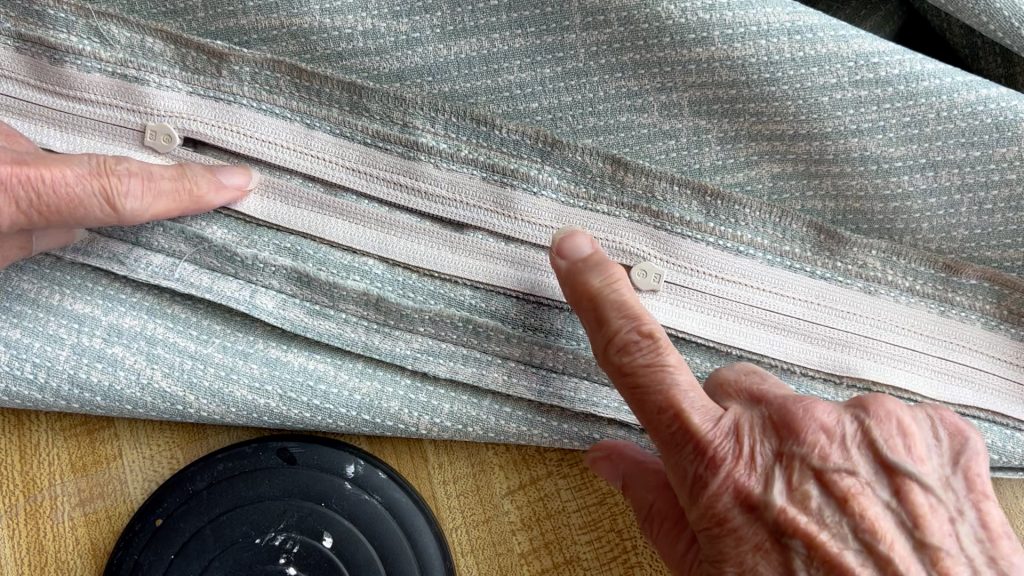
Step 4) Installing the Hidden Zipper–
Don’t let the idea of a zipper intimidate you! This is just a couple of straight lines of stitching. Also, the zipper is going to be hidden!
I love using zipper by the foot. There are a number of videos that show you just how to add the zipper pulls. This is a great one to get you started. You will be amazed if you have never used them before!!
Start by laying the thinner of the two long zipper gusset pieces, with the right side down, on top of the zipper with an edge aligned with the outer edge of the zipper tape. Stitch and then press the the fabric away from the zipper. The zipper tape should be flat. Now top-stitch to hold the fabric in place.
Repeat on the other side with the wider zipper gusset piece.
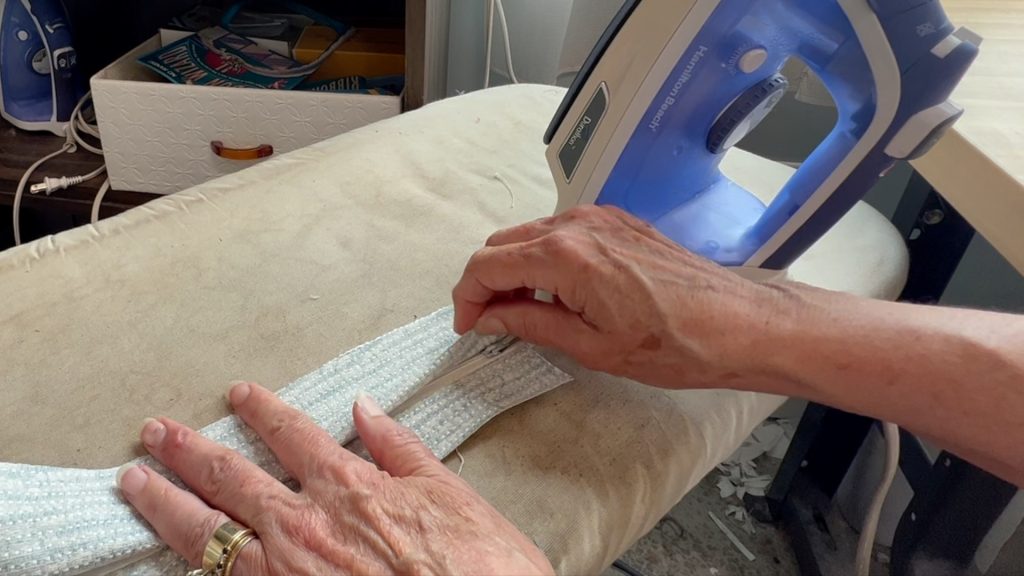
This time you want to fold the wider piece so the two long edges meet. The fold should cover the zipper and overlap the thinner piece you did first. If your pieces are all seem to fit together well, then press and topstitch through the three layers — the zipper tape and both layers of your fabric.
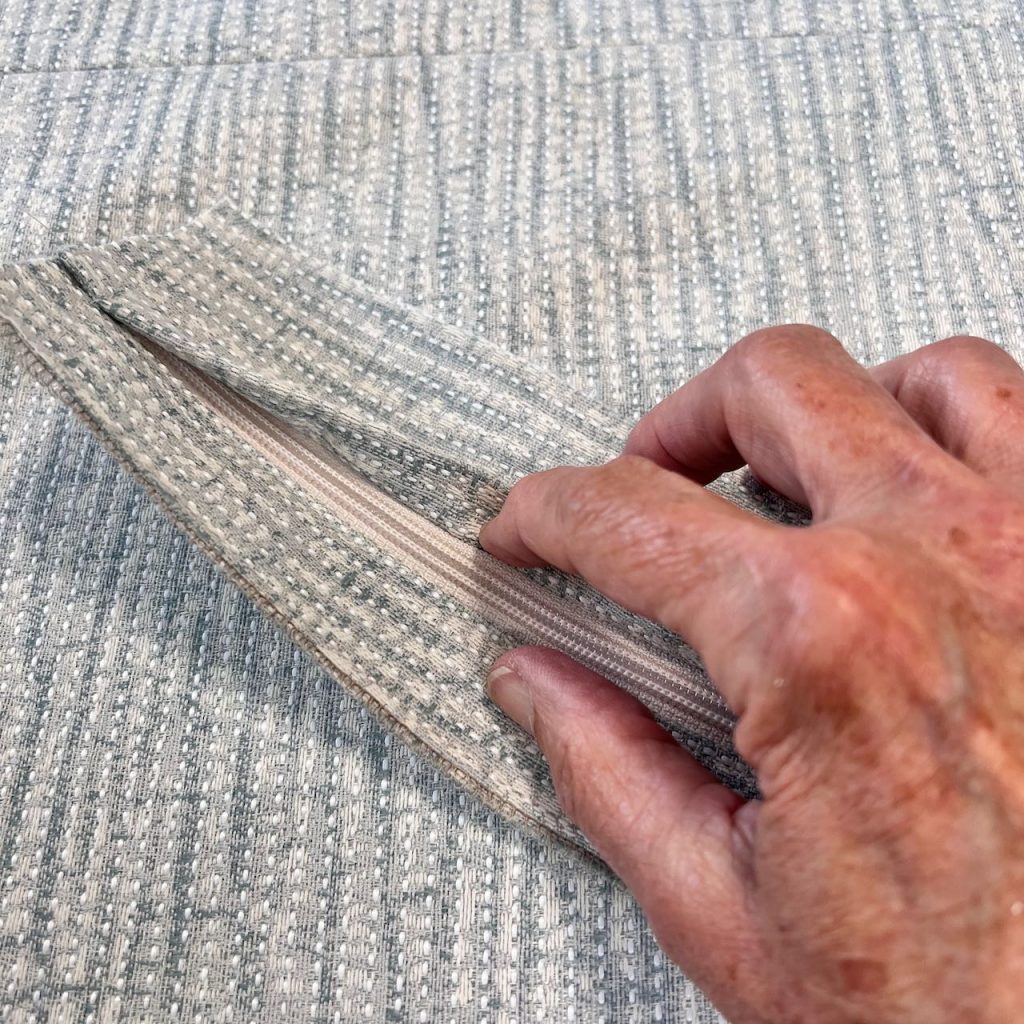
Stitch crosswise across the end of the zipper and the top of the zipper.
Step 5) Attach Gussets to Cushion Cover Top
Now time to attach the zipper gusset to the cushion top.
I always use plackets when attach a zipper gusset. It dramatically reduces the bulk in the corners and results in a very clean and high-end look.
You need two plackets. One for each end. These plackets and all your gussets should be the same width. I like to cut my gussets a bit linger than I need and trim off any excess when I trim the corners.
The length of the plackets depends on how much shorter your zipper is compared to the cushion length. I made mine 5-inches long.
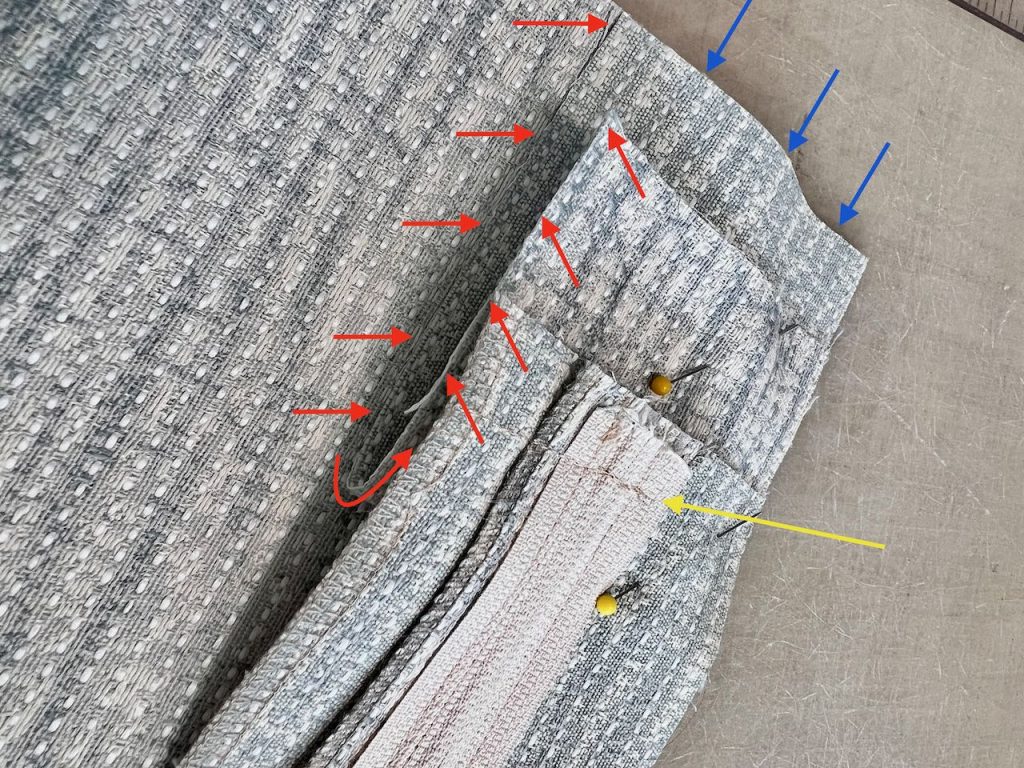
Lay one gusset placket right side down on the corner of the cushion top, lining up the two outside edges. Like the blue arrows show here.
Now fold the length back onto itself, but short of the end by about an inch. Like the red arrows.
Then lay the zipper gusset on top of that with the long outside edges all lining up and the ends short of the gusset end.
The yellow arrow is a reminder that you should have already stitched across the ends of your zipper holding everything in place. This stitching should be higher up than the placket fold.
Pin it all together.
Now gently fold it back and take a peek that all looks good.
Now stitch down the length of the gusset and cushion top.
NOTE: It is CRITICAL that you stop and backtack short of the ends both directions! Since I am using 1/2-inch seam allowances, I am stopping 1/2-inch from both ends!!!
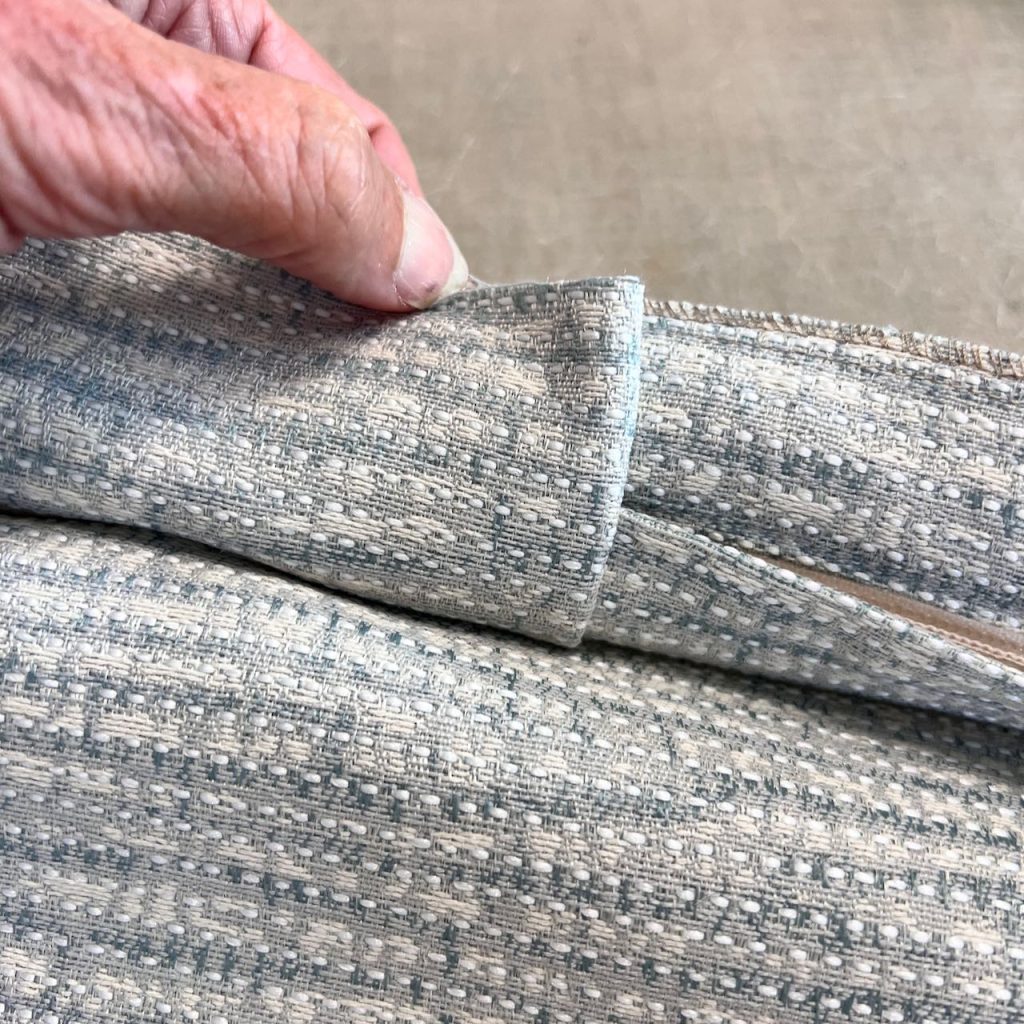
This is what your corner should look like when you have the zipper gusset and one of the short gussets sewn and pressed.
Notice the 1/2-inch excess from when the stitching stopped.
Now sew each gusset along the remaining edges of your cushion top remembering to stop and backtack 1/2-inch from the corners.
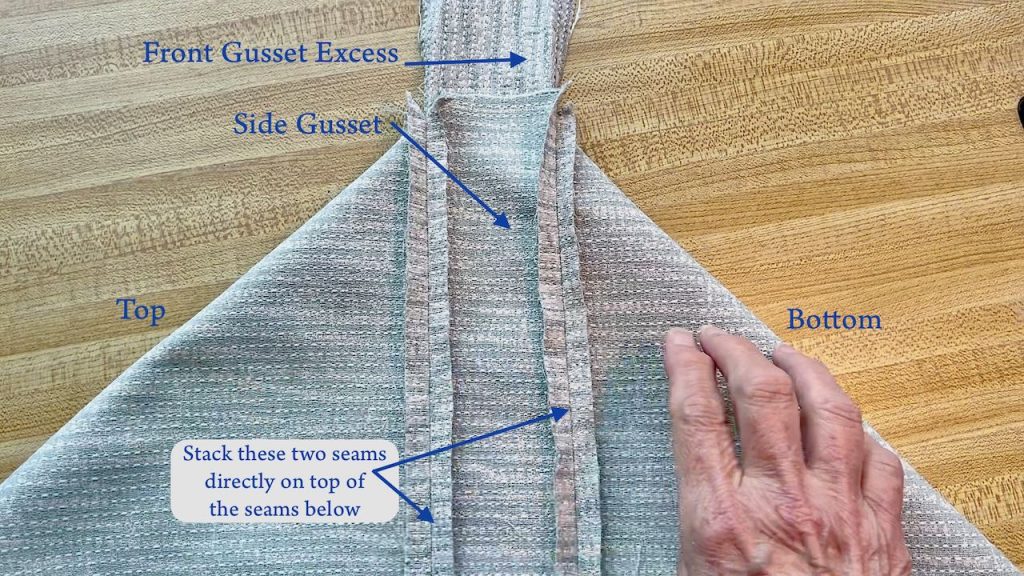
Step 6) Attach Cushion Cover Bottom to Gussets–
Repeat the same process stitching all four gussets to the cushion bottom.
CAUTION: It is critical to line the top and bottom up with each other.
Start with one of your longest sides, the ones that might have two seams where they were pieced. Lay the seams directly on top of each other, then slide the bottom directly across the gusset and pin bottom edge and the free gusset edge together. Make sure the seams are still stacked directly on top of each other.
Match up the other seam and pin in place. Now ease all the rest of the fabric edges together, pinning as you go.
Stitch that side, and then repeat for the next side.
CAUTION: Be sure to leave an opening in the zipper gusset so you can open the zipper all the way to turn and press your cushion cover.
Then stitch the two short edges.
Your stitching should not overlap. Every stitch line should stop 1/2-inch from the edge of the top and bottom covers.
Step 5) Stitch and Trim Corners–
Each of your four corners should be able to lay like this (one at a time).
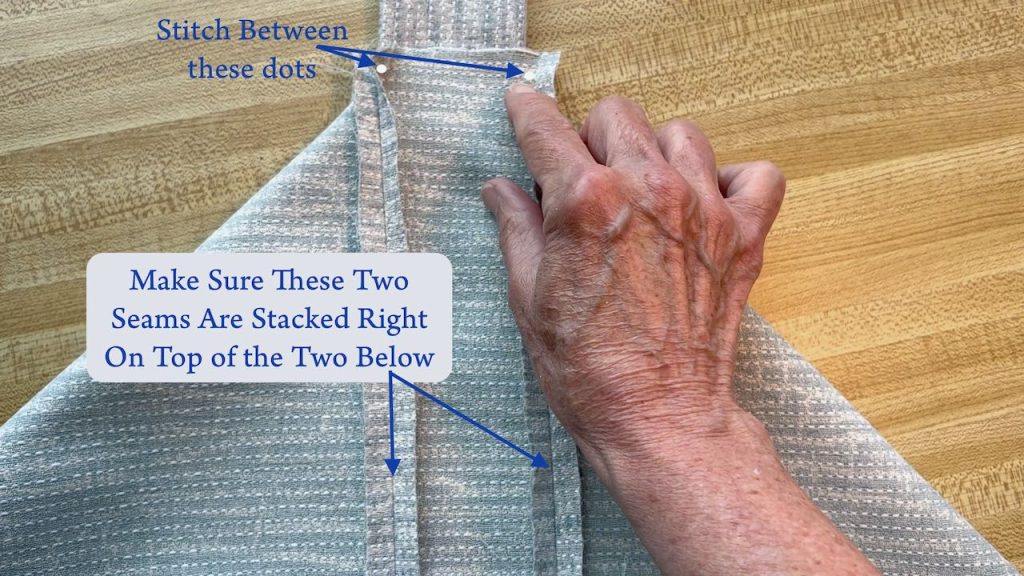
Once you have the two seams stacked exactly, fold back the both seam allowances at each of the corners and pin in place.
Stitch between those two marks, making sure not to catch any of the seam allowances.
Stitch between the spots, backtacking to hold it securely.
Cut off any excess of the gussets, and then carefully trim the corners so you don’t trim any fabric besides what is in the seam allowance.
Repeat for the other three corners.
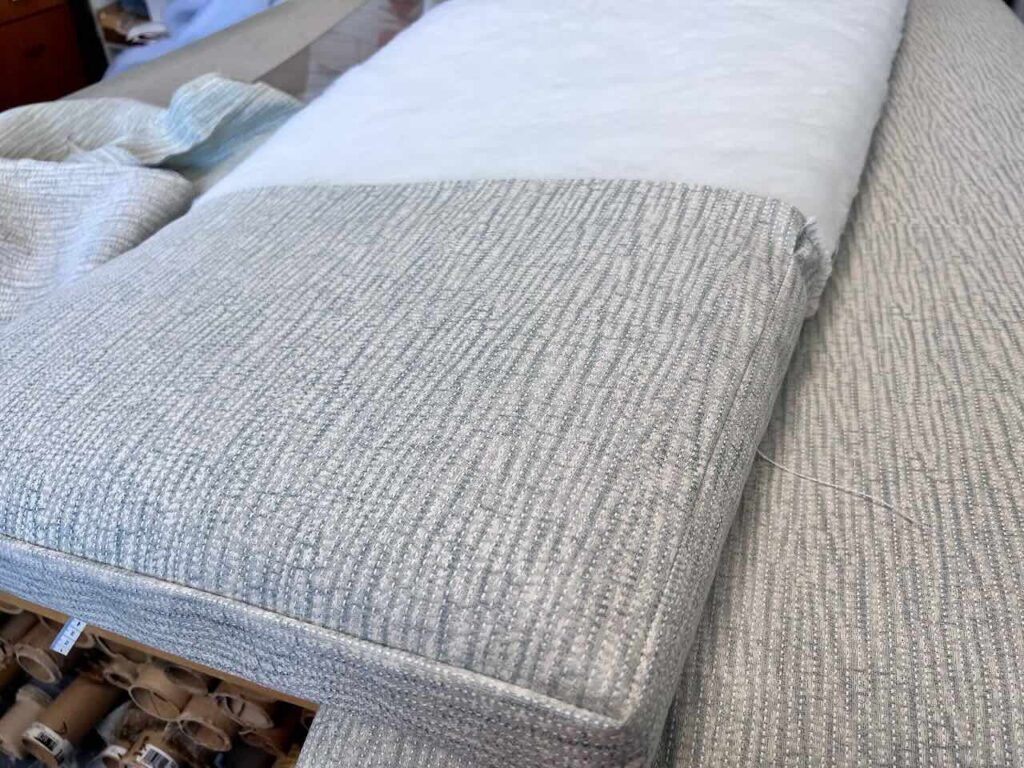
That’s it! Well, almost. Now you get to wrangle the batting covered foam into its new straight jacket.
I hope it’s comfy, just what you wanted and proud of the outcome!
Now on to the backrest, which I think is actually easier!!!
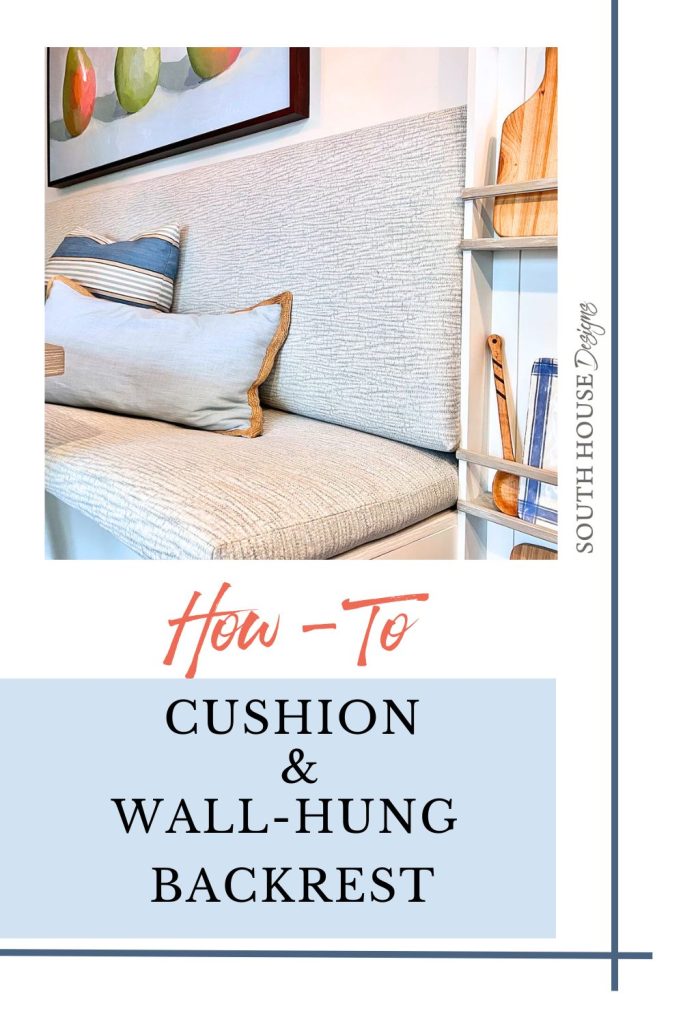
How to Upholster a Wall Hung Backrest
Supplies and Materials–
To Make Backing and Frame
- 1/4-inch thick plywood
- 1 x pieces of wood to frame
- French cleat, the exact ones we used, we used two pair
- Table saw or circular saw with jig
- Wood Glue, the one I use
- Brad nailer, not required but definitely easier
- Drill with Phillips bit
- Measuring stick
- Straight edge
To Upholster Framed Backing
- Fabric of choice
- Upholstery foam
- Upholstery Dacron batting
- Upholstery Spray glue
- Staple gun and staples
- Hammer
- Flat head screwdriver and pliers, only needed if you “Oops”
To Hang Backrest
- Stud Finder, I used my old, mediocre Zircon. This is the one I’ll change to, cheaper and Wirecutter recommended.
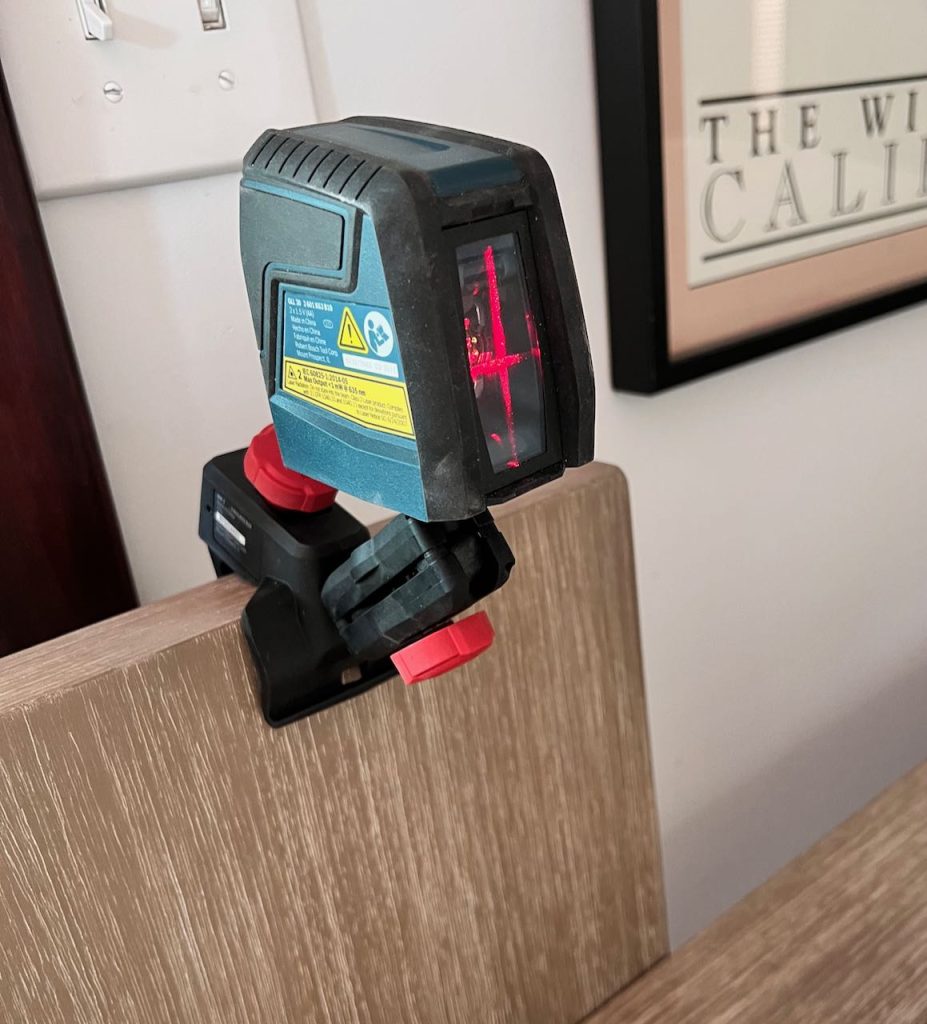
- Laser level
Prefer a Video Tutorial for the Upholstered Backrest?
Just click the image below.
Step 1) Make Backer and Frame It —
Determine the height and length of your backrest.
Cut plywood to these dimensions. If your’s will be wider than 8 foot, like ours, you need to cut another piece for the full length and piece them together using more 1 x’s.
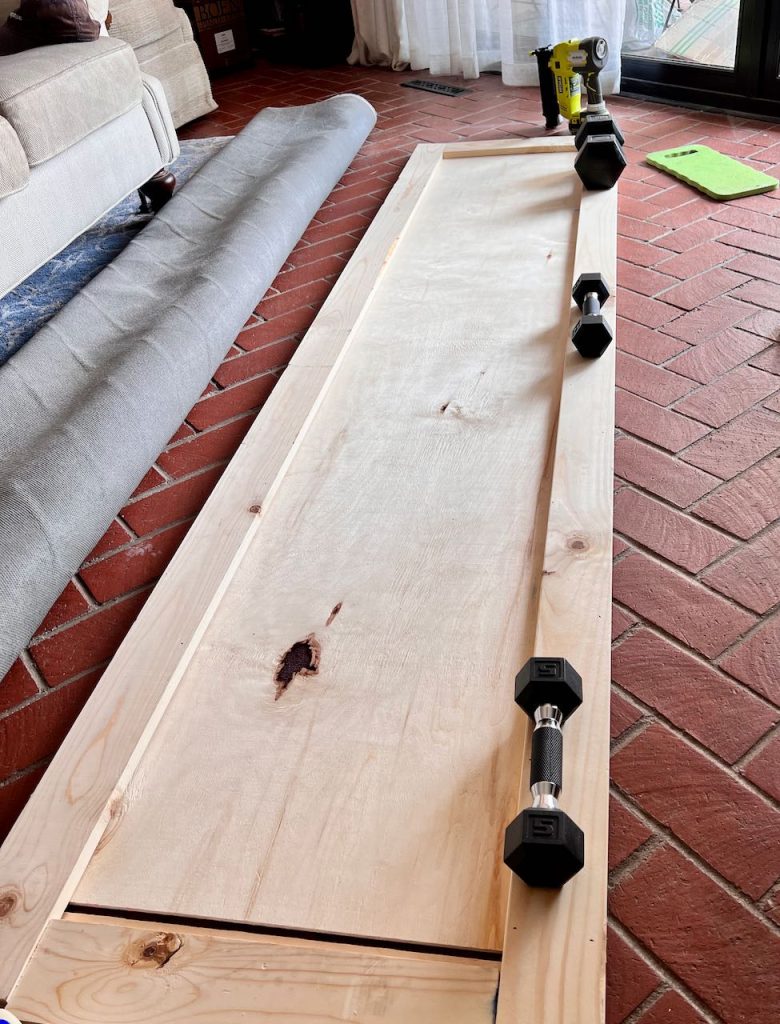
Around the edges, we glued 1 x pieces to provide enough depth for the staples to really grab into something, without adding too much weight. Our top 1 x is wider than the sides because the french cleat will attach to it.
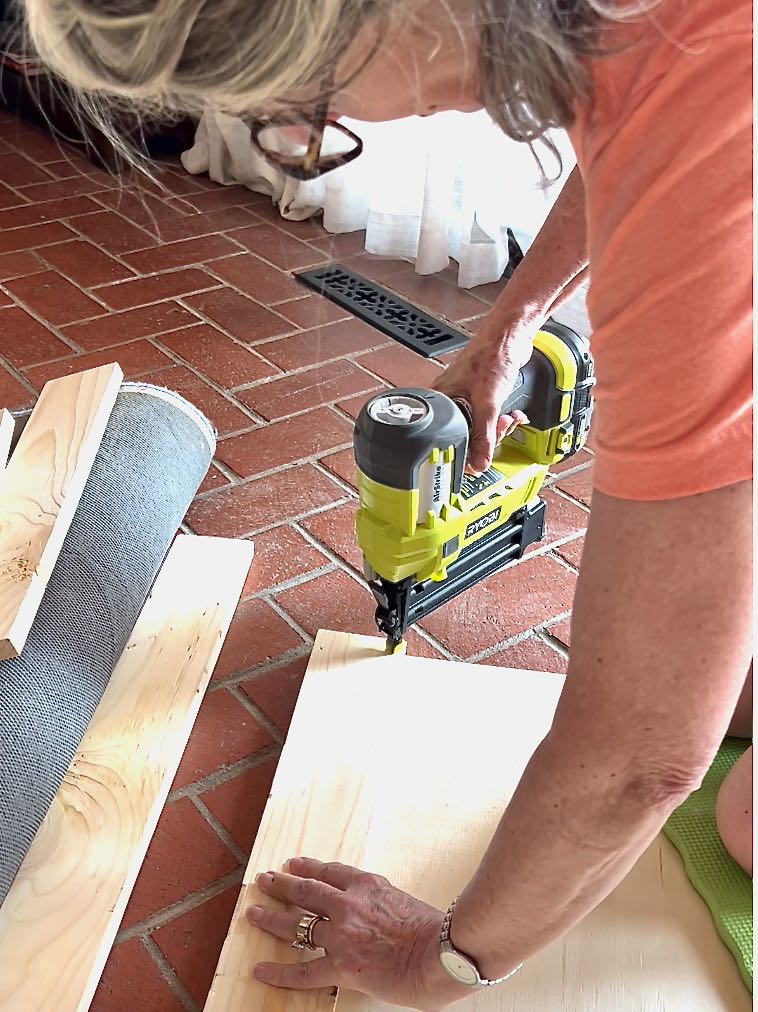
Once the glue was dried, we used the brad nailer to attach them together. Now it’s super secure. Without the glue, the weight of the plywood could have pulled away from the frame with just the tiny brads holding it up.
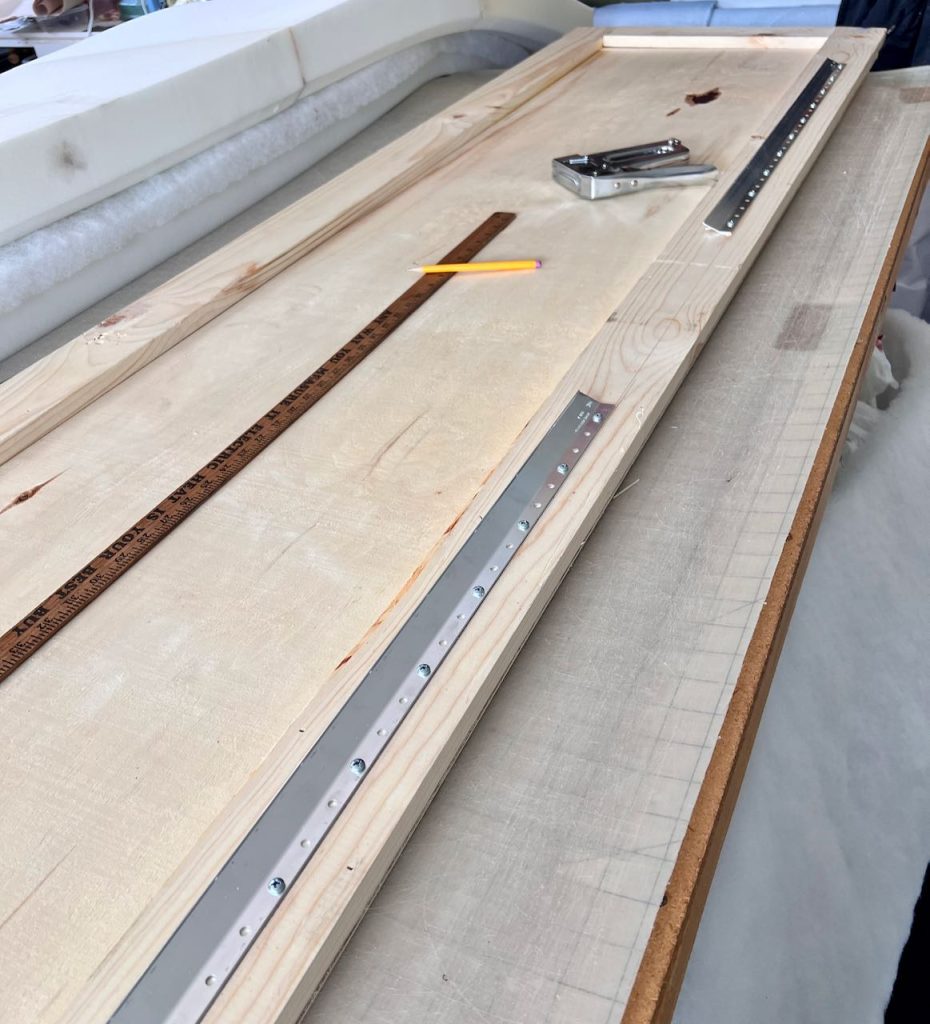
Now determine the placement you want for your french cleats. Space them out and install to the back of backrest on the top frame piece.
Make sure they are perfectly even along the upper back of the backrest. Don’t forget to give yourself enough space above the cleat to staple the fabric.
Step 2) Add Padding —
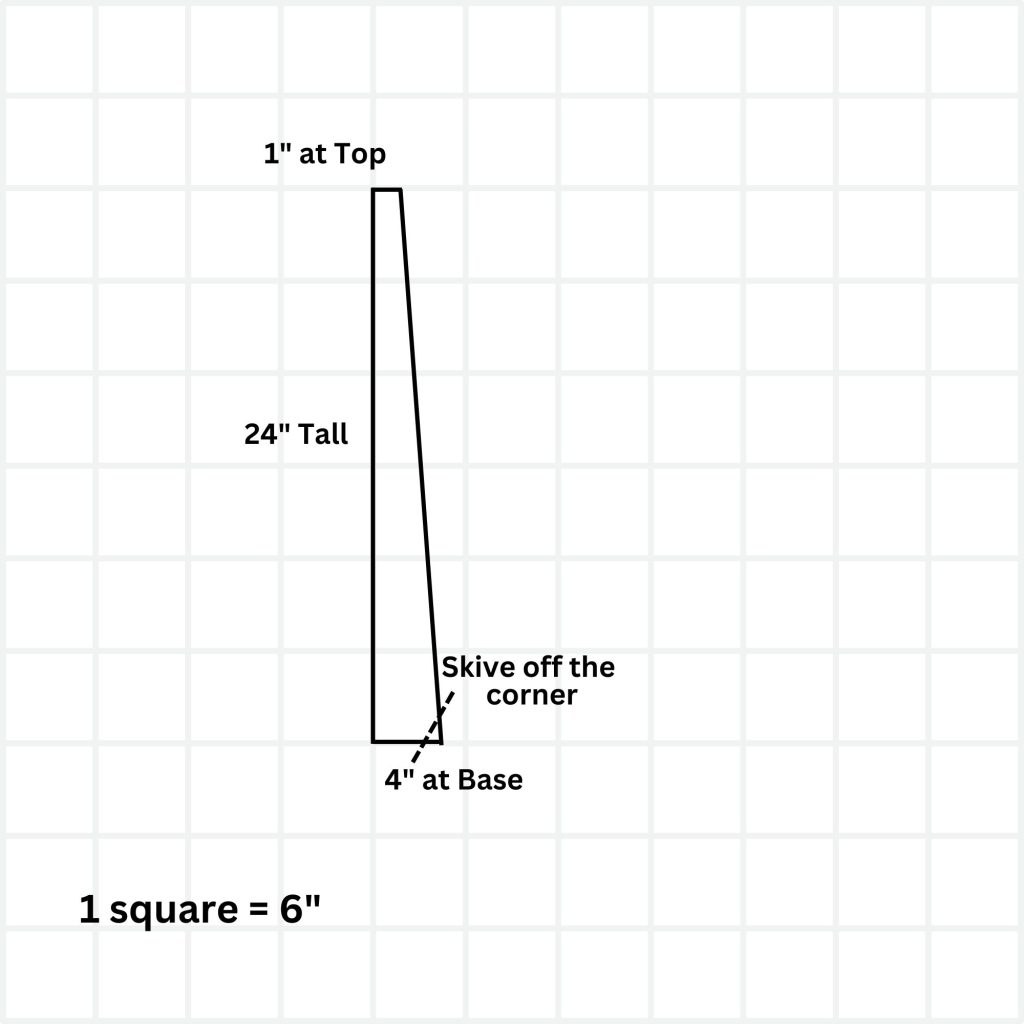
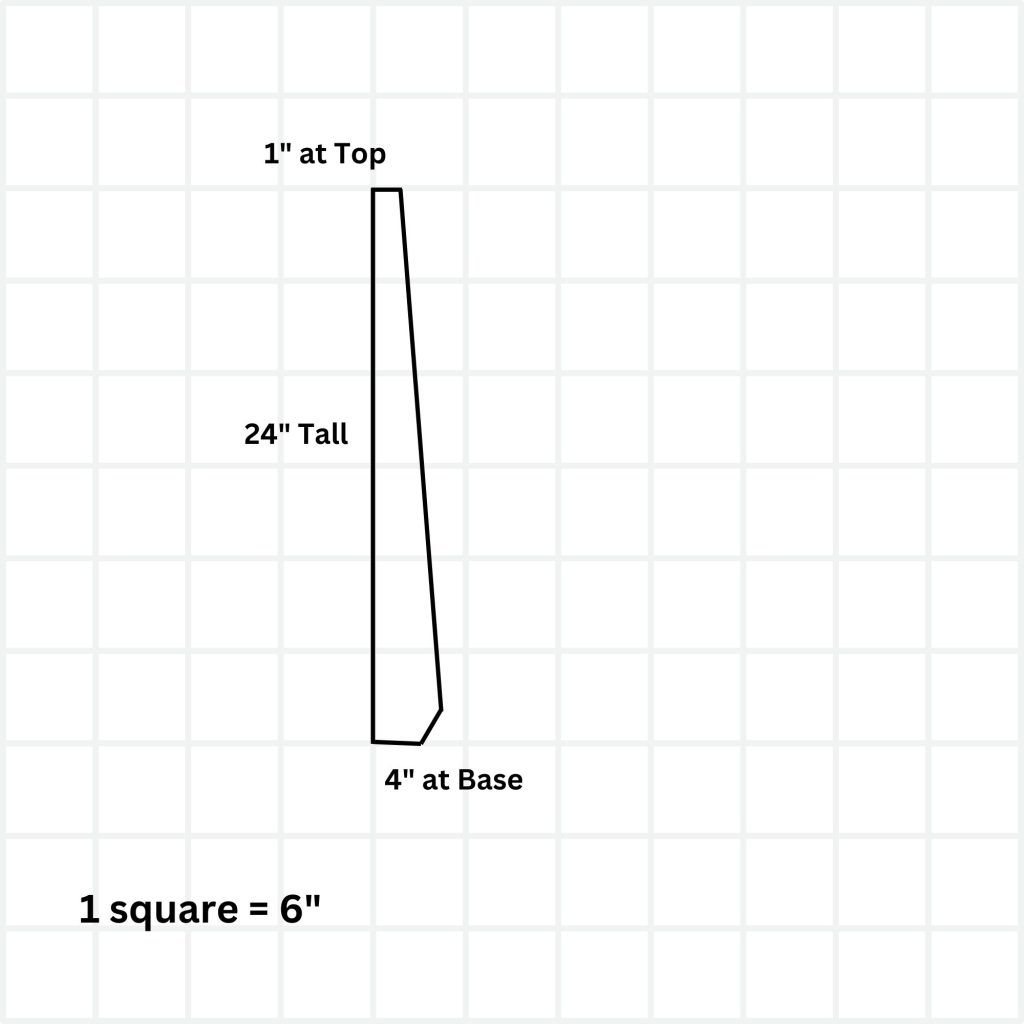
I wanted an ergonomic, slanted back.
Initially, I thought I would accomplish this in the wood framing. But after a lot of frustration, I came up with a much simpler plan!
Don’t bother looking at other options, this is definitely the way to go!!!
The results are fantastic and the effort required was truly minimal.
I went to my favorite upholstery supplier in Kansas City, Comfort Felt & Foam. If you are in the KC area, I highly recommend them.
I drew out what I wanted and they had it ready for me three days later — cut and skived.
Skiving is the process of trimming material off. In this case some foam off at odd angles. They could have made an actual rounded base, but it would have been ridiculously expensive and take a lot of time requiring a custom blade made — No thanks!!
By the time I wrapped it in Dacron batting and pulled it taut, it was rounded at the lumbar support without all the expense.
The only thing I would have done differently? I maybe would have gone with a 5-inch base to get even more recline and support.
Glue your foam to the wood backer board using upholstery spray glue.
Now stretch your Dacron batting over this and staple along the back. Trim off any excess.
Step 3) Upholster the Backrest —
If you need to piece your fabric because your backrest is wider than the fabric running the direction you want it to, jump back up to here, where I shared why and how to center a piece of fabric rather than a seam.
TIP: It’s better to give yourself a bit extra fabric than to run short.
This width will go in the center and will be seamed on each side with another piece of fabric. Be sure to match your pattern is there is a pattern. Also if you fabric has any kind of a nap, or if you suspicion it just MIGHT have a nap, but you can’t see it for sure, definitely use my Pro Trick.
Click here to jump back for tips on Dealing with Naps
Now, back to seaming your fabric to cover a wider backrest.
Cut your fabric to the width and height needed to cover your padded backer board. Be sure to measure where your padding is at it fullest.
HINT: It’s better to have too much fabric and trim it than to come up short. Be sure to measure that width at the point of the thickest padding.
Draw a line where you want to start you fabric on the top back.
Mark the center of your backer board at the top. And marker the center of the top of your fabric with a pin.
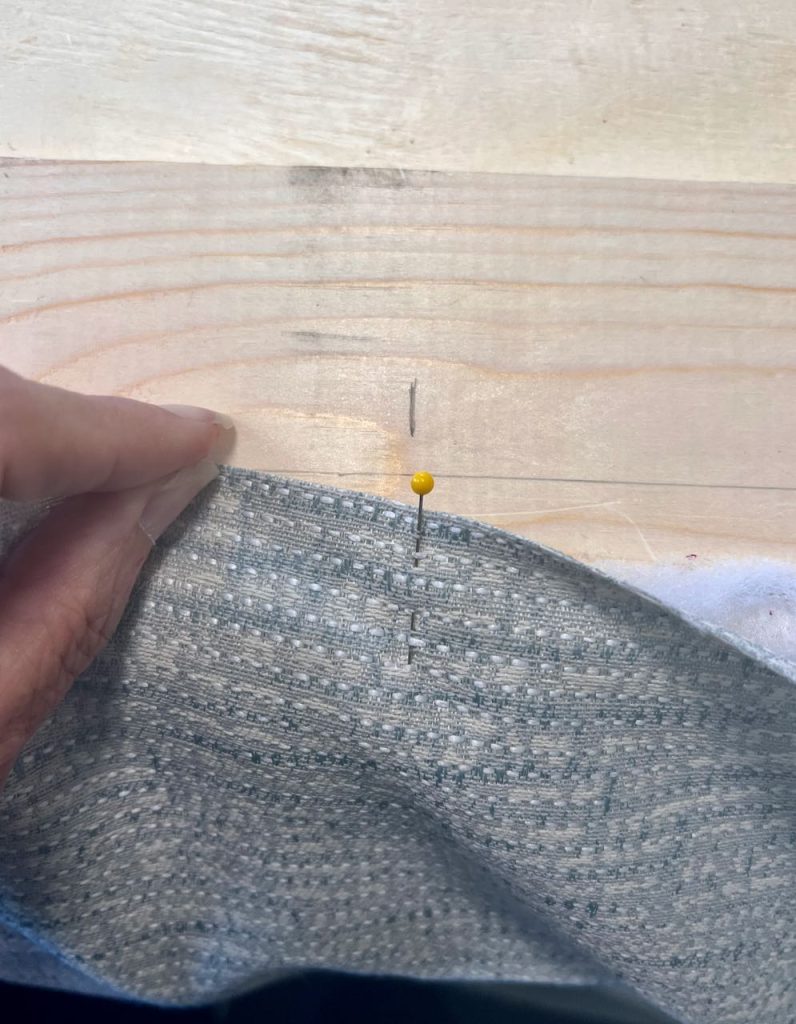
Now line up these two marks and staple your fabric at the line you drew.
Work outwards from center along the top.

Pull your fabric taut with even pressure.

Space your staples an inch or two apart as you go. When it all looks good, go back and add staples between these for a steady, fairly dense line.
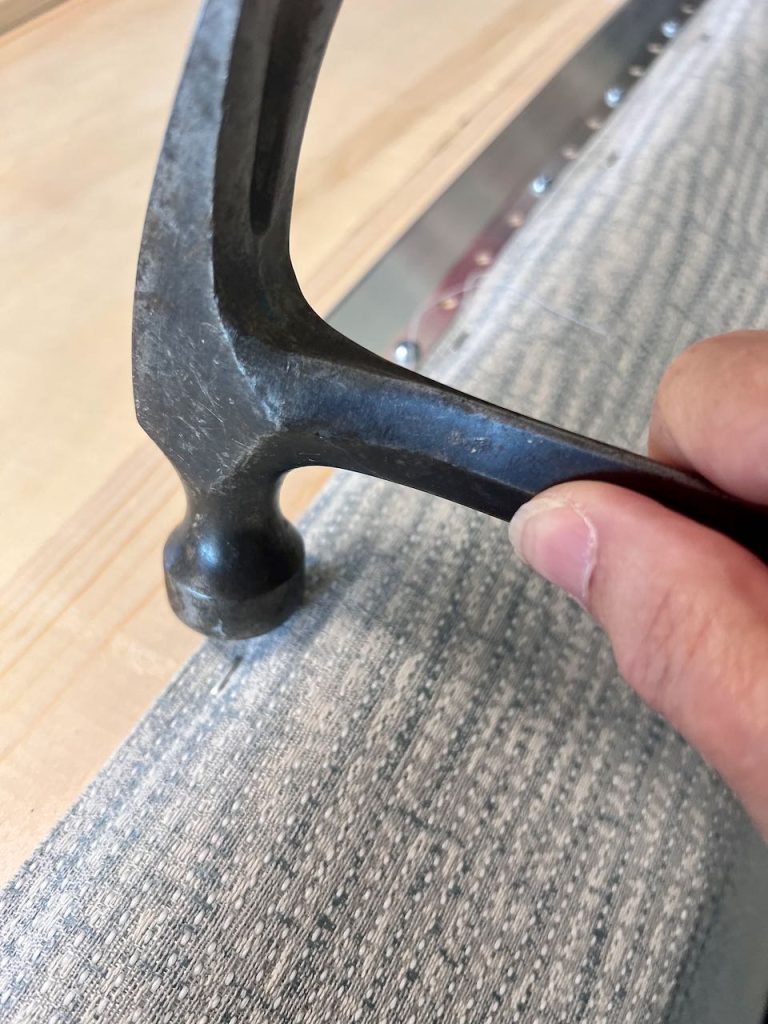
I needed to go back and tap each staple to fully embed it in the wood.
The top is done. Repeat this along the bottom.
I needed an extra set of hands to turn the backer board over, lay the fabric smooth and turn it over again to staple the bottom.
Make sure you are lining up the center marks again. Pull the fabric tight and get the first couple of staples in.
Look it over and see if you think it is tight enough.
OOPS: I stapled way too much of the bottom before I decided it wasn’t tight enough. I had to pull a ton of staples and re do that. Don’t follow my lead on that.
Check it early and maybe two or three times,
Along the bottom, you want to make sure you are pulling the fabric with the same tautness. Use the end of the fabric as a guide. Is the extra amount past the staples about the same. Consistency is the goal there.
Fold your sides in and repeat the basic process, except your excess will vary if the thickness of your padding varies.
Trim some of the excess fabric at the corners to make the corners cleaner and easier to manipulate. There are many ways to fold and staple the corners. I’d do whatever look you like best.
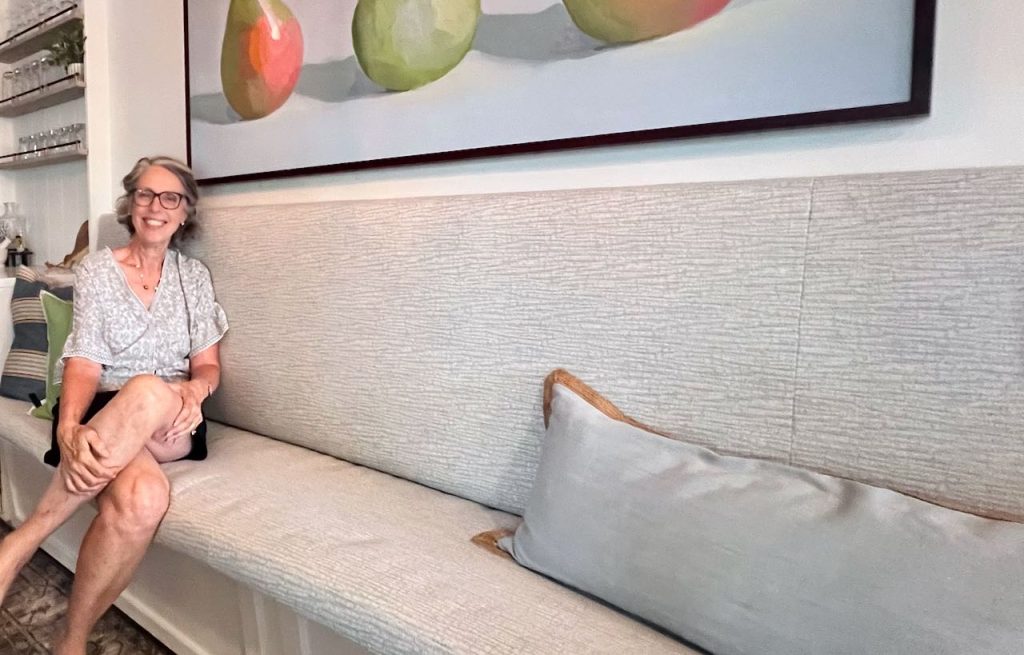
Step 4) Install Your Backrest–
We were so excited to get this up — a huge step forward on what at times felt like a never-ending project.
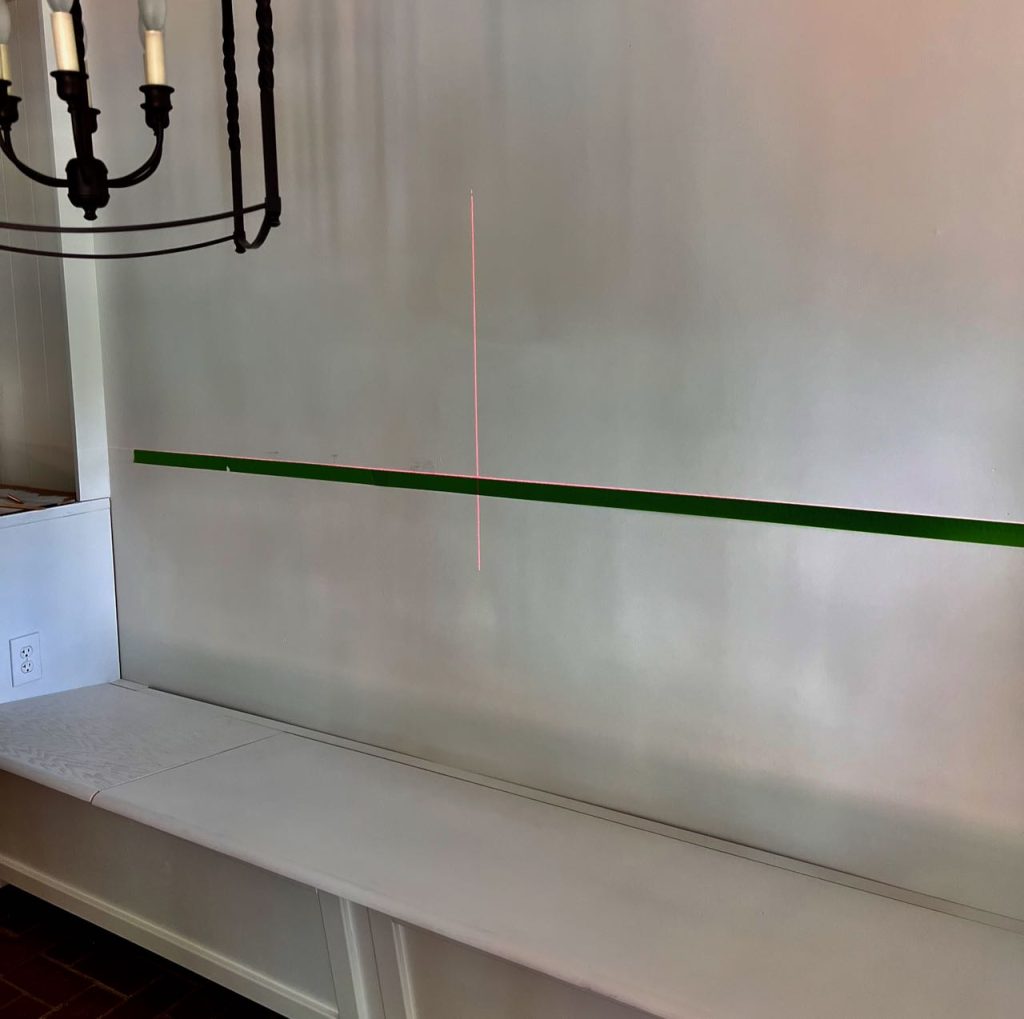
We broke out the laser level and applied painter’s tape at the right height along the laser line.

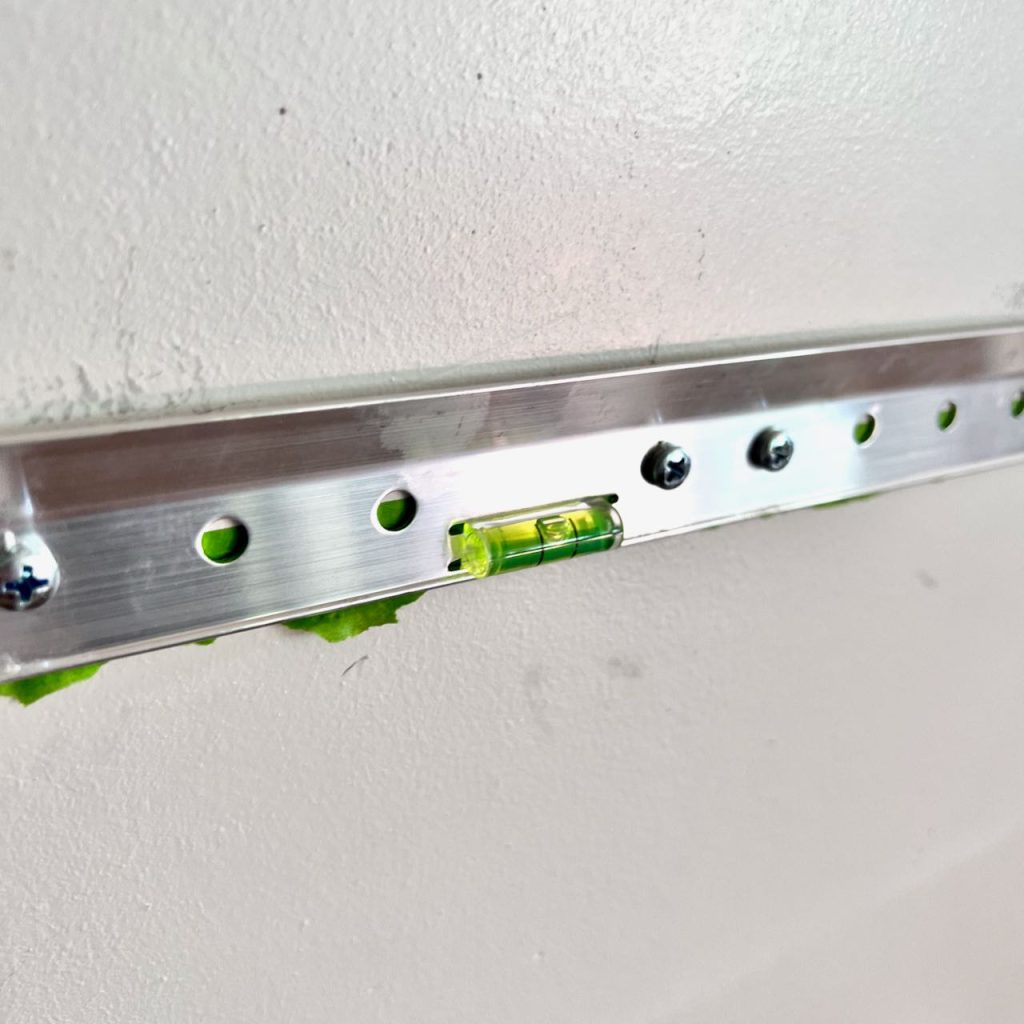
Yes, we, knew there was a little level bubble embeds in the french cleat side that goes on the wall. But I just didn’t trust them. I mean they looked so small, how could they possibly be right?
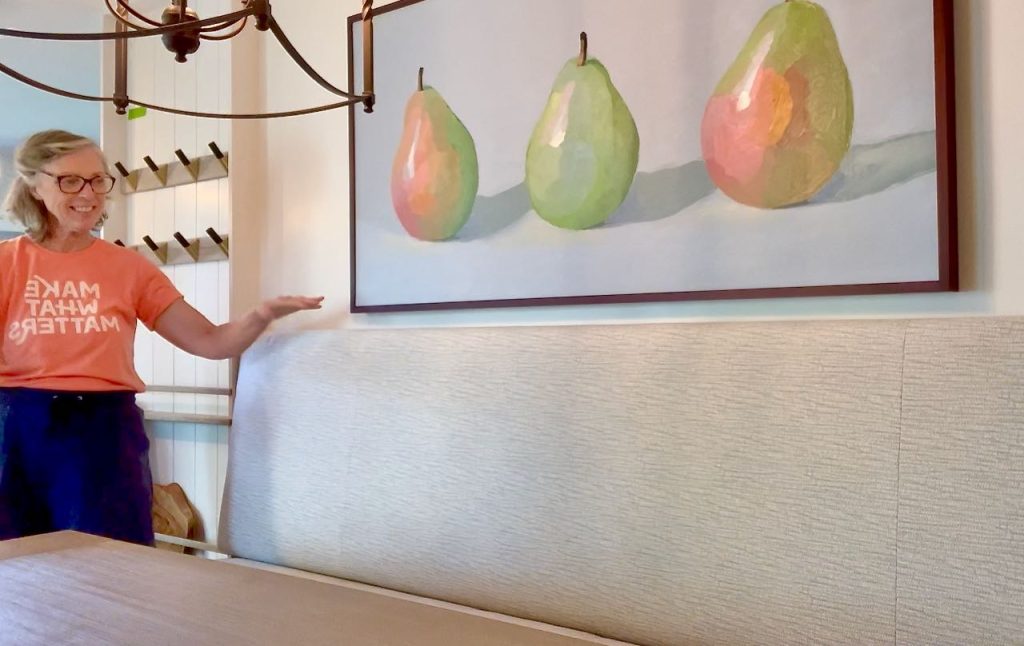
And if our backrest isn’t 100% level, it would be so obvious. What with the long table right in front of it and the large pear painting right above it.
Better safe than sorry! But just saying, you may be able to reduce the steps if you use the same french cleats we used. I’ve linked them in the materials list above.
What a relief! It was so easy to mount on the wall — I was truly amazed!
Phew! I know this was a lot in one post!!!!
Thanks bunches for making it to the end. I hope maybe this means you are going to build a banquette in your home! Or perhaps add a wall hung backrest for a bench you already have. Or maybe you have a bench that just needs a new cushion.
Blog Posts For Each Component of the Makeover
The Bad, The Goals and The Ugly, Plus the Plan
The Dining Rom Makeover Reveal
Building an Ergonomic, Comfortable Banquette
DIY Padded Wall Hung Backrest and Bench Cushion (You’re Here Right Now)
Small Cabinet Bar with Open Shelves Above

Whatever piece you might use. I’m thrilled if I answered some questions. Or perhaps fostered a new spark of inspiration.
My goal is to help you bring an extra smidgeon of joy to your home, your family, your life!
And a gathering of my favorite peeps around a super comfy, inviting table is one of my greatest joys.
As always, please share this with your friends and family.

Interested in the Rest of the Dining Room Transformation?
(Just click on a picture)
The Dining Room Plans
The Reveal!
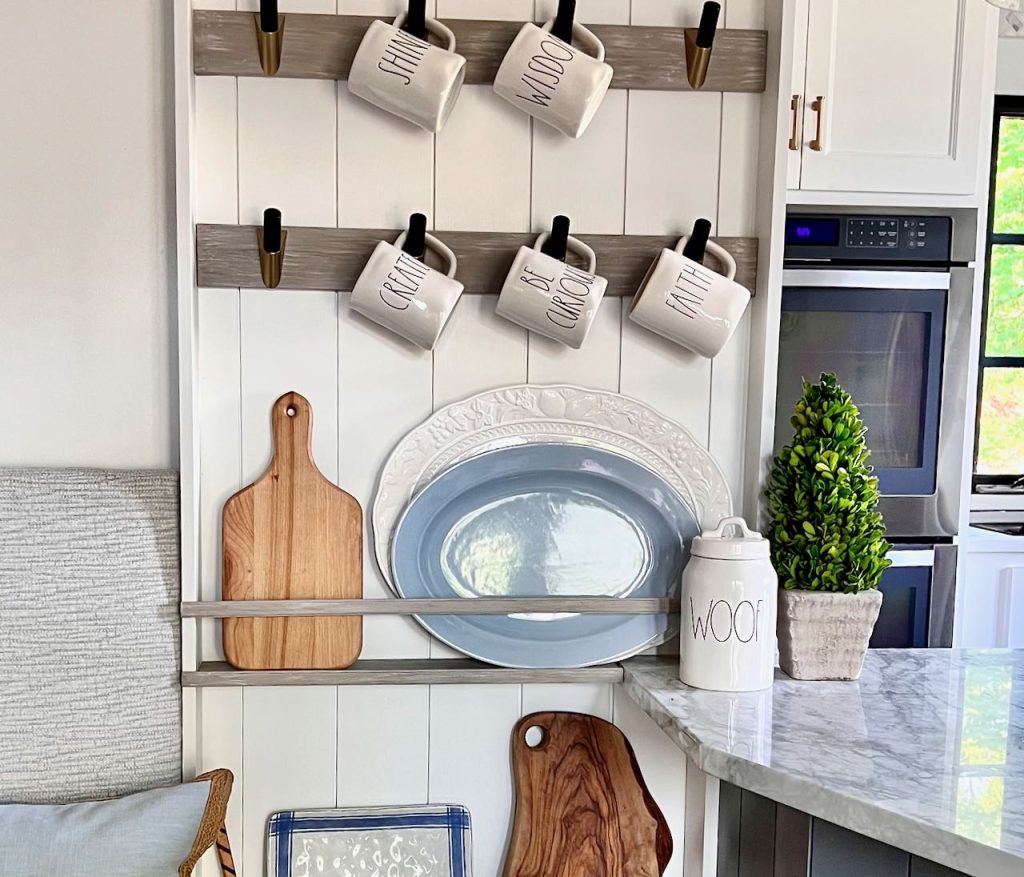
DIY Mug & Plate Rack Wall
Build a Comfy Banquette
That was quit a feat. I have done box cushions for porch furniture and have to say it is my least favorite. I wouldn’t attempt one your size. It looks very professionally made. Great job!
Thanks for a great post and such detail! One question I have: how far from the top of the backrest did you affix the cleat? I’m trying to plan out where I should be putting mine. Is there a rule-of-thumb you went with?
Thank you so much for this post and your YouTube video about Box Cushion construction. Your method with the additional gusset at each end of the zip and the fold to hide the zip as well are both so effective . Genius! Much the best method amongst other posts. Thank you again.