
How To DIY an Inviting Banquette to Comfortably Seat More
Is banquette seating the answer for your home, your family, your style? If so, You, too, can build an inviting, custom banquette for more seating, more storage, more room and usually better traffic flow.
Why built-in banquette seating?
A banquette bench is a great way to gain:
- space savings
- seat more people
- storage
- and many times, better traffic flow
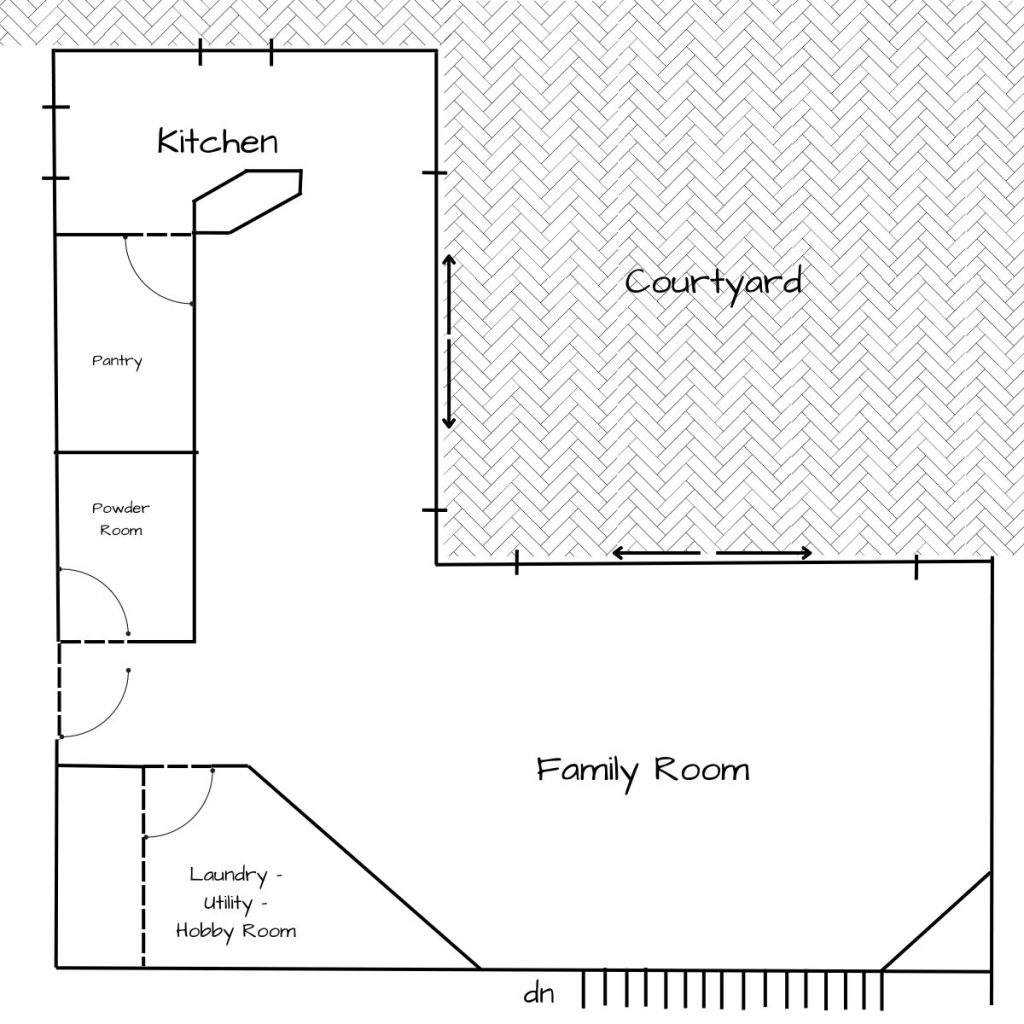
Our dining area is really a wide hallway connecting the kitchen and our family room, along with the courtyard patio.
It’s the center of where we do the bulk of our entertaining.
However, because it is long and narrow, a standard table and chairs cut off traffic. Plus seating eight or more was extremely tight.
The longer we tried to make do, the faster this “room” became a priority.
And this Spring, it became the focus of our One Room Challenge entry!
Today, let’s talk specifically about the banquette portion of the makeover.
We bought this quirky 60’s home five years ago.
Warning: this is NOT a pretty picture!
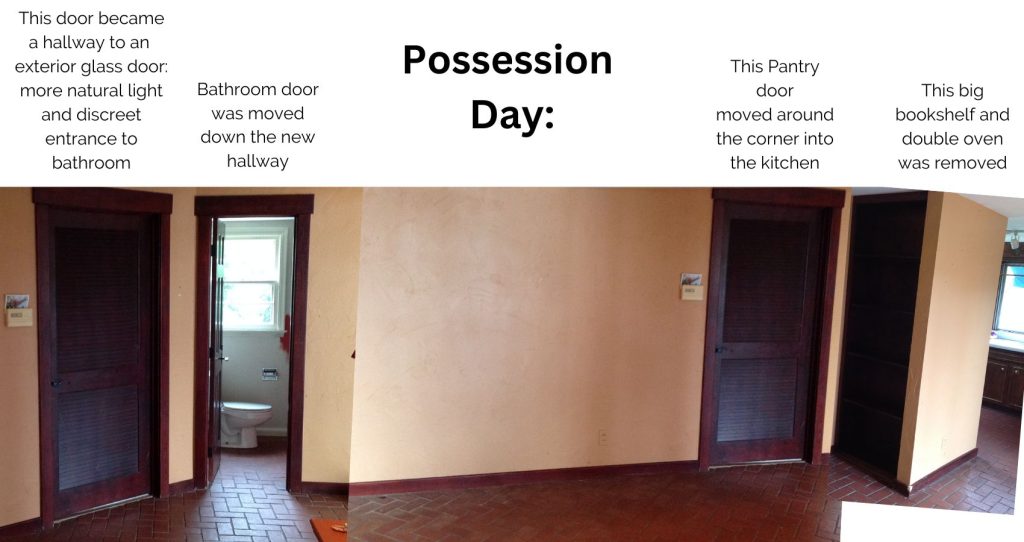
Before we moved in, we hired a contractor to remodel a number of larger items including the kitchen, the two full baths upstairs and converting the car port into a two car garage, that so far has served as my sewing studio.
As part of those initial renovations, the contractor relocated two doors that were in this wall. This helped immensely in turning this wide hallway into a dining area between the kitchen and family room.
Before this latest One Room Challenge makeover, it looked like this:
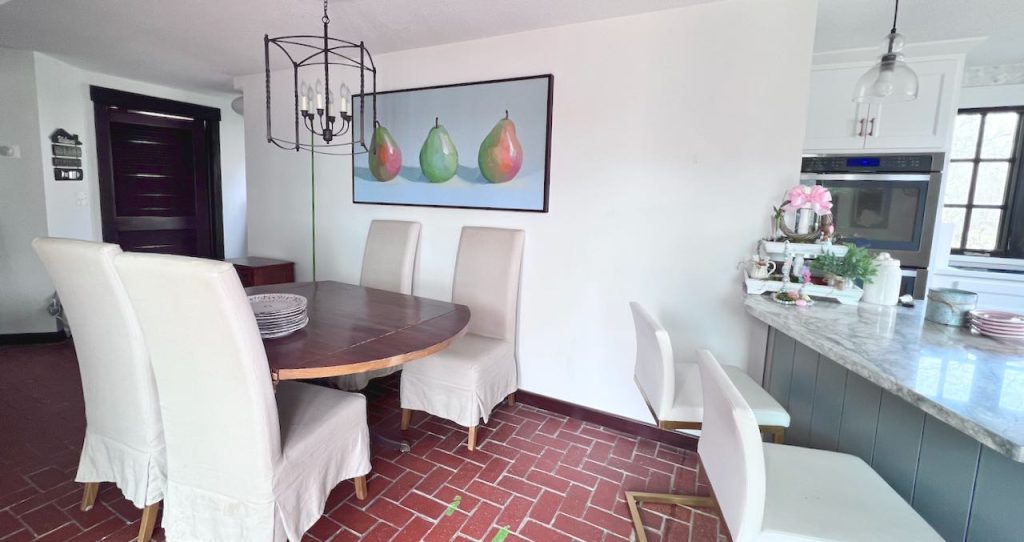
This gave us an almost fourteen foot uninterrupted wall — hallelujah!!!!
So very much better, but it still was not functioning as, or feeling like a real dining room.
We spent a lot of time analyzing how we use this space and how we wanted to use this space. We had a specific set of goals for our remodel. And we developed a plan based on these.
The banquette is the centerpiece of our plans and dreams. You can click here to delve deeper into the issues of the space, our goals and the plan.
Today I want to help you decide if a banquette might be a good solution for your home too. Plus we’ll go through all the elements that need to be thought through to customize a banquette to your specific needs and your style and you home.
Our banquette is custom to our home and our family. It probably won’t be the perfect solution for you, but it can be a great jumping off point and a great exercise to go through the same decision-making process we did.
Considerations When Planning a Built-In Banquette
Shape of Your Custom Banquette–
The shape of your room and all the components of your room will dictate the shape or layout of your banquette. Will it be straight like our own banquette, or will it be an L-shaped bench, or corner bench, or fill a bay window, or maybe line the walls of an existing dining nook area?
You can see why we built one long banquette — across from the 12 ft wide sliding glass doors. It expands the kitchen and also serves the family room.
Built-in banquette seating is an efficient use of space and creates a cozy place for more than just dining.
Because an individual dining chair requires more space than an individual sharing a long bench. Bench seating may be the solution you need for a seating area in smaller rooms or larger awkwardly shaped rooms.
Starting & Ending Points (Transitions)—
One of the things that can make banquettes look clumsy and appear to be an afterthought, is how and where you begin and end them.
If you are filling a wall with just the banquette bench, that’s pretty straight forward. If you’re planning a corner unit, then it might begin and end at doorways. That’s pretty straight forward.
But if your situation is like mine, a banquette in the middle of a long wall, you should determine the starting and stopping points.
In our case, I designed a plate and mug rack wall on the kitchen side. And a dry bar with shelves for glassware on the family room side.
Not only did these additional built-ins create great transitions, they also addressed several problems we were struggling with. I talk about these more in the planning post, and then again in the reveal post.
These three builds together, integrated with our kitchen island, made our kitchen space feel so much larger. This space became more like a combo kitchen and dining room that also serves the family room. With no formal dining room, this area provides that much needed dining space!
Extra Storage Space—
Is it even possible to have too much?
Certainly not in older homes — and when you have a weakness for dishes, trays and so much more . . . just saying ???? ???? ????.
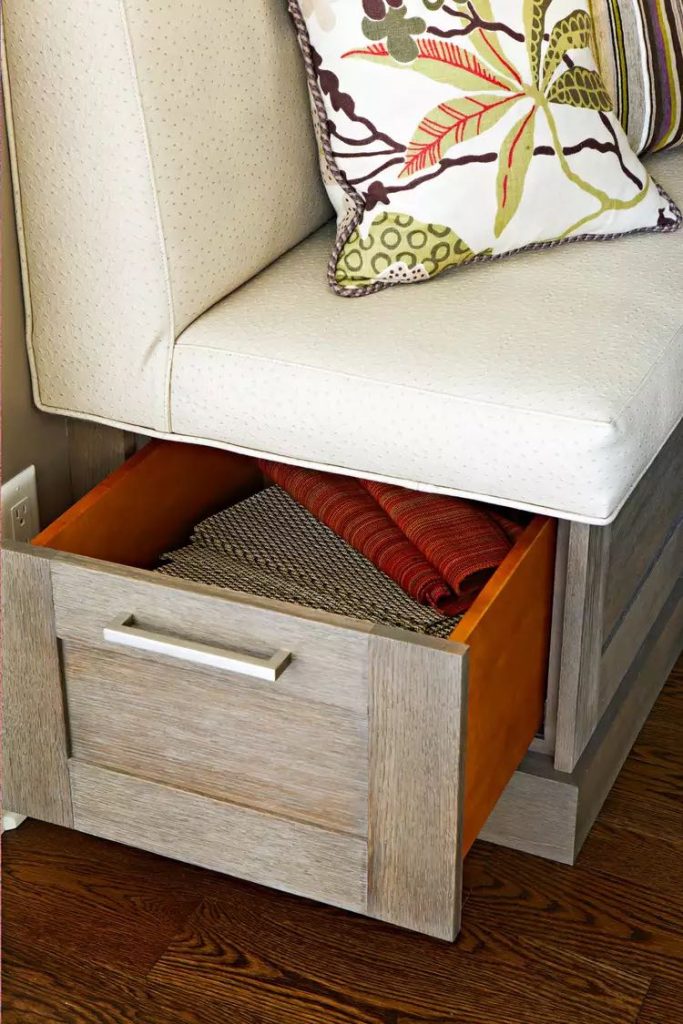
If your banquette will end at a doorway or on a wall where the end of the banquette is exposed, I love the idea of a long drawer to access the space, like above, from BHG.com.
Drawers are the easiest for access, but the tradeoff is that you lose some of the precious space. Remember the drawer box is smaller than the opening and because of the internal structure (like 2. x 4’s) the opening is smaller than the entire space.
There’s always trade-offs, right? So figure out what works best for your home.
Because I planned additional built-ins at the ends of my banquette, the storage space under the seat will have to be accessed by raising the seat top via hinges along the back.
Some banquettes have drawers that open out the front, I have never understood the practicality of those. You’d have to move the table completely out of the way to get to anything.
Remember, I’m a “Function First” believer.
Okay, you’re right! I’m a downright “Function First” evangelist , always spreading the word.
My lift top is not as convenient, but it will be great for things I don’t access frequently like seasonal dishes and decor.
In my world, it must function, and then I can always make it lovely.
Ergonomics—
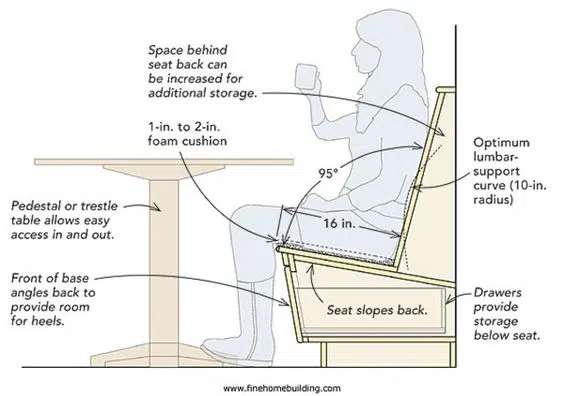
What is ergonomics? I call it the study and principles of comfort as dictated by our human physiology. But it also includes safety, efficiency and aesthetics. Here and now, I’m focusing on comfort.
If a workstation is ergonomic, it is designed to minimize fatigue and minimize the effects of repetitive actions on our bodies
For instance, wrist supports for someone who works at a computer most of the day. These can stave off carpel tunnel syndrome.
An ergonomic chair and desk will allow for proper back support while sitting for hours and can be adjusted so that you can sit at tthe optimal angles of 90 degree bends at our ankles, knees, hips and even elbows.
My goal for the bench seating was comfort! my goal is for our family and friends to want to sit there for hours and hours, eating, conversing, laughing, playing games, making memories.
I researched and researched all the best angles and heights for banquette seating. This post was particularly helpful, and so was this one.
Of course, for simplicity, I would have loved to build the banquette from some pre-made cabinet boxes or an IKEA box on a raised frame. But then I would not have achieved my no. 1 goal of comfort.
Plus the base would not angle back as it gets lower to the floor allowing room for legs and heels beneath you. With children in particular the box would be kicked constantly. That would be kissing great function right out the window.
I would strongly advocate that this method be used only for areas such as mudrooms where you won’t be sitting long.
The best of the articles I used in my research are on a new Pinterest Board I created for you. I want to make it as easy as possible for you to determine if a banquette is a good solution for you and then help you go about designing the perfect custom banquette that you can build yourself. Or if that just isn’t your thing, at least you will have solid criteria and designs to give to a carpentry builder.
The Table–
It’s important to consider the dining table or kitchen tables you will pair with your banquette. The most critical factor is that the table must be a pedestal table or trestle style table. It’s really the only way to go!
You do not want a table with legs at the four corners!!!! If that is the case, anyone sitting on the banquette has to crawl past the table leg and then lower their legs back down over the edge of the seat.
I mention this now so that you know the entire scope of this project. If you were planning to use your existing traditional table, all may not be lost! The thrift stores I frequent usually always have one pedestal table, and often three or four, in stock.
HINT: Think about whether you can refinish or paint the thrifted pedestal to use with your table top.
You may be wondering if the table needs to be the same length as the banquette.
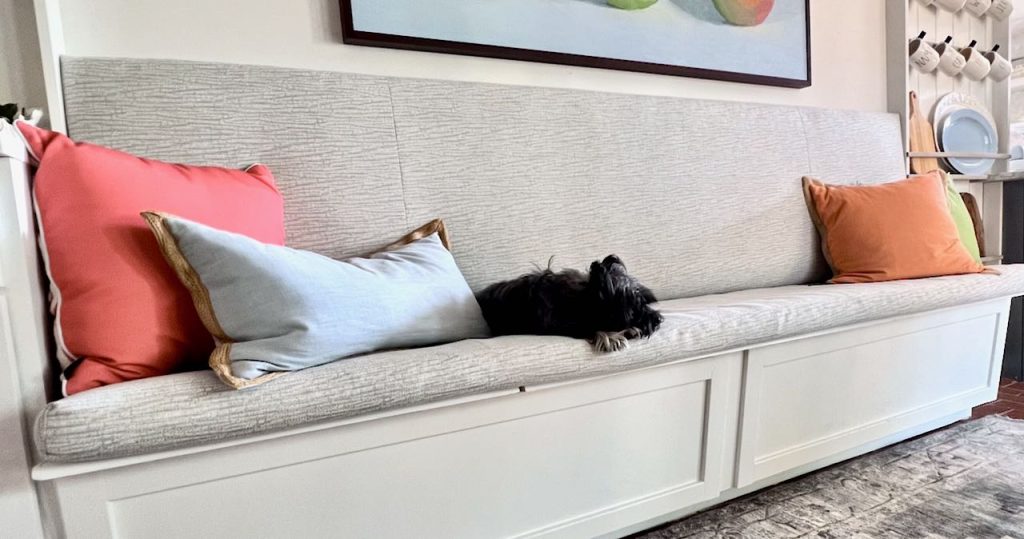
I say No! I purposely designed our banquette to be longer so I could add some colorful throw pillows. Also I like to be able to sit down and then skooch over to my spot behind the table.
Plus, this allows for a table leaf to be added and the banquette still fits the table.
Power—
Don’t forget about all our power needs in today’s living.
I like to sit at our banquette part of the day to work on projects, and to do my blogging computer work. This way I can be near The Hubs while he’s in the kitchen whipping up dinner, like my favorite Mashed Cauliflower!
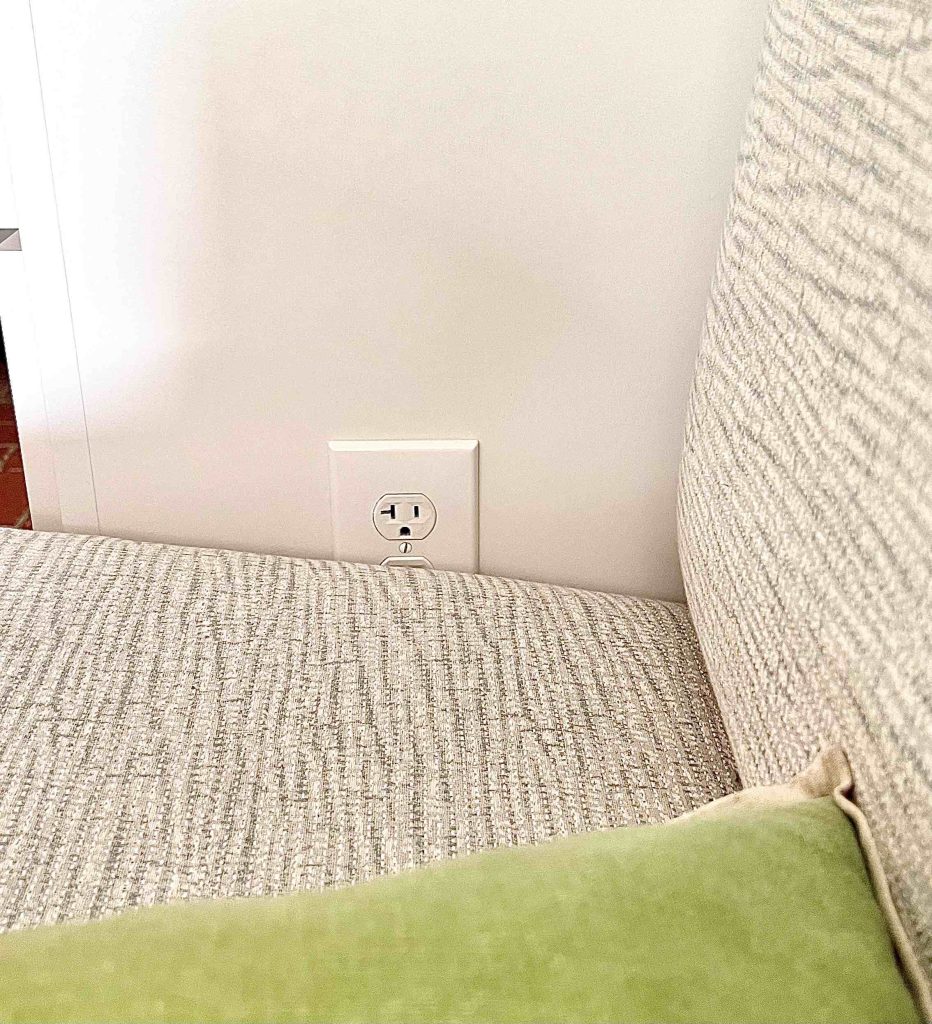
There was one outlet in the middle of this wall that would be buried by the banquette, so I had our electrician pull that power through a conduit inside the seat, across the wall, into the side of the dry bar and then into an outlet we added to the side of the dry bar down low by the seat cushion.
It received a workout when the kids were all home recently with all the laptops and tablets in use at this new gathering spot.
And it sure will be handy when we want to offer a blended cocktail as the signature drink for an evening get together.
Backrest—
You also need to determine if you want to include a backrest.
It was a must for us — totally non-negotiable for me. Remember one of my highest goals was comfort. There, I said it again! Surely you’ve got the message by now.
But there may be some instances where a backrest is not really necessary.
I can see not adding a backrest if your kitchen is very small, your children are young-ish and your banquette is only for family meals and perhaps homework station. Especially, if there is a window that would interfere and you have a proper dining room to serve larger groups and “special” meals.
And then if you are adding a backrest, will it be integrated in the construction of the banquette ( I discovered that’s how most are done when I was researching how to build a banquette), but I decided I wanted an upholstered panel hung on the wall.
The main driver for this decision is that it would save another 3 – 4 inches of depth required. Every inch helps the traffic flow in our room.
So by hanging an upholstered panel on the wall that includes lumbar support, I checked the comfort box AND function by gaining a couple of inches in the traffic flow department.
Upholstered—
Do you want your seat and any backrest upholstered?
Again, my top priority was, say it with me, “comfort”! As this is our only dining room/space, I opted for a tall upholstered backrest and a long (separate) cushion for the seat.
This gave me the inviting, but casual look plus comfort I wanted.
Your room may be needing something completely different.
If you have a backrest, do you want it attached to the bench or wall hung? Either way, do you want it upholstered?
If you want seat cushions, do you want it as separate, loose cushion(s), or as a padding with a taut cover stapled in place (similar to most restaurants)?
Your decisions regarding a backrest and upholstery need to be made now. It will affect the way you construct the bench seating.
How I upholstered our backrest and and made our separate cushion will be covered in the next blog post. Keep an eye out for it.
Or better yet, so you don’t miss anything, please consider subscribing. You control how much is right for you!
Thanks so very much! Now back to building!
Windows and doorways—
Do you have windows that will interfere with the your built-in banquette?
Yes, sometimes these can be moved or modified in size to accommodate your plans. That will incur extra expense, but in some cases it may be well worth it. Just be sure to think of these and plan according before, rather than in the middle of your build.
Time for the Plans & Build
My Plans–
The steps I’ll lay out are the steps we took in building our banquette. You may need or want to deviate from them here and there. But they worked great for us and the end product is beyond my expectations.
We took it slow and watched lots of YouTube videos. Keep in mind we had almost zero carpentry experience.
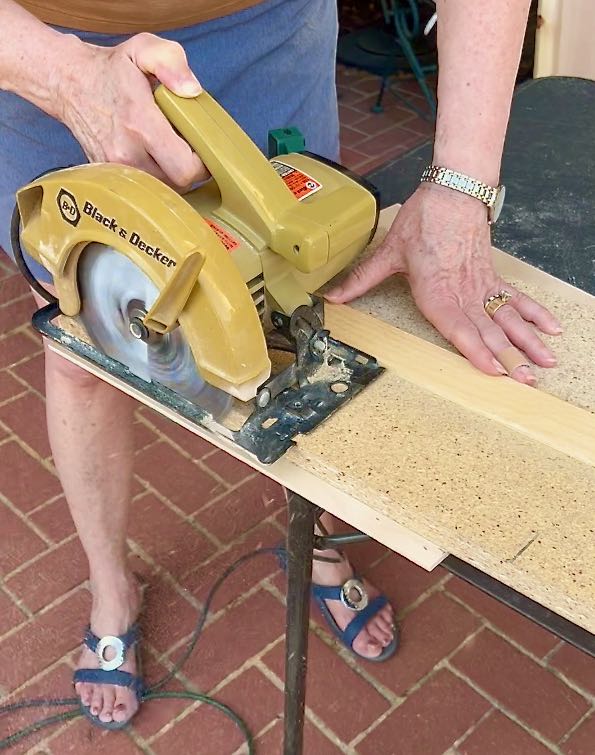
And our tool inventory is NOT extensive. Our workbench is a plastic folding table from Walmart. We made a jig so that our ancient circular saw could function like a table saw.
We just had a vision and determination to make this dream come true. You can too!
I’m telling you this to encourage you to try something that challenges you. Break it into the small steps. Tackle them one at a time and you’ll be amazed by what you will accomplish!
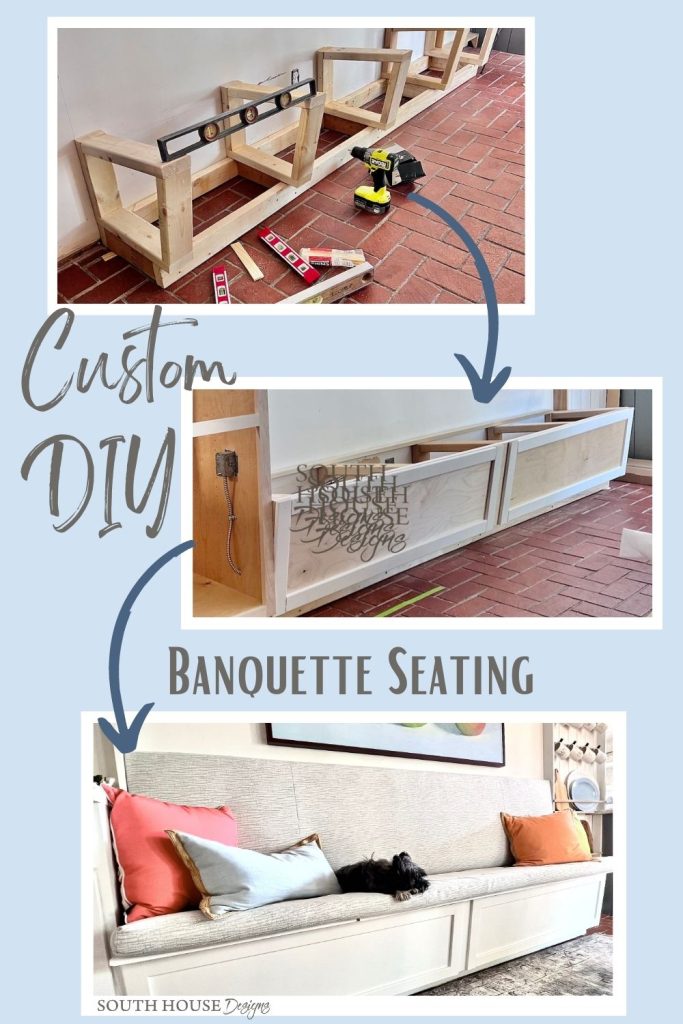
Cut & Install Base Frame–
We installed the plate and mug rack on the kitchen end of the banquette first. Then we assembled and installed the cabinet portion of the dry bar on the other end of the wall.
The banquette fills the space between for one large built-in.
So now we knew our banquette would be 100 3/4-inches long and we could set to work on the base frame.
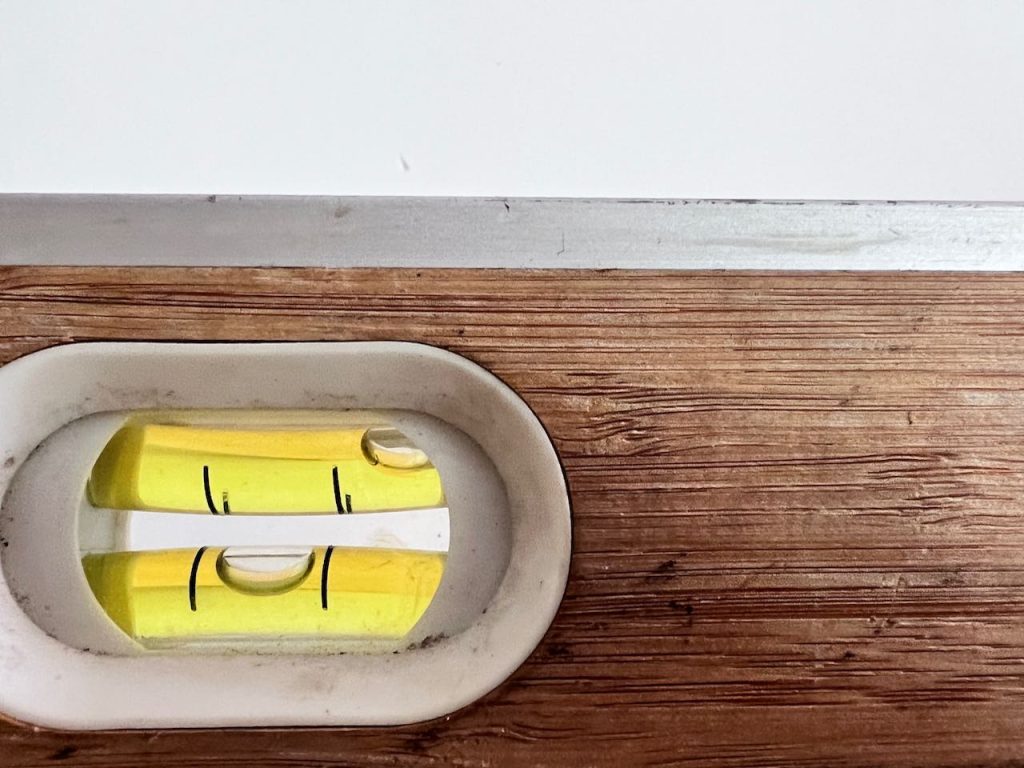
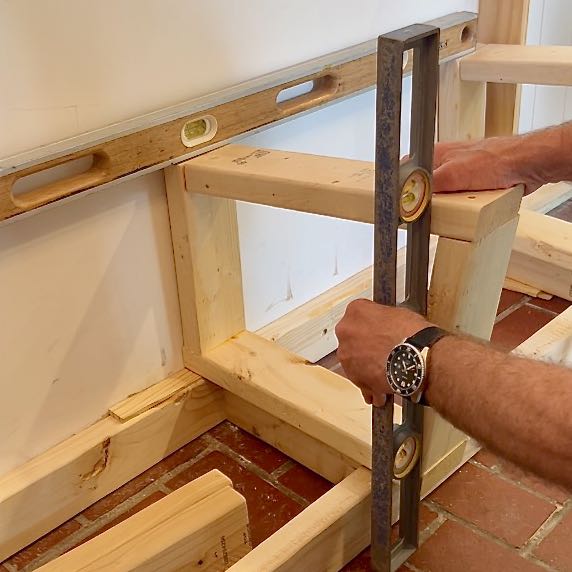
We have 60 year old brick floors, so we spent a lot of time leveling this base frame. But even in new construction, this is critical.
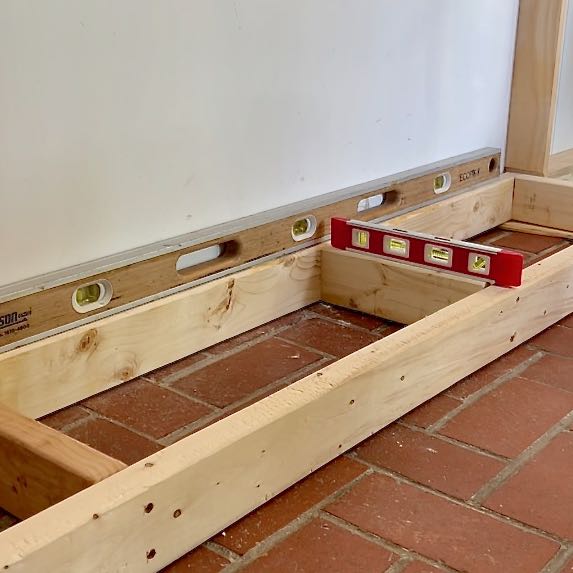
NOTE: You want your base to be perfectly level side to side, front to back, AND vertically!!!
Take your time and get this right and you will avoid a world of headaches!
You’re right, this is not a particularly pretty picture! But at this point in the “game” it looked mighty beautiful to us.
Remember: In large, challenging projects (and in life), it’s important to stop and celebrate the victories, no matter how small they might seem.
2 x 4’s are the standard for the framing, the infrastructure so to speak.
This base is really a long rectangle, sized to your banquette.
The vertical front face of our banquette will slope inward per the diagram. But we also wanted a 4-inch toe kick space. So this determined the placement of the front 2 x 4.

The back 2 x 4 is screwed into the wall.
We used five internal frames, including the two ends. So we installed our front to back spacers in those same planned locations along the front of the brace. These were attached with decking screws through the front using a corner brace and then toenailed into the back wall mounted 2 x 4.
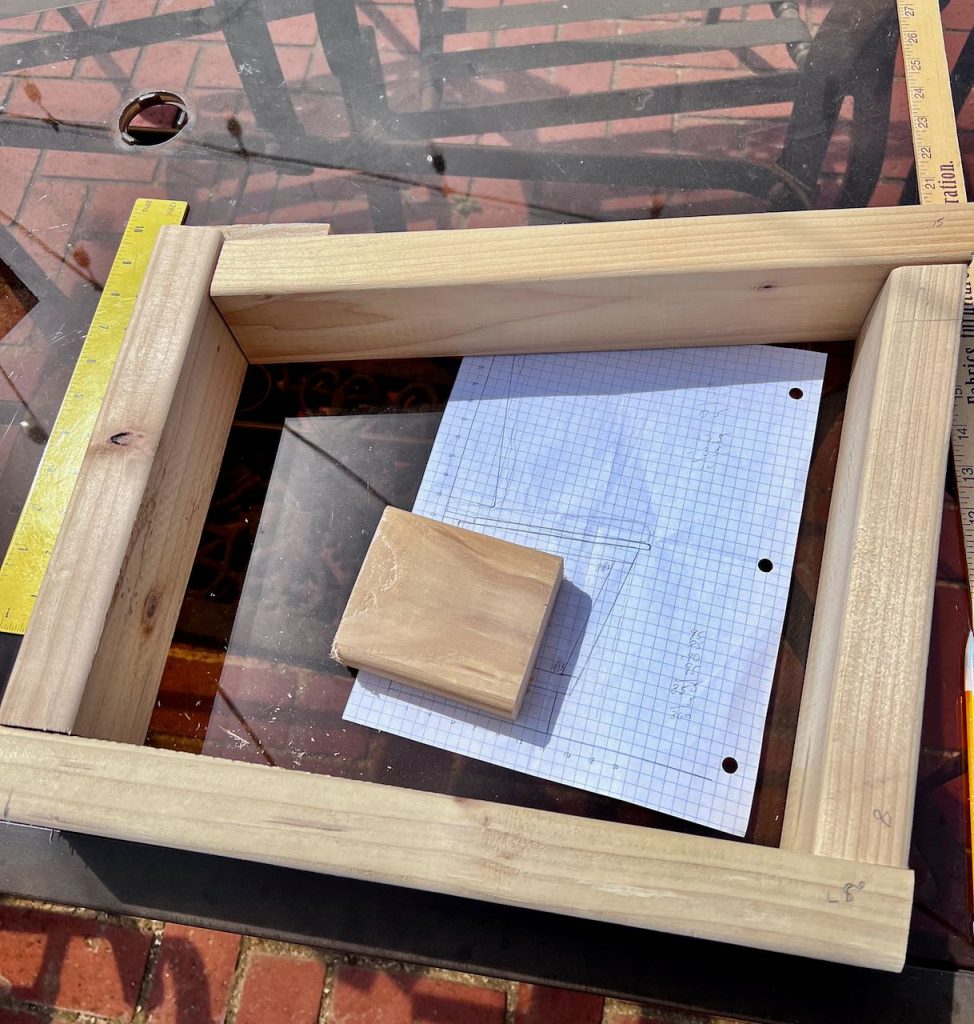
Cut & Assemble First Internal Frame–
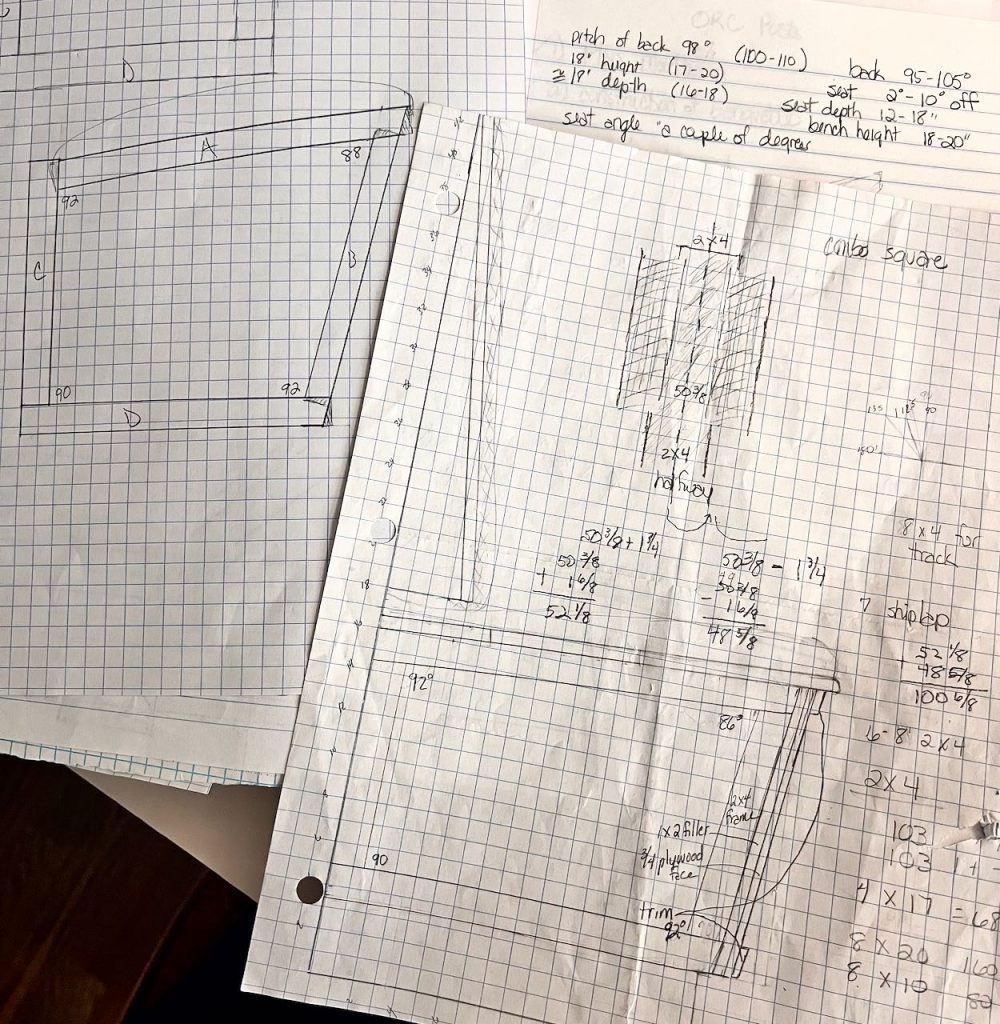
Per our detailed diagram, using our compound miter saw, I cut each of the four sides.
This was a little tricky. Honestly, I admit to several trial and error cuts adjusting the angles.
Once I had what I thought worked well, I made a second set duplicating each piece and labeled them A thru D.
I then assembled one using glue and wood screws. Doubled checked everything.
Reproduce All Remaining Frames–
Then, when I determined all was good, It just took a couple of minutes to cut three more sets using the unassembled one as my guide.
I had been warned that since only one angle is a right angle, reproducing the exact same frame multiple times would be very difficult. But using this method (based on some production sewing techniques that I use in my studio) made it simple and rather fool-proof.
Check out this quick video to see just how easy that was:

Install all Banquette Seat Frames —
This is where all your careful measuring pays off. One frame sits on each of the back to front stretchers in the base frame.
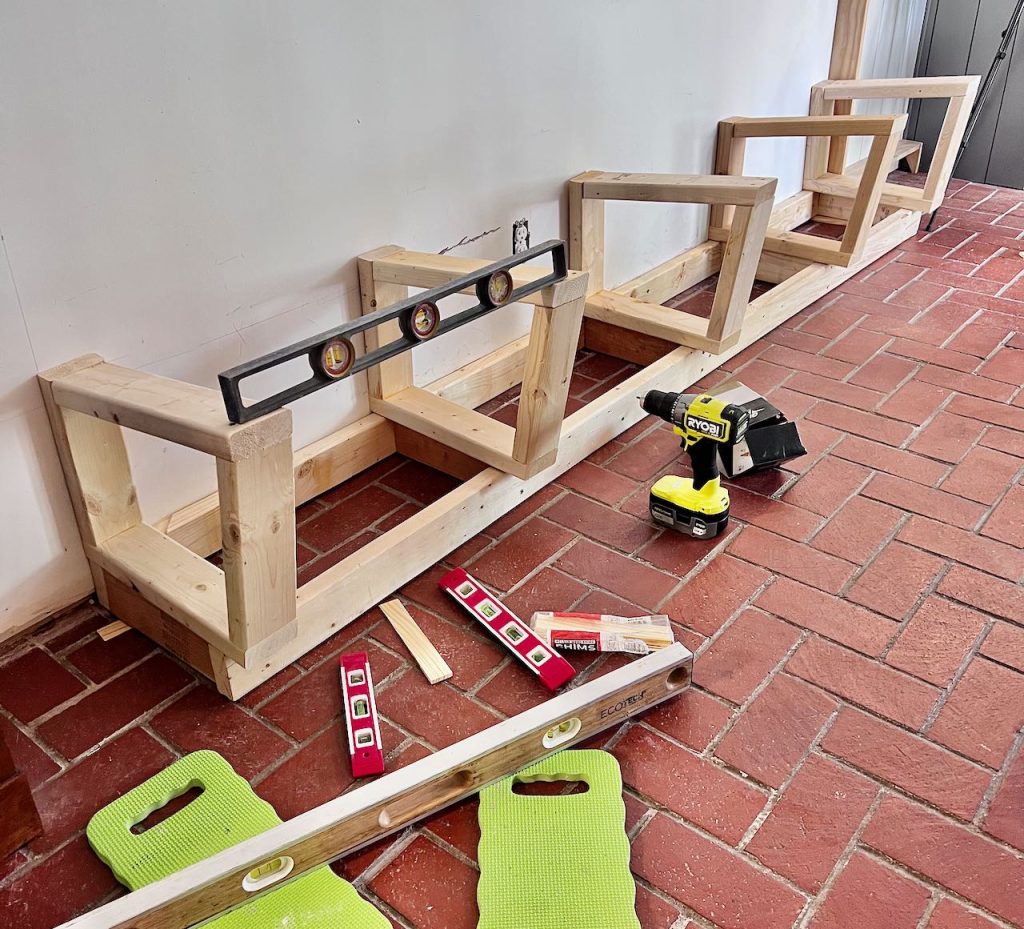
But before you screw them into the bae frame and the wall, make sure that everything is level:
- Along the top against the wall
- Along the top in front
- Each frame vertically
Measure, Cut & Apply the “Skins” —
Now that the basic structure was built, leveled and securely in place, it was time to add the edging that the skins would attach to.
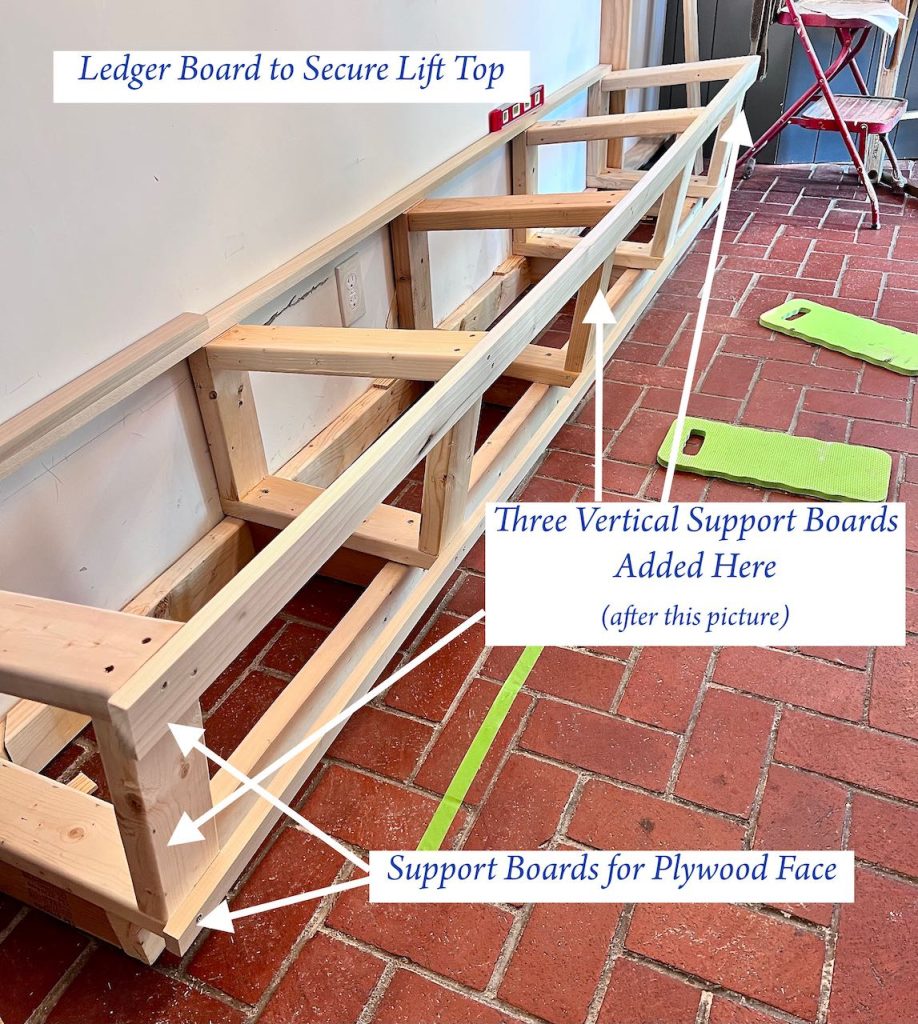
We added 1 x 2’s along the bottom and 1 X 4 along the top of these internal frames and vertically on each end. Sorry, I missed taking a picture with the vertical pieces.
With these in place, we carefully measured, then measured again and once more for good luck, the length and height for the 1/4-inch veneer plywood we used for the skin. To hide the required seam, we planned the placement of it to fall beneath some planned trim.
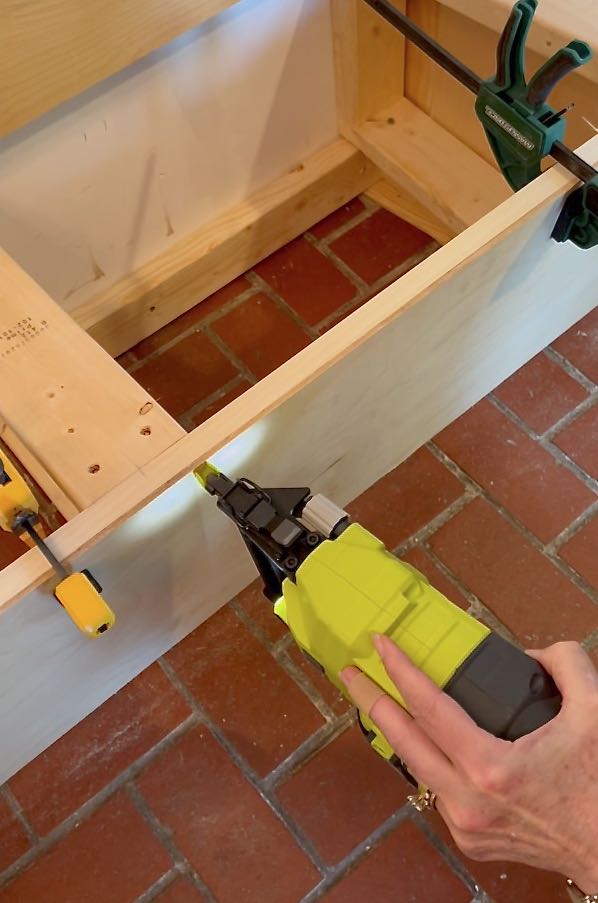
With a brad nailer, I attached the plywood skin. Then again with the brad nailer (LOVE this power tool — we have used it so much more than we ever anticipated) and with clamps and levels in hand I applied the accent trim.
Did we need this trim? No, not at all. There is no function to it . . . . besides making me smile. But this is a focal point of the room and I wanted it to feel complete.
You see, we didn’t hire a finish carpenter to build our custom banquette, but that doesn’t mean it can’t look like we did, right? I wanted some simple trim that matches our base moulding and coordinates with our kitchen and dry sink cabinetry.
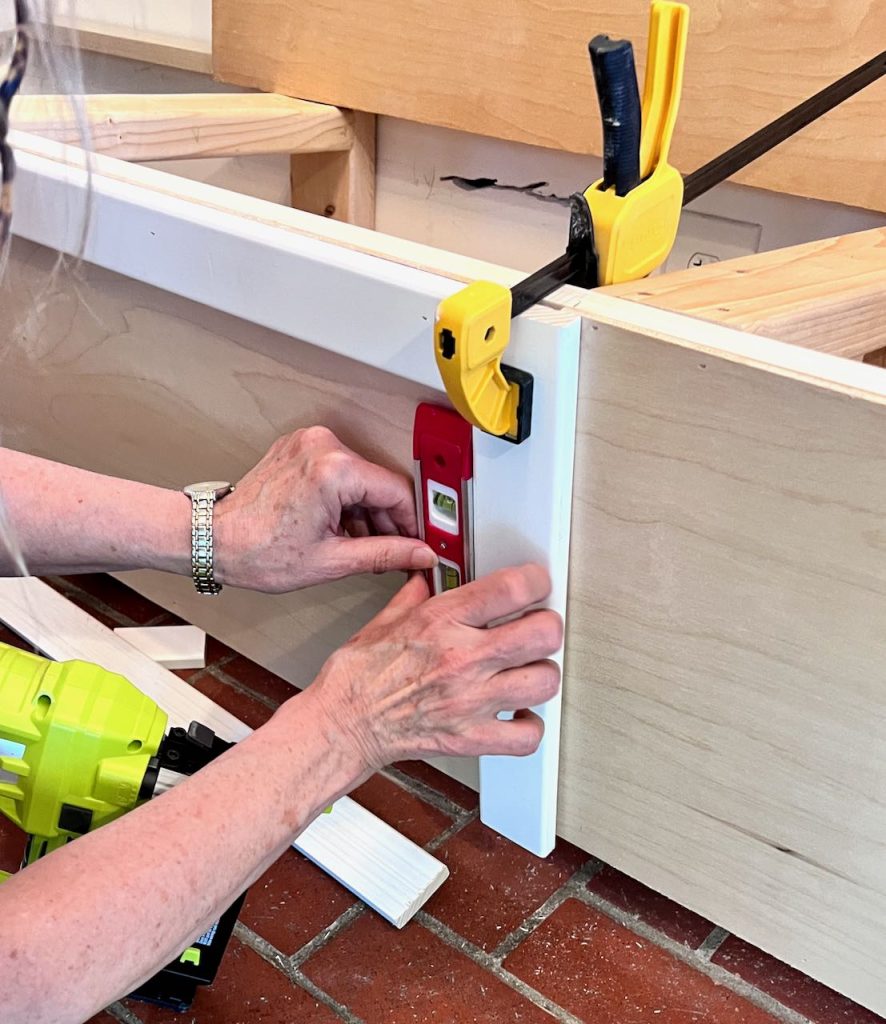
It doesn’t show a lot because of tthe table. But you definitely see it and it gives the banquette a high quality feel. Well worth the minimal investment in time and materials if you ask me,
Measure & Cut the Bench Top
You may have wondered why the vertical piece of the bench frame’s right angle was cut straight across. No, that wasn’t a short cut, or lazy maneuver. It was because we planned for a bench lid.
A bench lid that lifts open needs a narrow strip of wood to hinge to. And that wood strip needs to be attached somewhere/somehow. That narrow strip of wood with be attached to that back flat piece of the frames to hold the seat lid securely in place.
Using our makeshift circular saw turned table saw set-up, we cut two pieces of 3/4-inch plywood to the right depth. Then we cut them crosswise so that they meet over one of the internal frames.
With comfort in mind, we added 3/4-inch quarter round along the lip of this lid to soften that edge. We discovered that because of the angle and the seat is nice and deep, after a bit of time, the sharp cut edge of the wood would not be comfortable. With it’s new rounded edge and the addition of the cushion, it is now super comfy.
HINT: Large quarter-round on the seat edge makes it more comfortable. Be sure to add that in when figuring the depth to cut your bench lid.
We took a bit of a break here to finish all the built-in detailing on the dry bar and plate & mug rack. This was so I could spray everything white at once. I sprayed the two seat pieces and the cabinet drawer front and doors flat and then assembled them.

Install the bench seat —
We chose not to use a long piano hinge. I’ve seen these fail in other places, I think the failures are due to the piano hinges’ short flat screws installing really close to the edge of the wood, causing the wood to split along the row of screws.
Instead we used more “traditional” hinges. Attached them to the seat and to the wood ledger strip. Then we screwed the narrow ledger boards into the internal frames on that flat piece discussed earlier.
In Summary —
Banquette seating can be a great solution for a smaller space or an odd shaped space. It’s a clever way to save space and often times improves traffic flow.
A custom Banquette can fit a multitude of situations, whether a single wall (like ours), an unused corner, an existing breakfast nook area, or even open-plan spaces.
We are thrilled with how ours came together. It has transformed how we use this space and we are looking forward to all the family gatherings and years of use that lie ahead.
Blog Posts For Each Component of the Makeover
The Bad, The Goals and The Ugly, Plus the Plan
The Dining Rom Makeover Reveal
Building an Ergonomic, Comfortable Banquette (You’re Here Right Now)
DIY Padded Wall Hung Backrest and Bench Cushion
Small Cabinet Bar with Open Shelves Above
If this seems like an answer to your own dining woes, I hope our project and success encourages you. I’m here for you if ever you have any questions, concerns, or just need a pep talk along the way.

I hope you feel empowered to take on a larger project, or a more challenging project you’ve been tempted to try.
Remember, I’m always here for you, friend!

What an amazing tutorial Diane! I love that you included info about ergonomics – we want our people to be comfortable! The area looks amazing. Pinned 🙂
Amazing, truly. I’ve seen this in person and it’s a masterpiece. It turns the room into a fully welcoming environment. Its gorgeous!
Oh Jacquie! Thanks bunches! We do truly love it!!!
How much longer than the table is the banquette; meaning how much bench under hang do you have available to sit down before skooching? I’ve seen a recommendation of 16”, but I think I’ll only be able to get 12”. I’m wondering if that’s enough. It may be, considering it’s the “open” end with no other obstructions.
Hi Ann,
I’m so sorry I’m just now seeing this. Without any leaves in the table, we have 10-inches on one end and almost 16 on the other.
I know, that’s odd. The space is very narrow and you can’t stand where you would notice that the table is not centered on the banquette. But you do notice if the table is not centered under the light. So until I have an electrician in and get the light moved sos it is centered, this is how our table sits.
You’ll be fine with 12-inches. During Christmas, we added one leaf to the table and had many meals here, played games and lots of visiting around this table with no overhang and it still worked — just not quite as easily.
Funny thing, the architect son who didn’t like the idea of a banquette, guess where he sat every time!!!! And he’s a 6-foot cross fit addict!
Hi! We’re trying to duplicate this banquette seating, but are having trouble figuring out the specific angles for the base as well as angle of the seat back to the horizontal plane.
Do you happen to have these written down by chance?
Hi Catherine —
So happy to hear this has inspired you. The angles according to my schematic I was working from are: lower back – 90, upper back – 94, lower front – 100, upper front 76. I hope that makes sense. Don’t hesitate with any other questions you may run into
I love the look of this. Are you able to tell me the measurement of the depth of base timber (perpendicular to the wall)please?
Hi Natalie, Thanks for the banquette love!!!
Definitely use 2 x 4’s for all the framing! Then I used 1/4-inch plywood for the “skin”.
Hope that’s what you needed to know.
And yes, I story urge you to take the extra effort to build your bench with the ergonomic detailing. We had another dinner party recently with 5 coup0les gathered around the table. We ate, and then laughed and told stories for four hours around the table with five adults on that bench seating — perfectly comfortable!
Wow, just love this design! Would be great to know the details on how you designed and built the hanging backrest as well!
Thanks so much Marissa. Yes the hanging backrest and cushion are covered in this blog post
A little late to the party, but this is a great tutorial and design as I’m building a similar banquette myself! One question is why did you bother with the toe kick? People’s heels won’t really take advantage of it while sitting, and people never really face the back of the bench where their toes would benefit. Thanks!
I wondered the same thing at the time, but am so glad it’s there. I keep my extra entertaining dishes under the seat and am often getting into it by sliding the table out a bit and then wedging myself in, yes, facing the back. Aesthetically, all banquettes in restaurants have a small legs under or a frame like I made. I actually did a Google images search of “restaurant banquettes” — none! I just didn’t want to cut corners.