
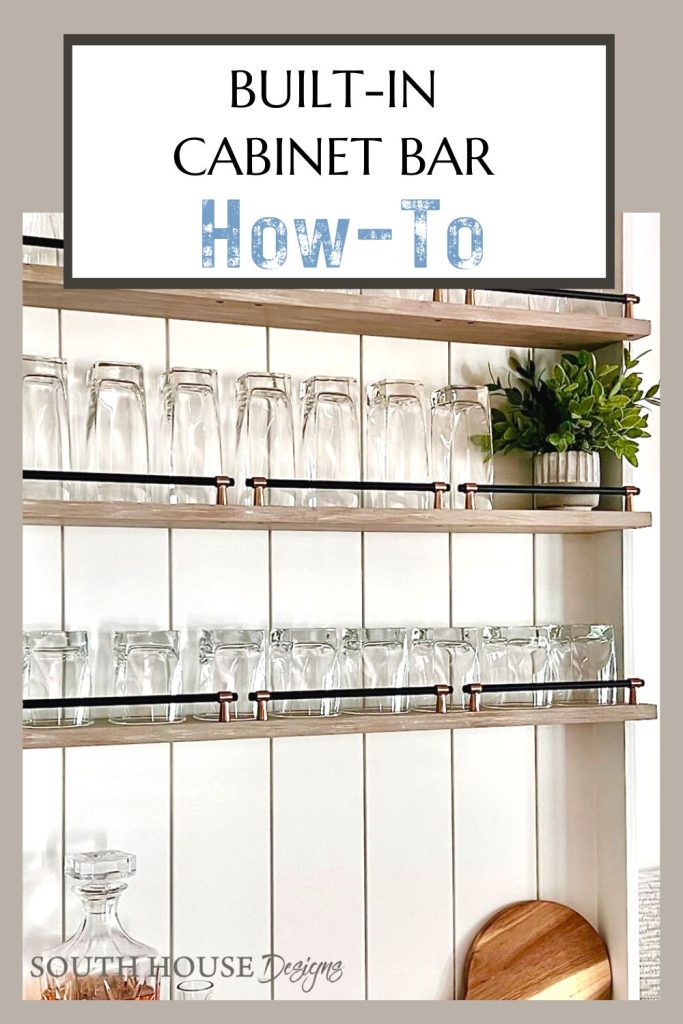
How-To DIY the Best Small Cabinet Bar With Open Shelves
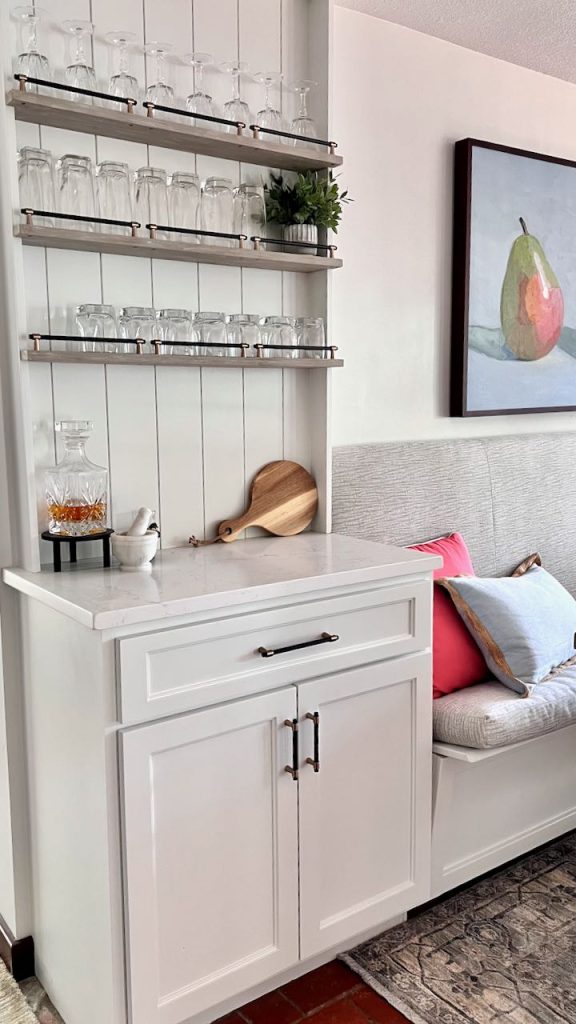
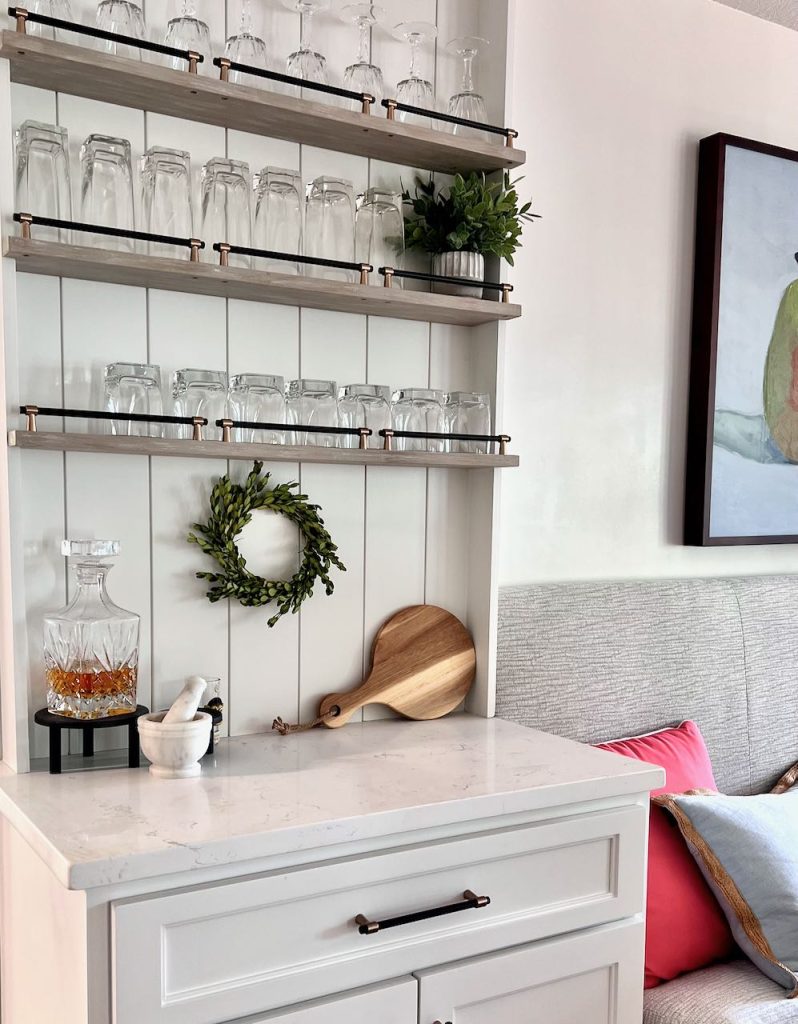
A small DIY built-in cabinet bar with open shelving can be give you the function you need with the style you dream about! Without big money!
Do you love to entertain guests but don’t have the space for a full-sized bar?
If so, a small home bar with a cabinet and open shelves above is the perfect solution. This type of bar, specifically a dry bar, is compact and stylish, and it can be easily customized to fit your needs.
Benefits of a Small Home Cabinet Bar with Open Shelves
There are many benefits to having a small home bar cabinet with open shelves above. Here are just a few:
- Compact and space-saving: This type of bar is perfect for a small space, including apartments or condos.
- Stylish and versatile: There are many different ways to style a small home bar cabinet, so you can choose one that fits your taste and space.
- Easy to customize: You can customize the size, layout, and features of your bar to fit your specific needs.
- Affordable: Building your own bar is a great way to save money.
In this blog post, we will show you how we built ours. We’ll provide step-by-step instructions, as well as several great tips along the way.
You will of course need to tweak what we have done to meet your specific needs and style. Our perfect fit is not necessarily your perfect fit.
Please note, some of the links in this post may be affiliate links which means if you purchase an item using my link, I may receive a small compensation. Know that I willl never recommend I do not believe in or would don’t purchase myself.
Our Project:
We do not have a vast inventory of tools or space! And we certainly don’t have cabinetry experience!
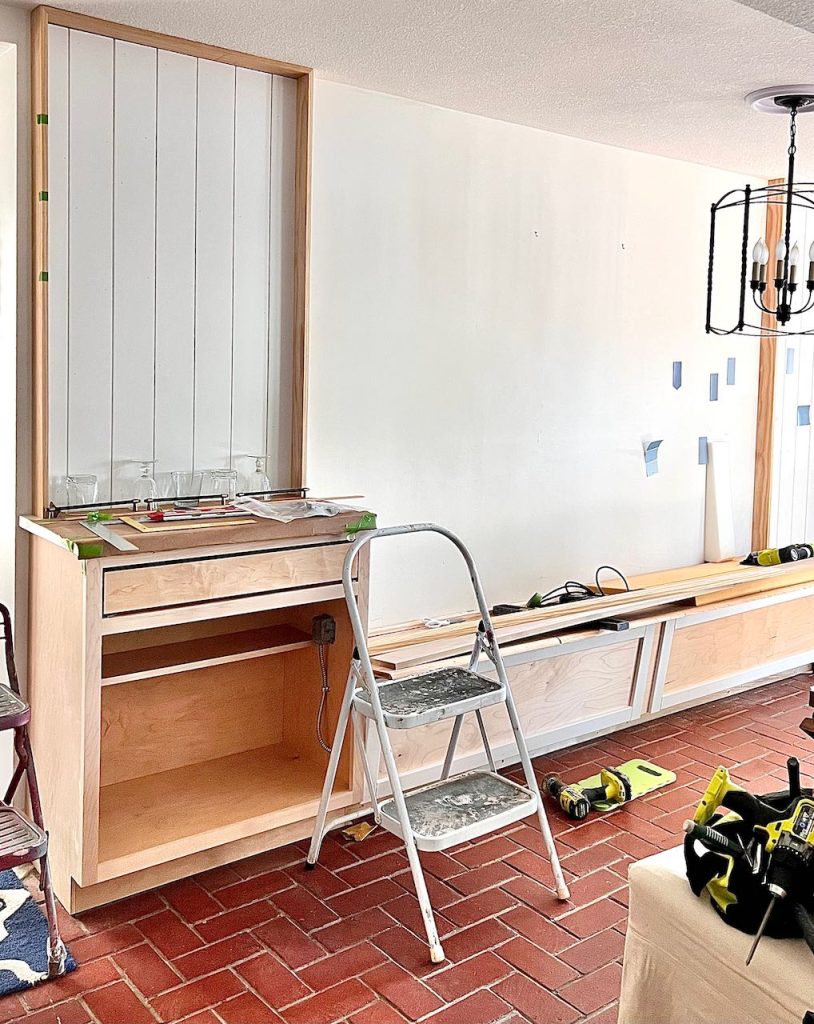
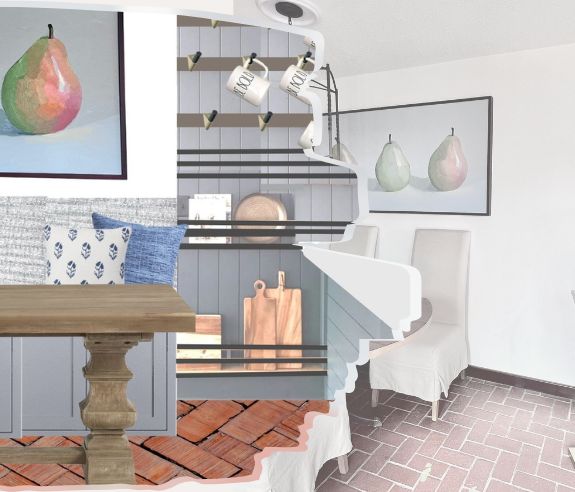
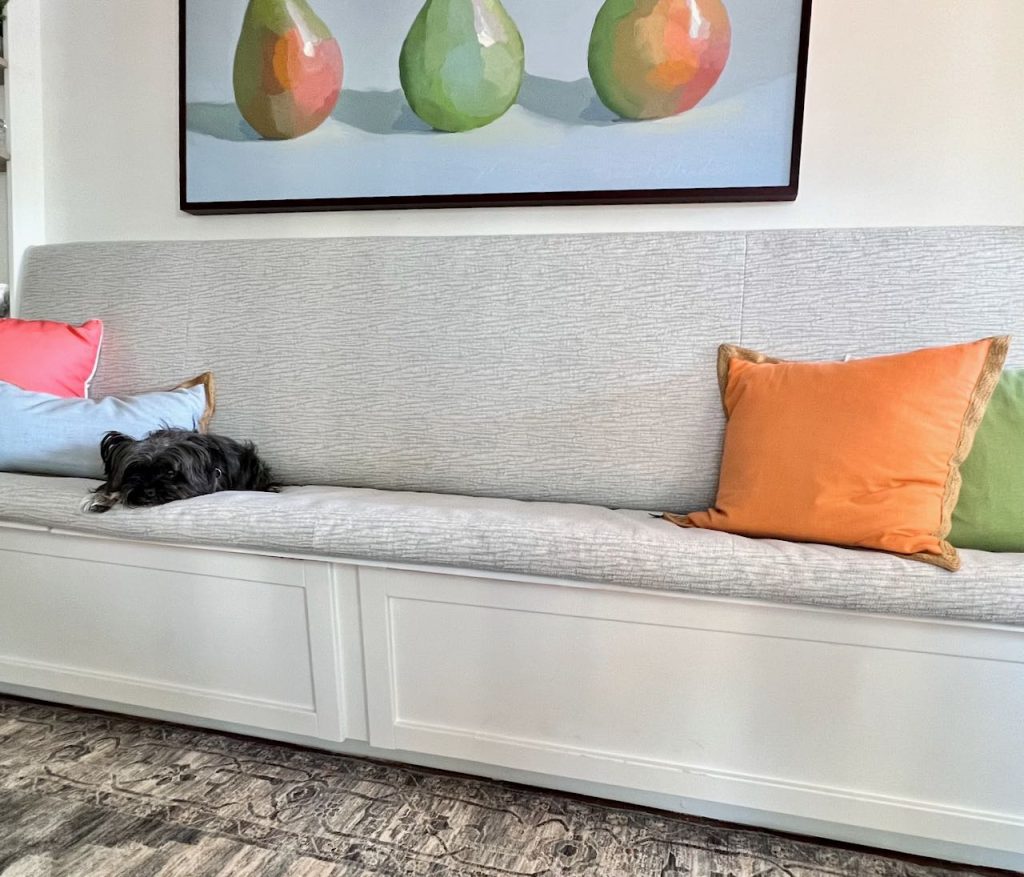
This dry bar was part of a much larger build — our entry in the One Room Challenge — the complete makeover of our wide hall between our kitchen and family room to turn it into a dining room extension of the kitchen that also serves the family room.
The dry bar I envisioned would serve many functions:
- Additional storage — liquor out of the pantry and bar glasses out of the kitchen.
- Beverage serving area — move drink service off the kitchen island (signature cocktail, cocoa bar, coffee station, etc.)
- Additional food service — provide holding area for serving dishes at far end of the table
- Functional statement piece for ending the planned banquette
We do not have a vast tool inventory and no woodworking space! We have limited cabinetry experience!
And with all the other elements of the entire build being DIYs, we needed source our base cabinet rather than build it.
But if you have the time, skill level and tools, by all means
What is a Dry Bar? Or What is Wet Bar vs. Dry Bar?
Dry vs. wet is not a designation based on size or appliances or any function beyond, quite literally, running water.
A dry bar is a home bar that does not have a sink or running water. Whereas, a wet bar will have a sink and faucet. Often times the sink will be vey small or perhaps a long, thin trough type that is perfect for icing beverages.
Either wet or dry can include a small beverage fridge and/or a wine fridge. Mine does not include either due to the lack of space, but it’s not a big inconvenience as we are 20 feet from the large kitchen refrigerator.
Notes For Ordering a Cabinet
If you are like us, not ready to build your own cabinet . . . . . yet.
Ready-to-assemble (RTA) cabinets and custom-built cabinets would both be great options.
There is also using a stock cabinet as your base and adding your own style to it.
Think of all the IKEA hacks you’ve seen and marveled over.
All three types of cabinets have their own advantages and disadvantages, so it is important to weigh your options carefully before making a decision.
Ready Made, Stock Cabinets
- Pros:
- Affordable: Least expensive option
- Easiest to Install: Assembled and ready to go.
- Wait Time: None to minimal.
- Cons:
- Least durable: typically made of thin materials, often times, fiber board
- Limited size options:
- Limited customization:
RTA Cabinets
- Pros:
- Affordable: RTA cabinets are typically much more affordable than custom-built cabinets.
- Easy to install: RTA cabinets come in flat-pack boxes, so they are easy to transport and install.
- Wide variety of styles: There is a wide variety of styles and finishes available for RTA cabinets.
- Customization: The level of customization available with RTA cabinets is fairly extensive depending on which company you go with.
- Cons:
- Not as durable: RTA cabinets are not as durable as custom-built cabinets.
- May require assembly: RTA cabinets require assembly, we did not find it difficult or very time-consuming. We wish we had better instructions.
- Wait Time: Very Reasonable — assuming all arrives as ordered.
Custom-Built Cabinets
- Pros:
- Durable: Custom-built cabinets are much more durable than RTA cabinets.
- Highly customizable: Custom-built cabinets can be customized to fit your exact needs and specifications.
- Long-lasting: Custom-built cabinets can last for many years.
- Cons:
- Expensive: Custom-built cabinets are much more expensive than RTA cabinets.
- Time-consuming: Custom-built cabinets can take longer to order and install than RTA cabinets.
- May require professional installation: Custom-built cabinets may require professional installation.
Which is Right for You?
The best type of cabinet for you will depend on your individual needs and budget. If you are looking for an affordable and easy-to-install option, then RTA cabinets may be a good choice for you. However, if you are looking for a durable and highly customizable option, then custom-built cabinets may be a better choice.
Here is a table that summarizes the key considerations of stock cabinets vs. RTA cabinets vs. custom built cabinets:
| FACTORS | Stock Cabinets | RTA | Custom Built |
|---|---|---|---|
| Price | Least Expensive | More Expensive | Most Expensive |
| Durability | Not Particularly | More Durable | Very Durable |
| Customizable | Not | Substantially | Completely If Budget Allows |
| Ease of Installation | Easy Installation | Slightly More Involved | May Require Professional |
| Time | Quick | Moderate Wait | Lengthy Wait |
Tips for Ordering RTA
TIP: If you opt for RTA, make sure your package includes quality, full-extension drawer slides and soft-close hinges.
Order cabinet doors and drawer faces that best match any existing cabinetry.
When choosing your source, check their customer service and what support they have, such as videos, for assembly and installation.
TIP: Don’t forget to customize the interior.
I ordered the standard shelf to be a half shelf which changed the placement of the shelf pin holes in the side walls. So glad I did this when I ordered and not as an afterthought.
The best option for us was to order a Ready To Assemble (RTA) cabinet base online. We checked all the stock cabinets we could find and none were available with the dimensions I needed due to our tight floor space..
Ordering RTA allowed me to get the dimensions I wanted, in a reasonable timeframe without spending a fortune.
This great option became the winning answer for us!!!
A quick pause before we get to the nitty gritty: Are you enjoying this post? Would you like more? Please consider subscribing:
Oodles of thanks!
Step-by-Step Tutorial for Our Dry Bar Area
Materials and Supplies:
- Shiplap or alternative plywood panel for the back panel
- 1 x 4 wood trim pieces for frame
- Wood for shelves (i used 1 x 6, ripped down a bit)
- RTA Cabinet unit or cabinet materials if DIY
- Countertop or bar top
- Finishing materials (such as paint or stain)
- Hardware (drawer slides, door hinges, optional shelf rails)
- Basic Tools:
- Miter saw
- Circular saw with jig, or table saw
- Jigsaw
- Brad nailer with brads
- Drill with bits including, countersink bit
- Levels
- Clamps
- Tape measures
- Carpenter square
I get it! You’re busy. You may not have time at this moment.

Step 1) Assembling the base cabinet frame-
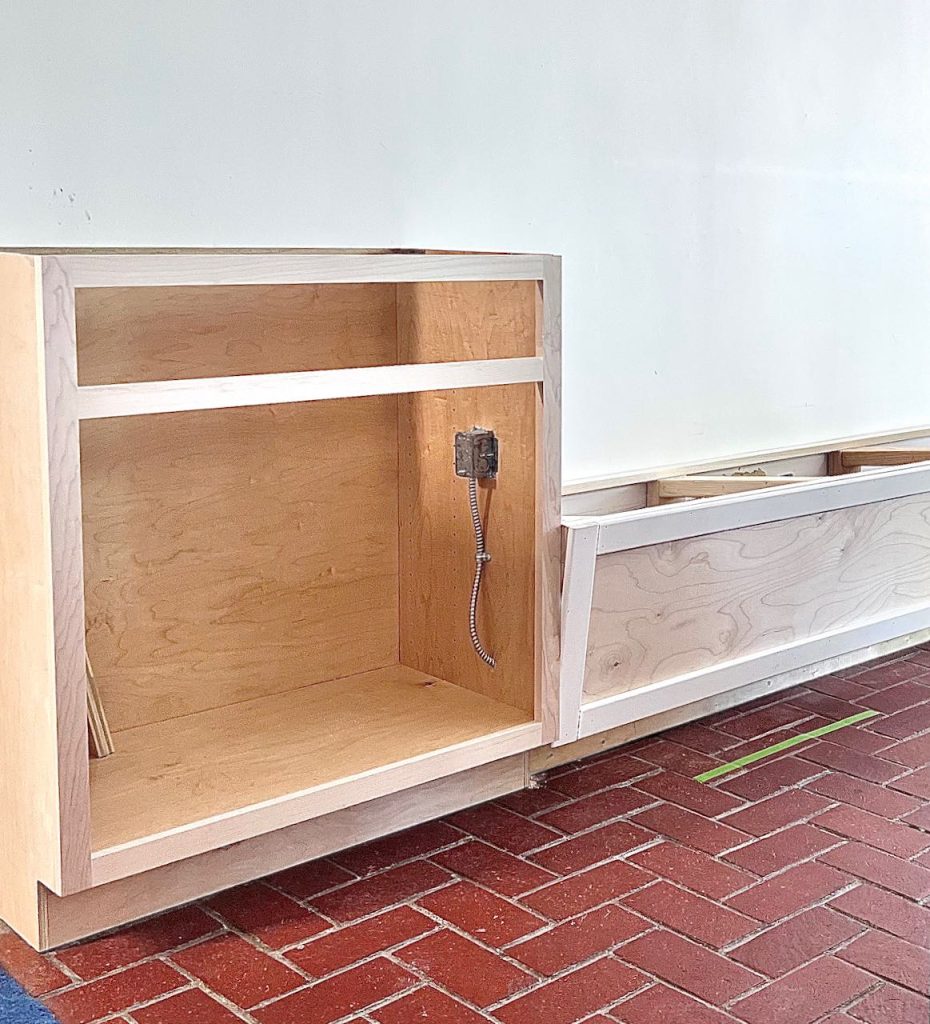
This will vary widely based on your cabinet.
Ours required a lot of wood glue and a few brads and level to assemble.
We placed it and attached to the wall with wood screws into wall studs.
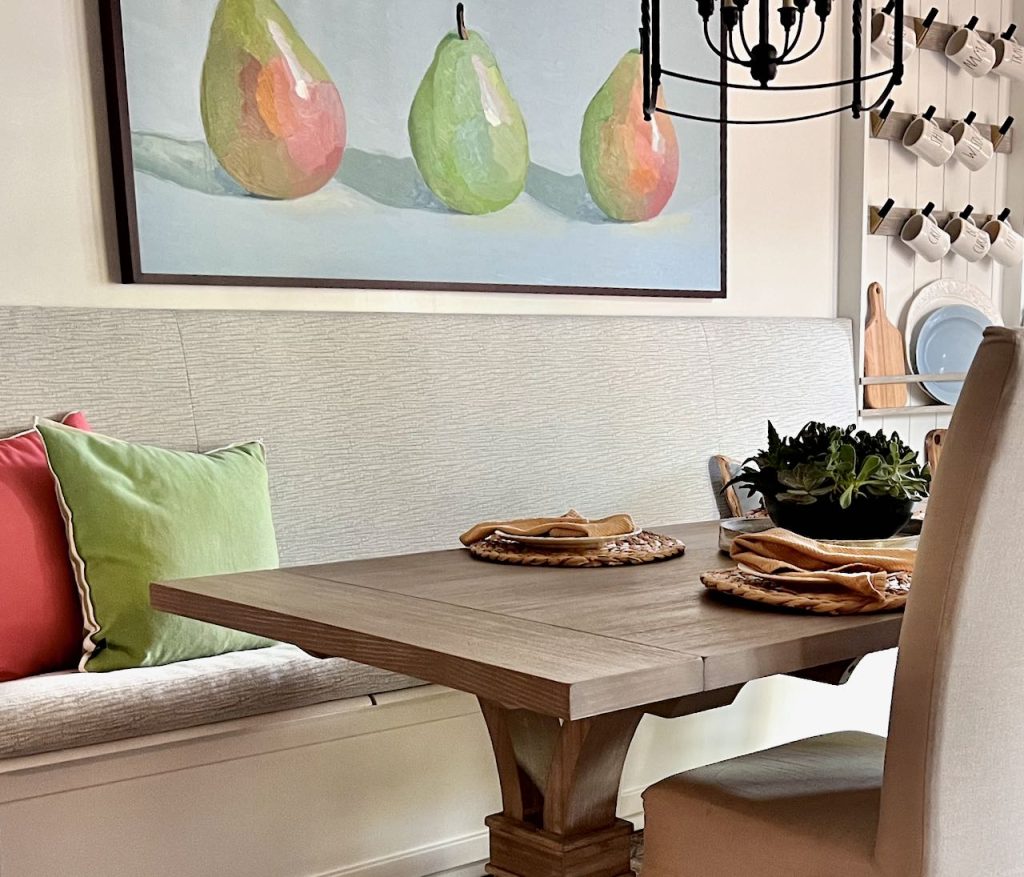
Step 2) Add countertop or bar top–
We found a remnant that matched our kitchen granite and ordered it cut with simple factory edges to our dimensions.
Step 3) Add power-
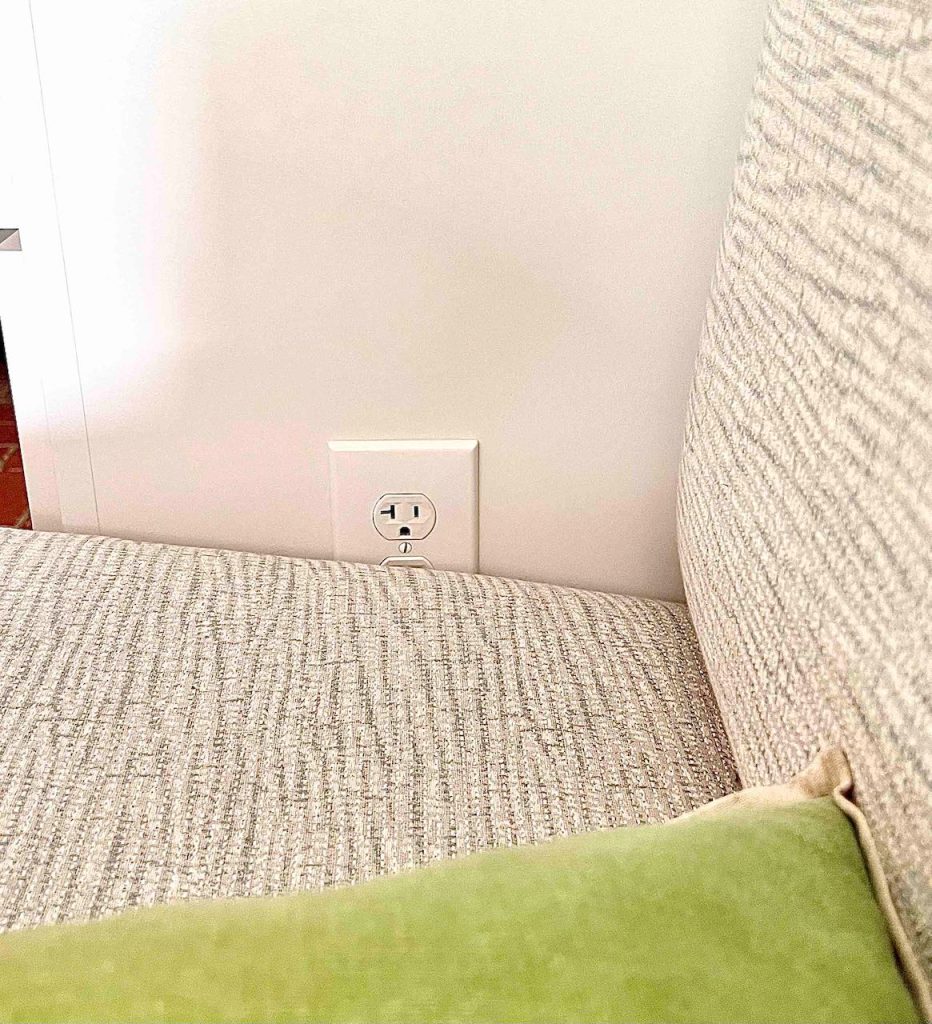
This is an optional step — but critical for us!!!
Our planned banquette would cover our only wall outlet, so we had an electrician move the power installing the outlet in the side of the bar cabinet.
Step 4) Install drawer box-
There are two main steps to installing the drawer box:
- Install the drawer glides to the base or the side of your drawer box depending on the type you have.
- Install the drawer rails inside the cabinet base
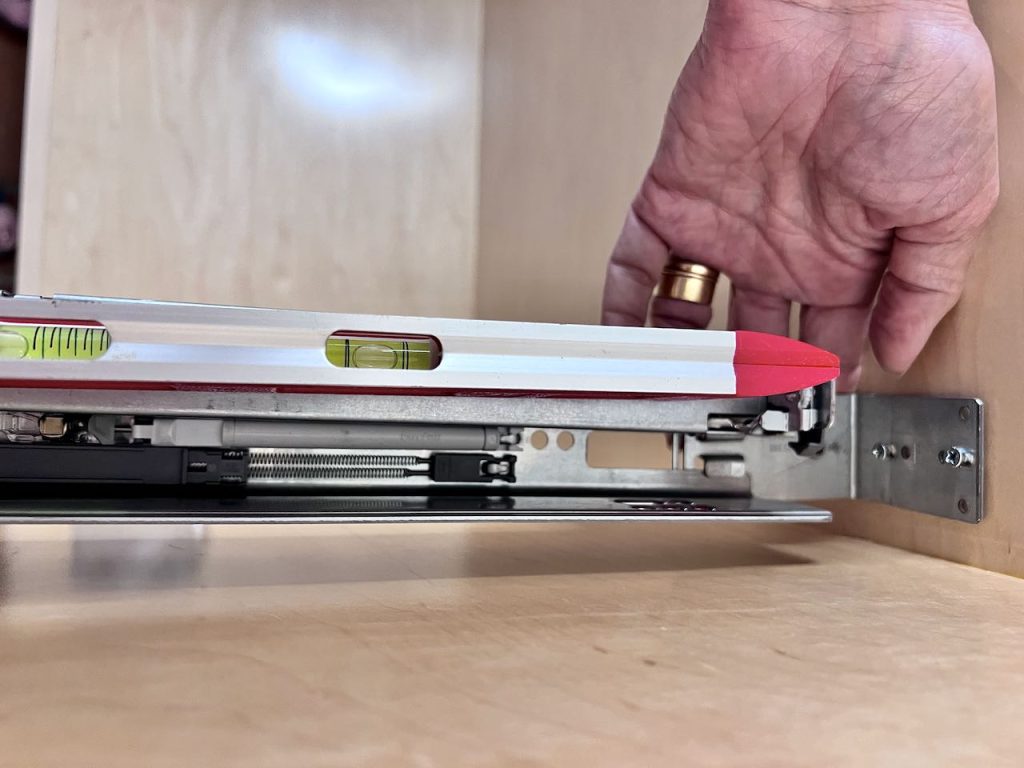
Follow an online tutorial for installation of the exact style of glides you have.
We chose bottom-mount Blum slides and they work great!
Some tips that help, that not all videos tell you about:
- Use a level to make sure that the slides are level.
- Use a square to make sure that the slides are square.
- Use the correct screws to attach the slides.
- Be careful not to over-tighten the screws.
- The slide will sit back a bit of distance from the front frame. Pay attention to that distance!!! It might just be 1/8-inch, but it will make all the difference.
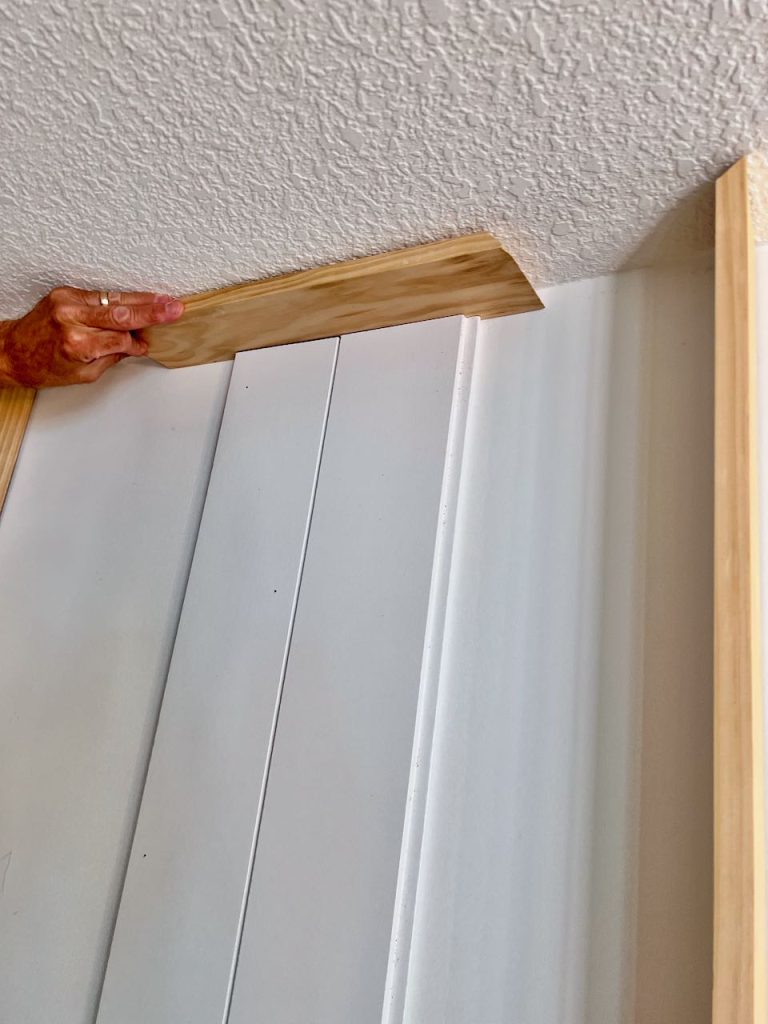
Step 5) Add shiplap and frame to ceiling–
1) Prepare your frame.
Start by cutting your vertical frame pieces. They will stand on the countertop.
Their outside surface should line up with the outside of the cabinet with the countertop extending a bit beyond both.
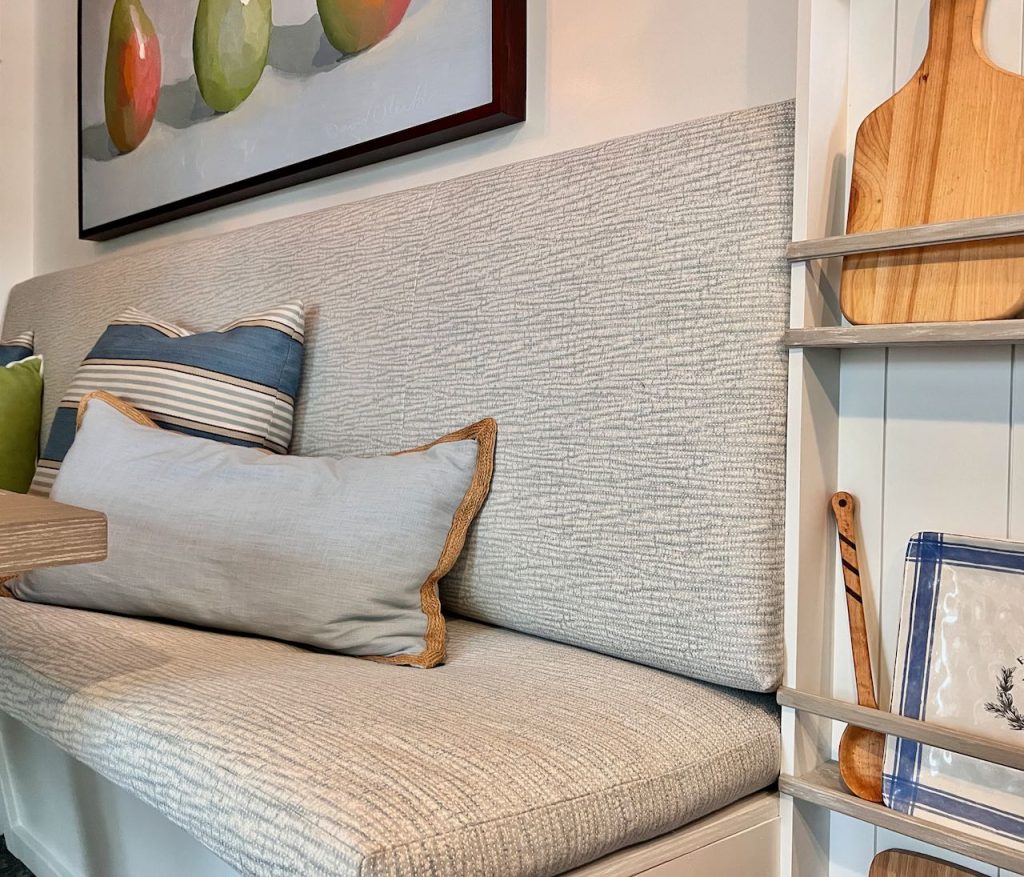
In our case, one side of our dry bar fits snuggly against a banquette with an upholstered backrest. In this case the countertop does not extend beyond the cabinet and frame.
The top edge should be cut at a 45-degree angle. Do not place them yet.
Cut a scrap piece of the frame wood to test fit cuts of shiplap.
2) Install shiplap.
Mark the center of the back edge of your countertop on a piece of tape.
Measure the exact height you need at the center point of your countertop, less the thickness of your frame.
Cut the first length of shiplap, and mark its width’s center point.
Matching the two pencil marks, hold this board in place.
Next step, with the scrap trim, dry fit to make sure the frame fits between it and the ceiling.
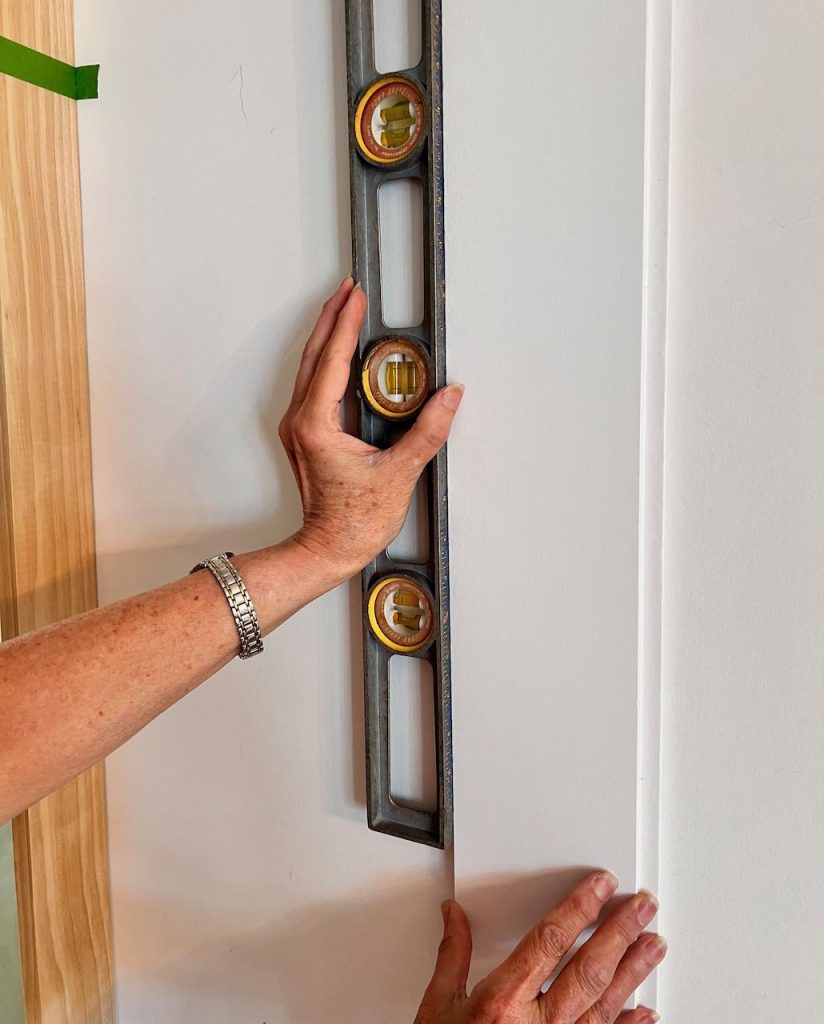
Third step, use a level to make sure it is vertically straight.
Once it all is correct, brad nail in place.
Now cut another plank for each side. Fit them to the center board. Check the height with your scrap piece of wood. When all is good, brad nail again. Repeat and repeat.
After the last full-width planks are installed, hold your side frame pieces in place. Draw a line along the inside vertical edge for both sides. Measure and cut your last planks of shiplap to that width. Cut to the correct height.
Install these last two partial planks of shiplap as we did before.
3) Install the frame.
Hold each long piece in place against the outside edge of the shiplap. The top point of the 45-degree angle should be just grazing the ceiling.
It should be vertically straight. Brad nail from the outside into the edge of the shiplap.
Measure across the top and cut the horizontal frame piece with two 45-degree ends.
Insert between vertical pieces and brad nail in place.
Step 6) Paint or stain all cabinetry-

You may be staining. I painted to match our kitchen cabinets.
So first we caulked all seams, filled all holes with wood filler and sanded and sanded and filled and sanded.
Then I sprayed and sprayed.
I really relied on my new Wagner FLEXiO 3500 paint sprayer. for a smooth “factory grade” finish. Wagner sent me this sprayer to test out in comparison to my way more expensive pro sprayer.
I love the light weight. My pro sprayer has a separate compressor that I have to haul around with it. It seems to be a bit easier to clean and not nearly as finicky as the pro sprayer. I particularly appreciate the fine detail nozzle. I felt like it gave me the greatest control.
We have all been conditioned to think that if something is made of plastic it is inferior. This is so not true, at least when it comes to the paint cups.
My pro sprayer I have used for years and years is all metal. Twice the cup has fallen over, with just enough pressure to dent the rim ever so slightly. It would no longer build the pressure needed to spray and I had to purchase replacement cups with new lids and all. UGH!
No problems like that so far with the Wagner. In this case the heavy plastic doesn’t seem prone to easy dent issues.
Step 7) Plan shelf heights-
I planned for and drew out three shelves, but the exact placement of those shelves I waited on until this point.
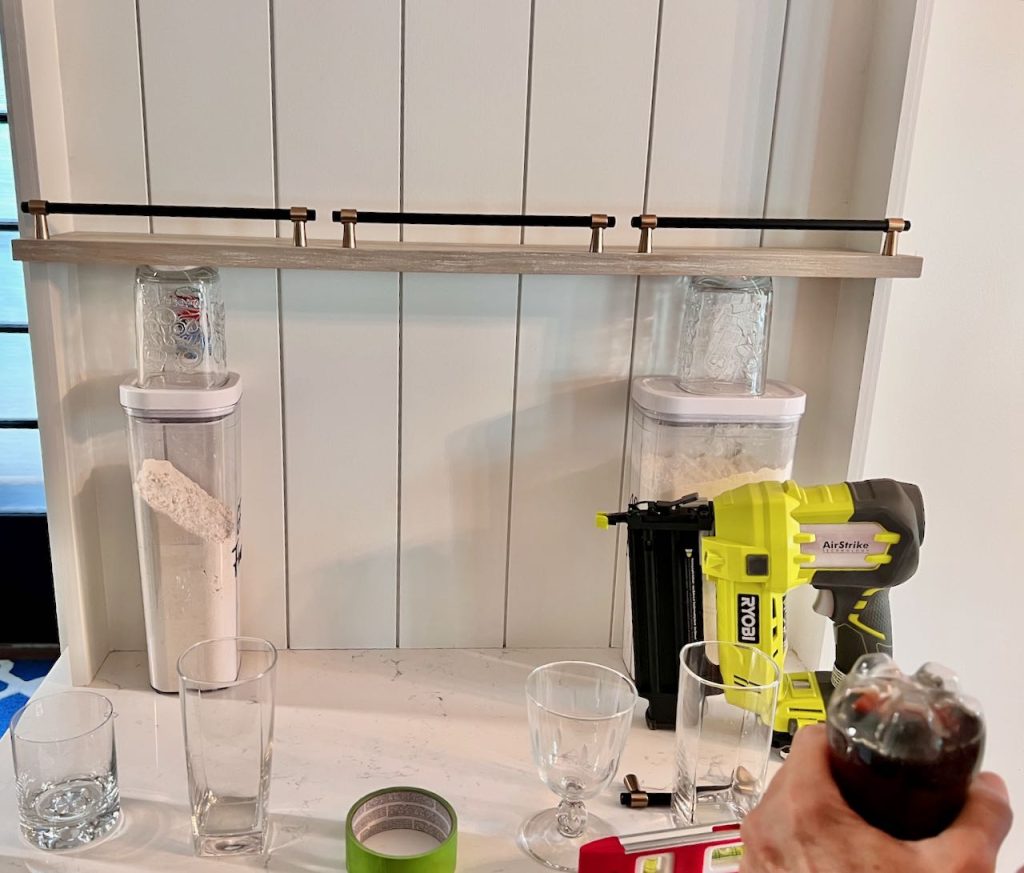
I used some clear canisters from the pantry and a whole range of glasses (yes, and even soda bottles) to experiment with heights.
Step 8) Cut and drill shelves-
Once I determined the exact shelf placement, I took fresh measurements.
This time I measured to the outside of the vertical frame because I wanted my shelves to wrap around the frame.
I needed that extra depth to accommodate our glassware. If I had just cut them to the inside width and let them extend beyond the frame, they would have looked like a mistake.
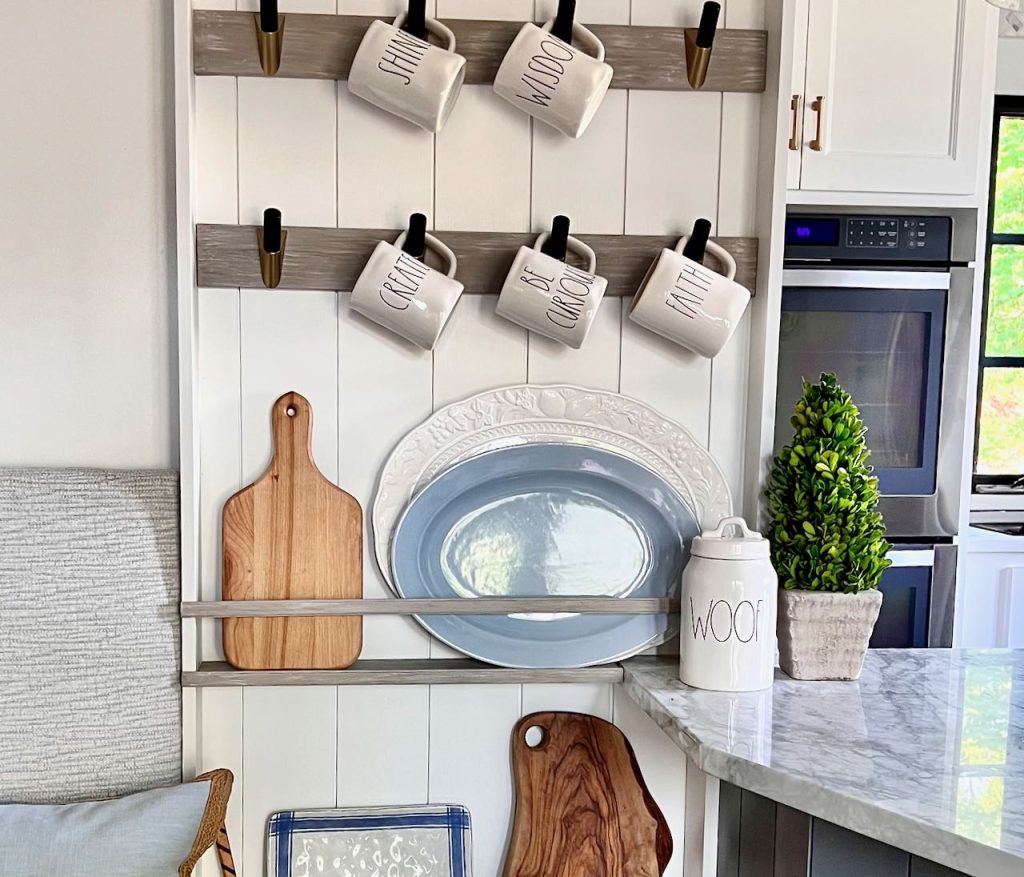
I wanted them to look intentional and it matched up with the plate and mug rack on the other side of the banquette.
Use the miter saw to cut your shelves. Then mark the cut out to fit inside the frame. Cut this out with a jigsaw.
Mark the placement of your optional shelf railings. With a countersink drill bit, drill from the bottom of the shelf up.
TIP: Countersunk holes must always be drilled from the direction your screw will be used
Step 9) Paint or stain shelves–
Time to finish your shelves. I opted to paint these shelves as well as the wood pieces for the mug and plate rack with a multi-layer paint treatment that compliments our new dining table.
I started with a base coat of Sherwin-Williams False Creek and then dry brushed several other shades to get a lot of gentle variation in coloring.
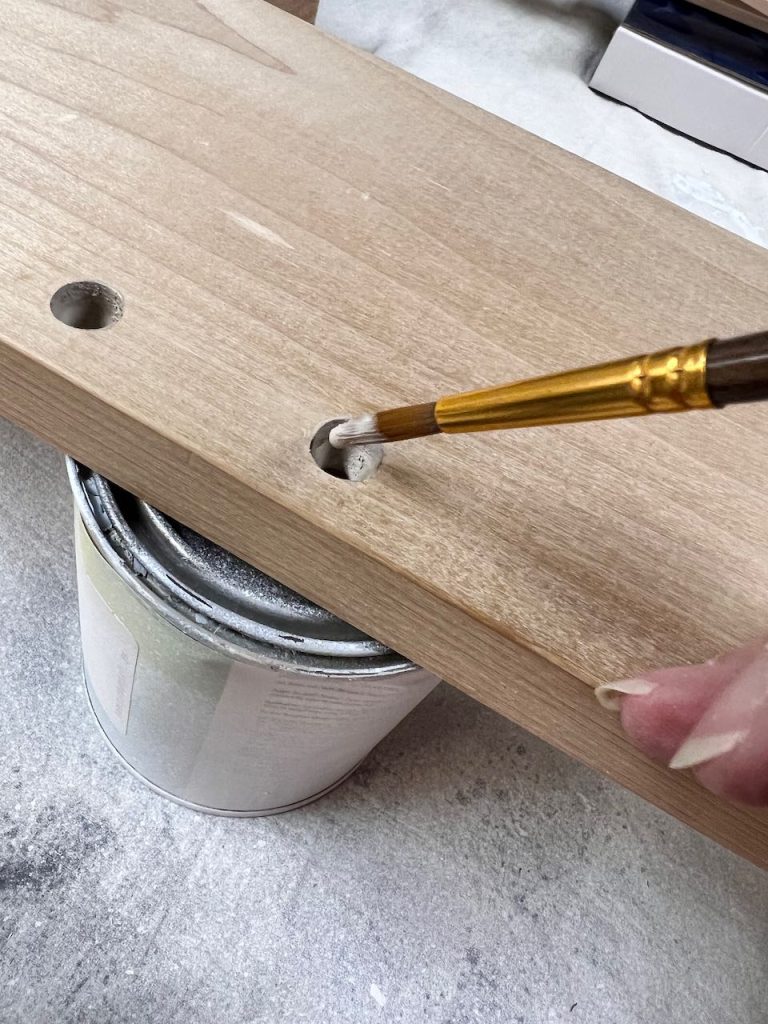
TIP: With countersink holes, always remember to paint or stain the inside of these holes. They will show, but not nearly as much.
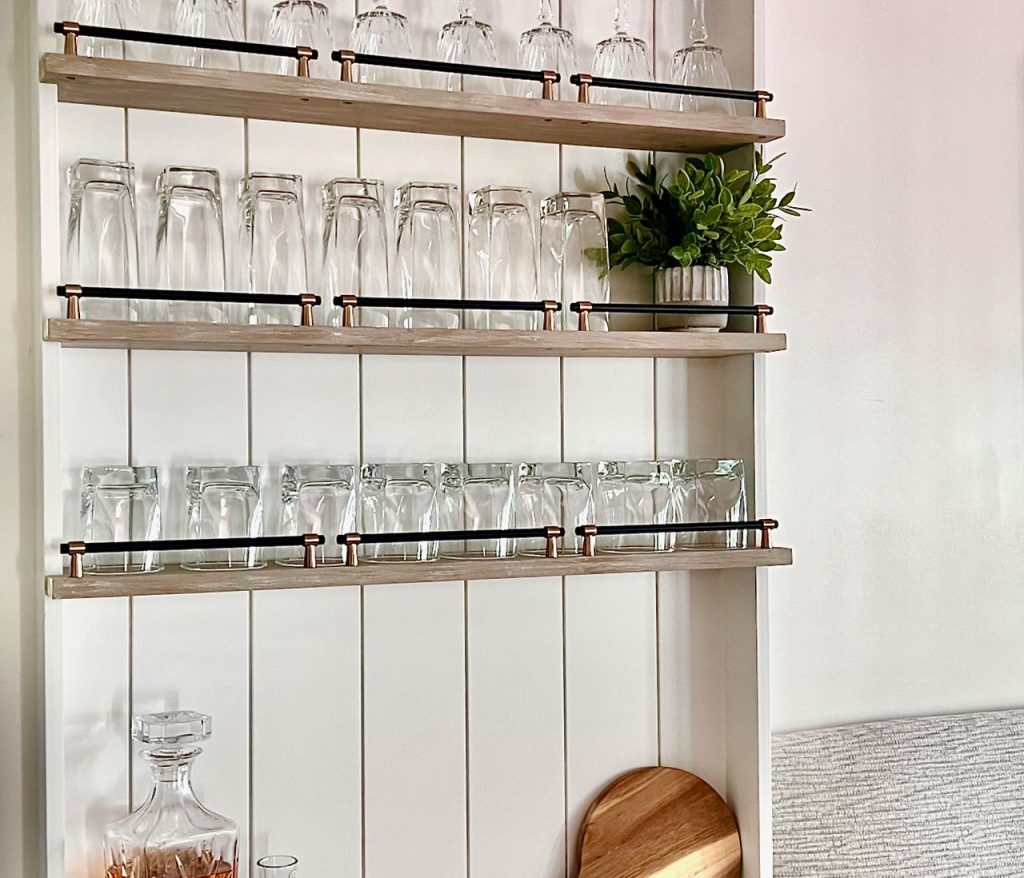
Step 10) Install shelf rails and shelves–
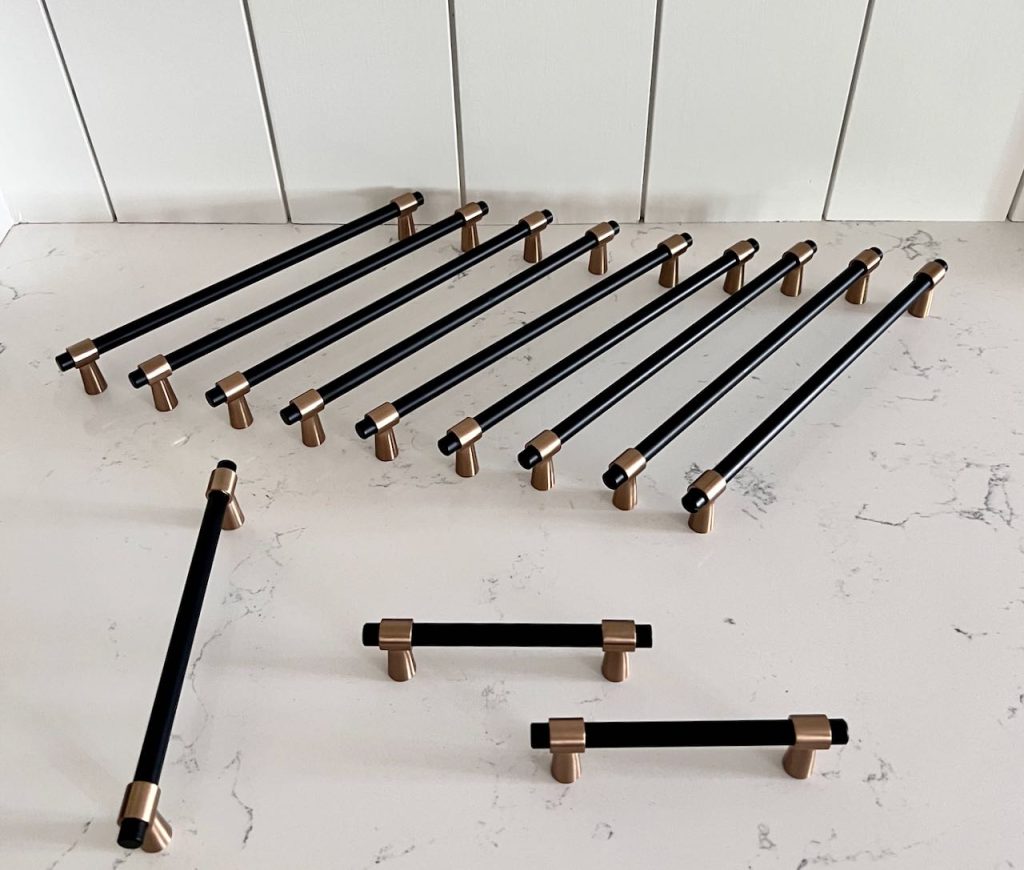
We used three gorgeous drawer pulls from Amerock (Mergence 224mm Black with Champagne Bronze) across the front of each shelf as the railings.
Amerock gifted me this hardware, and I am thrilled with every piece! The quality is first class!
I am over the moon with this look!!!!!
(What’s the acceptable limit on exclamation points? I’ll go ten beyond for these pulls.)
The same pulls in two smaller sizes (160mm and 96mm) were used for the drawer pull and the door pulls.
The hardware is the jewelry of this installation. It elevates and pulls the whole look together, doesn’t it?
Install the shelf railings.
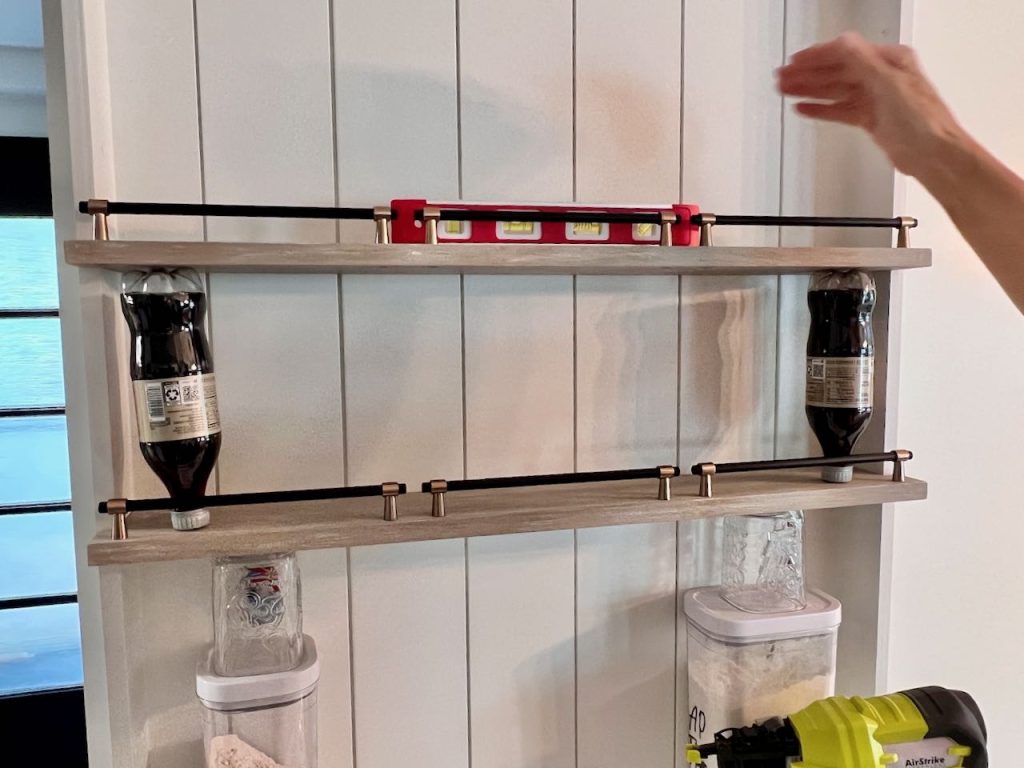
Now place the shelves at the proper height, level and attach with brad nails from the outside of the vertical frame into the side of the shelf. You can also drive some brads at an angle into the back wall.
TIP: When driving screws or nails at an angle through a shelf into the back wall, if the shelf is above eye level, work from the top down. If below eye level, work from the bottom up.
Step 11) Attach drawer front and doors-
The Drawer:
Attach the drawer front to the drawer box by finding center of the drawer box front. Drill those holes first. Test fit.
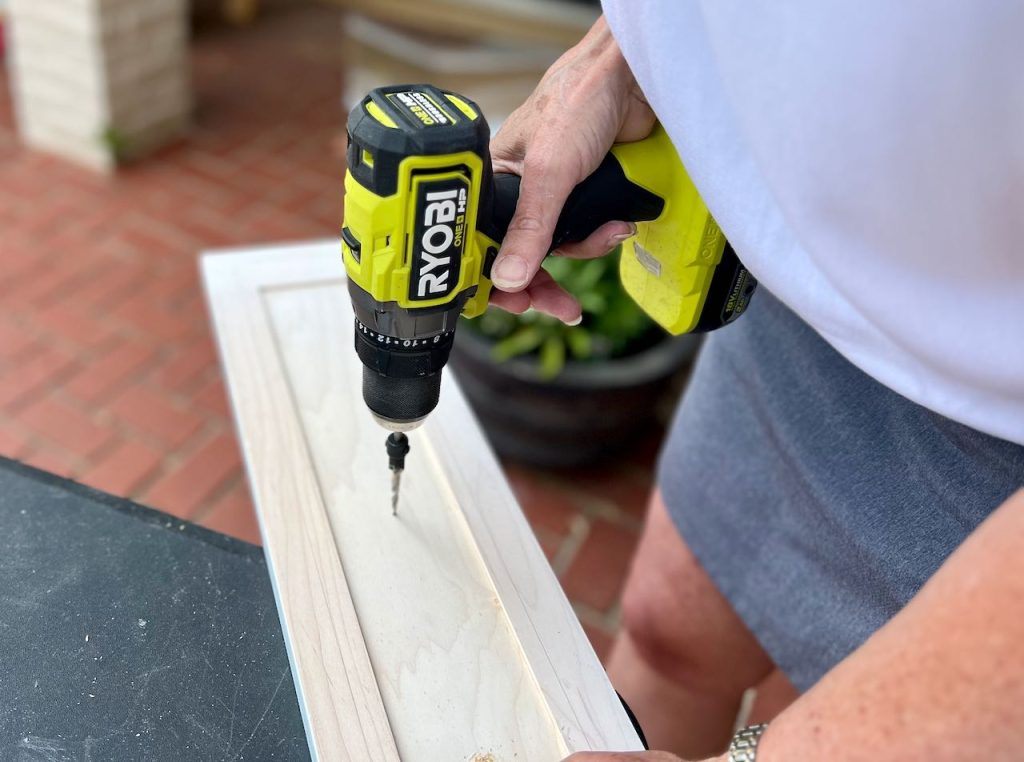
If all is right, clamp the drawer face to the box and mark through the hole on the the drawer face.
Drill those holes through the drawer face.
Then wood glue the face to the box and attach the drawer pull through both.
The Doors:
TIP: When adding door pulls to a pair of a pair of companion doors, clamp the two doors together and drilled through both at the same time. This assures thee same distance from the top and from the outside edge.
We drilled and attached the door pulls, then attached the hinges and made adjustments until they were level and square.
Lastly, break out the wood putty again. Fill, sand and touch up paint.
Stock the bar with all those liquor bottles from the pantry, and the glassware from the overflowing kitchen cabinet.
And let the party begin.
Would We Do It Again?
In a Heartbeat!
We are thrilled with the outcome. Function! and Style!!! I brought intentionality and inviting hospitality to this otherwise sad wide hallway!
Building your own small home bar cabinet with open shelves above is a great way to save money and customize your space. With a little planning and effort, you can create a stylish and functional bar that will be the envy of your guests.
What Else Would We Do?
1) Interior motion-activated lights inside the cabinet
2) Door mounted “cool” bottle racks for the most used bottles
3) Possibly wine rack inside the cabinet
4 ) Add a box header with down lights over the dry bar and the mug and plate rack and pin lights over the pear painting
UPDATE: Addition no. 1, motion-activated interior lighting is added. What a difference!
The interior was and worked fine before, but with the lights it feels luxurious and truly elevated!!!!
Do you have any other suggestions for me?
I hope this helps!
Please note: In some cases my link may be affiliate links. That means if you use a link and then purchase something, I may receive a small commission. This costs you nothing extra. But I sure appreciate you using my links when possible.
As always don’t hesitate with any questions, concerns, comments. I read every one of them. And I appreciate every one of them!!!

Interested in the Rest of The Dining Room Project?
(Click on the Picture to Jump Over)
WOW I love this project what a pretty and smart way to create more storage! Hugs- Tanya 🙂
Thanks so very much Tanya! Don’t you love it when a project turns out even better than you had imagined it!!!
It’s so good to hear. You know, no matter what, the photos just don’t do it justice and I was nervous that it wouldn’t show well.
This is SO great and so timely! I don’t need a full dry bar, but I desperately need a place to store cups! Lots and lots of lots of cups! We have a Lake House Vacation home, in the summer there are regularly 15+ guests at any given time! It’s a bit CRAZY – but oh so fun! I need a place for everyone’s cups to go so that they aren’t scattered everywhere and abandoned 1/2 full. I could build something like your narrow shelves on an end wall between the kitchen and family room.! I’m so excited! Thanks for the inspiration!
Oh Michelle, I’m so glad you found it and are feeling inspired!
Thanks for letting me know! Now I’m asking a favor — please send me pics of your project!!! I love to see what others are doing too.
It does sound perfect for your lake house!