
Massive Wall of Floating Bookshelves – How To Install
Install magazine-worthy floating bookshelves that actually work! How-to install hidden brackets, anchor tips & styling tricks.
NOTE: This is an extensive rewrite, including often requested details and pics of the installation. It’s long, but don’t let that scare you off. We did this project April ’21, and four years later it still looks great, all tight and sturdy!
Are you a book lover too? Do you dream of a room with floor to ceiling books, but in a fresh contemporary style?
Yes? and Yes? Good, then you’re in the right place, whether you have space for floor to ceiling books, or just a small corner . . . for now.
I have a project to share with amazing results.
All done by two totally novice shelf installers armed with minimal tools, plenty of determination and a rather obsessive regard for measuring and leveling — my daughter and I!
A bit of background:
Our daughter and our new bonus son bought their first home during Covid. An historic townhouse in DC that was perfect for them . . . except it was totally void of personality, and storage!
Before they submitted their offer, they sent me a video walkthrough and a request.
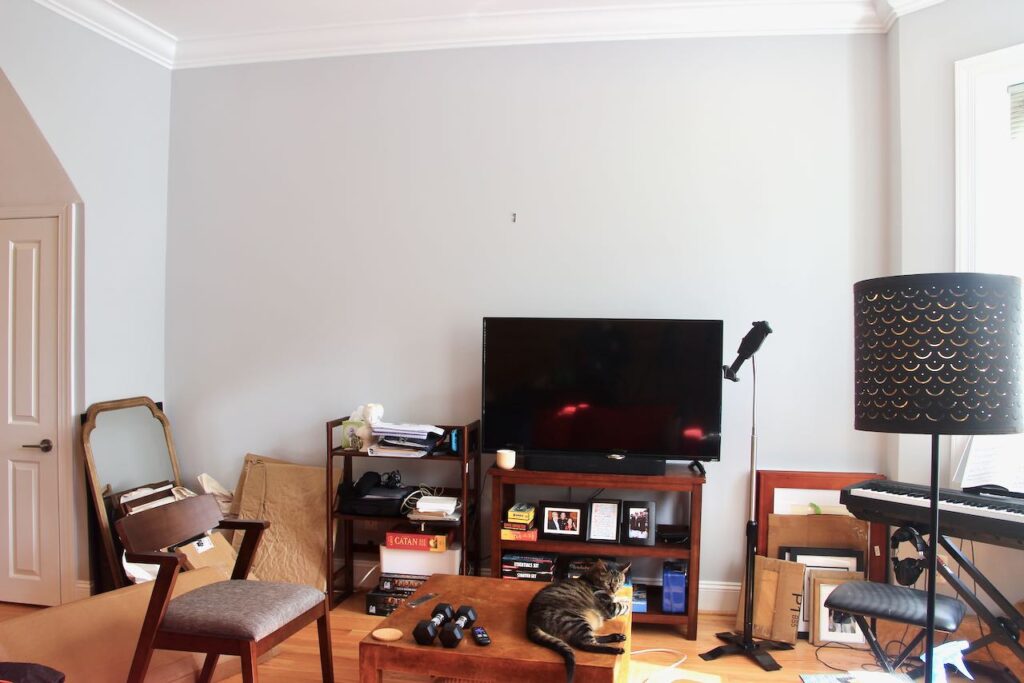
They wanted to know if I thought that large empty wall in the living room could become a library wall? They wanted wall to wall, floor to ceiling book shelves
See, they are rather book-obsessed. Their wedding pledge to each other even includes “our home will be filled with music, laughter and towering piles of books.”
I naively responded “Sure”!
So they bid, it was accepted, and now I was committed.
We immediately began the serious design and must-have discussions.
As we drilled down on exactly what they wanted, it became really more bookshelves around a TV. And it needed some closed storage for well, . . . . you know, life . . . and board games.
“Oh, and we really do not want a lot of heavy woodwork, nothing like traditional built-in’s”.
Wait, WHAT?
Yes, they wanted wall mounted bookshelves of some kind. They found a few pictures. Nothing that really had it all.
After a week of back and forth, they determined that they liked the floating look. They wanted a floating bookshelf, actually LOTS of floating book shelves. Oh, and not a box style floating shelf (too thick),
They wanted solid wood slab floating shelves.
Oh, and NO shelf brackets or mounting brackets showing. In other words, no sign of visible support.
And because they will be holding their prized books, (and someday hopefully I’d have a grand baby crawling around those shelves) they needed to be super sturdy!!!
It didn’t take long to realize we needed custom.
We needed Etsy!!!
You’re thinking Etsy? Isn’t that the crafting marketplace? Yep, but all variety of crafting and at all levels.
Don’t believe me? Our daughter even ordered her wedding dress on Etsy — it is stunning and it fit her perfectly! Now that’s custom.
The third seller I contacted, J Thomas Home Goods, was a perfect fit for this huge book storage project!
Josh was great to work with, beautiful product, reasonably priced and surprisingly located just about 30 minutes from us! Kinda crazy, right?
I was hoping to find someone more or less on the route from KC to DC, that we could stop and pick them up on our way. This was so much better! I never thought I’d find a craftsman making exactly what they wanted in the KC area!
Josh offered many different options. The kids agonized over the type of wood. But ultimately these walnut shelves were the winners!
We double and triple checked all the measurements and placed the order with J Thomas Home Goods.
A couple of weeks later, we were vaxxed and the shelves were ready. Josh and his crew loaded all the shelves and hardware in our Highlander and strapped the countertop on the rooftop luggage rack. We were off the next morning to DC.
TABLE OF CONTENTS: these are live links, click to jump ahead as needed
- A bit of background:
- But Can Floating Shelves Actually Hold Books? (YES! But Here’s the Catch)
- The Problem with Most “Floating” Shelves
- What’s Behind Our Floating Bookshelves’ Success
- What You’ll Need: Tools and Supplies
- Know Your Books (Seriously)
- Shelf Spacing: The Sweet Spot
- My BEST Tool: Use Canva For VisualizingEleven Options Without Moving a Single Book
- Planning for Your Wall Type
- Step 1) Mark It Up – Layout and Planning-
- Step 2) Find Your Studs-
- Step 3) The First Bracket – Where Dreams Become Real-
- Step 4) Level Up – Getting Everything Aligned-
- Step 5) Anchor Management – Stress-Free Solutions
- Step 6) Troubleshooting Wobble and Forward Tilt-
- Now That They’re Functional, Let’s Make Them Beautiful!
- Time to Celebrate!
The links in this post may include affiliate links, which means if you purchase anything using these links, you pay no extra, but I may receive a small commission that helps keep this blog running. I truly appreciate you using affiliate links whenever possible. Please know that I will never recommend a product I do not believe in!
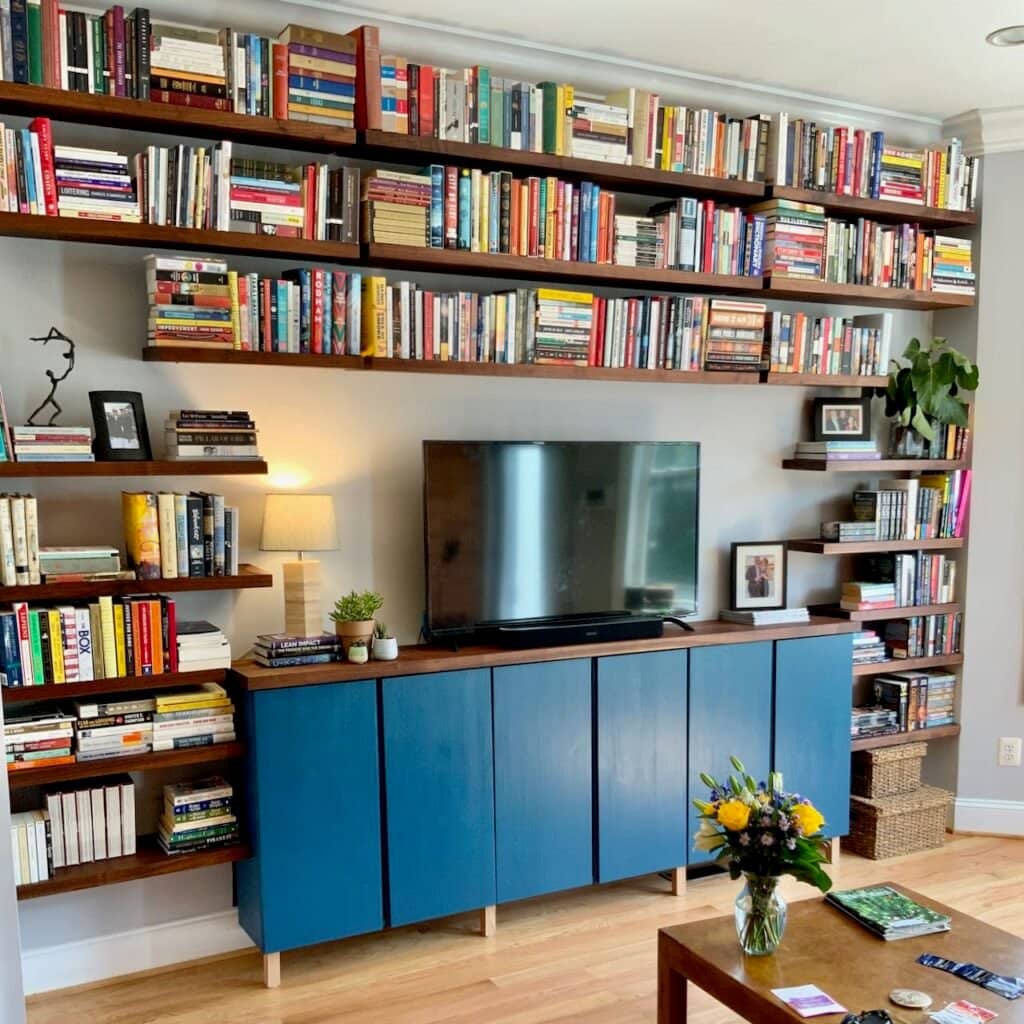
Floating Bookshelves: The Dream vs. The Reality
(Spoiler: Dream = Reality on this one )
But Can Floating Shelves Actually Hold Books?
(YES! But Here’s the Catch)
Okay, let’s address the elephant in the room. You’ve probably seen floating shelves before – maybe you’ve even bought some – and been supremely disappointed when they started doing that sad forward droop the minute you loaded them with anything heavier than a decorative candle.
The Problem with Most “Floating” Shelves
Wimpy Hardware: Those little L-brackets hidden inside store-bought floating shelves? They’re designed for looks, not books. Put more than three paperbacks on there and you’re asking for trouble.
Terrible Anchoring: Your wall anchors are literally the only thing standing between success and your books scattered across the floor at 3 AM.
Poor Weight Distribution: Every inch away from the wall multiplies the stress on your anchors. Put books at the front edge of a 10-inch shelf, and you’re creating way more strain than if those same books were pushed back against the wall.
What’s Behind Our Floating Bookshelves’ Success
Quite literally, it is what’s behind and inside them!
Hidden Steel Framework: Each shelf has a recessed channel with thick steel rods that extend deep into the shelf. No visible hardware, all the strength you need.
Strategic Anchoring: We learned this the hard way – it’s not about finding one stud. It’s about creating multiple attachment points that work together: minimum one stud + two high-quality anchors per shelf.
Real Weight Capacity: These can handle 110-130+ pounds per shelf when properly installed (that’s roughly 70+ hardcover books). But conservatively, keep loads below 80 lbs per shelf – the sheetrock can fail before the anchors do.
Smart Loading: Keep your heaviest books pushed back toward the wall where the shelf is strongest. Use lighter items toward the front edge.
The Catch (Because There Always Is One)
You absolutely MUST install these correctly. Cutting corners on anchors or skipping the stud finder will turn your dream library into a nightmare cleanup job. But follow the process, and you’ll have floating bookshelves that can handle your entire Stephen King collection without breaking a sweat.
Wall of Floating Book Shelves?
The Real Talk: What You’re Actually Getting Into
Skill Level: Advanced Beginner to Intermediate (translation: you need to be comfortable with a drill and have patience for measuring . . . a LOT of measuring). Our daughter and I have done a few smaller DIY projects, but this is the first time for shelves and this large of a project.
Time Investment: Plan for a full weekend. The Hubs and I drove from KC to DC and spent four days working on the dining room accent wall and the living room wall. The blue closed cabinets are not included in that because they were out of stock at IKEA (awww, yes, Covid). I added those in August when I went back out.
Physical Demands: You’ll be on ladders, holding heavy shelves above your head, and you’ll get your squats in for the day week. You’ll need a helper – preferably one who won’t judge your measurement obsessiveness.
Cost Range: Our project ran just over $3000 for custom walnut shelves covering 56 linear feet, but you could do a smaller version for $300-800 depending on size and wood choice. It was a bargain, but still a sizable investment on the kids part (which put a bit of extra pressure on me).
The Payoff: A show-stopping wall that perfectly displays your book collection, adds serious value to your home, and gives you bragging rights for life. Plus, you’ll finally have a good answer when people ask where you put all your books.
What You’ll Need: Tools and Supplies
Before you commit and start channeling your inner DIY rockstar, let’s talk the gear:
BONUS: All the necessary tools are basic tools.
- Two ladders
- Tape measure
- Painter’s tape
- Drill, preferably two, use one as a drill and one as a driver.
- Laser level, not really required, but helpful at first
- Stud Finder (I used a mediocre zircon, but this one is cheaper and the top pick of Wirecutter)
- Pencil
- Magic Eraser, (we did a LOT of marking and drawing on the wall)
- An easy to read carpenter’s square, nothing fancy
- Levels, I recommend two or three 9 – 24-inch lightweight with a magnetic base!
- Drills (having two is crazy helpful) and bits
- Screwdriver (for hand tightening screws), a ratchet one like this is well worth it to save your wrist and speed things along!!!
- Anchors, these are the ones we used and recommend
- Wood screws, minimum 2 1/2-inches
- Wood shims, just in case. You may not even need them.
Yes!, The only power tool needed is a power drill and we used two to save time switching bits. We used one as a drill and one as a driver.
The best part? When it’s done, people will think you hired a professional carpenter. Little do they know it was just you and a friend with a drill and a questionable compulsion with getting things perfectly level.
Before we jump in, I’d like to take a quick pause to ask if you are a subscriber? If not, now is a great time to join us:
Thanks bunches! Now back to our books:
Ready to turn your book hoarding habit into your home’s most stunning feature? Let’s get booking!
Planning Your Floating Bookshelves for Heavy Books
Now it’s time for the dreaming to get real specific. It’s project planning time. This is where a bit more time spent will pay off with great dividends during the installation phase AND the enjoyment years.
Know Your Books (Seriously)
This might sound obvious, but not all books are created equal, and your shelves need to accommodate what you actually own:
- Standard Paperbacks: About 7″ tall, 4-5″ wide
- Textbooks: Often 10″+ and heavy as bricks
- Hardcover Novels: Usually 8-9″ tall, 6″ wide
- Coffee Table Books: 10-17″ tall, with quite a range of widths (these bad boys need special consideration)
My kids don’t have many coffee table books, so we took them out of the equation. We went with 10-inch deep shelves.
PRO TIP: Keep in mind the weight distribution mentioned previously. You want the weight to be back towards the wall. Don’t go with shelves too deep. The further you want to pull the book out to the edge, the more pressure on the shelves to start slanting downward.
Grab a representative sample of your books and measure them. You’ll thank me later when everything actually fits.
Shelf Spacing: The Sweet Spot
The “official” rule is rather broad and says 11-17 inches vertically between floating shelves, but I’m going to give you the real-world advice:
- For Most Books: 13 inches between shelves gives you plenty of breathing room
- For Oversized Books: Plan at least one section with 15+ inch spacing
- For Variety: Mix it up – some closer sections for paperbacks, wider sections for statement pieces
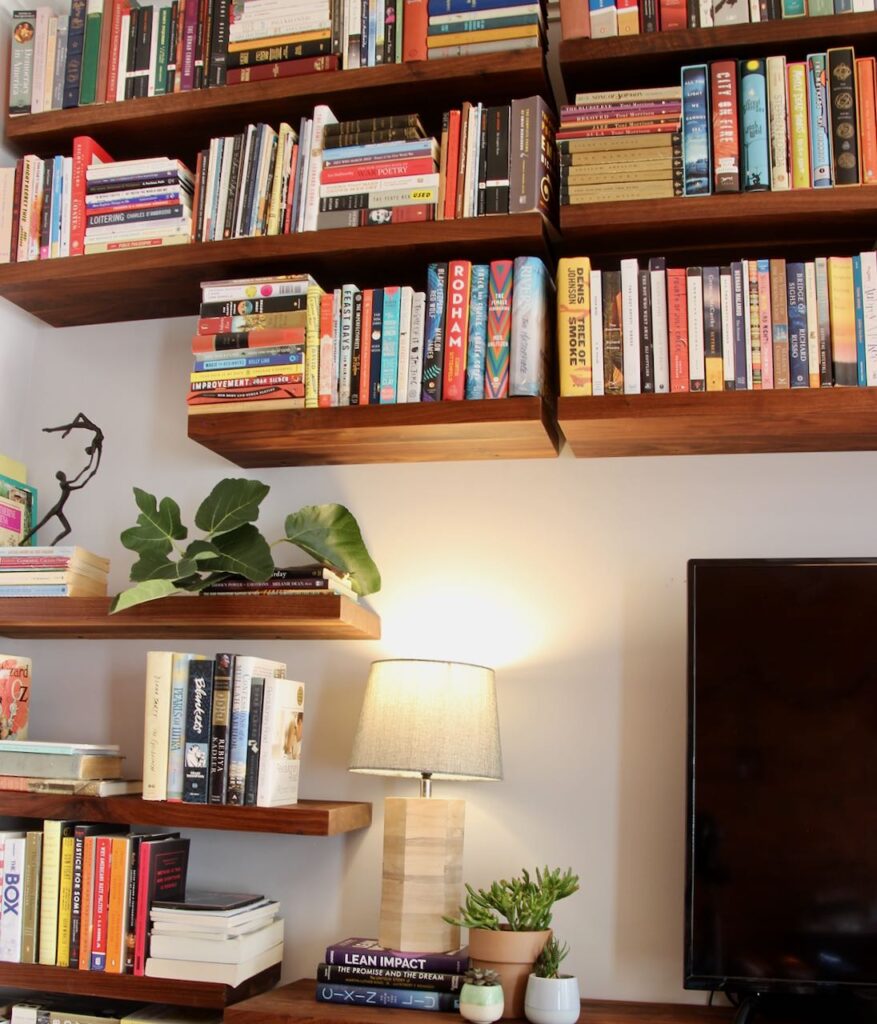
My Special Sauce: We started with 13-inch spacing for most shelves, but once we started laying it out in scale, the 13 grew to 14. It’s just what worked with their ceiling height.
And we created two taller spaces for plants and decorative objects.
Books are beautiful, but a little visual break makes the whole wall more interesting. On a large wall like this, or even in a generous hutch, I like to plan room for some artwork/photographs, an accent lamp and at least one green plant.
My BEST Tool: Use Canva For Visualizing
Eleven Options Without Moving a Single Book
If you don’t use Canva, . . . . well, why the heck not?
It’s easy to use and free. Yes, I have a paid version which is worth it for the daily workout I give it. But if you just need it here and there, the free version should serve you well.

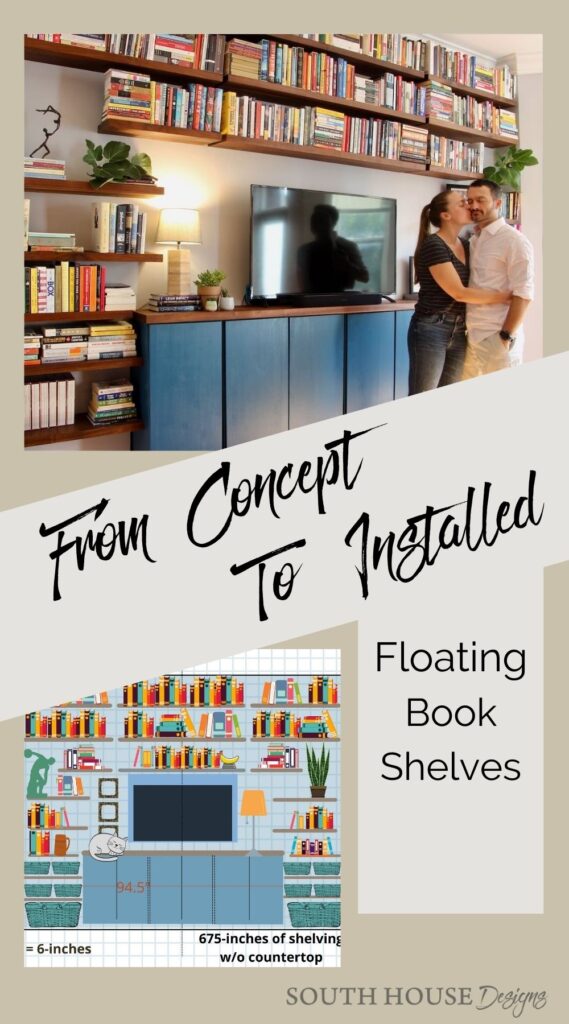
Katie had found the Ivar pine cabinets at IKEA and thought they’d be the perfect size and solution for floating closed storage with a walnut countertop ordered with the shelves from J Thomas Home Goods.
We also needed to plan for the TV.
The black rectangle is their current TV size. The blue rectangle behind it represents the next size up if they would want to grow it a bit when this one is due to be replaced.
I sent K+J, a folder with eleven proposed versions (created in Canva) of how the shelves could layout and still have some closed storage. The baskets were for flexible, easy access storage like their laptops, cables, paper and office supplies (this floor was Katie’s office during Covid).
Those shelves are slowly being claimed by graphic novels, newspapers (yes, in print!) and magazines.
NOTE about the layout:
Initially, Katie & Jon would have liked the top three rows to just be single slabs. But it was not to be — just one more pandemic supply chain issue. Yes, it meant measuring and aligning nine shelves vs. three, so a bit more work.
But in hindsight, one long 12+ ft shelf probably would have been too unwieldy for Katie & I straddling ladders.
We ended up loving the little breaks of air in there. And these breaks are consistent with the breaks from the side walls, where I knew the back corners were not square. It all looks very intentional this way.
This layout process allowed us to:
- Visualize the project — collectively
- Test 12 different layout options before buying anything
- Get exact measurements for each shelf
- Offer the kids a variety of options, helping them think through the possibilities
- Avoid expensive mistakes
Now the question was three or four of the double door Ivar’s? The winner, three.
Then, of the options with three double door cabinets, which will they choose? They chose option 8 of the eleven we started with. Personally, I think the cat and the banana bookend sealed the deal.
How to Do This:
- Measure your wall dimensions
- Create a rectangle in Canva to scale, adding a grid background on top.
- Add rectangles for shelves, TV, cabinets, whatever you’re planning
- Play around until it looks perfect
- Use the measurements to create your shopping list
If it would be helpful for you to see all eleven of our layout options, or perhaps you’re just curious, they are all in a Google folder that you can access through my Free Resource Library. It’s available to all subscribers. If you are not a subscriber, no worries we can take care of that right now for instant access.
PRO TIP: Be sure to include outlets, light switches and any moulding that might be intruding in your space.
Planning for Your Wall Type
Not all walls are created equal, and this matters more than you might think:
- Standard Drywall (½” thick): Most common, easiest to work with
- Thick Drywall (⅝”): Slightly better for heavy loads
- Plaster Walls: Common in older homes, finding the studs can be tricky, different anchors needed
- Brick/Concrete: Whole different ballgame (and probably not a DIY project, at least at our level))
The type of wall you have will determine your anchor strategy, so figure this out before you start shopping for hardware.
Ours was 1/2″ drywall. The original plaster had been replaced by previous owners renovations.

Lots of how-to information you don’t want to forget when your time comes.
Make sure you know where to find it!
How to Install Floating Shelves
(Without Losing Your Mind)
Alright, here we go – the moment where all that planning pays off! This is where we transform your carefully measured wall into a stunning floating bookshelf display. Take a deep breath, because you’ve got this.
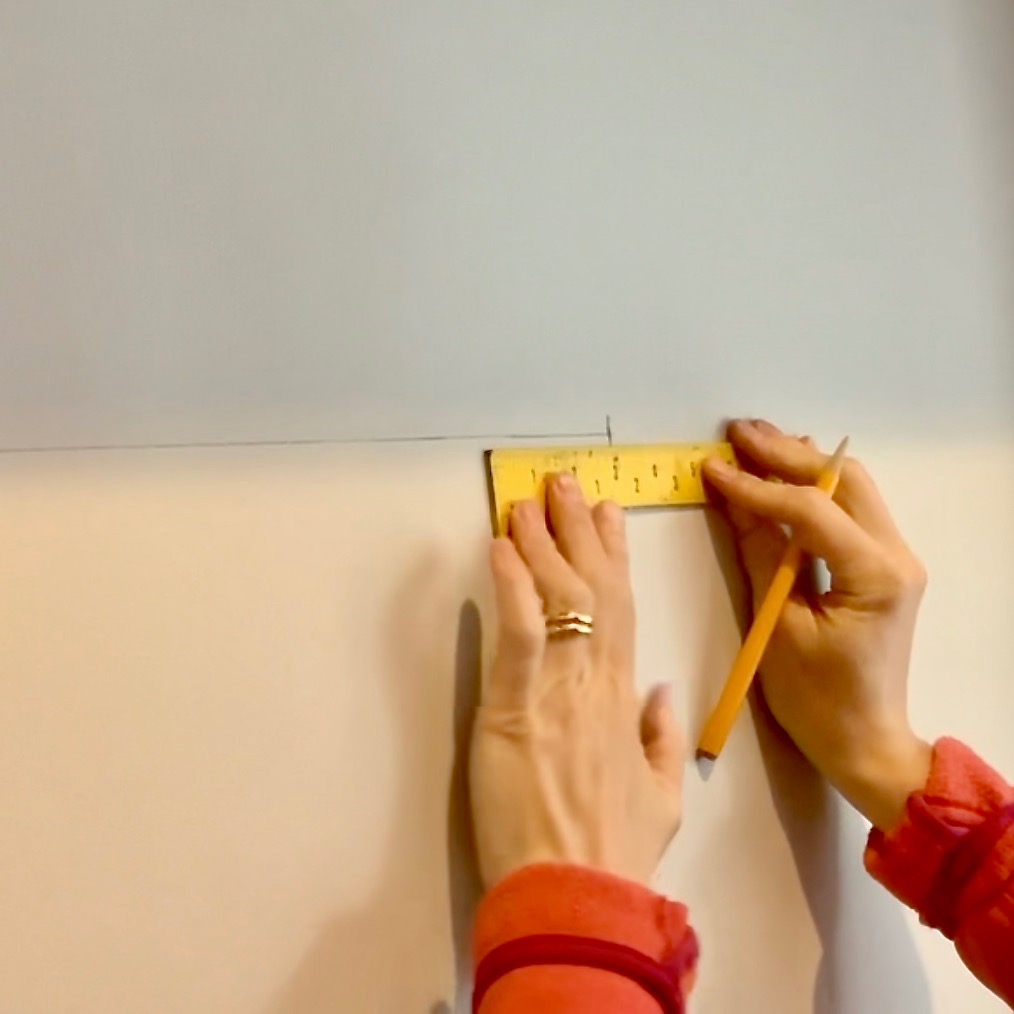
Step 1) Mark It Up – Layout and Planning-
Where painter’s tape becomes your best friend and measuring becomes an obsession–
This is where we take your beautiful Canva design and make it real on your actual wall. Don’t rush this step – I promise the extra time here saves you hours of frustration later.
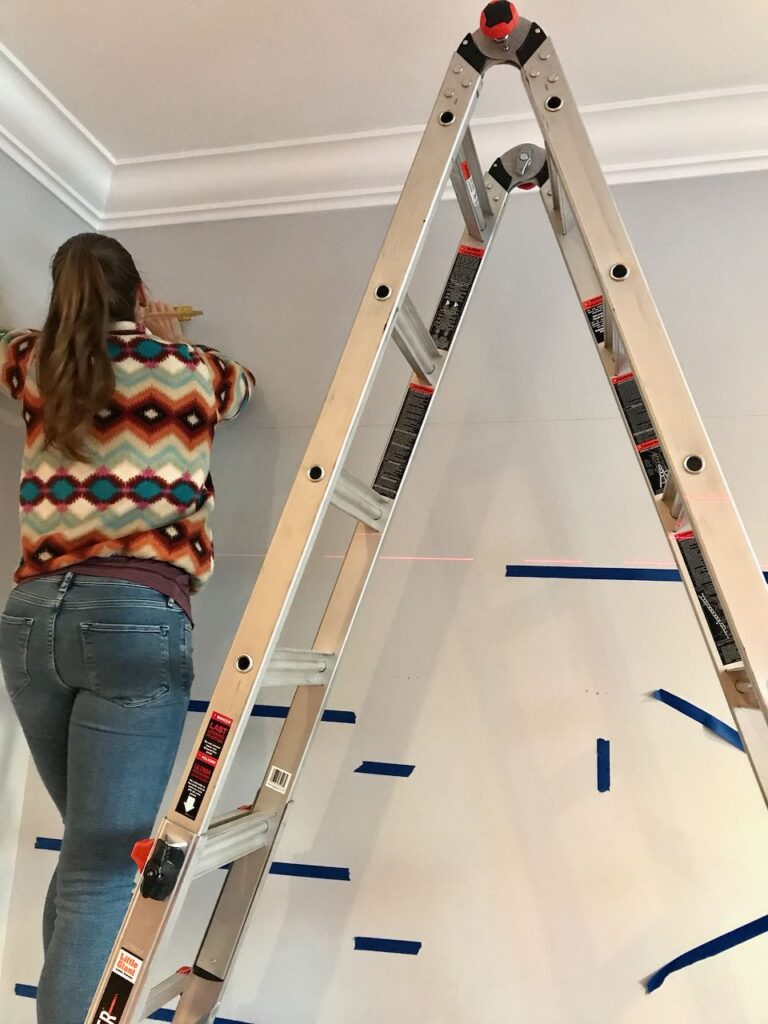
What You’ll Do:
- Transfer your measurements to the wall using your tape measure and pencil
- Mark each shelf position with light pencil marks at both ends — a laser level helps here, but not an absolute must
- Use painter’s tape to outline each shelf – this lets you step back and see the whole layout
- Double-check everything because moving tape is easier than moving holes in your wall
The Reality Check: Stand back and look at your taped layout. Live with it for a day if you can. Sometimes what looks perfect on paper needs tweaking in real life. Katie and I adjusted two shelf heights after seeing the tape layout – so glad we did.
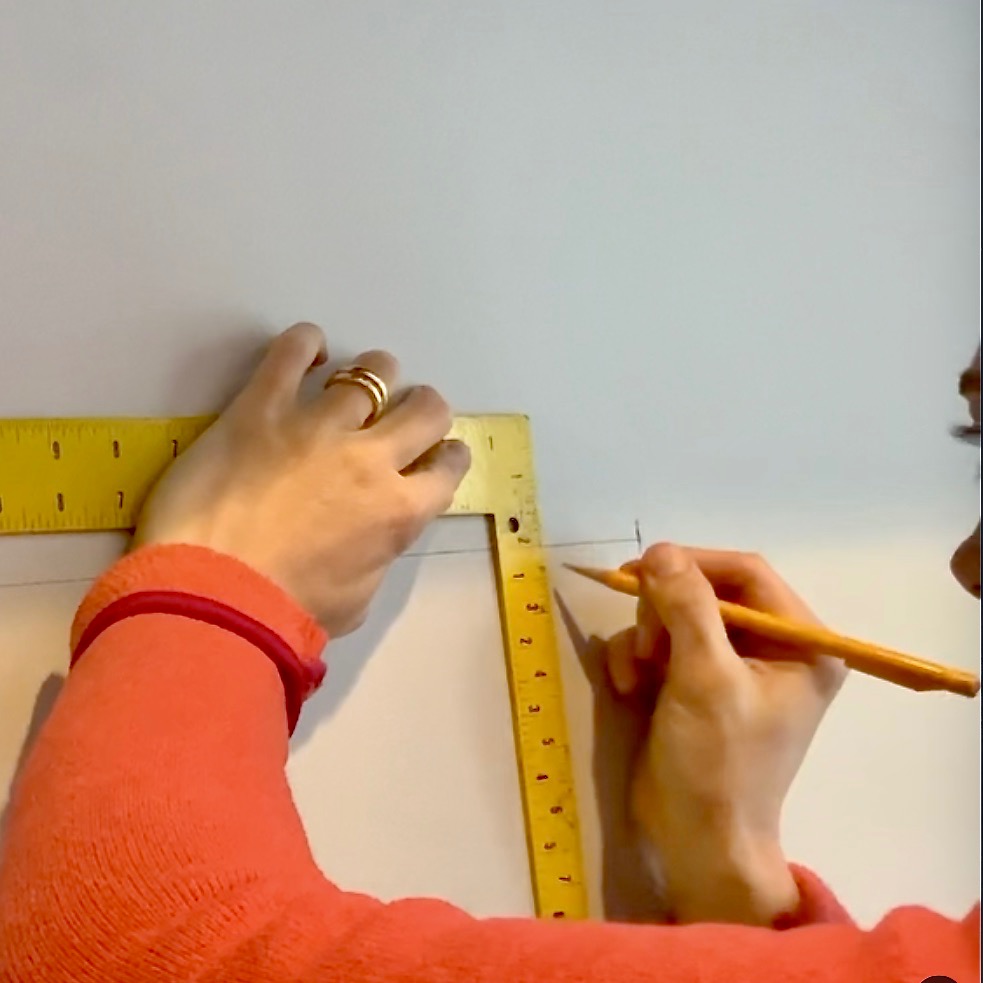
Step 2) Find Your Studs-
Because floating bookshelves for heavy books need something solid to grab onto–
Here’s the truth: your floating shelf weight capacity is only as good as what’s holding it up. Studs are your foundation, everything else is just backup.
The Stud-Finding Process:
- Use your stud finder starting from one end of the wall
- Mark each stud location with a small pencil mark
- Verify each stud by tapping (you’ll hear the difference between hollow and solid)
- Measure between studs – they should be 16″ or 24″ (On Center) apart in most homes
- Mark stud locations on your painter’s tape so you can see how they line up with your shelves
What We Learned the Hard Way: Not every shelf will hit two studs perfectly. That’s okay! Plan for it.
Each shelf should hit at least one stud, with quality drywall anchors for additional support points.
NOTE: Our shelves with the recessed bracket system have a ton of flexibility in attachment points. This helped immensely!
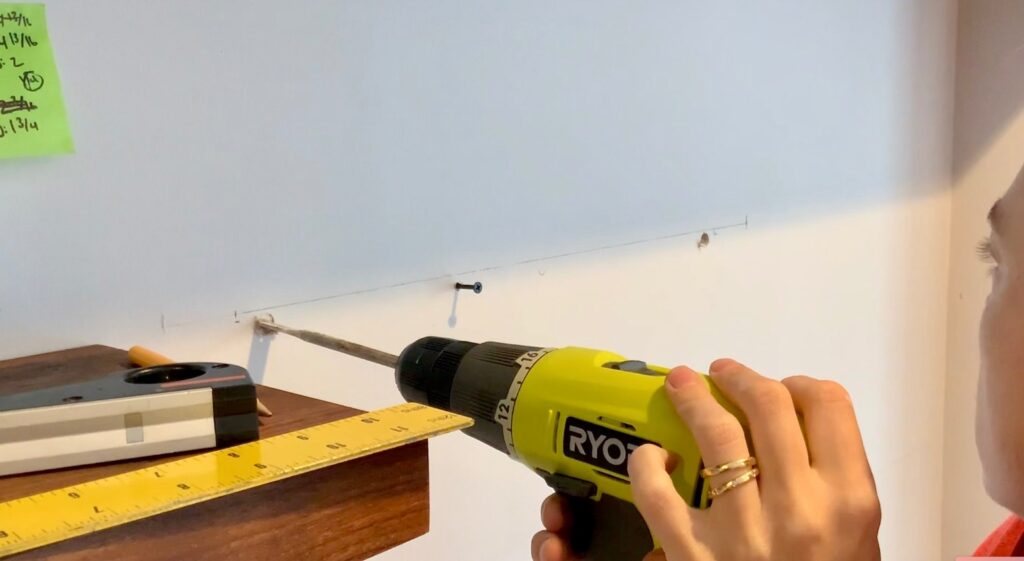
Step 3) The First Bracket – Where Dreams Become Real-
Starting with the easiest shelf first (and the most critical measurements of the whole project)-
You’re going to install your first hidden bracket floating shelf, and you should start with the shortest, closest to eye level shelf you have.
Why? Because it’s the most forgiving place to learn, and if something goes wrong, it’s easier to fix.
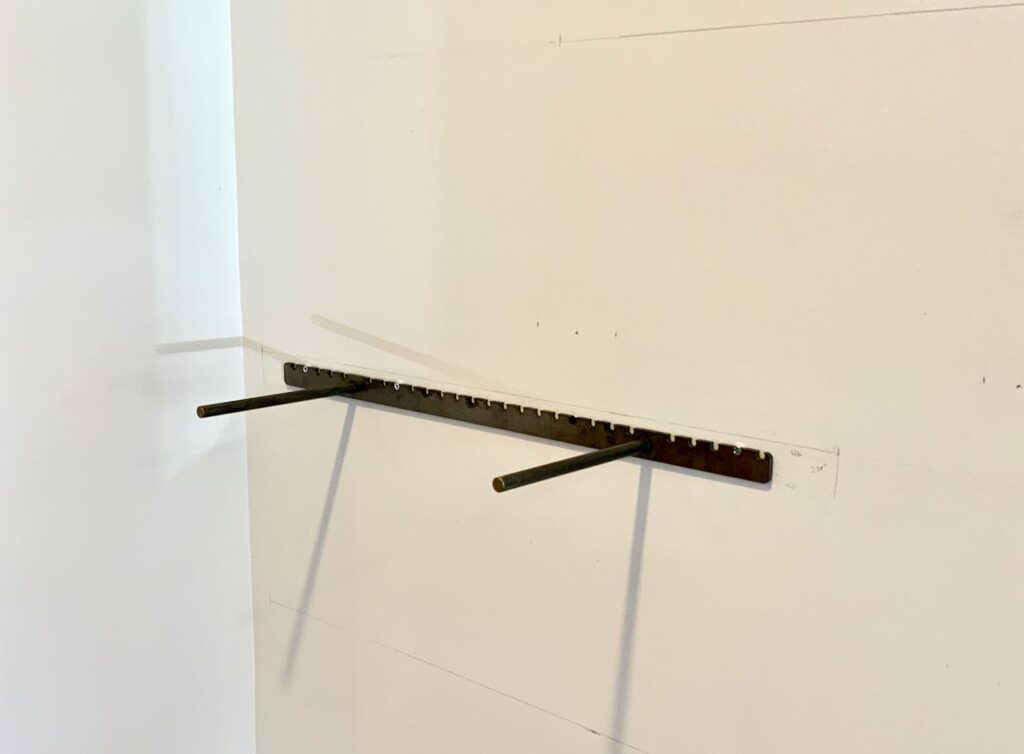
Understanding Recessed Channel Floating Shelf Mechanics: Our shelves have a recessed channel cut into the back – think of it like a keyhole that slides onto the steel mounting bracket. The rods of the bracket extend deep into the shelf (ours went 8 inches in), distributing weight along the entire depth.
The Critical Measurement Process: Here’s where precision becomes everything. This is the most important measurement of the entire project. It took us several hours of frustration before we came up with this method.
Our process may seem crazy, but it worked like a charm for us! Give it a try and I think you be on board too.
- Hold the wood shelf with bracket inside in place on the wall at your marked position
- Level it perfectly using one of your lightweight levels
- Double and triple check the shelf placement – this is your one chance to get it right
- Draw a pencil line across the top of the wood shelf and down the sides – this becomes your reference
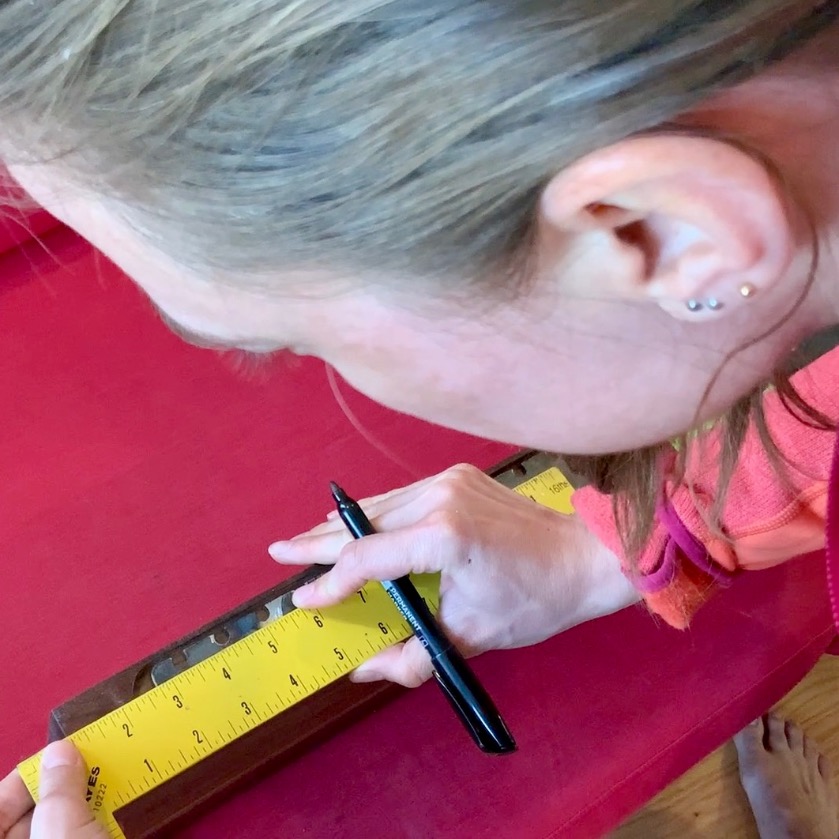
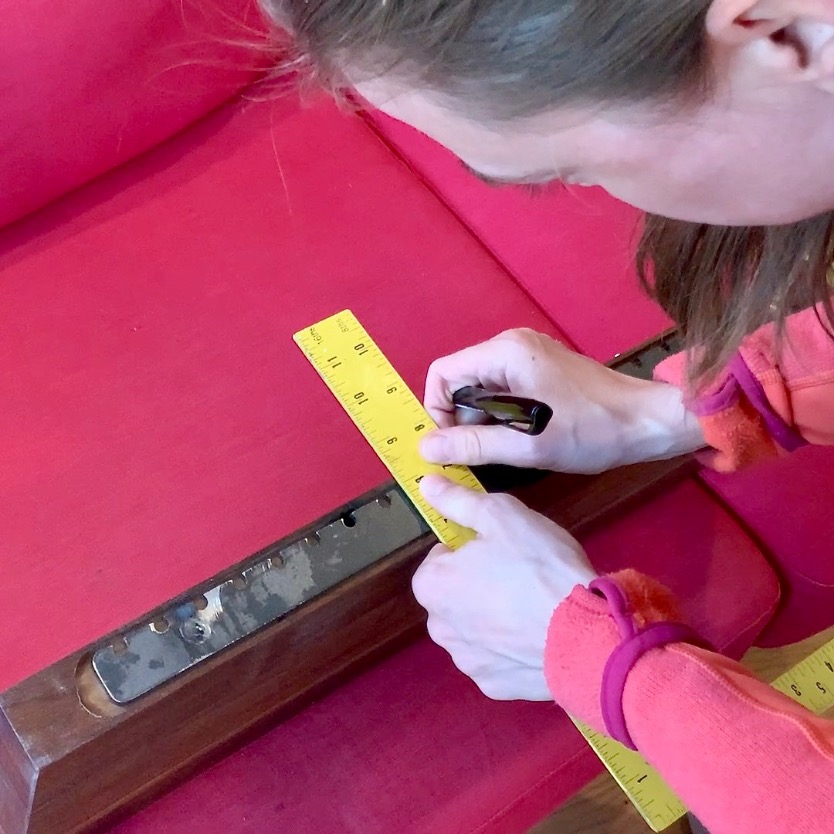
- Lower the shelf and bracket. Stand the shelf on its front edge and carefully measure the distance from the edge of the steel frame to the outside edge of the wood on each side. Note these measurements — we used post-its.
- Now push the metal frame up towards the top of the wood shelf (because the set screws will force the frame upwards). Now measure the small distance between the top of the wood to the top of the steel frame. Ours were about 1/4-inch, but they did vary and we took that into consideration because we had rows where we wanted them all the exact same height.
- Transfer these measurements to the wall using your pencil outline as reference points. Yes, you should only need one of the sides, but we did both for a good double check.
PRO TIP: For the most precise measuring, start at any inch marking, NOT at the end of the ruler which can off by as much as 1/8-inch.
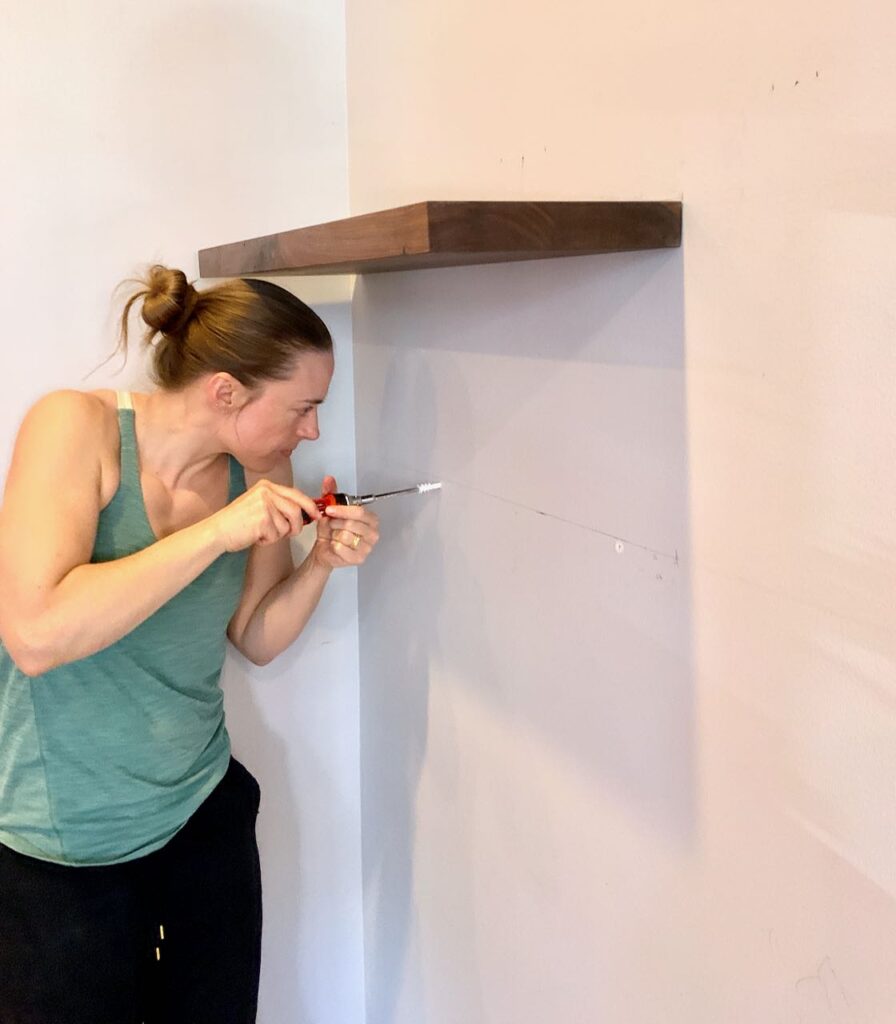
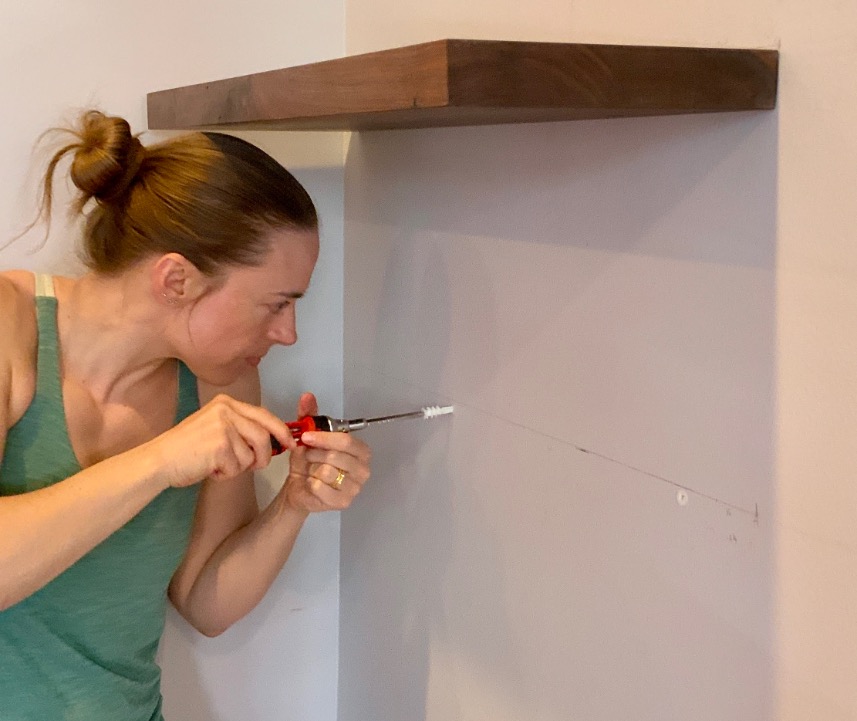
Installing the Bracket:
- Align the bracket up to these markings. Determine and mark where you can attach to studs and where you need another anchored attachment or two.
- Drill in the screws for the studs, stopping short of the wall
- Test fit the steel frame. Adjust if needed.
- Drill the holes for the anchors and add the screws, again stopping short of the wall.

- Add the steel frame, triple check placement and level, tightening screws gradually watching the bubble as you go.
PRO TIP: If you’re a DIY novice, you may not realize levels work on top and on bottom. If the anchor screws stick up above the metal frame, hold your level against the bottom of the frame.
Installing the Shelf:
Now comes the moment of truth – sliding your beautiful shelf onto its hidden bracket. Don’t wait to do this later; you need the shelf installed to properly align the next one. Besides, it its so satisfying!
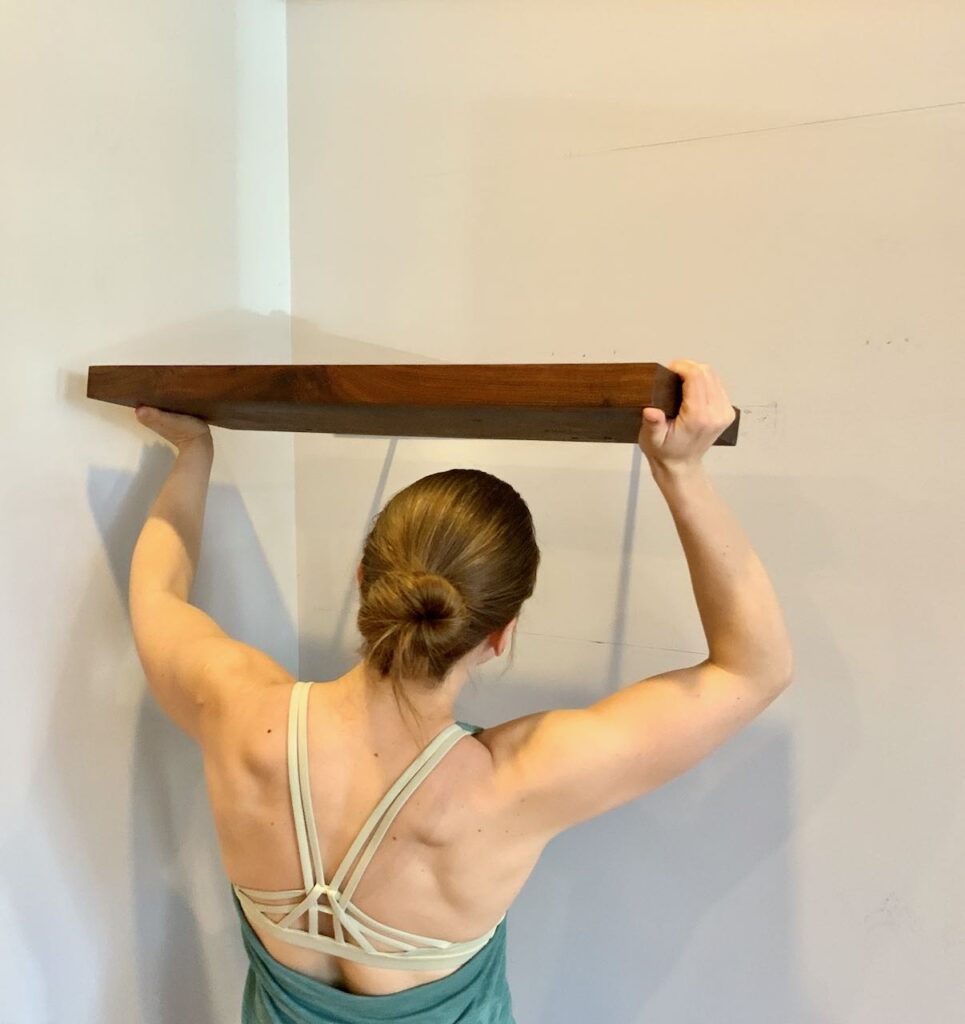
- Align the shelf with the mounting rods
- Slide the shelf on squarely – this is important! Each side needs to slide at the same pace. If one side goes on faster than the other, you’ll bind up the system
- Push until the shelf sits flush against the wall
- Double-check level and that it feels solid – no wobble or movement
- When it’s all nice and tight and level every which way, secure with set screws – there’s a small set screw for each rod that goes through a recessed hole in the bottom of the shelf. These lock everything in place
HINT: If you were rather liberal with your markings and measurements as we were at times, between steps 3 and 4 is a good time to use your Magic Eraser.
Why Install Each Shelf Immediately: You actually have to do this to properly align your next shelf. Plus, it’s the only way to know if your bracket installation was successful before moving on.
Why This Method Works: By using the actual shelf as your template, you eliminate the guesswork. The shelf tells you exactly where the bracket needs to be, not the other way around.
Why We Started Easy: That first shelf teaches you how the whole system works and how critical these measurements are. Once you nail it (literally), the rest feel much more manageable. You’ll use this same process for every single shelf.
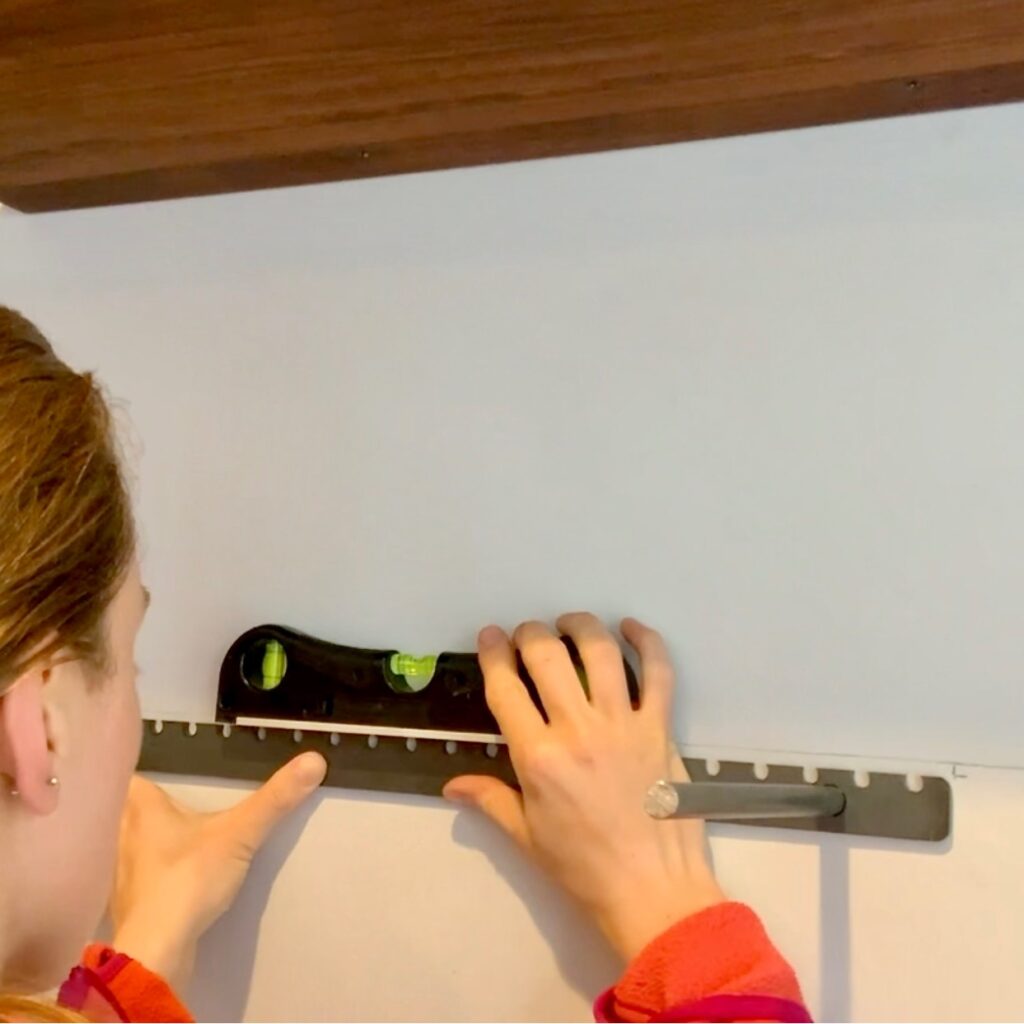
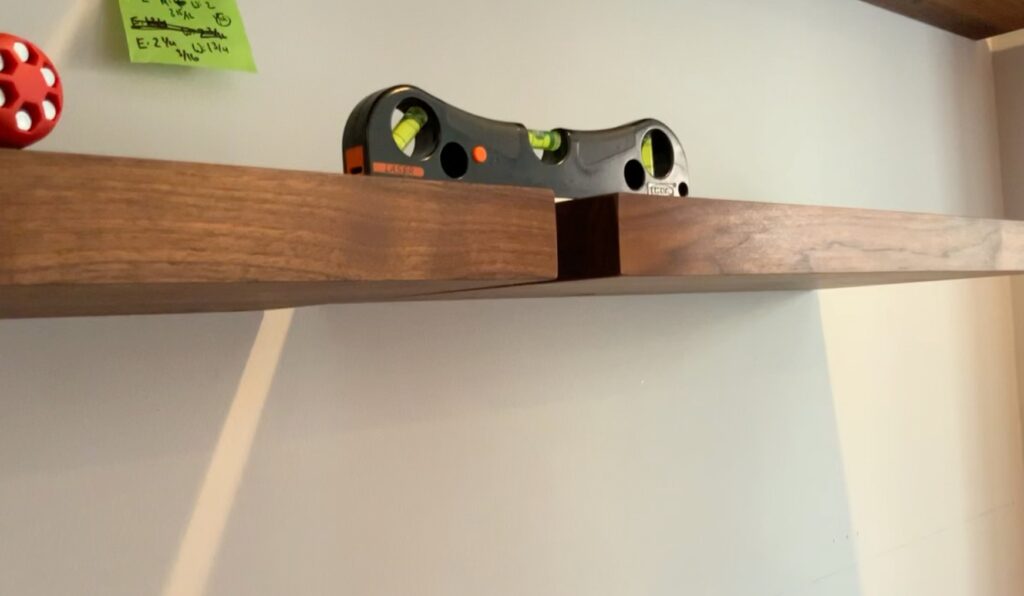
Step 4) Level Up – Getting Everything Aligned-
Why multiple levels beat a laser level every time (at least for us)–
Here’s where things get real. You’ve got one shelf up, and now you need to install the rest so they’re perfectly aligned both vertically and horizontally. This can be the downfall of a project like this, but not yours.
The Reality About Laser Levels: Many people will tell you to use a laser level for aligning all your shelves. We used ours initially for the overall wall marking, but when it came to actually hanging the shelves, we found it more frustrating than helpful. Inevitably, one or both of us were always in the way, obstructing the laser line right when we needed to see it most.
Our Better Solution: Multiple Lightweight Levels– We discovered that using two (and sometimes three) lightweight levels worked much better. At least one should be magnetic – trust me on this.
The Two-Level Alignment Process:
- Hold your second shelf in position according to your initial layout
- Use the first level held vertically against the side of your mounted shelf and the second shelf to fine-tune vertical alignment, or across the top of both (if they align horizontally)
- Use a second level to fine-tune the horizontal level of the new shelf
- Outline new shelf on the wall once everything looks perfect
- Repeat the critical measurement process and the remainder of installation from Step 3
Why This Works Better:
- No obstruction issues – you can see your levels clearly
- More precise control – you’re making micro-adjustments with direct feedback
- Both people can work simultaneously – one person holds the shelf, the other checks levels
- Magnetic levels stick to brackets – freeing up your hands for adjustments
The Reality Check: Our shelves needed to align both vertically (straight up and down with each other) and horizontally (with other shelves in that row). The two-level method let us nail both requirements without the constant “move left, no right, now I can’t see the line” dance that comes with laser levels.
Pro Tip: Get comfortable with this process on your second shelf, because you’ll repeat it for every remaining shelf. The good news? It gets faster and more intuitive with each one.
Step 5) Anchor Management – Stress-Free Solutions
Helping you keep your cool while getting rock solid results.
Let’s talk about floating shelf drywall anchors, because this is where a lot of DIY projects fail. You’ve found your studs, but you will probably need additional anchor points for maximum stability.
Look at the anchors we started with. It became clear after the first two shelves that we needed another solution. A trip to Lowe’s and we had our answer — Toggler heavy-duty anchors. NOT what you see here!!!
PRO TIP: Even if they come with your shelves, you definitely want to trade them up.
Our Anchor Strategy:
- For stud locations: minimum 2.5-inch wood screws
- For drywall-only locations: High-quality toggle bolts for floating shelves
- Our favorite: Toggler heavy-duty anchors (rated for 265 lbs each in 1/2-inch sheetrock)
Flip Toggle Bolts for Floating Shelves Technique:
- Drill the correct size hole (check your toggle bolt packaging)
- Lay the flip toggle flat to fit through the hole
- Pull back gently to engage the toggle against the back of the drywall
- Slide the “cup” down the strips and snap off the two legs
Quick & Easy Peasy!
Step 6) Troubleshooting Wobble and Forward Tilt-
What to do when your shelf has a mind of its own–
Sometimes, even with perfect measurements and installation, you’ll encounter a shelf that wants to wobble or tilt forward. Don’t panic – this happens, and there’s a simple fix.
Why This Happens: If your drywall or studs aren’t exactly vertical in a spot (and trust me, they often aren’t in older homes), you may experience a shelf that wants to tilt forward or feels unstable.
Our Real-World Experience: We had one troublesome spot on our wall where this exact issue came up. The shim fix worked perfectly. It’s been over four years now – it’s held beautifully! I’m not even sure I could now tell you which shelf it was.
The Fix That Actually Works:
- Double-check your bracket – make sure it’s level, tight, and sturdy
- Slide the shelf back into place while adding a shim or two behind it until it sits perfectly level
- Tighten the shelf set screws to lock everything in place
- Score with a utility knife and snap off the visible part of the shim below the shelf line
Pro Tip: Keep a few wood shims handy. They’re cheap insurance against imperfect walls, and every old house seems to have at least one spot that needs this fix.
Hopefully this won’t happen to you, but if it does, now you have a solution that actually works long-term.
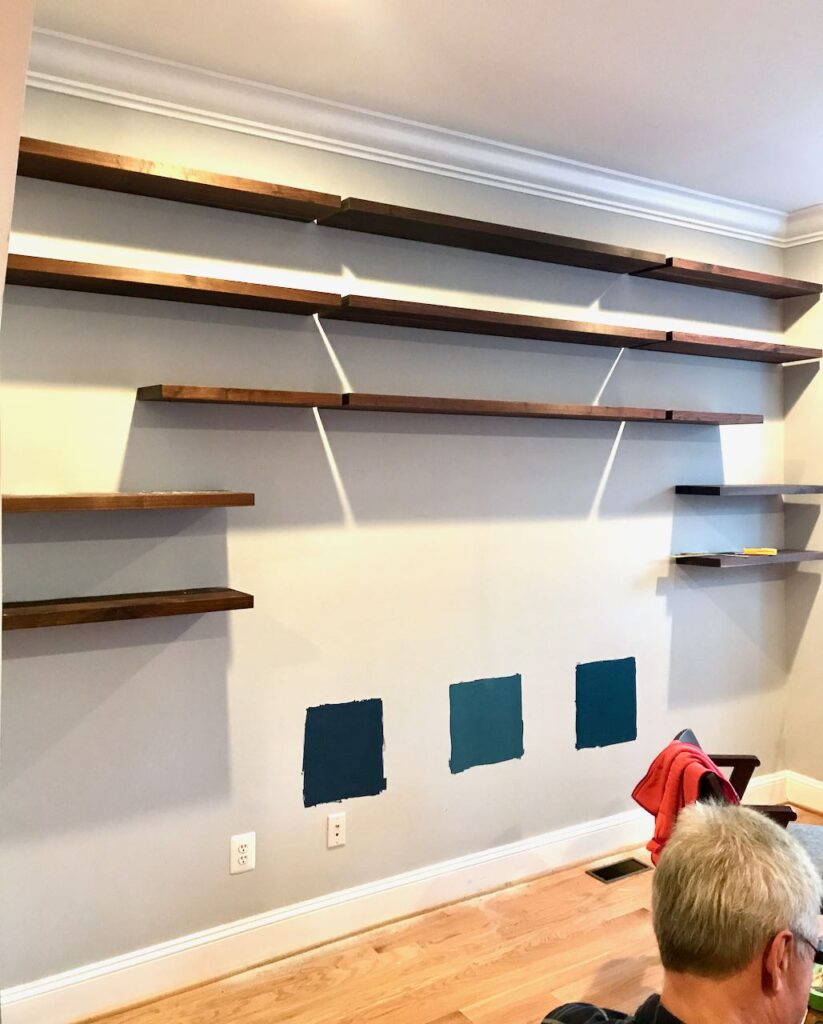
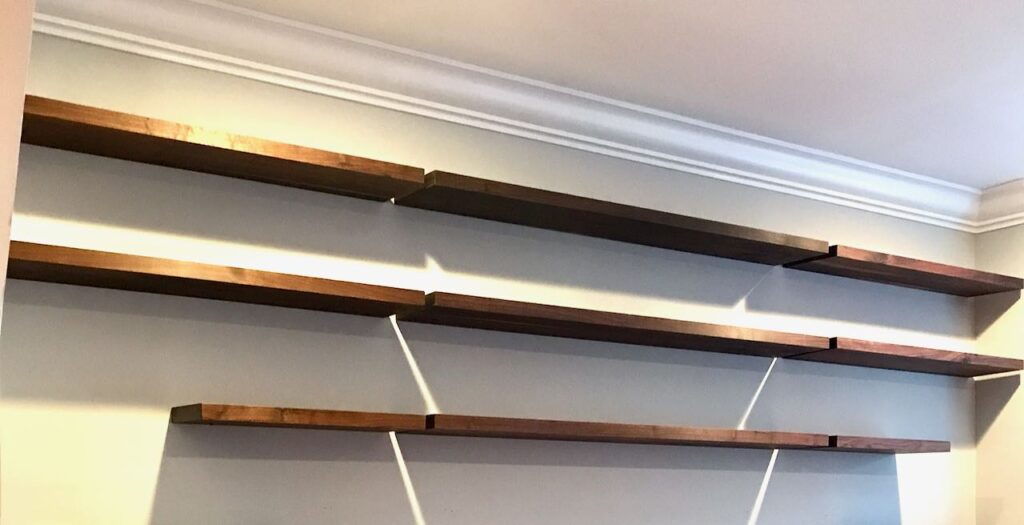
Phew, working slowly we have the thirteen hardest shelves installed. Night has fallen with six smaller ones left to go!
Those blue swatches? Sample colors of paint for the cabinets that will be floating there.
Have you been wondering where the fellas were?
The fine detail of measuring is just the kinda thing Katie & I obsess over, so we made a good installation team while The Hubs caulked and painted the big green feature wall that we installed on our first day.
And Jon was in the midst of a large project at work, so he jumped in between marathon zoom calls to check on our progress and cheer us on.
Book Loading and Styling Strategy
How to arrange books for stability and looks (because both matter)–
You’ve got beautiful, sturdy floating shelves – now let’s load them like a pro.
This isn’t just about aesthetics (though that matters too), it’s about keeping your investment and your family safe for years to come.
Weight Distribution Rules:
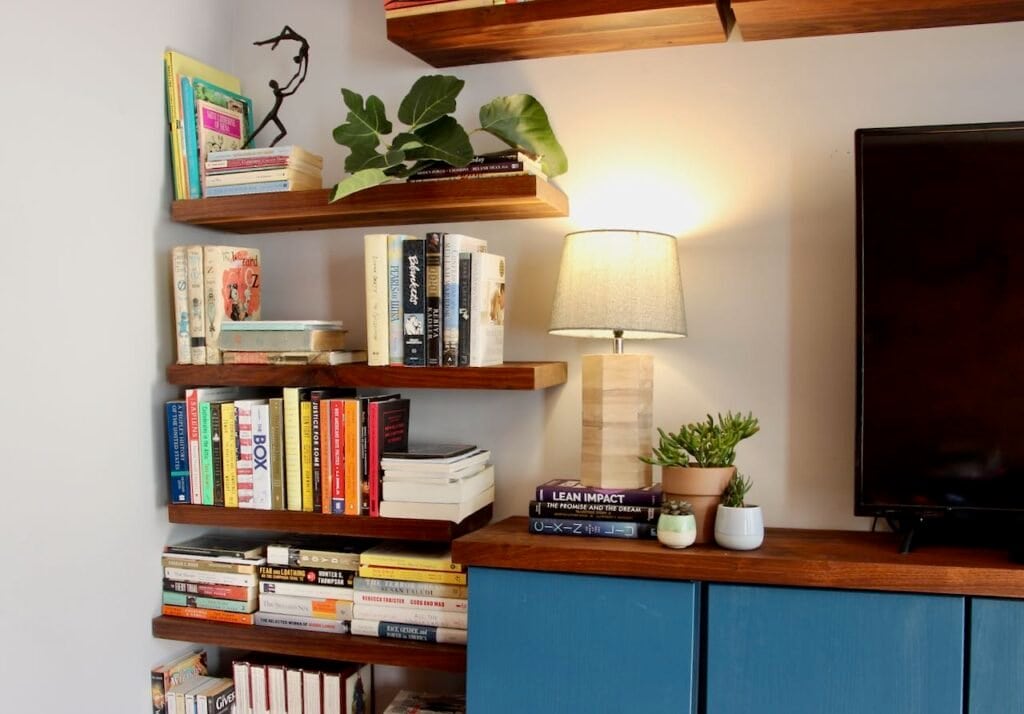
- Heaviest books sit to the back (closest to the wall)
- Lighter items can come forward (or leave some empty space)
- Distribute weight evenly across the length of each shelf
- Mix vertical and horizontal book placement for visual interest
The Reality: Even with perfect installation, physics still applies. Keep your heaviest coffee table books on lower shelves, and save the upper shelves for lighter paperbacks and decorative objects.
Now That They’re Functional, Let’s Make Them Beautiful!
Keeping in mind the weight distribution rules above, now let’s talk a few styling guidelines:
We discovered that pushing books about 1-3 inches back from the front edge was the perfect compromise for us on function (keeping weight more to the back than front) and style. Win-win! Functions great and looks great! And yes, it’s been over four years now!!!
Visual Balance Tips:
- Mix vertical and horizontal book placement for visual interest
- Group books by height in some sections, mix heights in others
- Leave some breathing room – not every inch needs to be filled
- Add a few decorative objects (banana bookend, anyone?) to break up long rows of books
- Consider color coordination in some sections for visual impact, but our kids grouped by subject matter
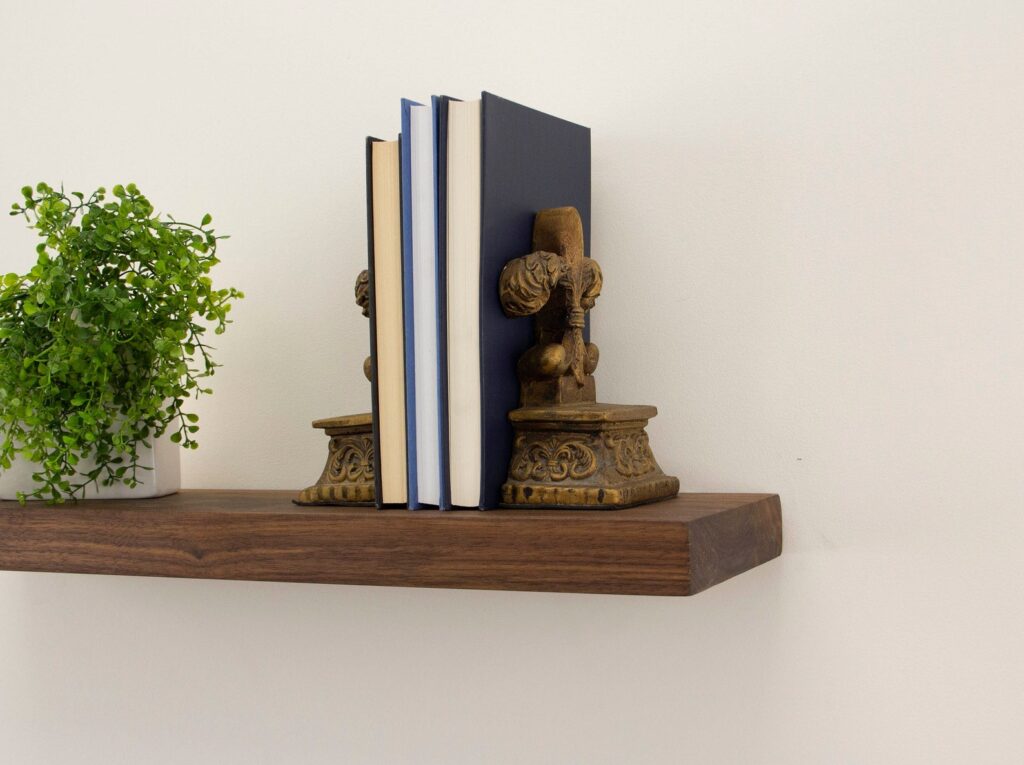
Who wants utility bookends displayed with your beautiful books? No one, ever!!!
PRO TIP: Use my favorite hidden bookend trick: You can find it here!
This will change your book display game forever.
Our work is done for this trip.
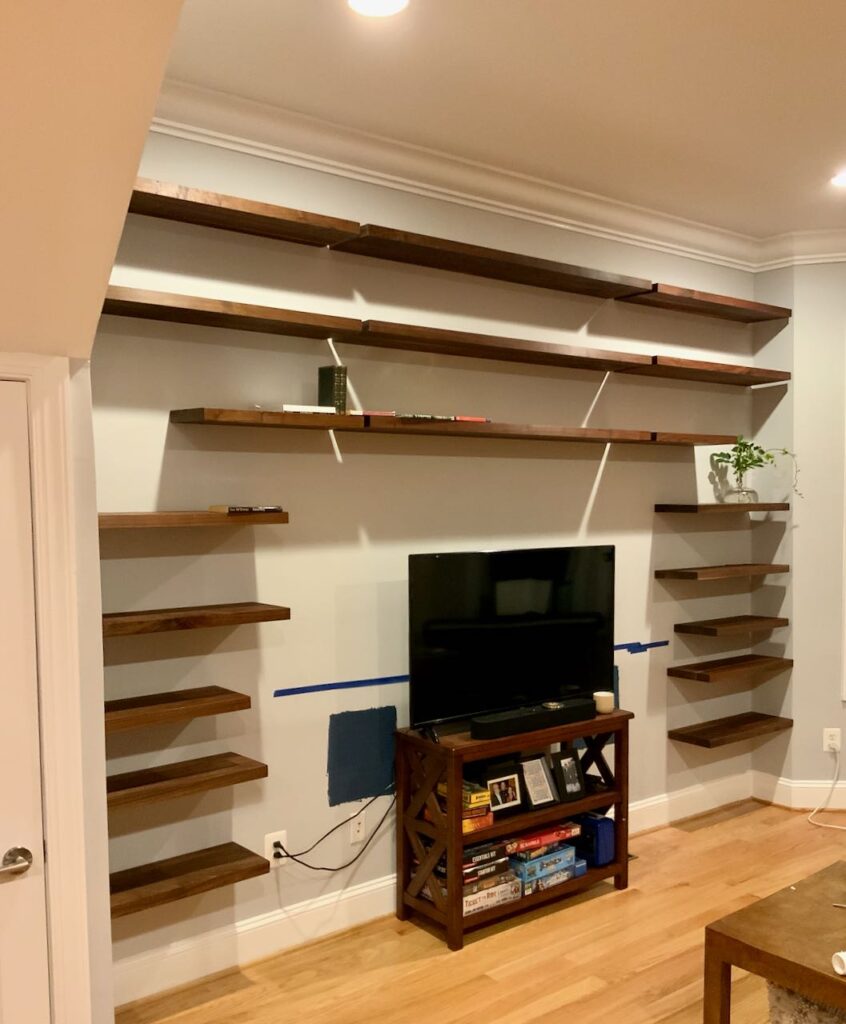
Those Ivar cabinets? They seemed to be one of the first Covid supply chain fatalities. They were not available pretty much throughout the US at that point.
Fast forward several months, and the cabinets finally arrived and I returned in August to install. The details of the closed storage part of this project and lots of pretty after pictures are right here.
Time to Celebrate!
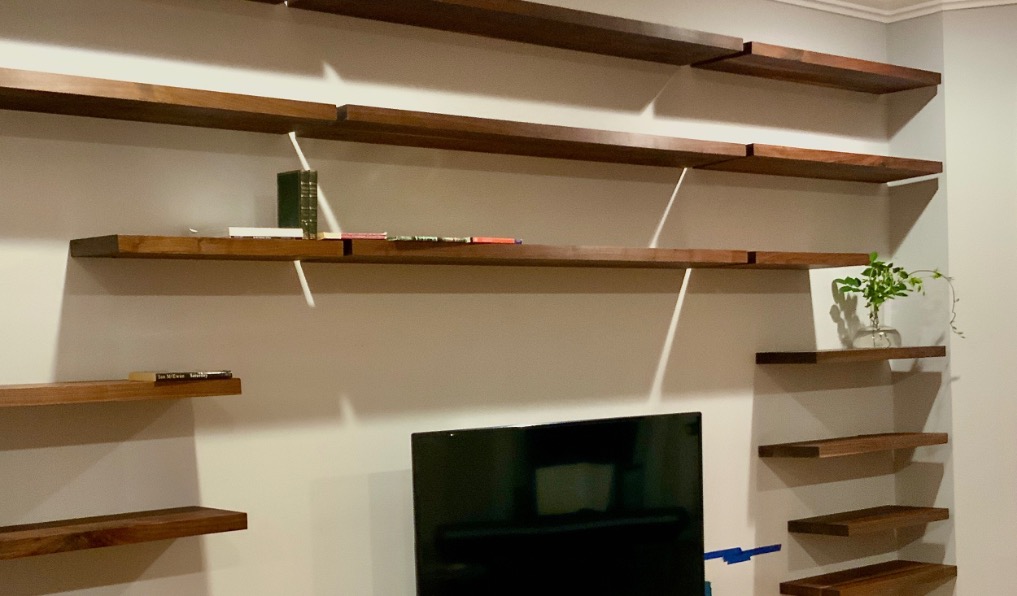
Notice six lonely-looking books on the shelves?
They were not really lonely, they were ceremonial! (Remember, it’s important to celebrate all of life’s victories, large and small — and this was a big one and we were ready to celebrate!!!).
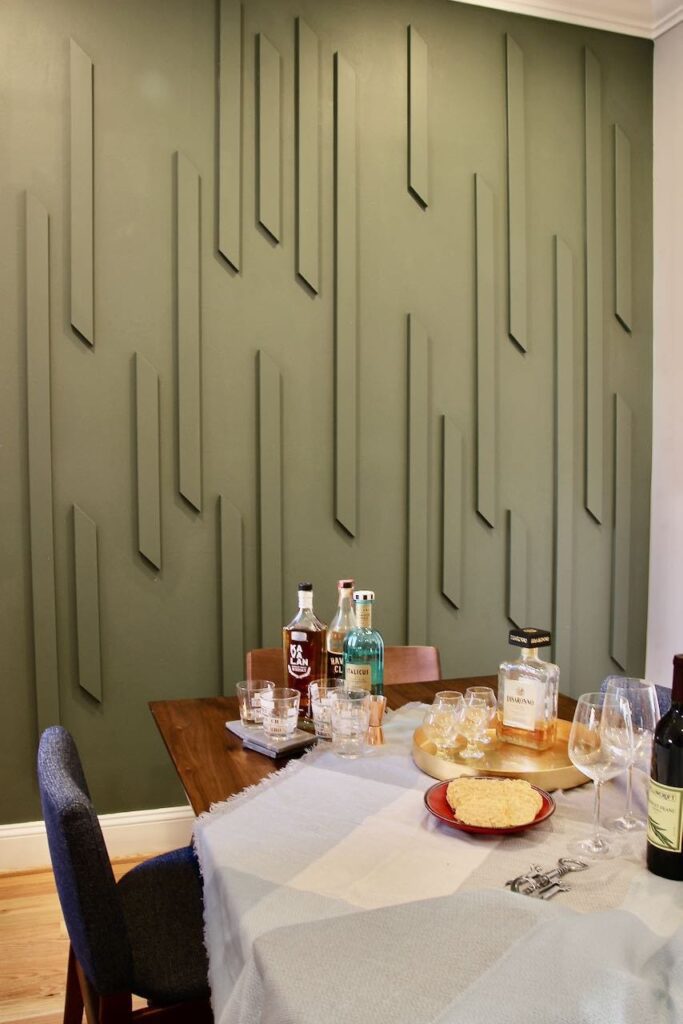
Jon’s parents made it into DC for our last night there. We enjoyed the first dinner party in the new dining room.
Then after delicious food, wonderful wine and great conversation, we each chose a special book from the kids’ collection and had a silly little ceremony of “booking” the wall.
And of course, I just couldn’t let it be without a vase of clippings from the yard.
This was a great way, perhaps the best way, to make this house truly Katie and Jon’s home, infused with their personalities. It’s now their sanctuary (but not a quiet sanctuary) filled with boisterous laughter, loads of music and enough towering piles of books to satisfy their incredibly bright and curious minds!
That first trip, April of ’21, we installed and painted the dining room feature wall. And installed all the floating bookshelves. Then I returned in August of ’21, to make the closed storage finally happen.
In Spring of ’24 we remodeled the half bath that lives between the two projects.
Then in July ’24 I returned for a baby shower and to turn Jon’s office into a nursery. Yep, the hoped for future grandchild is here! She is worth every moment of anticipation!!!! And I am in Grandma heaven!!!
Don’t hesitate to reach out to me with any additional questions.

Thanks, thanks so much! Great info!