Cozy Up with This Easy DIY Winter Decor Idea (Non-Christmas)
Create a stunning DIY winter decor piece using thrifted materials to bring cozy, non-Christmas winter style to your home.
When the last of the Christmas decorations is nestled in its storage box and the Christmas tree makes its yearly trek to the attic, many of us face that familiar new year challenge: how to keep our homes feeling warm and inviting without the sparkle of holiday decor.
The transition from Christmas to winter decorating doesn’t have to mean stripped-bare surfaces and cold, empty corners.
In fact, it’s the perfect opportunity to lean into what truly makes a home feel cozy during the winter months — the frostiest time of year.
Like many of you, I found myself staring at a particularly challenging spot this January – our stairwell. Where a twinkling Christmas tree once cast its warm glow up the steps, the brick wall now felt stark and uninviting, despite its natural warmth.

The space was practically begging for something to soften its post-holiday sterility.
The secret to creating that perfect winter ambiance lies in embracing textures and natural elements.
Start by eliminating all the bright shiny red, but keep a good helping of evergreen branches and winter greenery.
Add in cozy textures, think warm blankets or throws draped invitingly over chair backs. And an abundance of pillows in rich, touchable fabrics, like sweater fabric, and the organic warmth of wooden accents.
Pine cones scattered through tablescapes and the soft light of candles (lots of candles!) can infuse any space with a warm, cozy feel.
But sometimes, a space calls for something more – a focal point that bridges the gap between glittery holiday season and winter serenity.
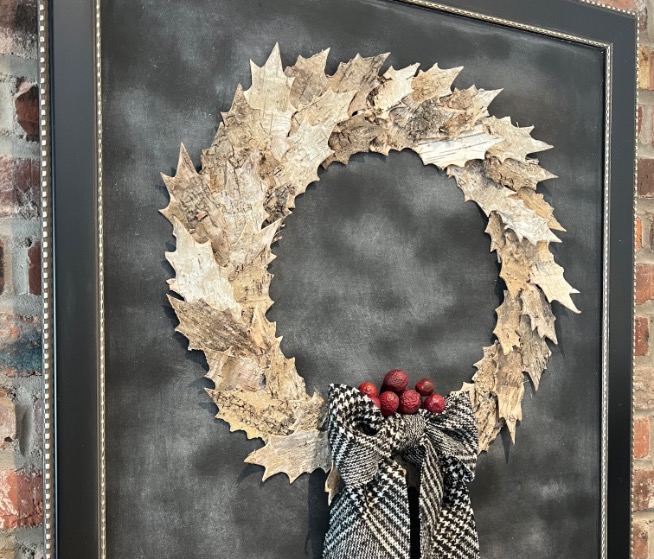
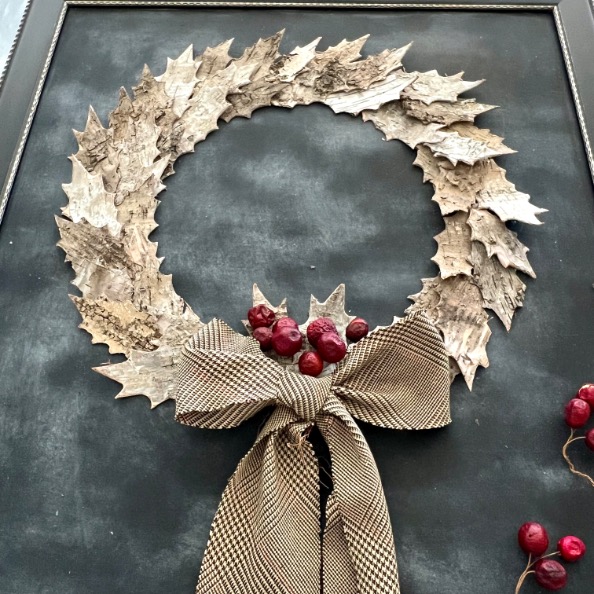
That’s where this project comes in – a sophisticated winter wreath that marries the organic beauty of birch bark with the cozy comfort of black and white plaid. The best part? It all started with a serendipitous thrift store find during their Christmas in July sale…
Where it All Started
You guys, I’m so excited to share one of my recent thrift stores score with you!
You know those moments when you find something amazing and can barely contain your happy dance in the store?
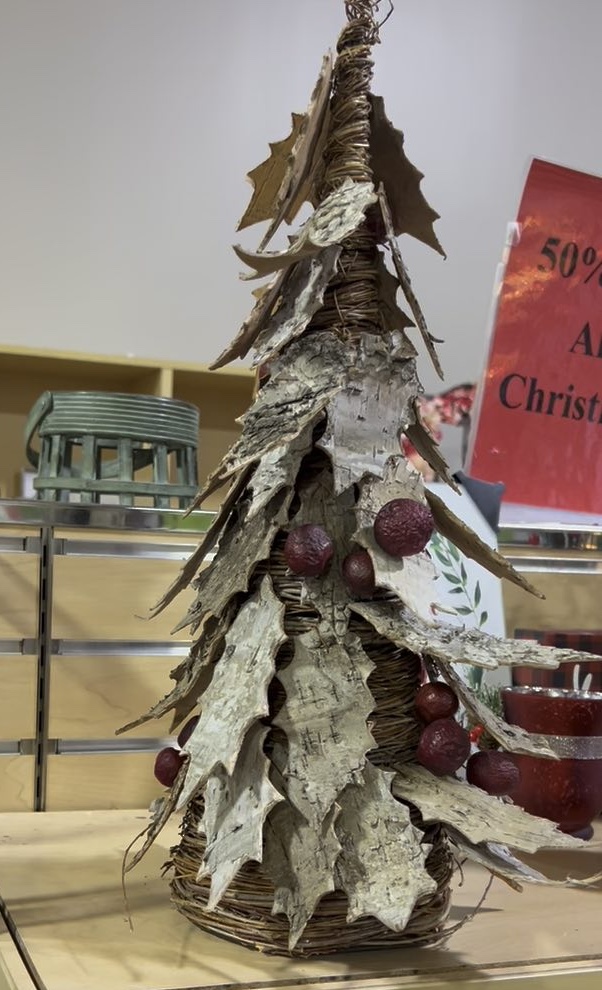
That was totally me during the Christmas in July sale when I spotted this grapevine cone tree for – wait for it – just $4! (Half off $8, hello bargain!)
The tree came decked out with these gorgeous birch bark leaves and dark red berries, all wired on, and my creative wheels started spinning immediately.
Here’s the fun part – this single thrifted find actually turned into TWO projects!

First, I transformed the cone tree with some gold leaf (which looks absolutely incredible), and now those beautiful birch bark leaves are getting a second life as a stunning winter wreath. Talk about getting your money’s worth, right?
Let me tell you, today’s wreath project is seriously simple.
Seriously, if wreath-making by wiring leaves onto a curved frame intimidates you. This is a great project you will love!!! So easy peasy, yet looks great!
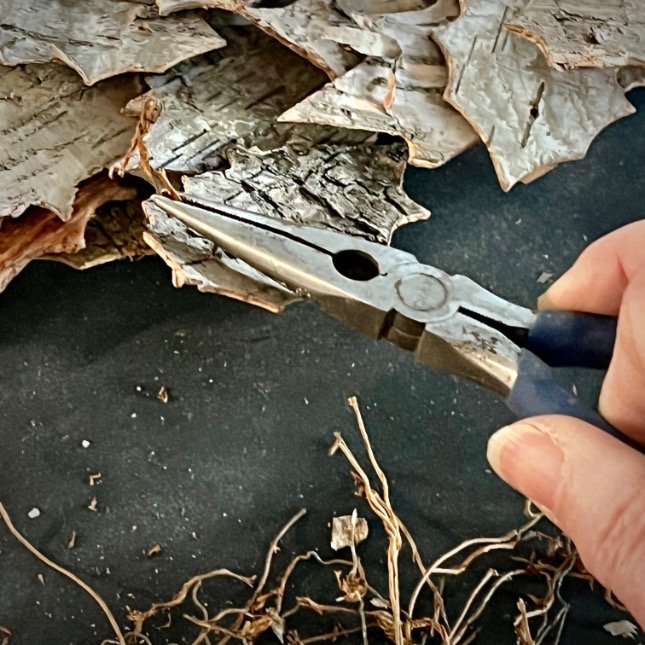
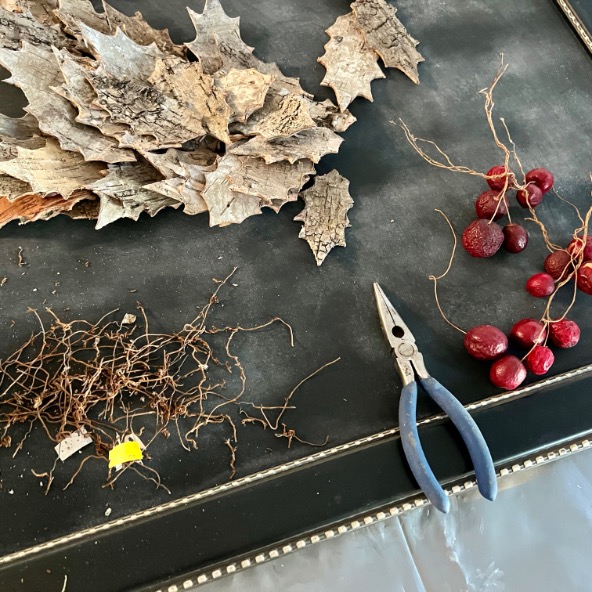
The most time-consuming part was just removing the leaves from the tree with needle-nose pliers, which should give you an idea of just how quick and easy this whole thing is.
And you know what makes it even better? I had almost everything else I needed just hanging out in my basement!
Remember that saying about one person’s leftovers being another’s treasure? Well, my sweet neighbor had this black frame with a chalkboard from her daughter’s wedding (from quite a few years back), and it found its way to me. Perfect for this project!
And for that cozy finishing touch, I got a bit crafty with some plaid fabric – cut it on a 45-degree bias, which is just fancy talk for “diagonally.”
The best part about cutting it this way? No hemming needed! The edges stay neat all on their own.
Add in a hot glue gun and some glue sticks (because honestly, what DIY project doesn’t involve a hot glue gun?), and that’s literally all it took to create this piece that’s brightening up my previously sad, post-Christmas stairwell.
Let’s Get Crafting! (And I Promise, It’s Super Easy!)
First things first – grab a dinner plate!
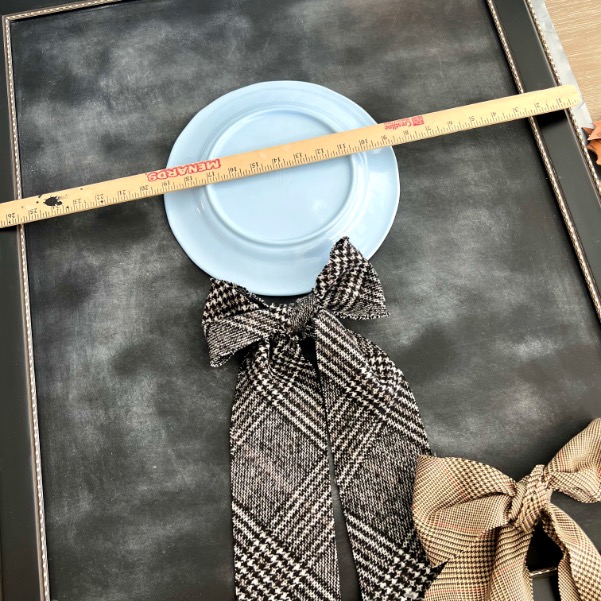
Yep, you read that right. This is my not-so-secret weapon for getting that perfect wreath shape.
I used it as a template to lay out my leaves because, well, eyeballing a circle isn’t exactly my superpower!
Pro Tip: Before you grab that hot glue gun, do yourself a favor and arrange all your leaves first.
I know some of you are probably thinking “Just let me at that glue gun!” (and if you’re a confident wing-it crafter, go for it!), but trust me on this one.
As someone who can get a teensy bit obsessive about details (raising my hand here! 🙋♀️), laying everything out first saved me from having that “oh wait, maybe that leaf should go THERE instead” moment after the glue was already dry.
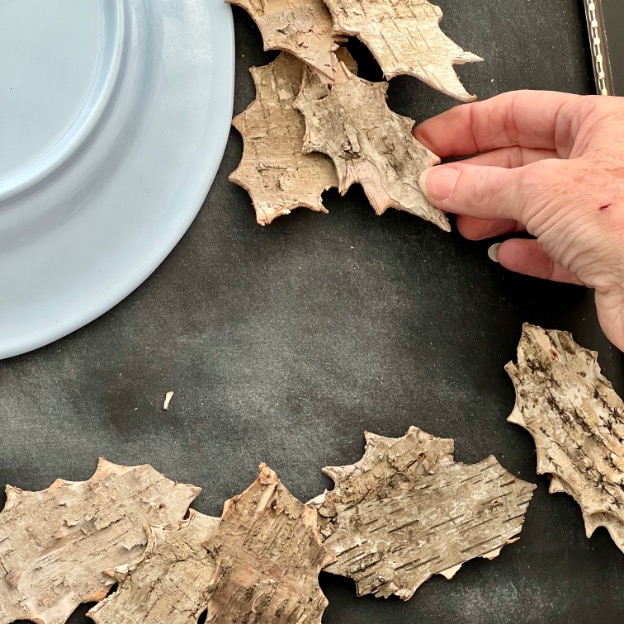
Here’s the key to making your wreath look naturally gorgeous: think “organized chaos.” Mix up those birch bark leaves like nature would – some big, some small, pointing different directions. Layer them over each other in places.

The goal is to avoid anything too perfect or symmetrical because, let’s be real, when’s the last time you saw a perfectly symmetrical tree in nature?
Step-by-Step (For My Fellow Detail Lovers):
- Place your chalkboard frame on a flat surface
- Center your dinner plate on the frame (don’t glue it – it’s just your circle guide!)
- Start arranging those birch bark leaves around the plate
- Play around with the placement until you love it
- Fire up that glue gun
- Start securing each leaf, working in sections of two or three leaves at a time
Now For That Cozy Plaid Bow!
Remember that fabric we cut on the bias? Here’s where it becomes the perfect finishing touch to our wreath.
And can we just talk about black and winter whites plaid for a second? It’s like the little black dress of winter decor – it goes with everything and instantly makes things look put-together!
The bow is super simple, but here’s a little trick: because we cut the fabric on the bias, you can actually shape it really nicely without it getting all wonky on the edges.
I just gathered the first loop, twisted it a bit as I was wrapping the end over it and pulling the second loop through. That twist is how you can assure that the same side of the fabric is showing outward on the loops and tails.
Then after tucking in a few of the dark red berries, I secured it with – you guessed it – our trusty hot glue gun.
Here’s a little behind-the-scenes confession: I actually played around with two different looks – the black and winter white plaid AND a cozy brown menswear plaid.

Both looked amazing! Don’t you love when you can’t go wrong?
PRO TRICK: I only used a small bit of hot glue on the bow.
Why? Because options! This way, I can switch up the look whenever the mood strikes.
In the end, the black and winter white plaid won out, and here’s why: I’ve got this super fun Walk in the Snow/Sledding party in the works (eek, I can’t wait to show you guys!).
This wreath is going to be just the beginning of a whole cozy, woodsy winter wonderland I’m creating. Get ready for an upcoming post about the warmest, most inviting tablescape that’ll make you want to come in from the cold and stay awhile!
Want a hint? Think warm woods, natural textures, and all the cozy vibes you could ever want for a fun, casual gathering during the winter season. But that’s all I’m saying for now – you’ll just have to check back to see the whole party come together! 😉
May I interrupt for a moment? Are you a South House Follower? Then watch your inbox for more on hosting a casual winter gathering. Not a follower? You can take care of that right now:
Thanks bunches! Now back to our wreath:
About That Bow Placement!
Let’s talk bow positioning – I tried something a little different and placed mine at the bottom of the wreath, letting those fabric ends dangle just past the frame. It gives the whole piece this wonderfully relaxed, casual vibe that I’m totally loving.
There is no right or wrong. Just follow your heart!
To add some extra oomph to the bow, I let the ends cascade a bit down the side of the wreath. It adds this lovely, casual drape that makes everything look more elegant but still totally cozy and inviting.
And just like that, you’ve got yourself a gorgeous piece of winter decor that’s going to look amazing right through those grey, chilly months!
The best part? When people ask where you got it (and trust me, they will), you get to say “Oh, I made it!” with that little smile that comes from knowing you created something beautiful without breaking the bank.
Want to know the real kicker? This whole project cost me basically $2 (half of the thrift store find that netted me two projects) since I used what I had on hand. But even if you need to buy everything new, you’re still looking at an inexpensive way to DIY seasonal decor that looks like it came from one of those fancy home decor boutiques!
Make This Look Work Anywhere!
And the best part? It’s totally not a one-spot wonder!
This wreath is like that perfect winter outfit – it just works in all your living spaces.
While mine is currently bringing some cozy charm to our stairwell leading down to the family room, I’ve got plans to possibly relocate it to the dining room when I set up that woodsy winter tablescape I mentioned (which may or may not include birch logs 🤭).
But don’t feel like you have to go big or go home! Here are a few fun ideas to reinterpret my wreath into diy winter decorations for your own home:
- A smaller version of this would look absolutely dreamy in a bathroom – imagine it bringing some natural texture to those typically stark spaces.
- Or even just adding a few birch bark leaves and berries to a chalk board hot cocoa sign could be wonderful
- Or create a welcoming moment in your entry hall by incorporating it into a vignette with some candles and maybe a vintage mirror.
- Hang a small wreath or cluster of leaves on a mug rack or peg rack
- Tie some around a pillar candle for the coffee table display
- Tie around apothecary or glass jars on your counter or shelves
- Add them to a diy garland for the front of your fireplace mantel
And hey, who says it has to stay inside? This beauty would make a gorgeous front door statement piece!
PRO TIP: Just remember to stick some adhesive bumper pads on the back of the frame first. Your door’s finish will thank you!
The beauty of using neutral elements like birch bark and black and white plaid is that this piece plays nicely with any decor style.
Whether your home leans farmhouse cozy or modern minimal, this wreath adds that perfect touch of winter warmth without screaming “holiday decorations!”
And there you have it, friends! A super simple, budget-friendly project that brings some much-needed coziness to those post-holiday winter months.

Don’t forget to pin this for later, and stay tuned for more winter decorating ideas coming your way soon!
Looking For More Winter Ideas?

Vintage Ice Skate Charmer!
Vintage ice skates can make nostalgic decor beyond hanging them. For centerpieces, for shelving, for coffee table vignette, etc. Check them out here.
Candle Magic
No such thing as too many candles in the winter, right?
This burns brighter than a pillar candle. Maximize the burn, while minimizing the budget. Works with flameless candles too!

Cozy Pillows
Add some cozy touches through your home during these bleaker months — BONUS they add a subtle nod to Valentine’s Day
