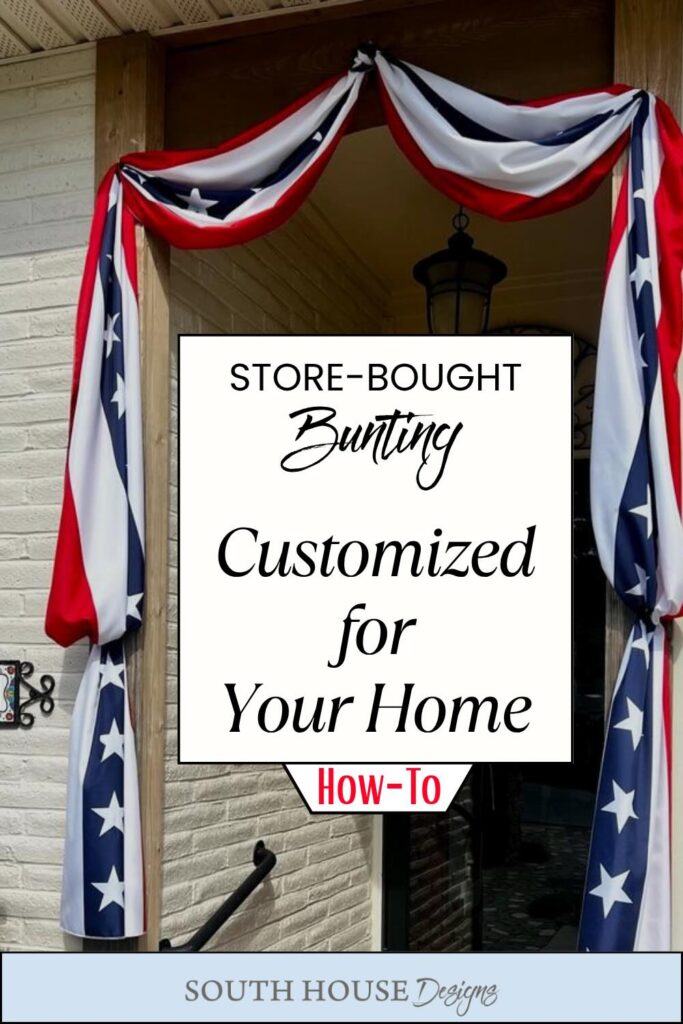
How to Turn $36 Bunting Into Custom Patriotic Decor for Your Home
Store-bought bunting gets a custom touch. A few folds, clever magnets and gathered swags will turn generic into custom for your mailbox, pillars and porch.
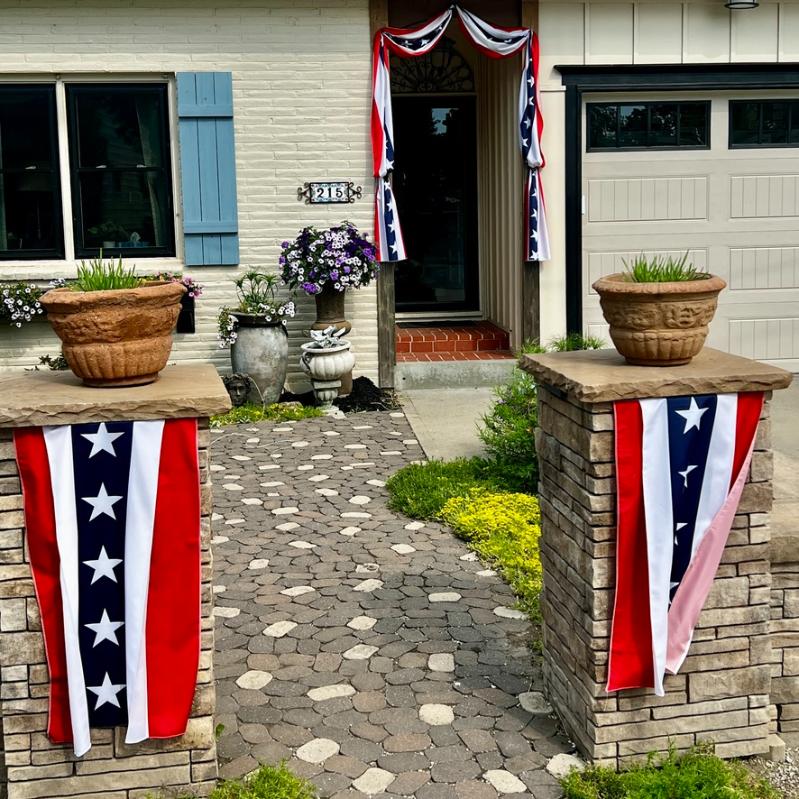
Two twenty-foot buntings from Amazon. Three projects. $36.
That’s the whole story — except it isn’t, because what came out of those two rolls of fabric is a mailbox swag, a pair of pillar flags, and a sweeping porch bunting that drops nine feet and looks like it came from a party stylist, not a Prime delivery box.
The secret? You’re not making bunting. You’re customizing it — cutting, folding, gathering, and a few clever tricks (hello, refrigerator magnets) to fit store-bought fabric exactly to your home.
No pattern. No precision required. Just a needle, thread, and an iron.
Before we dive in, one non-negotiable: press your bunting before you cut a single inch. It comes out of the package looking like it spent a month in a suitcase. Press it flat, and everything that follows will be easier, more accurate, and look ten times better.
Ready? Here’s how to customize patriotic bunting for your whole front porch — for $36.
Ready to jump right to it?
Here’s a Quick How-To Card for Confident Crafters
If you’d rather feel like I’m right by your side, stepping you through it — no problem, keep scrolling.
Customize Patriotic Bunting for Your Home
Turning generic store-bought bunting into custom decor for your home - mailbox swag, pillar flags, porch bunting.Two 20-ft patriotic buntings
Materials
- Two 20-ft patriotic buntings
- Coated wire
- Magnetic promotional magnets (flat, with good surface area)
- 2-inch iron-on interfacing
- Elastic or ribbon (for pillar flags)
- Heavy hand-sewing thread
Tools
- Iron and pressing surface
- Hand sewing needle
- Straight pins
- Pencil or fabric marker
- Scissors
- Sewing Machine
- Nails with generous heads
- Hammer
Instructions
- Press both buntings before cutting anything
- Cut and shape the mailbox swag; finish curved edge
- Pleat, stitch
- Attach magnets to underside
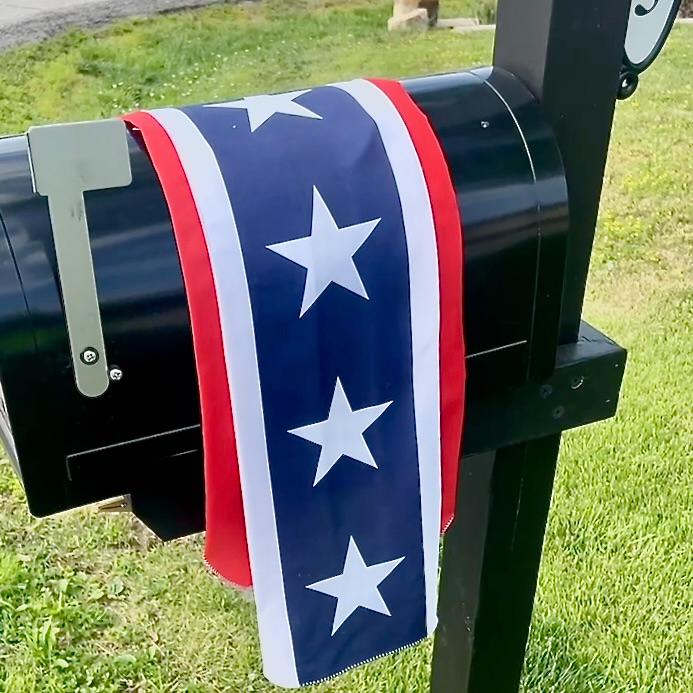
Mailbox Swag
Pillar Flags
5. Cut to length, hem
6. Press folds,
7. Interface top edge; attach to posts
Porch Bunting
8. Tie center slip knot in full-length porch bunting; add wire for hanging
9. Determine and mark your swag dimensions
10. Gather and wire the swags
11. Poof the ends
12. Tack red edges on backside to keep them in place
13. Hang in place
Notes
For all the Details, Tips and Hints, keep scrolling
Detailed How-To Customize Bunting + Hints and Tips:
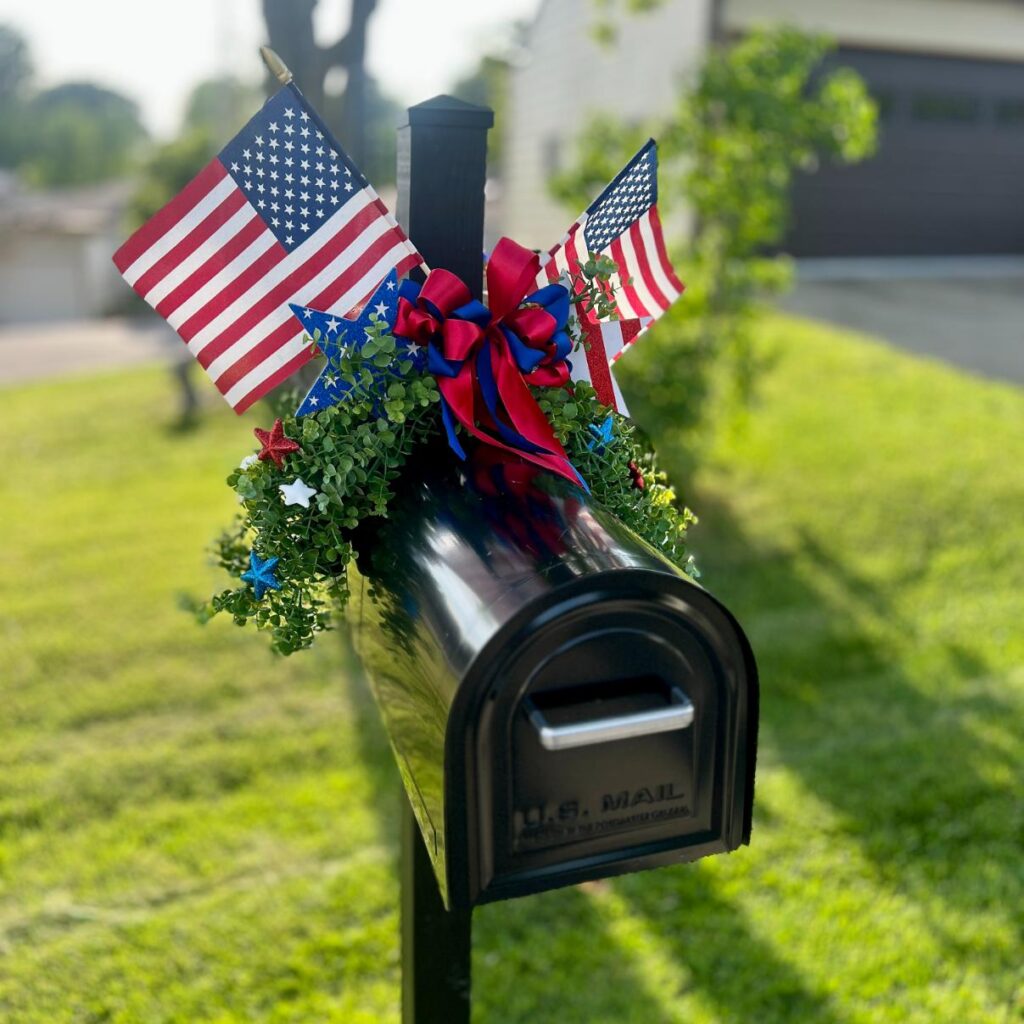
PROJECT 1: MAILBOX SWAG
What You’ll Need
- Bunting
- Flat promotional magnets (the kind meant to hold a photo on a fridge work great)
- Hand sewing needle and thread
- Straight pins
- Scissors or rotary cutter and mat
- A curve template or dinner plate
- Iron and pressing surface
- Sewing machine
Step 1) Press First, Cut Second-
I know I already said this, but it bears repeating — press your bunting before you cut anything. Wrinkles make it nearly impossible to cut accurately or pleat evenly. A few minutes at the ironing board saves a lot of frustration later.
Step 2) Cut and Shape the Swag-
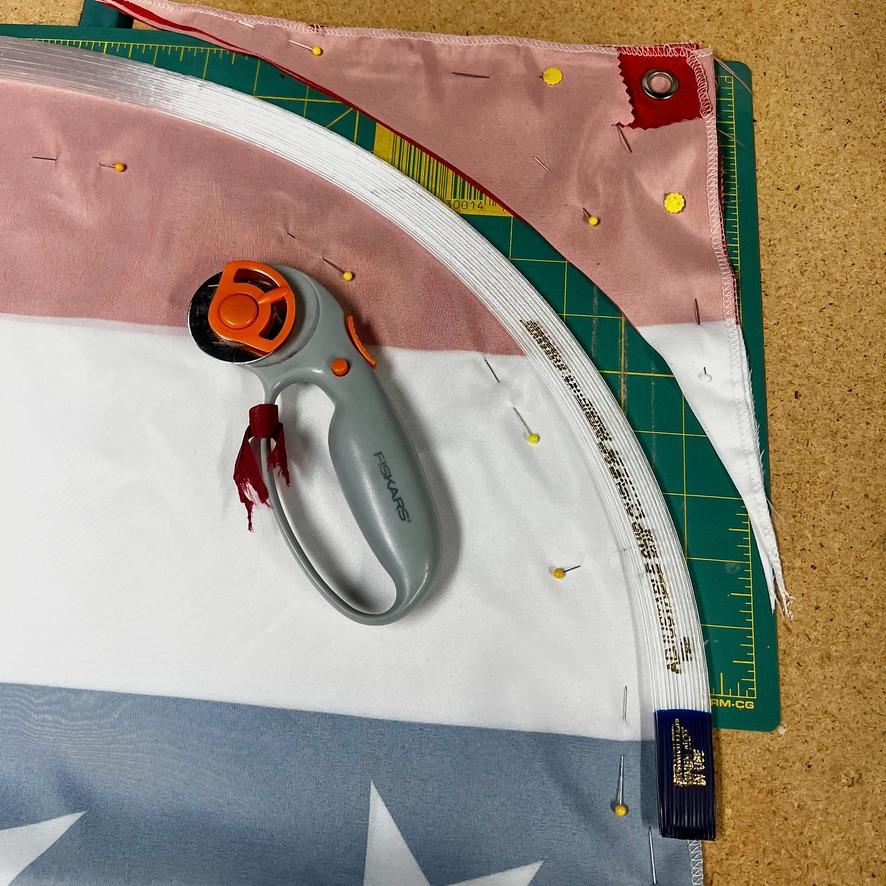
Cut 48 inches from one end of your first bunting. This is your mailbox swag.
Fold it in half lengthwise, then in half again crosswise, so all four corners are stacked on top of each other. Pin all four layers together to keep everything from shifting.
Now round those corners.
You can freehand a gentle curve, or use a curve template or even a dinner plate as your guide. Cut through all four layers at once — when you unfold it, you’ll have a beautifully symmetrical curved end on both sides.
Finish that curved edge with a zigzag stitch, a serged edge, or a small turned hem — whatever your machine handles best. This keeps it from fraying and gives it a clean, intentional look.
Step 3) Pleat and Stitch-
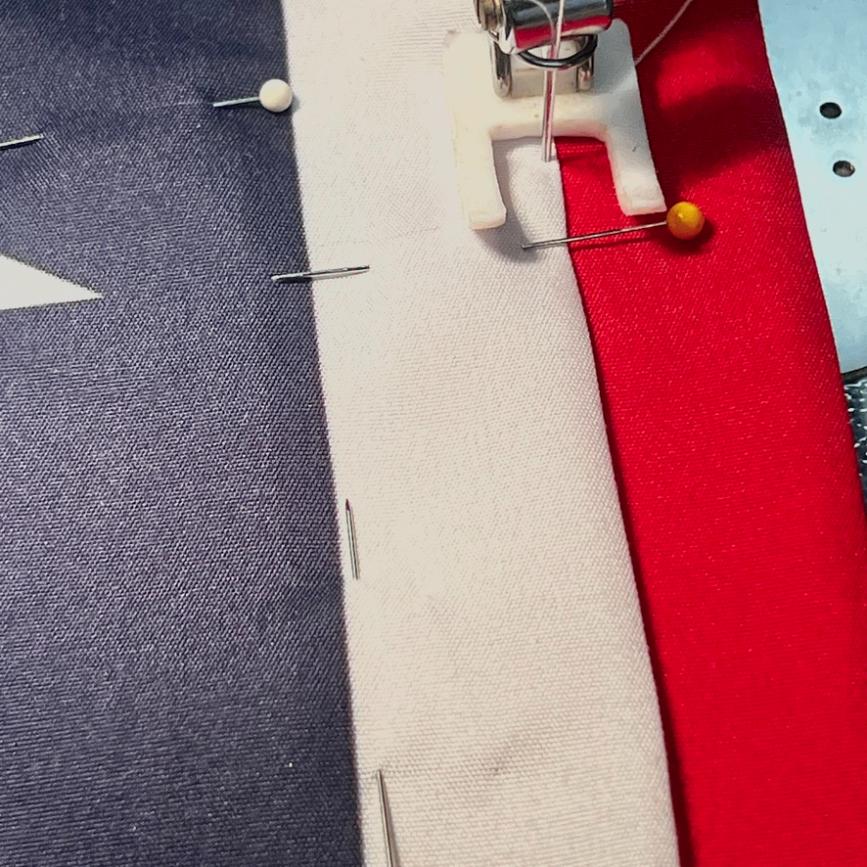
Fold and press your pleats based on the depth of your mailbox. There’s no formula here — hold it up to your mailbox and eyeball what looks right.
Once you’re happy with them, stitch a running stitch along each fold to hold the pleats in place.
PRO TIP: Stitch along a white stripe so your thread virtually disappears into the fabric. Start and stop your stitching 12 – 18 inches from each end — you’ll want those ends to hang free and blow naturally.
Step 4) Attach the Magnets-
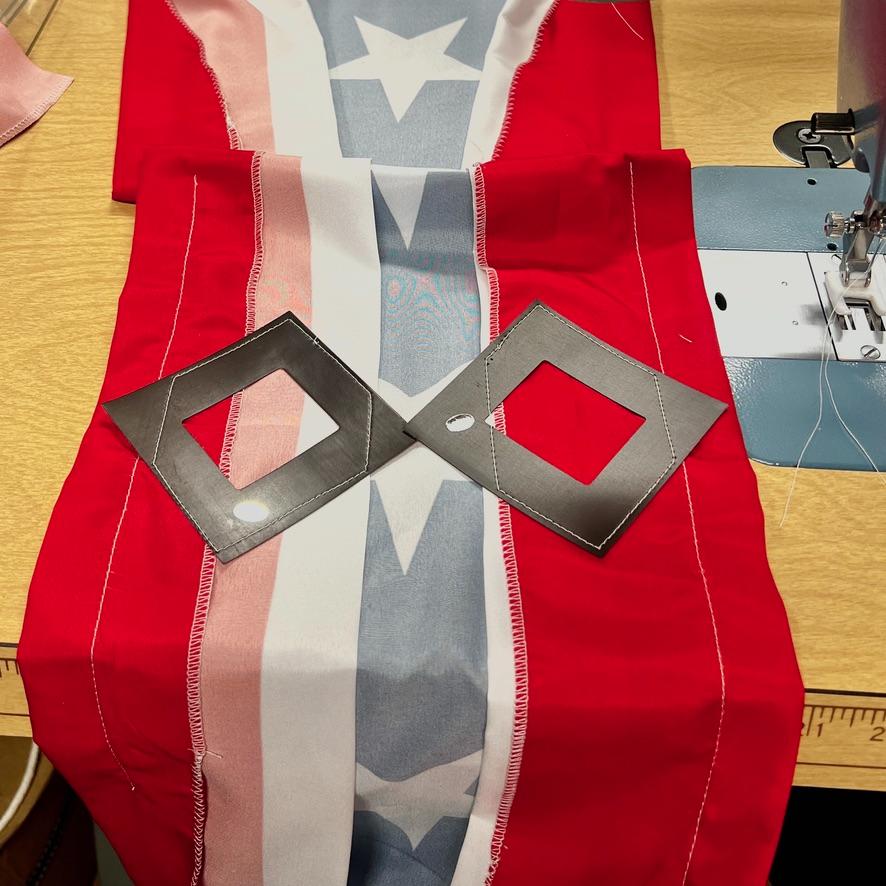
Step 4) Attach the Magnets-
Dig through your stash of flat promotional magnets — the ones that come in the mail advertising insurance agents and pizza places. Those frame-style magnets meant to hold a photo on your fridge are ideal. By placing two of them diagonally, tip to tip, they cover more surface area across the top of the mailbox and span the full width of the folded bunting.
Stitch the magnets to the underside of the bunting. When you reach a fold, hold the pleat out of the way before stitching so nothing shows on the front. Start again after the fold.
Drape it over your mailbox and let those magnets do the work. No staples, no tape, no damage — and it comes down in seconds when you’re ready to store it.

Excuse this quick pause in th action, as I ask if you are enjoying these projects, you might like more! Subscribe to my email to not miss a thing — every printable, every exclusive tip and offering, every project:
Thanks! Now back to the bunting:
PROJECT 2: PILLAR FLAGS
What You’ll Need
- Remaining bunting from your first 20-ft roll
- 2-inch iron-on interfacing
- Elastic or ribbon
- Hand sewing needle and heavy thread
- Scissors
- Iron and pressing surface
- Sewing machine
Step 5) Cut to Length and Hem-
Measure the height of your pillar from the top cap down to where you want the flag to end. Add 2 inches for the top turnover hem and cut two lengths — one for each post.
Finish the bottom edge of each flag with a small zigzag stitch to keep it from fraying.
Step 6) Press Your Folds-
Fold and press the bunting the way you want it to drape on the pillar. Take your time here — those crisp pressed folds are what give it that intentional, styled look rather than fabric just hanging on a post.
Step 7) Interface and Attach-
Cut a strip of 2-inch iron-on interfacing the full width of each flag. Press it onto the backside of the top edge. This reinforces the area that does all the work of holding the flag in place.
Now, how you attach it depends on your posts. Here are three options:
Option 1 — The Lucky Lift If your post cap is heavy but slightly loose, you may be able to slip the interfaced top edge right underneath it. That’s what worked for my posts, and honestly it couldn’t be easier.
Option 2 — Elastic Band Stitch an elastic band to one side of the interfaced edge, stretch it across the top of the post, and stitch the other end to the opposite side. Size it so it pulls snugly over the top and tucks discreetly between the cap and the post. This is the most secure and cleanest-looking option for most posts.
Option 3 — Ribbon Ties Stitch a length of ribbon to each side of the interfaced edge. Pull both ribbons around the post and tie them tightly at the back, using the edges of the bricks or stones to keep the flag from slipping down.
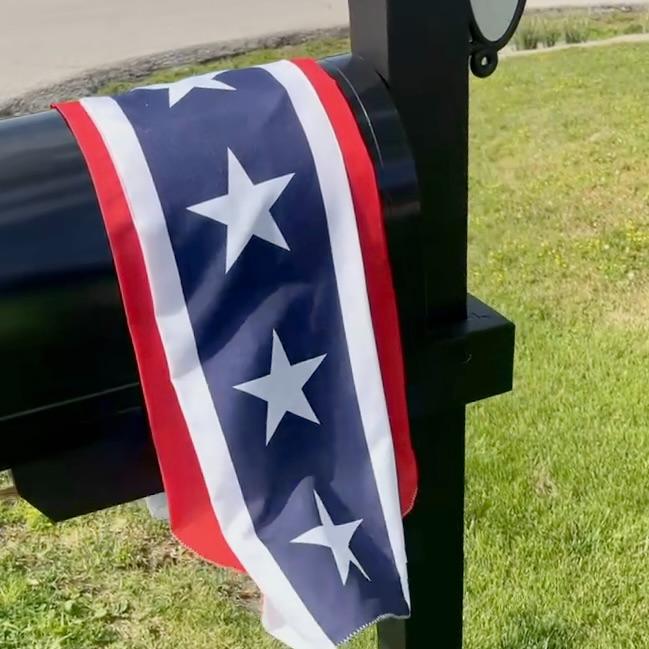
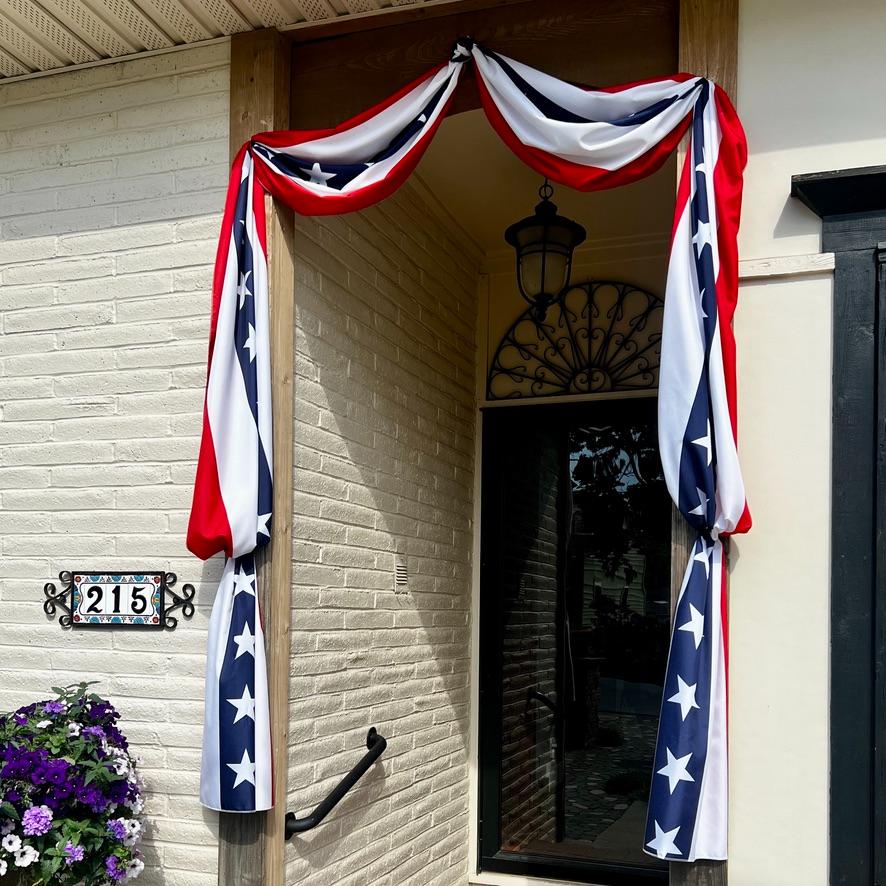
PROJECT 3: PORCH BUNTING
What You’ll Need
- One full 20-ft bunting, pressed
- Coated floral wire
- Nails with generous heads
- Hammer
- Hand sewing needle and heavy thread
- Straight pins
- Pencil or fabric marker
- Straight edge or yardstick
Step 8) Start at the Center-

Tie a slip knot in the exact center of your bunting. Thread a short piece of coated wire through that knot — this is how it will hang from your center nail.
Hang it temporarily on a nail at the center of your doorway or porch header. This is your starting point for everything that follows.
Step 9) Determine and Mark Your Swag Dimensions-
With the bunting hanging, mark two measurements on each side of the center knot:
- 24 inches from the center for the top of the swag
- 36 inches from the center for the bottom of the swag
These were my measurements — adjust them to suit your porch width and the look you’re going for.
Take the bunting down and lay it flat on a table or the floor.
Step 10) Gather the Swags-

Using your two marks as guides, lay a straight edge diagonally between them and pin along that line.
Using a long, loose running stitch, hand-stitch along that diagonal line.
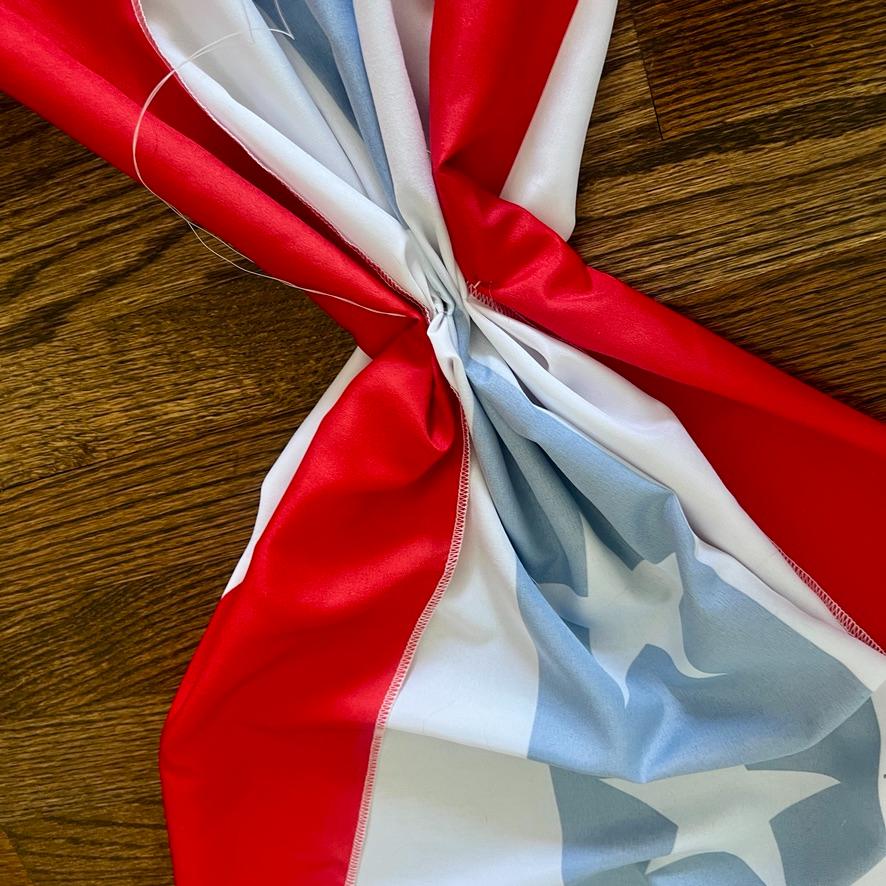
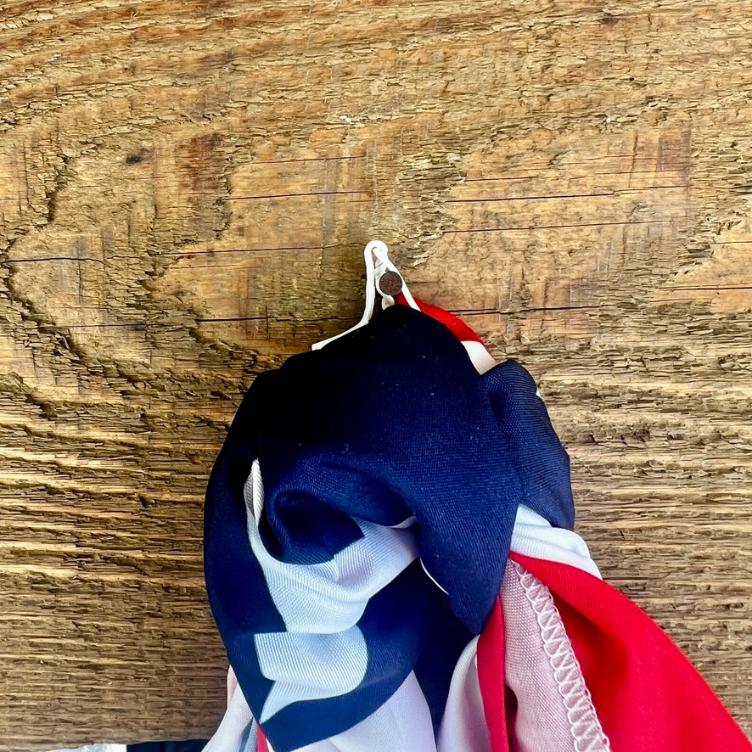
Pull both thread ends to gather the fabric up along that diagonal line. Pull tight and knot securely. Wrap a piece of coated wire around the gathered bundle — this wire will twist around the nail at the top corner when you hang it.
Repeat on the other side of the center knot.
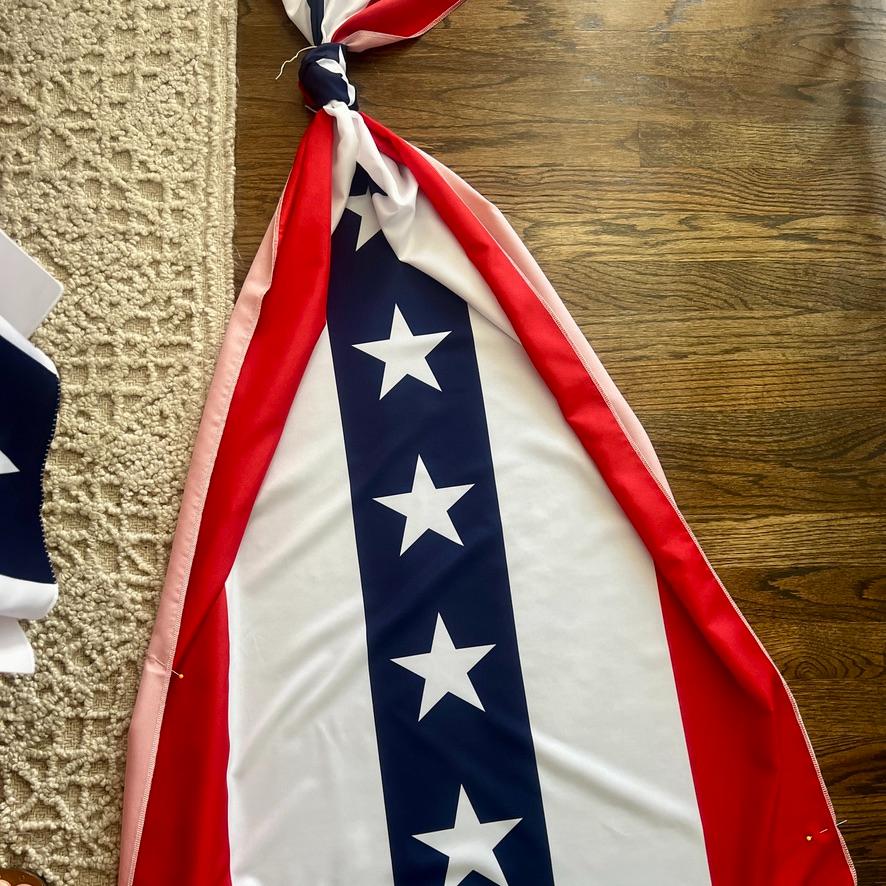
Step 11) Poof the Ends-
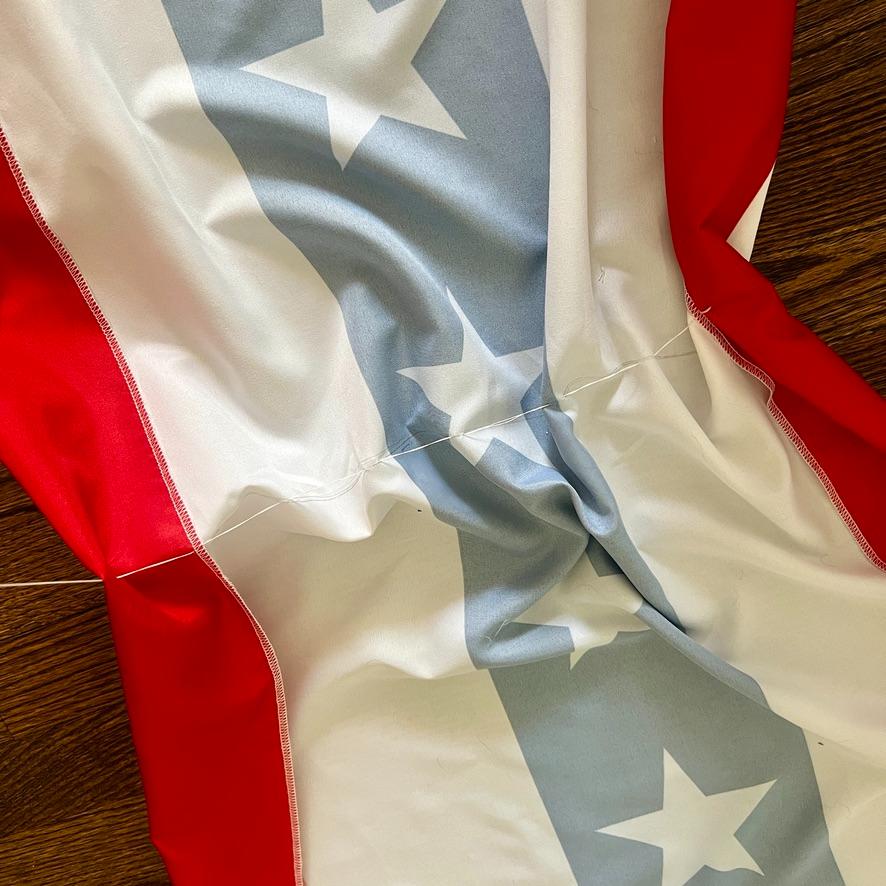
Decide how much bunting you want hanging free at each end — I went with 3 feet.
Mark that point lightly in pencil on the back of the bunting. Lightly tuck the two red edges inward, then stitch another loose running stitch across this point, gathering everything up so the red edges lay the way you want them. Wrap a piece of coated wire around this gathered bundle as well.
Step 12) Tack Red Edges on Backside to Keep Them in Place-
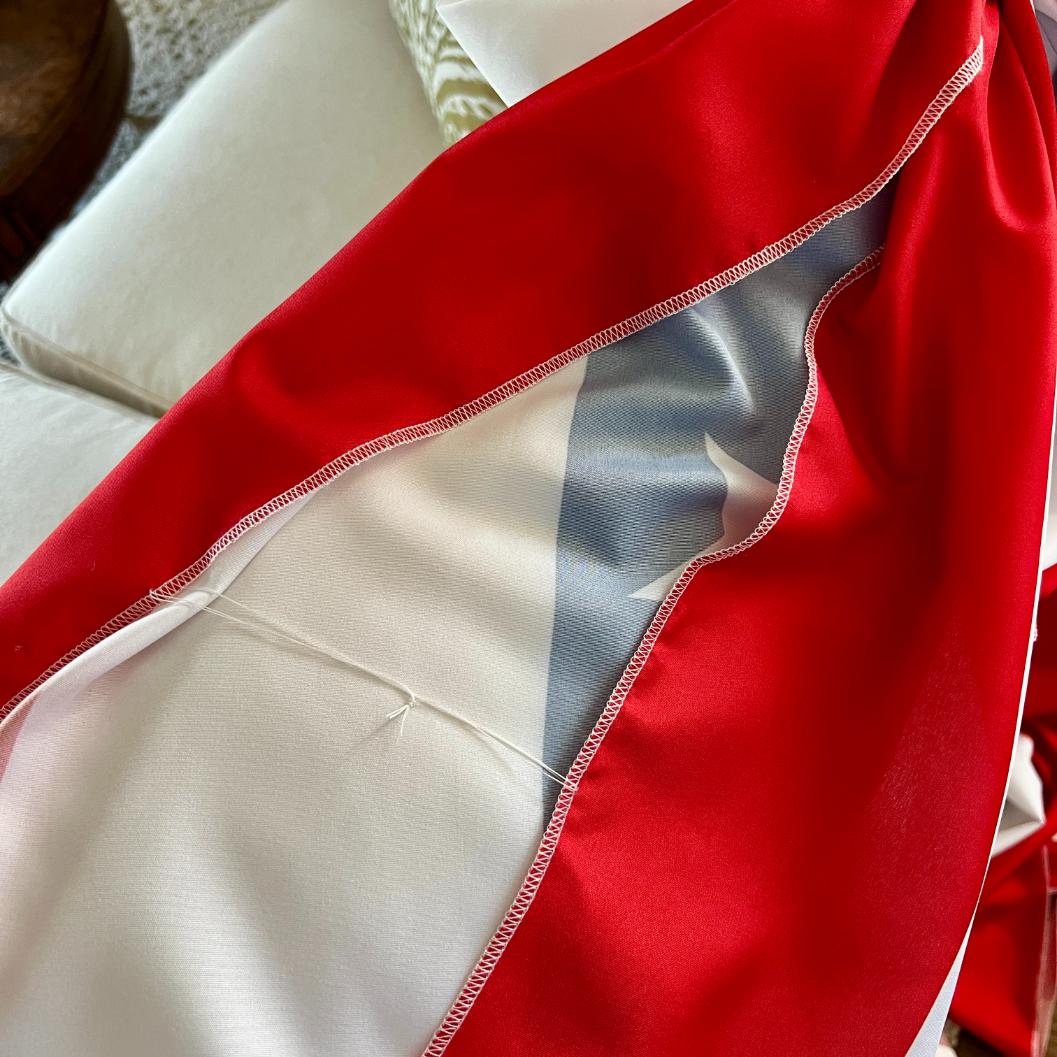
After hanging mine, I discovered the red edges of the bunting have a tendency to flip forward, exposing the back of the fabric. Sadly, I did not have a calm sunny day for new photos before leaving town to welcome our new granddaughter, so my pictures don’t reflect this fix. But trust me, it’s worth doing.
Here’s the solution: thread a needle with about 36 inches of heavy thread, doubling it and knotting the ends together. On the backside of each swag, tack the two red edges together with a few stitches, keeping the thread short enough that the red sides simply cannot fold forward. You’re not gathering — just adding an invisible leash to keep everything behaving.

PRO TIP: To anchor your first stitch so it won’t pull through the fabric, thread your needle with a long piece of heavy thread. Knot the ends together. Poke your needle through the fabric and before pulling it tight, bring the needle back between the two thread strands to lock it in place. This works for all hand stitching and is worth making a habit.
Step 13) Hang It-
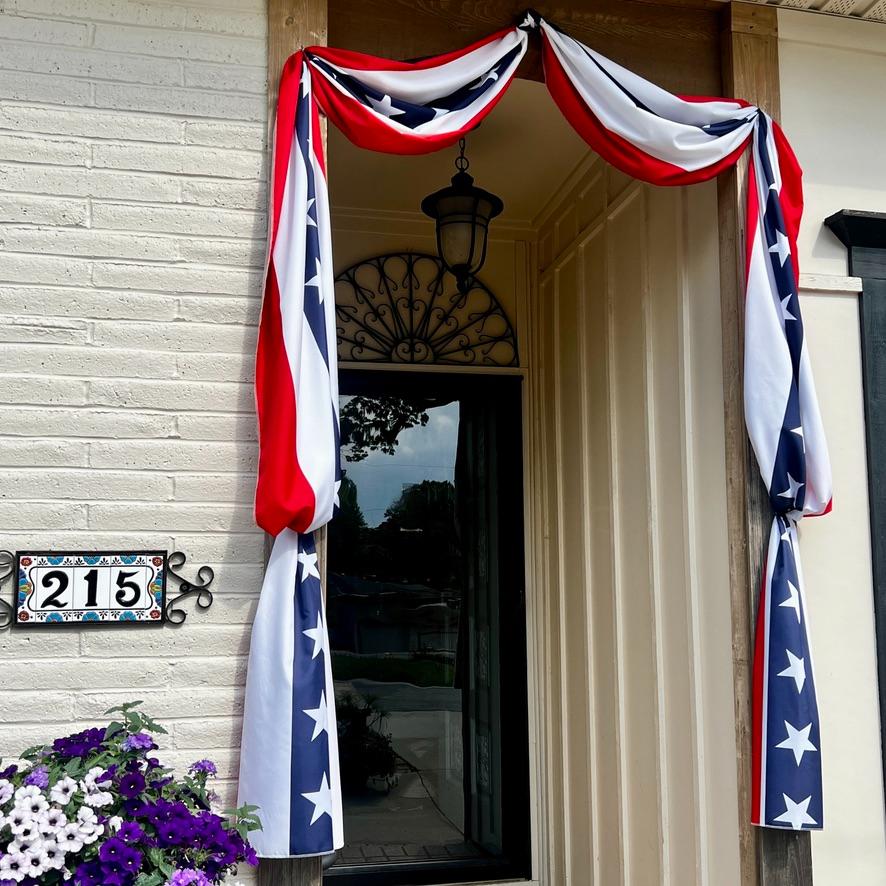
Add nails with generous heads about a foot higher than where each gathered bundle will fall. Twist the wires tightly around the nail heads. The extra fabric will flounce forward and downward over each nail, hiding the nail, wire and gathering completely.
Wrap – Up
And that’s it. Two rolls of bunting, $36, and a front porch that looks like you planned it all along.
The best part about customizing store-bought bunting? It works for your home — your mailbox depth, your pillar height, your porch width. No two will look exactly alike, and that’s exactly the point.
For less than $40 and an afternoon of relaxed sewing, you’ve got a cohesive patriotic display from the street all the way to your front door. And when the holiday is over, every piece tucks away neatly for next year — magnets, wire and all.
If you make any of these projects, I’d love to see them! Tag me on social or drop a photo in the comments below.

More Patriotic Projects to Enjoy