
Faux Concrete Fireplace Surround and Mantel
How to create a custom faux concrete fireplace surround, mantel and flue for less than $125 in materials. Add warmth with a cozy corner fireplace.
There’s nothing like a fireplace to cozy up a basement. And out new faux concrete fireplace surround, mantel and flue certainly bring the warmth and wow!
Our basement was a perfectly serviceable rumpus room. Yes, it’s where the “Wild Things” hung out.
Well, that was until I stumbled onto a stunning antique pool table at a neighbor’s. Thwarted by their basement stairwells, it ended up in their garage sale.
Fortunately, our basement is a walkout. And I couldn’t walk out of their garage without naively claiming that table as ours.
Thus began the 3 year DIY project. Yes, the pool table is significantly larger than the Air Hockey table it replaced. So smaller game area flipped with larger lounge area, which means we stole a bit of space from the adjoining storage room to increase our lounging footprint; and certainly that fabulous pool table deserved more than the painted concrete floors; and certainly new carpet deserves fresh paint, which of course means … and on … and on …
Oh yeah, like you‘ve never brought home a pair of shoes that demanded a whole new outfit.
Yeah, I thought so.
And now, finally, the biggest ticket element is in the final stages. Yes, the gas fireplace we’ve been dreaming of and saving for is ordered. Now what to do for the surround and mantel? We wanted a solid, built-in, warm look but with no busy texture.

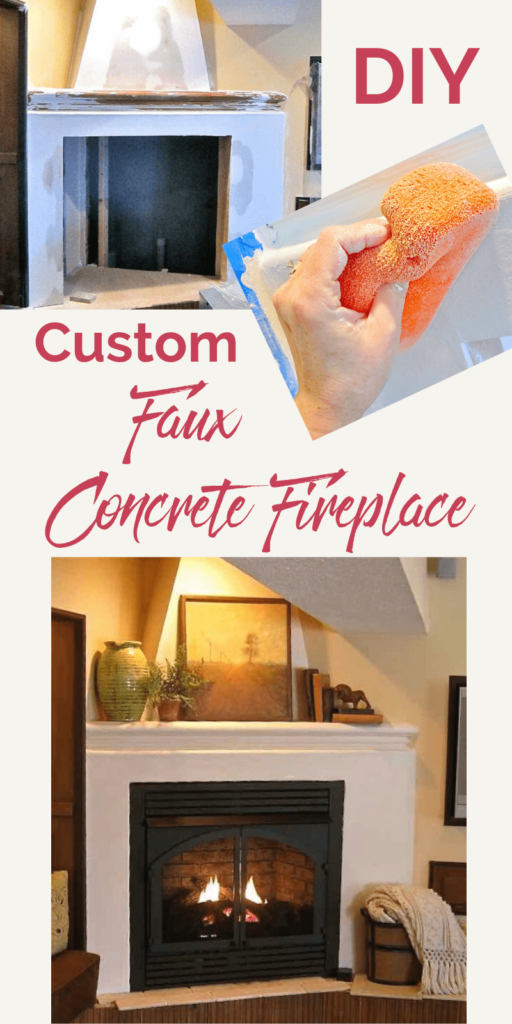
Once I saw this photo of a cast concrete fireplace surround with tapered flu on Nell Hill’s website. I knew what we had to have. But I didn’t want to wait 3 more years while we saved up the serious dough that a custom concrete surround requires.
Being the cheapo thrifty DIY-er, I broke out some trusty supplies and started experimenting to DIY a faux concrete fireplace surround, mantel and flue.
The result: A custom “concrete” fireplace surround, mantel and flue for less than $125 in supplies. (Check out the supply list at the end of this post).
Let’s get started:
Can you see it yet?
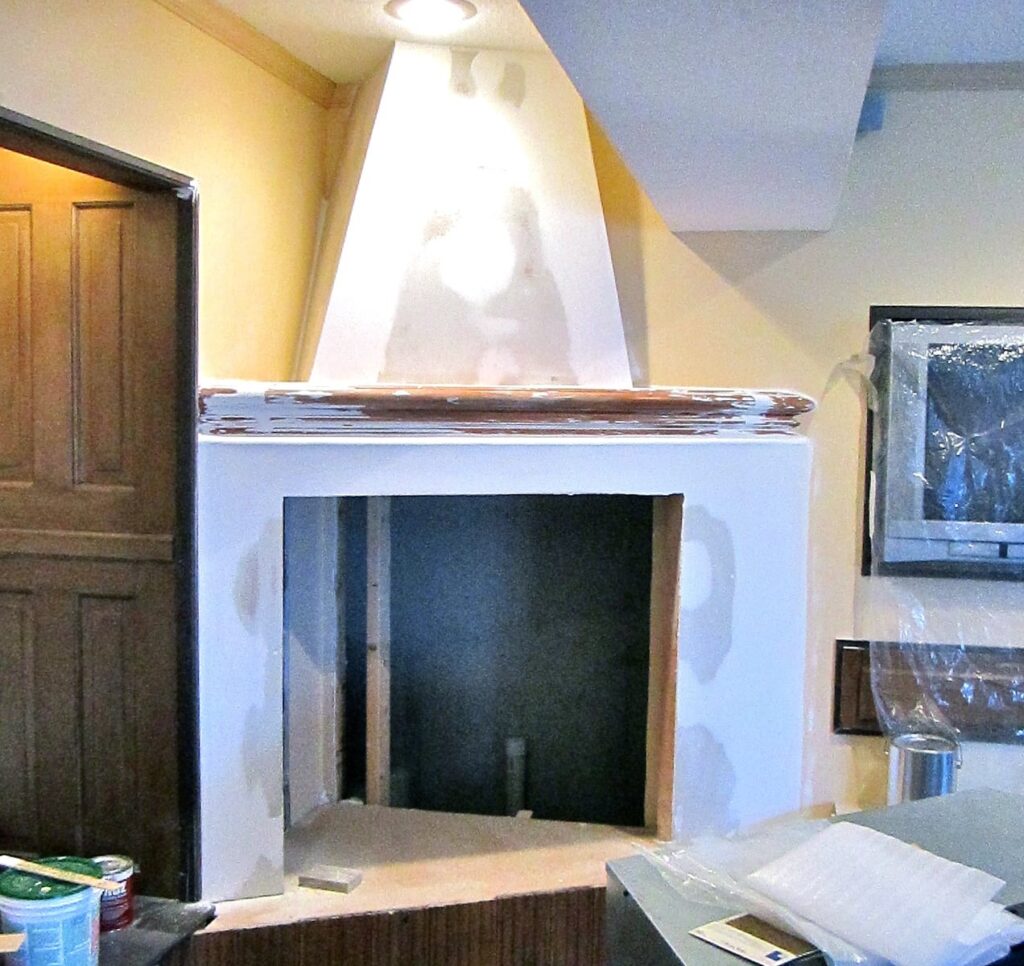
The construction is done. Yes, the fire box is not centered in the surround. Blame those pesky support beams. No point in rehabbing the basement to have the top two floors coming crashing down, right?
It will work once I get to accessorizing, trust me.
Just a bit of detail on the construction decisions:
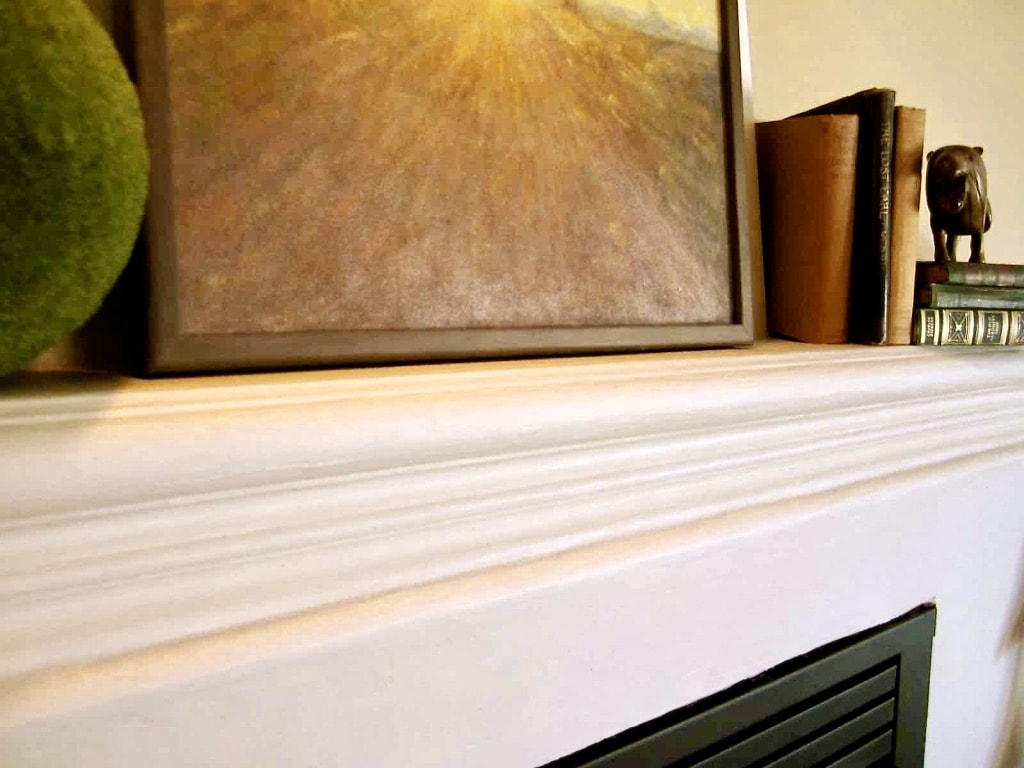
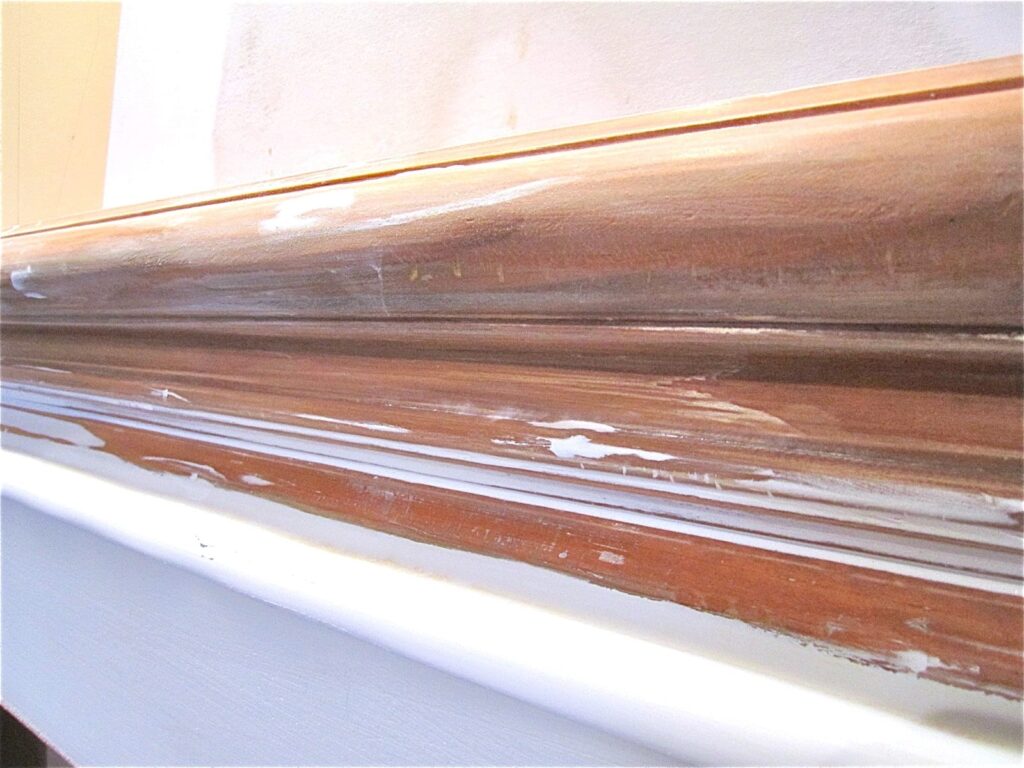
I rescued a great mantel from the ReStore to use. But, Safety codes + raised hearth + low-hanging beam = mantel profile NOT mantel overhang. Pooh!
That’s why the mantel is set back with no overhang.
Building codes can be such party poopers!
We finished the frame surrounding the firebox with bullnose edging to marry up with the profile of the mantel. Not the original vision, but I’m still lovin’.
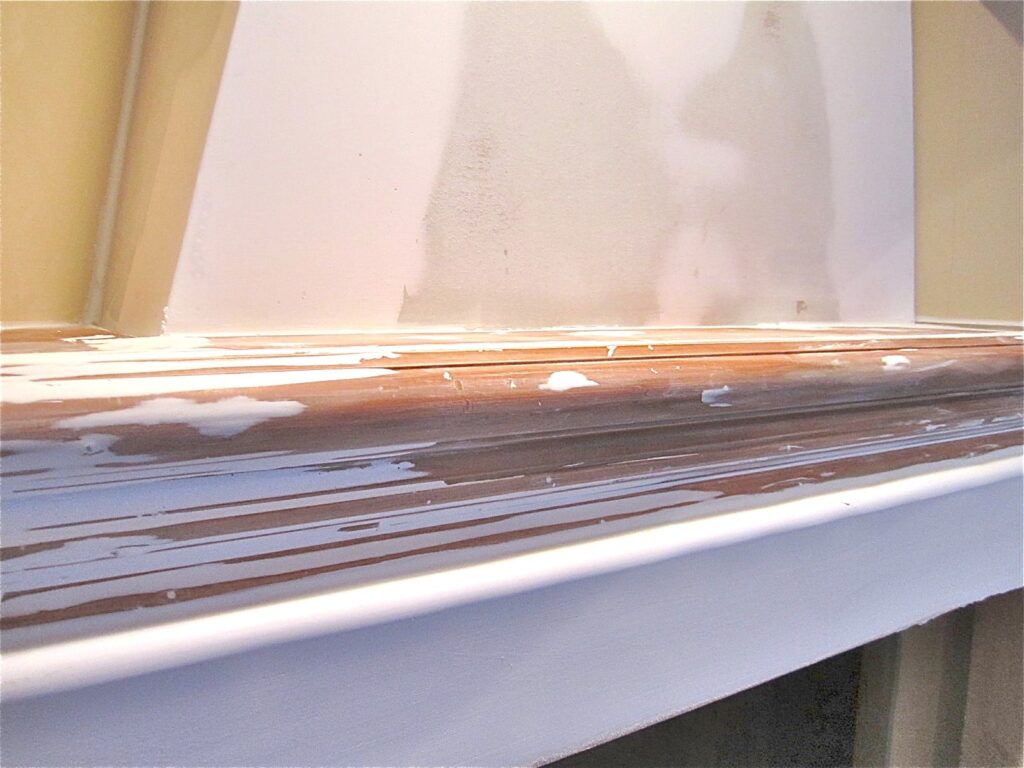
Next sand the gloss and excess filler off the mantel.
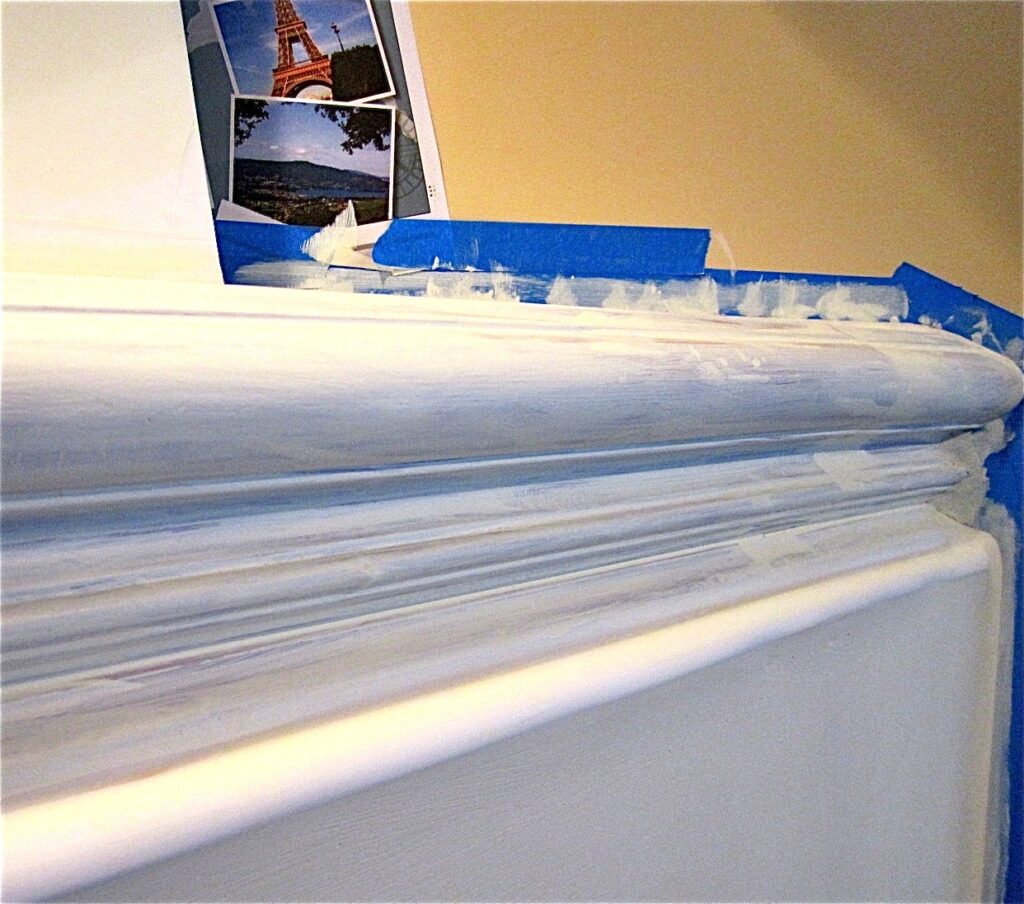
Tape off the walls and lay on a good coat of primer. I used some leftover Kilz I had on hand as really the idea is to unify the color of the wood part with the drywall part, so the final product is cohesive.
Now let the fun begin. Mud pies and Finger Paints, anyone?
Once the primer is dry it’s time to layer on the “concrete”, kinda like frosting a cake.
But my icing is joint compound.

The joint compound needs to be thinned a bit, but rather than water, I used latex paint. This thins it while also altering the color to a version of concrete that works for our room.
Bonus: two steps in one – color AND texture. Woo!Hoo! Streamlining!
I just raided my paint stash and started adding anything latex I thought would take it from the cold grey of joint compound to a bit brighter and warmer greige concrete.
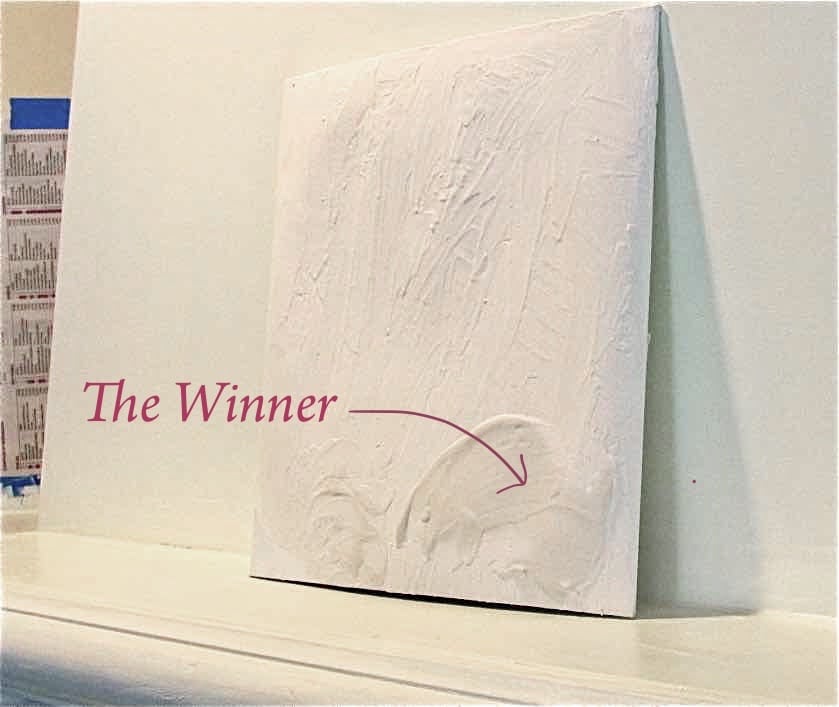
This took a bit of experimenting. So I used a piece of white cardboard, close to my basecoat primer starting point.
Initially I mixed a bit too yellow, then pink undertone – ooow, not good! Then finally I had it right.
The colors in the pic are all off, but you get the idea.
The color changes significantly from wet to dry, so be sure you let it dry before judgement.
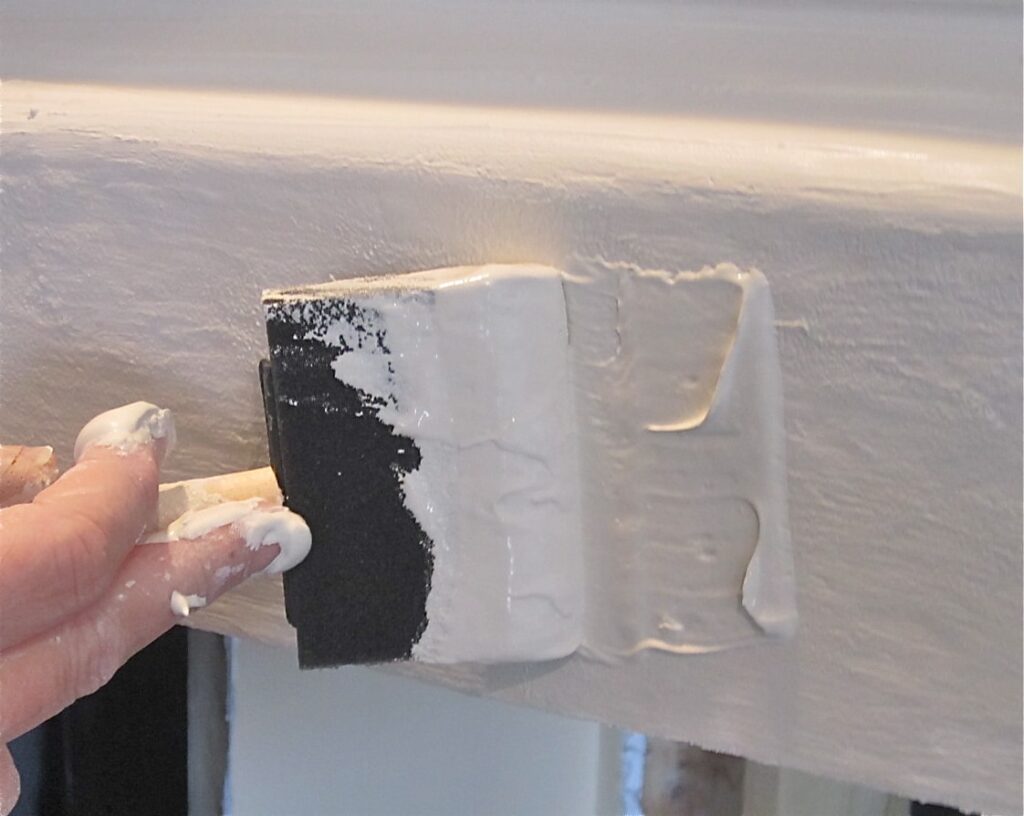
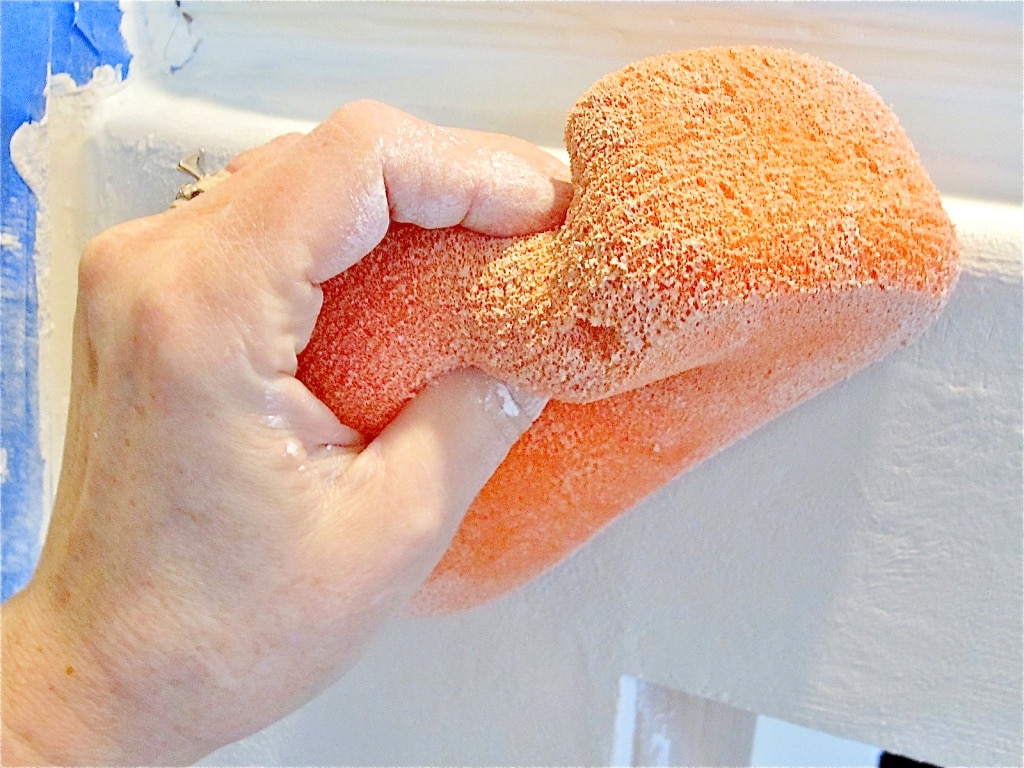
I started by trying to spread my mud mixture with a putty knife. Don’t recommend this.
Rather, I found a wide foam brush worked the best. Surprisingly, it held up great despite the weight of the mud.

But then when you get to the dips, valleys and curves, nothing works better than your fingers. Finger painting …. aww, how I miss those kindergarten days.
As with painting, the best results are from two light coats, rather than one heavy coat.
After the initial layer of mud is on, let it dry a bit and then smooth it out using a combination of this damp tile sponge and foam brush.
Then in selected spots, a light pouncing of the sponge produces the “concrete” dimples I was hoping for.
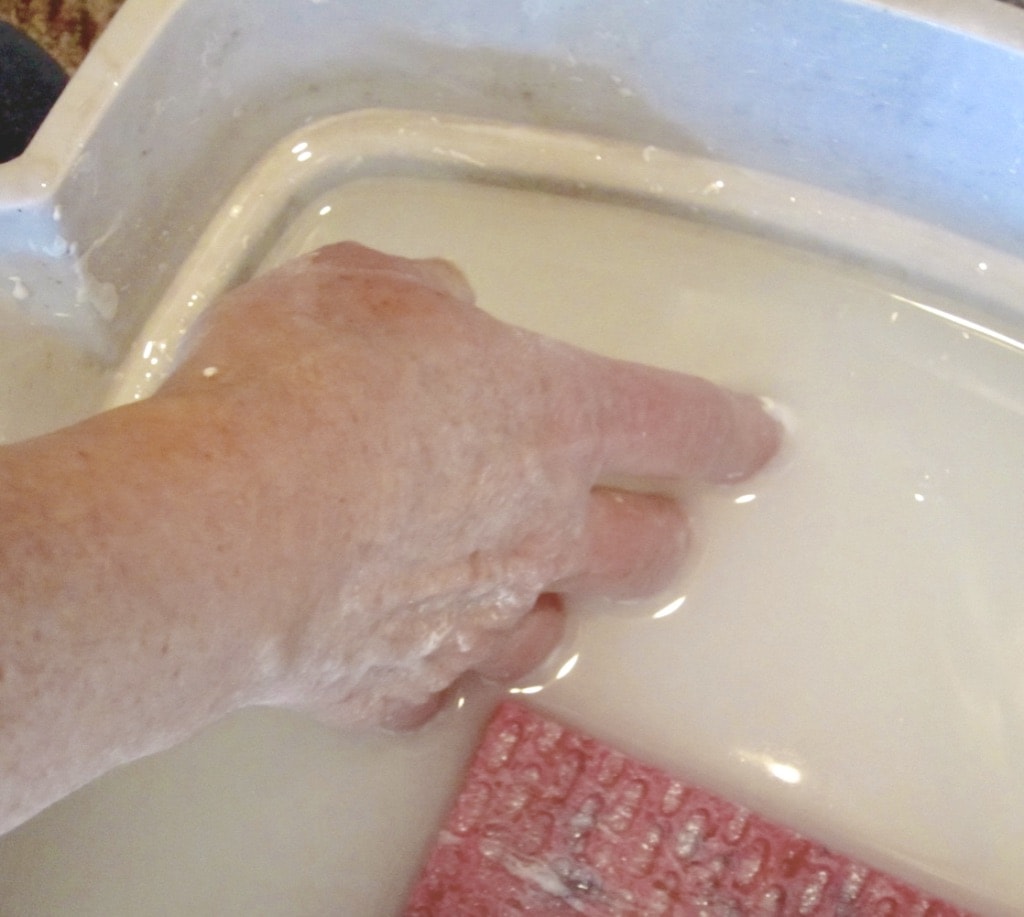
In those tight spaces and valleys, I again resorted to my fingers. Here I dipped my fingers to get them plenty wet, so the mud wouldn’t stick to them as the idea now is to smooth and texture the mud that is already in place.
(Yikes! time to schedule a deep conditioning manicure)
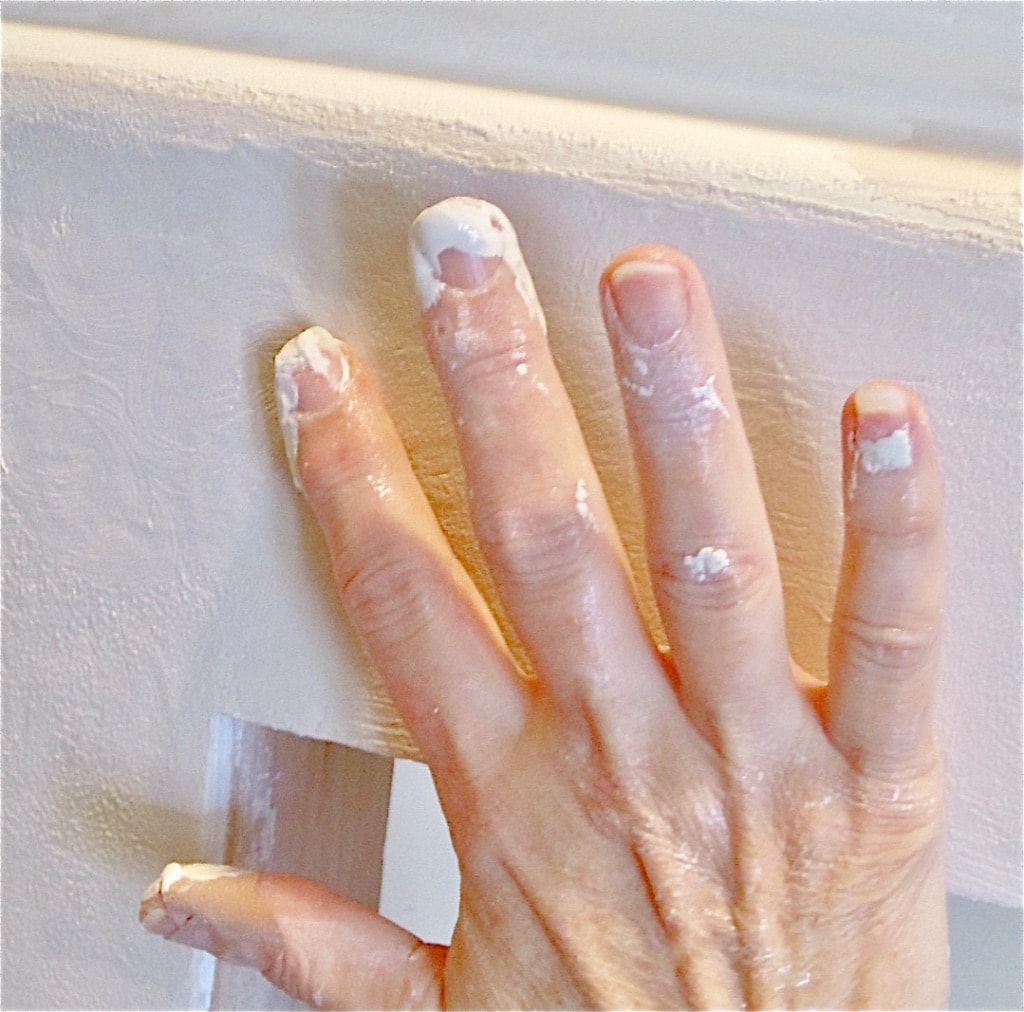
And on the flat surfaces where I used a sponge to create the dimples, if it left some raised bumps, or too much texture, I again used my wet fingers to smooth them out a bit.
I was going for the look of traditional cast concrete, not adobe or stucco. If those fits your home and style, then certainly adjust your texturing accordingly.
After the initial coating is completely dry, lightly sand, wipe away the dust and layer on a second coat using the same method.
Again, dry, sand and wipe.
Joint Compound is porous – yes, it will absorb any splatter of pizza sauce, spray of Dr. Pepper, or splash of red wine.
Not that any of that would happen in our house.
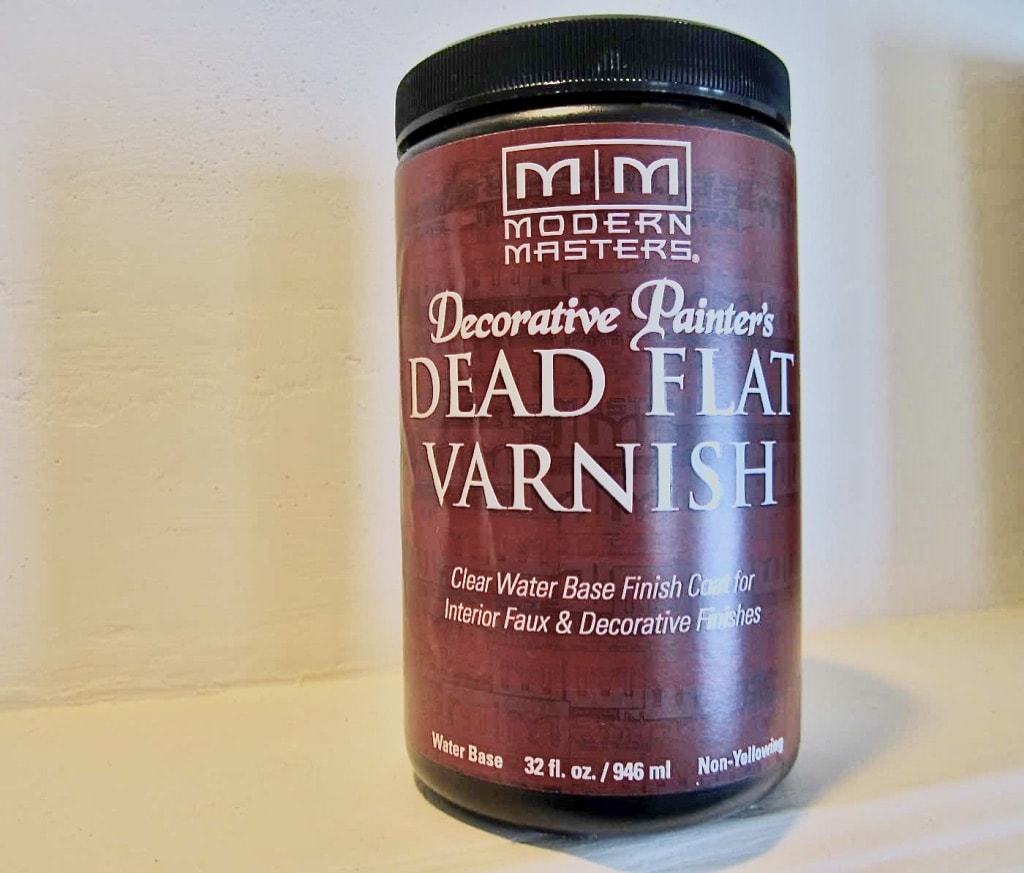
Two coats of Dead Flat Varnish from Modern Masters, a sister company of Rustoleum, is protecting our new basement focal point from all of “Life’s Fun”.
It is the only water-based, truly flat finish varnish I know of. It is a bit pricey at $31, but I have a number of projects I plan to use it on. And it was perfect here.
And now for the pretties:
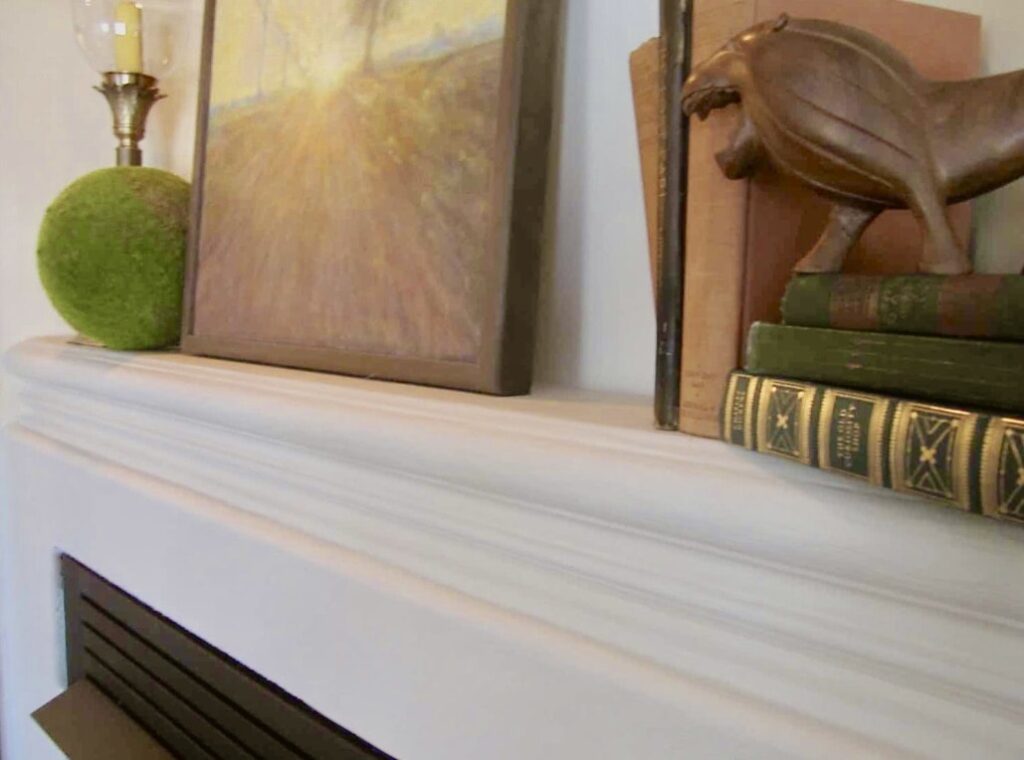
Fireplace is installed – by the Pros!
I’m off for that deep conditioning manicure, then back to let the decorating begin!
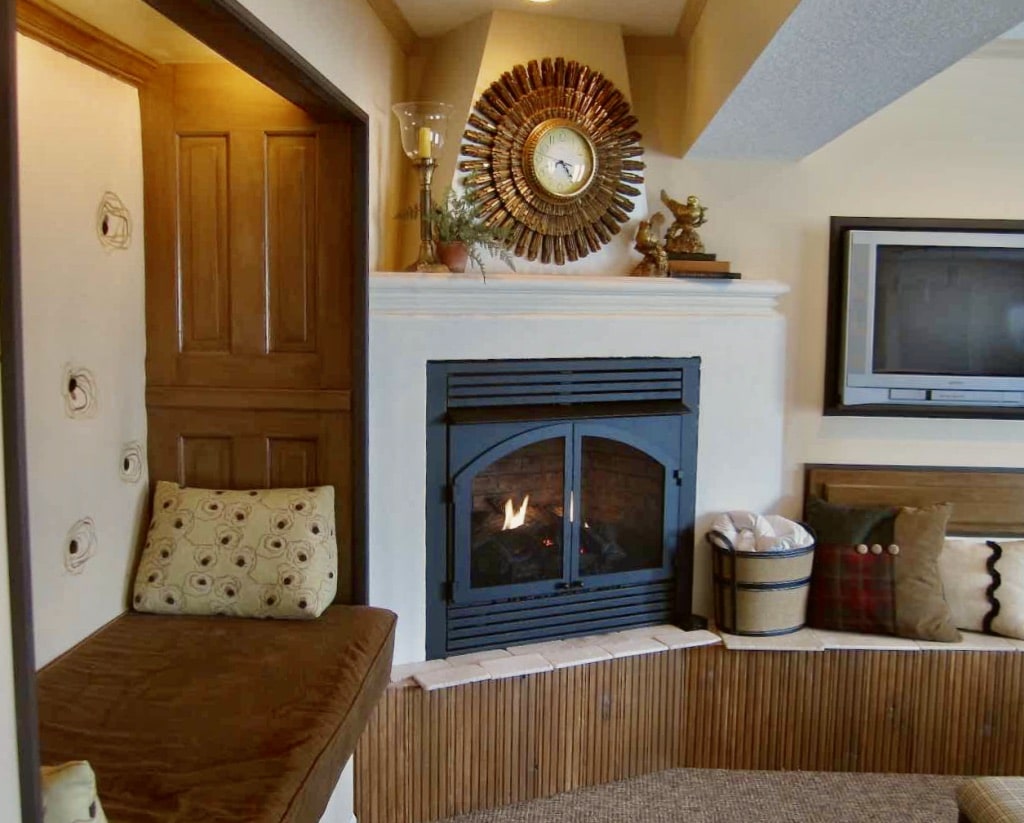
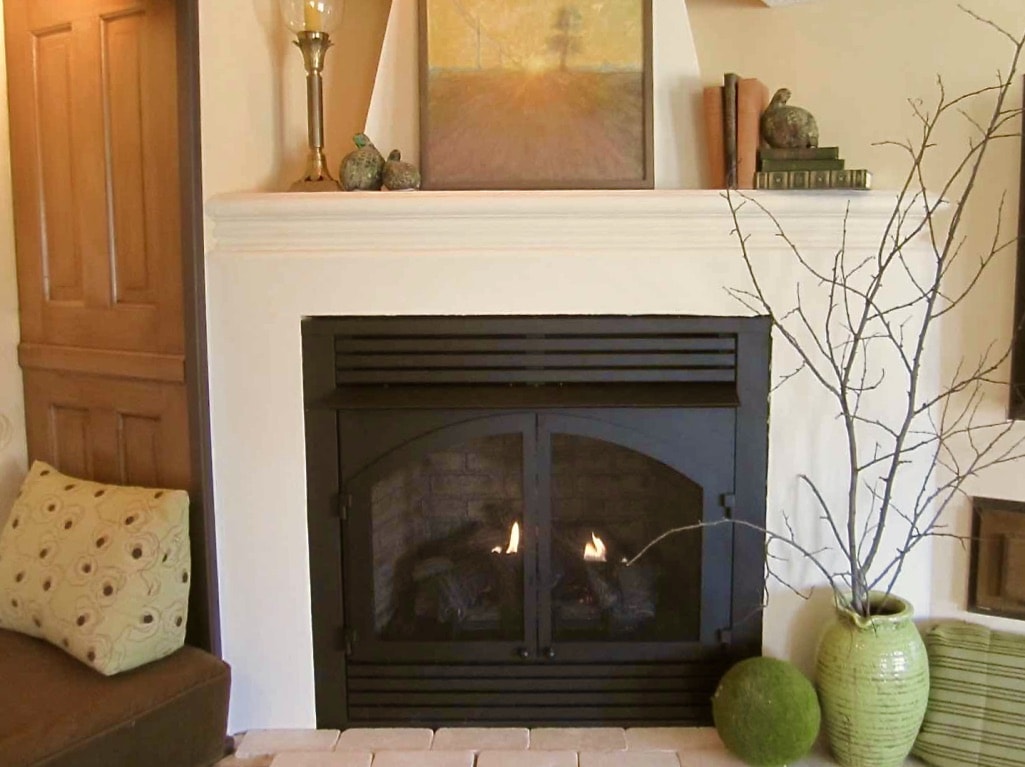
This is the view as you come down the stairs.
Love the impact of my great sunburst clock there – a real wow from that angle!
But from the rest of the room, it’s chopped off too much by the low-hanging beam. So it will hang in a better, more deserving spot in this new room.
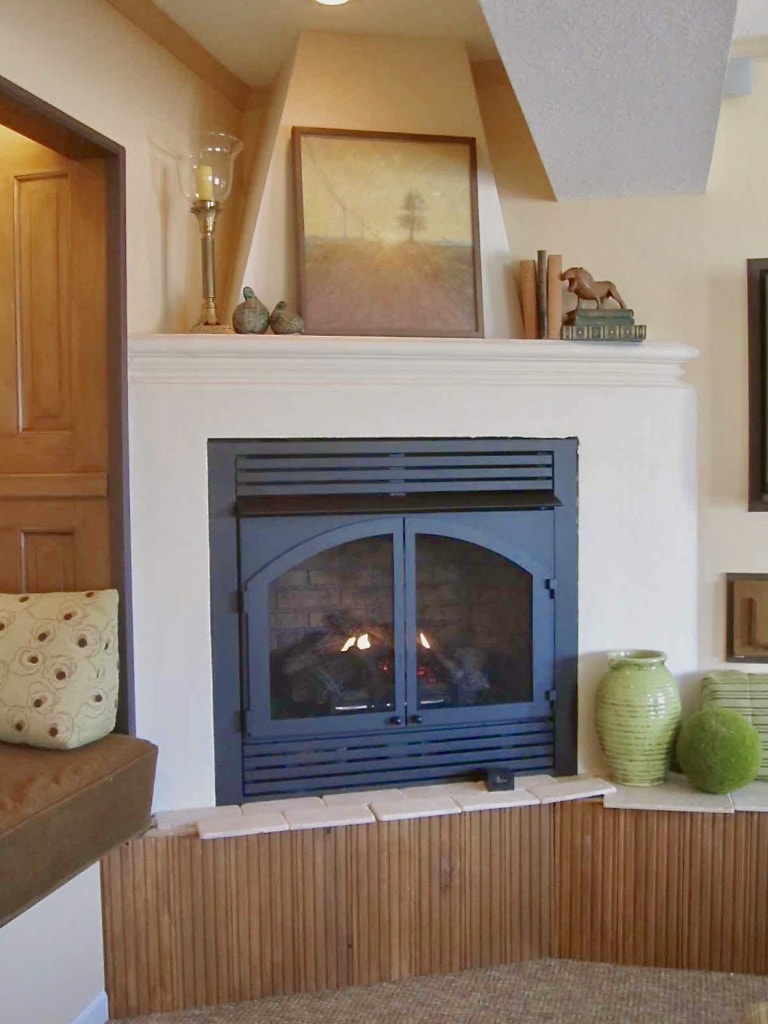
For now, I’m going with this as my initial set-up. Certainly it will change significantly with the seasons and my whims – and of course as I score new treasures and flex my crafting muscle.
The fireplace is a huge one off the list, but still many details to go:
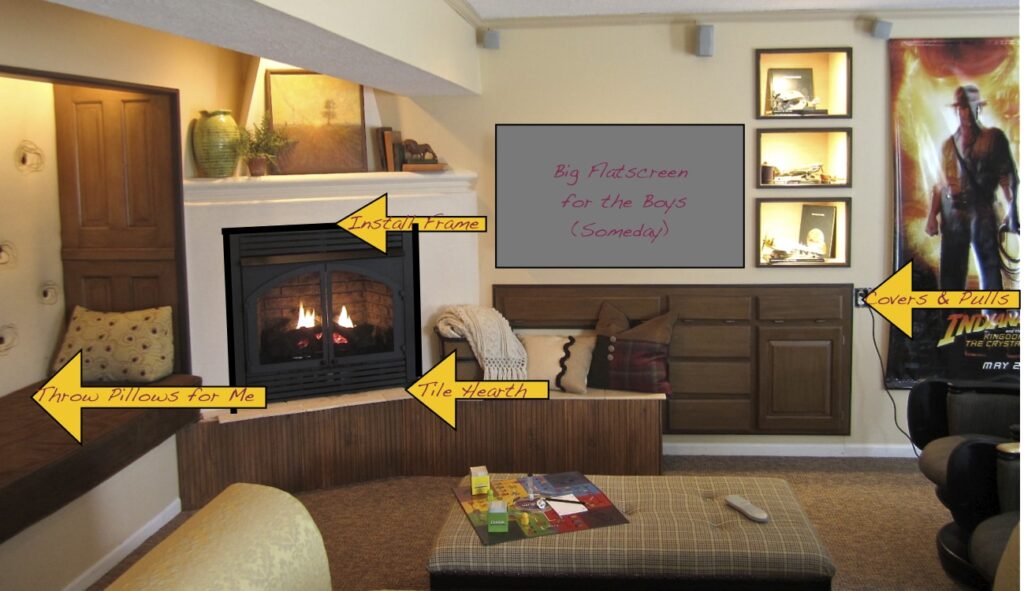
First, tile that hearth bench!
And surely, the back-ordered steel fireplace frame will arrive soon.
Multiple swoon-worthy throw pillows, of course! Window treatments, drawer pulls and cabinet knobs, switchplate covers, magazine & book rack, drum shade over the game table, …. And yes, the sons’ top priority, a B.I.G. flatscreen TV – someday, boys, someday!
And that huge tufted ottoman? That’s another DIY. Check it out here.
For you skeptics, my promised supply list:
- Oak mantel: $20
- Drywall, tape, bullnose: $20
- Screws & Nails: $18
- Joint Compound: $13
- Lumber: $22
- Dead Flat Varnish: $31
- Total: $124
Don’t hesitate to contact me with any questions. I’m happy to lend advise and encouragement should you head down a similar muddy road. Don’t be intimidated – it’s really very fun and easy. (Not so much the construction, mind you).
And in the meantime, pin this to find it again when you ready for your own faux concrete fireplace:
[/et_pb_text][/et_pb_column][/et_pb_row][/et_pb_section]
Beautiful! What is inside the fireplace? It looks like real fire!
Thanks Kristen! That is a real fire. It’s a vent-free gas fireplace. That’s the reason I couldn’t have the mantel profile extend out in front like originally planned.
Dreaming of built-in bookcases flanking my fireplace. After seeing this gorgeous styling, I may just forgo the shelving, hassle and put up photos of loved ones/ trip adventures. Yours Turned out spectacular!
Awwww Thanks Mrs. K. We do enjoy them and are thrilled with how the room turned out.
I’m surprised that the building codes allowed you to use drywall as a gas fireplace surround. I would have thought that there would be more non-combustible material required next to the black metal of the gas fireplace insert. Building codes usually follow manufacturer’s specifications – when my sister was thinking about using a vent free gas fireplace, the minimum clearance for sides was 9” (another one was about 16”).
I just wanted to mention this in case someone decides to use your idea (which is a great one). You could use cement board instead of dry wall for whatever the clearance requirement is. Has the joint compound cracked at all? Joint compound (with added paint) seems a lot easier than applying some type of smooth stucco/cement. If it holds up well – I’m going to suggest it to a friend who is renovating her fireplace surround. Thanks!
Hi Dani,
All valid questions, but I assure you we followed all the codes to the letter. That is why the mantel could not protrude out as I originally planned and wanted. The surround is recessed back behind the firebox unit itself. And with the gas insert we used, there are no sparks of embers to fly out and ignite anything.
We were in that house about four more years after that reno and had no cracking. I think sometimes when people use joint compound for crafting purposes (covers lamps and jar, etc.) the tendency is to put on one thick layer and that when the cracking happens. I have done many projects with JC mixed with latex paint and have never had an issue (knock on wood) but I always use at least two thin layers letting it dry thoroughly between just as the sheet rock pros do.
Hi I have a question. If I want to paint it black after do I still need the varnish? Looks great by the way.
Thanks Victoria! I love the idea of a dramatic black surround. Go for it! I would suggest, even though we think black doesn’t how dirt and what not, it’s surprising how much shows. We have a black dresser in our bedroom and that thing needs to be dusted three times a week!!! I would protect the paint with some kind of a sealer. Just so that you will be able to wipe it clean. That’s just me, though.
Love this. Could I do this to the bottom where my tile meets the floor? How would it hold up if it were stepped in is my question. I would be doing this over my tile.
So glad you love this. Hmmmmm. I really can’t attest to how well it would hold up down where it could get kick about. I suppose it would depend in part on whether you have kids rough-housing in that room. Mine held up great, but I had built the hearth up to provide additional seating and I had faced it with wood — actually the back side of leftover wood flooring that was at the ReStore. It was an easy way to get some texture before polewrap became a thing.
There is an outdoor product that I used when I refaced the brick that was used to add some bricks posts to our courtyard.
Oops, it looks like I need to post that. I just went to get you the link. This is the post I was thinking off, but I just read that because the post was running so long I would include the refacing tutorial in a second post that i forgot all about. Gosh, I forgot all about that. I used an exterior grout or mortar — that came in powder form and I mixed with water. But in this post you can see how I manipulated that grout to get the look I wanted, similar to the joint compound on the fireplace surround. Except here I used a thin dowel to make accentuate the grout lines between the bricks and then a pad full go nails to get the pock marks I wanted, all to mimic the original large columns.
Hope this is of help for you.
Diane’s “mud pie” approach—using a wide foam brush and wet fingers to texture the joint compound—is an ingenious way to democratize the look of expensive custom-cast stone. It is a perfect project for budget-conscious decorators who aren’t afraid of a little mess.
The transparency regarding the project’s total cost ($124) and the specific supply list makes this one of the most accessible and trustworthy “luxury dupe” tutorials available. The lack of spam allows the critical safety discussions to remain prominent for future builders.