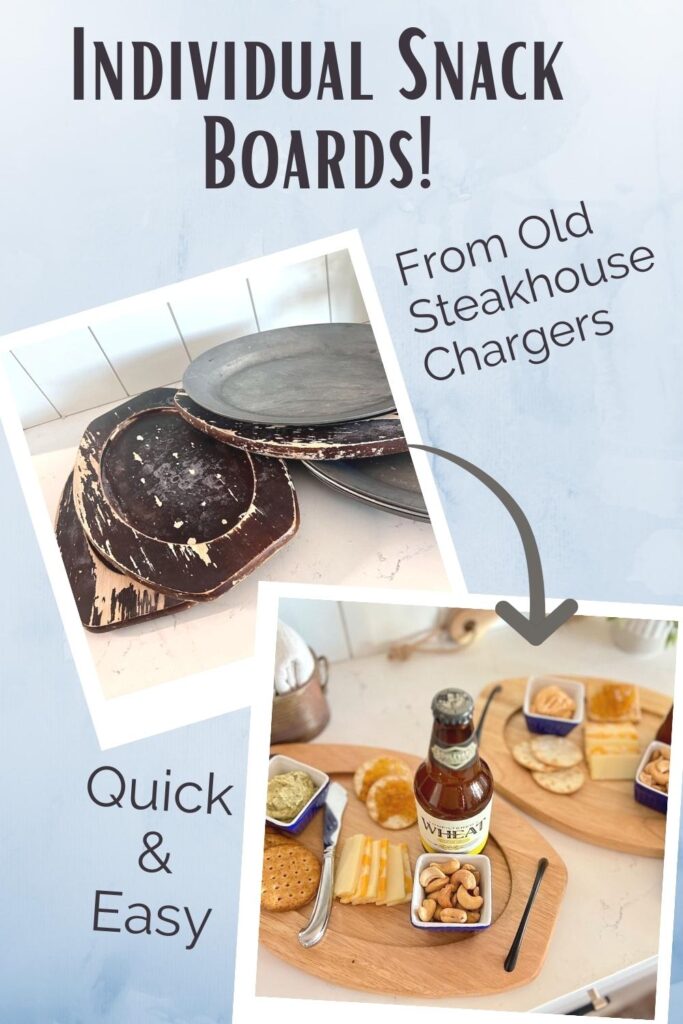
How To Make Personal Snack Boards From Old Wood Steak Plates
If you run across some old Steak House wood charger plates — buy every last one of them! They can be transformed many ways and today, we’re turning some into trays and individual snack boards.
It’s absolutely crazy what these can become. And to think I bought several huge boxes of them at a University auction years ago — for $2 total.
No one else wanted them. This was long before we knew how to spell charcuterie.
Still don’t know what I’ll do with the aluminum (I think) plate that topped each wood charger with a sizzling steak and baked potato on top.
For now, I’m concentrating on the wood chargers.
Because today is the first convening of The 2024 Handcrafted Society, organized by the amazing Wendy of WM Design House.
And you guessed it! Our medium is WOOD!
There are ten talented crafters all sharing their wood-centric projects with you. Be sure to look for their links at the bottom of this post. Some truly amazing projects are ready to inspire you!
Did you find your way here from one of these other gal’s blogs? Well if you’re new here, a very hearty Welcome! I’m Diane and I am all about flexing our creative muscles in the pursuit of joy-filled living.
Sound interesting? Please stick around. I’d love to see more of you. Leave me a note in the comments and let me know where you’re visiting from. And of course, don’t hesitate with any questions!
TABLE OF CONTENTS:
Some links in this post are affiliate links which means if you buy something using one of these links, I may receive a small commission. Please note that I will never recommend a product I do not believe in!
Old Wood Steakhouse Chargers
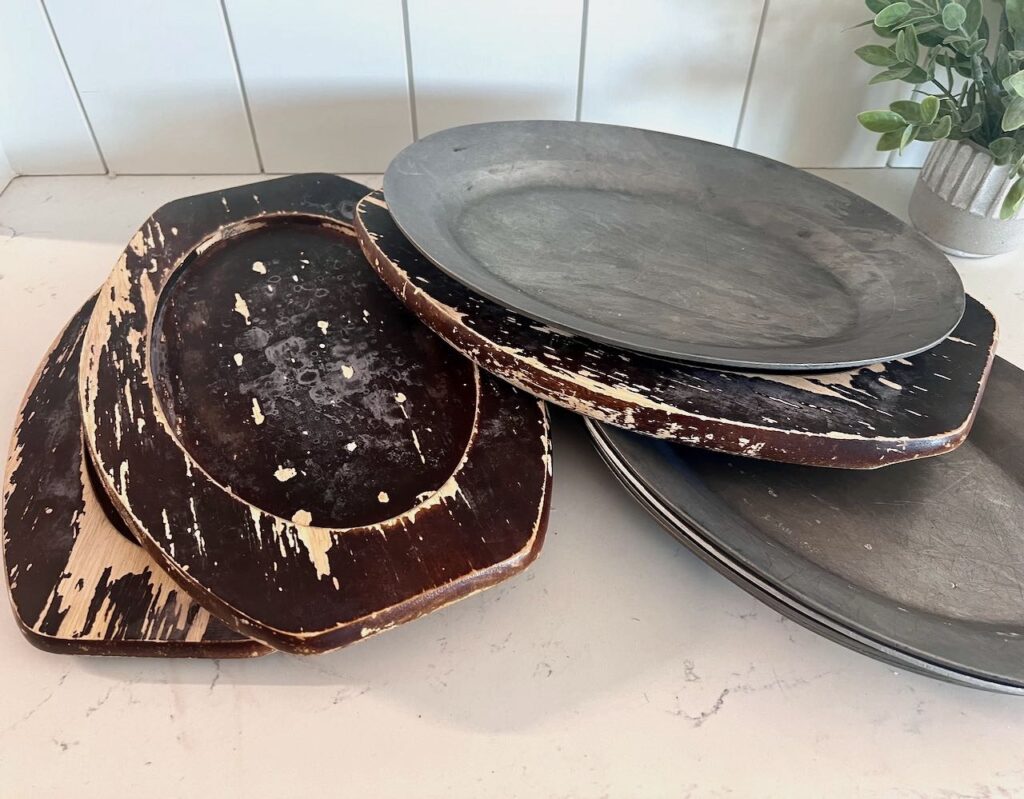
I’m guessing someone missed the memo about putting wood through the dishwasher — and a commercial one at that!
If you find some in this condition. Don’t be frightened off.
Just look at what they can become:
Crazy, right!!!
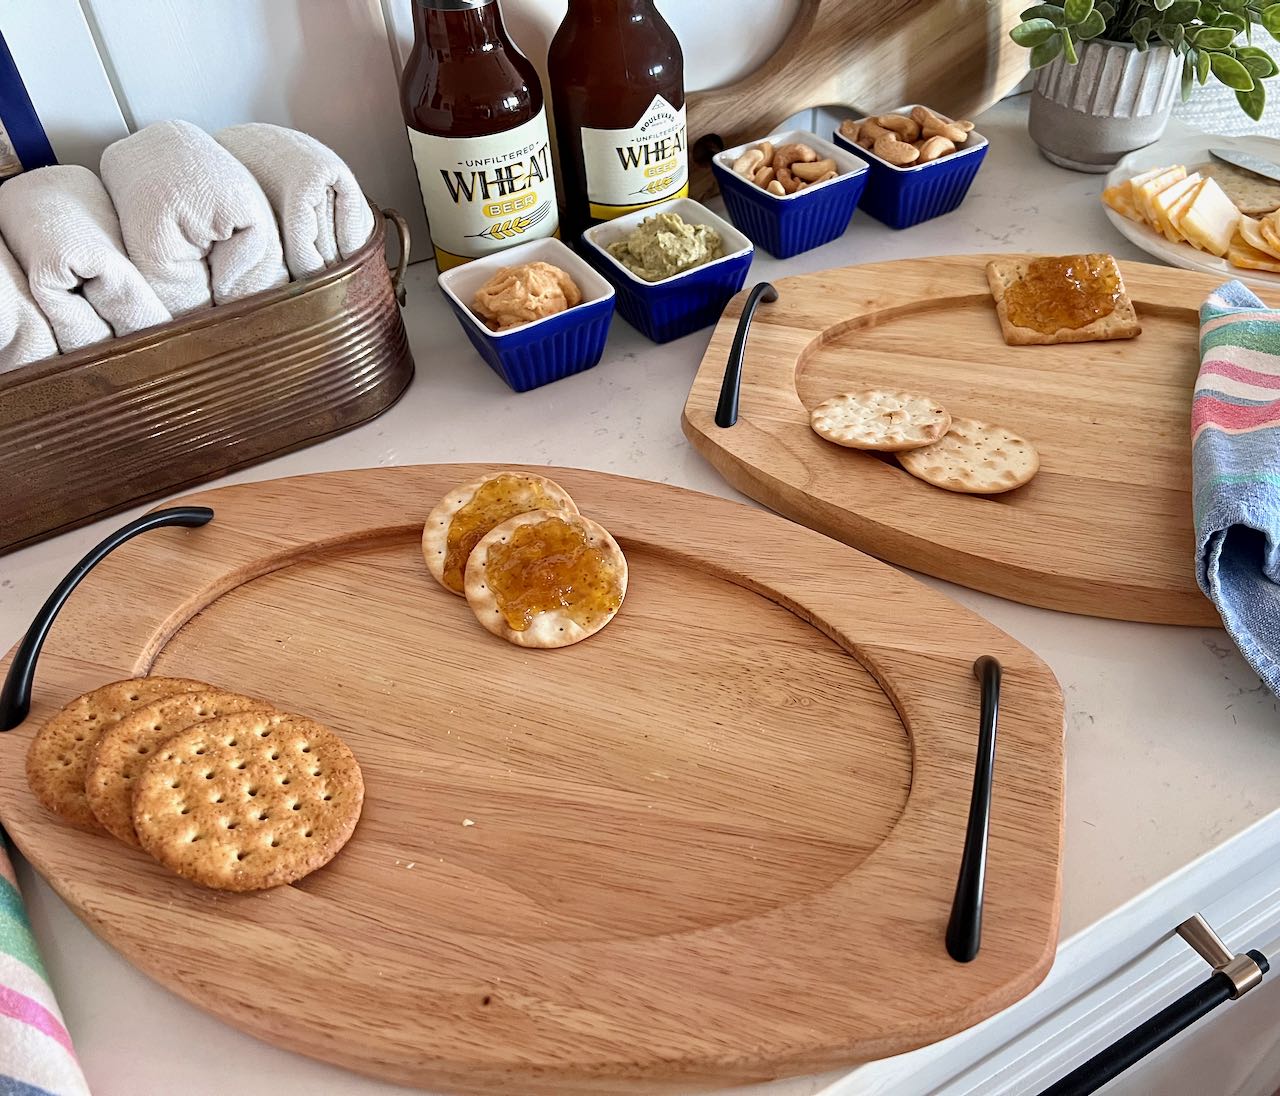
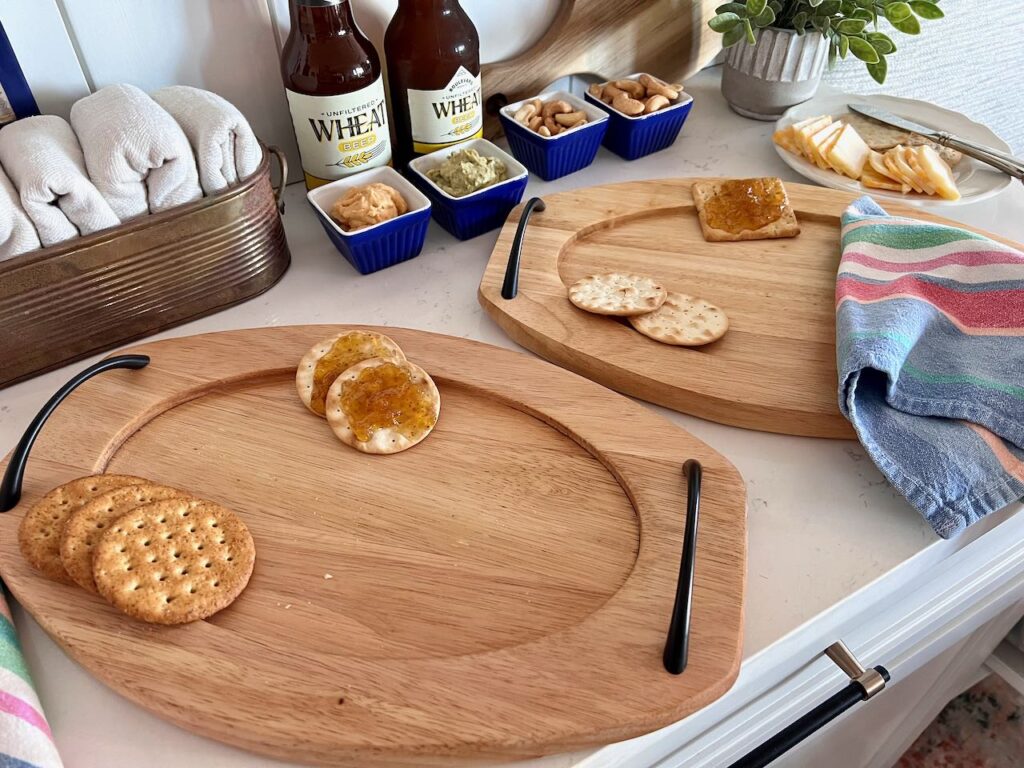
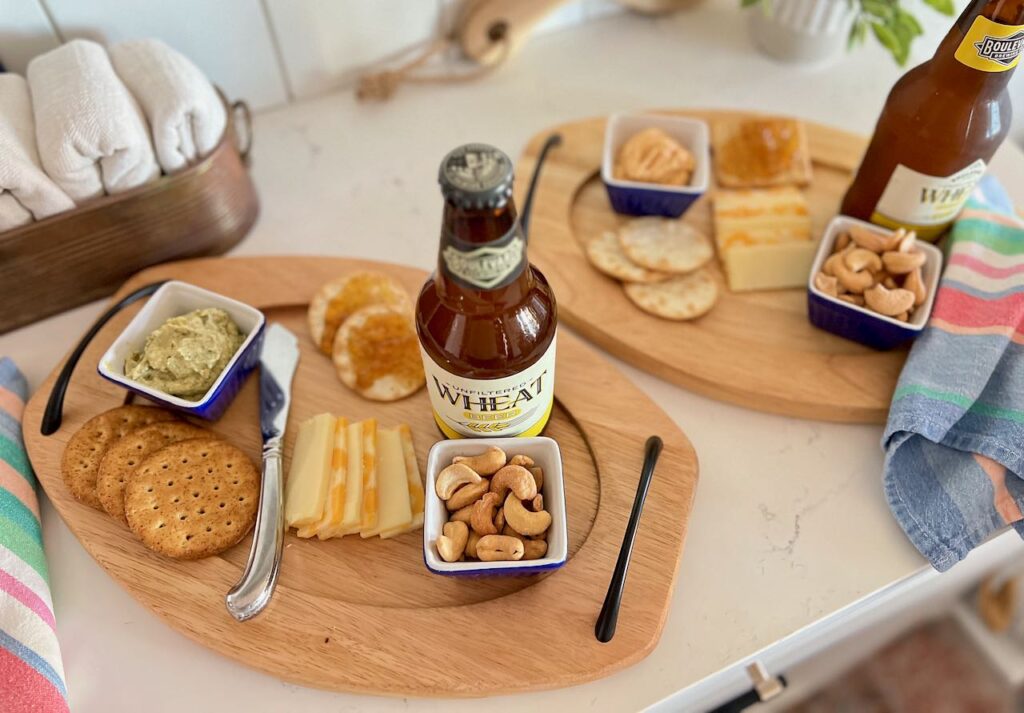
Let’s Make Some Personal Snack Boards
Remove Old Finish-
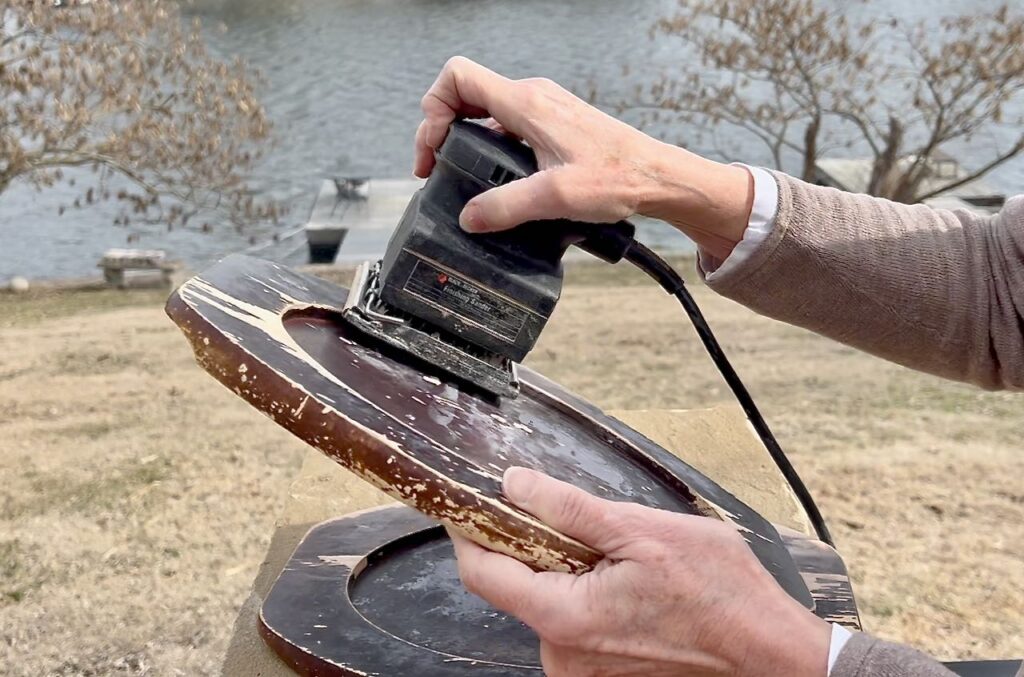
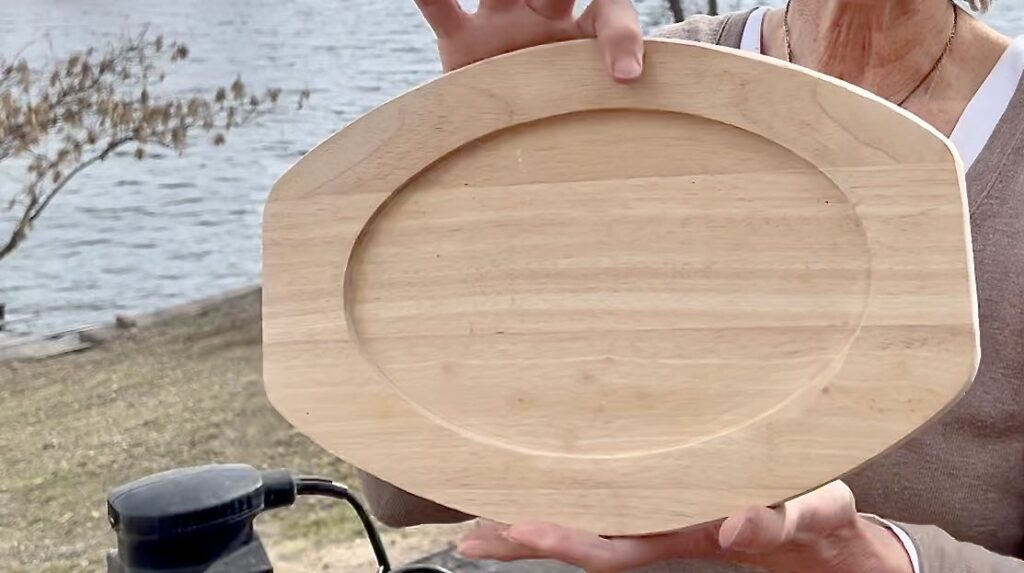
As you can imagine, the starting point is sanding.
Due to years of abuse, the paint came right off. I used an orbital sander for the majority, starting with 80 grit sanding discs, working my way to 220 grit.
NOTE: My rotary sander worked much faster and better than this one I started with.
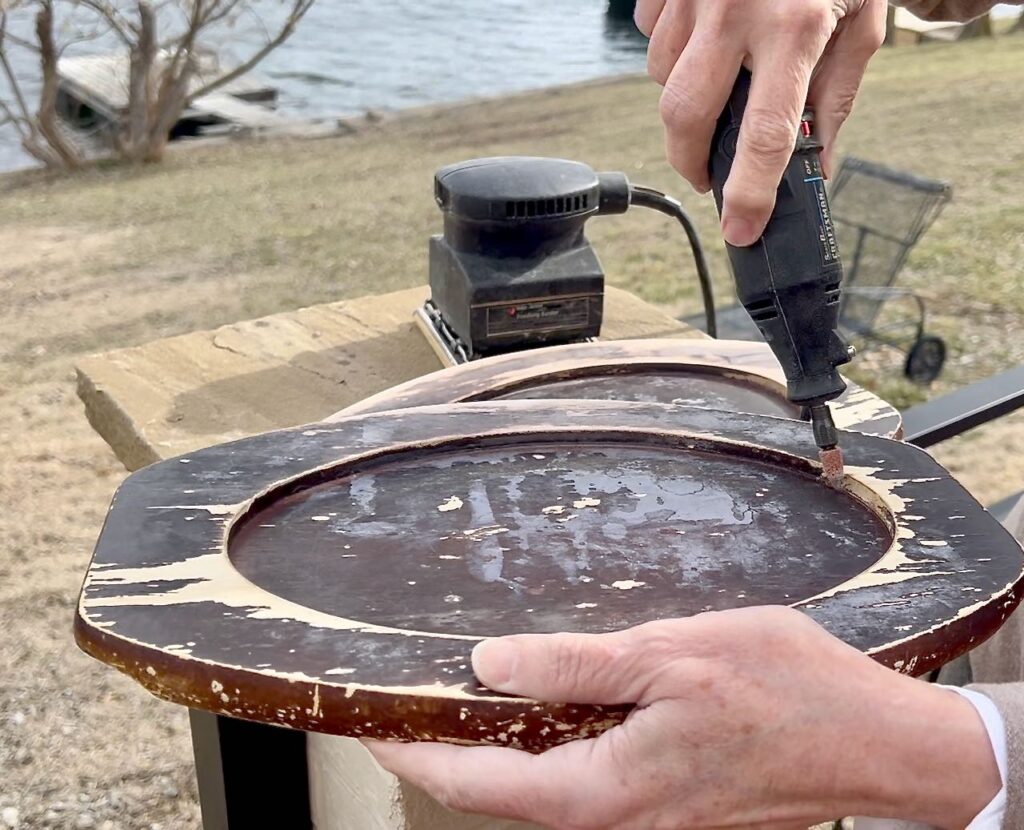
For the little groove where the walls of the oval meets the the recessed surface, I used a sanding cone on a dremel. For the most part it worked really well. In a few spots, A folded corner of sandpaper took care of the last remnants of that dark paint/stain.
There were times, I still found my favorite little microsander to be the best option. This one of the best all purpose tools in my craft room!!! Seriously, I use it every day in one way or another.
TIP: Wrap your velcro sandpaper around the edge of the micro sander and you can get into corners quite well.
New Finish-
There are a lot of products for sealing and finishing wood. But the choice quickly narrowed when I wanted the finish to be food safe
I mean, we’re talking individual snack boards or personalized snack trays. I’m expecting to set food directly on the surface, just like cutting boards.
I loved the color of the bare wood and wanted to change it as little as possible.
I went with one of the most reliable names in food-safe wood products, Howards. I brought home the Butcher Block conditioner first. After one application, it was a bit more orange, a bit deeper than I was hoping for.
So I went back and got the Howards clear cutting board oil.
My friend, Cindy at Reinvented Delaware told me that the beeswax in the conditioner could possibly bring out the orangier tones more than the oil that only contains food safe mineral oil.
Cindy sure knows the ins and outs of wood finishing. She even has this great video on caring for your cutting boards.

You can see the difference here. I have to acknowledge that the difference in the wood of each board could be contributing to the difference in the tone of the finishes.
But as a wood lover, I’m embracing the variance. Even wood from two different trees of the exact same species can vary significantly
I mean, it’s all part of the beauty of nature, right?
May we take a quick pause to ask if you are enjoying this? Please consider becoming a part of our creative community:
Many thanks! Now back to the Snack Boards and Trays
Add handles, Optional–
Handles aren’t necessary, but I like the extra style they bring. I found these new minimalist handles at my local ReStore. At $2 each, it’s an investment of $4 per board that I am good with.
I did have to get new 3/4-inch screws. ($1.18 for 10) The screws that come with door pulls are two long for these boards.
I marked the holes on the front, then drilled from the front down thru with a very thin drill bit. Then I turned it over and drilled again using a countersink bit at the starter hole.
Be sure to countersink the screws so the screw heads are recessed into the wood.
I planned to put some felt tabs on the bottom to protect any tabletops, but then I realized I’ll be washing these and they’ll never stick. So I just made sure the surface of the bottom is super smooth.
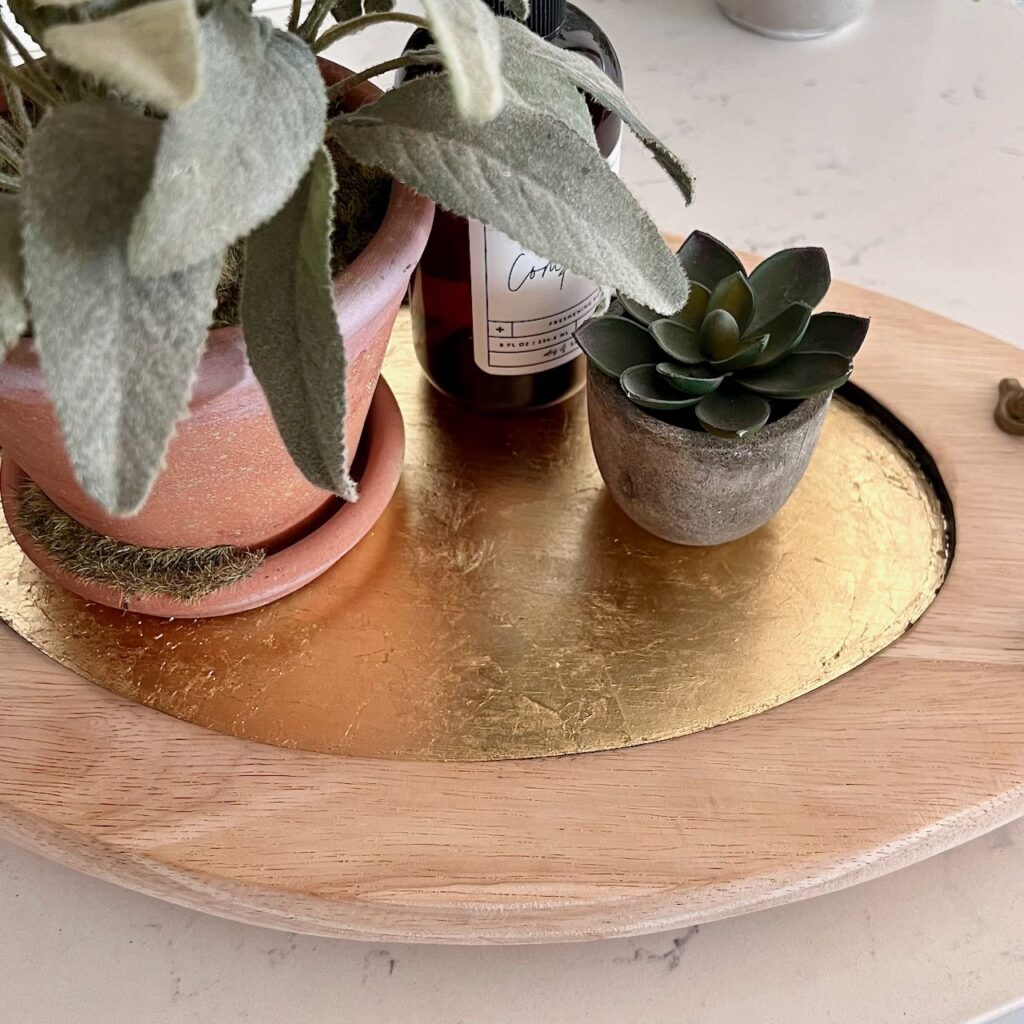
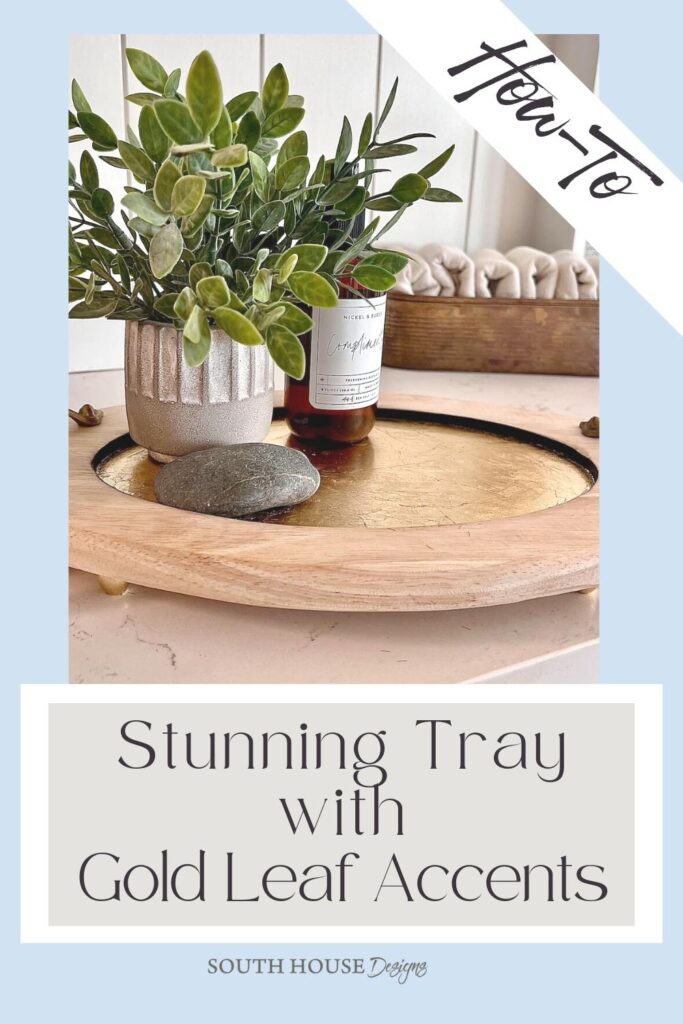
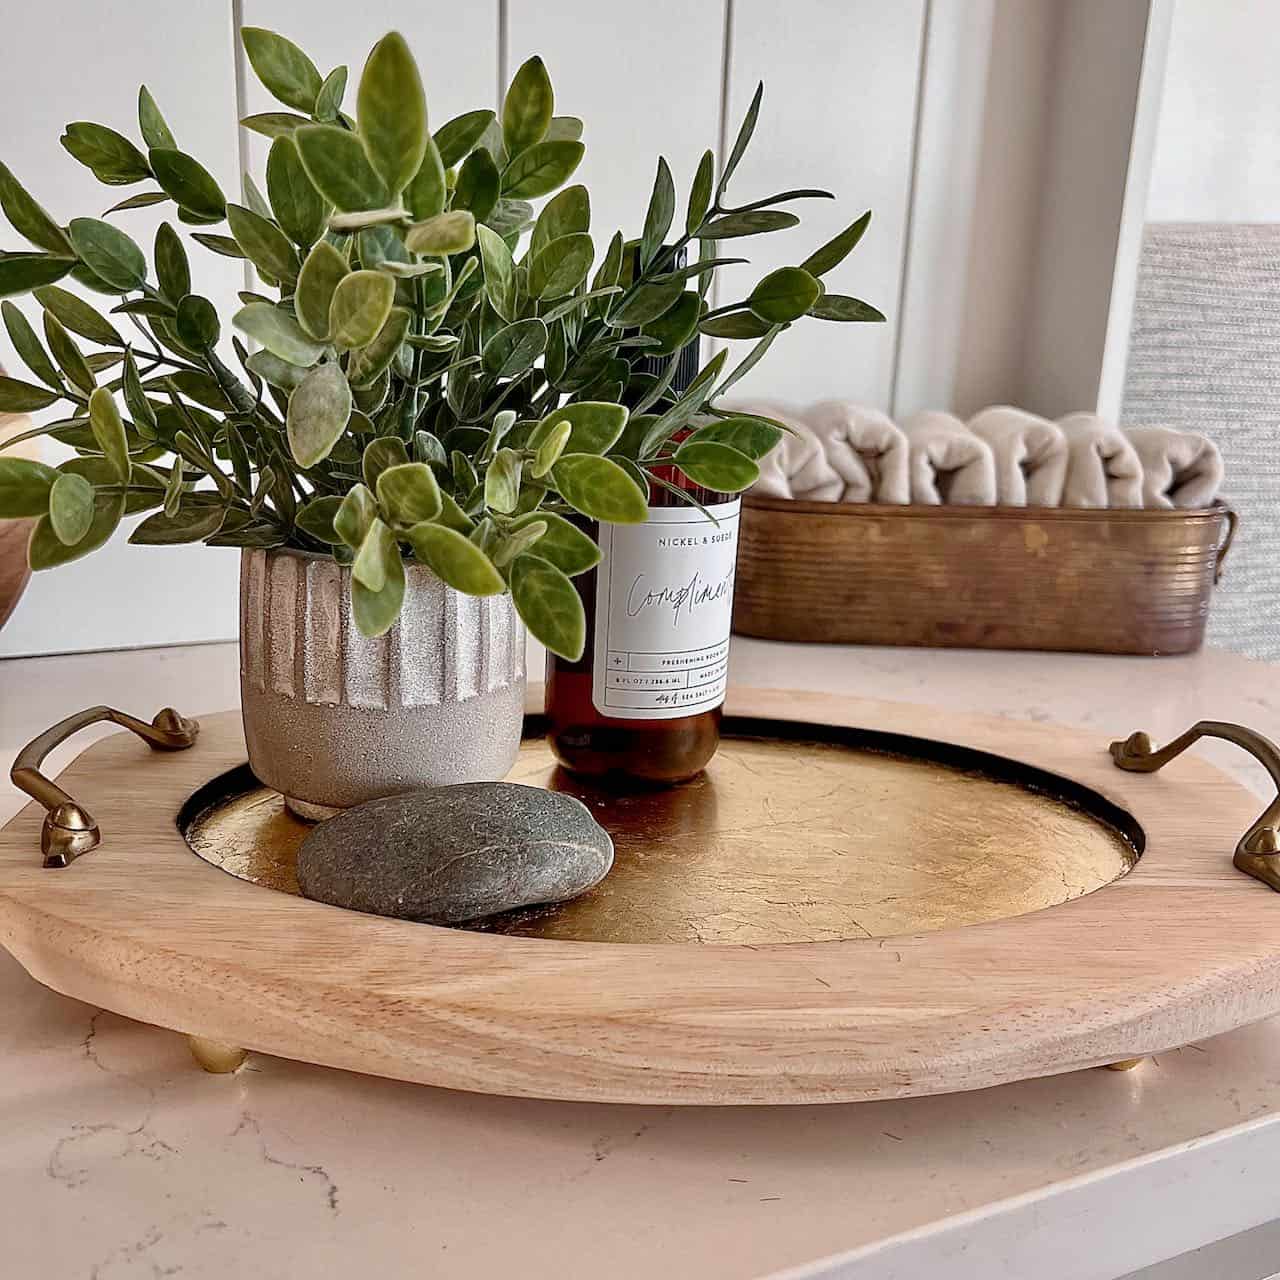
BONUS: Let’s Also Make a Stylish Tray

In the middle of the Snack Board project, I was inspired to add some gold leaf to that beautiful bare wood.
See, I had recently added a touch of gold leaf to our kitchen pendants and LOVED the results. And. had also just seen this wood bowl with gold leaf interior. So I decided to give it a try.
Besides, you can never have too many trays! Right?
Remove Old Finish-
So remove the finish, just like did with my personal sized snack boards.
I decided to keep the wood raw since I wouldn’t be using this one to serve food.
Prepare For Gold Leaf-
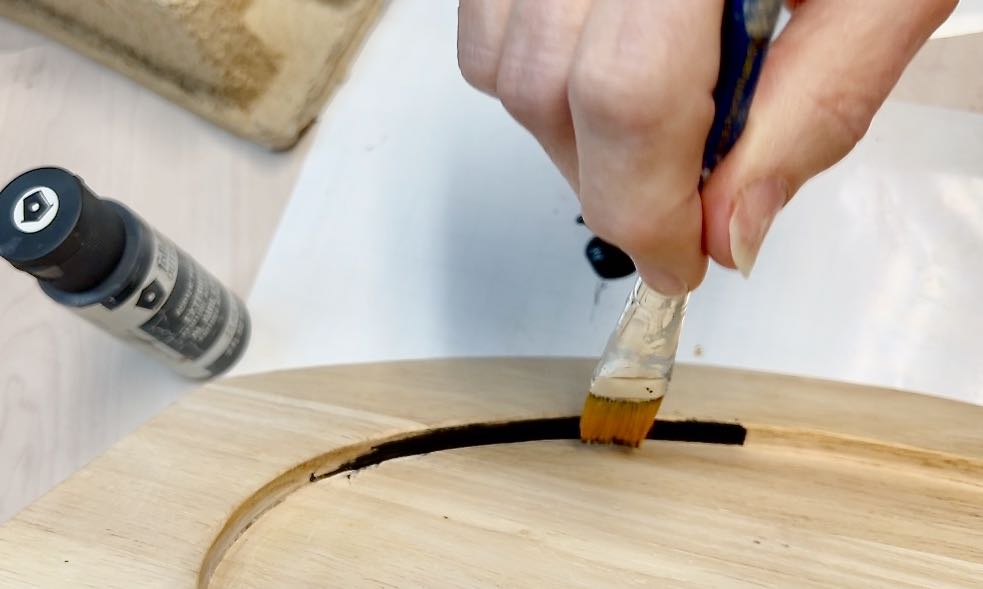
I used outdoor black craft paint, because that’s what I had on hand. And painted just the inner wall. This is optional, feel free to make this your own and take the gold leaf up the walls.
PRO TIP: Use a flat “artist” brush. Place tips lightly against the recessed surface and gently pull straight up against the wall. Have a damp cloth handy and wipe off the edge of the wall and rim as you go if needed.
Let the paint dry before proceeding to gold leaf.
Add Gold Leaf-
I chose to add some feet, to enhance the board’s identity as a tray. And elevate it just a bit.
I started to note the feet as optional. And of course, do what is best for your own project, your own style. But honestly they are so easy and bring so much to the tray that I’m rescinding the “optional” notation.
For my feet, I used four oval wood beads I had in my stash.

I first painted them gold using the same paint I used on the handles, But they needed more flash because of being mostly hidden under the tray. So they got a coat of gold leaf too.

I carefully covered the flat surface of the recessed area with a thin coat of the metal leaf adhesive or sizing. And with the beads smooshed onto the ends of bamboo skewers I covered the gold paint with a coat of adhesive too.
PRO TIP: Use a small “artist” brush to get a clean line next to the black wall. Then use a wider brush to fill the surface.
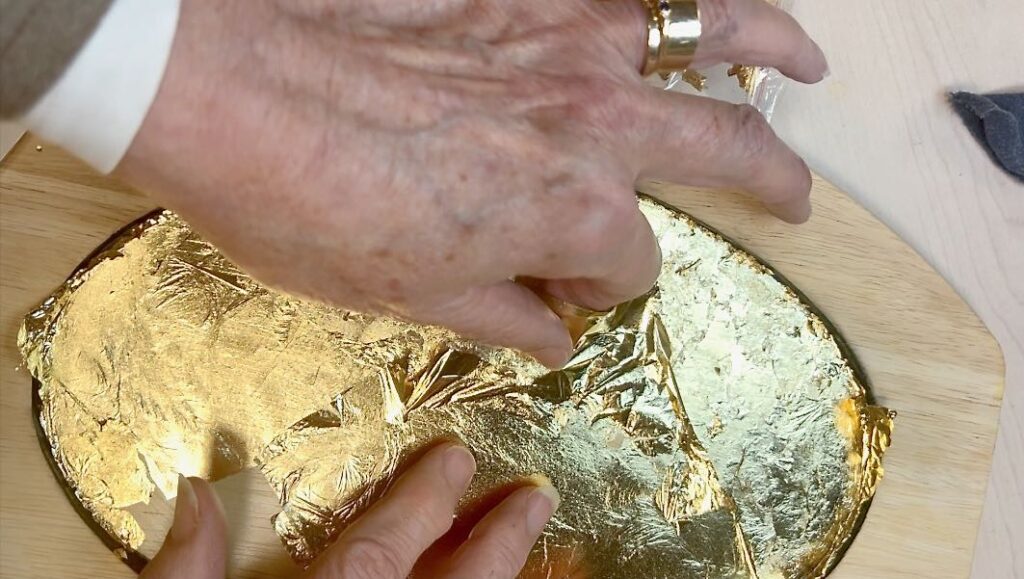
Once the adhesive sat for 60 minutes (per the directions on the bottle), I carefully applied the gold metal leaf. (Be sure to check the time recommendation on your adhesive).
I started with a package of gold metal flakes.
I didn’t care for how that was working so I switched back to my go-to favorite, gold metal leaf sheets. I had quite a bit left from my hanging light fixture project. And still have quite a bit. Hmmm, what should I gold leaf next?
NOTE: This is the second project I tried to use the gold metal flakes on and did not like them. That may just be my personal stye, but I find the sheets are much easier to work with and achieve a more cohesive look.
Very gingerly lift one sheet of gold leaf and place it, gently smoothing it out with your fingertips. It tears extremely easily, so don’t worry. Just make sure the space is completely covered. Where they overlap, gently remove the top layer and use it to fill another section or cover a bead foot.
Once it is all covered and smoothed with your fingers, use a soft brush to brush away any excess, overlapping and loose pieces.
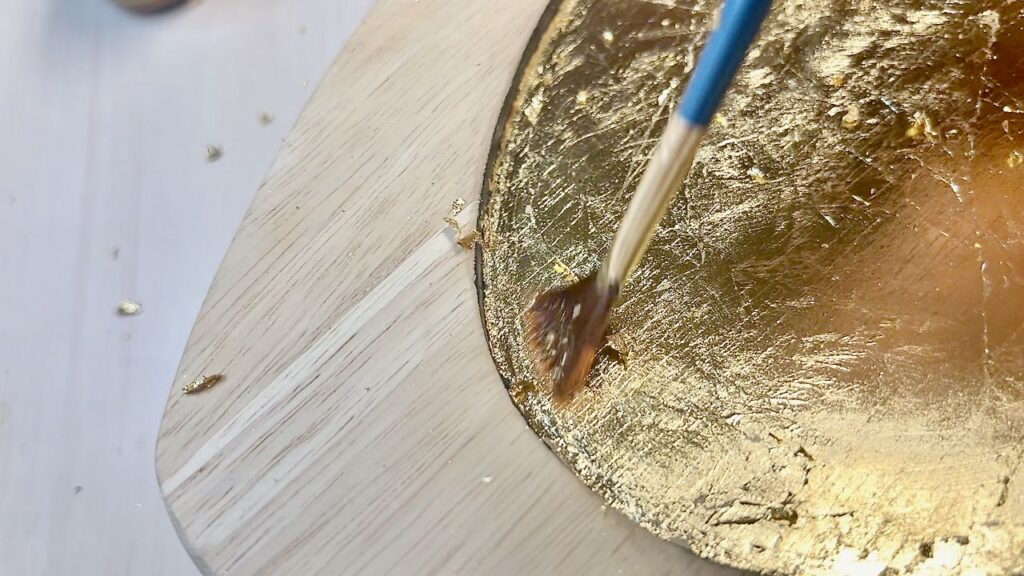
You can always go back over an area, reapplying the adhesive, wait and then add gold leaf again.
Then coat with two light layers of the gold metal sealer. Be sure to allow the recommended drying time between coats.
I used Speedball’s Mona Lisa brand adhesive, sealer and sheets. This bundle contains the same size pkgs but at a great group price of less than $20 (at the time of this writing).
Add Handles, Optional-
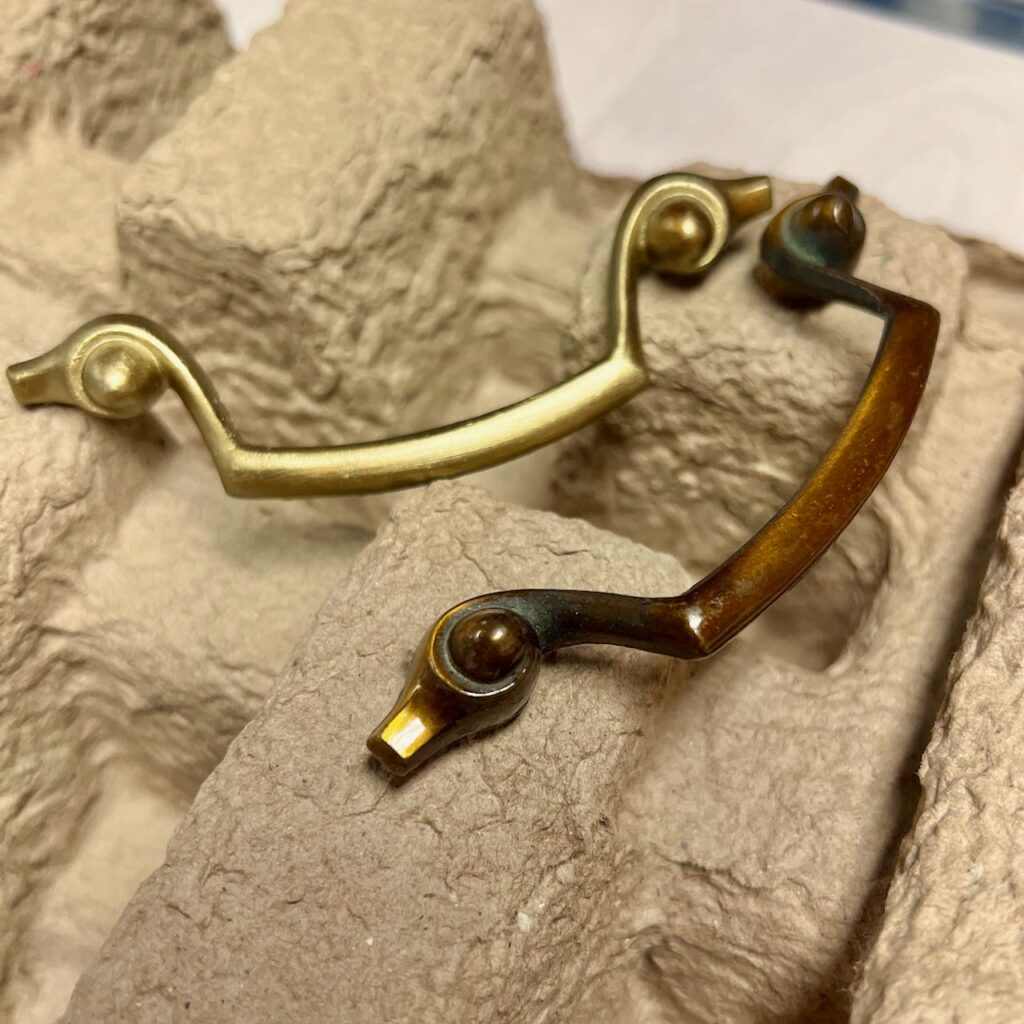
I had these handles in my thrifting stash and loved the shape for the tray.
I thought about going matte black with the handles, but once I had one painted gold, I really liked the look and stuck with it.
I used a tiny artist brush with Iridescent Bronze (Fine) from Golden Artist Colors tube.
Attach these handles just like the handles on the snack boards, with shorter screws and a countersink drill bit.
And I attached the bead feet with my go-to adhesive E-6000.
Other Uses and Styling Ideas
Talk about versatility. Here are just a few more ideas for the snack boards or as trays:
- If you’re hosting a harvest table style event, It’s best to have a set of passable condiments for every 6 – 8 people. Use an individual snack tray for each set. They’re the perfect size to hold salt and pepper, butter, one or two salad dressing options, or several sauce options.
- Make a pattern of the recessed surface and cut it out of different seasonal papers, or temporary wallpapers to match your theme or table top or room decor
- The recessed center surface offers endless options for cool resin treatments!!!
Pin either (or both 😉) of these to remember where to find the details when you have a board to make over.
More Wood Projects For You
From The Handcrafted Society
I hope this inspired you!!! And because there’s no such thing as too much inspiration, are you ready for NINE more amazing Wood-centric projects? Just take a look at all the fun, beautiful and clever projects waiting for you to explore.
Click on the image or blog name to jump right over to that post.


There are so may great options. Something for everyone! Tell me, Which ones caught your eye? Which one are you most likely to do, modifying to your style?
Did I answer all your questions? Was there anything I missed or skimmed over too lightly?

I love the way these trays came together, Diane. They can be used in so many different ways and throughout the year too! The handles you chose are fabulous and adding the gold leaf accents makes it feel extra special. I just love it all! Big hugs and thanks so much for all you do to help keep this group organized and on track! Hugs, CoCo
Thanks bunches Coco! Did we have a creative mind meld? Yet our trays are so different! This is always such fun to see where our creativity takes us. So glad to be be in this group together!!!
Loved the idea! Should I stumble over some old Steakhouse chargers, I’ll be sure to snatch them up!
Thanks Kim! Glad you are inspired!!!
Hi Diane! I can’t get over how well those old steak chargers cleaned up! They are such pretty pieces of wood and I love that you turned them into different types of trays! You will get so much use out of them now! You are so creative, I know you’ll come up with a fabulous way to use the metal plates someday! Pinning now!
Thanks Donna! I can’t believe I didn’t do this years ago!!! I’m so glad you joined the fun — and with such cute birdhouses!!!
This a brilliant upcycling project Diane! Surprising how good the wood is underneath the damaged finish. I think the gold leaf really puts the decorative tray over the top!
Michelle, you’re so right. I’ve been putting this off thinking it would be a tough project and it ended up being so easy. It’s great to do these challenges with you.
What a transformation! I would have never guessed that they could look so good after seeing where they started. You are a wizard! (I need one of the micro-sanders!) Thanks for all of your help with the Handcrafted Society this month. You are appreciated!
Thanks Missy! I can’t believe you don’t have a micro-sander. It’s a MUST!!! Such fun doing these challenges with you. Now we get to dream up Spring Door Decor.
Pinned!
Hi Diane! I can not believe the transformation of these steak house chargers! It’s funny that someone put them through a commercial dishwasher. That gave me a chuckle. Cindy is chalk a block full of knowledge when it comes to refinishing any type of wood. Loved how your project came out! They are beautiful.
Thanks bunches Anna! I’m so glad to have this challenge get me going on these. Wish I’d done this years ago!!! It sure is fun having you craft with us.
Wowsa Diane, these turned out amazing! I’m going to keep my eye out the next time I am thrift shopping. Thanks for sharing my video and I hope your readers find it helpful! Pinned 🙂
Thanks so much Cindy! Don’t you just love it when these makeovers work so well — and are actually easier and faster than anticipated! Thanks for your guidance on the wood conditioners.
Such a great transformation project, Diane. They turned out beautiful.
Oodles of thanks Tammy! Looking forward to having you join us next month.
Holy Transformation, Batman! The trays are lovely, Diane — but that before really gives a whole new perspective to your project. Well done! Pinning.
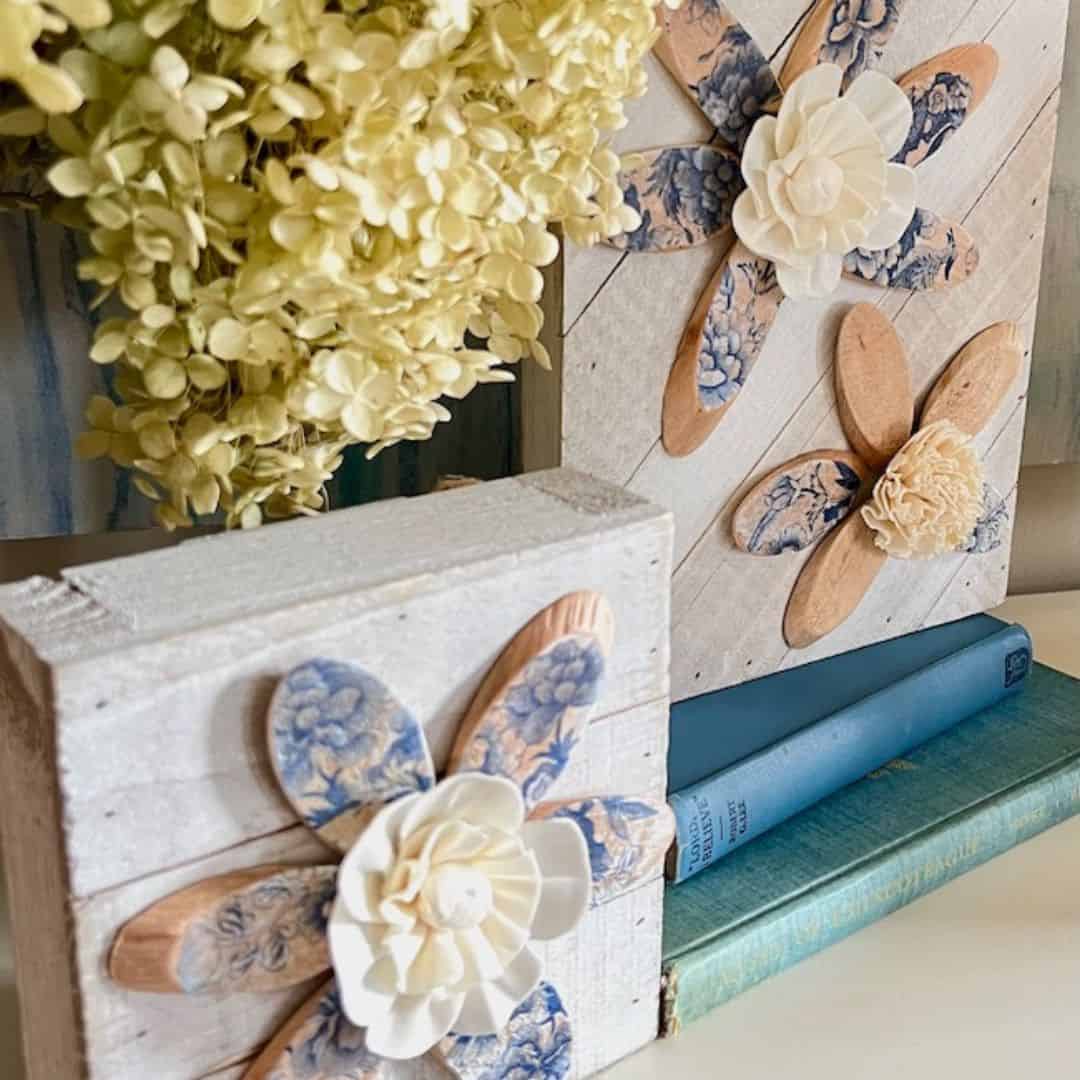
Thanks so much Kelly! I love the outcome and really thought it would be so much harder than it actually was. The condition was so bad the finish was ready to just about peel right off. And I love your fun wood flowers! It has been such fun crafting with you. So glad you said “yes”!
I love it! I have wanted to try some gold leafing!
And Amy, this is a good one to get started with gold leafing. Something flat to get the feel for it.
What a transformation, Diana! Your trays are stunning and can be used in so many ways! You’ve given them wonderful new life!
OMGSH, Diane, simply STUNNING!
I love all of the tips and tricks you shared on how to refinish the worn wood!
Don’t forget to join us over at the Creatively Crafty Linky Party every Wednesday through Sunday
https://creativelybeth.com/creative-crafts-linky-party/
Followed and Pinned!
Creatively, Beth
Thanks Beth, I’ll do that!