DIY Vintage Lanterns for Mantel Christmas Decor
[et_pb_section fb_built=”1″ _builder_version=”4.7.7″ _module_preset=”default” global_colors_info=”{}”][et_pb_row _builder_version=”4.12.0″ _module_preset=”default” global_colors_info=”{}”][et_pb_column type=”4_4″ _builder_version=”4.12.0″ _module_preset=”default” global_colors_info=”{}”][et_pb_image src=”https://southhousedesigns.com/wp-content/uploads/2021/10/Vintage-Lantern-Mantel-Decor-Title-Pic.jpeg” alt=”Wide view, title picture of a wood mantel with a pair of wood posts supporting vintage lanterns that are lit and adorned with linen bows and greenery. Between the lanterns are some green trees, pinecones and a pair of wire deer” title_text=”Vintage Lantern Mantel Decor Title Pic” _builder_version=”4.12.0″ _module_preset=”default” global_colors_info=”{}”][/et_pb_image][et_pb_text _builder_version=”4.12.0″ _module_preset=”default” background_color=”#d1e2f2″ width=”70%” module_alignment=”center” custom_margin=”-100px||||false|false” custom_padding=”30px||30px||false|false” global_colors_info=”{}”]
DIY Distressed Wood Posts and Lanterns
for Farmhouse Christmas Mantel Decor
[/et_pb_text][et_pb_text _builder_version=”4.12.0″ text_font=”||on||||||” text_font_size=”9px” background_size=”initial” background_position=”top_left” background_repeat=”repeat” global_colors_info=”{}”]
Stop them in their tracks with easy to make posts and lanterns for your Christmas mantel decor. No power? No worries — battery operated! .
[/et_pb_text][et_pb_image src=”https://southhousedesigns.com/wp-content/uploads/2021/10/Day-1.jpg” alt=”12 Days of Christmas Series Graphic” title_text=”Day 1″ _builder_version=”4.12.0″ _module_preset=”default” global_colors_info=”{}”][/et_pb_image][et_pb_text _builder_version=”4.12.0″ _module_preset=”default” global_colors_info=”{}”]
WELCOME!!! To Day ONE of The Twelve Days of Christmas Making: Decorating Edition
For the next two weeks, I’m thrilled to be partnering with Lynn of Living Large in a Small House. We will be sharing and trading tips, tricks and tutorials to help us all plan for and organize the most epic holidays celebrations with low stress and. effort. Isn’t that what we all want?
I’m kicking us off with THE item from this year’s Christmas stocking styling that garnered the most questions and excitement.
Before we get started, I just have to say I am super pumped for tomorrow, Day 2, which will be Lynn’s from. the Entertaining Edition. Lynn is going to share her inside track on planning, organizing and executing fabulous holiday entertaining. I am all on board for that one. So you might want to jump over and subscribe to Lynn so you’re sure you don’t miss out. Go ahead. Jump over to Lynn, subscribe and jump right back; we’ll wait right here for you.
Great! You’re back.
Now we can get rolling.
Every year as I set and reset our mantel to photograph the South House Designs Christmas Stocking Collection (in July & August) I tell myself, I’m going to document all the different stylings and share my how-to’s with you all. Well, FINALLY, I am doing just that.
Displays of any kind, any size, do best when there is a focal point. But your Christmas mantel styling needs to really shine.
So let’s start with a focal point — actually a pair!
[/et_pb_text][et_pb_image src=”https://southhousedesigns.com/wp-content/uploads/2021/10/IMG_9925.jpeg” alt=”Wood Mantel above a roaring fire with a pair of distressed wood posts holding lit vintage lanterns flanking tall thin fir trees and lots of pinecones and even a pair of wire deer” title_text=”IMG_9925″ _builder_version=”4.12.0″ _module_preset=”default” global_colors_info=”{}”][/et_pb_image][et_pb_text _builder_version=”4.10.7″ _module_preset=”default” global_colors_info=”{}”]
We are blessed with two fireplaces with mantels in our house. But neither mantel has much height above or any power.
Can we agree extension cords are such bummers?
I needed to bring some visual interest, beyond a traditional wreath. Plus some lighting.
Problem Solved:
[/et_pb_text][et_pb_image src=”https://southhousedesigns.com/wp-content/uploads/2021/10/Vintage-Lantern-Post-Right-Side.jpeg” alt=”Closeup of one lantern on wood post with one tree and one reindeer” title_text=”Vintage Lantern Post – Right Side” _builder_version=”4.12.0″ _module_preset=”default” global_colors_info=”{}”][/et_pb_image][et_pb_text _builder_version=”4.10.7″ _module_preset=”default” custom_padding=”0px|||||” global_colors_info=”{}”]
Last year a neighbor was refreshing their exterior light fixtures and gifting a pair of old, faded wall lanterns to anyone that could use them.
Ummm, YES, please!
So armed with these lanterns, I needed to come up with a way. to make them battery operated and to “hang” them.
Once, I had it thought through, it was really very easy. Follow along!
What You Need to Make Lampposts For Your Mantel:
- Lantern or wall lights of your choice. You can find similar ones at thrift stores and your local ReStore for typically $5 – $10 each.
- Wood, I used reclaimed wood for a rustic, farmhouse look
- Battery puck lights
- Wood screws
- Saw
- Wire Snips
- Drill and bits
A FEW NOTES: I had originally planned to give the lanterns a fresh coat of paint and really clean the glass and coat the inside with frosted glass spray paint. But, I had a couple of stocking groups that needed a real farmhouse touch. So I embraced the age and wear on these salvaged lanterns. This then dictated the use of reclaimed wood.
Otherwise, in our home, I would have stained some lumber mahogany like our mantel and used a bit of spit and polish on the lanterns. This is a simple project that can be translated into any decor language.
[/et_pb_text][et_pb_text _builder_version=”4.12.0″ _module_preset=”default” global_colors_info=”{}”]
Step 1: Cut Your Wood
[/et_pb_text][/et_pb_column][/et_pb_row][et_pb_row column_structure=”1_2,1_2″ _builder_version=”4.10.7″ _module_preset=”default” global_colors_info=”{}”][et_pb_column type=”1_2″ _builder_version=”4.7.7″ _module_preset=”default” global_colors_info=”{}”][et_pb_image src=”https://southhousedesigns.com/wp-content/uploads/2021/10/IMG_9909.jpeg” alt=”partial view of a man using a ryobi sliding compound miter saw to cut distressed wood planks” title_text=”IMG_9909″ _builder_version=”4.12.0″ _module_preset=”default” global_colors_info=”{}”][/et_pb_image][/et_pb_column][et_pb_column type=”1_2″ _builder_version=”4.7.7″ _module_preset=”default” global_colors_info=”{}”][et_pb_image src=”https://southhousedesigns.com/wp-content/uploads/2021/10/IMG_9912.jpeg” alt=”Two pieces of distressed wood cut and waiting to become a post” title_text=”IMG_9912″ _builder_version=”4.12.0″ _module_preset=”default” global_colors_info=”{}”][/et_pb_image][/et_pb_column][/et_pb_row][et_pb_row _builder_version=”4.7.7″ _module_preset=”default” global_colors_info=”{}”][et_pb_column type=”4_4″ _builder_version=”4.7.7″ _module_preset=”default” global_colors_info=”{}”][et_pb_text _builder_version=”4.12.0″ _module_preset=”default” global_colors_info=”{}”]
Cut two pieces of wood per post. Yes, these are very simplified “posts” — actually just the suggestion of a post.
I used salvaged boards I had stashed away for a “future project”
Determine the height you want for your lampposts. Because the wall above our mantel is very wide and short, I wanted our posts to go all the way to the ceiling.
Now this is where you get to learn from my mistake: do NOT assume that the wall is the same height across the width of the mantel. Mine has a full 1/2-inch difference between the two ends.
Now determine the length of the foot of your lamppost. You need the foot to be long enough enough to support the post, but not so wide that it interferes with the rest of your display.
That said, for the sake of full transparency, we actually replaced the original feet, making them longer to support another very important part of our mantel display. That part will be coming up next in the Decorating Edition of our 12 Days of Christmas Making.
Have you subscribed yet so you are sure you don’t miss it?
[/et_pb_text][et_pb_text _builder_version=”4.12.0″ _module_preset=”default” global_colors_info=”{}”]
Step 2: Assemble Your Posts
[/et_pb_text][/et_pb_column][/et_pb_row][et_pb_row column_structure=”1_3,1_3,1_3″ _builder_version=”4.10.7″ _module_preset=”default” global_colors_info=”{}”][et_pb_column type=”1_3″ _builder_version=”4.7.7″ _module_preset=”default” global_colors_info=”{}”][et_pb_image src=”https://southhousedesigns.com/wp-content/uploads/2021/10/Lamp-Posts-Assembly-1.jpeg” alt=”hands holding one plank against a brick wall to begin forming a post” title_text=”Lamp Posts Assembly 1″ _builder_version=”4.12.0″ _module_preset=”default” global_colors_info=”{}”][/et_pb_image][/et_pb_column][et_pb_column type=”1_3″ _builder_version=”4.12.0″ _module_preset=”default” global_colors_info=”{}”][et_pb_image src=”https://southhousedesigns.com/wp-content/uploads/2021/10/Lamp-Post-Assembly-2.jpeg” alt=”Pair of hands holding the two planks of wood to make a 90 degree angle” title_text=”Lamp Post Assembly 2″ _builder_version=”4.12.0″ _module_preset=”default” global_colors_info=”{}”][/et_pb_image][/et_pb_column][et_pb_column type=”1_3″ _builder_version=”4.7.7″ _module_preset=”default” global_colors_info=”{}”][et_pb_image src=”https://southhousedesigns.com/wp-content/uploads/2021/10/Lamp-post-Assembly-3.jpeg” alt=”The two planks screwed together forming a 90 degree angle” title_text=”Lamp post Assembly 3″ _builder_version=”4.12.0″ _module_preset=”default” global_colors_info=”{}”][/et_pb_image][/et_pb_column][/et_pb_row][et_pb_row _builder_version=”4.12.0″ _module_preset=”default” global_colors_info=”{}”][et_pb_column type=”4_4″ _builder_version=”4.12.0″ _module_preset=”default” global_colors_info=”{}”][et_pb_text _builder_version=”4.12.0″ _module_preset=”default” global_colors_info=”{}”]
The vertical piece should sit up against the wall with the foot in front.
Holding your boards at a right angle, drive two or three wood screws through the upright piece into the foot.
We used a brick column on our patio to help hold the boards at a right angle.
[/et_pb_text][et_pb_text _builder_version=”4.12.0″ _module_preset=”default” global_colors_info=”{}”]
Step 3) Attach Light Fixture to Your “Vintage” Lamp Post
[/et_pb_text][et_pb_image src=”https://southhousedesigns.com/wp-content/uploads/2021/10/Attaching-Vintage-Lamp.jpeg” alt=”Hand holding a Drill attaching a vintage lantern to the reclaimed wood post” title_text=”Attaching Vintage Lamp” _builder_version=”4.12.0″ _module_preset=”default” global_colors_info=”{}”][/et_pb_image][et_pb_text _builder_version=”4.12.0″ _module_preset=”default” global_colors_info=”{}”]
Your fixtures will be different than mine, so you’ll need to improvise a bit here.
I clipped the extra wires since I made mine battery operated.
Then we removed two decorative machine screws on each fixture. Then I inserted wood screws through these holes and drove them into the wood at the desired height.
Step 4) Power Your Fixtures With Battery Power
[/et_pb_text][et_pb_image src=”https://southhousedesigns.com/wp-content/uploads/2021/10/Lamp-Post-Lanterns-unadorned.jpeg” alt=”planks standing upright with a vintage lantern attached” title_text=”Lamp Post Lanterns – unadorned” _builder_version=”4.12.0″ _module_preset=”default” global_colors_info=”{}”][/et_pb_image][et_pb_text _builder_version=”4.12.0″ _module_preset=”default” global_colors_info=”{}”]
This is where the magic kicks in.
Instead of lightbulbs, you want a pair of LED battery powered puck lights, preferably remote controlled. I mean if we’re adding convenience, why not go all in, right?
Secure the puck lights to the base of the socket. Mine came with super heavy duty adhesive velcro pads. Where I went wrong was in not cleaning the socket thoroughly before adhering the adhesive pad. Lucky you, a second “learn-from-my-mistake” opportunity in one blog post.
Fresh cleaning and a dab of super glue and all is well. Almost! I wish I had thought of this project with enough time to really hunt down puck lights that are warmer white. I may still switch them out. I’m just not a fan of the blue LED light. But I am still smitten with my mantel lampposts.
Yes, be sure to get remote controlled puck lights. You really don’t want. to have to climb up and reach over and around all your holiday decor to turn them on and off.
[/et_pb_text][et_pb_text _builder_version=”4.12.0″ _module_preset=”default” global_colors_info=”{}”]
That’s it!
I promised they were easy — an inexpensive!
And do they pack a punch!
[/et_pb_text][et_pb_image src=”https://southhousedesigns.com/wp-content/uploads/2021/10/Farmhouse-Lantern-Christmas-Mantel.jpeg” alt=”Long view of a fire in the fireplace with a wood surround and mantel with two distressed wood posts and vintage lanterns adorned with linen bows and greenery, with trees and oinecones filling the mantel between the lights” title_text=”Farmhouse Lantern Christmas Mantel” _builder_version=”4.12.0″ _module_preset=”default” global_colors_info=”{}”][/et_pb_image][et_pb_text _builder_version=”4.10.7″ _module_preset=”default” global_colors_info=”{}”]
Don’t Have a Mantel?
No worries!
How about on the front porch?
Above a buffet or console table?
Do you have a screened porch you like to decorate?
[/et_pb_text][/et_pb_column][/et_pb_row][et_pb_row _builder_version=”4.12.0″ _module_preset=”default” global_colors_info=”{}”][et_pb_column type=”4_4″ _builder_version=”4.12.0″ _module_preset=”default” global_colors_info=”{}”][et_pb_text _builder_version=”4.10.7″ _module_preset=”default” custom_padding=”||0px|||” global_colors_info=”{}”]
How Do You Style Lampposts in Your Christmas Decorating?
[/et_pb_text][/et_pb_column][/et_pb_row][et_pb_row column_structure=”1_2,1_2″ _builder_version=”4.10.7″ _module_preset=”default” global_colors_info=”{}”][et_pb_column type=”1_2″ _builder_version=”4.7.7″ _module_preset=”default” global_colors_info=”{}”][et_pb_image src=”https://southhousedesigns.com/wp-content/uploads/2021/10/Lamp-Post-with-Wreath.jpeg” alt=”Vintage Lantern on Wood Post with Simple wreath hanging on it.” title_text=”Lamp Post with Wreath” _builder_version=”4.12.0″ _module_preset=”default” global_colors_info=”{}”][/et_pb_image][et_pb_text _builder_version=”4.10.7″ _module_preset=”default” global_colors_info=”{}”]
The easiest by far is to hang a wreath around each fixture.
[/et_pb_text][/et_pb_column][et_pb_column type=”1_2″ _builder_version=”4.7.7″ _module_preset=”default” global_colors_info=”{}”][et_pb_image src=”https://southhousedesigns.com/wp-content/uploads/2021/10/Mantel-Lamp-Post-with-Bow-and-Greens.jpeg” alt=”The finished vintage lantern on the post with the streamers of the linen bow finished in slip knots and the light now turned on” title_text=”Mantel Lamp Post with Bow and Greens” _builder_version=”4.12.0″ _module_preset=”default” global_colors_info=”{}”][/et_pb_image][et_pb_text _builder_version=”4.12.0″ _module_preset=”default” global_colors_info=”{}”]
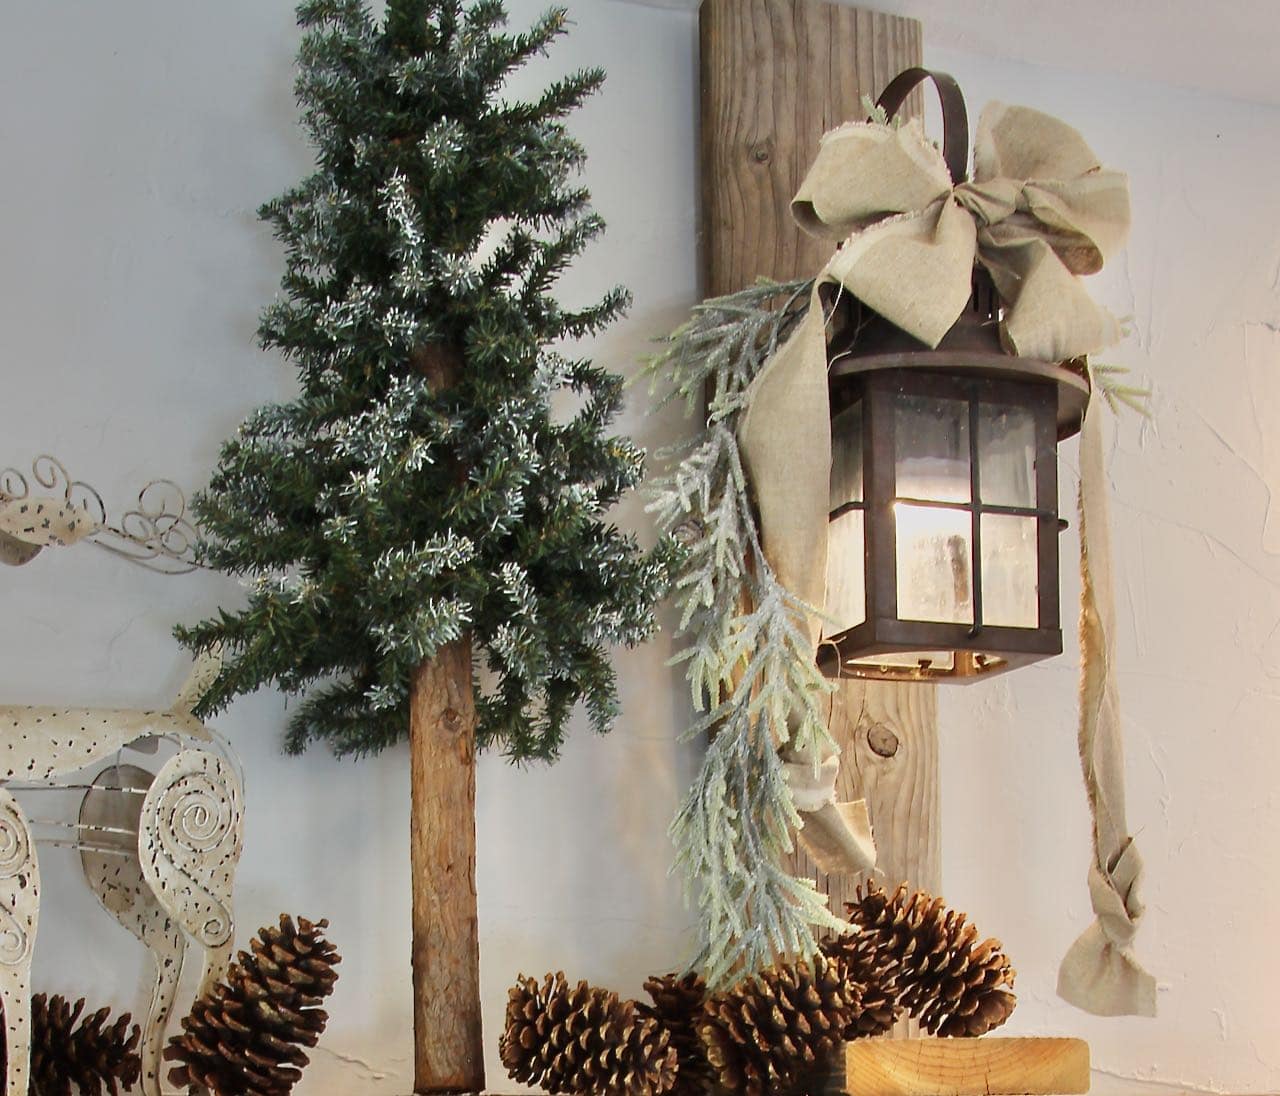
A close second for ease is to add a bow and some greenery.
[/et_pb_text][/et_pb_column][/et_pb_row][et_pb_row column_structure=”1_3,1_3,1_3″ _builder_version=”4.12.0″ _module_preset=”default” global_colors_info=”{}”][et_pb_column type=”1_3″ _builder_version=”4.12.0″ _module_preset=”default” global_colors_info=”{}”][et_pb_image src=”https://southhousedesigns.com/wp-content/uploads/2021/10/Lamp-Post-Lanterns-unadorned.jpeg” alt=”planks standing upright with a vintage lantern attached” title_text=”Lamp Post Lanterns – unadorned” _builder_version=”4.12.0″ _module_preset=”default” global_colors_info=”{}”][/et_pb_image][et_pb_text _builder_version=”4.12.0″ _module_preset=”default” global_colors_info=”{}”]
Here’s where you start your styling.
[/et_pb_text][/et_pb_column][et_pb_column type=”1_3″ _builder_version=”4.12.0″ _module_preset=”default” global_colors_info=”{}”][et_pb_image src=”https://southhousedesigns.com/wp-content/uploads/2021/10/Lantern-with-Burlap-Bow.jpeg” alt=”A linen bow is now added to the top of the lantern on the plank post” title_text=”Lantern with Burlap Bow” _builder_version=”4.12.0″ _module_preset=”default” global_colors_info=”{}”][/et_pb_image][et_pb_text _builder_version=”4.12.0″ _module_preset=”default” global_colors_info=”{}”]
Add a bow with long streamers — here I used some linen fabric.
[/et_pb_text][/et_pb_column][et_pb_column type=”1_3″ _builder_version=”4.12.0″ _module_preset=”default” global_colors_info=”{}”][et_pb_image src=”https://southhousedesigns.com/wp-content/uploads/2021/10/Lamppost-with-bow-and-greens.jpeg” alt=”Vintage lantern hanging on a post with a linen bow and a length of greenery cascading from the top of the lantern” title_text=”Lamppost with bow and greens” _builder_version=”4.12.0″ _module_preset=”default” global_colors_info=”{}”][/et_pb_image][et_pb_text _builder_version=”4.12.0″ _module_preset=”default” global_colors_info=”{}”]
Add some greens – here I used half of a thin garland.
[/et_pb_text][/et_pb_column][/et_pb_row][et_pb_row _builder_version=”4.7.7″ _module_preset=”default” global_colors_info=”{}”][et_pb_column type=”4_4″ _builder_version=”4.7.7″ _module_preset=”default” global_colors_info=”{}”][et_pb_text _builder_version=”4.12.0″ _module_preset=”default” global_colors_info=”{}”]
Then place one on each side of your display and fill the center with a large sign, or maybe some rustic trees or reindeer. Add whatever works with your holiday decorating theme.
[/et_pb_text][et_pb_text _builder_version=”4.10.7″ _module_preset=”default” global_colors_info=”{}”]
Aren’t they wonderfull?
And talk about an easy transition from holiday to winter decor.
[/et_pb_text][et_pb_text _builder_version=”4.10.7″ _module_preset=”default” text_font_size=”11px” custom_padding=”0px|||||” global_colors_info=”{}”]
The following links are affiliate links, which means if you purchase anything using these links, you pay NO extra, but I may receive a small commission. Please know that I will never recommend a product I do not believe in!
[/et_pb_text][/et_pb_column][/et_pb_row][et_pb_row column_structure=”1_3,1_3,1_3″ _builder_version=”4.10.7″ _module_preset=”default” global_colors_info=”{}”][et_pb_column type=”1_3″ _builder_version=”4.10.7″ _module_preset=”default” global_colors_info=”{}”][et_pb_code _builder_version=”4.10.7″ _module_preset=”default” global_colors_info=”{}”][/et_pb_code][et_pb_text _builder_version=”4.10.7″ _module_preset=”default” global_colors_info=”{}”]

My very favorite drill. This bundle is complete and right at $100 — Can’t beat it!
[/et_pb_text][/et_pb_column][et_pb_column type=”1_3″ _builder_version=”4.10.7″ _module_preset=”default” global_colors_info=”{}”][et_pb_code _builder_version=”4.10.7″ _module_preset=”default” module_alignment=”center” global_colors_info=”{}”][/et_pb_code][et_pb_text _builder_version=”4.10.7″ _module_preset=”default” module_alignment=”center” global_colors_info=”{}”]

These are NOT the puck lights I used. But they are the ones I wish I had — choice of color, choice of brightness, remote control. A pair and a spare, for $16!!!
[/et_pb_text][/et_pb_column][et_pb_column type=”1_3″ _builder_version=”4.10.7″ _module_preset=”default” global_colors_info=”{}”][et_pb_code _builder_version=”4.12.0″ _module_preset=”default” global_colors_info=”{}”][/et_pb_code][et_pb_text _builder_version=”4.10.7″ _module_preset=”default” global_colors_info=”{}”]

And here’s a pack of two with all the same features, but in a black frame for $13.
[/et_pb_text][/et_pb_column][/et_pb_row][et_pb_row column_structure=”1_2,1_2″ _builder_version=”4.7.7″ _module_preset=”default” global_colors_info=”{}”][et_pb_column type=”1_2″ _builder_version=”4.7.7″ _module_preset=”default” global_colors_info=”{}”][et_pb_text _builder_version=”4.12.0″ _module_preset=”default” global_colors_info=”{}”]
You know you’re going to want this info, if not for yourself then for a friend, so be sure to save it on your
Christmas Decor board
or
Farmhouse Christmas board
or
Cottage Core board
or
Mantel Styling board
or
Wherever and Everywhere you want to find it.
[/et_pb_text][/et_pb_column][et_pb_column type=”1_2″ _builder_version=”4.7.7″ _module_preset=”default” global_colors_info=”{}”][et_pb_image src=”https://southhousedesigns.com/wp-content/uploads/2021/10/Lamp-Post-Pin.jpg” alt=”Pin with a picture of one finished lamp post with lantern on the fireplace hearth” title_text=”Lamp Post Pin” _builder_version=”4.12.0″ _module_preset=”default” global_colors_info=”{}”][/et_pb_image][/et_pb_column][/et_pb_row][et_pb_row _builder_version=”4.9.10″ _module_preset=”default” global_colors_info=”{}”][et_pb_column type=”4_4″ _builder_version=”4.9.10″ _module_preset=”default” global_colors_info=”{}”][et_pb_text _builder_version=”4.12.0″ _module_preset=”default” global_colors_info=”{}”]
Thanks for joining us today, on this Day 1 of our 12 Days of Christmas Making: Decorating Edition.
I’m super excited about Day 2. Lynn, the queen of entertaining and organization is going to share with us some of her favorite foolproof ways to plan and organize our holidays celebrations.
Boy, do I need help in that department! You with me on that? Great, then I’ll see you tomorrow at Lynn’s.
[/et_pb_text][/et_pb_column][/et_pb_row][et_pb_row column_structure=”1_2,1_2″ _builder_version=”4.7.7″ _module_preset=”default” global_colors_info=”{}”][et_pb_column type=”1_2″ _builder_version=”4.7.7″ _module_preset=”default” global_colors_info=”{}”][et_pb_image src=”https://southhousedesigns.com/wp-content/uploads/2020/08/LargerHeres-to-Joy-filled-Living.png” alt=”Here’s to Joy-Filled Living, Diane” title_text=”LargerHere’s to Joy-filled Living” _builder_version=”4.7.7″ _module_preset=”default” global_colors_info=”{}”][/et_pb_image][/et_pb_column][et_pb_column type=”1_2″ _builder_version=”4.7.7″ _module_preset=”default” global_colors_info=”{}”][et_pb_image src=”https://southhousedesigns.com/wp-content/uploads/sub.png” title_text=”sub” url=”/subscribe” url_new_window=”on” show_bottom_space=”off” align=”right” _builder_version=”4.5.6″ _module_preset=”default” max_width=”400px” module_alignment=”right” custom_margin=”0px|0px|0px|0px|false|false” custom_padding=”0px|0px|0px|0px|false|false” global_colors_info=”{}”][/et_pb_image][/et_pb_column][/et_pb_row][/et_pb_section]
I love the way you upcycled the lamps to make lamp posts for your mantel. They look terrific!
Thanks so much Paula! It is such an easy trick to add a bit more interest and personality.
Omgoodness, this is my kind of project!! The lights are in my Amazon cart now and all I need is to go thrifting for the lanterns! Great idea Diane! Pinned 🙂
Thanks Cindy! I’d make a beeline to the ReStore near you.
oh my gosh! this is AMAZING! I love it! I admit I am a bit jealous over the awesome lanterns you were given by the neighbors! Thanks for sharing your talents!
Thanks Kimberly! Yes, the lanterns are GREAT!
These are fantastic, love them!
This is such a great project! Love the upcycle!
Great DIY project, the lanterns look wonderful! Donna
Great idea with so many possibilities. Adds a great focal point to your mantel.
Thanks Carol! We love a good focal point. Hope your Christmas is all the brights and merry’s!