
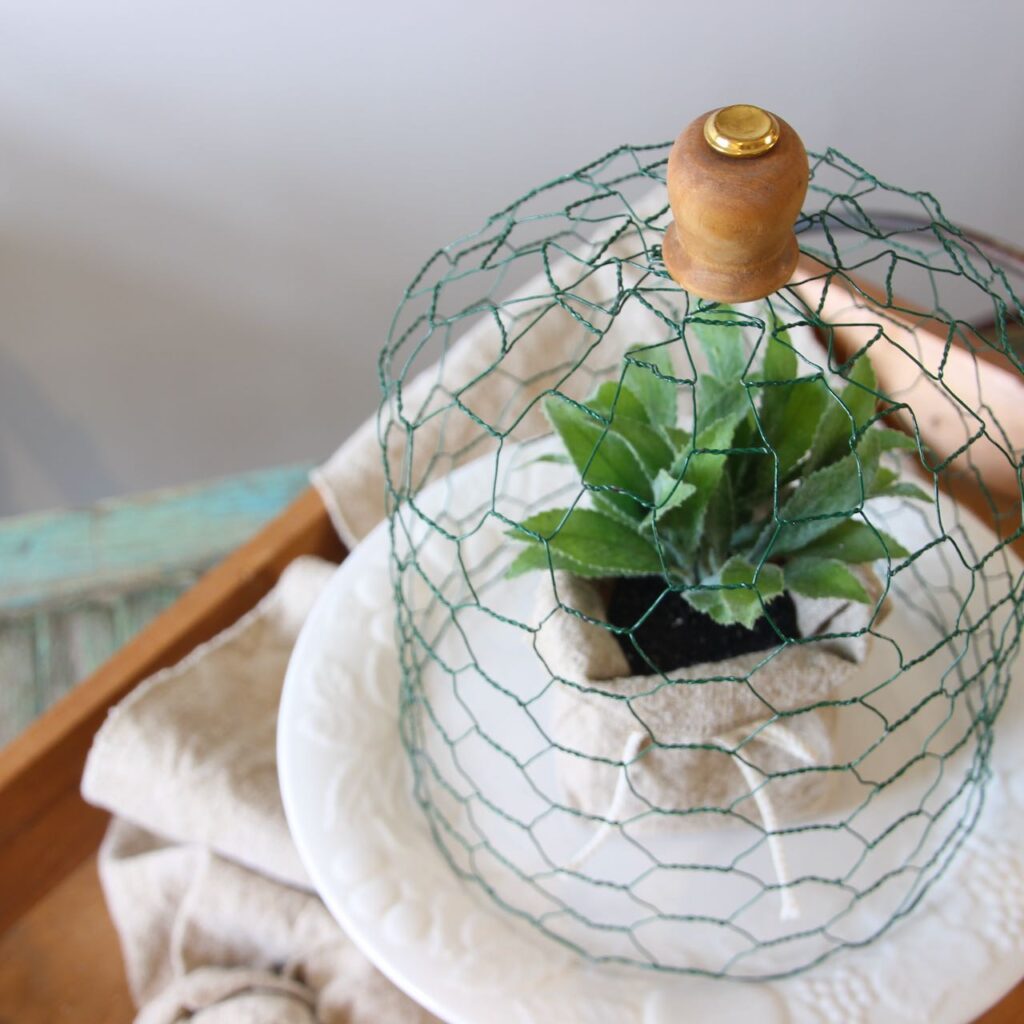
How To Make Wire Cloches With Wood Handles
Here’s the easiest way to make a wire cloche AND add a wood handle for extra style. Elevate your home decor with this fun accessory.
I know, I know, we’ve seen wire cloches.
And we’ve seen how to make a wire cloche. But, trust me, these are different.
Fresh color and a way to simplify the trickiest part AND add some great style. Check it out:
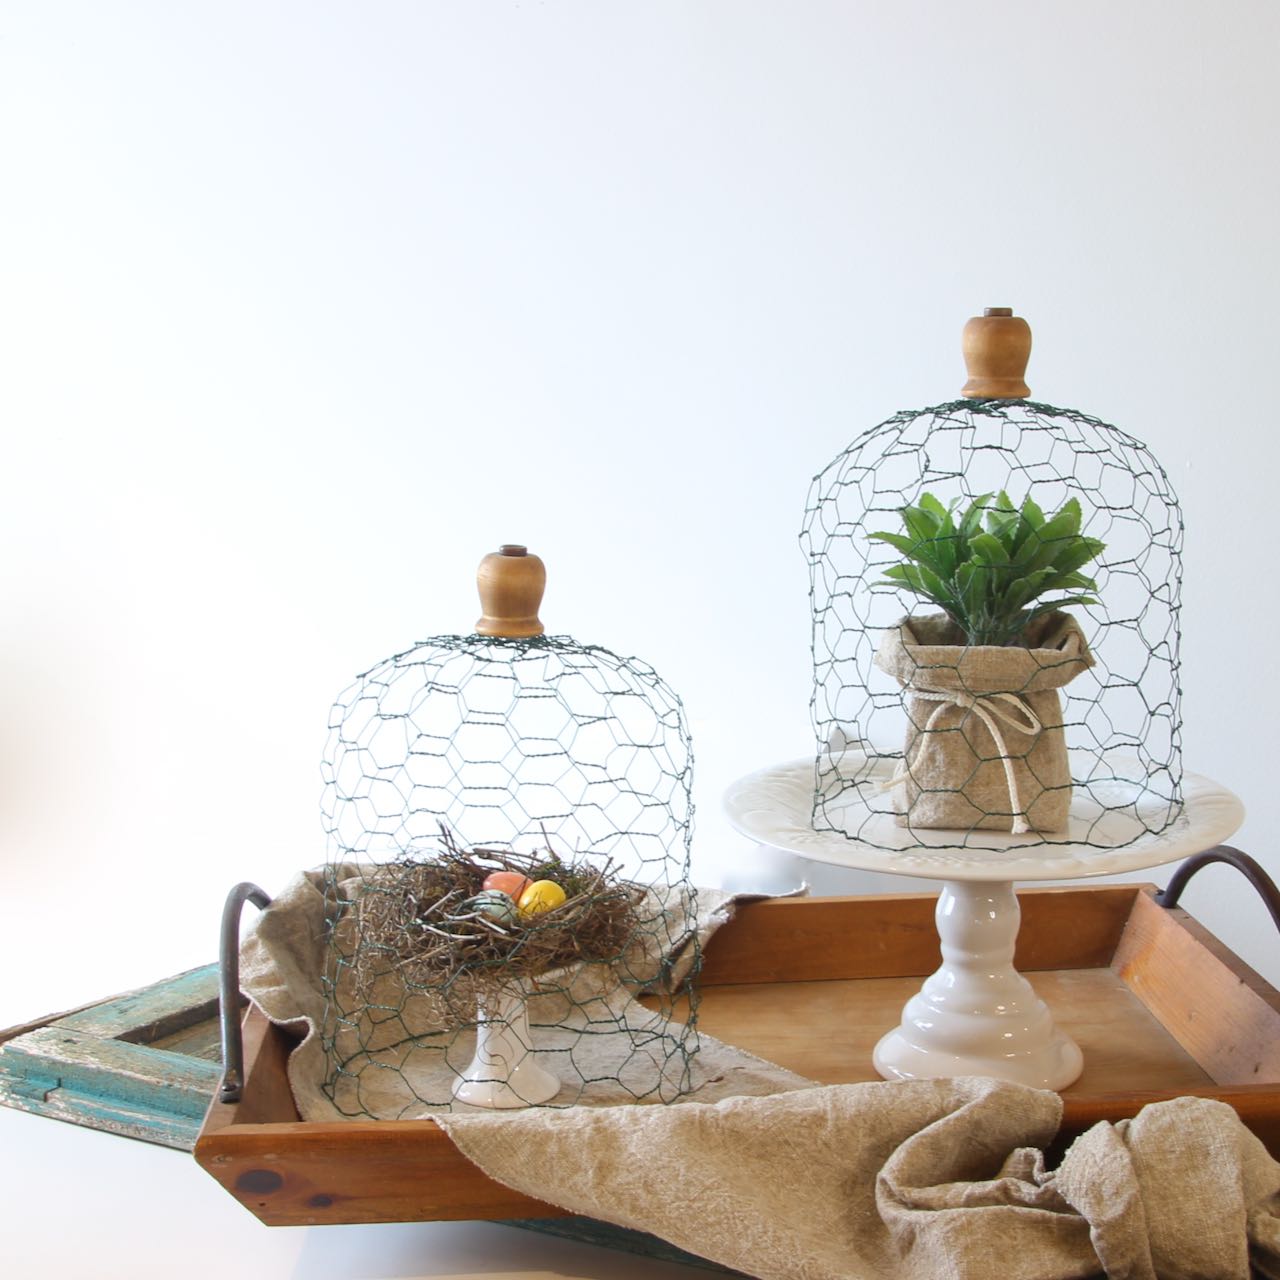
Super cute, right? Just wait until you see how I’m going to use them on my Easter table!
The links in this post may include affiliate links, which means if you purchase anything using these links, you pay no extra, but I may receive a small commission that helps keep this blog running. I truly appreciate you using affiliate links whenever possible. Please know that I will never recommend a product I do not believe in!
You might be thinking:
So what is a cloche?
Webster says: a bell- or dome-shaped cover: a glass or plastic cover used to protect small outdoor plants from frost; also a similar cover used indoors to display or protect ornamental objects.
But currently, cloches are used throughout our home decor — no longer just glass (or plastic).
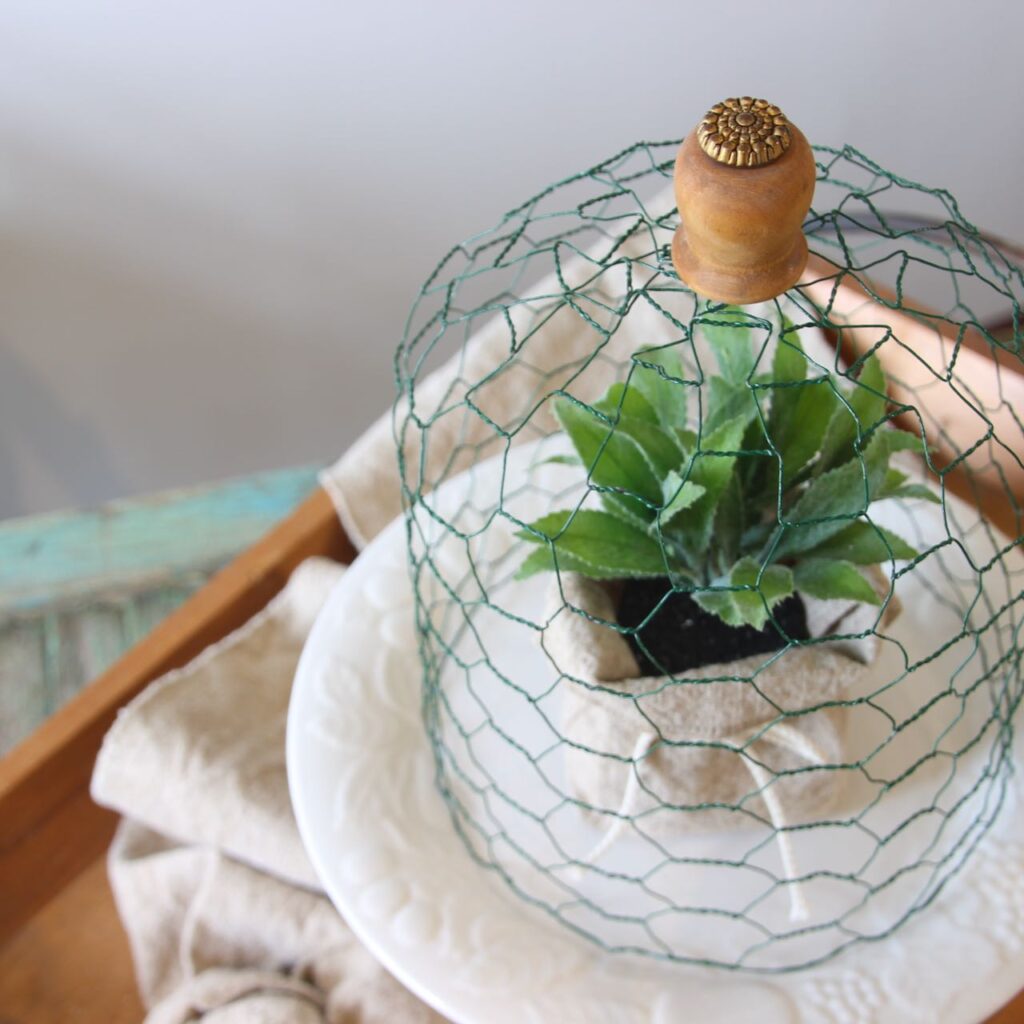
How do you use a cloche indoors?
Cloches are used to elevate small items. Cover a small item or several small items and they become “important”, they gain stature and grab your attention. A cloche is best with a base beyond the table top. A base can range from a plate, to a tray, to a riser, or even to a book. Then gather a small plant, or a group of little statues, or precious photographs, or a few geodes — whatever you enjoy, place it/them on your base and cover with a cloche. It’s really as easy as that.
I get it!
You’re busy right now.
So maybe pin this to your Crafts board
Or to your Spring board,
Or to your Vignette board (if you have one of those),
Or to whatever board makes sense for you, so you have it handy when you’re ready to get started.

How About We Get Started Making Your Wire Cloche!
You’ll Need:

Materials:
- Floral Wire Mesh, mine was from JoAnn’s, this is the best product and price available now.
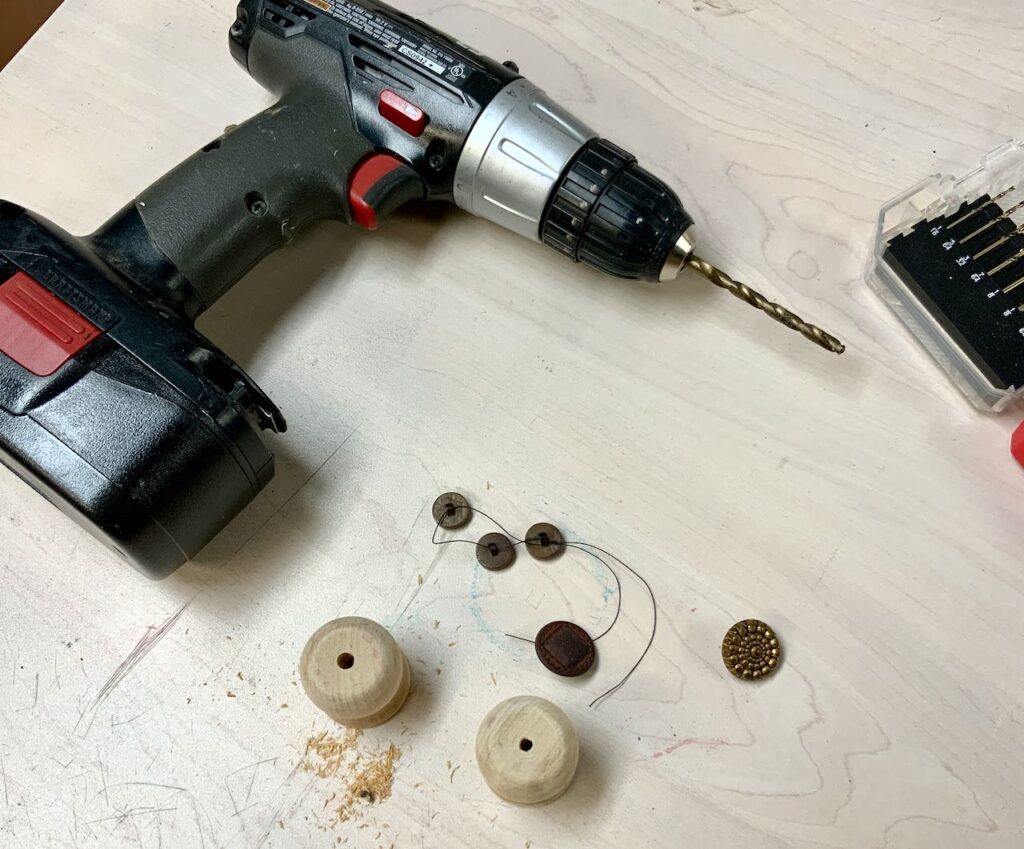
- Wood Candle Cup (Surprise! This is your handle)
- Shank Button (NOTE: some candle cups do not have holes, and then the button is optional)
Supplies:
- Optional stain, paint and/or sealer for candle cup
- sandpaper
- needle nose pliers
- wire cutters
- wire crimper (I did not use one, but if you have one it would be handy)
- gloves, optional (but strongly suggested!)
- hot glue gun and glue sticks
- glass cloche, inverted bowl, vase, bottle etc to use as a mould
1) Prepare Your Wooden Handle
Let’s start with the fun styling part — that adorable wood handle! Do you want to match the green of the wire for a more minimalist approach? Do you want another color for perhaps a bright, preppy party look? Or go farmhouse or cottage with an aged and faded or weathered wood look? Or perhaps paint or decoupage small flowers on it for Mother’s Day brunch?
I went with a basic stain with sealer that I had sitting close-by. I think it will transition between several rooms I have in mind.
BEFORE you paint or stain, if your candle cup has a hole, OR if you want to add one, we need to either enlarge the hole a bit or drill a new one.

If you are power-tool-phobic and there is already a hole in your cup, this is THE chance to dominate.
The hole is already there, you are just making it a bit larger. If you are adding a hole, be sure to find center before you get started.
I didn’t want to risk splitting the wood as I’m not sure how great this wood is, so I did a couple of passes, increasing the bit size each time. After each increase, check and see if it’s enough for the shank of your button to sit down inside the holes.
Done with the drilling, you can now lightly sand and paint or stain your handle as you please.
STEP 2) Flatten Your Wire Mesh-
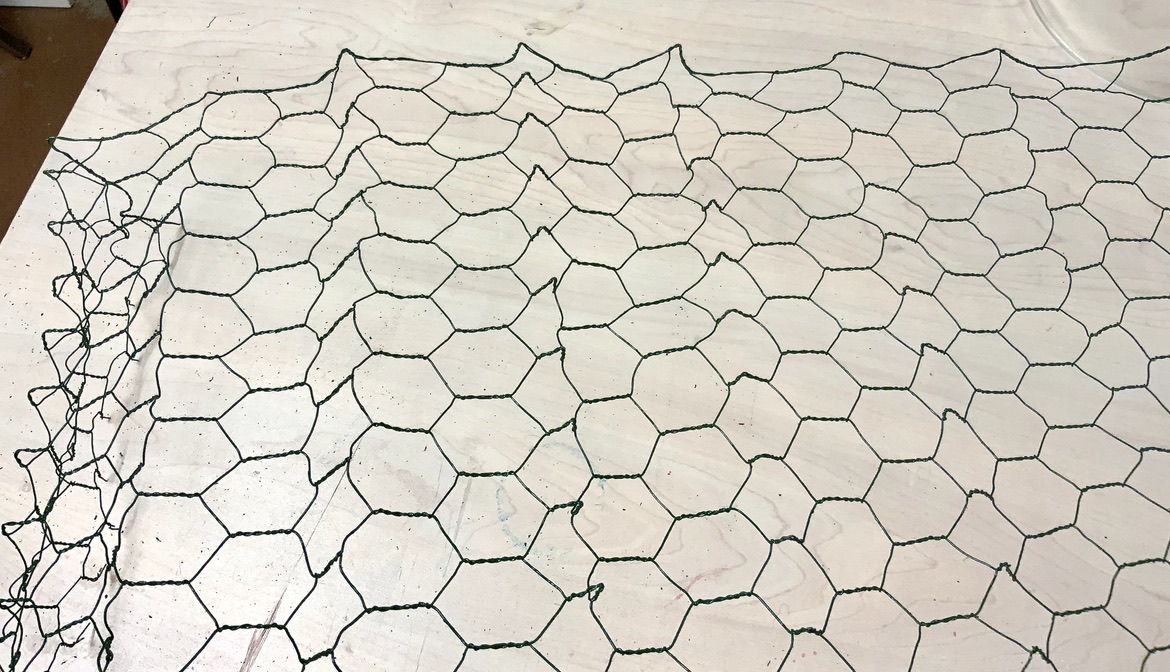
It was a bit tricky at first to find the end of the mesh and which direction to start unfolding it. But once I found it, no problem.
But each fold created a line of kinks in the mesh that I wanted to disappear.
So I spent 5 – 10 minutes, flattening the mesh and working out the kinks — good warm-up exercise, right?
STEP 3) Cut Your Mesh to Size-
I’m using a glass cloche as my mould.
It measured slightly less than 12-inches around. The package of mesh said 48-inches, but once it was flattened, it measured a bit over 49-inches. So I had my fingers crossed I could get two out of this package. Otherwise, I was prepared to go with one large and one a bit smaller.
Pull the mesh around your mould and determine where you are going to make your seam. This will guide you in where to cut you mesh. You’ll want enough wire at the cut to be able to twist several times around the other side. Cut across the 12-inch width of the mesh following the pattern of the mesh for a straight line.
STEP 4) Join the two side of the mesh up the height of your cloche-
Don’t let this intimidate you. Once you get started, it’s very straight forward and your twists don’t have to be perfect. No one will notice — they’ll be too busy ooohing and aahhing!
Ideally, you want a horizontal piece (a twisted piece on the meshI used) on each end lining up and overlapping each other. Then the two wires that spread out from the cut end will twist around the diagonal wires coming out of the other horizontal piece. You’ll have some leftover on one side. Don’t worry, we’ll take care of that next.
Here’s a video of mine. Again, because we are using different moulds, you may have to adjust.
STEP 5) Trim your seam-
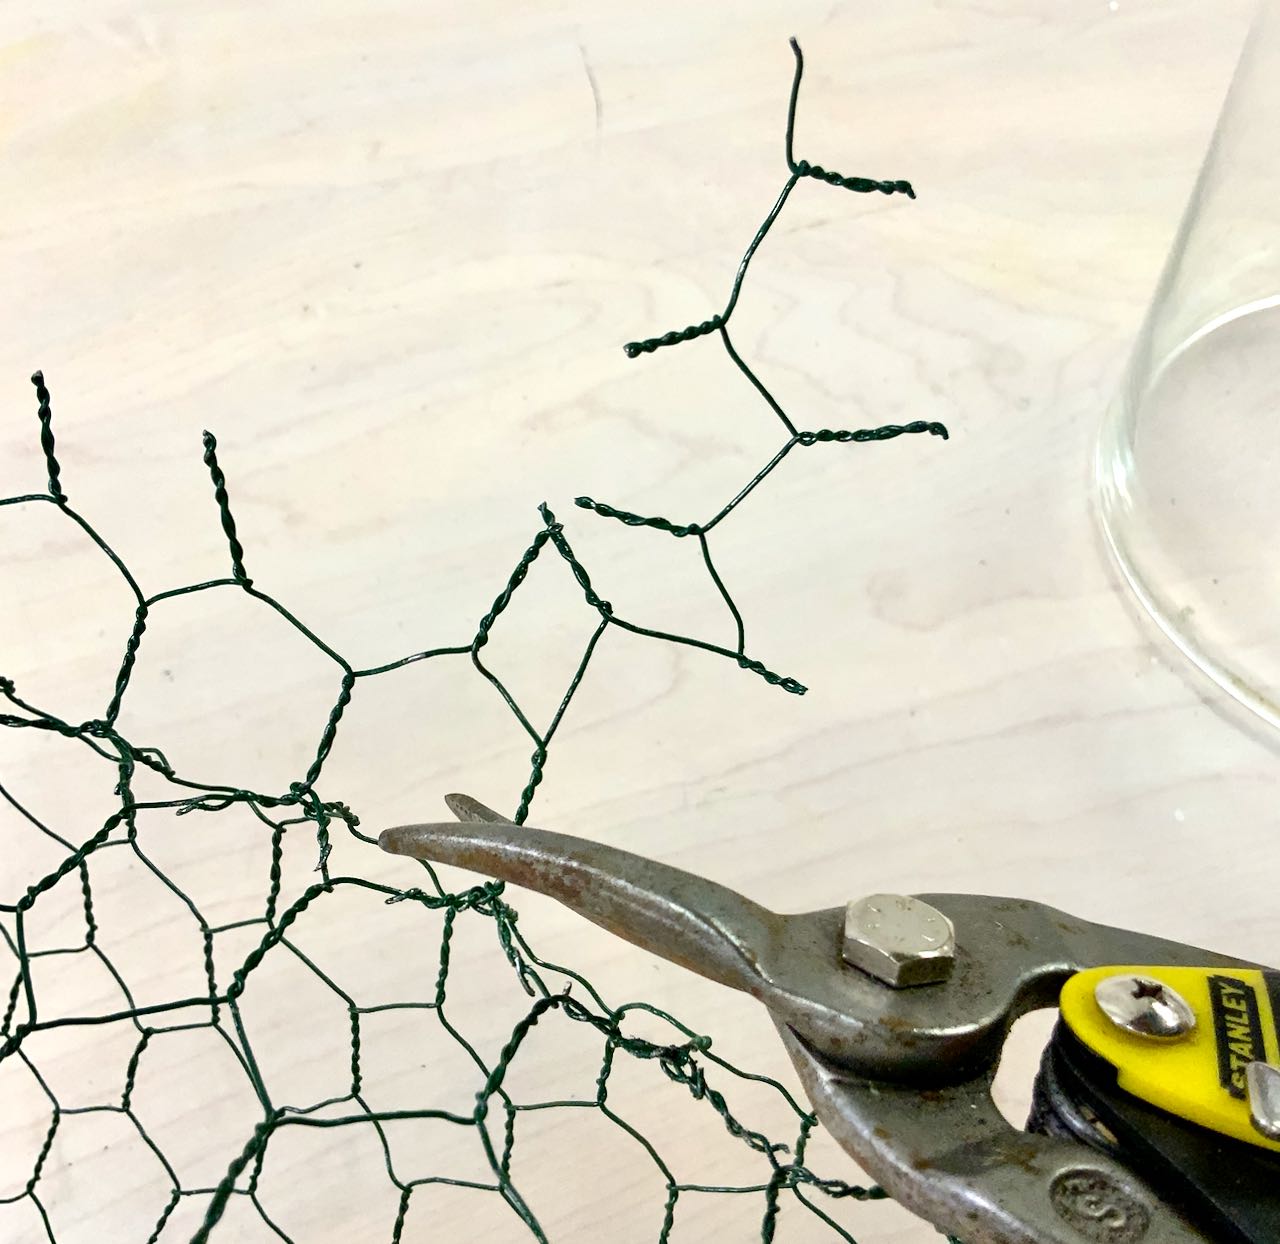
Your mesh should be a tube something like this.
Pull your excess up and out so you can see it very easily and know right where you need to trim.
Someone may or may not have been so excited about how this was turning out that she clipped the wrong side for the bottom 3 or 4 clips — oops. Learn from this hypothetical example.
STEP 6) Shaping your cloche-
This is the fun part, where it all comes together!
Slide Your wire tube over your mould.
Working around the whole mould slowly bend everything in evenly. Turning and pressing as you go.
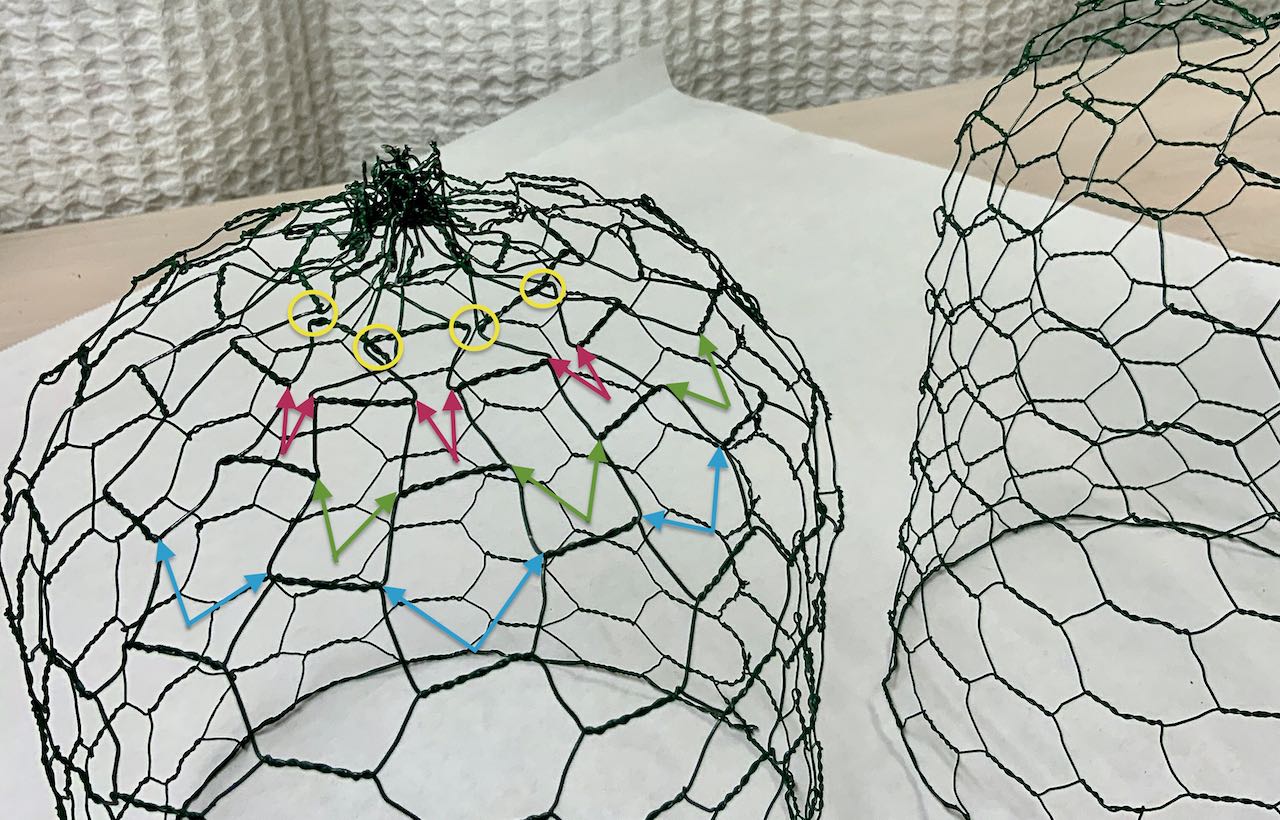
The goal is for each row going up and over the top to have even spacing between the horizontal bars of that row. And for each row, the spaces will get smaller as you move toward the center top knot with the center bars overlapping.
If needed, at the very top you can cut through some of the horizontal bars to get them to lay together tightly.
And here’s one more short video that might help:
When you think you have your bundle of wire at the top tight enough, test it by placing your candle cup upside down to make sure it will fit.
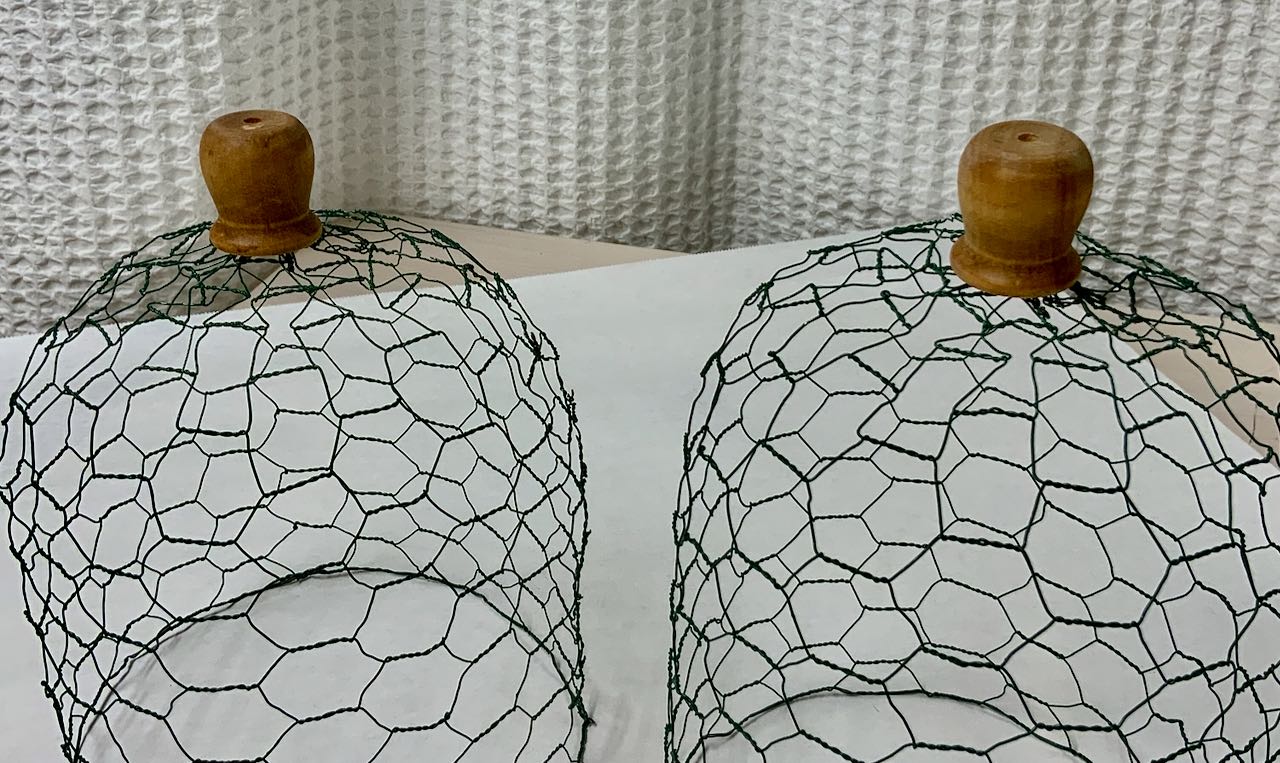
You want the lip of the cup to touch the flat part of the top, so it actually looks like an integrated piece. You may need to reach inside and press the flat part of the top up against it a bit.
A Quick Pause in the Action: Are you enjoying this post? Want more? Be sure to subscribe for weekly ideas and how-to’s, plus my bonus Free “Creator’s Toolkit”.
STEP 7) Glue the Wooden Handle Onto Your Cloche-
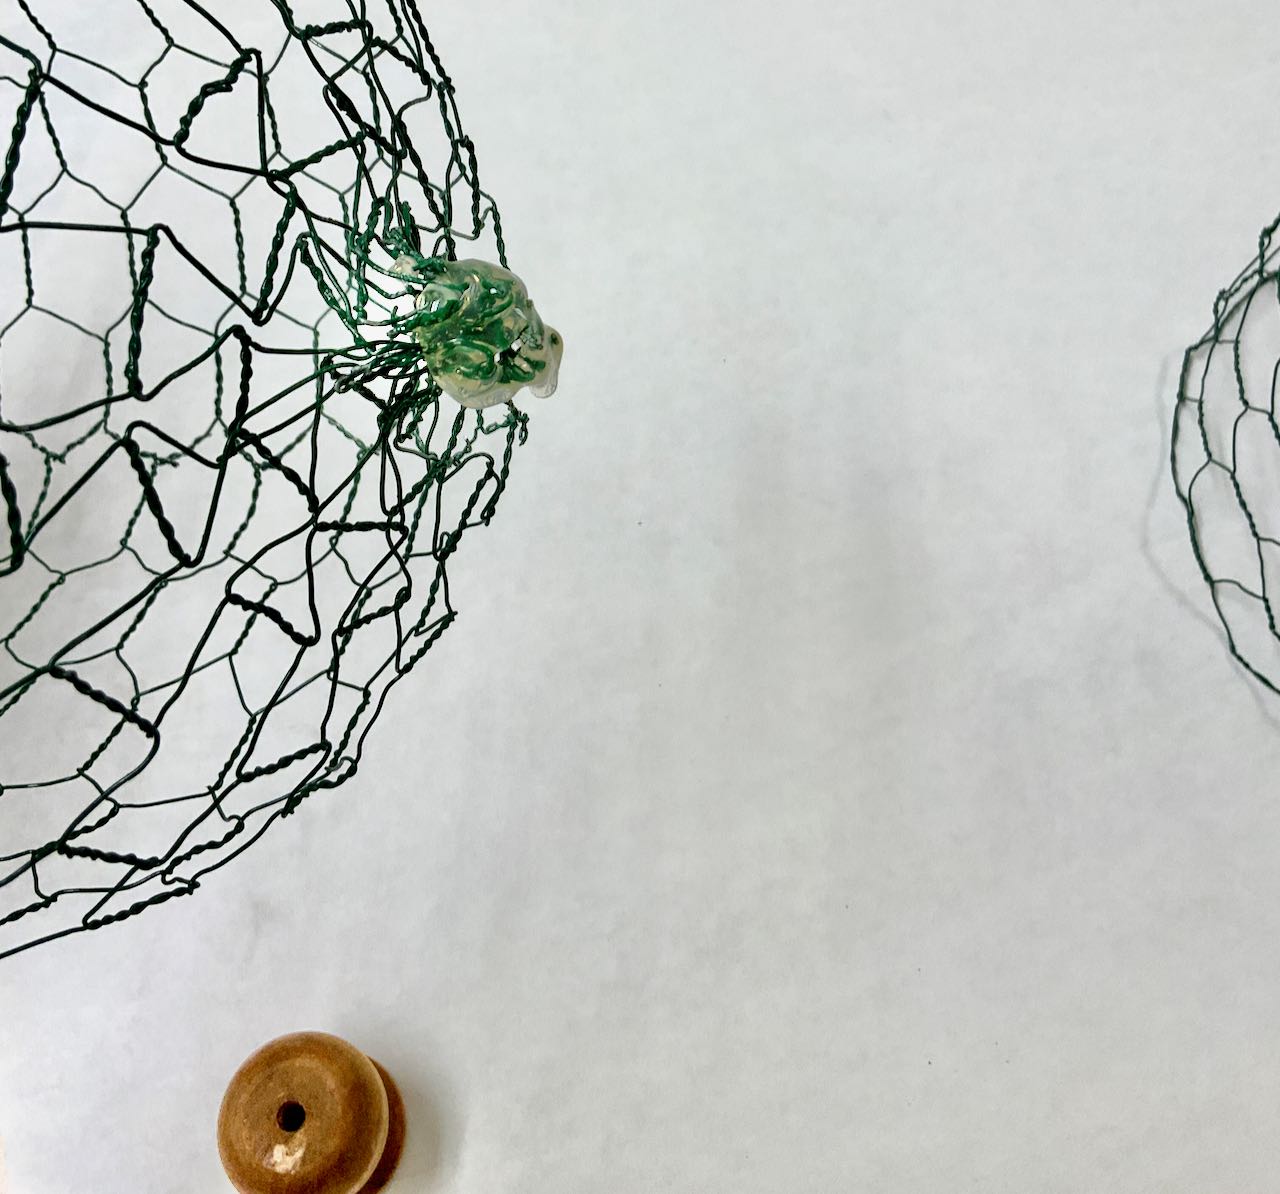
So much satisfaction here!
Lather on a mound of hot glue. (I went a bit overboard on one and had to cut some out around the neck with an exacto knife, so maybe a small mound).
STEP 9) Add Your Button

I can’t decide! Which would you choose? Leave me a vote below — just hit reply. I’d love to hear from you!
And since I can’t decide, I’m not gluing them in place yet. They fit tight enough, I don’t really feel like I need to. You be the judge on yours whether you need to glue it in place or not.
Aren’t they just the cutest?

More Garden Inspired Projects to Enjoy

Gr
Saw this on the Eclectic Red Barn link party. Love how simple you make a prickery problem. I love the look of chicken wire but working with it? Not so much. Pinned this project!
Love how you make this look so simple. Hope I can make one. Love chicken wire cloches. I like them all.
Thanks Kim! I do hope you give it a try. Don’t hesitate to reach out if you run into a snag along the way.
Hi there. I just watched your videos and love how your cloches turned out. Can you tell me what you used for the top? Where they handles? And what type do I look for. Thankyou, as soon as I get the handles I’m going to try making some
Debbie, I’m so happy you want to give these a try. The wood toppers are candle cups. Here is a link to mine on Amazon
Love cloches & what you can do with them & decorate! I see them like a basket or tray…keeping things together underneath~! Blessings to you & yours …thank you so much for the tutorial!
I’m happy you enjoyed it Rosita! Thanks for leaving me this message