EASIEST Way to Make Throw Pillows — From A Table Runner
[et_pb_section fb_built=”1″ _builder_version=”4.7.7″ _module_preset=”default”][et_pb_row _builder_version=”4.5.3″ custom_margin=”0px||||false|false” custom_padding=”0px||||false|false”][et_pb_column type=”4_4″ _builder_version=”4.4.9″][et_pb_image src=”https://southhousedesigns.com/wp-content/uploads/2021/02/Cabana-Stripe-Hero.jpeg” alt=”wide picture of four cabana stripe pillows with two polka dot pillows on an outdoor sectional” title_text=”Cabana Stripe Hero” _builder_version=”4.7.7″ _module_preset=”default”][/et_pb_image][et_pb_text _builder_version=”4.7.7″ _module_preset=”default” background_color=”#d1e2f2″ width=”70%” module_alignment=”center” custom_margin=”-100px||||false|false” custom_padding=”30px||30px||false|false”]
EASIEST Way to Make Throw Pillows
— From a Table Runner!
[/et_pb_text][/et_pb_column][/et_pb_row][et_pb_row _builder_version=”4.7.7″ _module_preset=”default”][et_pb_column type=”4_4″ _builder_version=”4.7.7″ _module_preset=”default”][et_pb_text _builder_version=”4.7.7″ _module_preset=”default” text_font_size=”18px” width=”70%” hover_enabled=”0″ text_orientation=”center” text_font=”||on||||||” sticky_enabled=”0″ module_alignment=”center”]
THE easiest, quickest way to make throw pillow covers. Darn-near-no-sew. One table runner = 4 lumbar throw pillows! Plus. they look great.
[/et_pb_text][/et_pb_column][/et_pb_row][et_pb_row _builder_version=”4.7.7″ _module_preset=”default”][et_pb_column type=”4_4″ _builder_version=”4.7.7″ _module_preset=”default”][et_pb_text _builder_version=”4.7.7″ _module_preset=”default”]
The easiest way to make throw pillow covers or accent pillows has to be when they are already cut and two or three of the sides are already finished for you. What more can we ask?
Well, we can ask for a bargain, too.
Crazy Bargain Alert:
B1 G1? 2 For 1? Ha! I scoff at these.
How about 4 for 1, actually 4 from 1?
AND the one I paid for was 80% off!!!
[/et_pb_text][et_pb_image src=”https://southhousedesigns.com/wp-content/uploads/2021/02/Table-Runner-w-pkg.jpeg” alt=”Stripe table runner on hanger from Hobby Lobby with price tag of $24.99″ title_text=”Table Runner w pkg” _builder_version=”4.7.7″ _module_preset=”default”][/et_pb_image][et_pb_text _builder_version=”4.7.7″ _module_preset=”default”]
So you know how Hobby Lobby clears out the remainder of their seasonal goods at 80% and sometimes even 90% off? If you happen to drop in at the right time, BINGO!
Last Summer I dropped in as they were closing out the Spring residue and I scored this cabana stripe table runner for $5!!!
“Big deal,” you say.
“Where’s the four?” you ask.
[/et_pb_text][et_pb_image src=”https://southhousedesigns.com/wp-content/uploads/2021/02/4-stacked-cabana-stripe-pillows.jpeg” alt=”Four Cabana stripe pillows stacked on an outdoor sectional” title_text=”4 stacked cabana stripe pillows” _builder_version=”4.7.7″ _module_preset=”default”][/et_pb_image][et_pb_text _builder_version=”4.7.7″ _module_preset=”default”]
Right here: That ONE runner became these FOUR “darn-near-no-sew” throw pillow covers.
Aren’t they great?
Here’s How You Can Make Four Throw Pillow Covers From a Table Runner:
You will need:
[/et_pb_text][et_pb_image src=”https://southhousedesigns.com/wp-content/uploads/2021/02/Two-sided-Table-Runner.jpeg” alt=”Showing two sides of the runner, both the same” title_text=”Two-sided Table Runner” _builder_version=”4.7.7″ _module_preset=”default”][/et_pb_image][et_pb_text _builder_version=”4.7.7″ _module_preset=”default”]
- A Two-sided Table Runner – and the two layers are NOT fused together
- Lumbar Pillow Forms or Fillers
- Your Choice of:
- Invisible zippers, sewing machine
- Buttons, ribbon and sewing machine
- Needle and thread — no machine
STEP 1) Measure & Measure Again, Then Cut
Do NOT believe what the packaging tells you. My runner actually measured 13 X 94-inches, not the 14 x 96-inches the packaging said.
1-inch, isn’t a big deal, right?
Oh, but it is. I try to always use down and feather fillers or a similar synthetic version. And I usually always fill a 20 X 20-inch cover with a 22 x 22-inch filler or an 18 x 18-inch cover with a 20 x 20-inch filler.
I like my pillows plump. I had planned on using four of IKEA’s amazing Fjadrar 16 X 26 fillers/inserts. I was able to squeeze them in for a very “supportive pillow”, but they took a bit more material to cover, so my other two covers are a bit shorter in length. I used two 14 X 20 feather and down fillers from JoAnn’s. and modified the style to close with a button flap.
I like this variety of two styles actually much better. Serendipity!
Side note: Isn’t “Serendipity” the happiest sounding word? Even fun to say.
I started by cutting my runner down the center.
Then each half I cut into two pieces: one 22 1/2-inches long and the other 24 1/2-inches.
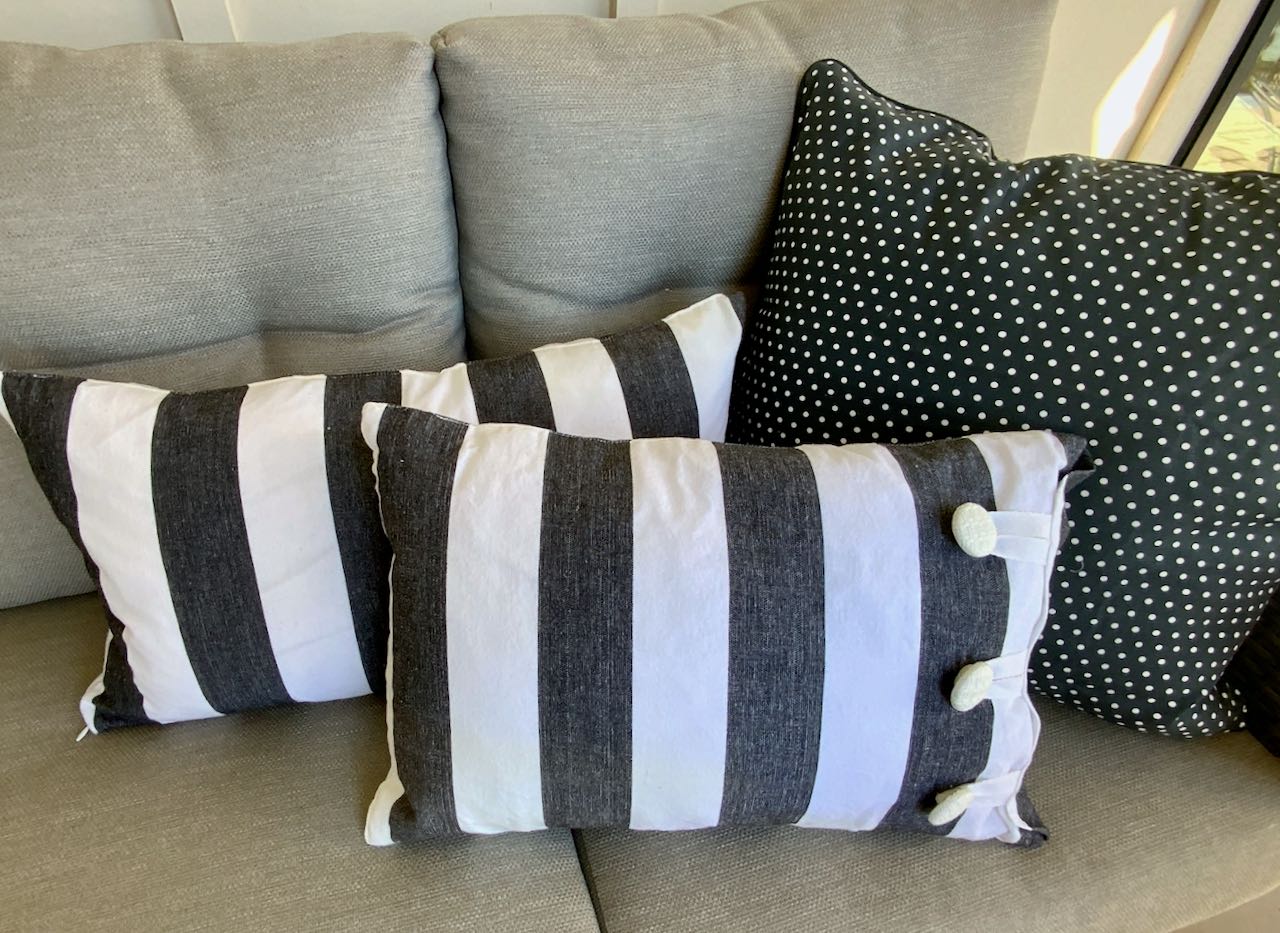
[/et_pb_text][et_pb_image src=”https://southhousedesigns.com/wp-content/uploads/2021/02/Two-Cabana-Stripe-Pillows-with-1-Dots.jpeg” alt=”Both a Zipper Closed and a Button Closed Cabana Stripe pillow pictured with a coordinating dots square pillow” title_text=”Two Cabana Stripe Pillows with 1 Dots” _builder_version=”4.7.7″ _module_preset=”default”][/et_pb_image][et_pb_text _builder_version=”4.7.7″ _module_preset=”default”]
STEP 2) Finish the Open Edges of Your Pillows
Option 1) With Invisible Zipper Foot
[/et_pb_text][et_pb_image src=”https://southhousedesigns.com/wp-content/uploads/2021/02/Cabana-Stripe-Zipper.jpeg” alt=”Cabana stripe lumbar pillow with invisible zipper closing” title_text=”Cabana Stripe Zipper” _builder_version=”4.7.7″ _module_preset=”default”][/et_pb_image][et_pb_text admin_label=”Text” _builder_version=”4.7.7″ _module_preset=”default”]
Invisible zippers are the absolute easiest and quickest zippers to put in a pillow.
Usually, you would stitch the zipper along the edge of the front and the back of the pillow and then stitch the remaining sides closed. So this is just a tad bit more awkward, but still quite simple to do. You just need an invisible zipper longer than your opening.
Here is a video showing you how I put the invisible zipper in WITHOUT an invisible zipper foot. Yes, the zipper foot makes it a bit easier for a novice sewer, but it is not a must have item.
[/et_pb_text][et_pb_video src=”https://youtu.be/1f7WLTWapHA” play_icon_color=”#ca4e64″ _builder_version=”4.7.7″ _module_preset=”default”][/et_pb_video][et_pb_text _builder_version=”4.7.7″ _module_preset=”default”]
Option 2) Button Flap Closing
[/et_pb_text][et_pb_image src=”https://southhousedesigns.com/wp-content/uploads/2021/02/Cabana-Stripe-Buttons.jpeg” alt=”cabana stripe with button closure” title_text=”Cabana Stripe Buttons” _builder_version=”4.7.7″ _module_preset=”default”][/et_pb_image][et_pb_text _builder_version=”4.7.7″ _module_preset=”default”]
I made my button closed pillows from the two end sections so they have three sides already done.
I serged the raw edges of the open end. If you don’t have a serger or zig zag option to overedge, then consider using some Fray Check or similar product. It’s a squirt bottle of clear liquid you apply along raw woven edges and when it dries, your fabric will not fray (much).
[/et_pb_text][et_pb_image src=”https://southhousedesigns.com/wp-content/uploads/2021/02/Button-fold-in-corners.jpeg” alt=”showing the open end of the pillow with the top tucked an and under the form and the corners poked in evenly” title_text=”Button-fold in corners” _builder_version=”4.7.7″ _module_preset=”default”][/et_pb_image][et_pb_text _builder_version=”4.7.7″ _module_preset=”default”]
Stuff the pillow with your filler or insert so you can figure how much your flap will overlap, your button placement and how long the ribbons will need to be.
Cut your three ribbons to the same length.
Fold the front down and under the end of the insert.
Fold in the two sides, kind of like when you are gift wrapping a package. Make sure the corners fold in the same distance from the side and the front fabric edge. You want them to mirror each other.
Turn up the raw edge and pin in place.
[/et_pb_text][et_pb_image src=”https://southhousedesigns.com/wp-content/uploads/2021/02/Buttons-PinTwill-tape-in-center-of-flap.jpeg” alt=”Shows one loop of twill ribbon pinned in place along the front flap” title_text=”Buttons-PinTwill tape in center of flap” _builder_version=”4.7.7″ _module_preset=”default”][/et_pb_image][et_pb_text _builder_version=”4.7.7″ _module_preset=”default”]
Determine the center point of the flap and pin the ends of a ribbon on each side of the centerpoint.
[/et_pb_text][et_pb_image src=”https://southhousedesigns.com/wp-content/uploads/2021/02/Buttons-PinTwill-in-Place.jpeg” title_text=”Buttons-PinTwill in Place” _builder_version=”4.7.7″ _module_preset=”default”][/et_pb_image][et_pb_text _builder_version=”4.7.7″ _module_preset=”default”]
Pin the ends of each of the other ribbons just inside the outside corners of the flap.
[/et_pb_text][et_pb_image src=”https://southhousedesigns.com/wp-content/uploads/2021/02/Buttons-Two-Rows-of-Stitching.jpeg” title_text=”Buttons-Two Rows of Stitching” _builder_version=”4.7.7″ _module_preset=”default”][/et_pb_image][et_pb_text _builder_version=”4.7.7″ _module_preset=”default”]
Stitch two rows of stitching. Be sure to catch all ends of ribbons securely.
[/et_pb_text][et_pb_image src=”https://southhousedesigns.com/wp-content/uploads/2021/02/Find-Center-Button-Location.jpeg” alt=”Mark for the center button on front of pillow” title_text=”Find Center Button Location” _builder_version=”4.7.7″ _module_preset=”default”][/et_pb_image][et_pb_text _builder_version=”4.7.7″ _module_preset=”default”]
Find and mark the center of the front panel for the center button placement.
[/et_pb_text][/et_pb_column][/et_pb_row][et_pb_row column_structure=”1_2,1_2″ _builder_version=”4.7.7″ _module_preset=”default”][et_pb_column type=”1_2″ _builder_version=”4.7.7″ _module_preset=”default”][et_pb_image src=”https://southhousedesigns.com/wp-content/uploads/2021/02/Buttons-Distnace-between-loops.jpeg” alt=”Ruler measuring the distance from the center ribbon to the outside ribbon” title_text=”Buttons- Distnace between loops” _builder_version=”4.7.7″ _module_preset=”default”][/et_pb_image][/et_pb_column][et_pb_column type=”1_2″ _builder_version=”4.7.7″ _module_preset=”default”][et_pb_image src=”https://southhousedesigns.com/wp-content/uploads/2021/02/Buttons-DistanceBetweenButtons.jpeg” alt=”Ruler measuring distance from the center mark to where the outside button placement mark should be” title_text=”Buttons- DistanceBetweenButtons” _builder_version=”4.7.7″ _module_preset=”default”][/et_pb_image][/et_pb_column][/et_pb_row][et_pb_row _builder_version=”4.7.7″ _module_preset=”default”][et_pb_column type=”4_4″ _builder_version=”4.7.7″ _module_preset=”default”][et_pb_text _builder_version=”4.7.7″ _module_preset=”default”]
Match the distance between ribbons with the distance between buttons and mark the placement of the two outside buttons.
Sew on the three buttons.
Close up your pillow wrapping the ribbon loops around each button.
Option 3) Needle and Thread
I will be using my pillows outside, so I knew I needed to be able to wash the covers.
But if you don’t need to, and either don’t have a working sewing machine (or you’re still a bit intimidated by it), feel free to insert the pillow filler, fold the raw edges in, pin in place and then do a quick slipstitch to close up the opening.
Here is a good tutorial if you need a refresher.
I just don’t think making pillow covers can get much easier than these!
Most of the cutting has been done for us. For my four pillows, I had to make 3 cuts — TOTAL!
For two of the pillows I just had to close one end, the other two required an additional straight seam — That’s It!
And I think they look great! Wait until you see how I’ll be using them this Summer.
Looking for MORE Easy-To-Make Outdoor Decor?
Check out these outdoor sheers without expansive and expensive rods, right here.
How about an adorable wire cloche? It’s all right here.
Do you have a piece of old wood furniture that needs a bit of oomph? Check this out!
[/et_pb_text][/et_pb_column][/et_pb_row][et_pb_row column_structure=”1_2,1_2″ _builder_version=”4.7.7″ _module_preset=”default”][et_pb_column type=”1_2″ _builder_version=”4.7.7″ _module_preset=”default”][et_pb_image src=”https://southhousedesigns.com/wp-content/uploads/2020/06/Pin-It-Now-MC.png” title_text=”Pin-It-Now-MC” _builder_version=”4.7.7″ _module_preset=”default”][/et_pb_image][/et_pb_column][et_pb_column type=”1_2″ _builder_version=”4.7.7″ _module_preset=”default”][et_pb_image src=”https://southhousedesigns.com/wp-content/uploads/2021/02/Cabana-Stripe-Pillows-Pin.jpg” alt=”Pin showing the table runner and then a cluster of three pillows and a stack of the four cabana stripe pillows” title_text=”Cabana Stripe Pillows-Pin” _builder_version=”4.7.7″ _module_preset=”default”][/et_pb_image][/et_pb_column][/et_pb_row][et_pb_row _builder_version=”4.7.7″ _module_preset=”default”][et_pb_column type=”4_4″ _builder_version=”4.7.7″ _module_preset=”default”][et_pb_text _builder_version=”4.7.7″ _module_preset=”default” custom_padding=”||6px|||”]
I hope this inspires you to keep an eye out for table runner options that might be better suited for your home as accent pillow covers. Please don’t hesitate to shoot me any questions or comments you might have.
As you guessed, my specific cabana stripe runner is long gone. So I scoured the web to find some good alternatives that might work for you — along with corresponding buttons, zippers, ribbon and fillers. Hope this helps. And yes, these are affiliates links which means if you purchase something using these links I may receive a small commission, but you pay exactly the same price. And remember, I will only refer products I believe in!!!
[/et_pb_text][/et_pb_column][/et_pb_row][et_pb_row column_structure=”1_4,1_4,1_4,1_4″ _builder_version=”4.7.7″ _module_preset=”default”][et_pb_column type=”1_4″ _builder_version=”4.7.7″ _module_preset=”default”][et_pb_code _builder_version=”4.7.7″ _module_preset=”default” hover_enabled=”0″ sticky_enabled=”0″][/et_pb_code][/et_pb_column][et_pb_column type=”1_4″ _builder_version=”4.7.7″ _module_preset=”default”][et_pb_code _builder_version=”4.7.7″ _module_preset=”default” hover_enabled=”0″ sticky_enabled=”0″]
[/et_pb_code][/et_pb_column][et_pb_column type=”1_4″ _builder_version=”4.7.7″ _module_preset=”default”][et_pb_code _builder_version=”4.7.7″ _module_preset=”default” hover_enabled=”0″ sticky_enabled=”0″]
[/et_pb_code][/et_pb_column][et_pb_column type=”1_4″ _builder_version=”4.7.7″ _module_preset=”default”][et_pb_code _builder_version=”4.7.7″ _module_preset=”default” hover_enabled=”0″ sticky_enabled=”0″]
[/et_pb_code][/et_pb_column][/et_pb_row][et_pb_row column_structure=”1_4,1_4,1_4,1_4″ _builder_version=”4.7.7″ _module_preset=”default”][et_pb_column type=”1_4″ _builder_version=”4.7.7″ _module_preset=”default”][et_pb_text _builder_version=”4.7.7″ _module_preset=”default” hover_enabled=”0″ sticky_enabled=”0″]And use with:


This Zipper
These Buttons
This Ribbon
And this Pillow Insert
[/et_pb_text][/et_pb_column][et_pb_column type=”1_4″ _builder_version=”4.7.7″ _module_preset=”default”][et_pb_text _builder_version=”4.7.7″ _module_preset=”default” custom_padding=”||0px|||” hover_enabled=”0″ sticky_enabled=”0″]And use with:
This Zipper
These Buttons
This Ribbon
And this Pillow Insert[/et_pb_text][/et_pb_column][et_pb_column type=”1_4″ _builder_version=”4.7.7″ _module_preset=”default”][et_pb_text _builder_version=”4.7.7″ _module_preset=”default” custom_padding=”||0px|||” hover_enabled=”0″ sticky_enabled=”0″]And use with:
This Zipper
These Buttons
This Ribbon
And this Pillow Insert[/et_pb_text][/et_pb_column][et_pb_column type=”1_4″ _builder_version=”4.7.7″ _module_preset=”default”][et_pb_text _builder_version=”4.7.7″ _module_preset=”default” hover_enabled=”0″ sticky_enabled=”0″]And use with:
This Zipper
These Buttons
This Ribbon
And this Pillow Insert[/et_pb_text][/et_pb_column][/et_pb_row][et_pb_row _builder_version=”4.7.7″ _module_preset=”default”][et_pb_column type=”4_4″ _builder_version=”4.7.7″ _module_preset=”default”][et_pb_text _builder_version=”4.7.7″ _module_preset=”default” hover_enabled=”0″ sticky_enabled=”0″]
As always, thanks for joining me and reading all the way through — I know I can get pretty windy and detailed at times. You are THE BEST!
[/et_pb_text][/et_pb_column][/et_pb_row][et_pb_row column_structure=”1_2,1_2″ _builder_version=”4.7.7″ _module_preset=”default”][et_pb_column type=”1_2″ _builder_version=”4.7.7″ _module_preset=”default”][et_pb_image src=”https://southhousedesigns.com/wp-content/uploads/2020/08/LargerHeres-to-Joy-filled-Living.png” alt=”Here’s to Joy-Filled Living, Diane” title_text=”LargerHere’s to Joy-filled Living” _builder_version=”4.7.7″ _module_preset=”default”][/et_pb_image][/et_pb_column][et_pb_column type=”1_2″ _builder_version=”4.7.7″ _module_preset=”default”][et_pb_image src=”https://southhousedesigns.com/wp-content/uploads/sub.png” title_text=”sub” url=”/subscribe” url_new_window=”on” show_bottom_space=”off” align=”right” _builder_version=”4.5.6″ _module_preset=”default” max_width=”400px” module_alignment=”right” custom_margin=”0px|0px|0px|0px|false|false” custom_padding=”0px|0px|0px|0px|false|false”][/et_pb_image][/et_pb_column][/et_pb_row][/et_pb_section]
Wow – brilliant Diane! And so pretty! Thanks for great instructions. I’ll be using the needle and thread method, as my sewing machine lost a lot of its insides when the high school class borrowed it many years ago! 🙂 Can’t wait to go table runner shopping!
Oh, I’m so glad this inspired you!!! The button one could also be done old school, too. Just saying. Please send me a pic when you have your beauties made. Best to you Barb