
Make Stunning, Unique Alcohol Ink Christmas Ornaments DIY
Do you dream of stunning, one-of-a-kind Christmas ornaments in your colors? Make these Insta-ready bulbs with this fun, easy process!
What could be better than show-stopping ornaments that are:
- each unique,
- each in your choice of custom colors,
- each handmade without requiring artistic talent or experience
- Equally lovely hanging on a tree or filling a bowl or scattered down the length of the dinner table
Better? Nothing could be better!
And these are my very favorite ornaments that fit the bill!
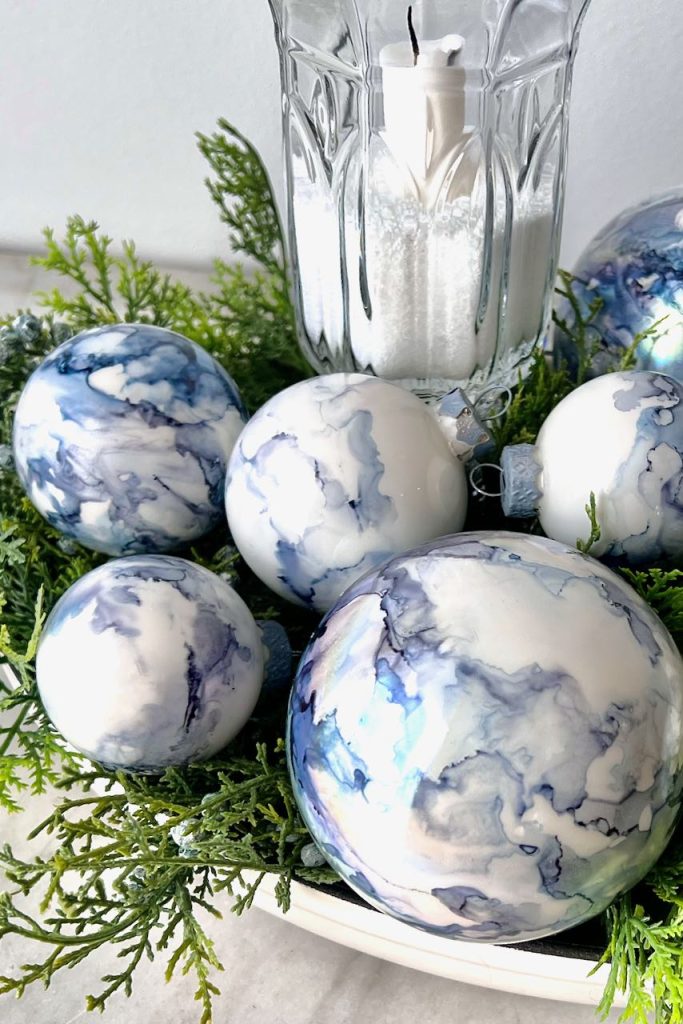
DIY alcohol ink ornaments are deceiving in their beauty. making them appear to be intricate artisan ornaments, when actually they are quite easy — with just a bit of practice.
The painterly effects of the alcohol inks puts these right at the top of my favorite Christmas tree ornaments.
They are gorgeous Christmas decorations for the holiday season, but also year round.
Interested?
Table of Contents
(these are active links, click to jump to the section you need)
Let’s Go Through the Steps of This Fun Craft
NOTE: This fun craft project can be adapted and applied to any non-porous surfaces, slick surface.
So many fun ways to use alcohol inks on:
- Tile coasters
- glass vase
- sealed ceramic and porcelain pottery pieces
- glass candlesticks, and more.
Materials and Supplies-
- Globe or Ball Ornaments * see notes below
- Alcohol Inks ** see notes below
- Blending solution
- Isopropyl alcohol (91% rubbing alcohol)
- Small paint brush, sponge dauber or even Q-tips will do
- Canned compressed air OR a hairdryer, OR a straw and strong lungs (I used a combination of all three)
- White paint, optional * see notes below
- Flat work surface with protective covering
- Protective gloves
- Small disposable cups like medicine cup or dixie cups
- Small bottles like these if you plan to mix inks for your perfect shade
- Sealer*
Supplies Notes:
* Globe or Ball Ornaments — I prefer working with glass ornaments. Most of the the plastic ornaments will have a seam or inconsistency. Even if you think, “no problem, I’ll just hang the seam to the back”. It still creates issues with the flow of the alcohol ink. This is a great set. I love that there are three different sizes included which makes for a more interesting display.
You can certainly use clear glass ornaments. But I found that I greatly prefer for my design to “pop” off of a solid background. But it is difficult to find anything other than clear glass. So this adds the step of painting the inside of your ornament
I tried using an old colored glass ornament. The color is on the outside and I’m not sure what it is, but it did not react nicely with the alcohol.
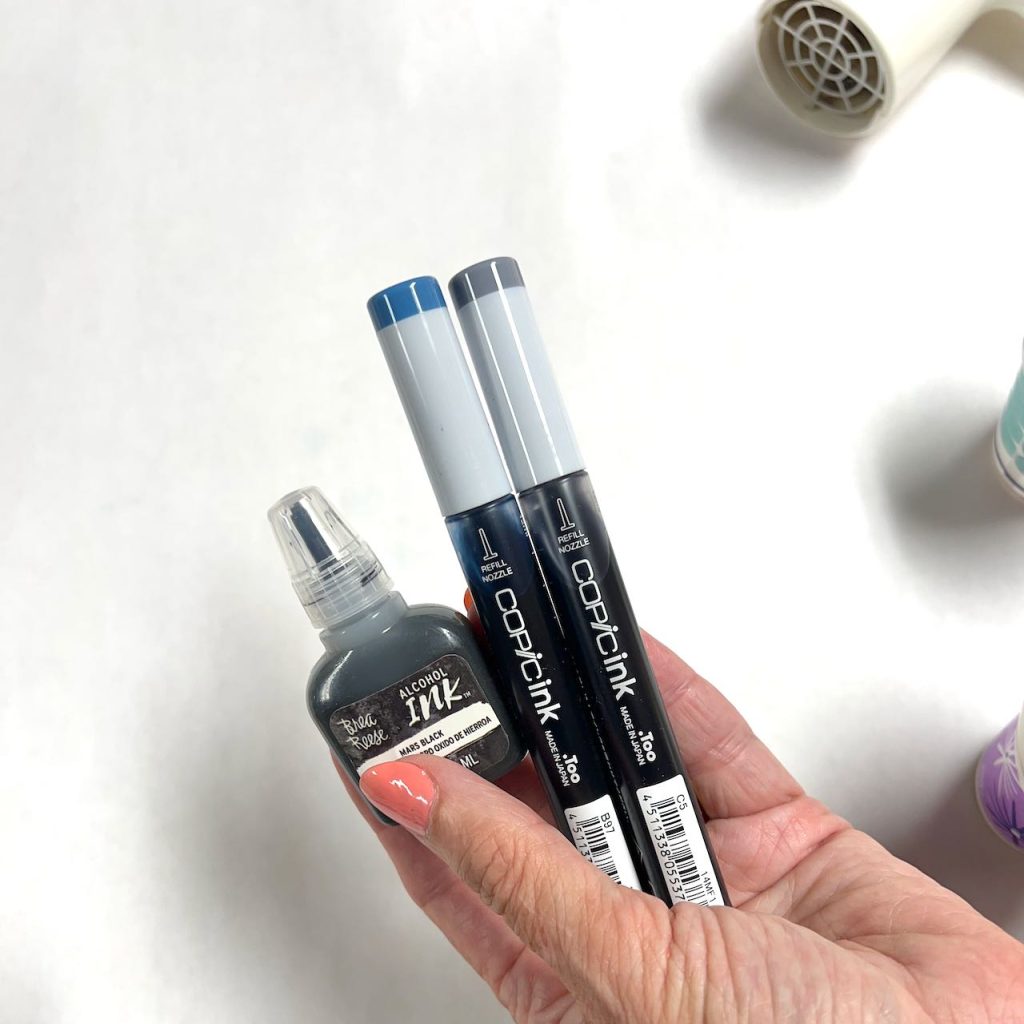
** Alcohol Inks — The tubes you see me using are the REFILL tubes for Copic Alcohol Ink Markers. These are artist grade. You will love working with them. I would insert an affiliate link for them at Michaels, but honestly, even with coupons they are more expensive than Dick Blick. These are what you want to order. I tried the Ranger/Tim Holtz metallic alcohol inks with no success. Dick Blick also offers these for a good metallic alcohol ink option.
Step 1) Remove and Optionally Paint the Ornament Cap —
You have to take the caps off anyway, and it’s so easy to do. Why not? This simple little step makes such a significant impact to really elevate your ornaments.
I stuck the prongs of the loop into the side ridges of some corrugated cardboard I had stashed away. This made then very easy to spray and dry.
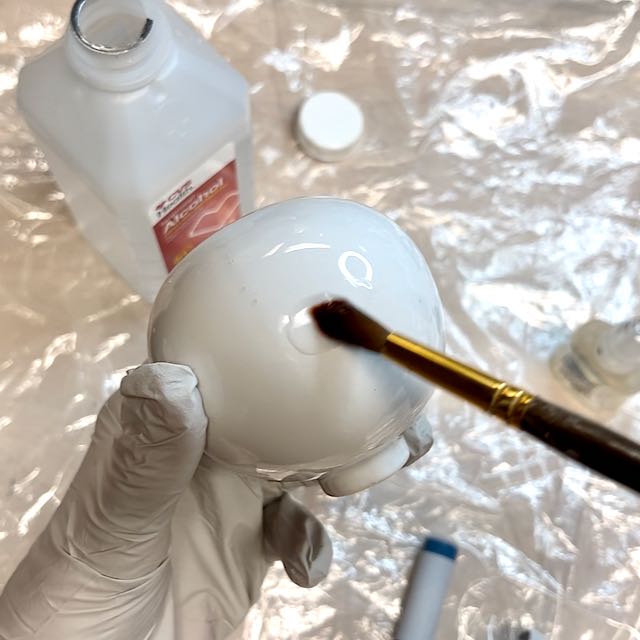
Step 2) Create a White Background —
You can use alcohol inks on clear bulbs for a translucent stained glass look. But I wanted my design to pop off a white background. To do this, grab your bottle of white acrylic paint and squirt enough inside the glass globe ornaments — or any shape you may be using — and swirl it around to fully coat the inside of the ornament.
Place the freshly painted ornament upside down over a narrow cup or can to catch all the extra paint that will run out. Let this dry overnight.
Of course, you can experiment with different color paints. Even something like black background with white and silver and gold metallic ink could be fabulous!
Please excuse this quick pause in the action. If you are enjoying this post and project, please consider subscribing to receive even more straight to your inbox:
Many thanks! Now back to our ornaments!
Step 3) Practice —

This was my first time using alcohol inks for ornaments and I practiced on an old green glass ornament to get a feel for it. I’m not sure why, but it reacted with the green glass in a very “interesting” way. It could be a really cool look in different colors. I may experiment with that at a future date for a different project.

Then I practiced on a glass ornament with the dried white paint inside. This was to get a feel for the different colors I had bought. The Duck Blue color on the left side was not the direction I wanted. So I packed that away for another day.
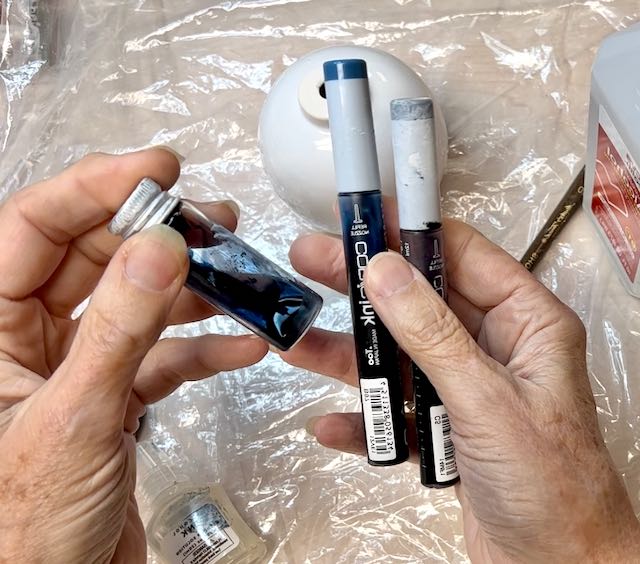
The Night Blue was still a bit more green than I wanted, so I mix 8 to 10 drops of it with 3 or 4 drops of the Cool Grey in a small vial. This worked perfect for me.
CAUTION: All dyes will stain. Be sure to protect your work surface, your clothing AND wear gloves!
The first time you add a drop of alcohol ink, it can be a little bit scary. Keep in mind that you can wipe off anything you don’t like even after it has dried.
Just wipe it with isopropyl alcohol and it will dissolve. If you have a spot that is just a bit dark or it dried faster than you could get to it. add the tiniest drop of alcohol or the blending solution on top of that spot and watch it dilute.
Then you can blow it, or roll it and let gravity disperse it.
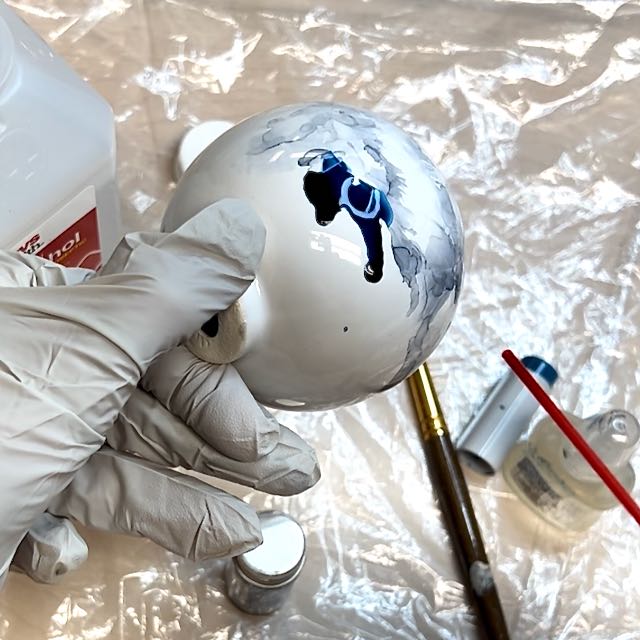
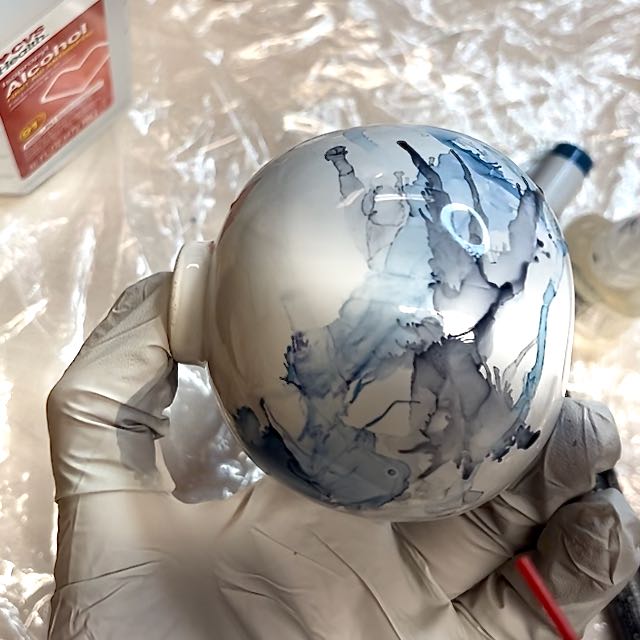
One of the cool things about this craft is there is no real wrong way. Explore until you find what works for you to get the look you want.
I really thought I wanted a mostly white bulb with bands around the middle of the grey and blended slate blue. But with several of mine, I was having so much fun and was absolutely mesmerized by the process that I just kept adding. Again, no right or wrong.
Alcohol ink colors are very saturated! It does not take much ink at all!
NOTE: If you are using a metallic alcohol ink, be sure to practice with it with the regular inks and the blending solution.
The blending solution disperses the individual metallic particles better than the isopropyl alcohol on its own.
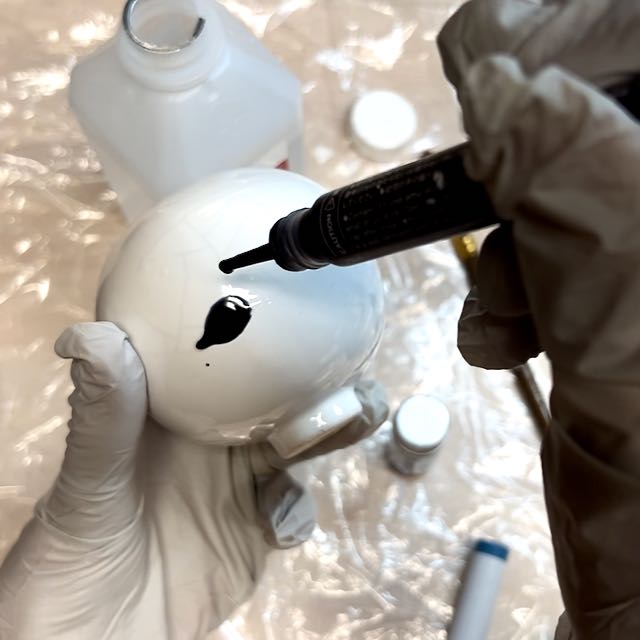
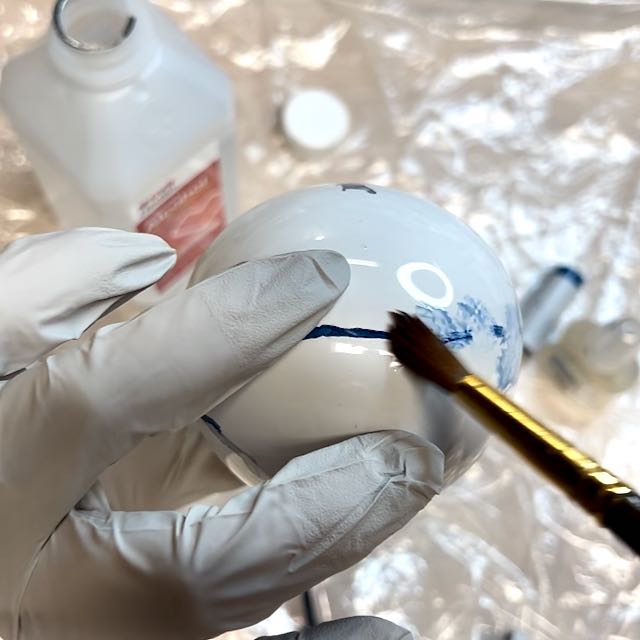
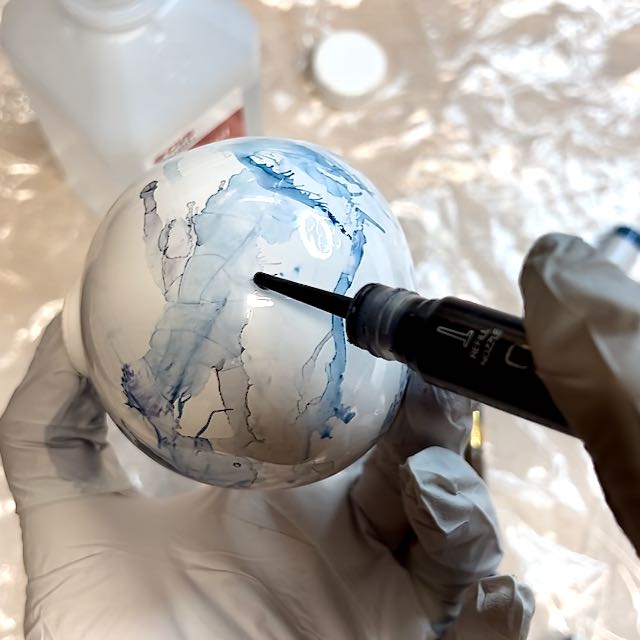
Step 4) Add Alcohol Ink Design —
Alcohol dries fast! Work little sections at a time.
TIP: in general, I’d advise using two or three colors max. More than that and you run the risk of the colors becoming muddy.
In general, the process is:
- Add a bit of isopropyl alcohol as a base to a section of your bulb
- Add a drop of ink to that alcohol, use gravity, a blow dryer, canned air, or a straw and your lungs to disperse the color and spread it.
- If that drop needs to be dispersed more, add a touch of alcohol or blending solution to it.
- If adding metallic ink, add it on top of the alcohol ink while it is wet with a drop of blending solution.
Much like watercolor paints, if you want the colors to blend together, add a small drop of each at the same time on the bed of alcohol. and let them run together or blow them together.
If you want the colors layered. Do one, let it dry then lay the second one next to the first. Be careful with the base of alcohol for the second color. if you put it on the first color it will become diluted.
Here’s a visual example of the basics, then you get to have fun improvising from there.
- 1) add a base of isopropyl alcohol to one area
- 2) add a drop of ink on the spot

- 3) blow ink to disperse it
- 4) add another drop or two of. different color of ink beside the dried one

- 5) dab a bit of alcohol over an area that dried too solid, too fast
- 6) blow to disperse
- 7) this time add a drop of blending solution and then a drop of the other color ink on top
- 8) see how much further they disperse and dilute before dryig
Experiment and have fun.
NOTE: There will be a video coming shortly. Jump over to my YouTube channel and subscribe so you will be notified when it publishes.
Step 5) Seal —
You must seal the alcohol ink design after it is fully dry and cured (24 – 48 hours).
CAUTION: Be careful of the sealer you use! It cannot contain alcohol or your design will run — and not in a pretty way.
Supposedly two coats of Mod Podge will work. I have not used that because I don’t think I’d be able to use it without brush strokes and I did not have any of the spray Mod Podge. If you try some, please let me know how well it works.
The very best protection is three different Krylon Sprays in a specific order:
- Krylon Kamar Varnish — This is the perfect base coat of protection between the ink and any other sealers. Three or four light coats should do it.
- Krylon UV Archival Varnish — this is to protect the inks from fading over time. I skipped this because my bulbs will only be used at Christmas time and I’m not expecting to have them in bright sunllight.
- Krylon Acrylic Crystal Spray — This is added on top of the UV for an extra protective surface to protect you alcohol ink art from scratches and such. Again, I am not anticipating any wear and tear, so I skipped this one also.
Yes, I used Krylon Kamar Varnish in gloss. And that’s it.
Step 6) Finishing Touches–
Replace the freshly painted cap and add a length of ribbon or thin metallic cording. Tie in a bow or slip knot to hang on the tree
Ta Da! Now you have the most beautiful alcohol ink Christmas ornaments in the perfect colors for your home and your decor.

Isn’t this a fun Christmas craft?
And the results are so high-end!
I think older kids would love this way of making ornaments!!! The end results are a bit unpredictable and they are fast to make — perfect for teens and tweens!
Wouldn’t these make beautiful holiday treats for your neighbors and friends?
They will certainly enjoy it long past the gingerbread you were probably going to make them.
There is something so special about handcrafted Christmas gifts. They will think of you every year as they proudly hang it.

Are you intrigued by alcohol ink? Well, there are more ways to use it — to use it in the kitchen, for entertaining. Check them out here. You won’t believe them. You can thank me later.
I would LOVE to see pictures of your Alcohol Ink Ornaments! What color combinations would you use?
Love these! They look so cool.
Thanks so much Jennifer! I’m so glad we are crafting together.
These are next-level GORGEOUS! I have never worked with alcohol inks before but this project really inspires me to give it a try! Beautiful project, Diane!
Awww shhucks, Missy! Thanks bunches!
I Do hope you give it a try. I can’t wait to see your results. Don’t hesitate to reach out with any questions!
Hi,
You mention the Blending Solution a couple of times. Is this something specific to the alcohol inks?
I have purchased a set of inks. Where can I get the blending solutions?
Diane, these are so gorgeous! I can see these looking so good in any color. This has inspired me to give this method a try! Great project,
Diane your ornaments are absolutely beautiful! I can image these in all sorts of colors but I love blue! Happy Christmas!
Thanks so much Michelle! Really, really missed you at HCS this month ????.
What blending solution did you use, please? Great tutorial
Just in case none is interested…and thrifty like me…I use alcohol mixed with three or four drops of glycerine. Works great and WAY cheaper than commercially bought blending solution.
I love the colour combo here, btw!
I love this tip. I’m sgoing to try that out!!! Thanks for sharing it. I’m all about thrifty when it comes to crafting supplies in particular.
Thanks