
Quick & Easy DIY a Blue And White Tabletop Christmas Tree
[et_pb_section fb_built=”1″ _builder_version=”4.16″ _module_preset=”default” global_colors_info=”{}” theme_builder_area=”post_content”][et_pb_row _builder_version=”4.16″ _module_preset=”default” global_colors_info=”{}” theme_builder_area=”post_content”][et_pb_column type=”4_4″ _builder_version=”4.16″ _module_preset=”default” global_colors_info=”{}” theme_builder_area=”post_content”][et_pb_image src=”https://southhousedesigns.com/wp-content/uploads/2021/07/Blue-White-Christmas-Trees-Title-Image.jpeg” alt=”Short wide partial view of three fluffy blue and white Christmas trees with an additional white tree and part of a blue and white wooden soldier ” title_text=”Blue White Christmas Trees Title Image” _builder_version=”4.16″ _module_preset=”default” global_colors_info=”{}” theme_builder_area=”post_content”][/et_pb_image][et_pb_text _builder_version=”4.16″ _module_preset=”default” background_color=”#d1e2f2″ width=”70%” module_alignment=”center” custom_margin=”-100px||||false|false” custom_padding=”30px||30px||false|false” global_colors_info=”{}” theme_builder_area=”post_content”]
Quick & Easy
DIY Blue & White Tabletop Christmas Trees
[/et_pb_text][et_pb_text _builder_version=”4.16″ text_font=”||on||||||” text_font_size=”9px” background_size=”initial” background_position=”top_left” background_repeat=”repeat” global_colors_info=”{}” theme_builder_area=”post_content”]
Such an easy, quick way to make a blue and white Christmas tree — or a forest of trees for your mantel, your tabletop, your shelves, . . . .
[/et_pb_text][et_pb_text _builder_version=”4.16″ _module_preset=”default” global_colors_info=”{}” theme_builder_area=”post_content”]
I just can’t help myself!
I tried, but I couldn’t resist Christmas in July any longer!
It’s July, and I’m deep into Christmas in my studio, so I am sharing some early Christmas joy with you. Sharing with the absolute cutest blue and white Christmas trees you’ve ever seen. Perhaps Chrismukkah. Honestly, I’m smitten!
Totally smitten!
And why stop with one post, right? So I invited some blogging friends to join me!!! You have got to check them out and get your BLUE & WHITE Christmas jammin’. We have so many fun simple projects to get you crafting and styling for a gorgeous Blue & White Christmas or perhaps a Chrismukkah celebration.
You’ll find all the links at the bottom of this post. So be sure to jump around and check out the garlands, and mantels and the ornaments and —- well, so many goodies. But let’s get started with trees, little trees! Little trees for styling your tabletop, for holiday vignettes, for styling your shelves or even for styling a tiered tray.
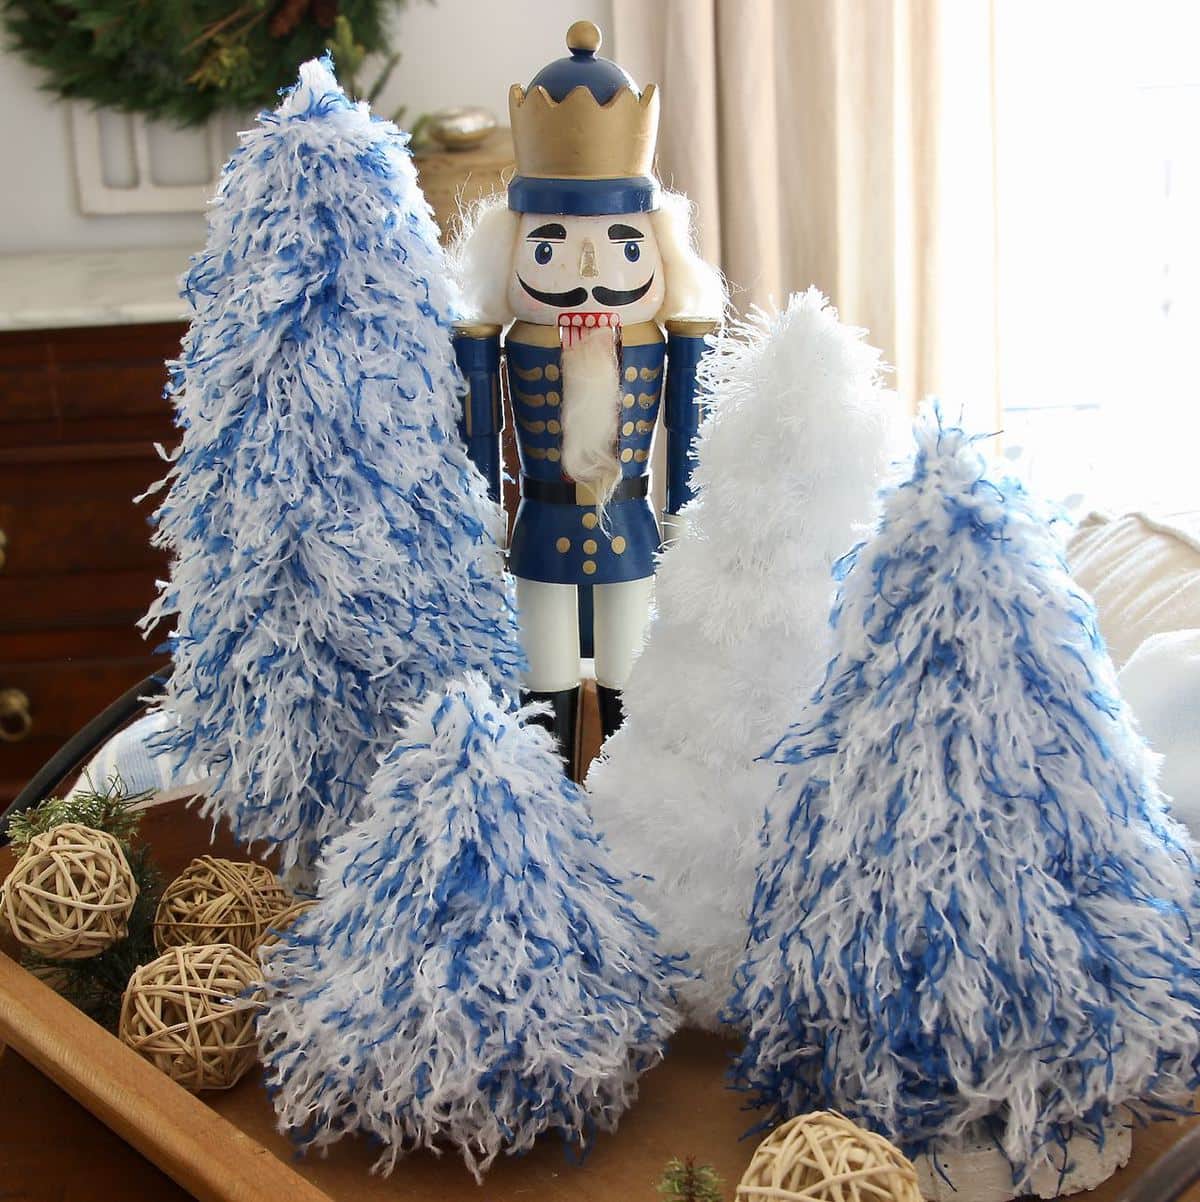
What do you think of the blue and white tabletop trees I made?
[/et_pb_text][et_pb_image src=”https://southhousedesigns.com/wp-content/uploads/2021/07/Blue-White-Christmas-Tree-Feature-IMage.jpeg” alt=”Blue Wooden Soldier surrounded by blue and white fluffy Christmas trees on a wood tray” title_text=”Blue & White Christmas Tree Feature IMage” _builder_version=”4.16″ _module_preset=”default” global_colors_info=”{}” theme_builder_area=”post_content”][/et_pb_image][et_pb_text _builder_version=”4.16″ _module_preset=”default” global_colors_info=”{}” theme_builder_area=”post_content”]
So can you guess what I made them from?
Would you believe that they cost $1 each to make? Actually the two shorter ones in front cost just 50 cents each!
Have you guessed yet?
[/et_pb_text][et_pb_image src=”https://southhousedesigns.com/wp-content/uploads/2021/07/Blue-white-Dusters.jpeg” alt=”Fout Blue and White microfiber Dusting Wand s still packaged laying on a table.” title_text=”Blue white Dusters” _builder_version=”4.16″ _module_preset=”default” global_colors_info=”{}” theme_builder_area=”post_content”][/et_pb_image][et_pb_text _builder_version=”4.16″ _module_preset=”default” global_colors_info=”{}” theme_builder_area=”post_content”]
I know! Can you believe it?!?
I found these at my local Dollar Tree — these blue and white microfiber dusters. [sorry, Dollar Tree does not have them available online and I could not find anything similar on Amazon]. So check you local Dollar Tree in person, and keep checking back.
You Will Need:
- One microfiber duster per tall tree, or one duster per two shorter trees
- Wood piece for trunk — a wood disc, tree slices, or a wood candle cup
- White Paint (optional)
- Super Glue
- Drill
- 7/32″ drill bit
- Scissors
- Painters Tape
There are just three easy steps to turning these dusters into Christmas or Hanukkah trees:
Step 1: Cut the Handle Off to Make Your Tabletop Christmas Tree
It is surprisingly easy to cut the handle off!
I used my trusty Fat Max coping saw because that’s what I had handy. A hack saw will work just as well, perhaps better.
Start by cutting through the plastic sheath all the way around, rolling the duster as you go. Now slide the plastic away from the fluff part, your future tree.
Now start cutting through the the metal handle at your desired tree height.
Here’s a video so you get the idea.
[/et_pb_text][et_pb_video src=”https://youtu.be/1D7GH-KVr1E” _builder_version=”4.16″ _module_preset=”default” module_alignment=”center” global_colors_info=”{}” theme_builder_area=”post_content”][/et_pb_video][/et_pb_column][/et_pb_row][et_pb_row column_structure=”1_2,1_2″ _builder_version=”4.16″ _module_preset=”default” global_colors_info=”{}” theme_builder_area=”post_content”][et_pb_column type=”1_2″ _builder_version=”4.16″ _module_preset=”default” global_colors_info=”{}” theme_builder_area=”post_content”][et_pb_image src=”https://southhousedesigns.com/wp-content/uploads/2021/07/Blue-White-Trees-two-trees-taped.jpeg” alt=”closeup of duster with green painters tape separating the fibers in opposite directions” title_text=”Blue White Trees – two trees taped” _builder_version=”4.16″ _module_preset=”default” global_colors_info=”{}” theme_builder_area=”post_content”][/et_pb_image][et_pb_text _builder_version=”4.16″ _module_preset=”default” global_colors_info=”{}” theme_builder_area=”post_content”]
If you want to make two shorter trees from one duster, separate the fluffy fibers at the desired height for your trees and wrap them with painters tape.
[/et_pb_text][/et_pb_column][et_pb_column type=”1_2″ _builder_version=”4.16″ _module_preset=”default” global_colors_info=”{}” theme_builder_area=”post_content”][et_pb_image src=”https://southhousedesigns.com/wp-content/uploads/2021/07/Blue-White-Christmas-Trees-2-For-1.jpeg” alt=”Super closeup of the wire rod cut in two where the painters tape was holding the fibers out of the way” title_text=”Blue White Christmas Trees – 2 For 1″ _builder_version=”4.16″ _module_preset=”default” global_colors_info=”{}” theme_builder_area=”post_content”][/et_pb_image][et_pb_text _builder_version=”4.16″ _module_preset=”default” global_colors_info=”{}” theme_builder_area=”post_content”]
Now cut on the painters tape and when you snap them apart, gently remove the tape and one of the cut ends will become the trunk of one tree and the other will be the top of the other tree.
[/et_pb_text][/et_pb_column][/et_pb_row][et_pb_row _builder_version=”4.16″ _module_preset=”default” global_colors_info=”{}” theme_builder_area=”post_content”][et_pb_column type=”4_4″ _builder_version=”4.16″ _module_preset=”default” global_colors_info=”{}” theme_builder_area=”post_content”][et_pb_text _builder_version=”4.16″ _module_preset=”default” global_colors_info=”{}” theme_builder_area=”post_content”]
NOTE, the shorter of your trees should be the top portion of the duster. The flared plastic neck at the base of the duster cannot be removed and it can interfere with the look of a really short tree.
Step 2: Adding a Trunk to Your Tabletop Trees
Any piece of wood will do, You can choose a craft wood disc, tree slices, wooden candle cups , or even a piece of reclaimed wood holding a forest of trees.
Keep in mind that the broader the base, the more stable your tree will be.
You’ll see that I chose tree slices (I had a large stash of them that were crying out to me), but I added a wider slice on the bottom of each. And I decided to paint them white with some leftover paint so they would fade into the trees. Strictly optional!
[/et_pb_text][et_pb_text _builder_version=”4.16″ _module_preset=”default” global_colors_info=”{}” theme_builder_area=”post_content”][/et_pb_text][et_pb_image src=”https://southhousedesigns.com/wp-content/uploads/2021/07/Blue-White-Tabletop-Trees-in-Process.jpeg” alt=”In Process picture of adding bases to the trees” title_text=”Blue and White Tabletop Trees in Process” _builder_version=”4.16″ _module_preset=”default” global_colors_info=”{}” theme_builder_area=”post_content”][/et_pb_image][et_pb_text _builder_version=”4.16″ _module_preset=”default” global_colors_info=”{}” theme_builder_area=”post_content”]
You can see that a wood candle cup could make a cute trunk also.
Be sure to securely glue the layers of your trunk as I do in the video below.
[/et_pb_text][et_pb_video src=”https://youtu.be/1upIiB0qbxs” _builder_version=”4.16″ _module_preset=”default” module_alignment=”center” global_colors_info=”{}” theme_builder_area=”post_content”][/et_pb_video][et_pb_text _builder_version=”4.16″ _module_preset=”default” global_colors_info=”{}” theme_builder_area=”post_content”]
Step 3) Trimming Your Tree To Bring it To Life
This is where the magic happens. It’s all about the shape. You want a pointy top and a broad fluffy base.
When you present it that way, it will be seen as a tree not as a duster.
So with a pair of thread snips or sharp scissors, I start at the top and cut the top layer just a bit longer than the plastic “topknot” working all the way around the tree. Then I slowly make my cuts longer and longer as I progress down the tree.
When I’m ready to shape it, I smooth down the top layers and the fluff out the bottom, longer layers to get the fullness.
Initially, I planned on making stars to go on top, so I started with the top most layers pointing down. In a few of my pictures, you can see the plastic topknot and the layers all smoothed downward. Then I decided against the stars and fluffed up the topmost fibers to bring it more to a point and hide the topknot. I think I like this way best. But either way works!
Here’s a video of this third step:
[/et_pb_text][et_pb_video src=”https://youtu.be/3RL57FmGPI4″ _builder_version=”4.16″ _module_preset=”default” module_alignment=”center” global_colors_info=”{}” theme_builder_area=”post_content”][/et_pb_video][et_pb_text _builder_version=”4.16″ _module_preset=”default” global_colors_info=”{}” theme_builder_area=”post_content”]
Aren’t they just delightful? This has to be one of my favorite Christmas crafts ever!!!
[/et_pb_text][et_pb_image src=”https://southhousedesigns.com/wp-content/uploads/2021/07/Blue-and-White-Trees-with-Wooden-Soldier.jpeg” title_text=”Blue and White Trees with Wooden Soldier” _builder_version=”4.16″ _module_preset=”default” global_colors_info=”{}” theme_builder_area=”post_content”][/et_pb_image][/et_pb_column][/et_pb_row][et_pb_row _builder_version=”4.16″ _module_preset=”default” global_colors_info=”{}” theme_builder_area=”post_content”][et_pb_column type=”4_4″ _builder_version=”4.16″ _module_preset=”default” global_colors_info=”{}” theme_builder_area=”post_content”][et_pb_text _builder_version=”4.16″ _module_preset=”default” global_colors_info=”{}” theme_builder_area=”post_content”]
And adding in a white fluffy tree or two really helps for a vignette. I’ll have how I made the white tree posted soon.
HINT: This may be a good time for you to subscribe to my newsletter so you’ll be sure not to miss it.
[/et_pb_text][et_pb_image src=”https://southhousedesigns.com/wp-content/uploads/2021/07/Little-Blue-White-Tree-Closeup.jpeg” alt=”Close up view of short blue & white fluffy Christmas tree with all white tree and the legs of a wooden soldier showing behind” title_text=”Little Blue White Tree Closeup” _builder_version=”4.16″ _module_preset=”default” global_colors_info=”{}” theme_builder_area=”post_content”][/et_pb_image][et_pb_text _builder_version=”4.16″ _module_preset=”default” global_colors_info=”{}” theme_builder_area=”post_content”]
Remember how I told you six of my blogging friends joined my in celebrating Christmas in July? You don’t want to miss a single one. All fresh, new ideas to inspire. So be sure to explore all these shares:
[/et_pb_text][et_pb_code _builder_version=”4.16″ _module_preset=”default” global_colors_info=”{}” theme_builder_area=”post_content”]
 Lynne | My Family Thyme Lynne | My Family Thyme |
 Diane | South House Designs Diane | South House Designs |
 Marie | This Dear Casa Marie | This Dear Casa |
 Leslie | Feet Under My Table Leslie | Feet Under My Table |
 Juliet | A Loverly Life Juliet | A Loverly Life |
 Stephanie | Gathered In The Kitchen
You can count on me not to lead you astray. Aren’t they great? I hope we planted some seeds for your holiday season. It may be hot and steamy right now, but we all know Fall is just around the corner, which means . . . . So you definitely want to pin this to one of your holiday boards.
[/et_pb_text][/et_pb_column][/et_pb_row][et_pb_row column_structure=”1_2,1_2″ _builder_version=”4.16″ _module_preset=”default” global_colors_info=”{}” theme_builder_area=”post_content”][et_pb_column type=”1_2″ _builder_version=”4.16″ _module_preset=”default” global_colors_info=”{}” theme_builder_area=”post_content”][et_pb_text _builder_version=”4.16″ _module_preset=”default” global_colors_info=”{}” theme_builder_area=”post_content”]
I get it!
You’re busy right now.
And you need to run to Dollar Tree for supplies
So maybe pin this to your Christmas Crafts board
Or to your Christmas vignette board,
Or to your Chrismukkah board (if you have one of those),
Or to whatever board makes sense for you, so you have it handy when you’re ready to get started.
[/et_pb_text][/et_pb_column][et_pb_column type=”1_2″ _builder_version=”4.16″ _module_preset=”default” global_colors_info=”{}” theme_builder_area=”post_content”][et_pb_image src=”https://southhousedesigns.com/wp-content/uploads/2021/07/7-Ideas-Blue-White-Christmas.jpg” alt=”Pin showing 4 fluffy Christmas trees with a wooden soldier on a tray with a title of 7 easy ideas for a blue & white Christmas” title_text=”7 Ideas Blue White Christmas” _builder_version=”4.16″ _module_preset=”default” global_colors_info=”{}” theme_builder_area=”post_content”][/et_pb_image][/et_pb_column][/et_pb_row][et_pb_row _builder_version=”4.16″ _module_preset=”default” global_colors_info=”{}” theme_builder_area=”post_content”][et_pb_column type=”4_4″ _builder_version=”4.16″ _module_preset=”default” global_colors_info=”{}” theme_builder_area=”post_content”][et_pb_text _builder_version=”4.16″ _module_preset=”default” global_colors_info=”{}” theme_builder_area=”post_content”]
Thanks for joining us. I hope we have entertained you and inspired you. And as always, I hope I have helped to bring a touch more joy to you!
[/et_pb_text][/et_pb_column][/et_pb_row][et_pb_row column_structure=”1_2,1_2″ _builder_version=”4.16″ _module_preset=”default” global_colors_info=”{}” theme_builder_area=”post_content”][et_pb_column type=”1_2″ _builder_version=”4.16″ _module_preset=”default” global_colors_info=”{}” theme_builder_area=”post_content”][et_pb_image src=”https://southhousedesigns.com/wp-content/uploads/2020/08/LargerHeres-to-Joy-filled-Living.png” alt=”Here’s to Joy-Filled Living, Diane” title_text=”LargerHere’s to Joy-filled Living” _builder_version=”4.16″ _module_preset=”default” global_colors_info=”{}” theme_builder_area=”post_content”][/et_pb_image][/et_pb_column][et_pb_column type=”1_2″ _builder_version=”4.16″ _module_preset=”default” global_colors_info=”{}” theme_builder_area=”post_content”][et_pb_image src=”https://southhousedesigns.com/wp-content/uploads/sub.png” title_text=”sub” url=”/subscribe” url_new_window=”on” show_bottom_space=”off” align=”right” _builder_version=”4.16″ _module_preset=”default” max_width=”400px” module_alignment=”right” custom_margin=”0px|0px|0px|0px|false|false” custom_padding=”0px|0px|0px|0px|false|false” global_colors_info=”{}” theme_builder_area=”post_content”][/et_pb_image][/et_pb_column][/et_pb_row][/et_pb_section]
This is so clever! I never would have guessed these were from duster mops! They turned out great. Thanks for organizing this hop and motivating me to prep for holidays.
Thanks Marie! Of course, I kept second guessing myself about the dusters. So I am glad to hear you would not have guessed.
The hop was a joy! So fun getting to know each other better.
These are adorable! I love the videos! I need to learn to do that…hold my hand, please!
Thanks so much Leslie! Hey friend, I am all about lifting each other up! If there is something I can help with, I am right there. Just holler.
Oh my goodness! The cuteness! I absolutely love them. On my way to Dollar Tree right this minute!
Thanks Jen!
I hope they have them in stock at yours. They’ve been sold out everywhere for months and months. But one of my stores, just got them back in and then a couple of weeks later, another one. So keep going back if no luck the first time.
That’s the best use of a duster I ‘ve ever seen!! Beats dusting with one that’s for sure! Thanks for sharing – pinning!
Ha! Ha! Why dust when you can trim, right?
You are so clever to think to use a duster for this project. I love what you created and have your project scheduled to share on my FB page.
Oh, Paula. I do scare myself at times with what my mind sees. Thanks so much for the FB share. I really appreciate it. Have a wonderful day!!!
these are adorable! At first I thought they might be made out of a cheerleader’s pom pom! This is such a cute idea! thanks for sharing!!
Oodles of fluffy thanks, Kimberly!
Such a clever idea. I would have never thought of that. Happy hopping with you. Thank you so much for organizing it. Hugs to you.
I just love these – the are so simple but the result is stunning.
So clever! i would have never thought to do this.
How clever to make Christmas trees from dusters! Love the blue and white theme!
Oh My Goodness! These are absolutely amazing, Diane! You are so clever and creative! Pinned!
Thanks so much Lynne!
These are just darling Diane!