Best Design Tips for Unique, Cohesive Container Garden
Inspiration for unique container gardening with design principles for creating cohesive container masterpieces using affordable tricks.
Woo Hoo! I’m participating in another Pinterest Challenge! Lucky you. This means below you will find 13 talented bloggers all sharing Container Gardening inspiration! What could possibly be better than friends and followers, right?
If you’ve made your way here from the super creative Lora, I’m so glad to have you!
Whatever led you here, Welcome! I’m tickled to have you here for a bit and hope you return often.
Let’s explore container gardens!
They’re one of the best ways to add a touch of life (and color!) to any space, from a rambling traditional garden to a small front porch.
But how do you take your container creations from “standard” to ” spectacular”?
Buckle up, because we’re diving into the world of unique, yet cohesive container garden design!
I’m sharing my best tips to help you craft container masterpieces that will turn heads.
We’ll cover everything from choosing or upcycling the perfect pots to selecting stunning plant combinations.

This is the inspiration photo that Cindy, from County Road 407, assigned.
It’s from a garden tour by Carlene of Organized Clutter.
It’s a fun garden and great jumping off point.
But before we delve into the specifics of containers and container plants, let’s explore a powerful design approach that can be applied anywhere, even your outdoor spaces: the art of the vignette!
TABLE OF CONTENTS:
The Magic of Vignettes
Have you ever been captivated by a perfectly styled shelf or a tabletop arrangement in a magazine? That’s the power of the vignette.
What’s a Vignette?
Simply put, a vignette is a small, intentional grouping of elements that tells a story.
The same principles that make vignettes so visually appealing indoors can be used to create stunning container gardens outdoors.
Over the years, I’ve developed a list of eight guiding principles to help me pull together well-styled vignettes. You may remember them first from this Halloween display, then I shared them again for an Easter buffet centerpiece, and then again for a Christmas party cookie display.
Today let’s apply them to a container garden. Afterall, a container garden is truly a garden display or vignette.
Don’t let the term Design Principles intimidate you!!!
Would you rather I call them Style Tips, instead? I mean, that’s what they are, so let’s go with that today. I’ve also changed up the terms to be more novice-decorator friendly:
- Vary your textures
- Vary finishes including matte and glossy
- Mix linear and curved
- Use common color theme
- Add textile or other unexpected touch
- Incorporate negative space — breathing room is a good thing
- Layers- Build up AND build out
- A triangular shape is particularly effective
These apply to the small plants within a combination planter, such as large containers, window boxes, and larger unique garden containers. But they also apply to the whole cluster arrangement of planted containers. Now even our gardens are going meta
By incorporating these style tips, you can transform your container gardens from ordinary to extraordinary.
In the next section, we’ll explore how to choose the perfect container and then plant combinations to bring your unique vision to life!
The Container Style Itself
The type of container you choose should be based on your personal style, as well as the style of your home and other elements in your garden.
A good choice can range from a ready-made container, to a truly unique vintage item you upcycle into a planter. SIDENOTE: You’ll see many amazing upcycled planters throughout this Pinterest Challenge — some of my friends are true vintage gurus!
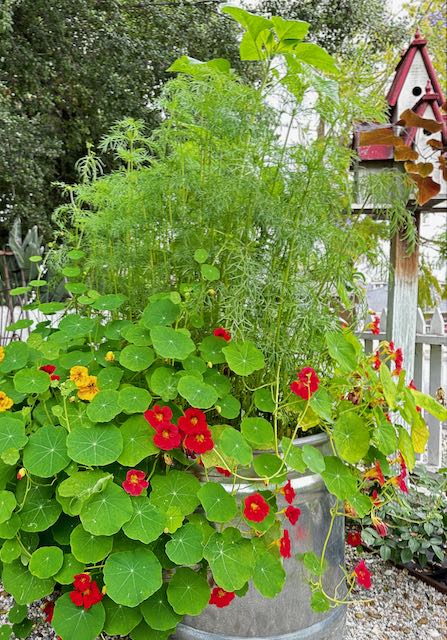
Carlene’s garden, our inspiration image, uses a wide range of vintage vessels, from a watering can to a galvanized bucket, to an old window box.

Check out this adorable seed spreader converted to a planter by my friend Cindy of Reinvented Delaware. We’ve seen wheelbarrows before, but I had not seen this.
I wish I had a picture of it with mature plants and a few other of Cindy’s fun vintage upcycles alongside it. Not surprisingly, it was purchased before the plants had a chance to grow.
PRO TIP: When creating a unique garden container from something else, it’s critical to remember there must be drainage holes.
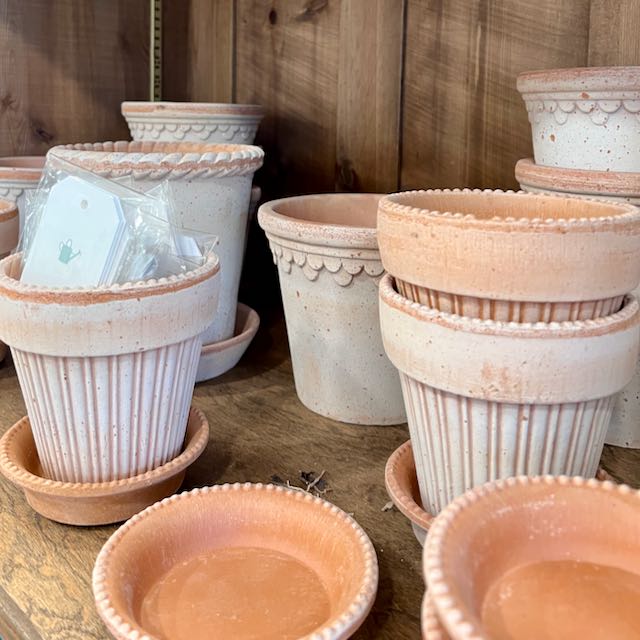
Maybe, you prefer a more terra-cotta style, like this display I saw in the JSHome Essentials shop.
Or maybe you love glazed ceramic pots, small pots and big pots. Either monotone or all different colors!
Maybe your style and your budget are all about the plastic pots. There’s absolutely nothing wrong with that!
Here’s how the first four design principles, oops! style tips, can be applied specifically to pot selection for your container garden:

- Vary Your Textures (Principle 1): Don’t settle for a monotonous row of identical terracotta pots! Create a symphony of textures by mixing and matching materials.
- Classic Elegance: Pair sleek, glazed ceramics in neutral tones with rustic terracotta for a timeless look.
- Natural Charm: Juxtapose smooth ceramic containers with weathered wooden planters or woven baskets to bring a touch of the outdoors into your design.
- Modern Edge: Introduce a contemporary vibe with sleek metal planters in a matte finish. These can be stunning paired with glossy ceramic pots for a touch of contrast.
- Play with Finishes (Principle 2): Introduce depth and sophistication by incorporating a variety of finishes into your container selection.
- Matte: Matte finishes offer a subtle elegance and can be particularly striking with brightly colored plants.
- Glossy: Glossy finishes add a touch of shine and can reflect light beautifully, making your container display stand out.
- Metallic Accents: For a touch of drama, consider incorporating a metallic pot or two. This can add a modern edge or a touch of glamour depending on the overall style of your garden.
- Mix Linear and Curved Shapes (Principle 3): Think beyond the standard round pot! Move away from a uniform look and create a dynamic display by incorporating a variety of shapes:
- Tall and Architectural: Introduce vertical interest with tall, columnar planters. These work well as focal points or for framing doorways.
- Squat and Rounded: Balance the vertical elements with squat, rounded urns or bulbous pots. These add a touch of whimsy and soften the overall look.
- Unexpected Touches: Don’t be afraid to experiment with unique shapes! Look for hanging planters, square containers, or even repurposed objects like watering cans or buckets (with proper drainage holes) to add personality.
- Use a Common Color Theme (Principle 4): A color theme will unify your container garden and create a cohesive look that complements your home. Here are some options:
- Echoing Nature: Select pots in hues that mimic the flower colors or foliage tones of your planned plants. This creates a harmonious and natural feel.
- Bold Statement: For a dramatic effect, choose a single bold color for your containers. This can make a real statement and highlight the beauty of your plants.
- Complementary Colors: Use a color wheel to find complementary colors that will create a visually pleasing contrast that’s full of energy.

There’s no need to force all four of these principles in the pot selection alone.
If your heart says “aged terra cotta”, don’t worry that all the finishes are matte, rather play with the shapes and sizes of the pots as well as any applied details and aging. Then use the plants you choose to bring more variety.
For a happy garden of bright colors, you might choose to go with all solid bright colored plastic or resin pots, varying their sizes and shapes and using a color theme of varying bold colors. Here the texture and finish varieties can again be added with the plants you choose.
By applying these principles, you will elevate your container selection from a random assortment to a curated collection that becomes an integral part of your design. Remember, the key is to have fun and experiment!
A Bit About Arranging the Containers
Now that you’ve chosen stunning containers, it’s time to orchestrate a show-stopping display! Then once you’ve decided on your planter arrangement, you be armed with exactly the kinds of plants you need.
Remember the 8 design principles we discussed earlier? They come into play again when arranging your container garden for maximum impact.

- Vary Textures and Finishes (Principle 1 & 2): Don’t settle for a monotonous row of pots! Our eyes go to bright or shiny items first, so scatter these throughout your arrangement to keep the eye moving.
- Mix Linear and Curved (Principle 3): Play with contrasting shapes. Offset tall, columnar containers with squat, rounded pots. This creates a dynamic flow and prevents a one-dimensional look.
- If you need to build height, Bricks or rocks in a garden are the books in a tray display. Use bricks, flagstone or cobbles to give a pot or two extra needed height.
- If your container garden is on a porch or patio, steps can also some of your pots a lift.
- Or use an old stool, bench or even a chair.
- Incorporate Textiles or Unexpected Elements (Principle 5): Soften the look and add a touch of whimsy with textiles. Woven baskets, textured planters, or even a splash of fabric peeking out from behind a pot can add personality.
- If none of these work for you, add in a garden statue or something whimsical and unexpected.
- Our muse, Carlene used an old pump
- Negative Space is Your Friend (Principle 6): Resist the urge to cram pots together. Leave breathing room between containers to showcase each one individually and allow for healthy plant growth.
- On the flip side, keep in mind that your are constructing a relationship between your containers, so you don’t want to spread them too much and break the bonds between them.
- Embrace the Power of Layers (Principle 7): Create a visually interesting display by building up and out with different container heights and strategically place taller containers in the back for a sense of depth.
- If your container garden is in a larger garden bed with a tree or shrubs, treat them as elements of your display incorporating your pots in and amongst them.
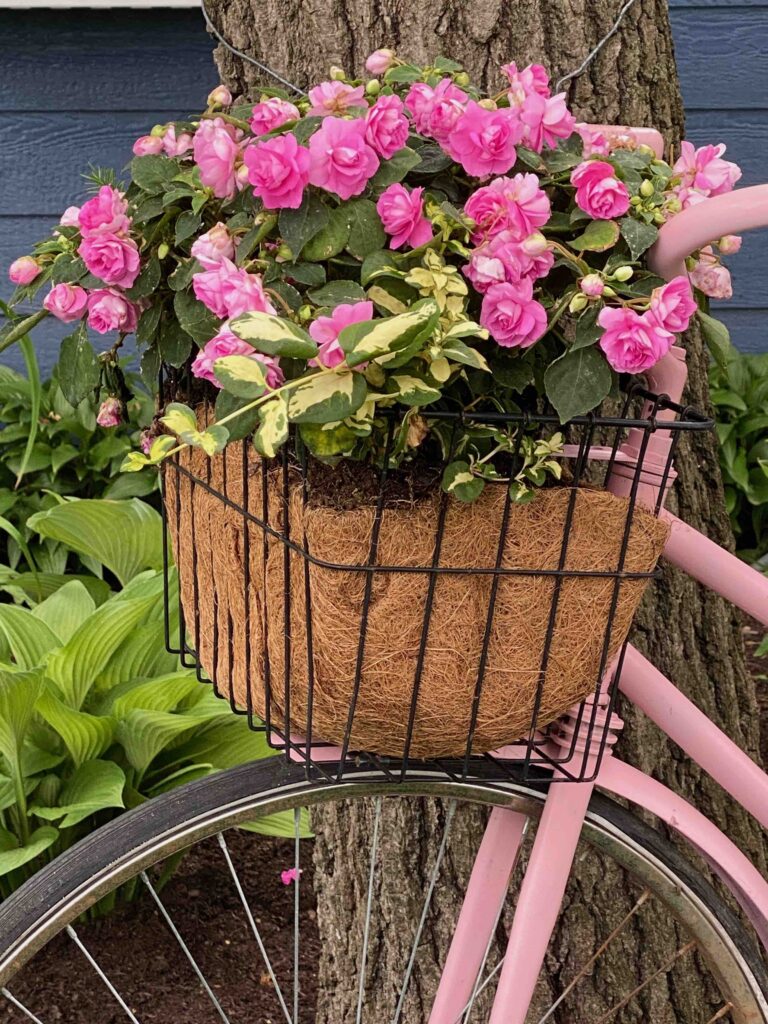
- A backdrop helps to confine the eye to the vignette and further establish the sense of depth. The house or porch itself might be the backdrop. A row of tall plants, like ornamental grasses can be a backdrop. Or even a painted bicycle like Lynn at Living Large in a Small House made.
- Carlene added a chippy white picket fence as a backdrop. Its also was a great way for her to elevate the planter box and a smaller pot.
- The Magic of Triangles (Principle 8): For a particularly effective arrangement, try the triangular formation. Place a tall container in the back as the focal point, flanked by two shorter containers on either side offset a bit differently. This creates a stable and visually pleasing composition.
- If your container garden will be seen from all sides, your tallest elements should be centered somewhat. And build your display out from there.
PRO TIP: As you are placing pots, straight lines, even spaces and symmetry are hallmarks of formality. For a casual, easy-going look, use meandering lines, imperfect spacing, and asymmetry.
Sidenote: it’s probably just the camera angle of the beautiful pots above, but I want to reach up and pull the front white just a bit to the right. Anyone else?
We’ve covered a lot and there is still more ahead, but let’s take a quick break to ask if you are enjoying this post, having an ah ha moment or two? Great! How about more? Join the House Mates or subscribe to be included in all the specials, the printables and blog post notices:
Many thanks! Now back to our gardens:
Finally, Let’s Talk Plants
Guess what! Our design principles, oops style tips, apply here too! Are you surprised?
Several of the 8 design principles we discussed can be applied to plant selection for a cohesive and visually stunning container garden. Here’s how:
Vary Your Textures (Principle 1): Don’t pick plants with similar leaf textures! Create a dynamic display by mixing foliage textures.
- Smooth and Feathery: This pairing from Wendy at WM Design House is full of delightful contrast.
- Bold and Spiky: Juxtapose bold succulents with wispy ornamental grasses for a touch of drama.
- Fine and Coarse: Balance fine-leaved herbs like thyme with the coarse foliage of ornamental millet.
Play with Color (Principle 2 & 4): Color plays a major role in creating a cohesive container. Here are some approaches:

- Monochromatic Magic: Opt for plants with blooms and foliage in various shades of the same color for a sophisticated look. (Think purples from lavender to deep eggplant!)
- Complementary Colors: Use a color wheel to find complementary colors for your flowers. This creates a vibrant and eye-catching display. (Like the purple and yellow Spring bulbs above that Lynn of Living Large in a Small House planted in a vintage wash basin)
- Analogous Harmony: Choose plants with flowers in colors that sit next to each other on the color wheel. This creates a harmonious and pleasing effect. (Think pinks, oranges, and reds for a warm and inviting container.)
Carlene’s garden arrangement could have looked rather scattered, but by repeating the red mixed with a few white and yellow flowers throughout, it became cohesive and intentional.
Height Variation (Principle 6 & 7): Just like container selection, consider plant heights for a layered effect.

- Thrillers: Introduce drama with tall plants like flowering spires or cascading vines as the focal point (thriller).
- Fillers: Fill out the mid-ground with medium-height plants with interesting foliage or colorful blooms (fillers).
- Spillers: Soften the edges and add a cascading element with trailing plants like petunias or sweet potato vine (spillers).
The flowers I used in the pot above are repeated in the window box and three large planters next to the front step. They are just on the other side of the entrance to the cobble courtyard (to the right).
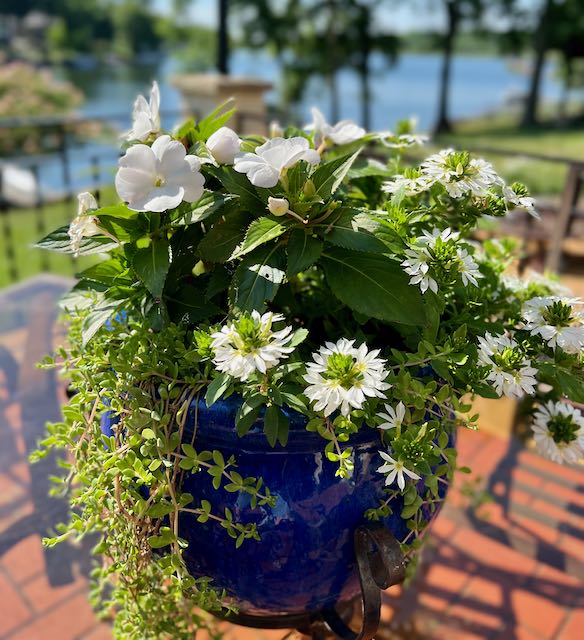
Remember these are guidelines, and there are times, when it may be better to stray.
The above pot sits on our patio dinner table. It’s heavy and awkward to pick up and move, so I intentionally went with two fillers and a spiller to keep it low enough to see and talk over.
And I kept it all white to reference two large patio pots that are filled with tall white perennial phlox. Even though they do not sit right next to each other, and the pots themselves are very different, they still are cohesive
In a display or vignette, your garden pots are all working together as one. So it’s best if you shop for their plants as one. At least know how many of each size plant you need.
PRO TIP: Think about using the same two or three “filler” plants across all your pots to build repetition and keeps the eye moving.
If your garden pots will be arranged within larger garden beds for your displays, keep those bedding plants in mind too. If the bed includes yellow Stella Dora lilies, keep them in mind when choose the potted flower colors.
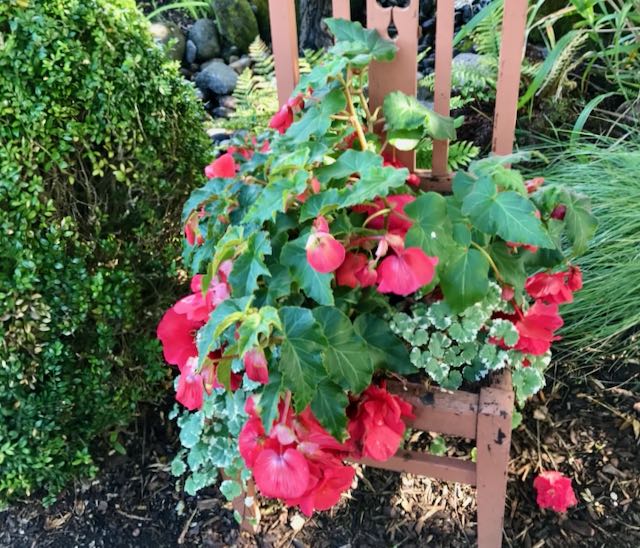
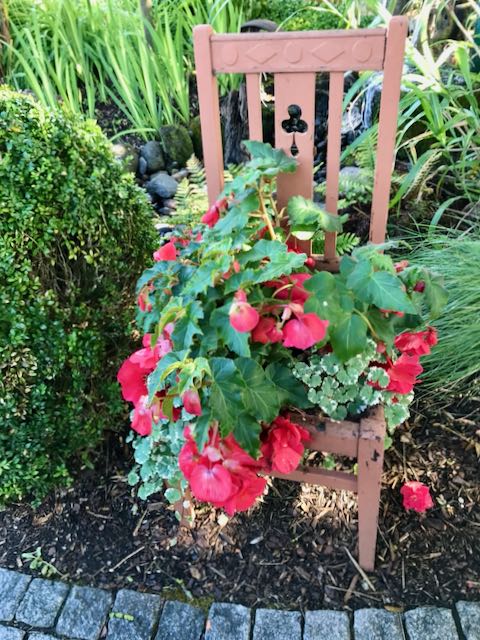
This chair arrangement caught my eye when we were traveling. Rather than sitting a pot next to the boxwood globe on the left, they planted the seat of this old chair. The bright color and variegated leaves really pop in the shade and the straight lines of the chair are a great contrast to the globe and cubes of the grasses.
Do not miss Wendy’s (WM Design House) Entry in this Pinterest Challenge — she shares how she turns a pair of chairs into planters!!!
Please be sure to save this pin to remember this post:

Know Your Plants Needs
With potted plants vs. in-ground plants, you need to be even more aware of their requirements and provide them with the right conditions to thrive. Don’t forget to select plants with similar requirements especially if they will be sharing a planter. These include:
- sun vs. shade
- water demand and drainage
- soil preferences
- root space
- how large and aggressively they will grow
Tips for Stretching Your Flower Garden Budget
PRO TIP: Think beyond annuals for your pots. I often plant perennials in my pots and then transplant them into garden beds in the Fall.
Yes, generally perennials are more expensive than annuals, but this way my pots are full, and I get to enjoy them year after year as I fill in and expand our garden beds.
PRO TIP: Last year I found large sweet potato vines in the Walmart Garden Center. Bought one for $3 and took three cuttings from it. Ten days later I had 4 well- rooted sweet potato vines at less than $1 each.
Be sure to check out my 17 Best Thrifty Flower Garden Tips for stretching your flower budget.
My Favorite Tips When Planting Your Pots
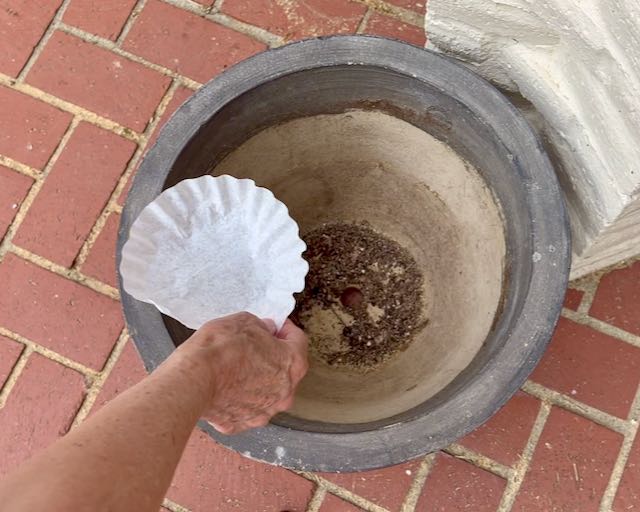
Good drainage is critical!!! But you don’t want to lose all that good garden soil! The answer: coffee filters! They work, plus they’re easy, on hand, and cheap!!!
If you’re pots are in a prominent spot and the plantings look a bit thin initially, over the soil surface add a layer of sphagnum moss with maybe a pretty rock helps fill the voids until the plants mature, and it helps reduce mud splatter during hard rains.
By incorporating these design principles, you will create a container garden that’s not just a collection of plants, but a cohesive and visually stunning composition.
Can’t do it all at once? I get that. Totally!!!
Use the disjointed pots you already have, maybe painting a pot or two, but arrange the pots in the best way possible and then intentionally select your plants with a cohesive plan in mind and you’ll be well on your way to a beautiful container garden sure to boost your curb appeal.
This has been a long post! Thanks for sticking in there with me. We covered a LOT of ground. So if something is confusing, don’t hesitate to reach out. I will respond! I truly appreciate all the feedback I get from you!
Now it’s time for my to send you on to Amber at Follow the Yellow Brick Home where she’s standing by with her beautiful container garden ideas.
Tell the girls I said “Hi!”.


Great tips today. I always forget about coffee filters. I’m also on the hunt for an old bike. Every farmhouse needs one of those. Fingers crossed I can find one that’s cheap! Thanks for joining in. pinned
Such great tips, Diane. I loved Lynn’s pink bike. It’s so pretty with all those flowers spilling over the front. I can’t wait to try the coffee filter trick too. I’ve been trying a few river rocks at the bottom of ours but they make the pots a lot heavier. Hope your Spring season has been a fun one, CoCo
Glad to think my tip may save you some back pain. The post was already so long, I did not go into adding a coiled up pool noodle over the coffee filter so save on some of the expensive and heavy soil in larger pots.
this is such a fun group to hop with hope you’re having a great Spring too!
Wow, great styling and planting tips, Diane! Very thorough. Love the terra cotta pots at your local store; those are divine! So glad you’re joining in on the fun of this group!
Aren’t those the prettiest. Sadly they only have the one style available on line so far. So I’m thrilled to be able to go in person and curate a gorgeous collection!
Really great, timeless gardening tips! Thanks for sharing, Diane! I love the idea of a vintage bike basket planted with stunning flowers!
Diane, I love how you’ve covered all those design tips!! It’s funny how we often just put vignettes together without intentionally thinking about things like the triangles or textures. I appreciate the reminders. 🙂 Beautiful photo stylings, too!
Happy Easter to you,
Barb 🙂
Thanks bunches Barb!
There are so many who see and appreciate a well-styled display, but don’t really know why one is so much more appealing than another. Once they know the “rules” it’s easy for them to replicate. Just hoping to give them all the understanding and confidence to put together some great designs.
What a fabulous post, my friend! love all of your advice about mixing textures and colors as well as all of your other design tips. The filler, thriller and spiller advice is truly one of my favorites. And a big thank you for sharing my link and image. You are a doll.
Thanks Wendy, I know these tips are part of your everyday design life, but hopefully they help others bring it all together. Thanks for so generously sharing your images with me!!!
I enjoyed reading your post Diane! It’s always good to review good advise and tips like yours when I’m getting ready to dive into to planting season! Happy Spring!
Thanks Michelle! Here’s to warm weather, sunshine, digging in the dirt and beautiful gardens!!!
So many great tips and ideas for design that I never think about. I love the coffee filter idea too. Thanks.
Thanks Marty! Coffee filters — not just for making coffee.
Diane, you should write a book using all these valuable tips. Excellent information that every gardener needs to know. Thanks for sharing.
Carol, that is so sweet of you! Thanks bunches!