Easy Hack to DIY Unique, Modern Trim Molding for Walls
Easy Hack to DIY Unique, Modern Trim Molding for Walls
[/et_pb_text][/et_pb_column][/et_pb_row][/et_pb_section]Learn how to create unique, modern trim molding for walls using inexpensive, ready-made trim and a time-saving jig.
So you’ve decided to add wood trim to add interest and depth to your plain, tired walls.
Good choice! Wood wall molding is a great way to add big impact.
But now you can’t find trim pieces that feel right with clean lines for your modern style.
I feel your pain!!!
But don’t worry, I have the perfect solution! And no it does not include a router and any of the specialty woodworking tools
Including several tips and tricks to save you money, loads of time — and an aching back!
So if you crave architectural details in a modern, clean look or perhaps craftsman style, read on!
TABLE OF CONTENTS:
First, a bit of background:
One Room Challenge, Week 4

Please visit the other ORC participants. There are some amazing projects taking place.
Although the challenge runs for eight weeks. I only have one week on site. We live in KC and our daughter lives in DC. And we are making over her terribly plain Jane main floor powder room.
It’s a tiny room that’s getting a huge injection of style — and function.
The first three weeks, I broke down the 3-Step processes I have learned to follow for planning a successful room makeover:
First Step – Wk 1 – Determining your goals for your makeover — starting with functionality and then adding style including general color palette
Next Step – Wk 2 – Refining and finalizing design choices — from flooring to wallpaper, to furniture pieces and specific paint colors
Third Step – Wk 3 – Checklists and Planning Aids for a Successful Makeover – all the tools I use BEFORE I begin installation
Takeaway From Week 1: Always, always do the proper planning with floor plan and mood board.
Takeaway From Week 2: Follow the correct order in finalizing your selections, each decision influencing the next. Hint: Specific paint color is NOT first!
Takeaway From Week 3: Breaking down installation steps and using checklists or a spreadsheet, makes for a smooth, shorter installation.
So it’s Week 4 and I am finally on site, ready to put all my best planning to work.
Did you miss these? Oh, you then you must not be one of the House Mates. You can take career of that now. Join this happy band of creatives to not miss anything and have access to our resources and exclusive content.
Thanks, now back to our trim project:
Learn my inexpensive way to create unique, modern trim molding for walls using budget-friendly ready-made trim and a time-saving jig.
What I am applying to a small powder room for the ORC, you can easily repeat this in a living room, dining room even a son’s bedroom in your own home.
Planning Your One-of-a-Kind Trim Work
Our design plan started with a unique chair rail. We wanted a chair rail that is symmetrical. But of course, do what you like best for your style and your space!
We wanted to bring the warmth of natural wood into this space, so we opted for a center band of raw wood (sealed with a clear coat) bordered by a simple profile of painted wall wall moulding on the top and bottom.
This chair rail will be the focal point of our wall treatment.
We planned to add box moulding, sometimes called picture frame molding, below the chair rail to continue the look with depth and interest.
To keep it from fighting the wallpaper in such small room, we will paint the wall and wood moldings one paint color.
Finding Your Box Molding
There are many places to find wood molding, mdf boards or even poly. You can even order pre-assembled wall molding picture frames.
But perhaps the easiest and least expensive way is to head to your local home improvement store (we bought ours at Lowes).
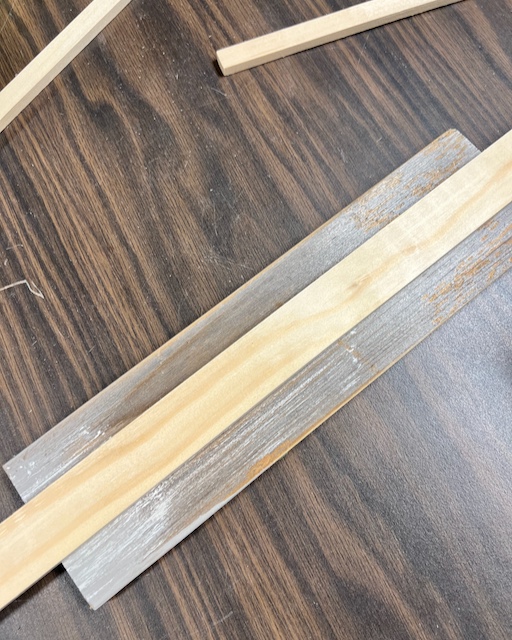
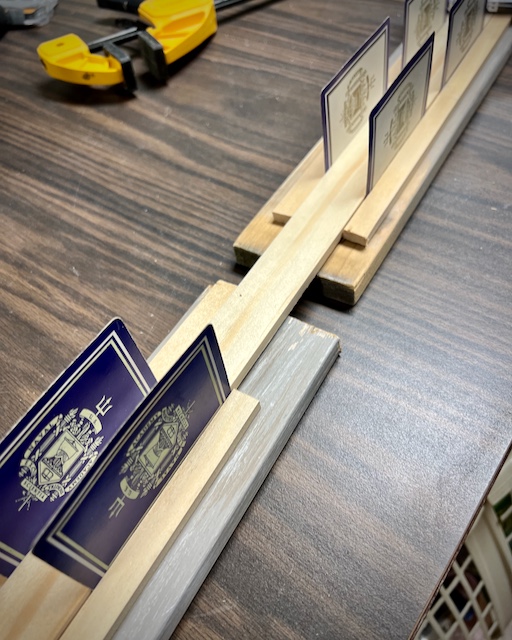
For the simple, clean look we wanted we opted to use a strip of lattice (1 1/8-inch wide lattice) topped with pine screen (3/4 -inch wide X 1/4 – inch thick). This simple clean look will be our box moulding frames,
We wanted the chair rail top and bottom to be related, but not exactly the same.
So we used the same pine screen, but thiis time it its topping a pine stop that has a one sided simple profile. It cost us just about $300 for all the wood trim to complete this project.
PRO TIP: Keep in mind the depth of your existing door casing and window frame when designing your stacked molding for a chair rail.
For a clean polished look, keep the chair rail depth less than the depth of door casing and any window frame. Your chair rail will butt up to these with no need for awkward transitions or difficult turn back cuts.
Easy Way and Best Way to Make Stacked Wall Molding
This is the best tip for really stream-lining your project!
Glue your stacked pieces together BEFORE cutting your trim pieces using a custom jig you make following my step-by-step guide (below).
It’s a short shopping list:
- scrap wood (see notes below)
- wood glue
- nail gun, brad nailer (or even brad nails and a hammer)
And samples of your trim pieces of course.
SCRAP WOOD NOTES:
— Your jig bases should all be the same thickness
— Your scrap pieces of wood for the bottom trim rails need to be the same depth (or slightly thicker than your bottom trim pieces).
— Any thin piece of scrap trim will work for the top pieces
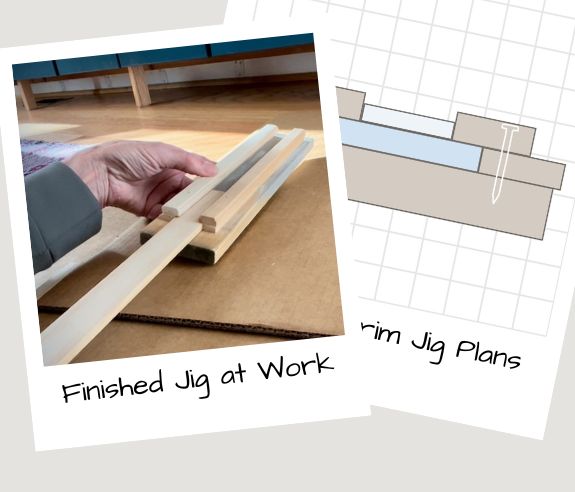
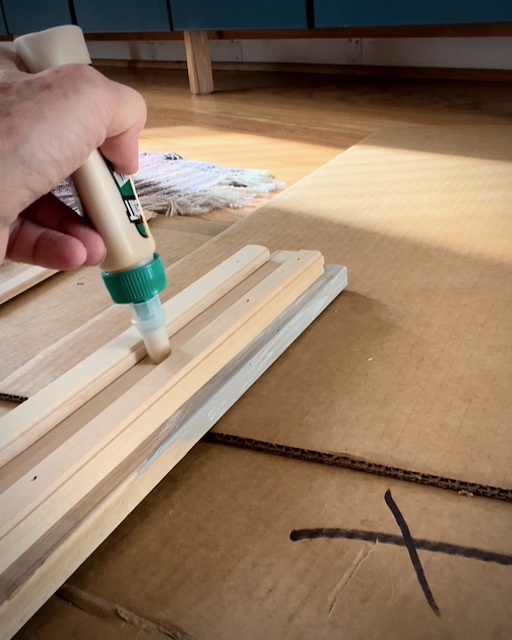
Build Your Stacked Trim Jig
We wanted the thin pine screen centered on the wider lattice.so with mitered corners, it is critical for the pine screen to be truly centered.
The thin screen has a tendency to bow side to side. so to speed the gluing process along and assuring a centered placement, I made a jig to hold the boards together.
As always, I encourage you to do “You”. Take my project and make it your own. So you’ll need to adjust the jig to meet your trim. But I think you’ll see it’s really a very simple concept — and simple to do!
NOTE: I made three short jigs, mainly because I was taking them on the plane. It worked fine. But a bit longer, or maybe four jigs would have been even easier.
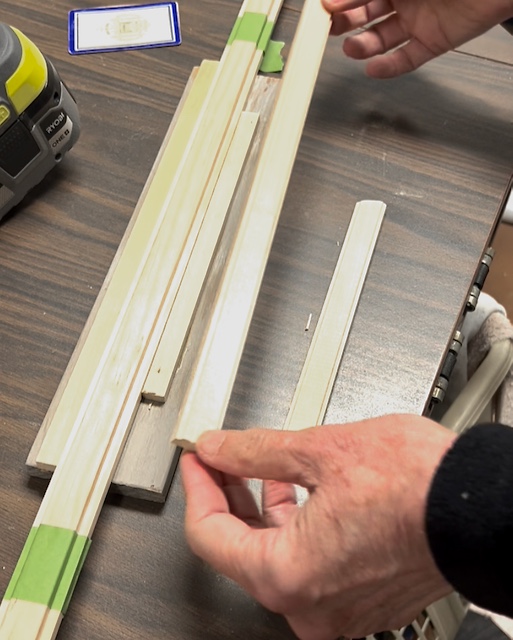
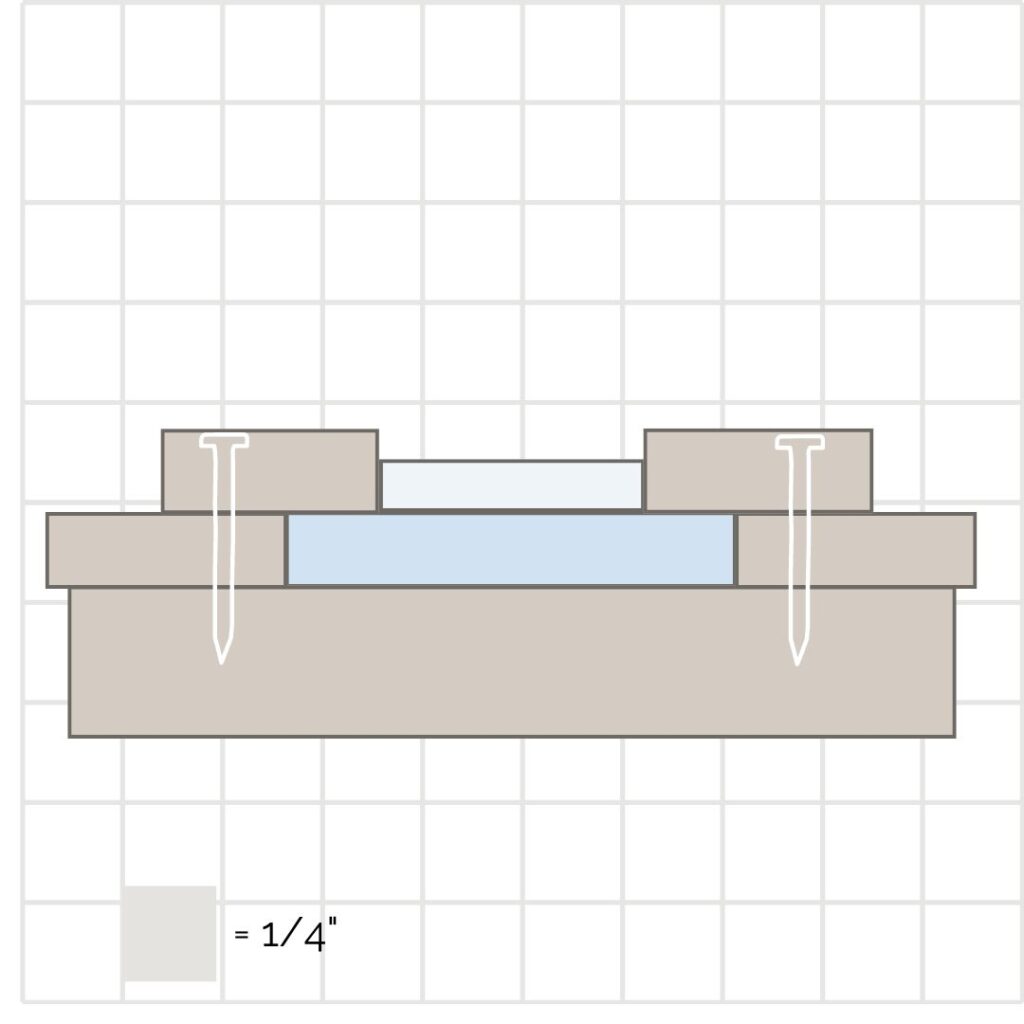
For my jigs, I needed 5 pieces of scrap wood for each jig — one for the base, one small trim piece on each side of the bottom trim pieces and one on each side of the top trim pieces:
- Set a length of your bottom trim on your jig base
- Add a length of same height (or slightly taller) scrap trim on each side. Allow a sliver of space between (I used a playing card) and glue in place.
- Center the top trim in place. Tape or clamp it, making sure it is centered
- Add scrap trim on each side, again with a sliver of space. Hold tightly and brad nail in place.
Slide your sample trim out and your jig is ready for the “big guys”.
Your jig is such a simple way to combine your long lengths of moulding before they head to the miter saw.
Using Your Stacked Trim Jig
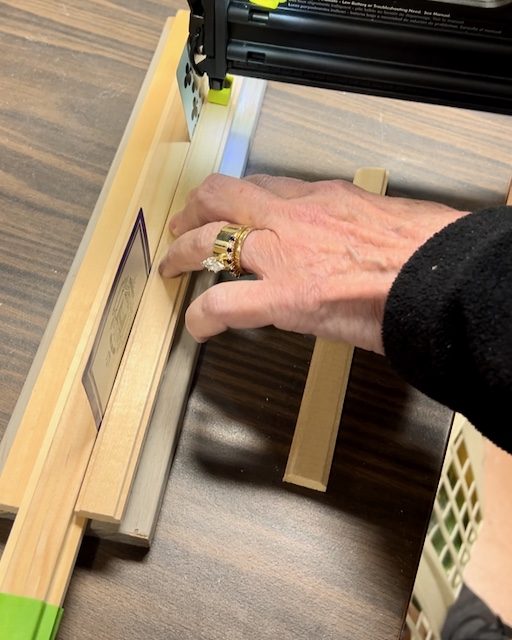
Start by sliding your base piece of wall molding into the jigs.
Add a very thin line of wood glue down the center.
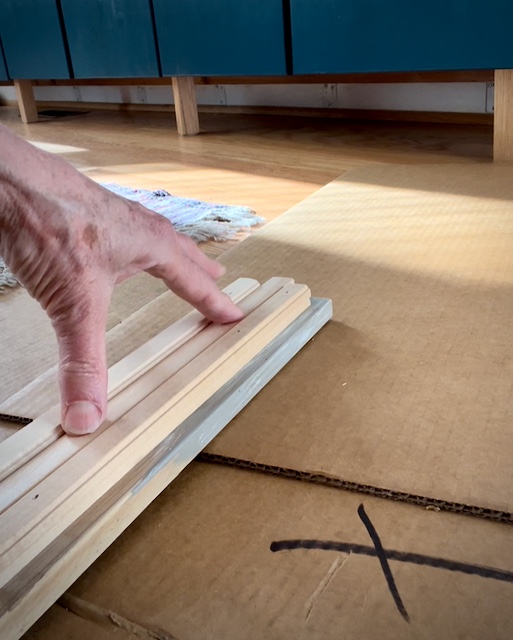
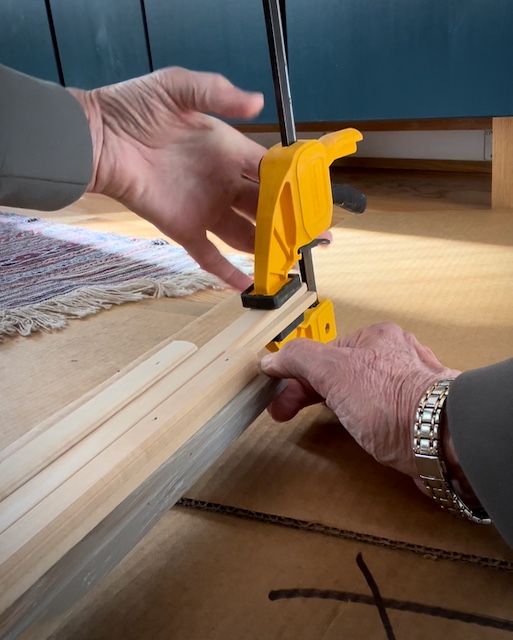
Lay your top trim between the top rails. Push down for good contact.
Lay some weights on top or clamp in place.
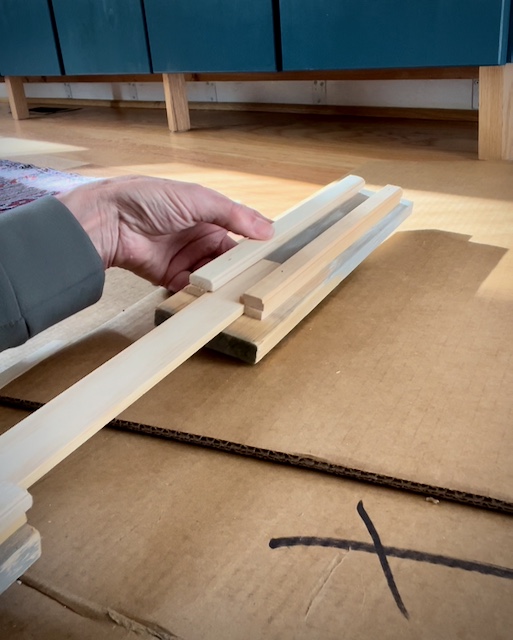
Let glue set per label directions.
Slide the jigs off.
Repeat and repeat.
PRO TIP: Slide the jigs to check and make sure there is no glue seeping out. Wipe any seepage with a damp cloth .
NOTE: I used Titebond III. We let the glue set up for about 30 minutes and then slid the jigs off and moved on to the next set.
This simple little jig saved us hours valuable installation time. But even more importantly, it assured our trim is centered properly and will line up when installing our trim boxes.
Forget limitations!
This DIY project goes beyond the basic trim options you’ll find at your local Home Depot or Lowe’s.
It’s about injecting your unique style, not just into the room, but all the way down to the trim itself.
Let’s ditch the “builder grade” look and create something truly personalized!
Stay tuned, coming on Friday, is how to plan out your chair rail and box frame, measuring, cutting and installing. I’ll be sharing all the best tips and tricks to streamline your project.
As always don’t hesitate with comments or questions; I am here to help.

I love how you showed setting this up! Can’t wait to see how it all turned out!
Juliette, AKA The Shady Gal, fellow ORC participant
Thanks Juliette! It’s coming together (so glad I had an extra day built into the schedule). Getting the water turned off certainly threw us for a loop! Gotta love these old buildings. 😬
pictures are confusing. Would like to have seen finished result
Sorry for the confusion! I hope Friday’s post clears this up for you. It was just too much to include the jig and the installation in one post. So two ORC posts this week.
Diane, I’m so intrigued with your DIY moulding. I love the idea of your jig and can’t wait to see he results in the half bath.
We are also remodeling a bathroom for the ORC, but ours is a major reno with reworking the entire bathroom layout.
Your’s is looking great! Fortunately you’ve got the whole eight weeks to accomplish such a major undertaking!
This is such a fun project Diane, I cannot wait to see the finished powder room.
Thanks Wendy! It’s been fun doing this with Katie and Doug!
Great instructions for DIY modern trim molding, which I desperately need. I am curious if your molding is only going chair rail height or all the way to the ceiling? I was just a tad confused, and anxiously awaiting ‘after’ photos!!! Keep at it, you are doing fabulous!
The jig as well as installation was a LOT to squeeze into one blog post, so I split it up a bit.
P.S. Nevermind me! I just looked at your drawings again at the top of the page and see your vision now!!
Ha Ha, Julie. Yes wallpaper above.
Excited to see this project come together! I love how you summarized the takeaways from each week. After DIYing for 15 years, I still have a takeaway from every single project. Also the diagram was a great idea! I’ll have to remember that in the future when I need a visual aid to explain things : )
Isn’t that the truth Mary! Every project we learn how to adapt and pivot as needed. Glad the diagram helped!
This bathroom is going to look amazing Diane! I’m sure your daughter is so excited about the finished project. Thanks for the great short video about the little sander! Great tip!
Thanks Cindy! YES!!! They are loving it — it so perfectly reflects their style. And Katie had a hand in every step along the way.