
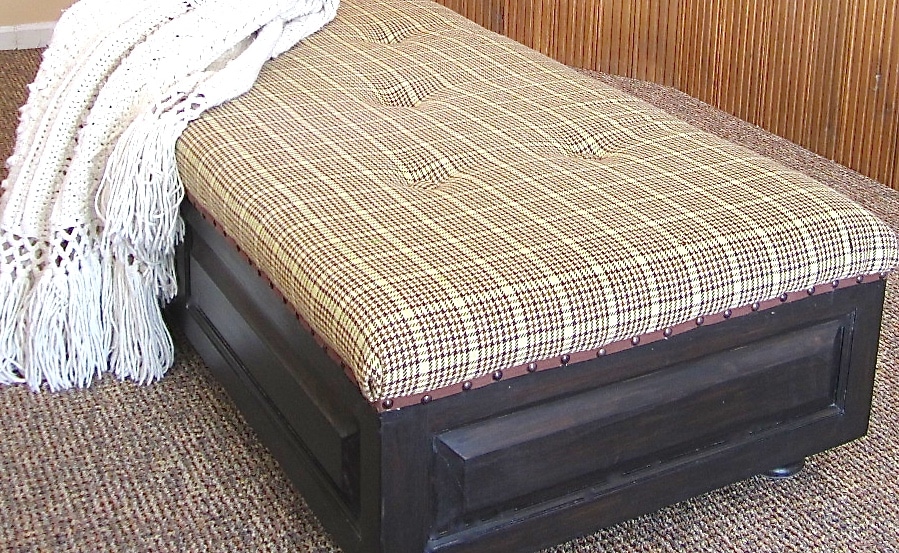
Great Comfy DIY Tufted Ottoman: From Overhead to Underfoot!
Learn how I repurposed a $5 ReStore furniture project into a stunning tufted ottoman,
complete with a button tufting tutorial.
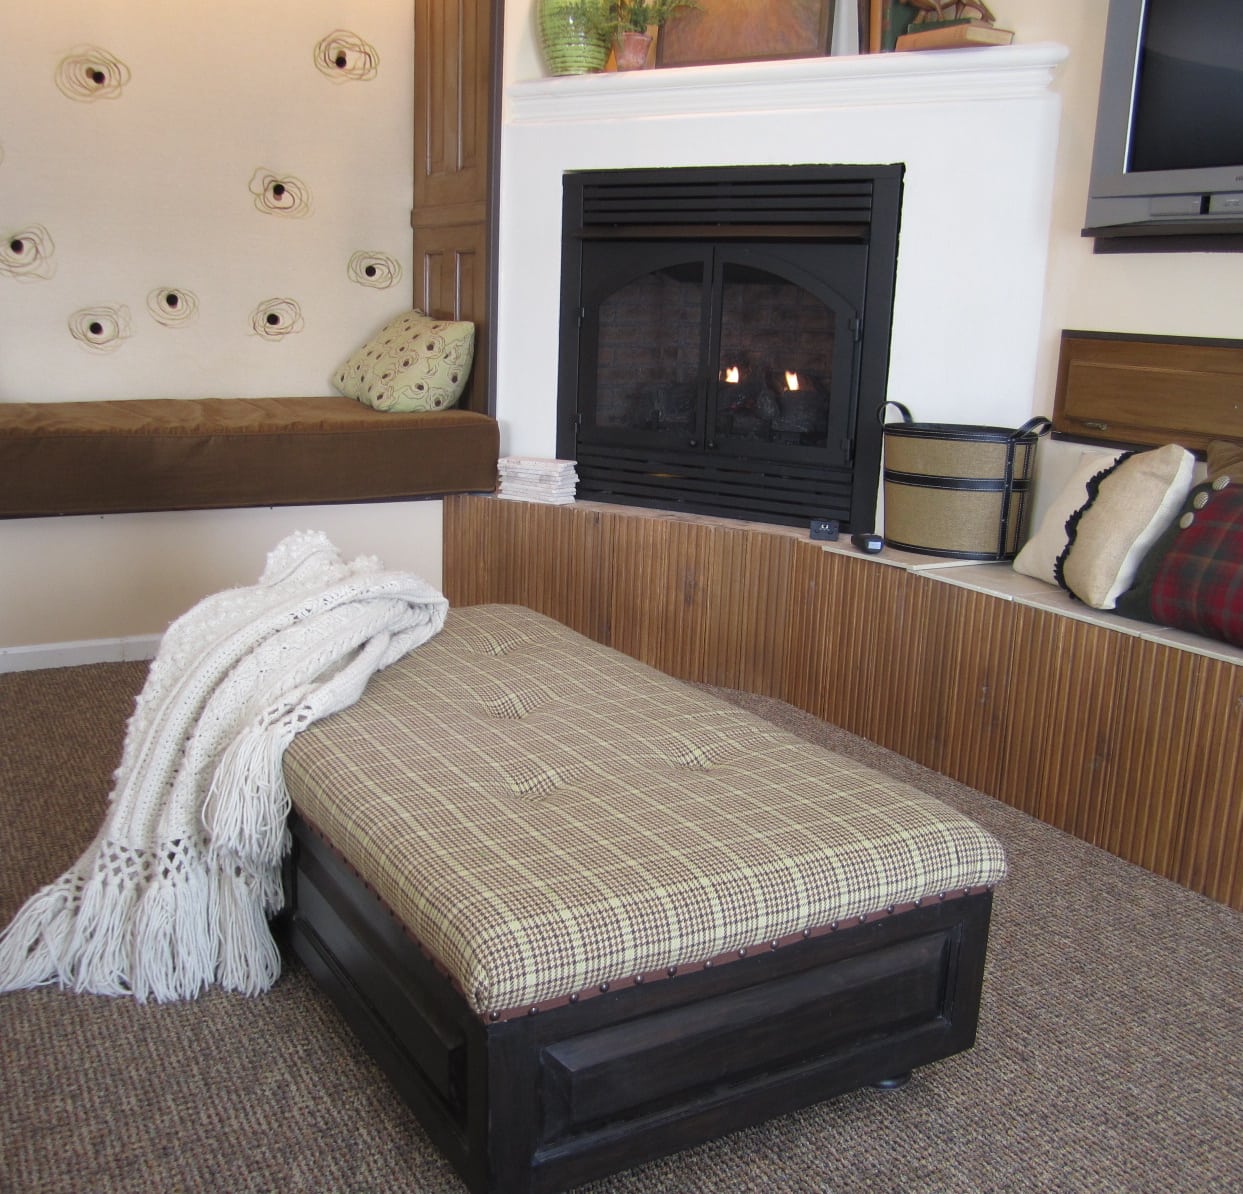
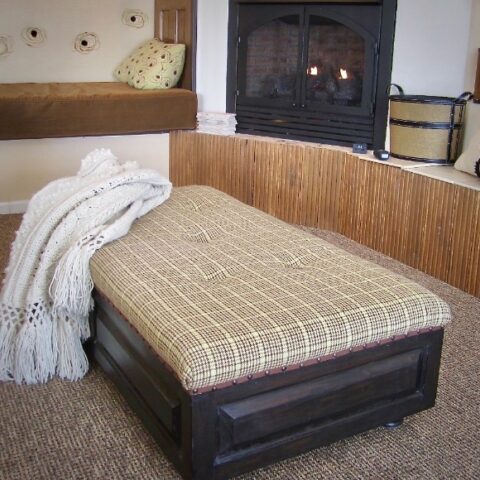
A large, sturdy tufted ottoman was non-negotiable for our basement makeover—large enough for when couples gather for rowdy games of Apples to Apples or Sushi Go, tufted for that irresistible cozy factor, and sturdy enough to withstand a herd of teenage boys.
With our renovation budget already stretched thin, DIY was the only way forward.
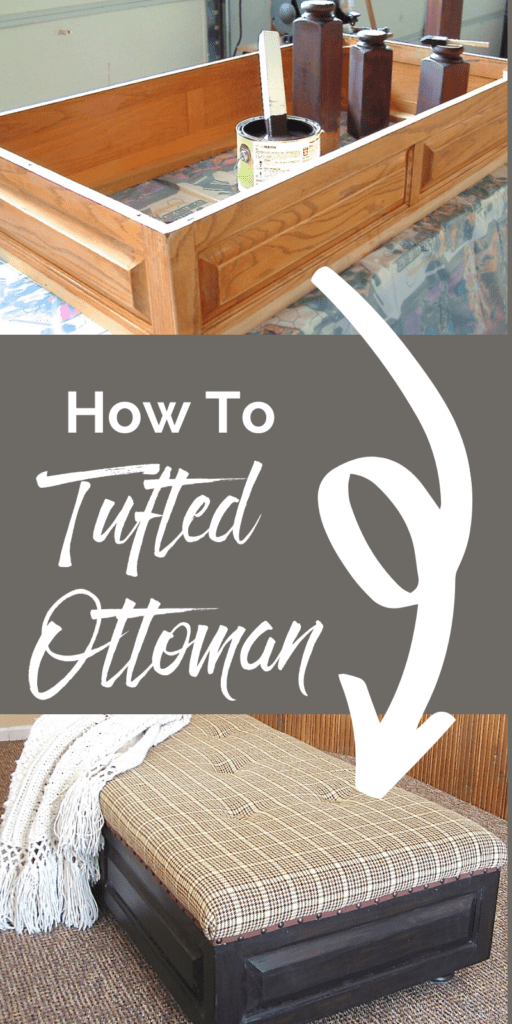
During one of my therapeutic wanderings through our local Habitat ReStore (fellow DIY addicts, you know that high!), I spotted a solid oak box that screamed potential.
For just $5, this former kitchen island light enclosure was coming home with me. Its hefty construction and perfect dimensions made it the ideal candidate to transform into the statement ottoman I’d been envisioning.
With a girth of 26 x 50-inches, this big guy definitely qualifies for beefy!
Since the frame is 9-inches tall and a couple more inches of foam, I didn’t need full legs, but just some substantial feet to lift it a bit off the floor and provide some toe clearance.
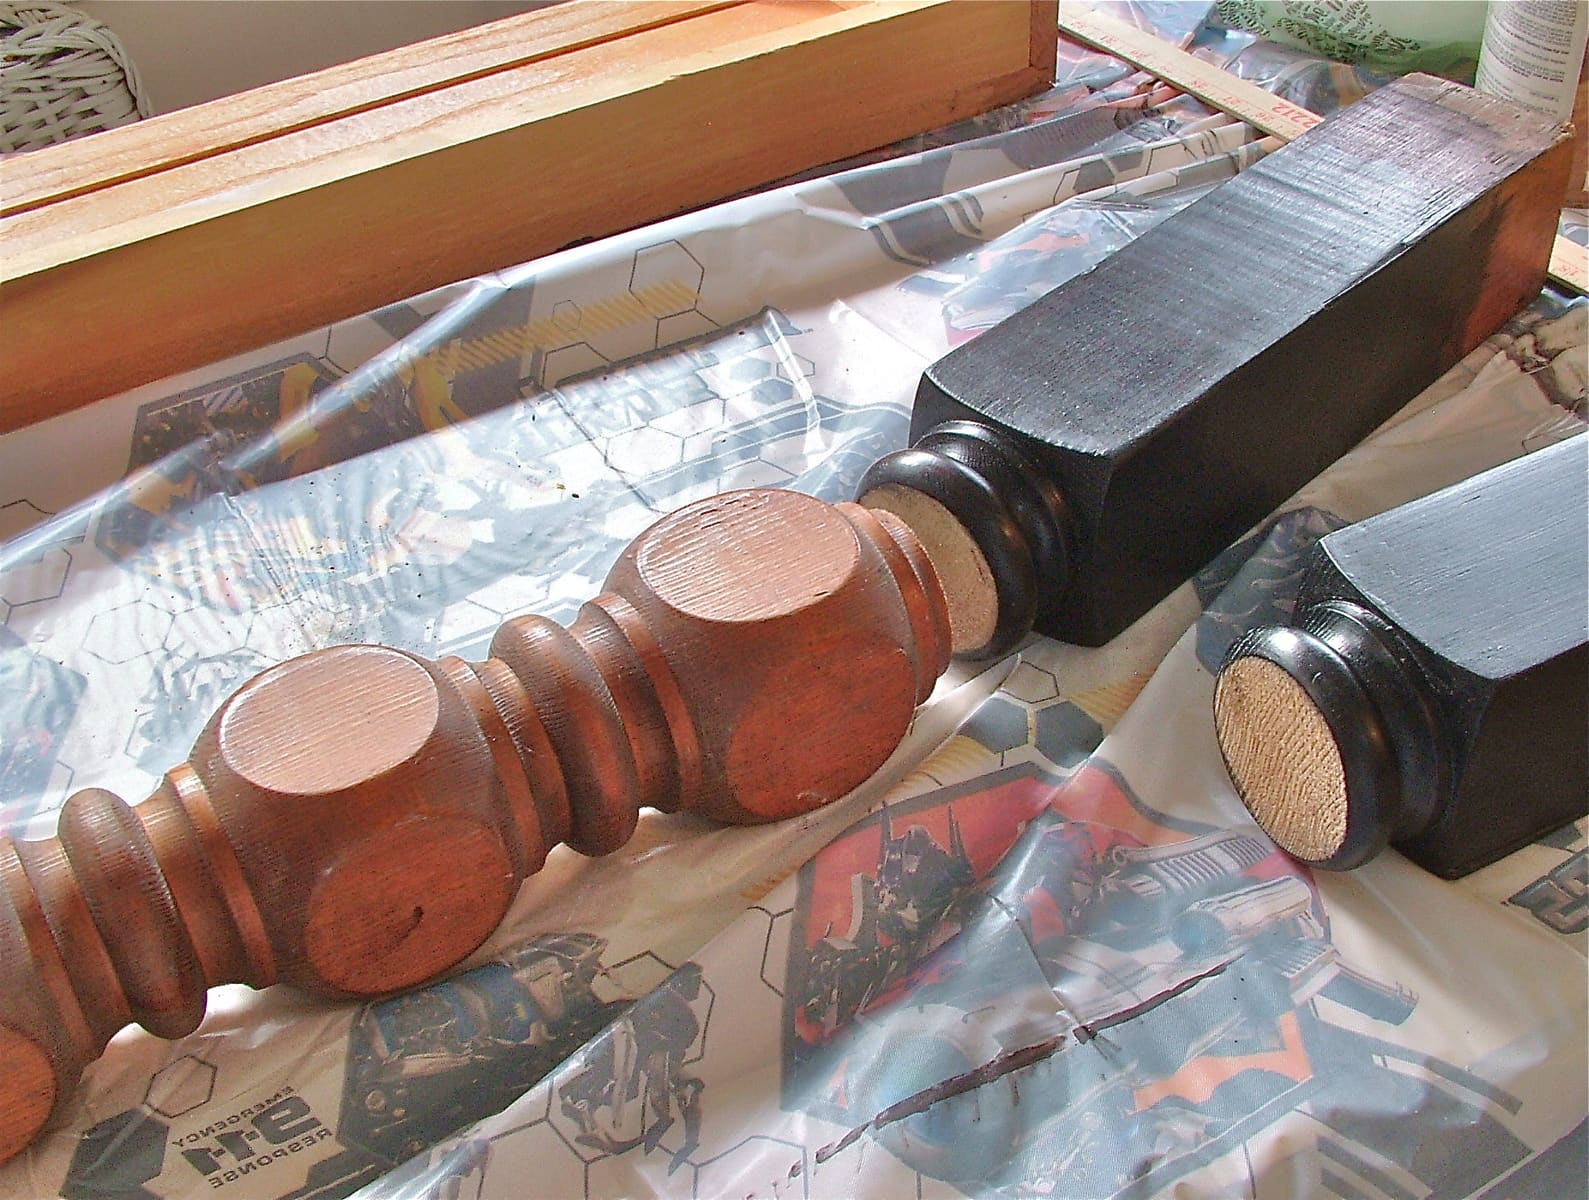
Across the way in the lumber department, I salvaged 2 horribly dated, but stout solid wood newel posts – just what I needed.
Join me on this overhead to underfoot transformation to help you envision something similar for your home.
TABLE OF CONTENTS:
For My Seasoned DIYers That Want Just a Quick Glance:
For those that want all the details and tips, keep scrolling
How to Easily Upcycle an Old Light Box into a Comfy Tufted Ottoman
How to easily convert an old overhead kitchen "feature" into a stylish ottoman.
Materials
- Wooden box/frame (mine: 26" × 50" × 9")
- Decorative wood posts for feet
- 3/4" plywood for top
- 3 - 4" upholstery foam
- Dacron batting
- Upholstery fabric
- Decorative buttons with shanks
- Clear backing buttons
- Upholstery thread
- Decorative nailheads
- Twill tape/webbing
- Wood screws, glue, stain, wax
Tools
- Saw
- Drill
- Staple gun
- Upholstery needle
- Tack hammer
- Sandpaper
- Measuring tape
Instructions
- Sand and stain wooden box and feet
- Attach feet to box corners with screws
- Cut plywood to match box dimensions
- Attach foam to plywood with spray adhesive
- Cover with batting and staple to underside
- Mark and drill button holes through plywood
- Cover with fabric, staple to box frame
- Add button tufting through pre-drilled holes
- Finish edges with decorative nailheads and trim
Notes
NOTE: Keep scrolling for all the details and tips!
The Full “Hold-My-Hand” Guide to Ottoman Glory
Step 1) Treasure Hunting for Your Ottoman Base and Legs-
Look, I’m not saying you should lurk around thrift stores with a measuring tape and a wild look in your eyes, but… okay, that’s exactly what I’m recommending.
The perfect base is out there waiting! I found mine at my favorite Habitat ReStore, in the form of a solid oak light box that was likely hiding fluorescent tubes in a 1990s kitchen.
My box was 9 inches tall—substantial, but still crying out for some elevation (beyond a couple of inches of foam) and toe clearance.
Across the way in the ReStore lumber department I salvaged 2 horribly dated, but hefty solid wood newel posts – just what I needed.
DIY Detective Tips:
- Look for sturdy wooden structures with good bones
- Ideal height is 16-19 inches for most comfortable ottomans
- Check for structural integrity (nobody wants a collapsing ottoman during game night)
- Get creative! Solid wood coffee tables are the next best thing. But also consider wooden crates, old trunks, even a bench with legs cut shorter
- Measure twice, buy once—make sure it fits your space
Step 2) Prepping Your Wooden Canvas and Legs-
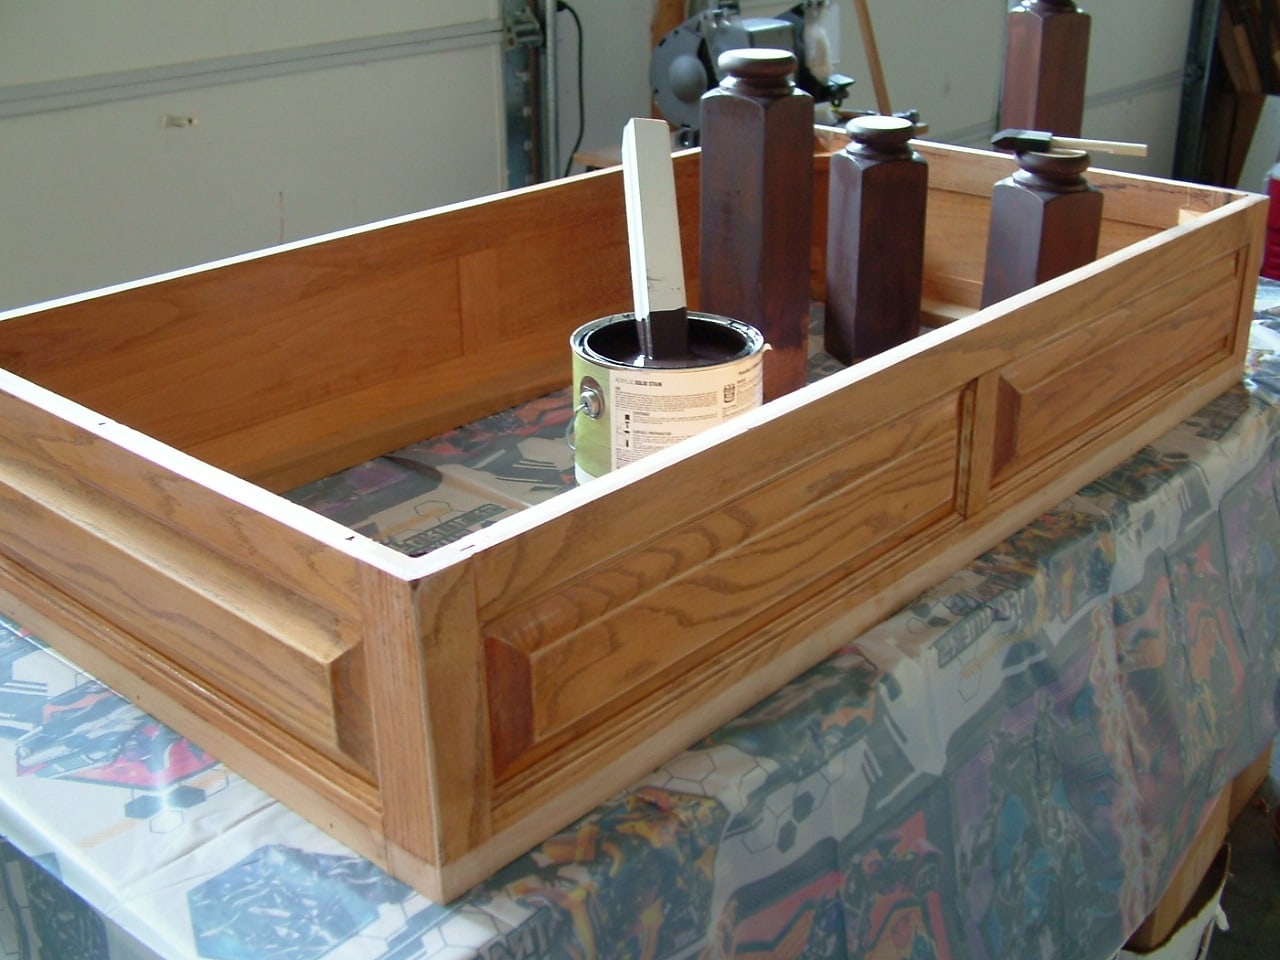
Once you’ve hauled your treasure home (and explained to your family why you’re so excited about a box), it’s time to make it beautiful from the ground up.
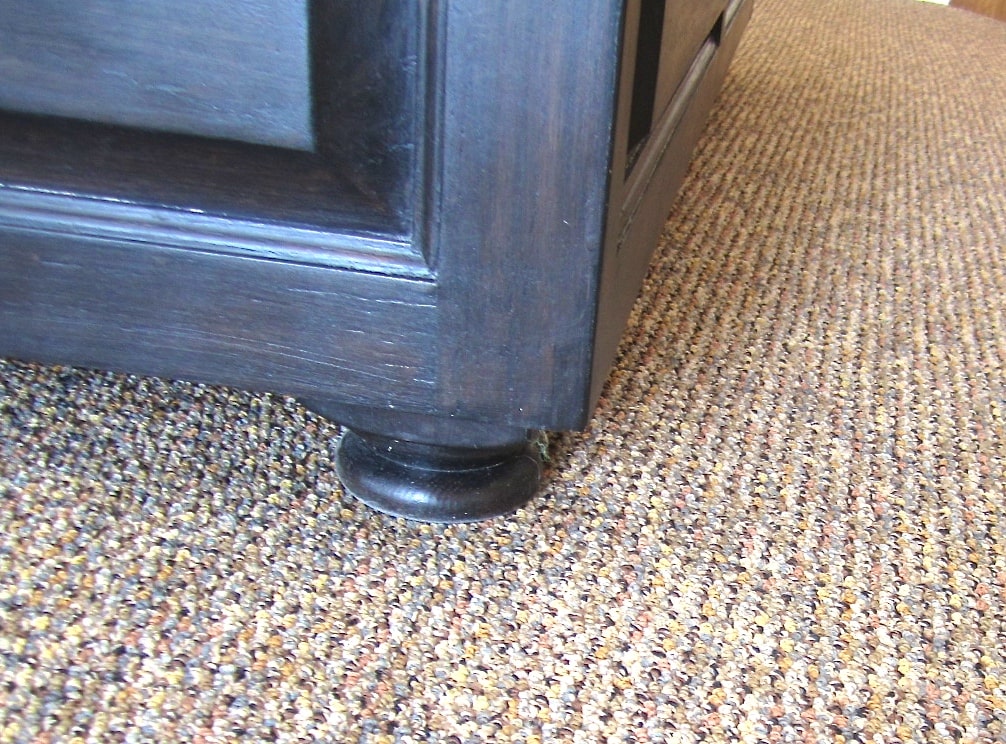
- Prep Your Posts: Cut your newel posts or furniture legs to desired length. I left enough of the squared part to fill the corners of my box, with just the round “bun foot” extending below.
- Sand Your Box and Legs: Give them a good sanding all over. I used 120-grit followed by 220-grit sandpaper to smooth any rough edges or splinters. You’re aiming for smooth, not baby-bottom perfect.
- Choose Your Finish: I went with a dark gel stain because:
- It’s fool-proof (perfect for any skill level)
- Creates a rich finish without hiding wood grain
- Doesn’t drip like liquid stains (my floors thank me)
- Apply Finish: Follow the directions on your finish of choice. For my gel stain, I wiped it on with a lint-free cloth, let it dry, then applied paste wax for that subtle sheen that whispers “I’m fancy” without shouting it.
Pro Tip: a dark stain or paint is best for marrying mismatched wood and still get a “perfectly planned all along” look.
Safety First! Work in a well-ventilated area unless you enjoy light-headedness and explaining to your spouse why you’re giggling at the garage wall.
Step 3) Giving Your Ottoman Feet to Stand On–
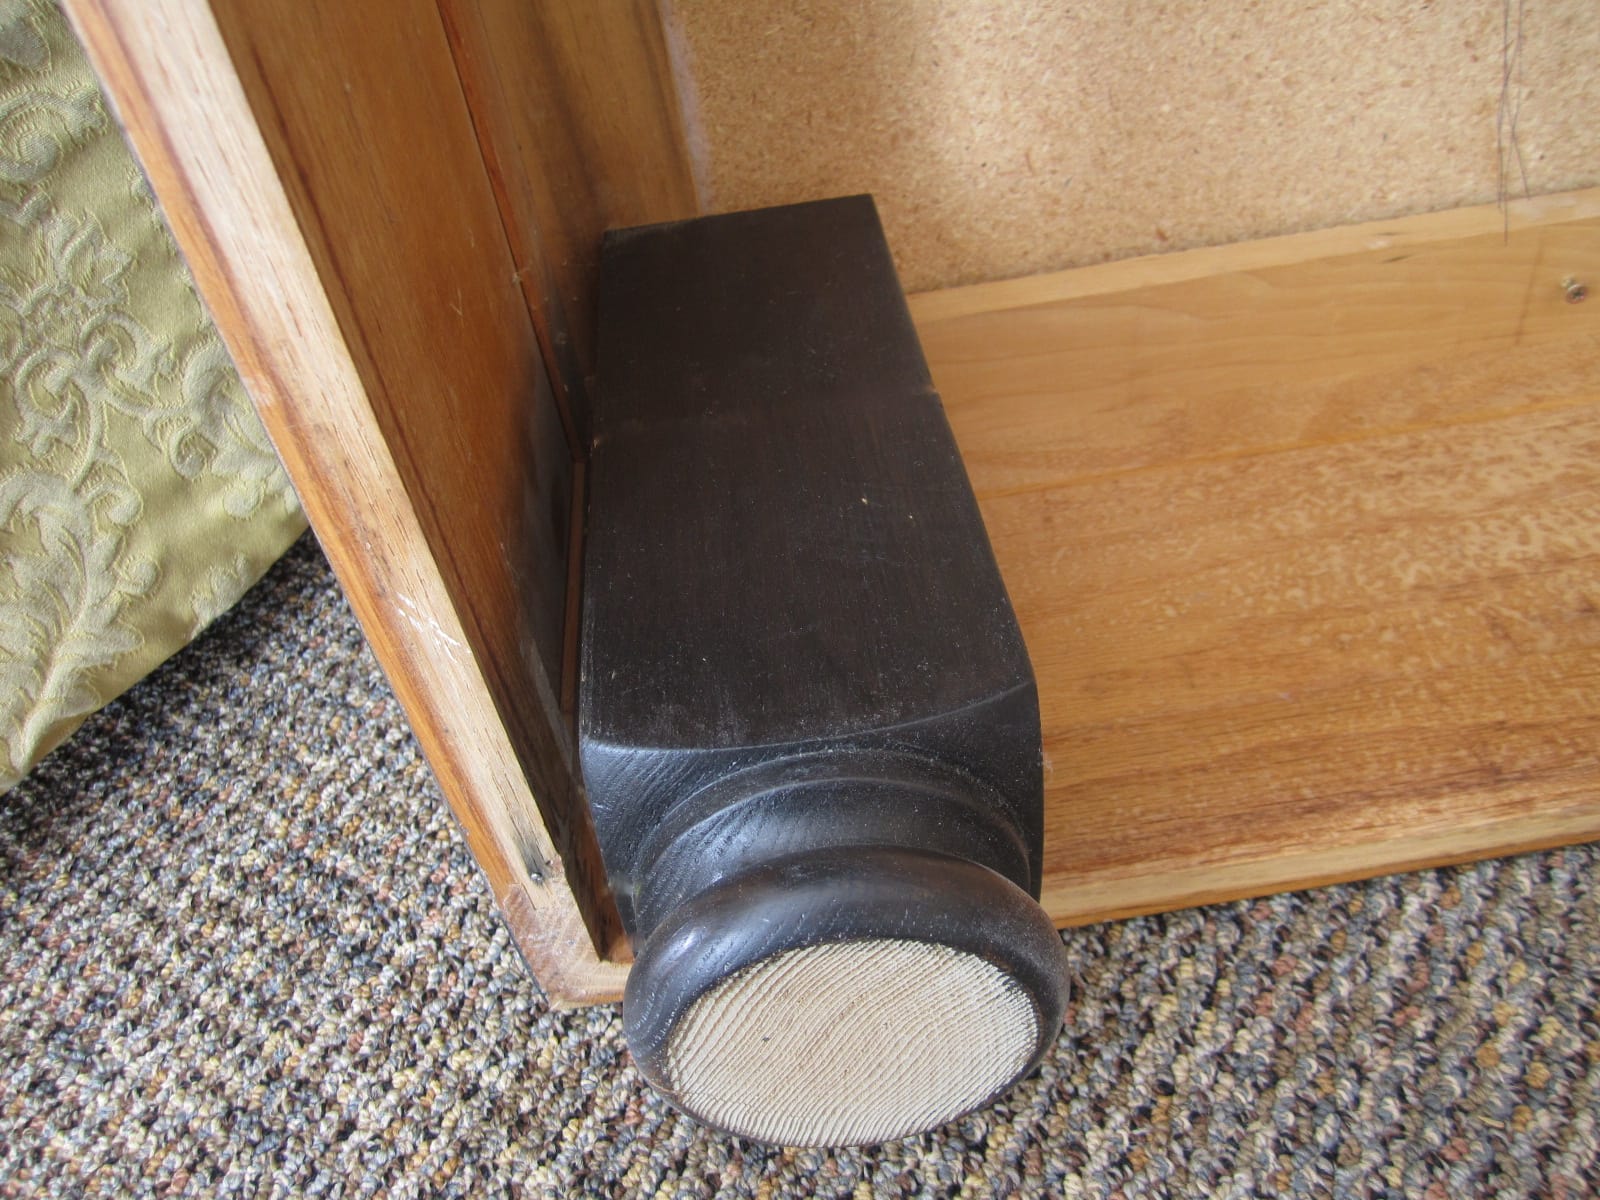
Attach to Box: Position in corners and attach with 4 wood screws per leg. I drove screws down through the lip of the box frame into the two outside edges of the posts.
PRO TIP: Pre-drill holes to prevent splitting and countersink screws so they don’t interfere with the top.
Wobbly Warning: If your legs aren’t perfectly even, address it now before you have an ottoman that rocks like it’s at a concert.
Step 4) Creating the Comfy Top–
This is where we transition from “weird wooden box” to “luxury furniture piece.” The magic happens with foam, batting, and a bit of determination.
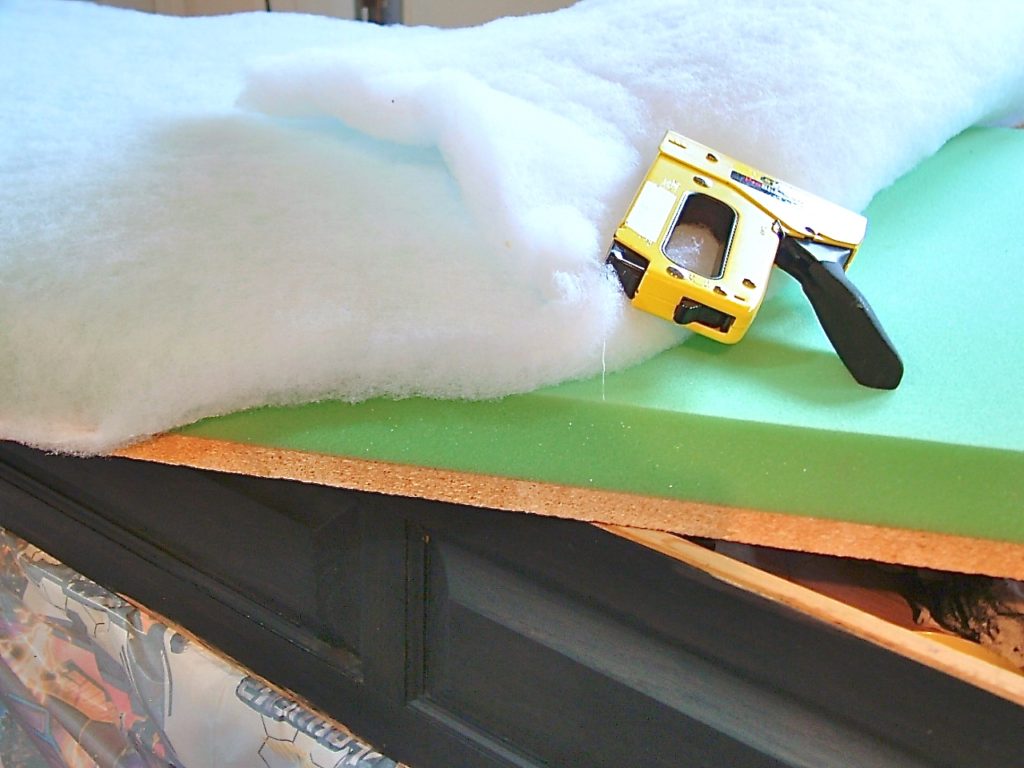
- Cut Plywood: Measure and cut your plywood to match the dimensions of your box top. If you don’t have a saw, most hardware stores will cut it for you (bat your eyelashes for free cuts).
- Plan Your Tufting: Mark where you want your buttons. I went with a simple grid pattern, but you can get fancy with diamonds if you’re feeling adventurous. Whatever pattern you choose, mark and drill small holes through the plywood at each button location.
- Foam Application: Cut your upholstery foam to match your plywood dimensions. Using spray adhesive (in a well-ventilated area!), attach the foam to the plywood. Press firmly and let it set.
- Add Batting: Lay your batting over the foam, allowing approximately 6 inches of overhang on all sides. Flip the whole assembly over (this is when a helper comes in handy) and staple the batting to the underside of the plywood. Work from the center outward, pulling taut but not stretching.
PRO TIP: The density of the foam is as important as the depth of the foam. If your goal is for function beyond the pretty face, invest in quality foam.
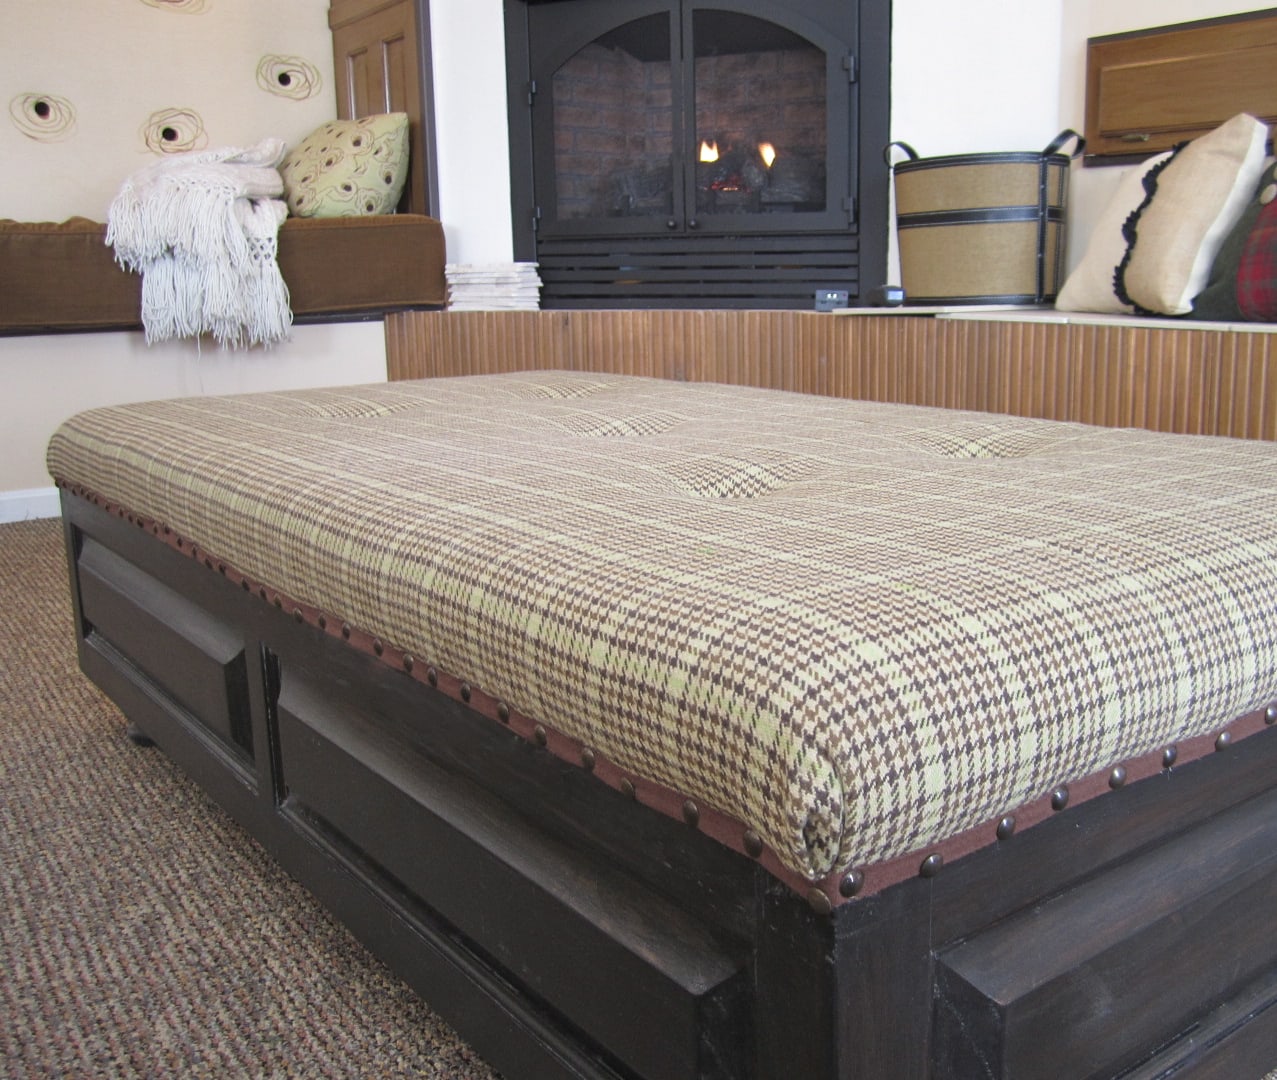
Step 5) Fabric Fantastic-
Time to dress your ottoman in its forever clothes. Choose a fabric that balances beauty with durability—remember, this piece is literally made for putting your feet on.
FABRIC PRO TIP: Upholstery fabric is a must, but even better are Performance fabrics.
You can read more and find some of my favorite sources in this post where I upholstered our dining banquette.
- Position the Board: First, place your particle board (with foam and batting already attached).
- Attach Board to Frame: Before adding fabric, secure the particle board to the box frame from inside the box. Use wood screws through the top lip of the box and into the underside of the particle board.
- Position Fabric: Center your fabric over the foam and batting, ensuring any patterns (like my plaid) are aligned properly with the edges of the ottoman.
- Staple Down the Sides: Instead of wrapping under the board (which isn’t possible now that it’s attached), bring the fabric down over the sides of the box, pulling taut as you go. Staple directly to the outside upper edge of the box frame. This approach has the added benefit of covering any damaged areas along the top edge of the box.
- Corner Folding: For neat corners, fold fabric like you’re wrapping a gift. Take your time here—these folds will be visible until we add the decorative trim.
Pattern Pointer: If using a plaid or striped fabric like I did, spend extra time ensuring it’s perfectly straight and aligned with the edges before stapling. It’s much harder to adjust once those staples are in!
Damage Cover-Up Tip: This method is perfect if your thrifted box has damage along the top edges. By bringing the fabric over the top and down the sides, you completely conceal any imperfections in the original piece.
Step 6) Decorative Edging-
Now that your fabric is stapled to the outside of the box frame, we need to hide those staples and create a polished look:
- Apply Trim: Position decorative twill tape or webbing along the upper edge of the box, covering all visible staples. The tape should sit just below where the fabric turns from top to side.
- Secure with Nailheads: Place decorative upholstery nails at regular intervals (I used 2-inch spacing) through the trim and into the box frame. Tap gently with a tack hammer.
- Work Methodically: Complete one side at a time, ensuring your trim remains straight and evenly spaced all the way around.
Step 7) Button Tufting-
With your fabric secured over the top and down the sides, now we can add the luxurious button tufting that gives this piece its distinctive style.
Gather Your Button Arsenal:
- Decorative buttons (with shanks for easier tufting)
- Clear backing buttons (one per decorative button)
- Upholstery thread (doubled for strength)
- Extra-long upholstery needle
- Small piece of tape
- Helper (optional but recommended)
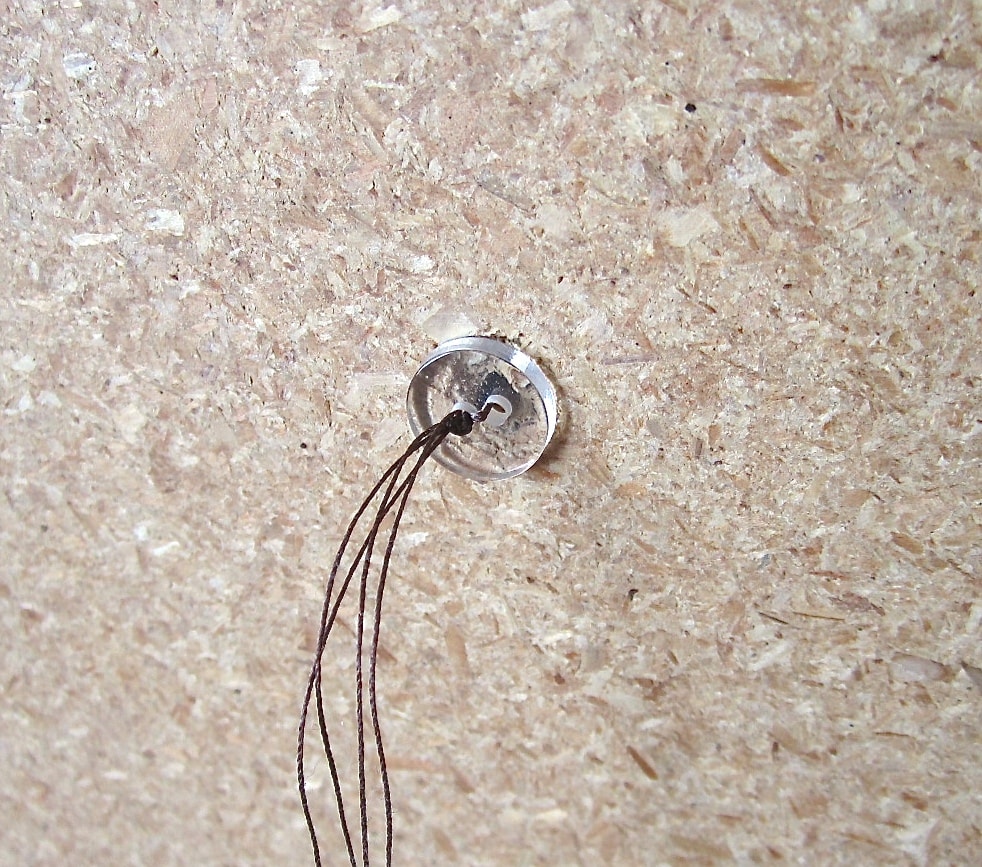
The Tufting Dance:
- 1) Turn your ottoman on it’s side for easier access.
- 2) Thread your needle with a long piece of doubled upholstery thread. Tape the thread ends to the underside of the plywood near your first button hole.
- 3)Start the thread by going through one hole of the backer button. Let that backer button just dangle resting by the tape holding the thread.
- 4) Now push your needle through the hole, foam, batting and fabric at a straight angle so your buttons will be exactly over the holes. It’s easier if you recruit a helpful hand on the fabric side pushing in the foam for you.
- 5) Once you pull the needle through, thread through the shank of the decorative button, then back down through the same hole. Don’t pull it tight yet; let the button dangle close to the fabric.
- 6) Now on the underside you will have 2 pieces of thread going through the backer button and into the hole and 2 pieces and the needle coming back out of the hole. Thread the needle through the empty hole of the backer button in the opposite direction (so the button will eventually lay flat against the underside) and then back up through the original backer button hole just like the first time.
- 7) Now repeat for extra security. Run the needle and thread back through original hole in backer button, along the same journey to the decorative button, through the shank in the same direction as the first time and back down through the hole and backer button.
- 8) Now you should have two lengths of thread coming out of each hole of the backer button and four threads going through the shank of the decorative button. Cut the looped thread by the needle so you have two pairs of long, loose thread. Remove the tape and holding a pair of threads in each hand. Pull gently (I find using a rocking motion of one hand pulling, then the other works great) until you get both the decorative button and the backer button in place against the fabric and the board. Now have your helper push the decorative button down into the foam while you firmly pull the threads taut and tie off in a square knot.
Repeat for all buttons
Tuft Tip: The deeper your tufts, the more dramatic the look. Aim for consistency in depth for a professional finish.
Repeat for each button.
Ta Da!
The “Why I Did It This Way” Explanation
A note about my approach:
Yes, the sequence of steps I took is a bit different than most projects like this. Due to damage along the top edge of my thrifted light box (where trim had previously been attached), I chose to mount the particle board first, then bring the fabric down over the sides of the box rather than wrapping it underneath to the inside of the box.
This technique not only hid the damaged edges perfectly but also allowed me to create a clean finish with decorative trim and nailheads. If your box is in pristine condition, you could alternatively wrap the fabric under the board before attaching it to the frame—both methods yield beautiful results!
Please Pin this: Pin it to Remember it!!!
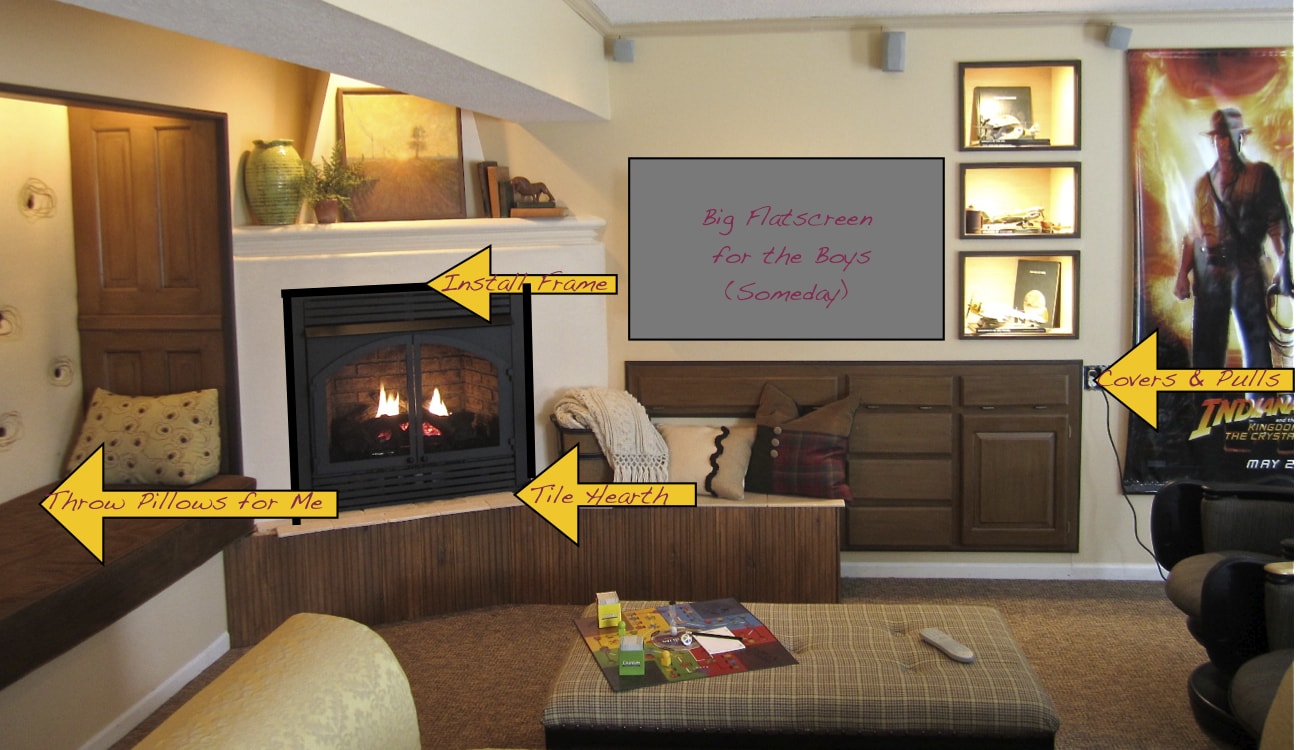
Yes, quite a few more projects for the basement reno, but definitely getting there.
Loving the results so far – AND the process!
Fireplace install made the biggest difference and I’m thrilled with how the Faux Cast Concrete surround turned out. Here’s the tutorial for how I did that one.
Great idea, wonderful work, A plus finished project. Question: where do you get your upholstery foam from?
Thanks so much Kim!
If you are in the Kansas City area, I get all my foam products from Comfort Felt & Foam. This is to a pretty showroom, but they have bee around forever and really, truly now their stuff, are eager to help customers find success in their projects, and offer very honest pricing.
If you are not in KC, I suggest doing a Google search for your geographic area to find an upholstery supplier.
Last resort, you can order online, just knowing that the shipping wil not be cheap because they will have to charge you dimensional weight (oversized packages).
Let me know if you have any other questions I ca help with.