
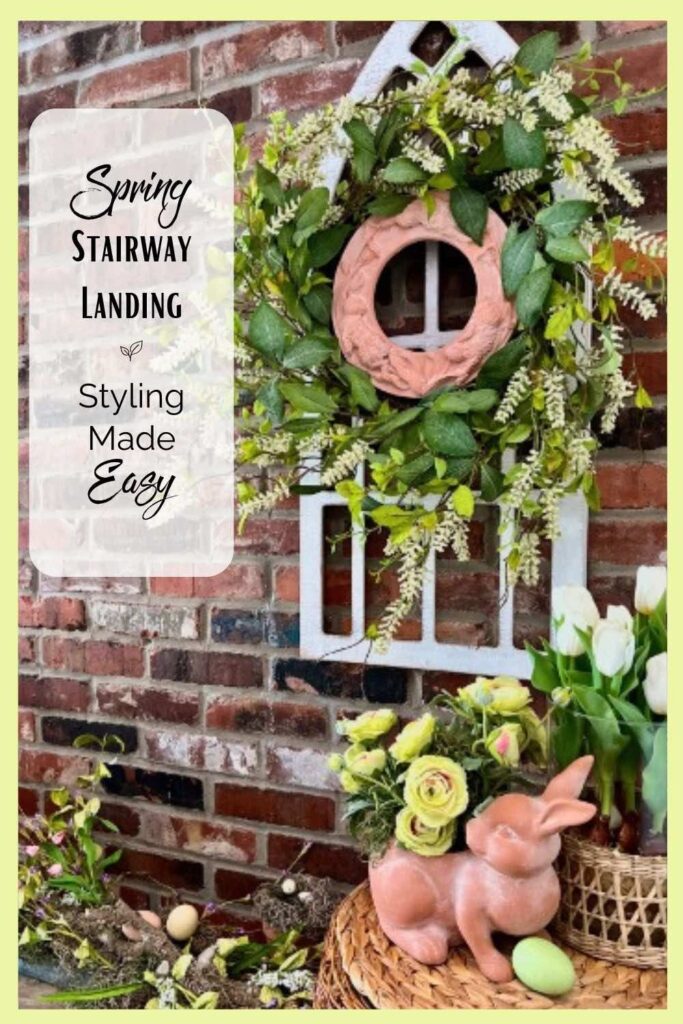
No Mantel? No Problem! How to Style Your Stair Landing for Spring
Discover how to adapt spring mantel inspiration for your stair landing or any surface with this budget-friendly guide using creative display techniques.
Have you ever spotted the perfect spring mantel decor on Pinterest and thought “That’s gorgeous… but I don’t have a mantel”? Well, friend, you’re not alone!
Today I’m going to show you how to take that mantel inspiration and transform it into a breathtaking spring display for your stair landing (or really, any space in your home!).
TABLE OF CONTENTS:
- From Mantel Dreams to Stair Landing Reality: The Inspiration
- Making It Your Own: How to Transform Mantel Inspiration to Any Space
- Breaking Down Each Cluster: Your Step-by-Step Guide
- DIY Terra Cotta Wreath Made from a Thrifted Mirror
- Budget-Friendly Tips for High-End Style
- Making It Work in Your Space: Tips, Tricks, and “Oh No!” Solutions
From Mantel Dreams to Stair Landing Reality:
The Inspiration
When I first saw this inspiration photo from Sharon @ HouseonHeatherfield.com. (that fresh spring mantel with its church window frame, woven textures, and perfect pops of terra cotta), I’ll admit – I was stumped for a hot minute.
You see, while I have two fireplaces in my home, neither mantel was quite right for recreating this look. But then it hit me – why not use my stair landing?
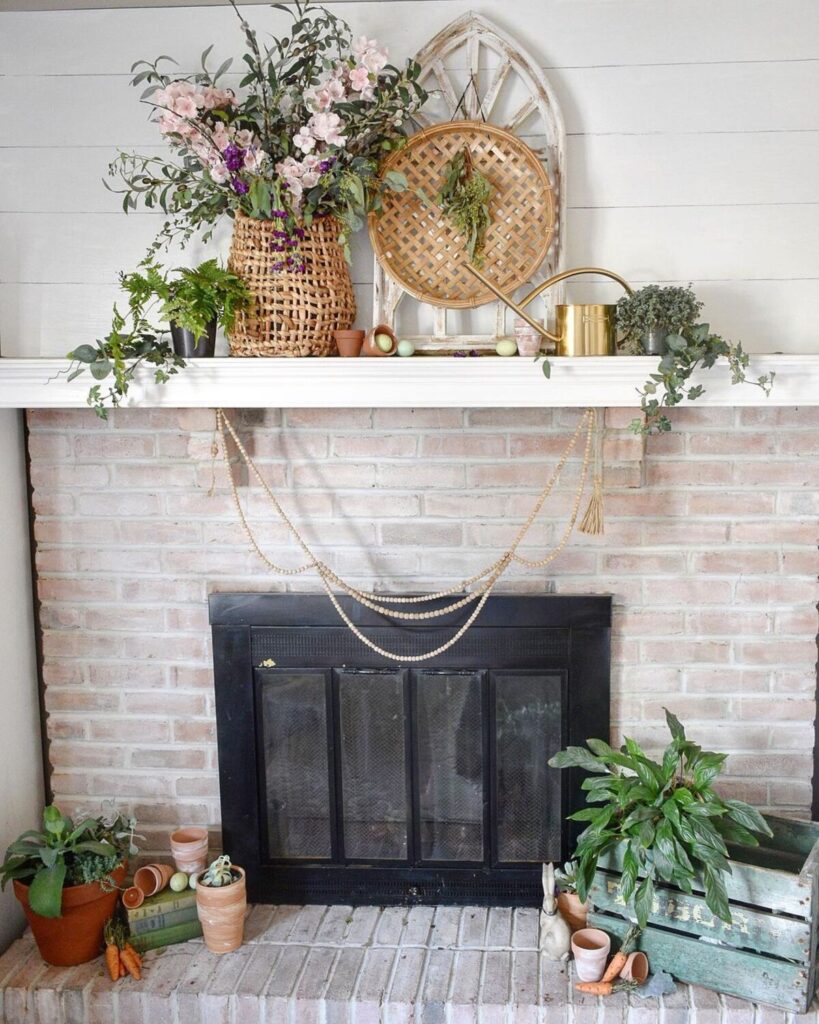
Take a good look at this charming mantel display. What makes it work so well? It’s not just about the individual pieces – it’s about how they work together.
Approach it as remixing a song – you keep the core beat but add your own instruments and vocals.
Here are the key elements that caught my eye:
- The focal point: That sweet arched window frame crowned with a textured basket and greenery
- The clever composition: Three distinct display clusters creating a perfect design triangle
- The height variation: Using boxes and stands to create different levels
- The texture play: Woven baskets, terra cotta pots, and natural elements
- The greenery mix: Both arranged flowers and live plants
- Those sweet seasonal touches: Little bunnies, eggs, and garden accents scattered throughout
The best part? Every single one of these elements can work just as beautifully on a stair landing – or almost any surface you have available!
Making It Your Own:
How to Transform Mantel Inspiration to Any Space
Here’s where the magic happens! Instead of getting hung up on what I didn’t have (a mantel), I focused on what I did have – a beautiful stair landing just begging for some spring style.
Let me walk you through how I recreated each key element from the inspiration photo:
1) Creating the Focal Point–
I started with a similar window frame from Hobby Lobby (keeping it real here – not everything needs to be a pricey antique!).
But instead of a tobacco basket, I created a terra cotta wreath using a thrifted mirror frame. More on that DIY in a bit!
2) Establishing the Three Display Clusters–
Just like the inspiration photo, I created three distinct groupings. However, since I don’t have a mantel and fireplace to work with, I had to rethink their arrangement.
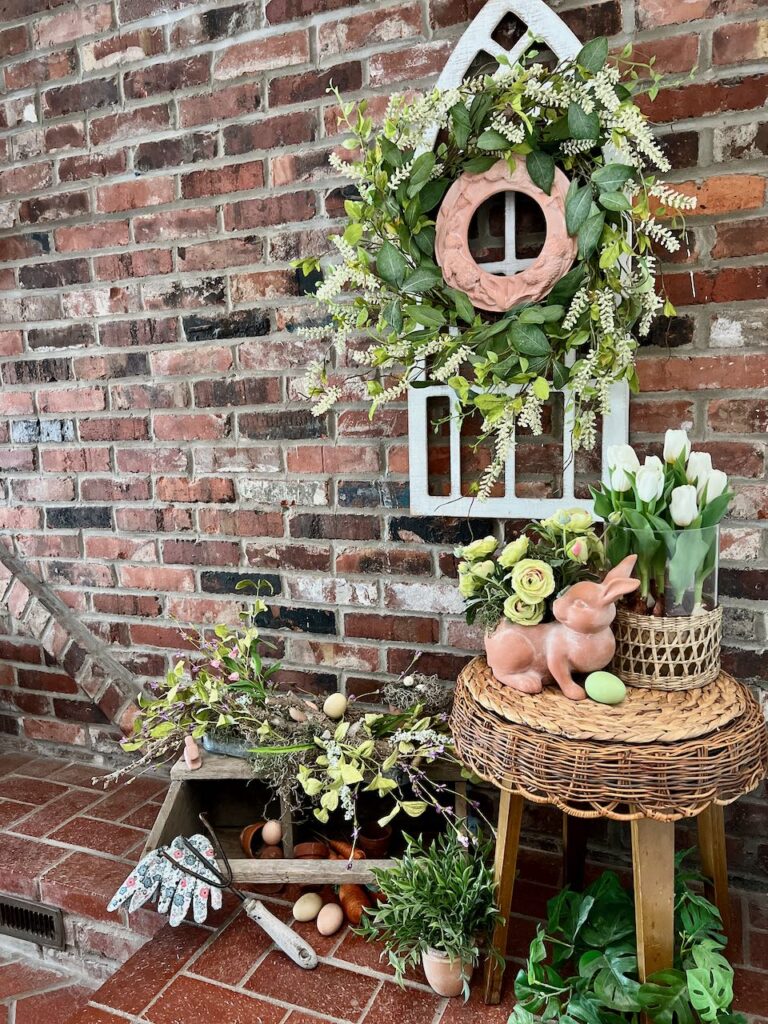
In the inspiration, the focal point features a casual basket arrangement sitting beside the propped window frame on the mantel. For my stair landing interpretation, I created a different focal point by hanging my terra cotta-embellished wreath on a larger arched window frame directly on the wall – no mantel needed!
Without a fireplace creating natural spacing, my two supporting clusters sit closer together at the base of the display. These tighter groupings create an intimate vignette that’s perfect for a smaller space while still maintaining that appealing design triangle of the original inspiration.
3) Playing with Height–
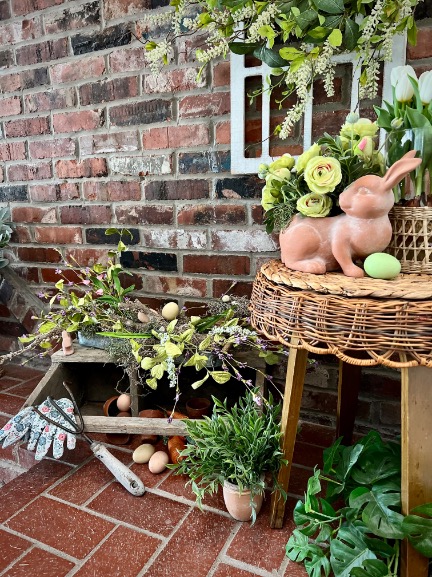
Without a mantel’s natural platform, I got creative with heights:
- The hanging window frame provides our tallest point
- A stool topped with an inverted basket creates our medium height
- The tool box on its side offers our lowest display point This variation in height keeps your eye moving through the display, just like in our inspiration photo.
4) Mixing Up the Greenery-
I balanced my greenery just like the inspiration:
- A lush wreath provides that dramatic floral moment
- Forced tulip bulbs add live plant interest
- A loose arrangement in the tool box mirrors the casual elegance of the inspiration piece
5) Incorporating Natural Textures-
Texture is key to creating warmth and interest:
- Woven baskets (both as decor and cleverly repurposed as a table)
- Terra cotta elements throughout (both real and faux-finished pieces)
- Natural wood from the tool box
- Mixed greenery textures from various faux plants
6. Adding Those Special Seasonal Touches–

Just like the inspiration photo, I scattered small spring elements throughout:
- Terra cotta bunny planter (using my faux finish technique)
- Garden gloves and hand rake (my version of the inspiration’s watering can)
- Small terra cotta pots and bunnies
- Decorative eggs and carrots
Breaking Down Each Cluster:
Your Step-by-Step Guide
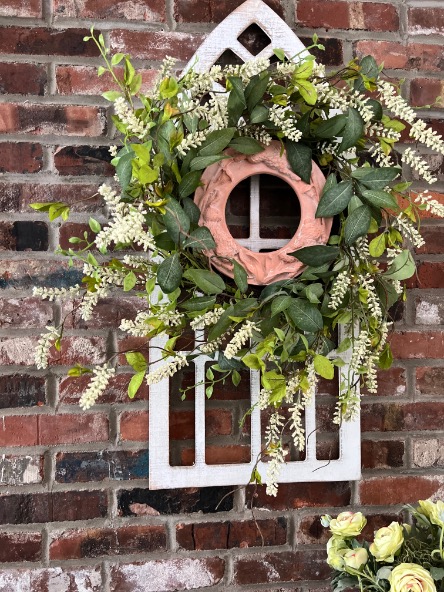
The Focal Point: Window and Wreath-
Let’s start with our eye-catching centerpiece. Here’s exactly how this cluster came together:
I used one large faux arched window frame for the substrate.
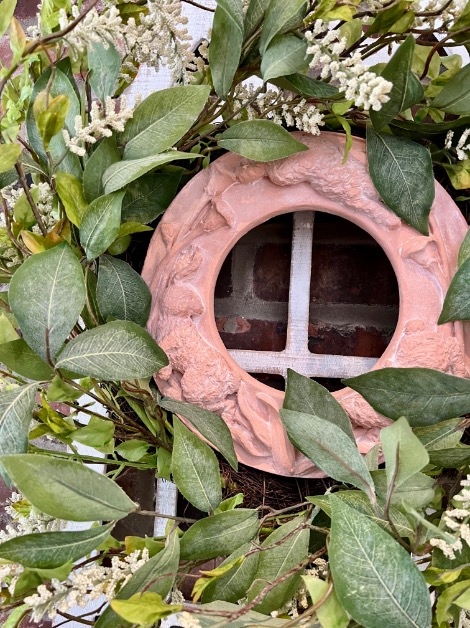
For the round element that added texture, I used a thrifted framed mirror with three bunnies in relief.
To give the frame more a generous size to work with the scale of the window, I hung the frame to the base of a premade wreath I found at Hobby Lobby.
Details on making over the frame and attaching them all together are coming up soon — keep scrolling!
PRO TIP: Terra cotta comes in a zillion shades. For the curated, acquired over time look, be sure to use several different shades. What I used for this wreath has more pink tone than what I used on the bunny planter and is a bit more saturated than the little pots.
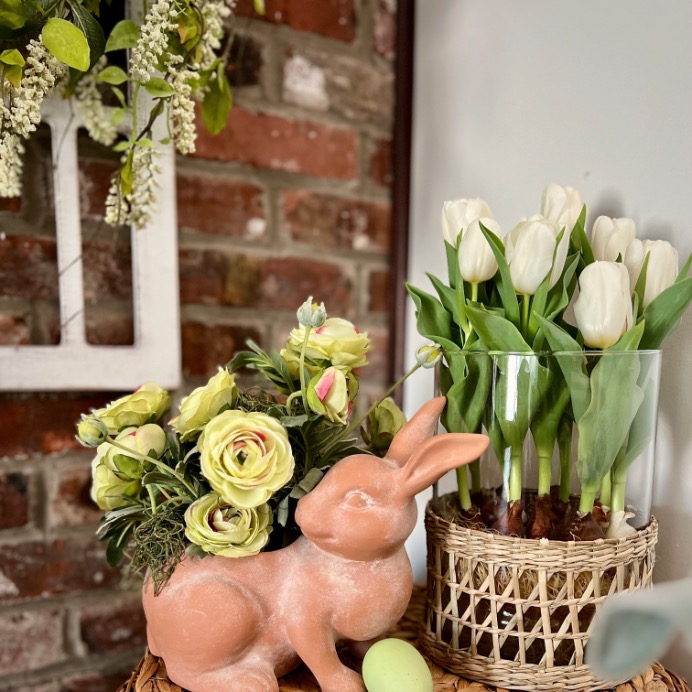
The Garden-Inspired Side Table-
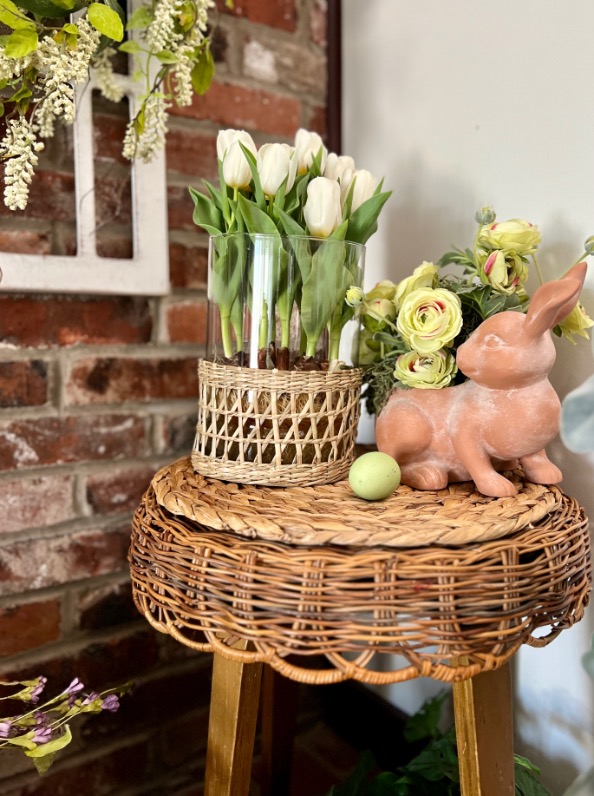
This might be my favorite, but don’t tell the others!
I can’t help it – who doesn’t love a good furniture hack?
Here’s how to recreate it:
- Start with a sturdy stool – anything around 18-24 inches high works great
- Choose a large basket with a flat bottom and decorative edge (mine’s scalloped!)
- Flip that basket upside down on the stool – instant pretty table!
- Top it with a terra cotta bunny planter, or your substitution
- Add height and life with the wicker-based forced tulip container
- Tuck in small terra cotta pots and eggs around the base
PRO TIP: If your basket wobbles, use museum putty (poster putty) to secure it to the stool
SIDENOTE: The Magic Power of Trays (Strictly optional)-
At the last minute, my bunny planter and tulips felt a bit disjointed. We know how to take care of that, don’t we? Put them together on a tray and — Poof! Instantly related. They belong together!!!
Well, I didn’t have a tray the right size, shape or color, so I added a seagrass placement to act like a tray. It’s not perfect, but it works surprisingly well!
The Vintage Tool Box Display-
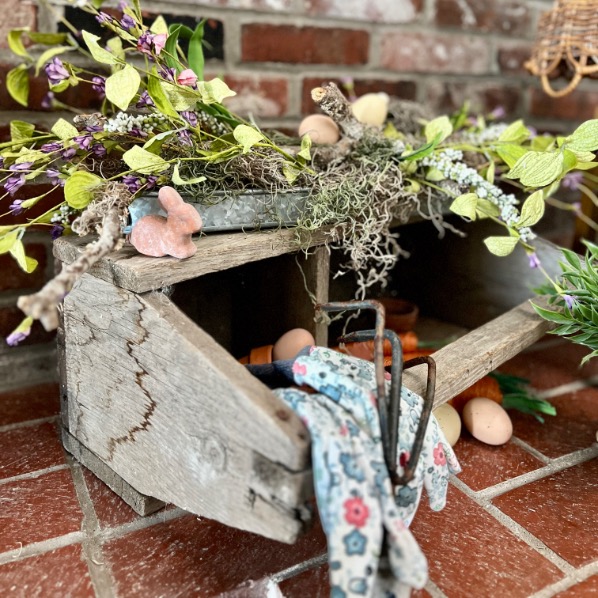
This cluster completes the triangle and provides that important third level.
- Position your wooden box (or toolbox) on its side, allowing the open top to face outward
- Create a loose, garden-inspired arrangement that spills slightly over the edge
- Fill the box interior with a mix of terra cotta pots, some tipped as if forgotten
- Layer in your garden gloves and hand rake for gardening authenticity
DIY Terra Cotta Wreath Made from a Thrifted Mirror
This project is easy, and requires just a bit of time. The resulting statement piece is so worth it!!! Here’s your supply list:
- Round mirror with substantial frame
- My faux terra cotta paint technique supplies (get the full tutorial here)
- Large spring wreath as your base
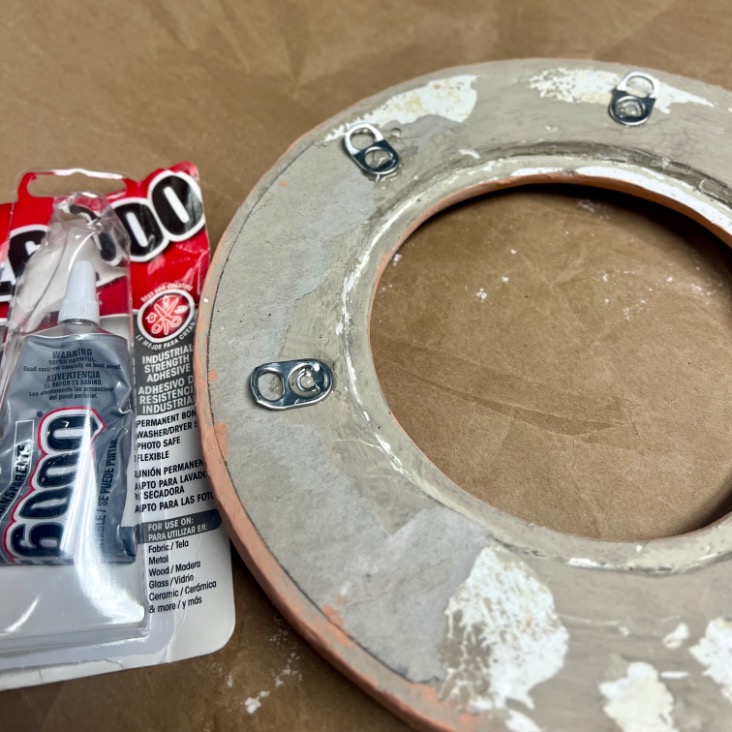
- 3 Can flip tops, bent slightly
- E-6000 glue or similar
- Florist wire
Quick Steps:
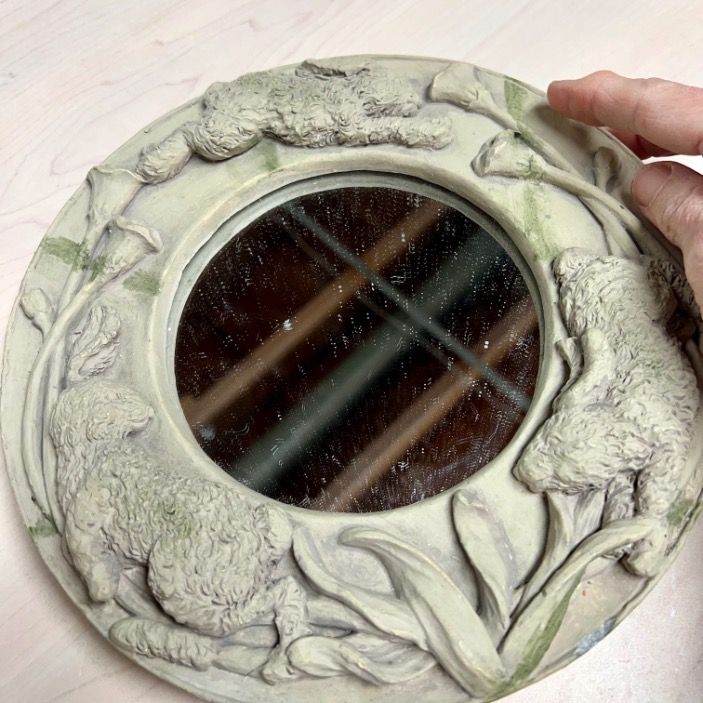
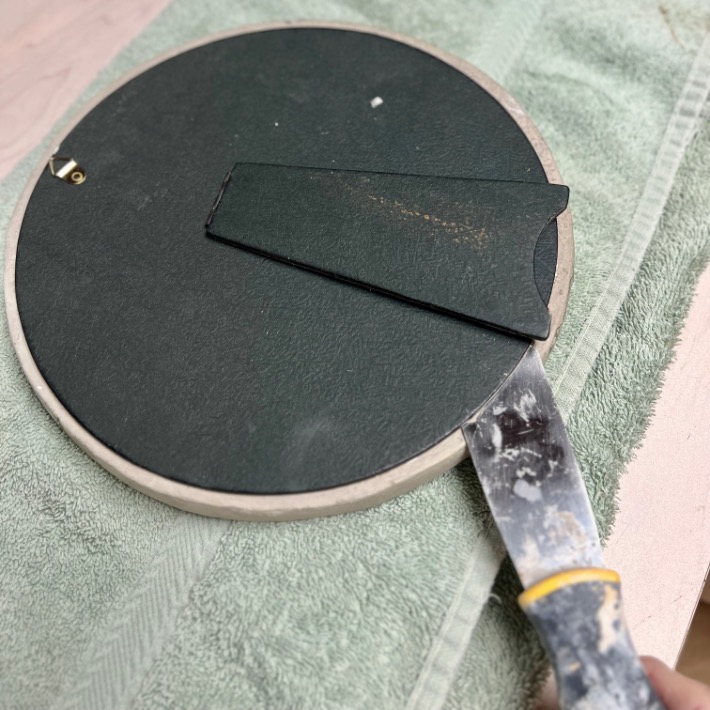
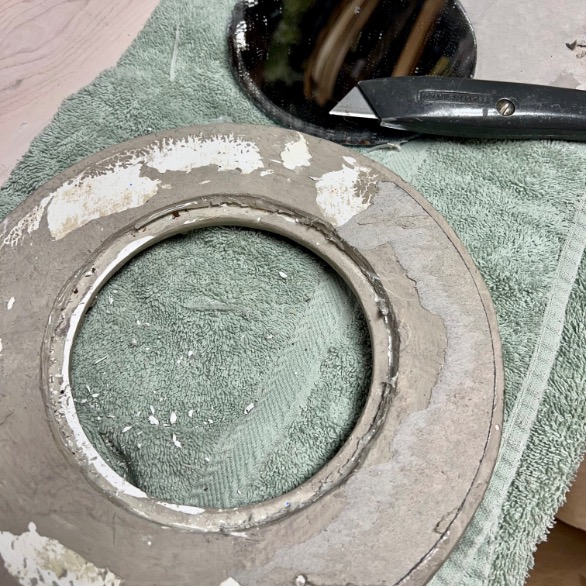
- Remove mirror and backing from frame
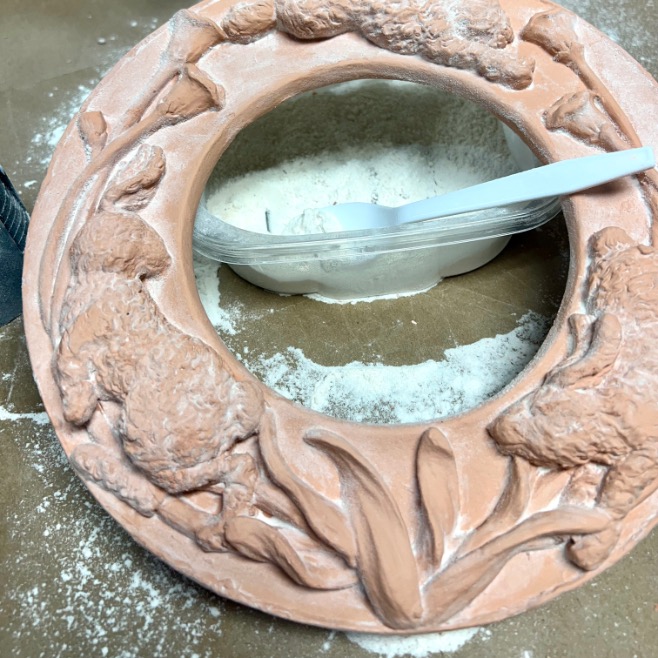
- Apply terra cotta finish following my technique (seriously, check out that full tutorial – it’s a game changer!)
- Once dry, attach the slightly bent flip tops to the back of your wreath using E6000 glue.
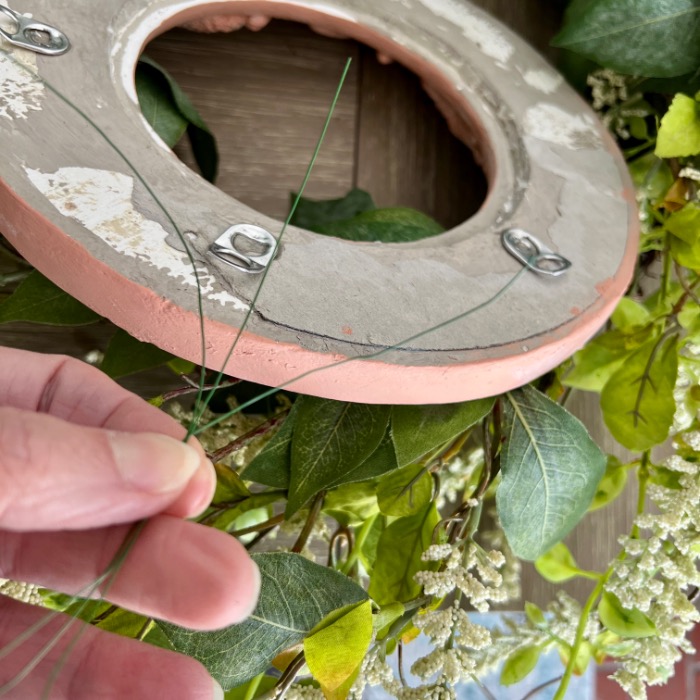
- Add a generous piece of wire (18-24″) through each flip top
- Wrap each wire around the wreath base and secure
- Hang on your window frame using more florist wire
Budget-Friendly Tips for High-End Style
Let’s talk about creating this look without breaking the bank:
- Shop Your Home First:
- The inspiration photo had a brass watering can – I used garden gloves and a hand rake instead
- Look for baskets, pots, and wooden boxes you already own
- Rethink items: That basket? It’s not just for storage anymore!
- Mix High and Low:
- Yes, my window frame is from Hobby Lobby – and it looks fantastic!
- Combine thrifted finds with a few new seasonal pieces
- Invest in good faux greenery you can use year after year
- Think Outside the Box:
- No stair landing? This same arrangement could work on:
- A console table
- A buffet
- A wide windowsill
- Even a piano top!
- No stair landing? This same arrangement could work on:
Making It Work in Your Space:
Tips, Tricks, and “Oh No!” Solutions
Let’s be real – we rarely have the exact same space to work with. Maybe your stair landing is more of a stair ledge, or perhaps it’s so big it could host a dance party (lucky you!).
Here’s how to adapt this look for your home:
When Your Space is Cozy (aka Tiny)-
- Think “up” not “out” – Your wall is your best friend here!
- Focus on your window frame and wreath as your statement piece
- Then create the other points of your triangle with two mini clusters at varying heights using what you have – even a stack of vintage books can work as a riser
- Concentrate on height rather than width
- Remember: Good things come in small packages, and that includes displays!
When You’ve Got Room to Spare-
First of all, I’m not jealous at all. Nope. Not one bit. 😏
Here’s what I’d do with all that glorious space:
- Go bigger with your window frame (or use two!)
- Add seating like a vintage garden stool
- Create larger clusters while maintaining that triangle concept (larger cluster does not mean more, it means larger versions of the same number of items)
- Include bigger statement pieces like oversized urns or larger potted plants
PRO TIP: Just because you have the space doesn’t mean you need to fill every inch. Let your display breathe!
The “Help! I Don’t Have…” Solutions-
No window frame? No problem! Here are some alternatives that work just as well:
- Large vintage picture frames (paint them weathered white for that garden look)
- Garden gates (real or decorative)
- Even an old screen door panel would work!
No terra cotta? That’s fine too:
- Hit up your local thrift store for any round frame
- Check the garden section of discount stores
- Or embrace a different accent color entirely – this look would be gorgeous in sage green or even a weathered blue
See that little bunny? Those little fellas are styrofoam and came in a package of 8 from The Dollar Tree and received a terra cotta treatment. (They can also be the sweetest place card holders)
Before we jump to my budget-saving tips, don’t forget: Save it to Remember it!
Budget-Friendly Tips (Because Who Doesn’t Love Saving Money?)-
Listen, I’ll be the first to admit – not everything needs to be a precious antique or designer piece. My window frame is from Hobby Lobby, and it’s living its best life!
Here’s how to get this look without breaking the bank:
- Shop Your Home First
- That wood crate you’ve been using for books? It might make the riser!
- Check your holiday decor – you might have perfect pieces hiding in other seasonal bins
- Raid your garden shed for authentic touches … hello, well-worn hand rake!
- Think Outside the Box (or basket, in our case)
- Old wooden crates work instead of vintage tool boxes
- Paint any frame to look like terra cotta (my tutorial will help!)
- Use faux plants from last season in new ways
- Timing is Everything
- Shop end-of-season sales for next year (that’s how that large window frame made it home with me)
- Check thrift stores right after major decorating holidays
- Join local buy/sell/trade groups – you’d be amazed what people are getting rid of!
Remember: Rome wasn’t built in a day, and neither is the perfect seasonal display.
Take your time collecting pieces you love, and don’t be afraid to try something unexpected.
The worst that can happen is you need to move things around a bit – and let’s be honest, we’re probably going to do that anyway! 😉

Diane what a spectucular post! I loved your inspiration and how you applied it to another decorating opportunity. I used the Hobby Lobby window too. Great miinds! 🙂
Oh thanks so much Laura! It was fun to have an opportunity to use that window besides as a prop for shadows 🤭. This has been a fun challenge, pushing me outside my normal comfort zone.
Woza, girl, this is stunning! Love the garden theme and that adorable picture frame you turned into a wreath. You are so creative.
Why thanks my friend!!! That little frame was a pretty sweet find. Really enjoyed pulling that wreath together in about 30 minutes.
So many great tips and ideas Diane! You have created a garden oasis with so much charm and warmth. Creativity Queen!
You’re too sweet! Not my usual style. But really enjoy the freshness!
Great post. You always do a lovely job of explaining things. Love your styling and how you included all the happiest points. Hope you enjoy seeing it for weeks to come. pinned
Diane, I love your idea to use what you have to create a “mantel!” The stool with overturned basket is brilliant and the adorable bunny planter… I really love the triangle effect between all three decorated areas. Really fun post!
Enjoy your beautiful hearth and its spring magic! 🙂
Diane you are so clever to use all the inspo elements to decorate a stair landing. This is absolutely darling ,and I’m impressed with the mirror frame makeover! That’s pure genius!
Love your interpretation, Diane! Especially that cute wicker stool. Great styling tips, too. I love how you explained how to either make the display smaller or larger; so smart!
Diane, your spring vignette is so lovely. Whimsical and romantic and so full of interesting things to see. Doesn’t matter that it’s not a mantel. Feast for the eyes.
Thanks bunches Carol. I really appreciate that!