
How To Turn a Ceramic Rabbit Into the Best Terracotta Bunny
It’s such fun (and money-saving) to makeover thrift store finds into cute, fresh terracotta decor. Here I’m thinking Spring and transforming a ceramic bunny with the look of aged terra cotta.
Hop to it, bunny lovers! Does your ceramic rabbit look a little, well, dated?
Maybe it’s gathering dust in the attic, longing for an earthy makeover.
No worries, because you’re about to discover the secret to transforming your glazed friend into the most adorable terracotta bunny on the block (or should I say burrow?).
This ain’t no magic spell, but a simple DIY trick that’ll have your bunny feeling terracotta-tastic in no time. Change the colors a bit and you can have aged pottery!
So grab your paintbrush, put on your crafting cap, and let’s unleash your inner bunny whisperer!
Poof!
Let’s Turn That Rabbit Into a Faux Terracotta Planter

This is one of the easiest diys for such great results!
Oh, and if terracotta’s not your thing. Maybe you’d rather the bunny go aged concrete, then you can see another version of paint magic on yet another bunny.
TABLE OF CONTENTS
Materials and Supplies:
- A ceramic, glass or plastic or foam statue or planter. See NOTE for sources
- Primer spray paint, I use this one
- Craft paint in your color choice. Any color with a matte finish will work. See NOTE for the ones I used
- Disposable cup for mixing pain
- Flour, baby powder, or baking soda
- Paper plate
- Matte Spray Sealer, I use this one
- Sandpaper (80 grit) and microsander or sanding block
- chip brush or foam paint brush
- work space with protective covering
- Plaster of Paris or baking soda, optional
NOTES:
Where to find a rabbit or any other potential terracotta statue. With Spring & Easter right around the corner, go hunting for bunnies, but keep in mind there are lots of other possibilities too. So many places:
- Your storage tubs or dark corners of your attic
- Your mom’s basement
- your favorite thrift stores
- garage sales and estate sales
- Dollar Tree and Dollar Store
I used Decoart colors: Peaches ‘n Cream, Spiced Pumpkin, Burnt Siena, Honey Brown, Khaki Tan and Oyster Beige. I could probably have done without the Khaki Tan.
Step 1) Prepare Your Statue-

If your statue or planter is glossy, sand it gently with 80 grit sandpaper, just to knockdown the shine a bit and make it easier for you pain to stick.
If your statue is plastic or styrofoam, there is probably a seam or several that show as raised lines. I like to sand these down before I do anything else.
Once your surface is ready, I always add a coat of primer. If you are using chalk paint as your craft paint, you may not need to. Use your own judgement here.
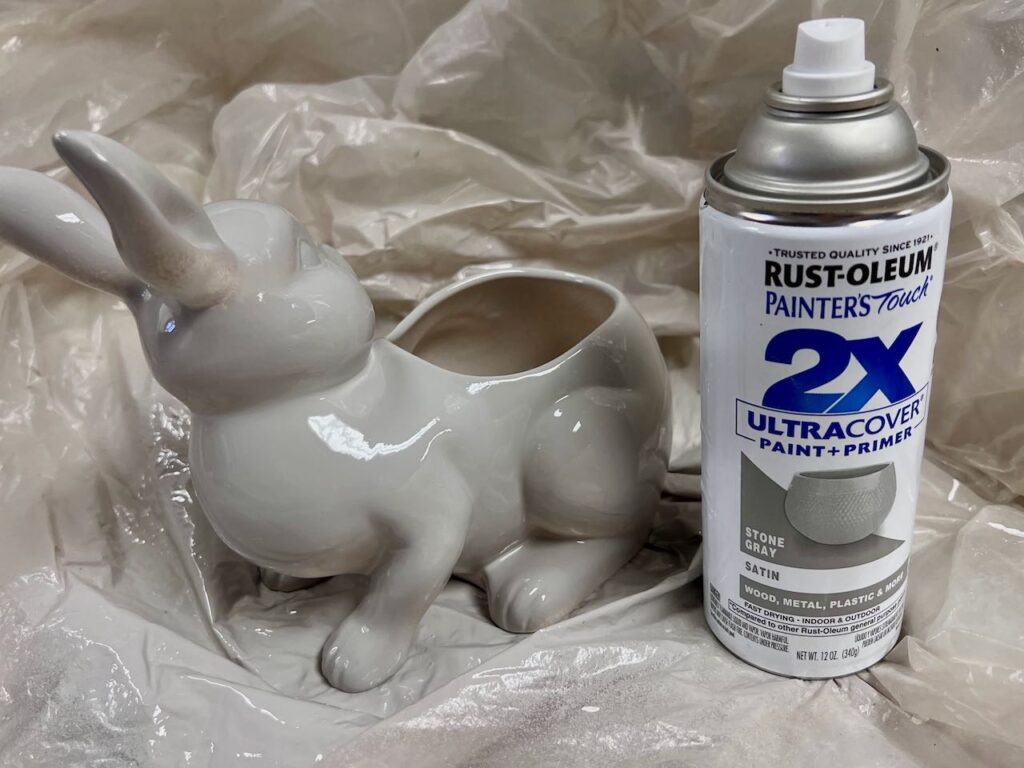
I used a spray primer. The primer is great for bonding the craft paint the super smooth surface.
The grey is because I had it on hand after this diy project that required covering crazy bright paint with white paint. The grey is the only thing that would cut it. So if your original statue/planter is brightly colored and you want to take it down to an aged neutral, I strongly suggest a grey spray primer.
Once your primer is dry, you can move on to the next step.
Step 2) Mixing Your Paints and First Coat-

In a disposable cup mix your craft paint mixture until you have the color you like.

PRO TIP: With craft paints, keep in mind that the color will dull as it dries and becomes matte. The color will typically lighten a bit too.
And with this project the look of aged pots is achieved by add the flour, baking soda or baby powder. And this white “calcification” will naturally brighten you color too.

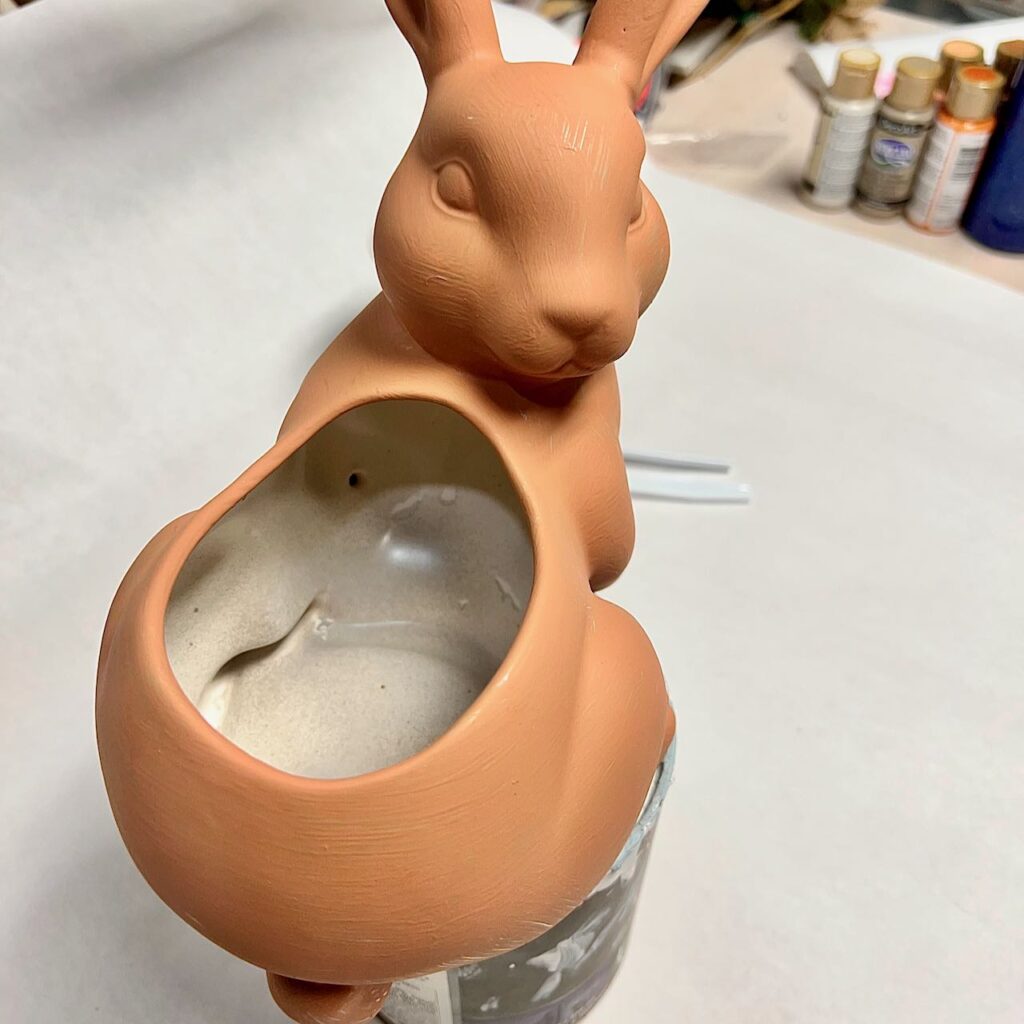
Paint a thin coat of your terracotta paint mixture using the brush of your choice. Both chip brush and foam brush work. I wanted to minimize the brush strokes and I feel like a small foam brush did that best for me.
HINT: Depending on the style of your pot, jug or vase, don’t forget to paint the inside of the pot down an inch or two so it appears to be solid terra cotta.
As with all paint jobs, two light coats is much better than one heavy coat.
Interrupting this program for a quick request: If you are enjoying, intrigued by, or inspired by this post, please subscribe for all the goodies:
Many thanks!!! Now back to my sweet bunny. . . . .
Step 3) Second Coat of Paint and Aging-
Have a cup of your additive (flour, baking soda or baby powder) ready to go
Once the first layer is dry, add a second layer.


While this second layer is still wet, working quickly sprinkle your additive over your project.
Then with a dry soft paint brush sweep off any and all excess
LESSON LEARNED: Next time I will have a paper plate or fresh paper under my planter when I am sprinkling and sweeping the flour to catch all the excess and pour it over the top again and again.
Leave as much on or sweep as much off as looks right for what you are envisioning.
There really is no wrong way.
If there is an area that dried too quickly, you can always go back and add more paint there and sprinkle with flour. It does not hurt to have a second coat of the baking soda or other additive.
Remember, the natural aging process on terracotta pots is not all smooth and even over the entire outside of the pot.
Step 4) Sealing Your Finish-
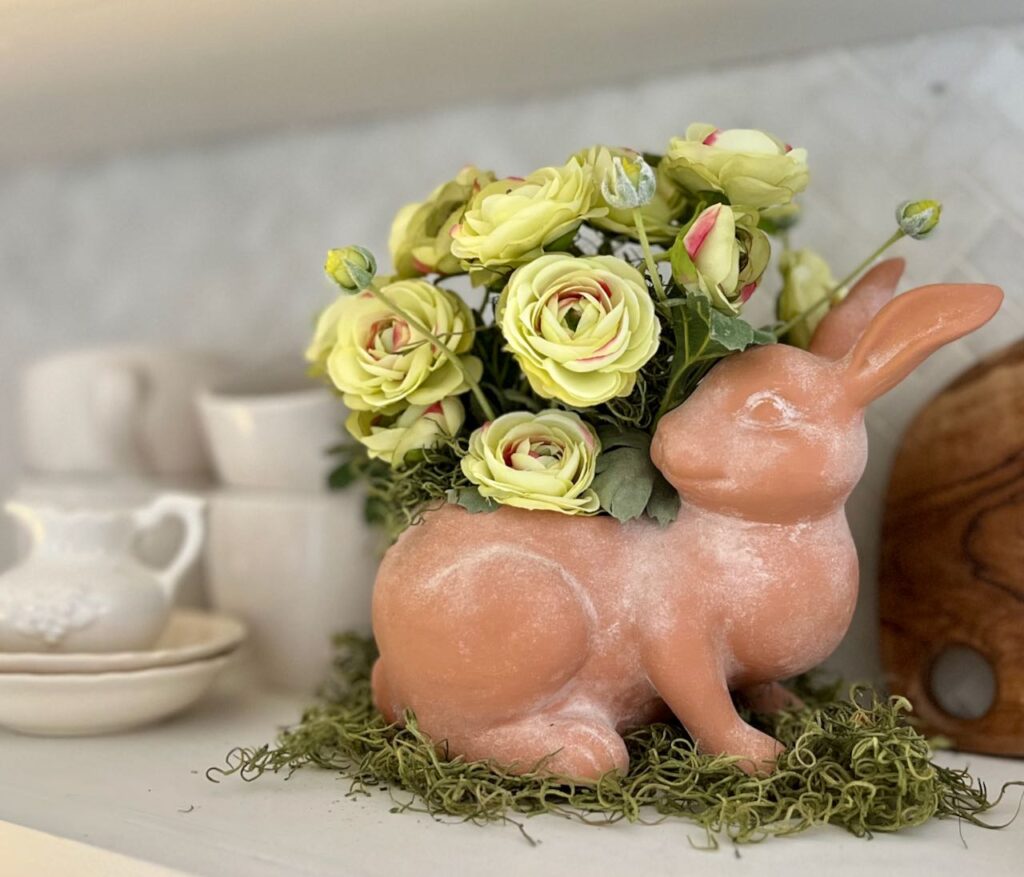
In the matter of minutes you’ve aged a terracotta pot, or a bunch of terra cotta pots.
When really it’s a faux-aged clay pot, or rather looks like clay.
It’s faux aging and faux clay. Here, two faux’s make a positive — and what a positive look it is.
Don’t worry, I love keeping secrets!!!
This one last step will help that well-aged (wink, wink) planter stay just like it is for many years and seasons to come.
Be sure to use a Matte spray sealer.
Where Did This Inspiration Come From?
From my good friend Wendy at WM Design House. Last year she turned foam pumpkins into the most adorable terracotta pumpkins. I loved them.
Six months later, when I found my bunny planter, I knew exactly what I wanted to do with him.
Lesson: save this tutorial so you have it handy when you stumble upon a fun piece that just needs a new finish:
How to Care For Your “Terracotta Creation”
Just keep in mind this is not real terracotta. It cannot withstand the outdoors like real terracotta. Mine will probably enjoy the Summer months outside — but on a table that is under cover.
Alternatives — To Make it Your Own!
If You Want the Surface More Textured-
Mix baking soda or Plaster of Paris into the paint before you paint it on your pot or planter.
You can control just how much texture you want by how much you add.
Your Style, Your Colors-
Remember, crafting is all about having fun, so don’t be afraid to experiment with different paint colors, textures, or even tiny accessories to personalize your bunny even further.
And hey, if terracotta isn’t your jam, this process works with other colors and styles too!
How to Use and Style Your Terracotta Creation
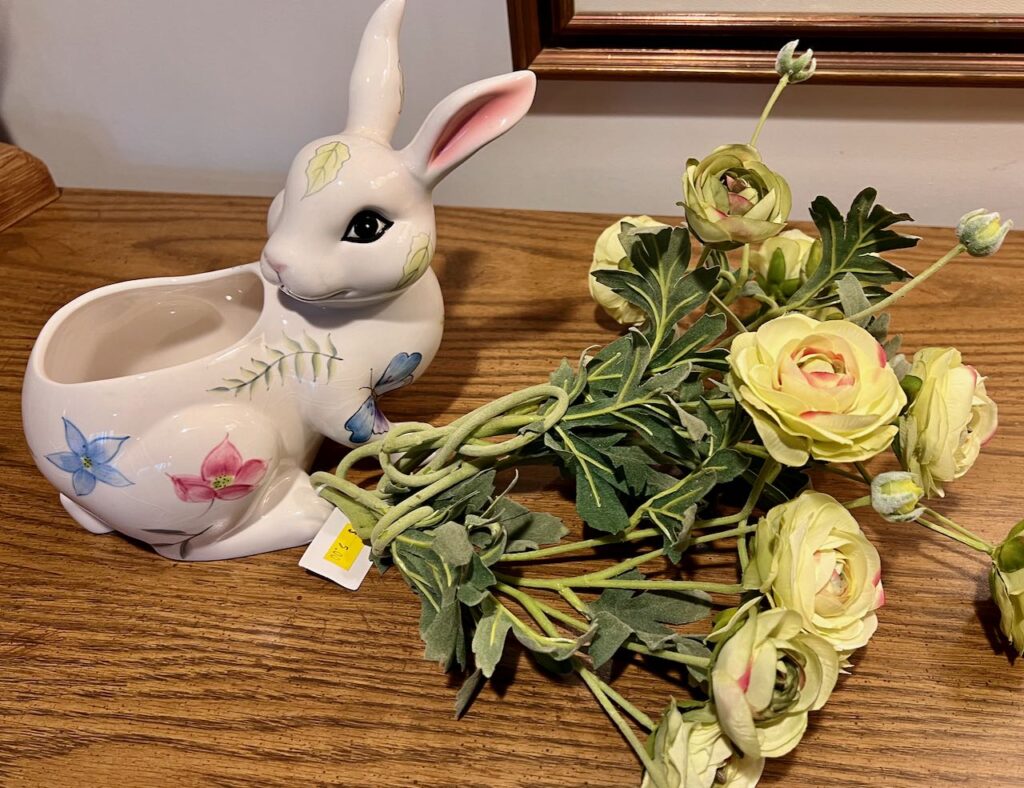
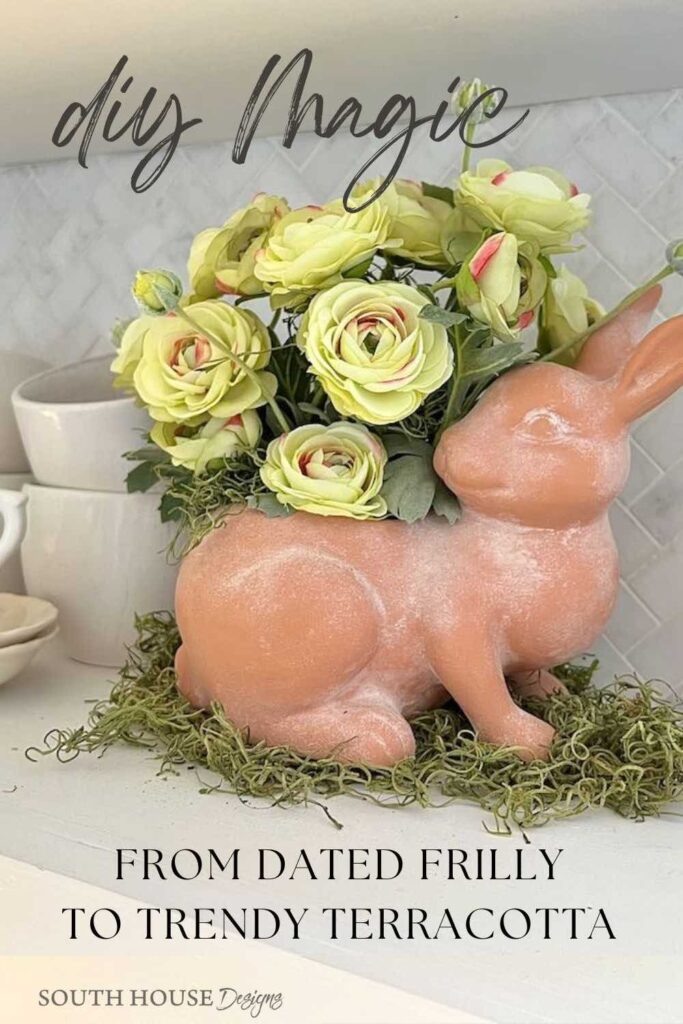
Mine bunny is a planter, with no drainage hole. So he is definitely getting planted with some wonderful ranunculus that I found in the same trip to the same thrift store as the planter.
In fact, I saw the ranunculus but couldn’t justify them until I had already gone through checkout, spied the bunny planter in a display up front. grabbed it and ran to the back corner of the store hoping the ranunculus would still be there. They were! And plant and planter fit as though they were made for each other!

There you have it, folks! My ceramic rabbit has officially hopped into the terracotta trend, ready to charm my kitchen shelves (or maybe the mantel) with its earthy elegance.
With just a few simple steps and a sprinkle of creativity (okay, flour), we’ve given my bunny a whole new lease on life (and burrow space!). So sit back, admire your terracotta masterpiece, and let your bunny, or frog or mushroom take pride of place as the most stylish critter on the block.
Now get out there and spread the bunny love (and maybe even inspire some terracotta transformations of your own)! Happy crafting

Omgoodness this bunny is he cutest! I’m going to try this technique Diane! Pinned 🙂
Thanks so much Cindy! So glad I rescued him from the thrift store shelves!
Your bunny came out so darn cute! Love him.
Thanks Wendy! Thanks to your terracotta pumpkin post.