Cutest Clothespins To Make
[et_pb_section fb_built=”1″ _builder_version=”4.7.7″ _module_preset=”default”][et_pb_row _builder_version=”4.5.3″ custom_margin=”0px||||false|false” custom_padding=”0px||||false|false”][et_pb_column type=”4_4″ _builder_version=”4.4.9″][et_pb_image src=”https://southhousedesigns.com/wp-content/uploads/2021/01/Tulip-Clothespin-Hero-1.jpeg” alt=”galvanized steel stary holding washed linen party favor bags on a quartz countertop with tulip decorated clothespins and valentine name tags scattered about” title_text=”Tulip Clothespin Hero” align=”center” force_fullwidth=”on” _builder_version=”4.7.7″ min_height=”359px” height=”359px” max_height=”359px”][/et_pb_image][/et_pb_column][/et_pb_row][et_pb_row _builder_version=”4.7.7″ _module_preset=”default”][et_pb_column type=”4_4″ _builder_version=”4.7.7″ _module_preset=”default”][et_pb_text _builder_version=”4.7.7″ _module_preset=”default” text_font_size=”41px” background_color=”#eef2f6″ width=”70%” module_alignment=”center” custom_margin=”-125px||||false|false” custom_padding=”30px||30px||false|false”]
Cutest Clothespin Tulips
To Make
[/et_pb_text][/et_pb_column][/et_pb_row][et_pb_row _builder_version=”4.7.7″ _module_preset=”default”][et_pb_column type=”4_4″ _builder_version=”4.7.7″ _module_preset=”default”][et_pb_text _builder_version=”4.7.7″ _module_preset=”default” width=”100%”]
The cutest clothespins! Here’s how to dye with food coloring, then watercolor and add outlines. Use to close goody bags, label baskets, more!
[/et_pb_text][/et_pb_column][/et_pb_row][et_pb_row _builder_version=”4.7.7″ _module_preset=”default”][et_pb_column type=”4_4″ _builder_version=”4.7.7″ _module_preset=”default”][et_pb_text _builder_version=”4.7.7″ _module_preset=”default”]
Let’s make some of the cutest little clothespins!
We could all use a touch of Spring, and for me that means tulips! And they’re tall and thin, just like clothespins. Sound like a perfect combination.
Use them to close up party bags — even if the party is virtual. Wouldn’t you love to receive a party bag on your porch?
I can’t be with “my girls” (the HS tribe of years gone by), but we can still laugh and gab and rib each other on zoom and I plan to have treats on each of their porches to open during our party. These clothespins will be perfect.
[/et_pb_text][et_pb_image src=”https://southhousedesigns.com/wp-content/uploads/2021/01/IMG_2096.jpeg” title_text=”IMG_2096″ _builder_version=”4.7.7″ _module_preset=”default”][/et_pb_image][/et_pb_column][/et_pb_row][et_pb_row column_structure=”1_2,1_2″ _builder_version=”4.7.7″ _module_preset=”default”][et_pb_column type=”1_2″ _builder_version=”4.7.7″ _module_preset=”default”][et_pb_text _builder_version=”4.7.7″ _module_preset=”default”]
So you’re super busy right now. I get it!!!
Save this to your Crafts board,
or to your Spring board,
or to you Organizing board,
or maybe your Home Schooling board.
Save it wherever it makes sense for you so you can find it when you have some snippets of time to feed your creative soul.
Or send it to a friend to plan a crafting session on FaceTime.
[/et_pb_text][/et_pb_column][et_pb_column type=”1_2″ _builder_version=”4.7.7″ _module_preset=”default”][et_pb_image src=”https://southhousedesigns.com/wp-content/uploads/2021/01/TulipClothespin-Pin2.jpg” alt=”Pin Tower with three pictures of the finished tulip clothespins” title_text=”TulipClothespin-Pin2″ _builder_version=”4.7.7″ _module_preset=”default”][/et_pb_image][/et_pb_column][/et_pb_row][et_pb_row _builder_version=”4.7.7″ _module_preset=”default”][et_pb_column type=”4_4″ _builder_version=”4.7.7″ _module_preset=”default”][et_pb_text _builder_version=”4.7.7″ _module_preset=”default” hover_enabled=”0″ sticky_enabled=”0″]
For a quick overview of the process, you can jump to see a YouTube video of the entire process.
Below, I have it all broken down with short videos embedded in two of the steps.
[/et_pb_text][/et_pb_column][/et_pb_row][et_pb_row _builder_version=”3.25″ background_size=”initial” background_position=”top_left” background_repeat=”repeat” collapsed=”off”][et_pb_column type=”4_4″ _builder_version=”3.25″ custom_padding=”|||” custom_padding__hover=”|||”][et_pb_text _builder_version=”4.7.7″ _module_preset=”default” hover_enabled=”0″ sticky_enabled=”0″]
Start by Gathering Your Supplies
[/et_pb_text][et_pb_image src=”https://southhousedesigns.com/wp-content/uploads/2021/01/Supplkies-for-Tulip-Clothespins.jpeg” alt=”Supplies laid out on table” title_text=”Supplkies for Tulip Clothespins” _builder_version=”4.7.7″ _module_preset=”default”][/et_pb_image][et_pb_text _builder_version=”4.7.7″ _module_preset=”default”] Supplies:
- Plastic cup
- Rubbing Alcohol
- Liquid Food Dye
- Mixing stick
- Clothespins
- Wire that fits through the spring hole
- Watercolor Paints
- Super thin black marker — I used Micron
- Paint brush
You’ll also want to have:
- Cup of water
- Paper towels
- Plastic cloth
- gloves (optional)
[/et_pb_text][/et_pb_column][/et_pb_row][et_pb_row _builder_version=”3.25″ background_size=”initial” background_position=”top_left” background_repeat=”repeat” collapsed=”off”][et_pb_column type=”4_4″ _builder_version=”3.25″ custom_padding=”|||” custom_padding__hover=”|||”][et_pb_text _builder_version=”4.7.7″ _module_preset=”default” hover_enabled=”0″ sticky_enabled=”0″]
Step 1) Dye the Clothespins
[/et_pb_text][et_pb_image src=”https://southhousedesigns.com/wp-content/uploads/2021/01/Cup-of-Red-Dye-With-Clothespins.jpeg” alt=”Cup of red dye with six clothespins strung on wire” title_text=”Cup of Red Dye With Clothespins” _builder_version=”4.7.7″ _module_preset=”default”][/et_pb_image][et_pb_text _builder_version=”4.7.7″ _module_preset=”default”]
Be sure to work on a piece of plastic, food coloring will stain virtually anything! And that’s why I prefer to glove-up for this step.
Mix your dye. Use enough rubbing alcohol to cover your clothespins. Add 10 drops of food coloring to start with, may need more if you want a deeper color. (I actually diluted mine by pouring some out and adding more rubbing alcohol).
Thread three or four clothespins on your piece of wire, bending the wire ends up to form handles.
You may want to test your timing and strength of dye with just one or two to start with.
[/et_pb_text][et_pb_image src=”https://southhousedesigns.com/wp-content/uploads/2021/01/Clothespins-Floating-in-Dye.jpeg” alt=”six clothespins on wire floating in cup of dye” title_text=”Clothespins Floating in Dye” _builder_version=”4.7.7″ _module_preset=”default”][/et_pb_image][et_pb_text _builder_version=”4.7.7″ _module_preset=”default” hover_enabled=”0″ sticky_enabled=”0″]
The wood clothespins will want to float.
[/et_pb_text][et_pb_image src=”https://southhousedesigns.com/wp-content/uploads/2021/01/Pushing-Clothespins-Down-in-Dye.jpeg” alt=”Gloved hand holding pushing down on the wire to keep them fully submerged” title_text=”Pushing Clothespins Down in Dye” _builder_version=”4.7.7″ _module_preset=”default”][/et_pb_image][et_pb_text _builder_version=”4.7.7″ _module_preset=”default”]
Just put a bit of pressure on the wire handles to keep them submerged.
[/et_pb_text][et_pb_image src=”https://southhousedesigns.com/wp-content/uploads/2021/01/Three-clothespins-above-dye-in-cup.jpeg” alt=”Gloved hand holding a set of three clothespins over the cup of dye, letting the dye drip off” title_text=”Three clothespins above dye in cup” _builder_version=”4.7.7″ _module_preset=”default”][/et_pb_image][et_pb_text _builder_version=”4.7.7″ _module_preset=”default”]
Since I wanted just a very faint pink cast, I found I needed to submerge them for just a count of five.
[/et_pb_text][et_pb_image src=”https://southhousedesigns.com/wp-content/uploads/2021/01/Six-Dyed-Clothespins-on-Plastic-Drying.jpeg” alt=”Two sets of three clothespins drying on a plastic cloth” title_text=”Six Dyed Clothespins on Plastic Drying” _builder_version=”4.7.7″ _module_preset=”default”][/et_pb_image][et_pb_text _builder_version=”4.7.7″ _module_preset=”default”]
They may not look like they have much color, but let them dry to get the full idea. You can always repeat to get a deeper tint. You can always add more food coloring to get a richer, deeper color also.
Using the rubbing alcohol also makes them dry super fast.
[/et_pb_text][et_pb_image src=”https://southhousedesigns.com/wp-content/uploads/2021/01/Variation-in-Color.jpeg” alt=”A bunch of dried, dyed clothespins laying on table to show the variation in color to expect” title_text=”Variation in Color” _builder_version=”4.7.7″ _module_preset=”default”][/et_pb_image][et_pb_text _builder_version=”4.7.7″ _module_preset=”default”]As you can guess, clothespins are made from a huge variety of cheap wood. They will take the dye in great variety.
I find it adds to the whimsy of these. It goes with the unpredictable nature of watercolor that makes it so beautiful. So I’m embracing the variety and all the different shades!
[/et_pb_text][/et_pb_column][/et_pb_row][et_pb_row _builder_version=”3.25″ background_size=”initial” background_position=”top_left” background_repeat=”repeat” collapsed=”off”][et_pb_column type=”4_4″ _builder_version=”3.25″ custom_padding=”|||” custom_padding__hover=”|||”][et_pb_text _builder_version=”4.7.7″ _module_preset=”default”]
Step 2) Watercolor Your Clothespins
[/et_pb_text][et_pb_image src=”https://southhousedesigns.com/wp-content/uploads/2021/01/Sketching-Design-Ideas.jpeg” alt=”Spiral notebook with sketches of tulips an other flowers” title_text=”Sketching Design Ideas” _builder_version=”4.7.7″ _module_preset=”default”][/et_pb_image][et_pb_text _builder_version=”4.7.7″ _module_preset=”default”]
I am NOT an artist. I probably don’t need to point that out to you when you watch me in action.
Since I don’t have the confidence of an artist, I wanted to plan this out a bit more.
So I traced around a clothespin many times and then started sketching.
I tried a pussy willow branch and a eucalyptus branch, but really wanted pink. I thought about trying a dogwood or cherry blossom branch for the pink, but they grow more horizontal and with the shape we are working with, I needed tall and thin! Perfect for a tulip.
Then I just needed to determine if I could fit two or just stick with one.
[/et_pb_text][et_pb_image src=”https://southhousedesigns.com/wp-content/uploads/2021/01/Sketched-Outline-on-Clothespin.jpeg” alt=”Four dyed clothespins with tulips sketched on them” title_text=”Sketched Outline on Clothespin” _builder_version=”4.7.7″ _module_preset=”default”][/et_pb_image][et_pb_text _builder_version=”4.7.7″ _module_preset=”default”]I’ve played around with watercolors recently, but once again did not have the confidence to just “wing it” . . . . . . yet.
So I lightly sketched out how I thought they might work on the clothespins themselves. Decided to try these first four and see how it went. I filled in those four and found myself trying to paint a bit outside the lines for more of the “loose watercolor” look that I love. It took some work to force the watercolor outside the sketch lines because of the slight pressure of the pencil leaving a bit of indentation perhaps. I/it felt a bit forced. And I want these to be joyful little guys.
Then logic took over! These clothespins came in a pack of 36 for $1 (yep, you read that right) from my neighborhood Dollar Store. If I mess up even 18 of them, I’m only out .50 and I’ve had a whole lot more fun this way (and a lot less time).
So after the confidence boost from pre-sketching, I was now ready to try free-handing it — okay winging it.
As with all watercolor, start light, then while it’s still wet, where you want a darker shading, add a tiny touch of darker color and it will spread and blend into the lighter colors. When I am dipping off camera, I am touching the tip of my brush into a navy. I barely tapped the bottom of the bloom while it was wet and it blended to become a touch of deep purple.
After two or three, all successful, I then made a batch of blooms only and then went back and added the “loose” stems and leaves.
In this 30 sec. clip I show you one complete process and followed by a bit of my assembly line version.
[/et_pb_text][et_pb_video src=”https://southhousedesigns.com/wp-content/uploads/2021/01/reduced-watercoloring-tulips-blog-post.mp4″ play_icon_color=”#ca4e64″ thumbnail_overlay_color=”rgba(0,0,0,0)” _builder_version=”4.7.7″ _module_preset=”default” width=”75%” max_width=”75%” module_alignment=”center”][/et_pb_video][/et_pb_column][/et_pb_row][et_pb_row _builder_version=”3.25″ background_size=”initial” background_position=”top_left” background_repeat=”repeat” collapsed=”off”][et_pb_column type=”4_4″ _builder_version=”3.25″ custom_padding=”|||” custom_padding__hover=”|||”][et_pb_text _builder_version=”4.7.7″ _module_preset=”default”]
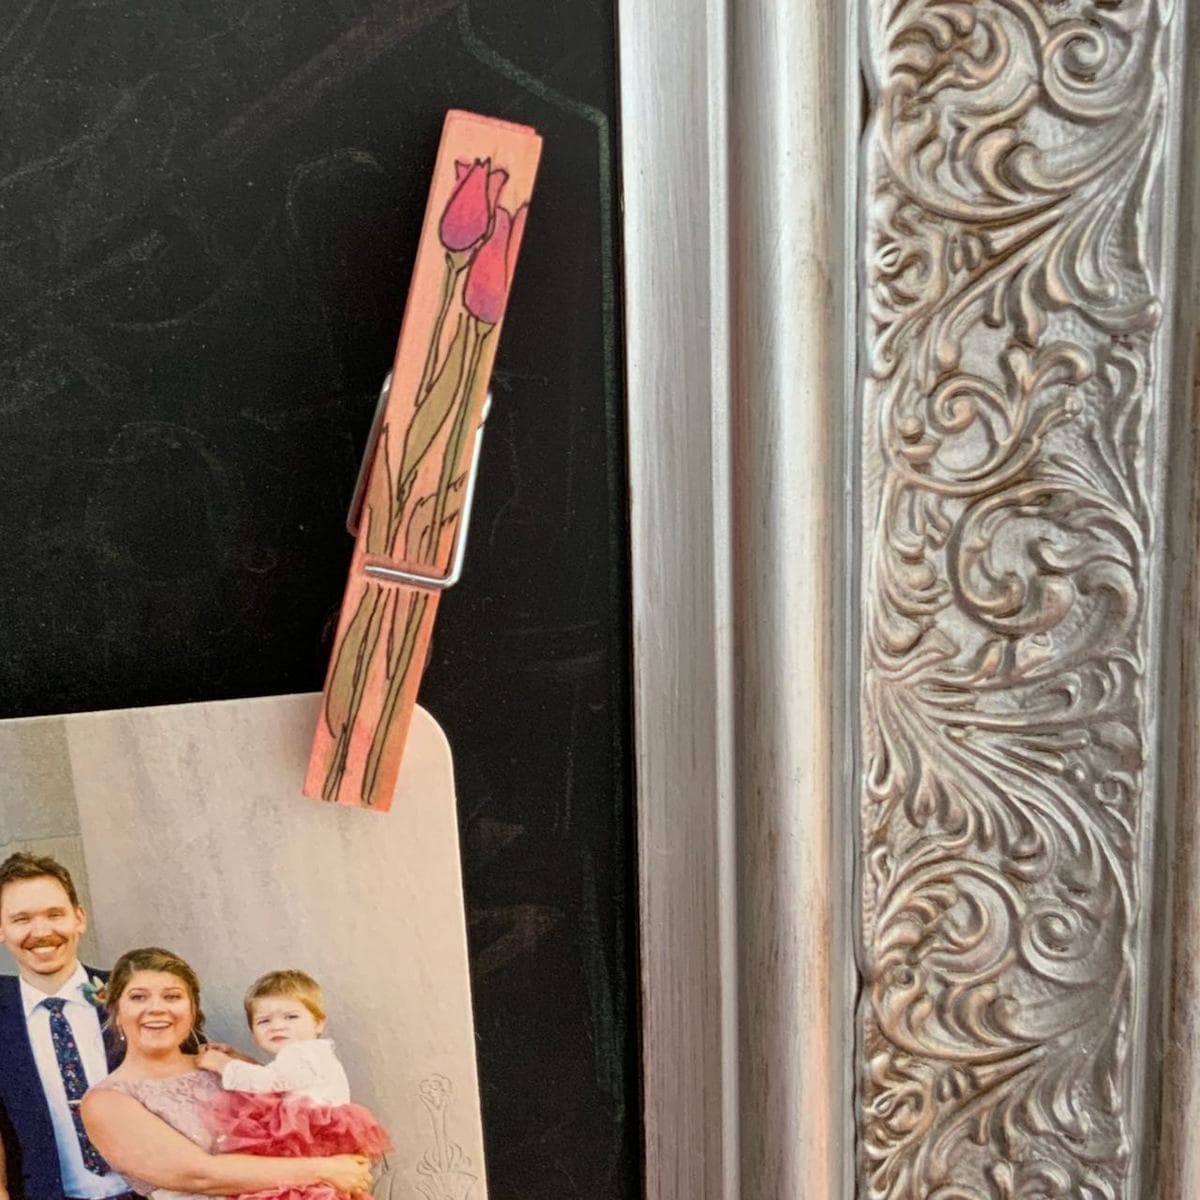
Step 3) Outline Your Design on Your Clothespins
[/et_pb_text][et_pb_image src=”https://southhousedesigns.com/wp-content/uploads/2021/01/Tulip-clothespin-on-magnetic-chalkboard.jpeg” alt=”A Decorated CXlothespin on a megnetiic Chalk board with ornate frame holding the corner of a family photo” title_text=”Tulip clothespin on magnetic chalkboard” _builder_version=”4.7.7″ _module_preset=”default”][/et_pb_image][et_pb_text _builder_version=”4.7.7″ _module_preset=”default”]
Only do this after your watercolor is thoroughly dry.
Don’t let this step intimidate you. The beauty of this loose watercolor style is that you aren’t supposed to follow any lines exactly.
Look at how your watercolor dried and let the subtle color changes lead you where a petal might be or if a leaf is behind or in front of a stem. But keep your lines simple and just suggestive of a tulip shape.
The charm is in the simplicity.
Here’s a video that might help:
[/et_pb_text][et_pb_video src=”https://southhousedesigns.com/wp-content/uploads/2021/01/My-Movie-2.mp4″ image_src=”https://southhousedesigns.com/wp-content/uploads/2021/01/A05D6DE7-B1C9-4426-935C-10C2006114A0_1_201_a.jpeg” play_icon_color=”#ca4e64″ thumbnail_overlay_color=”rgba(0,0,0,0)” _builder_version=”4.7.7″ _module_preset=”default” width=”75%” max_width=”75%” module_alignment=”center”][/et_pb_video][et_pb_image src=”https://southhousedesigns.com/wp-content/uploads/2021/01/Closeup-name-tag-on-goody-bag.jpeg” alt=”One name tag clipped on a washed linen party favor bag with additional bags in a galvanized metal tray on a quartz countertop” title_text=”Closeup name tag on goody bag” _builder_version=”4.7.7″ _module_preset=”default” custom_padding=”40px||||false|false”][/et_pb_image][et_pb_text _builder_version=”4.7.7″ _module_preset=”default”]
.Aren’t they just the sweetest?
And it’s always a bonus, when I am able to make things with all the supplies I have on hand.
And let’s stop for a moment and talk about those washed linen trinket bags. Aren’t they the best? What would you fill them with? How about these sweet shell ring dishes?
And while we’re talking gifts and organizing, displays and labeling, you must check out my newest post. It is so fun. I am delighted with how these little display easels turned out! They’d be perfect next to the party favor bags with a cute note of thanks or well wishes!
[/et_pb_text][et_pb_image src=”https://southhousedesigns.com/wp-content/uploads/2021/01/IMG_2096.jpeg” alt=”Washed linen party favor bags in a galvanized steel tray and five loose clothespins and nametags scattered on a grey and white quartz countertop” title_text=”IMG_2096″ _builder_version=”4.7.7″ _module_preset=”default”][/et_pb_image][et_pb_text _builder_version=”4.7.7″ _module_preset=”default”]
So how would you use yours? Identifying seedlings in their starter trays? Bring a touch of Spring to your home’s command center? Add magnets and sprinkle them on a magnetic memo board? Add a “Thank You” tag on a flower pot for a hostess or just someone special? ID party favor bags or for placecards?
Leave a comment on how you’d use them.
And if you’re thinking warm weather and outdoor entertaining, be sure to check out these centerpieces to make. Guaranteed to take your garden party to the next level.
[/et_pb_text][/et_pb_column][/et_pb_row][/et_pb_section][et_pb_section fb_built=”1″ _builder_version=”4.7.7″ _module_preset=”default”][et_pb_row column_structure=”1_2,1_2″ _builder_version=”4.7.7″ _module_preset=”default”][et_pb_column type=”1_2″ _builder_version=”4.7.7″ _module_preset=”default”][et_pb_image src=”https://southhousedesigns.com/wp-content/uploads/2020/06/Pin-It-Now-MC.png” title_text=”Pin-It-Now-MC” _builder_version=”4.7.7″ _module_preset=”default”][/et_pb_image][/et_pb_column][et_pb_column type=”1_2″ _builder_version=”4.7.7″ _module_preset=”default”][et_pb_image src=”https://southhousedesigns.com/wp-content/uploads/2021/01/Tulip-Clothespin-Pin-1.jpg” alt=”Pin Tower Reminder with two pictures of he finished tulip clothespins” title_text=”Tulip Clothespin – Pin (1)” _builder_version=”4.7.7″ _module_preset=”default”][/et_pb_image][/et_pb_column][/et_pb_row][et_pb_row column_structure=”1_2,1_2″ _builder_version=”4.7.7″ _module_preset=”default”][et_pb_column type=”1_2″ _builder_version=”4.7.7″ _module_preset=”default”][et_pb_image src=”https://southhousedesigns.com/wp-content/uploads/2020/08/LargerHeres-to-Joy-filled-Living.png” alt=”Here’s to Joy-Filled Living, Diane” title_text=”LargerHere’s to Joy-filled Living” _builder_version=”4.7.7″ _module_preset=”default”][/et_pb_image][/et_pb_column][et_pb_column type=”1_2″ _builder_version=”4.7.7″ _module_preset=”default”][et_pb_image src=”https://southhousedesigns.com/wp-content/uploads/sub.png” title_text=”sub” url=”/subscribe” url_new_window=”on” show_bottom_space=”off” align=”right” _builder_version=”4.5.6″ _module_preset=”default” max_width=”400px” module_alignment=”right” custom_margin=”0px|0px|0px|0px|false|false” custom_padding=”0px|0px|0px|0px|false|false”][/et_pb_image][/et_pb_column][/et_pb_row][et_pb_row column_structure=”1_2,1_2″ _builder_version=”4.5.3″ _module_preset=”default”][et_pb_column type=”1_2″ _builder_version=”4.5.3″ _module_preset=”default”][et_pb_code _builder_version=”4.7.7″ _module_preset=”default”]
[/et_pb_code][/et_pb_column][et_pb_column type=”1_2″ _builder_version=”4.5.3″ _module_preset=”default”][et_pb_code _builder_version=”4.7.7″ _module_preset=”default”]
[/et_pb_code][/et_pb_column][/et_pb_row][/et_pb_section]
Super cute idea. I’m guessing that you’re more of an artist than you claim. A very humble one.