How to Make Cutest Bird Baths For Centerpieces or Decor
With simple steps and endless customization options, you’ll love upcycling cast-offs into charming bird baths for centerpieces and more.
Transform your garden party into a whimsical wonderland with these captivating centerpieces that resemble concrete birdbaths. By upcycling thrift store finds, you can create stunning centerpieces that are both unique and budget-friendly.
Welcome all you DIY Wedding magazine readers who have hopped over here to see how I craft these faux concrete birdbaths for your garden-themed shower, rehearsal dinner, bridesmaid brunch or reception centerpieces.
Personally, I jump at the opportunity to eat outdoors. Somehow al fresco elevates every gathering – even if it’s a gathering of one with her cup of caffeine and the morning news. The patio beats the kitchen table every time!
It’s no wonder I’m attracted to the look of worn and weathered concrete statuary. Especially for event or party decorating.
So what would be better for garden party centerpieces than tabletop “concrete” birdbaths? But they would also be great for outdoor wedding receptions, birthday parties, anniversaries, showers and so many other outdoor themed events!
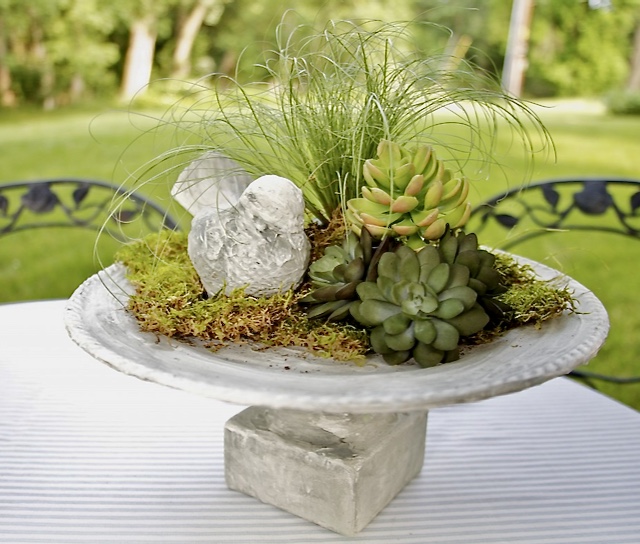
Hard to believe this is an inexpensive bird bath made from repurposed materials found at thrift shops and your own stash.
NOTE: Your DIY bird bath may look like a concrete bird bath, but keep I’m mind they are not intended for extended time outdoors.
Mine have held up beautifully for several years on our covered porch during the frost-free months. But I do not let water sit in them and I don’t let them freeze.
TABLE OF CONTENTS:
Let’s Make a Faux Concrete Easy Bird Bath
Materials and Supplies–
- Old dishes, old serving bowl, old candlestick, glass lid, shallow bowl, small old lamp base
- Small bird statues, optional
- Cheap Mardi gras beads or string of glass beads, optional
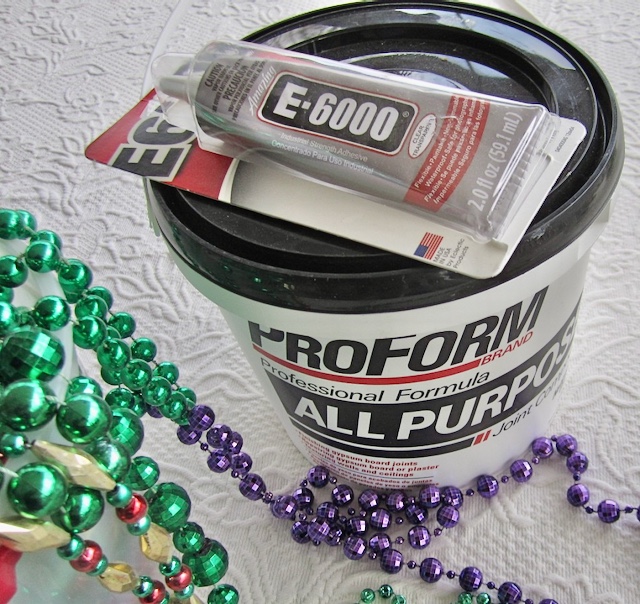
- Joint compound
- Craft paint
- Putty knife or craft stick
- Adhesive, I used E-6000
- Fine sandpaper, optional
- Matte sealer, optional
- Disposable bowl for mixing, with a lid if you have it
- Disposable cup
- Clean water
- Craft paint brush
- Old t-shirt rag or paper towels
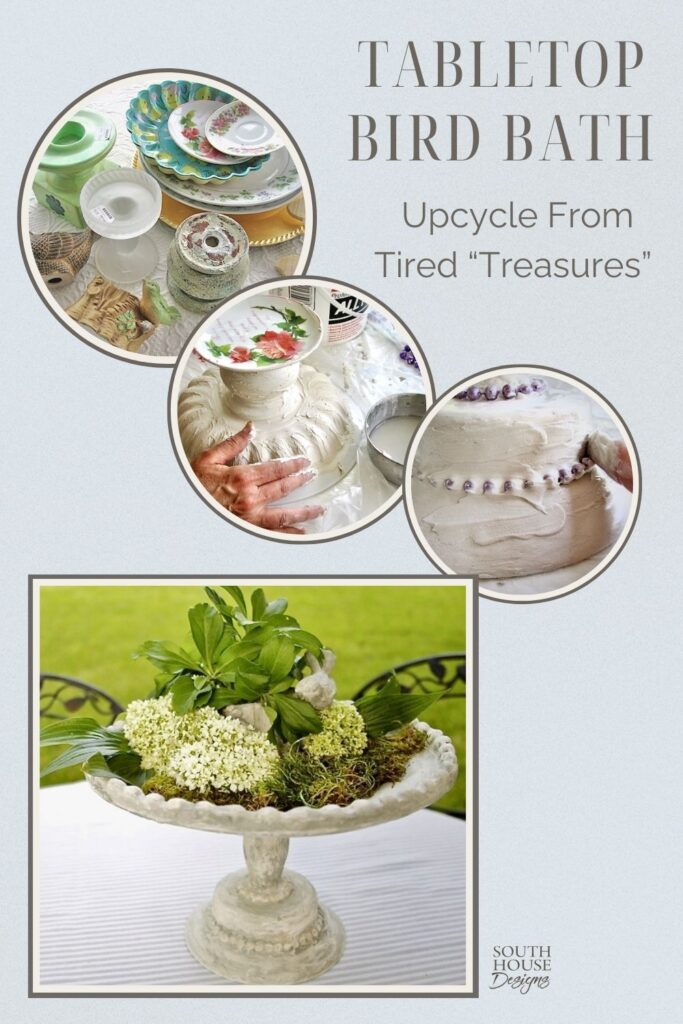
Step 1) Gather Your “Armature”-
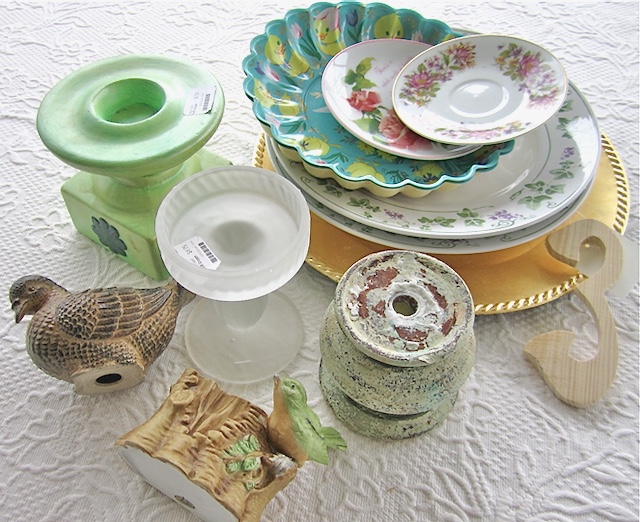
To craft your own unique bird bath, start by gathering odd pieces to form the structure.
Keep in mind you are only looking at the shape, the form, the scale. Don’t be put off by the truly atrocious colors, finishes or surface designs. Feel free to mix different colors, as they will all be unified in the end. Which means lots of different options.
Mine through your cabinets, take a field trip through your local thrift stores, dollar stores or yard sales. If you find a statue of some feathered friends, grab it too. It’ll make a great addition. Because what’s a bird bath without a bird, right?
Each birdbath will need at least 2 items. First, a large plate, pasta bowl, shallow bowl or small platter for the water basin.
Then for the pedestal, a squatty vase, a hefty candle holder, a small old lamp base, a stemmed dessert glass are all good options.
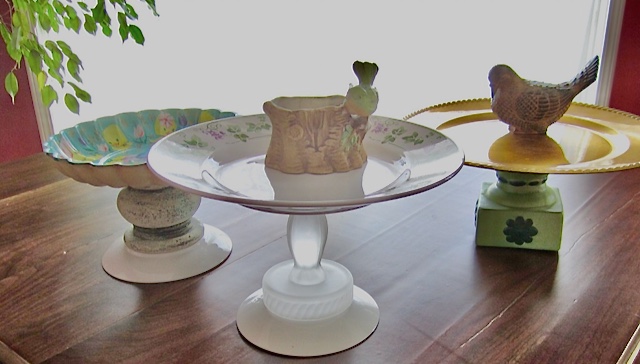
If the footprint of the pedestal needs more width for stability or a bit more height, I like to add a salad plate or saucer upside down, like the one on the left and in the center.
A solitary bird statue or even a short vase or planter with a bird attached that will hold some fresh cut flowers in water, are fun additions Have fun with this!
I left one without wildlife because its arrangement will include a table number and a candle. Add in a bird and that’s a mighty busy bath!
Play with your cache of quirky, neglected, worn “treasures” until you find the ideal combination of forms.
A quick pause in the crafting while an ask, Does this sound like a project you might enjoy? How about more? It’s easy when you’re a subscriber. Please consider subscribing now:
Many thanks!!! Now back to our birdbaths:
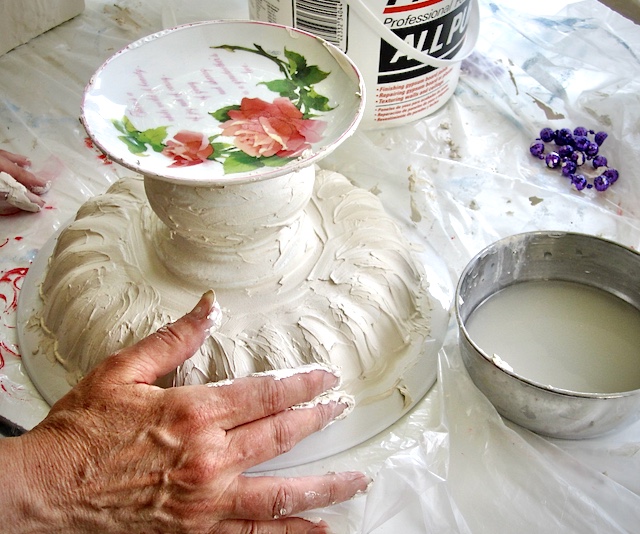
Step 2) Time to Assemble-
Break out a super strong adhesive – I used E-6000.
The only trick here is to make sure everything is centered and level.
Step 3) Sculpting Your Bird Bath-
Once your glue is dry, it’s time for the fun. Bring on the joint compound!
Now it’s time to “sculpt” your birdbath. Joint compound, a versatile patching material, will be your sculpting medium.
Yes, you read that right — joint compound. It’s my secret go-to!
My first joint compound (JC) project was this “cast concrete” fireplace and flue. Can you believe that? And this mirror on our patio. And these “concrete” eggs. And these large artisan pots. Oh, and even pinecones.
Yes, you can guess it’s one of my favorite mediums.
Transfer a generous amount of JC to your disposable container.
Stir the joint compound to get a smooth and even consistency. If it seems too dry, add some water. You want it the consistency of frosting. And this is very similar to, but way more forgiving than frosting a cake. Just don’t lick the spoon.
PRO TIP: Two steps in one. If you want a deeper color, more grey, more taupe, more moss, more brown, etc. Use craft paint to help thin it a bit.

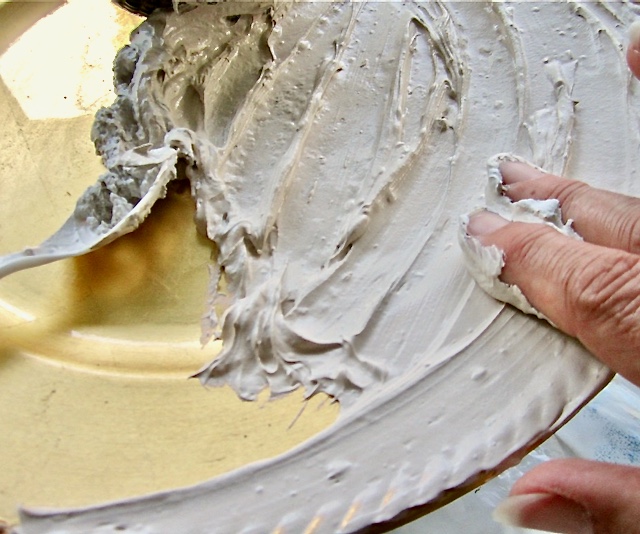
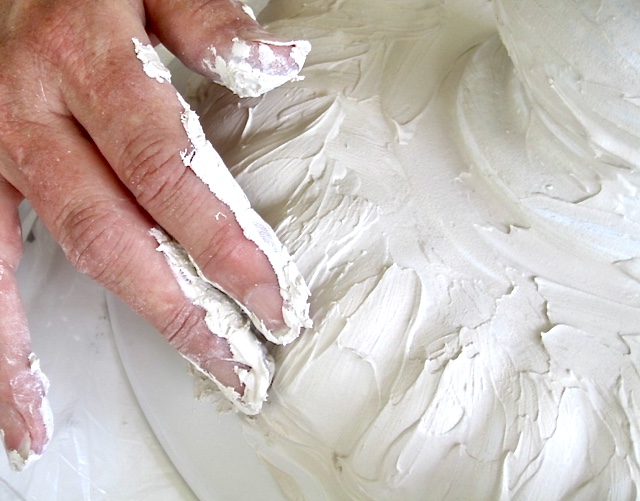
When your JC is colored and thinned (if needed), start by piling on a good helping of joint compound (JC).
Then with your fingers, work it into all the nooks and crannies. Lather this beginning layer on all surfaces.
PRO TIP: But just like with painting, two thin coats is better than one heavy coat.
Don’t obsess over this first coat. You will smooth it out and work on the texture later. The goal here is a good somewhat consistent base layer.
Step 4) Add Additional Details, optional-
Stand back and take a good look at your birdbaths. If at this point you decide, your birdbath needs a bit more, it can still be added.
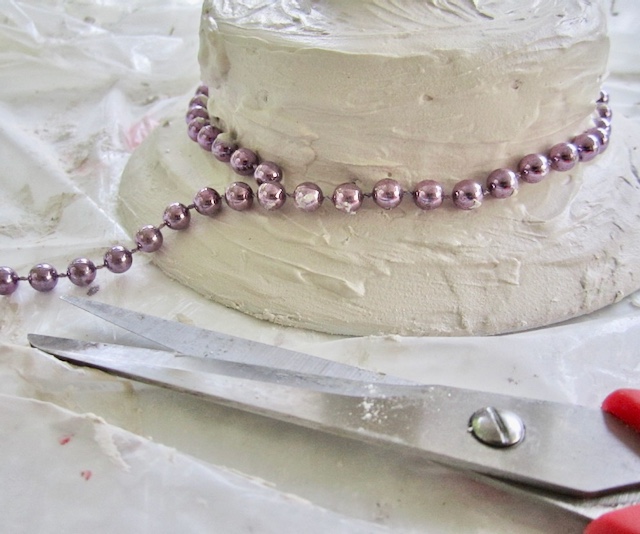
I decided this pedestal was a bit too plain. So I added some mardi gras beads for a bit more detail and texture.
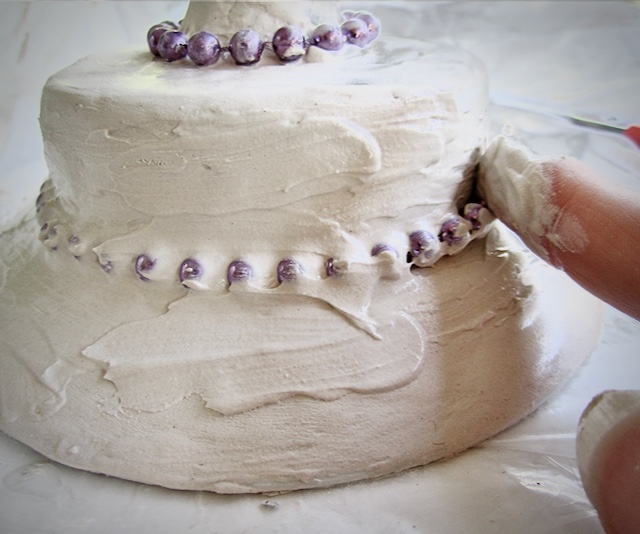
It was simple enough to do, I pushed the beads into the wet JC to secure them in place. Then I gave them an initial covering of JC.
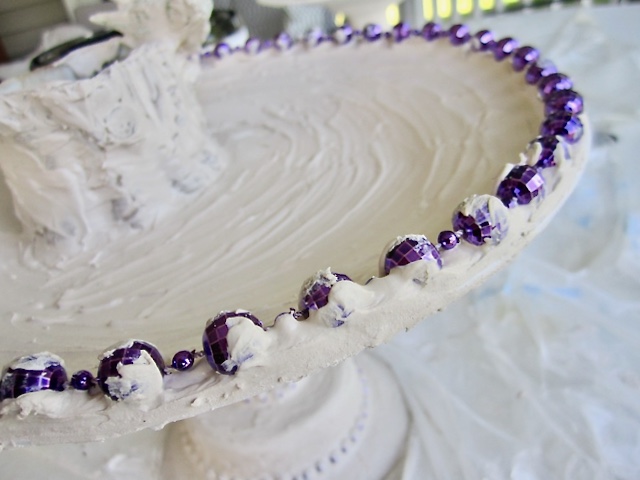
The basin was a bit too flat, so I adhered larger Mardi gras beads to the top of the edge with a thick band of JC to create an awesome scallop and a bit more depth.
Yes, it is a great idea to add these details with the adhesive before starting with the JC, but I want you to see that you can add as you go if you need to.
Be sure to get the underside of the bird bath bowl too.
Let it dry a bit (an hour or two), or even overnight and then dip your fingers (or a small soft rag or pad works here too) in a bowl of water and gently rub to smooth out your semi-dry finish a bit.
PRO TIP: While your birdbath is drying, keep your bowl of JC covered and it should be ready for the next step.
Step 5) 2nd Verse — Same as the First-
Let it dry a bit more or for several days if your schedule requires, and you are ready to add a second coat of joint compound.
This layer should be enough to give you complete coverage and polish the texture. If you were a bit thin in your application, and you have the time, there is nothing wrong with a third thin layer.
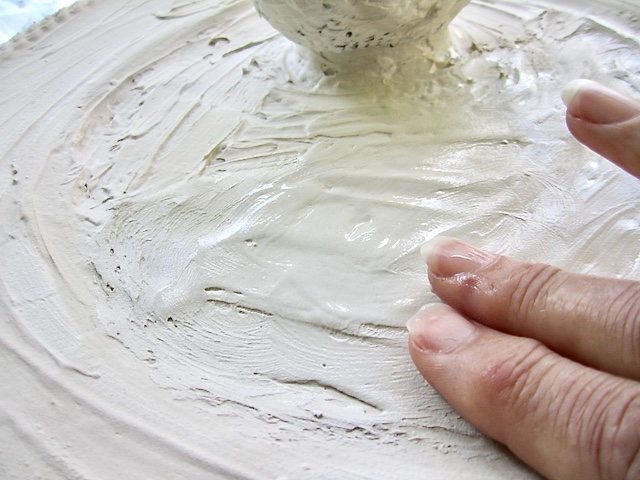
Again, wet fingers, or a damp smooth rag rubbed over the almost dry surface will smooth it out further. Once it is dry, fine grit sandpaper can also be used if you have a particularly troublesome spot.
This whole process is very forgiving, so just get in there and play
Step 6) Add the Aging or Patina-
Once you’re happy with the texture and it’s dry, it’s time to add the aging.
Watered down paint applied quickly and rather sloppily is it.

I used cheap black craft paint thinned with water.
Make sure all areas are covered and let it pool a bit in the nooks and grannies.
Keep a damp rag or paper towel handy and wipe as you go on the raised areas lightening the raised areas and leaving the recessed areas darker.
You can go as light or dark as you like. Not sure how dark you want? Then start light, you can build up the color.
PRO TIP: If you’re unsure about your color, when you’re making your bird baths, make a small sample one to test different colors.
Step 7) Add Sealer, optional–
As I stated before, we have used our birdbaths on our covered porch for several seasons without issue. And I never sealed them. But it certainly wouldn’t hurt anything. I suggest a matte sealer.
Ideas to Use Your Birdbath Beyond a Garden Party
Oh the possibilities!
Where and When-
Isn’t this the cutest tabletop diy birdbath idea? But, they don’t have to sit on a table, a hanging bird bath would also be really sweet.
These are such a fun and inexpensive project, why not make three of different heights for the perfect way to decorate a buffet table, or the gift table at a shower or by the guest book at a reception.
A friend and I actually made 24 of them for our church’s Mardi Gras themed dinner and dance.
With this craft, the whole family can get in on the action! Wouldn’t this make a great gift from tweens to their Grandma?
And who says you have to confine them to outdoor spaces. If you have a garden-themed bedroom, your homemade bird bath could serve as a jewelry dish. Or maybe one could serve to to coral your clippers and seed packets in your greenhouse.
Ideas to Style Them for Centerpieces-
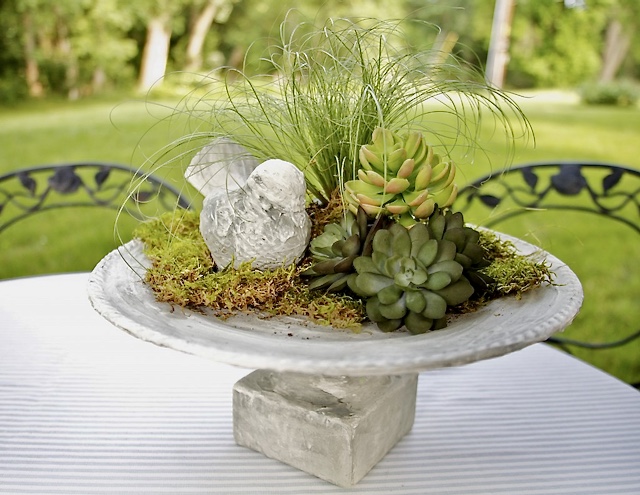
Give your simple tabletop bird bath a contemporary twist with faux succulents, florist moss and a tuft of wispy grass!
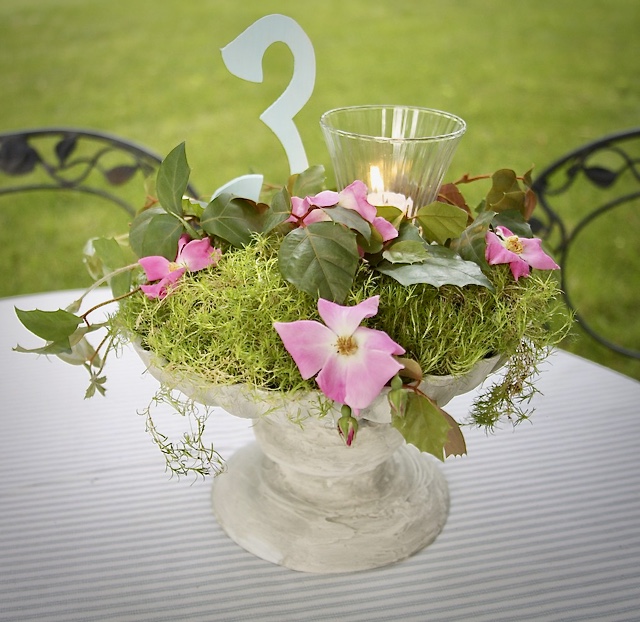
Or, for nostalgic charm, how about with a candle and a table number in homespun garden clippings?
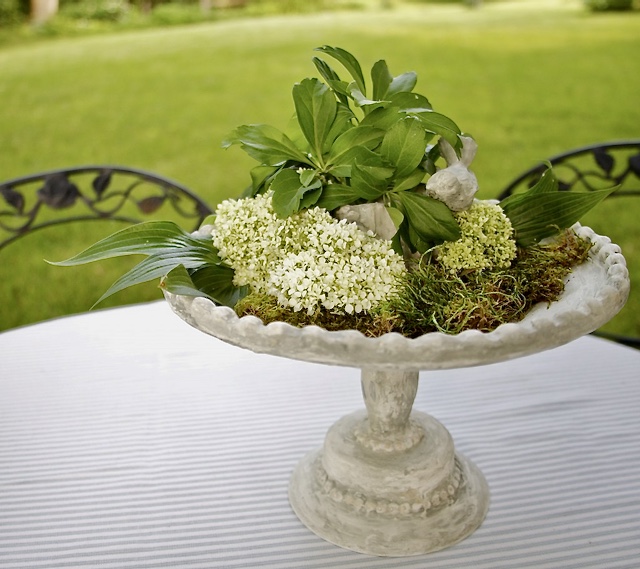
Maybe a traditional style with a monotone flavor of all shades of green?
The best part is, you are the designer! Grab your supplies and a pile of junk, uhhh tired treasures, get messy, and create something fabulous.
Be sure to Pin It to Remember It (maybe even on multiple boards 😉):
I hope this post fueled your creative thinking.
Let me know what you’ve come up with or if I can help you with any part of the process! I’d love to see pictures of your unique “concrete” bird bath projects.

So, I have been online shopping for centerpieces for my daughter’s first birthday party and I could not believe how expensive the items were going to be. I started to research birdbaths and there you were. Amazing craft project. I can go to a thrift shop and spend 3 dollars on each centerpiece with just random plates. I’m so excited to get started. Thank you so much for this idea. It’s going to save me so much money!!!!
Thank you,
Wanda
Wanda, do you have pictures to share?
This is such a nice idea. I’ve made a similar one but minus the joint compound so I had to be careful and match up the pieces in color. This has such a cohesive, natural and aged look and you don’t have to be concerned as you said with the colors of your pieces AND allows you to add elements such as the beads to jazz it up. I can’t wait to try it. Thanks for sharing.
These are SO fabulous! Could you please give a bit more specific information regarding the type and color(s) of paint you used? Thank You!
Thanks Shelley! I love how they turned out, and they really are fun, messy and very forgiving. As for paint color, I just used a very, very watered down black craft paint I had in my stash.
What a fun idea! You are brilliant and I need to make these!
Have a wonderful day!
karianne
This is so clever! Such a fun and creative idea! I just might have to make one! I love the idea of just getting into it and playing with the jc adding the beads was brilliant! Pinning this!
Hugs,
Karin
Thanks Karin! They are fun.
I actually came up with this over a decade ago for a church dinner-dance with a Mardis Gras theme. We were converting the parish gym into a New Orleans courtyard. A friend and I made 24 of these all at once!!! Wish I had picture of that one. Hope you make one, or four. and please send me a pic.
Oh my goodness, this is incredibly creative!! They’re beautiful and I had no idea you could make something look concrete like that!
And soooo fun to make Elena — it’s like you’re back playing in the mud, but this time making something fun and charming from a bunch of throw aways. Hope you give it a try!
Oh my goodness, how fabulous is this! I have a 1-gallon pail of the stuff and now I want to shop my home to do this to ALL THE THINGS.
You go girl! Just be sure to come back with some amazing pics to share! Have fun playing with the mud!!
Wow! I’m amazed with the items you started with to the final reveal. I’m a thrifter so you’ve got my mind racing for what items I have in my thrifted piles! Pinned.
So glad to spark a bit of creativity, Allyson! Please send pics of what you come up with. Would love to see.
What a fun and creative idea! Thank you for sharing with Charming Homes and Gardens Link Party!
Thanks Kim!
And many thanks to you for hosting the Charming Homes & Gardens Link Party.
Lovely cakestand! It has stood the test of time! Thanks for sharing at Tuesday Turn About!
Thanks Julie! So glad that it looks like it’s been around for a time.
And thanks for hosting Tuesday Turn About!
I LOVE this idea. So cute. Thanks for sharing to Charming Homes & Gardens Link Party. Look for your feature on Wednesday. Rachel
Oh thanks Rachel! I am thrilled to be featured on Charming Homes & Gardens!
Truly appreciate you hosting … and selecting my birdbaths!
I love these bird baths. Congratulations, you are being featured at Thursday Favorite Things. I hope you stop by.
https://www.eclecticredbarn.com/2020/05/thursday-favorite-things_21.html
Hugs,
Bev
Oh Bev, thanks so much! Such an honor — I’m so happy.
Those are amazing! I just love them, and I love how fun it looks to make them! I’m definitely pinning for later. Thanks for sharing with us at the TFT party – I’m featuring it at the TFT party today!
They are fun to make. The first time I came up with them, I made 24 at one time!!!! I needed centerpieces for a parish dinner dance with a Mardi Gras theme. We were trying to convert the gym into a New Orleans courtyard. Budget: $100 for all 24! I had to get creative–fast!
Wow! These are fabulous and I love how you gathered up things from around the house to make them. Featuring when my link party opens up tonight!
Wow, Carol! Thanks bunches!!! They are fun to make and can be a family craft too!
I’d like to find out more? I’d like to find out some additional information.
It’s WP, custom designed using Divi Builder. Thanks for the feedback.
I am so looking forward to creating this project with my young granddaughter. We were just talking last week about wanting to do crafting together. Thank you so much!
This is a great project for the two of you to do. It’s like adult finger painting. Please send pics of your creations.
great love them
Thanks bunches, Anna!