
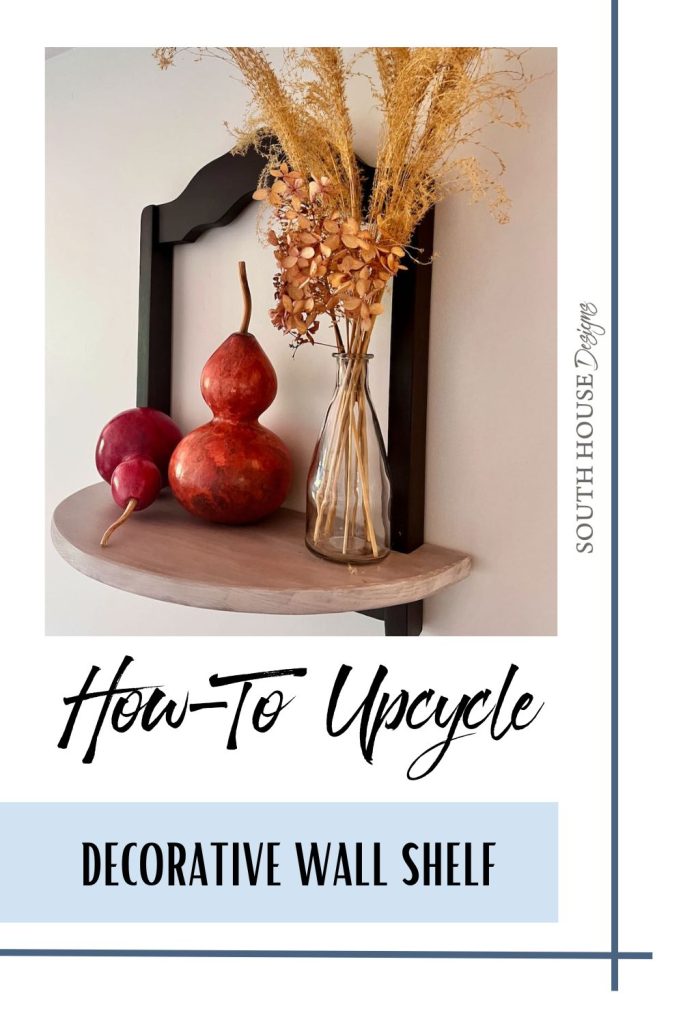
Best How To Upcycle: Old Chair Into Decorative Wall Shelf
Upcycle CAN go modern! See how I upcycled a dining chair into a fresh, transitional decorative wall shelf — only a few basic tools required.
You’ve seen them. Charming relics of the past languishing in the dark corners of garage sales and thrift stores.
Those old wooden chairs served their purpose quite well, but they’ve seen better days. Perhaps their legs are a bit wobbly — too tired to trust.
Sad really. But what if we found them a new purpose?
What if we gave them a new lease of life? Well, actually a new lease of life that would be a fresh coat of decorative paint with a furniture transfer perhaps.
Rather, what if we gave them a Whole New Life? A whole new purpose!!!
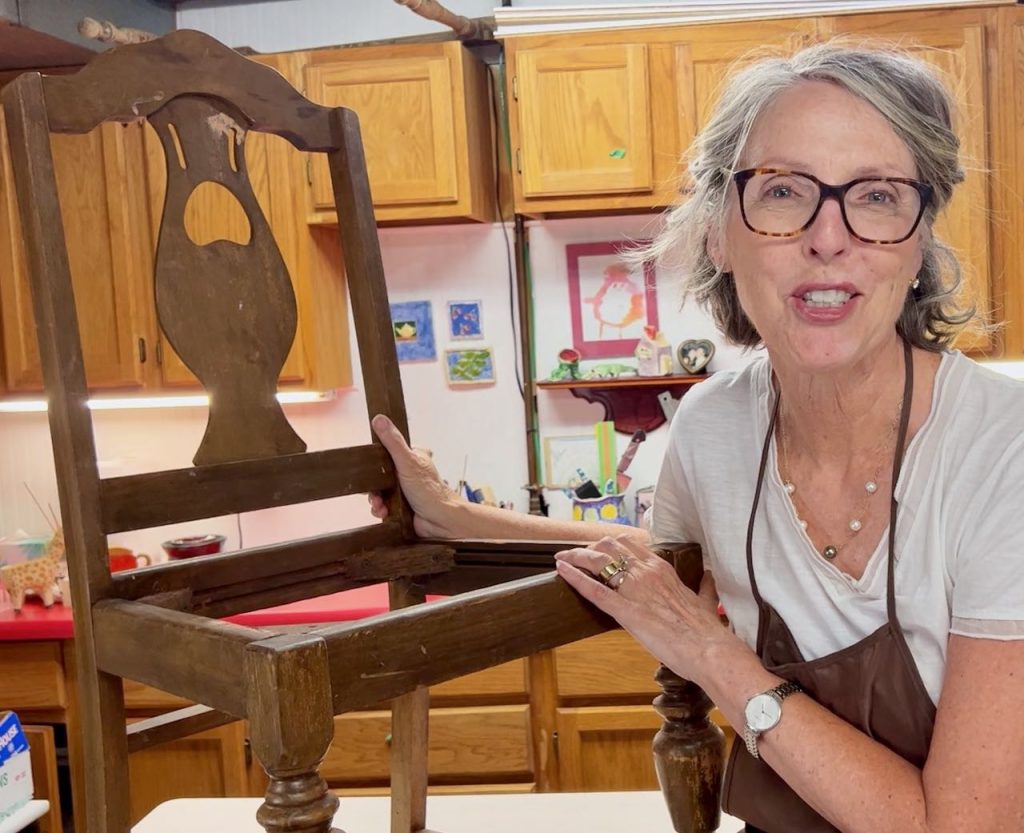
Of all my upcycling projects, this is one of my favorites! Using just the back of the chair. That’s right, not the entire chair. Bonus: now I have some gorgeous old chair legs for another project.
What’s really fun about this post, is that it’s also a challenge.
My friend Cindy [from Reinvented Delaware] is all about Vintage Farmhouse style and really knows how to rock upcycles — let’s just say it’s one of her super powers!
We thought it would be fun to each upcycle a vintage wooden chair of our choice into anything we want. Without sharing our projects until now! I can’t wait to see what Cindy has come up with. How far apart will our projects be? Or maybe, how really similar?

Where to Find Old Dining Chairs
Of course one of the first things you need for this project is an old wooden chair. Keep an eye out at all the typical spots:
- your favorite thrift store
- garage sales
- yard sale
- charity shops
- curbside castoffs
- your mom’s attic perhaps
What to Look For In Your “Found” Chair
First, keep in mind, since you really only need the back, chairs with broken legs, rough edges, disgusting seat cover and the like could be great bargains!
A chair with a flat back like mine, will make the easiest project.
I intentionally wanted a back frame that didn’t scream “Chair”, but if you have a vintage farmhouse style or rustic or cottage style, that may be exactly what you want. I’d encourage you to go for it!!!
When I saw this forlorn chair on a neighborhood curb on trash day, I jumped to rescue it. But honestly, I went for the legs first.
But when carrying it in, I realized it had an almost flat back and a really simple back frame with just the sweetest arched top to make it special without too much detailing.
And this project was born.
Because my frame was so simple, refinishing it was a breeze.
If your style is all about the ornate pressed wood and spindles, don’t be discouraged. No need to strip the finish.
If the finish is not peeling, the good news is that after a good cleaning, you can always use chalk paint finished off with a wax top coat — Annie Sloan, Dixie Belle, Jolie and a number off other brands.
Keep in mind that many of these ornate backs will be curved. You’ll need to add a straight backed shelf to keep your chair shelf from rocking side to side.
CAUTION: If your chair back cannot be integrated solidly with the shelf, attach your hanging hardware to the shelf itself, with secondary hangers on the chair back. Always make sure your shelf is secure!!!
Let’s Make a Small Decorative Wall Shelf – A Chair Shelf!
Do You Prefer Video Tutorials?
No worries! I’ve gottcha covered. Just Click Here or on the image below.

Supplies & Materials:
- Old Wooden Chair (actually just the chair back)
- Scrap wood for the shelf
- Pencil, regular or red (see tip below)
- Bondo, lightweight automotive filler
- Sandpaper
- Paints of choice
- Paint brushes
- Drop cloths or work surface covering
- Water and misting bottle, not required, but huge help. My exact one.
- Disposable cups and sticks for mixing paint
- Lint free rags
- Wood glue
- Jigsaw (the one I’m using & love) with wood scroll blade
- Carpenter’s square, not required but helpful
- Orbital sander with sandpaper discs, can substitute sanding block
- Microsander and sandpaper, so helpful!! This is the exact one I wouldn’t be without.
- Brad nailer with brads, or brads and hammer
- Hanging hardware and any require tools
Step 1) Remove Back From Wooden Chair and Prep It—
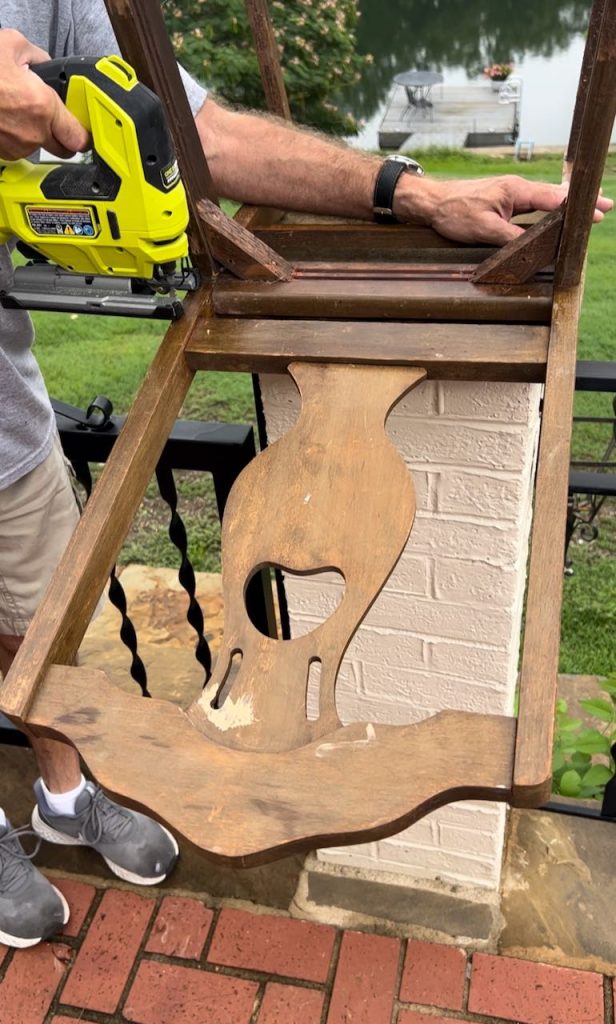
This is just the first of several times your jigsaw will be the tool you need for this project.
I used my jigsaw to cut through the the chair back’s two support pieces just above the seat.
Then, because I wanted to remove the center decorative piece in the back, I cut it across the middle. Each half just fell right out of their placement grooves in the top and bottom of the back.
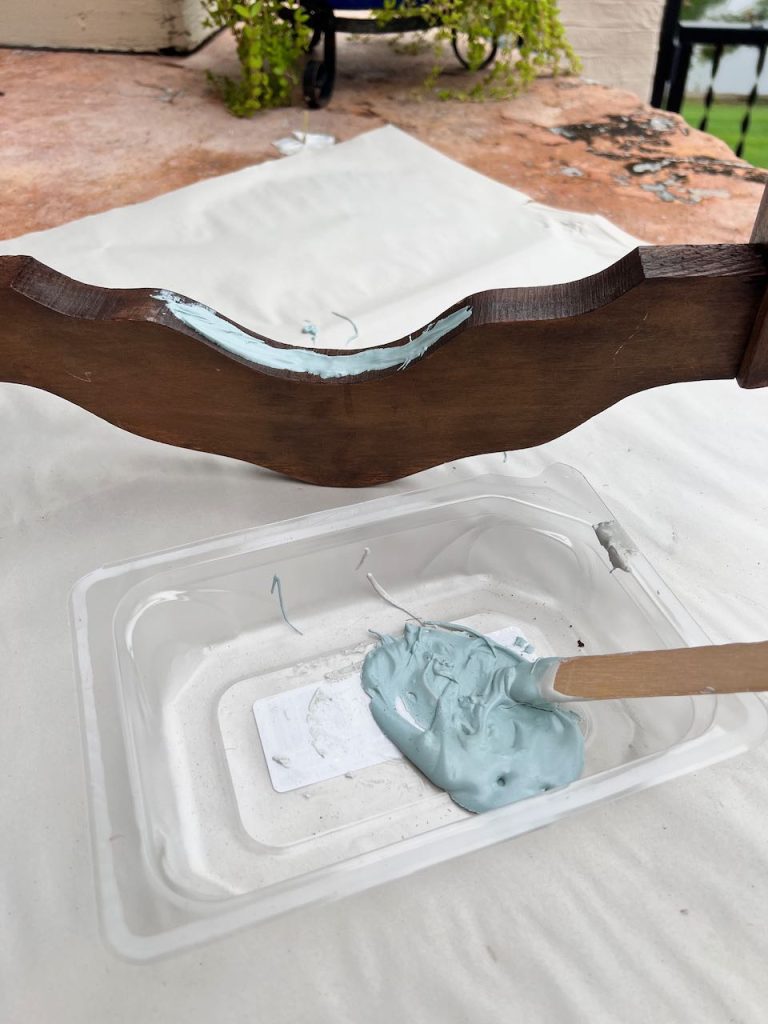
I mixed up a small batch of Bondo (outside, wow it’s stinky stuff!) and filled the upper groove. The shelf will be sitting on the lower stretcher bar so no need to fill that one.
Once dry (not more than 10 minutes), I sanded it smooth with my microsander with a piece of medium-to-coarse sandpaper, then moving to fine sand paper. If you don’t have a micro sander or detail sander, quick order one now!!! It’s truly one off those great things you shouldn’t be without. Think of the time you’ll save — and your fingers!
Since I want to do a paint wash on mine, I sanded the entire back piece to expose the beautiful grain and eliminate some spots of old botchy top coat.
Before we get too far into the process, may I pause a moment and ask you to consider joining this great community we are building. You say how much is right for you!
Thanks Bunches!
Step 2) Cut Shelf-
Now cut your shelf to whatever size and shape you want.
I went with a semi-circle that extended beyond the width of my chair back. I wanted my shelf to wrap around the legs of the back for a fully integrated, intentional well-designed look.
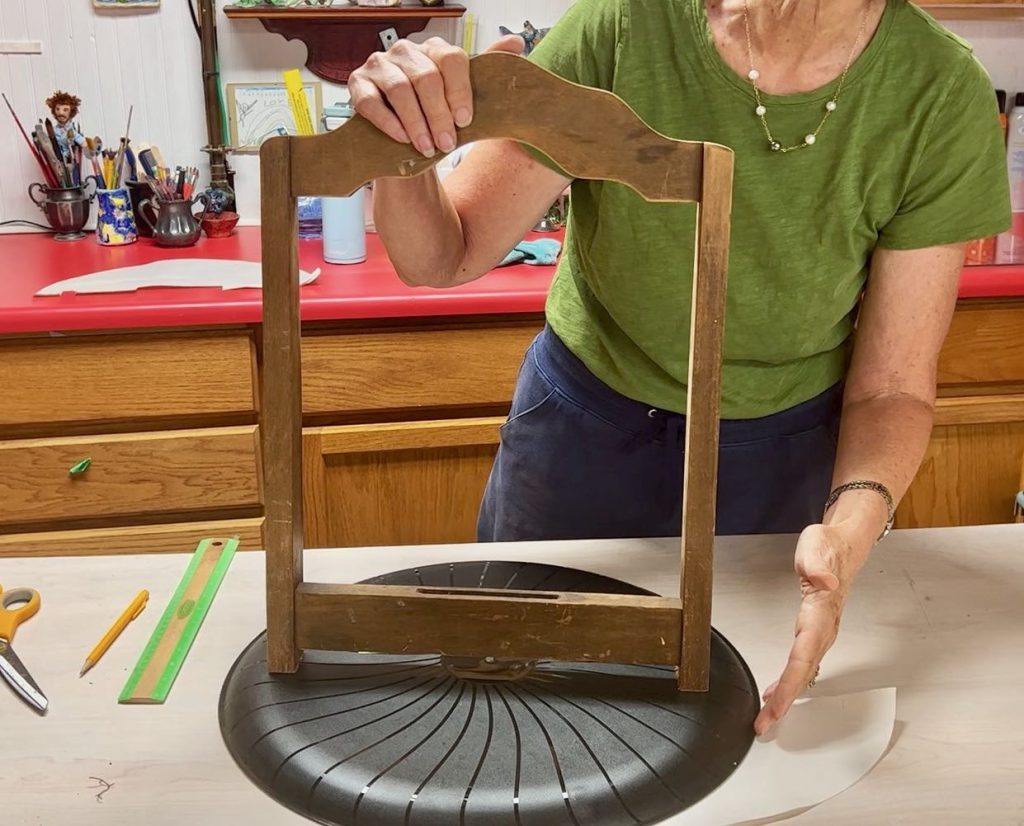
I used a large plastic party platter that I had saved in my stash for a pattern. I traced around it on a piece if scrap wood I had (you’ll understand why it was scrap when you see the back side). And here’s where experience taught me something that I’m happy to pass on to you.
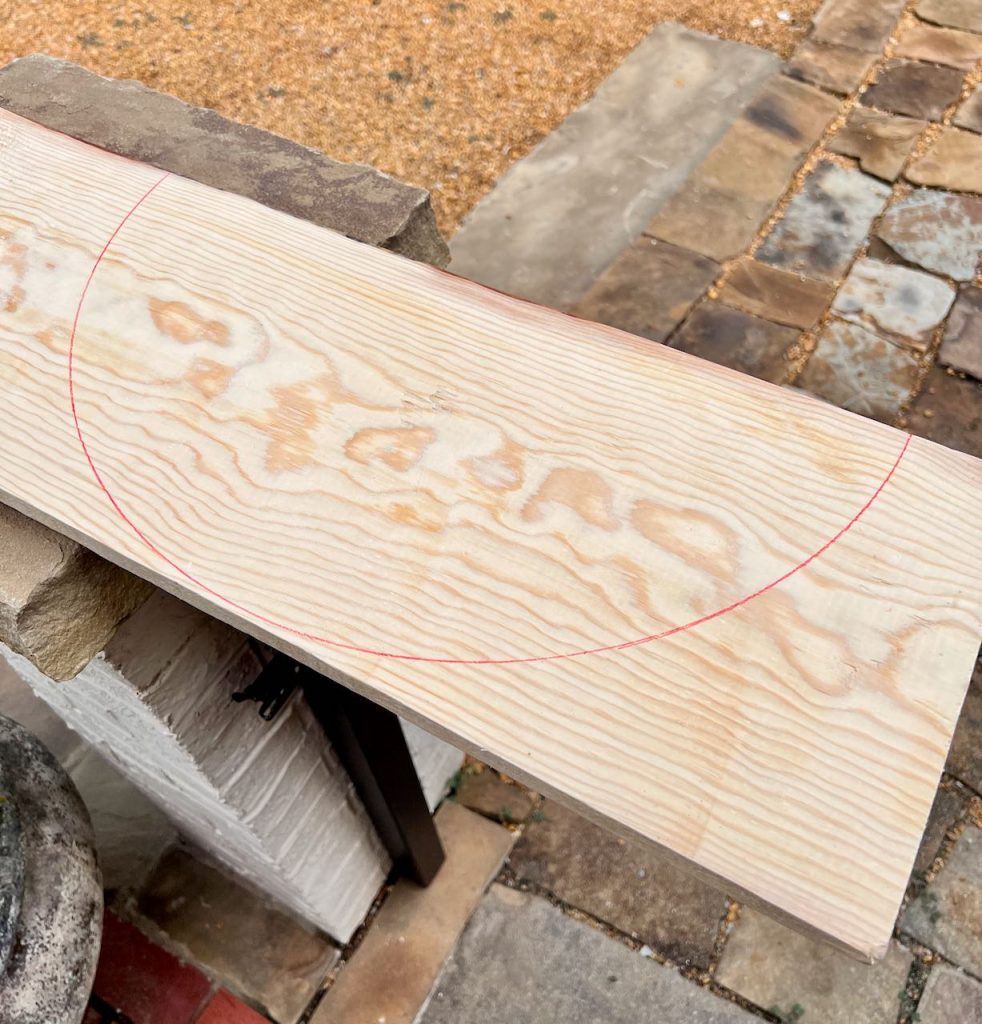
TIP: When drawing cut lines on wood, use a colored pencil. No. 2 lead lines disappear in the shadow made by the jigsaw when cutting.
REMEMBER: When cutting curves, even long sweeping curves, use a wood scroll blade in your jigsaw.
Sand the shelf smooth. I also sanded the curved edges to soften the lines.
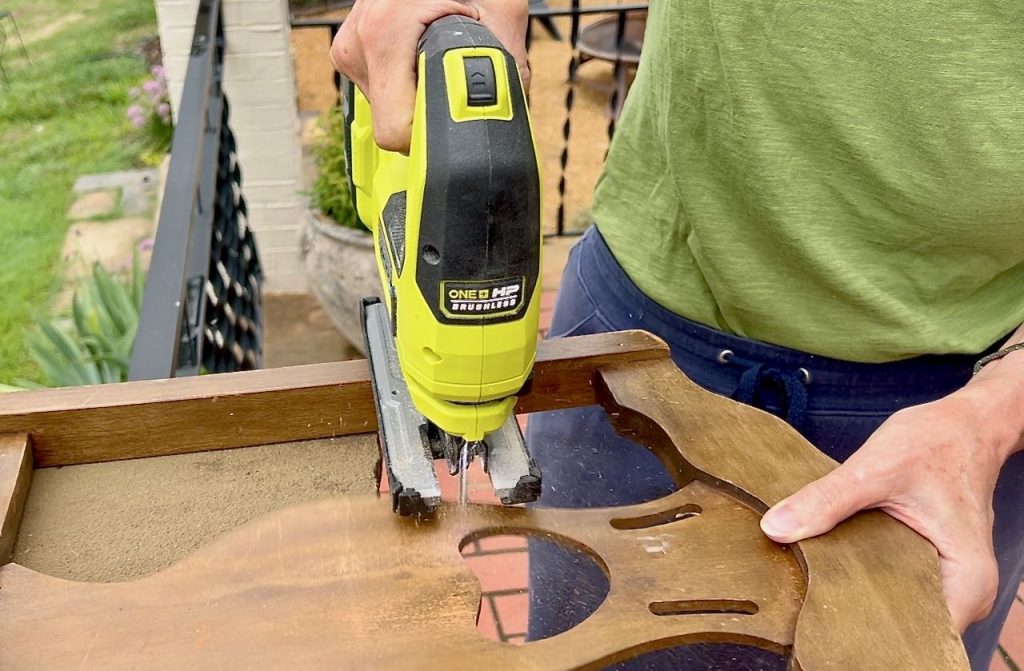
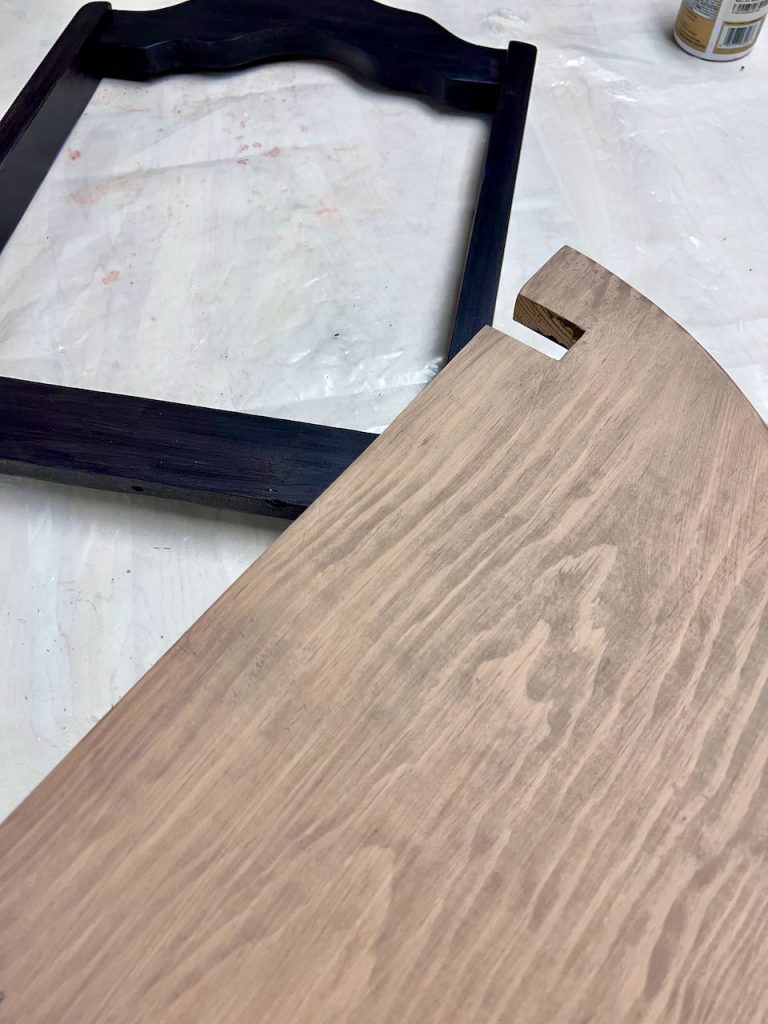
Step 3) Cut Notches to Combine Back and Shelf-
Once your shelf is cut, you need to cut notches in it for the back vertical pieces.
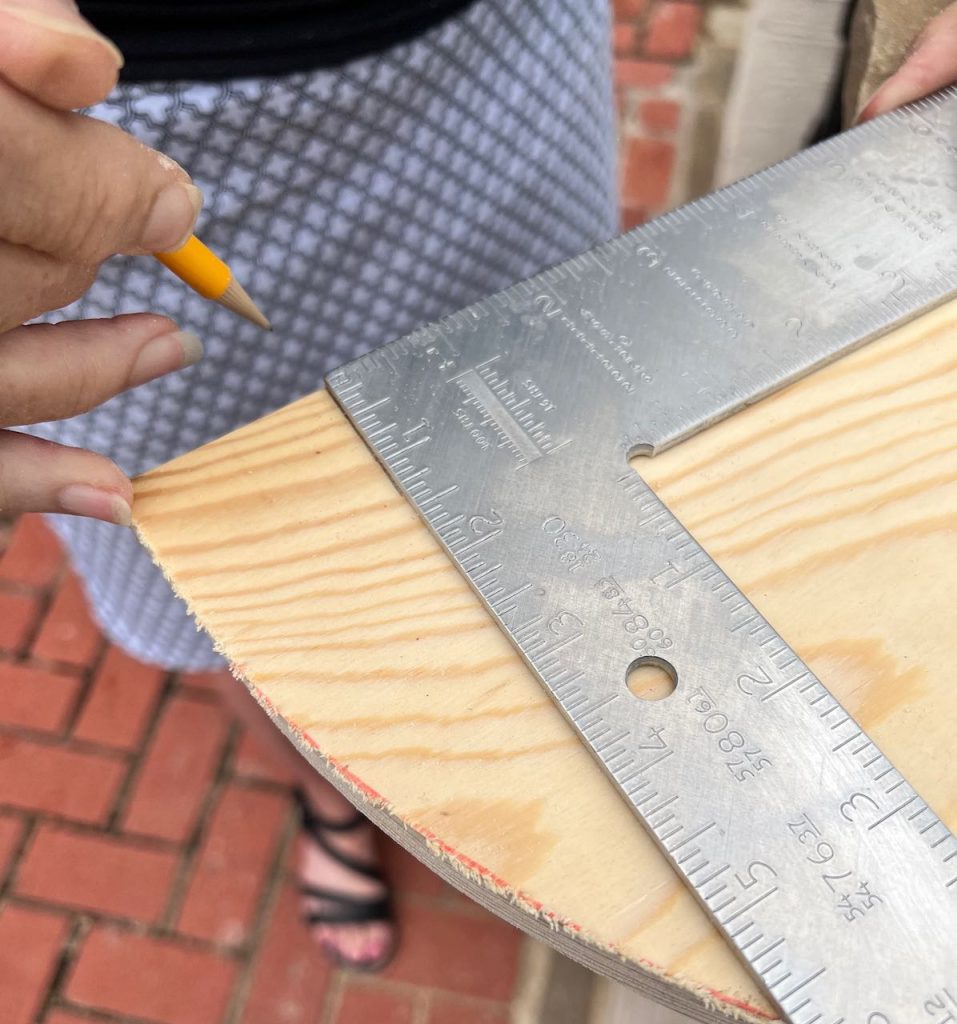
Be sure to center the back and mark the outside of each chair back leg. Then I measured how wide the legs were and how deep they would protrude into the shelf. With a carpenter’s square, I marked my cut lines.
At first glance, cutting notches can look intimidating. Using a jigsaw with a scroll blade is the easy way.
Cuts to Make For a Notch in Wood
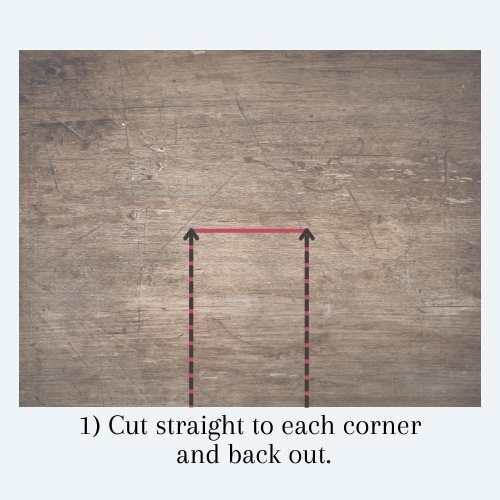

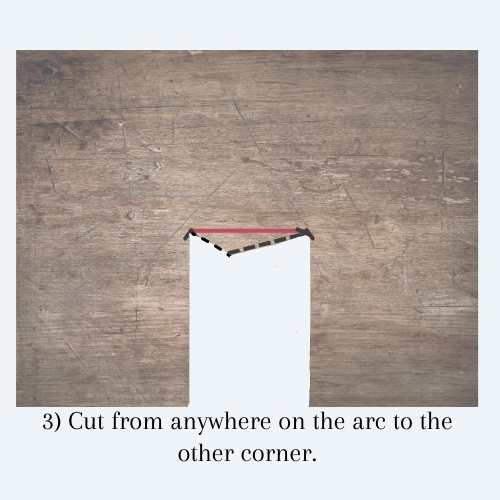

- Cut in from the edge of wood along each of the outside cut lines, and back your blade out.
- Starting at either outside cut line cut a diagonal arc to the inside corner on the opposite outside cut line. A big chunk will fall out.
- Now cut from anywhere on the arc to the other inside corner. Another smaller chunk will fall out.
- Now cut across the inside inside line to cut out the last remaining sliver.
Step 4) Prepare for Paint or Stain Finishing-
If you haven’t already, just like any diy project using old furniture, it’s a good idea (actually quite critical) to clean it well. It may look clean but any lingering grease can ruin your paint or stain treatment.
I use TSP mixed in a bucket of warm water with a rag or scrub brush.

Step 5) Paint or Stain Your Chair Back and Shelf-
This is where you can get really creative and dramatically alter the look and style of your chair shelf.
How To Paint Wash
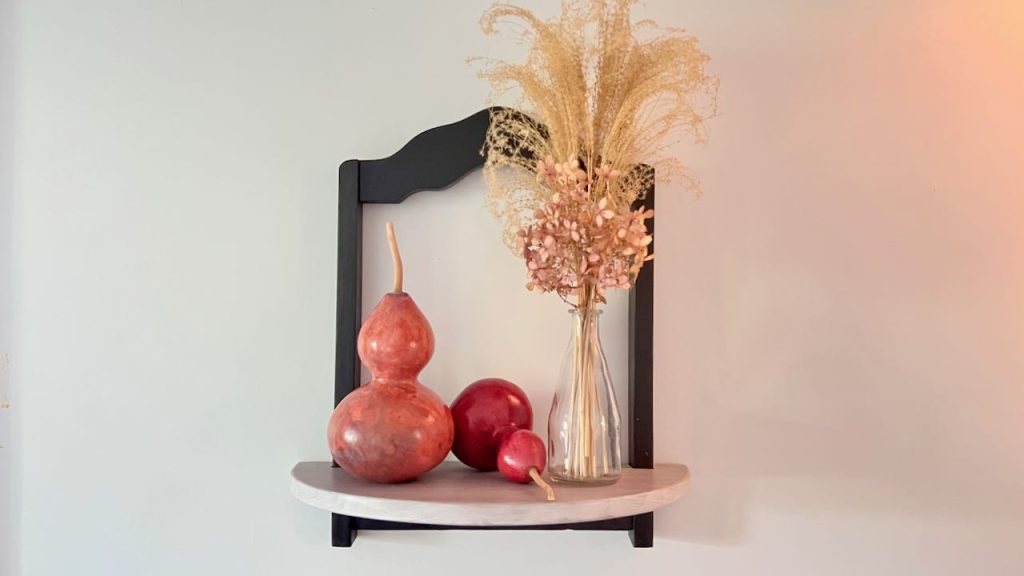
I’m crazy about black accents and I envisioned my little diy wall shelf to be black with a bleached or white-washed wood shelf.
I wanted to do a paint wash because it’s a great way, one of my favorite ways, to finish wood. Because a paint wash, or color wash:
- still brings the warmth of wood because the grain is still present
- easier to control the color outcome
- no brush strokes
- super easy
- a little bit of paint goes a long way
- any acrylic paint will do
PAINT WASHES: Start with 1:1 paint to water ratio. If it’s too thick, or too opaque, mix in more water. If it is too thin, or too transparent, mix in more paint.
To apply a paint wash:
- Apply the wash with a brush, rather quickly and sloppily
- Right away, wipe it back off with a lint-free rag
- In a nutshell, that’s it.
Keep in Mind:
- How quickly and aggressively you wipe will determine how much pigment stays with the wood.
- Don’t let the paint dry out before wiping. Mist it to keep it damp
- The longer it sits on the wood the deeper the color.
- Let it rest for a couple of minutes and then repeat for a bit more color.
- Alter the color of layers for depth.
- A final dark color can give an “antiquing” look like a dark wax on chalk paint.
- A final light color can give a white wash look like white wax does on chalk paint.
- A misting bottle of water can be your best friend through this. spray to wipe off something you didn’t like before it dries. Spritz before you apply paint for an even more translucent appearance.
- Always test your wash on the back side or a scrap off the same wood to see how the natural colors in the wood will affect your wash.

On the back of the frame, I tested my black wash. I discovered, that when I kept the black transparent enough to still expose the woodgrain, it looked more like a very, very dark brown. So I started with a first coat of grey wash to neutralize the golden brown hues of the wood.
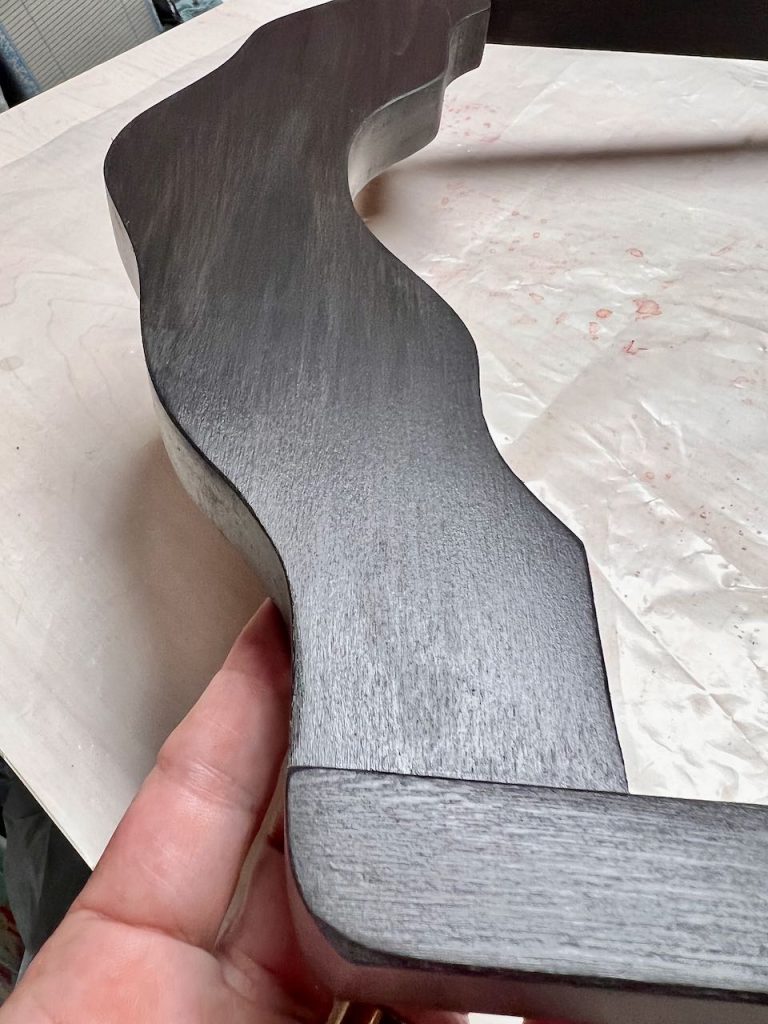
I used a sample jar of Sherwin Williams Caviar as my black paint and then mixed a bit with water for my wash. I added a coat of this black wash over the grey. And then did a second coat off the black wash, wiping it back off fairly vigorously to show the grain in spots.
On my shelf, I started with a first coat of Folk Art Linen Toile craft paint diluted into a wash.
After it was wiped, I let it rest while I mixed a wash of brown (another sample jar in my stash). I applied the brown and wiped.
Then I made a wash of grey, applied and wiped.
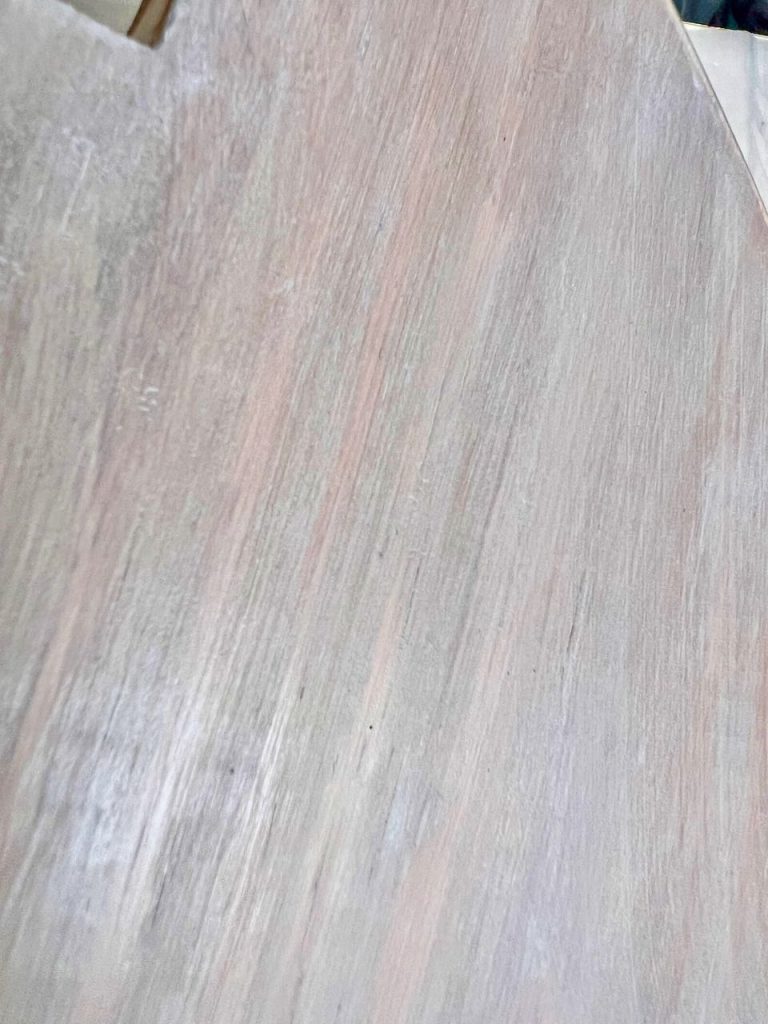
Then I wanted just a bit more, so I applied a second coat of both the grey and brown washes together alternating between them and swirling them on the shelf as I went.
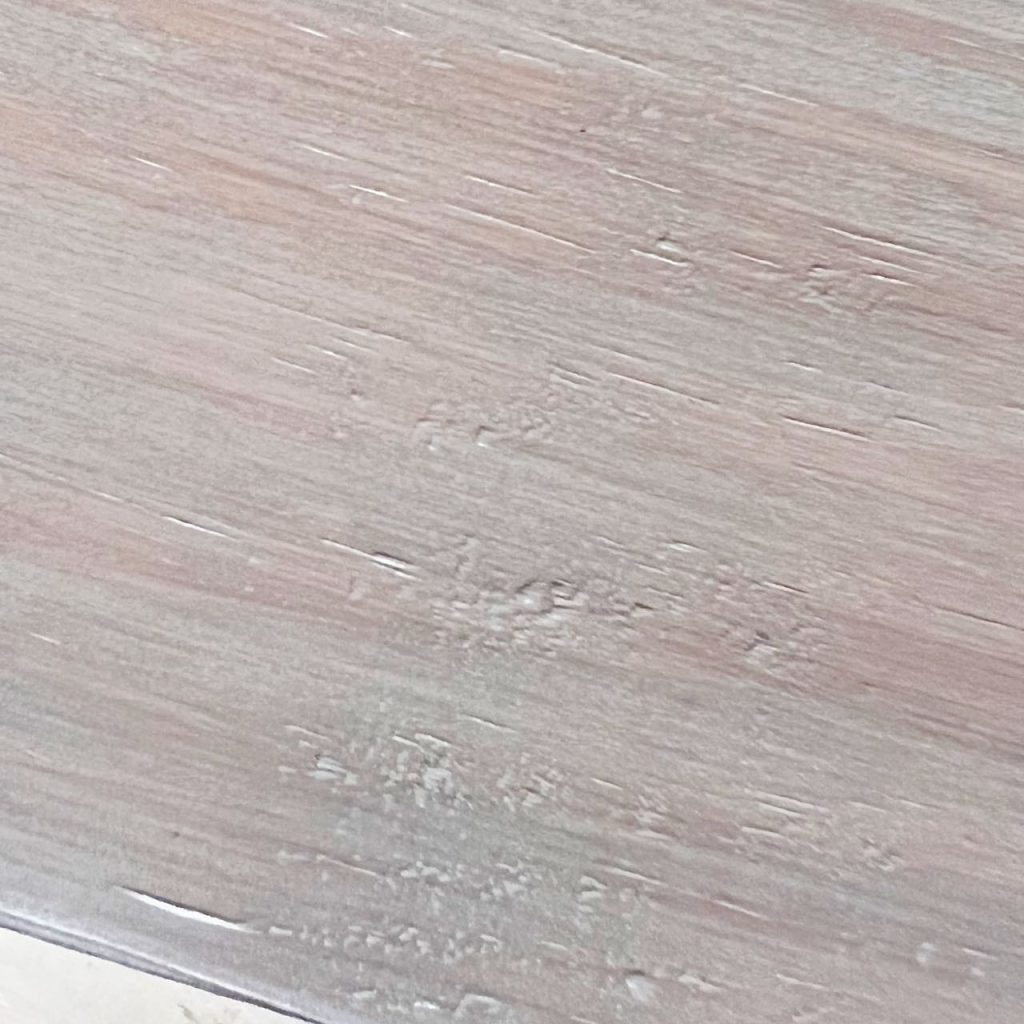
That got me almost there. But I decided it needed a whitewash to brighten it just a bit.
Because I wanted it to just catch in the grooves and crevices I misted first and then applied the white wash. Let it sit for a minute and then gently wiped it off where I thought it needed it.
NOTE: It’s not necessary to let each layer of a wash completely dry between layers. But it is important that the wood be completely dry before you top coat.
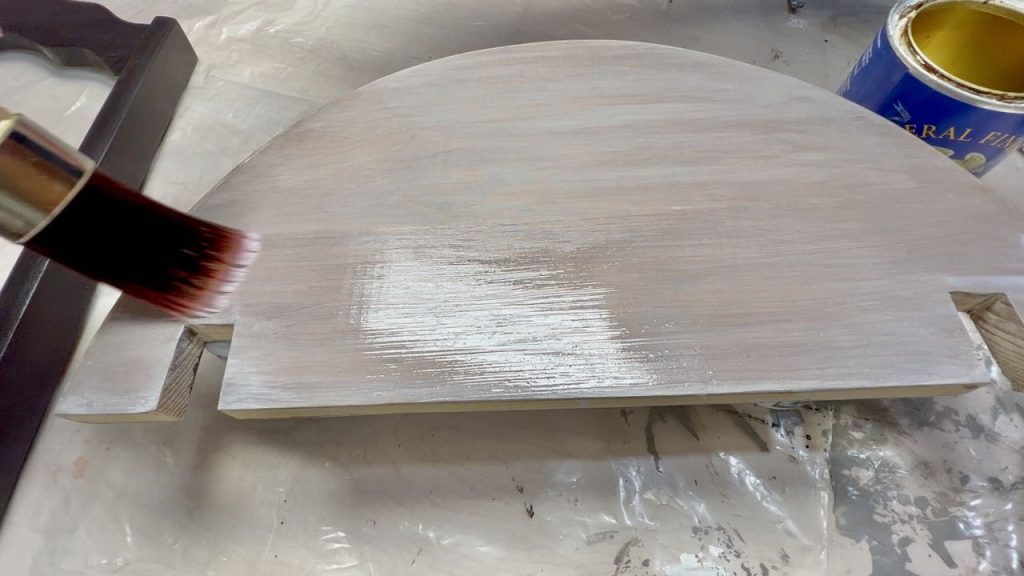
I used General Finishes High Performance Top Coat in flat. I used a new Dixie Belle paint brush to help eliminate any brush strokes.
If you need help with top coats, be sure to jump over. to the companion video to learn more.
Step 6) Assemble Your New Hanging Chair Shelf-
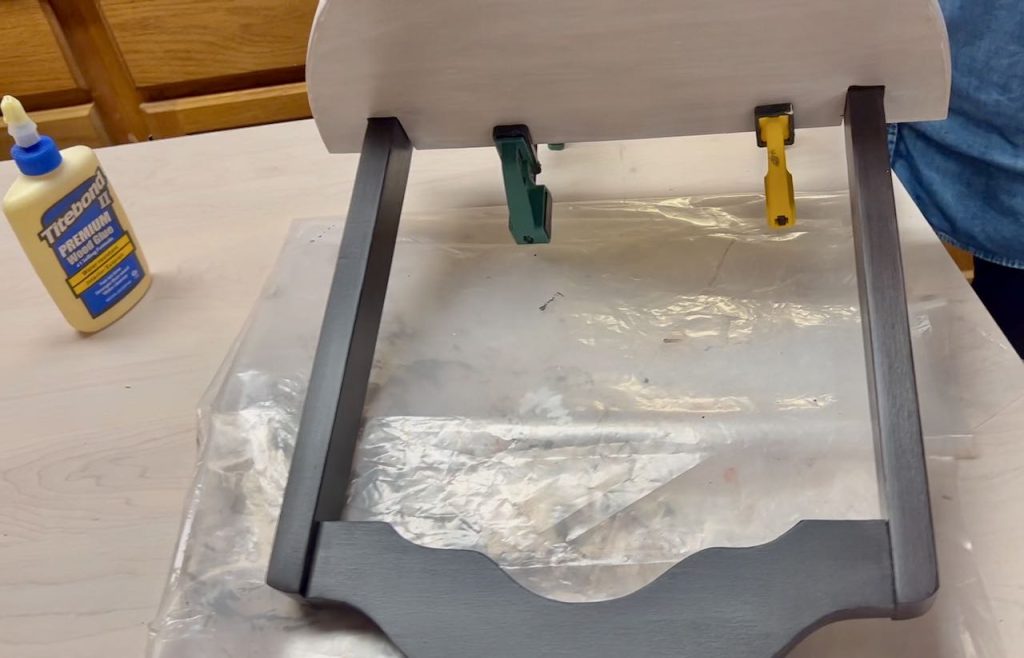
If yours is similar to mine, assembly is a few simple steps:
- Add a bit of wood glue across your lower stretcher bar
- Slide the shelf in place and hold securely with clamps while the glue dries
- Brad nail the shelf securely in place.
NOTE: depending on the depth of your shelf and the placement of the horizontal stretcher of the chair back, you may. need extra support under the shelf.
Mine did not. I was prepared to black wash two triangles of wood to add more support underneath, but didn’t end up needing them.
I then added two D-ring style picture hangers to the back of the arched piece. It hangs easily and securely.
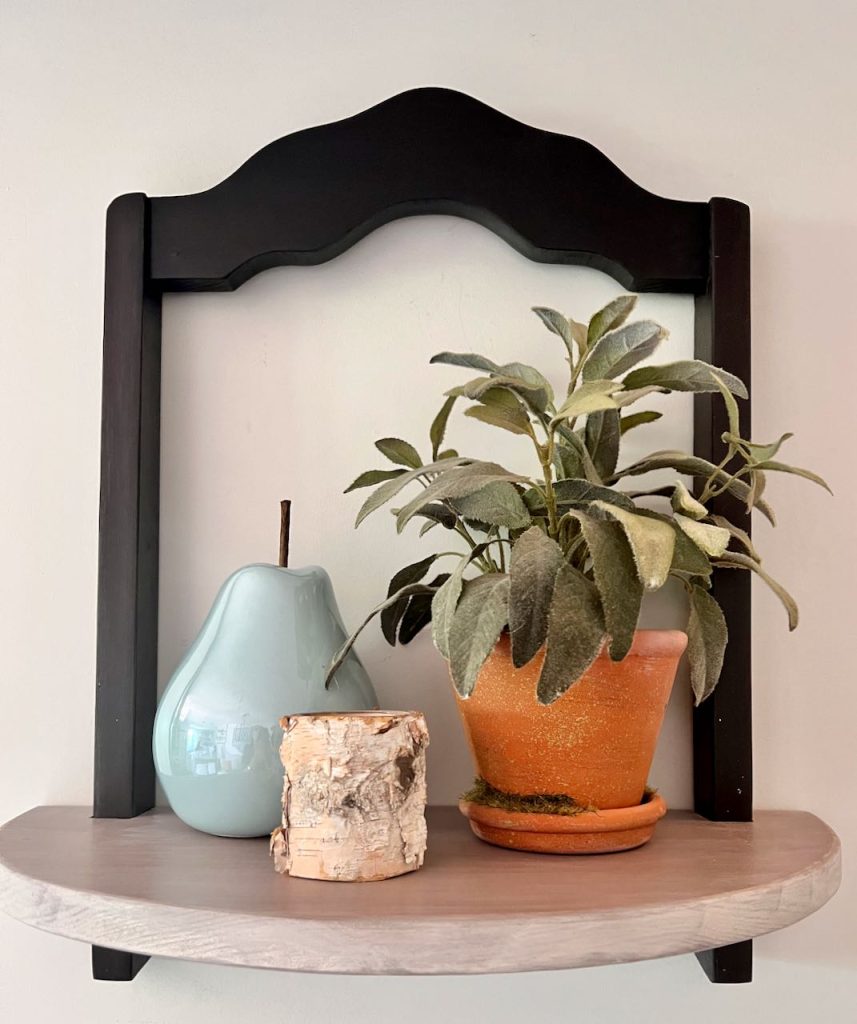
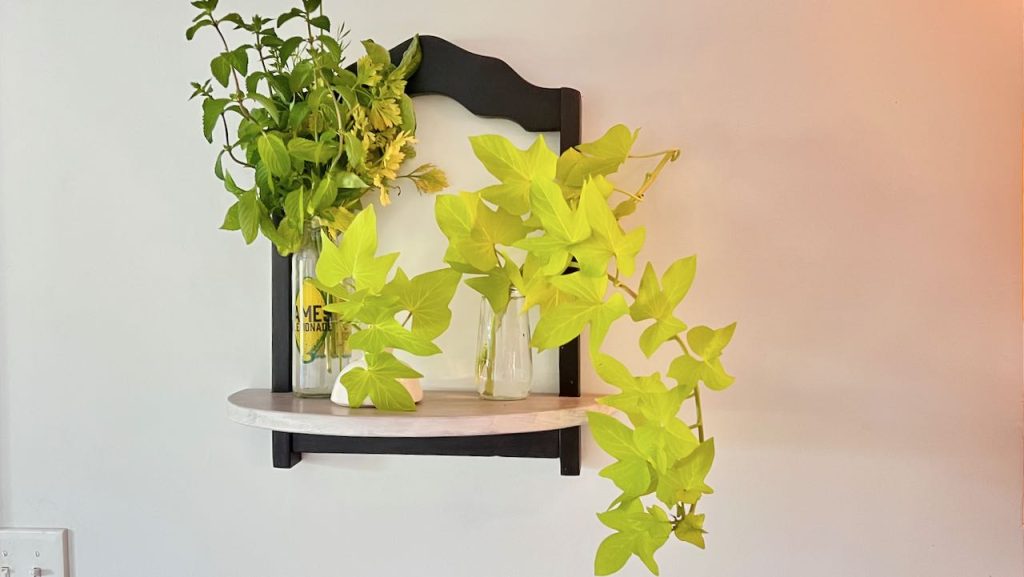
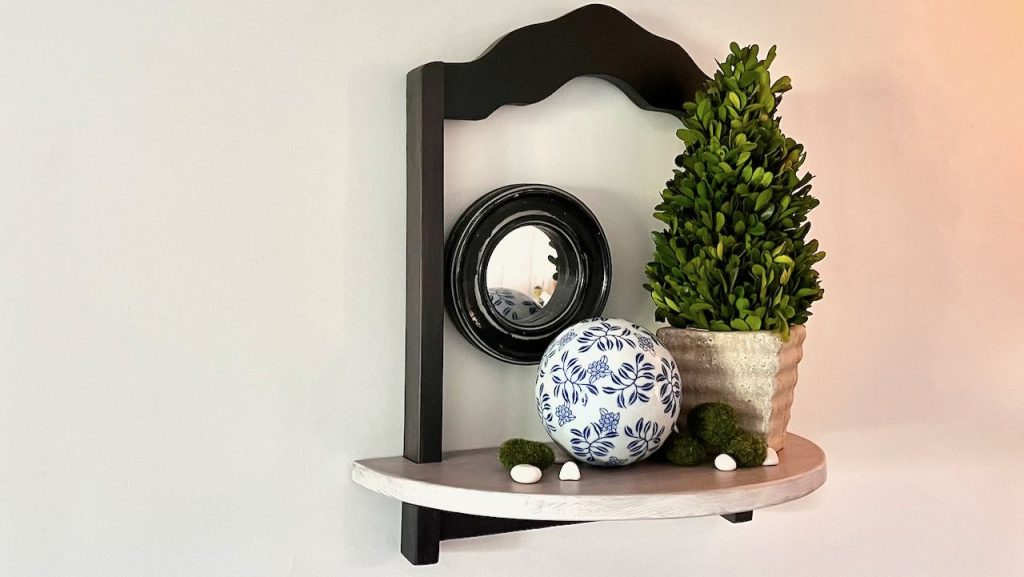
I’m thrilled with the end result! Isn’t this a wonderful way to save an old kitchen chair from the landfill?
When creative ideas meet a great find, so often good things happen!
I needed a smaller project like this after the large dining room project we just finished up.
Now that you’ve seen my rather modern or transitional upcycle, don’t forget to jump over and see what Cindy turned her wooden chair into.
Click Here to watch Cindy’s video
and her blog post is right here.
If you’ve already seen Cindy’s, leave me a comment: what surprised you the most? Big differences? or not really so much?
Thanks for spending a bit of your day with me! I hope you’re taking with you an “ahhh haaa” nugget and inspiration. I’d love to hear about your projects and pics are always enjoyed.

One Comment