Polymer Clay Pumpkin Stems
[et_pb_section fb_built=”1″ _builder_version=”4.9.10″ _module_preset=”default” global_colors_info=”{}”][et_pb_row _builder_version=”4.5.3″ custom_margin=”0px||||false|false” custom_padding=”0px||||false|false” global_colors_info=”{}”][et_pb_column type=”4_4″ _builder_version=”4.4.9″ global_colors_info=”{}”][et_pb_image src=”https://southhousedesigns.com/wp-content/uploads/2021/09/Polymer-Pumpkin-Stem-Hero.jpeg” alt=”Title Image of fingers holding a faux pumpkin stem made of polymer clay with more stems in the background” title_text=”Polymer Pumpkin Stem Hero” _builder_version=”4.10.7″ _module_preset=”default” global_colors_info=”{}”][/et_pb_image][et_pb_text admin_label=”Blog Post Title” _builder_version=”4.10.7″ header_font=”Crimson Pro|600|||||||” header_text_color=”#6D6965″ header_font_size=”63px” background_color=”#f1edeb” text_orientation=”center” width=”63%” max_width=”100%” module_alignment=”center” custom_margin=”-50px||||false|false” custom_padding=”25px||25px||false|false” global_colors_info=”{}”]
Make Pumpkin Stems From Polymer Clay
[/et_pb_text][et_pb_text _builder_version=”4.9.10″ _module_preset=”default” text_font=”||on||||||” text_font_size=”10px” text_orientation=”center” width=”65%” module_alignment=”center” global_colors_info=”{}”]
Need pumpkin stems for all your pumpkin crafting? Make your own pumpkin stems from polymer clay. Easy, inexpensive, satisfying!
[/et_pb_text][/et_pb_column][/et_pb_row][et_pb_row _builder_version=”4.7.7″ _module_preset=”default” global_colors_info=”{}”][et_pb_column type=”4_4″ _builder_version=”4.7.7″ _module_preset=”default” global_colors_info=”{}”][et_pb_text _builder_version=”4.9.10″ _module_preset=”default” global_colors_info=”{}”]
Is it hard to keep your pumpkin love in check?
Are you crafting pumpkins from velvet, from sweaters, from buffalo plaid and ticking?
Would your Dollar Store pumpkins do well with nicer stems? Well that’s an easy fix you know.
Maybe, just maybe you’re ready for something between rustic sticks or perfectly identical resin stems. And we know dried stems are in high demand.
Maybe it’s time for you to make a pumpkin stem, or two . . . or twenty-two!!!!
WARNING: It’s rather addicting.
[/et_pb_text][et_pb_image src=”https://southhousedesigns.com/wp-content/uploads/2021/08/Metal-Pumpkins-Thumbnail.jpeg” alt=”Finished copper metal pumpkin with a clay stem, two leaves and a wire tendril sitting atop a black wood riser” title_text=”Metal Pumpkins Thumbnail” align=”center” _builder_version=”4.9.10″ _module_preset=”default” global_colors_info=”{}”][/et_pb_image][et_pb_text _builder_version=”4.9.10″ _module_preset=”default” global_colors_info=”{}”]
Stems that you can size to your pumpkin.
Stems in any color you choose.
I know, sounds too good to be true, right?
Good news, it’s very attainable. Enter polymer clay.
[/et_pb_text][et_pb_image src=”https://southhousedesigns.com/wp-content/uploads/2021/09/Hand-holding-Pumpkin-Stem.jpeg” alt=”Hand holding faux pumpkin stem with three risers full of additional ones in all sizes and colors” title_text=”Hand holding Pumpkin Stem” align=”center” _builder_version=”4.9.10″ _module_preset=”default” global_colors_info=”{}”][/et_pb_image][et_pb_text _builder_version=”4.9.10″ _module_preset=”default” global_colors_info=”{}”]
If you have never worked with polymer clay before, you are in for a treat! This is an excellent beginner project.
[/et_pb_text][et_pb_text _builder_version=”4.9.10″ _module_preset=”default” global_colors_info=”{}”]
What You’ll Need to Make Faux Pumpkin Stems from Polymer Clay:
Supplies:
- A smooth surface you can cut on
- A small straight edge
- An exacto knife or just a thin sharp knife
- A smooth glass bottle (or equivalent) to roll out your clay
- A foil baking pan with a foil cover or lid, optionally lined in batting
- Oven
Materials:
- Packages of polymer clay in colors of your choice
A Couple of Notes :
Polymer clay is NOT to be injested.
Do not use with any of your kitchen tools.
Children should not use polymer clay unsupervised.
Wash hands and equipment thoroughly.
I use a disposable foil baking pan lined with batting to bake my clay pieces. Clay tends to develop a shiny surface where it bakes in contact with a smooth surface. The batting prevents this. I use a matching pan on top and clip it with binder clips while it is baking to help minimize any odor. I set it outside to cool, again minimizing any odor. You can cover a disposable pie pan with foil.
Suggestions for a smooth surface to work and cut on are a large, smooth tile, a piece of glass or I use a glass bottom from an old microwave oven (thrift stores usually have stacks of them).
[/et_pb_text][et_pb_image src=”https://southhousedesigns.com/wp-content/uploads/2021/09/Polymer-Pumpkin-Stems-on-Black-Trays.jpeg” alt=”Polymer pumpkin stems arranged on three risers by color and size” title_text=”Polymer Pumpkin Stems on Black Trays” _builder_version=”4.9.10″ _module_preset=”default” global_colors_info=”{}”][/et_pb_image][et_pb_text _builder_version=”4.9.10″ _module_preset=”default” global_colors_info=”{}”]
Two of these stems are real!
Can you guess which ones?
[/et_pb_text][et_pb_image src=”https://southhousedesigns.com/wp-content/uploads/2021/09/Polymer-Clay-Stems-with-Dried-Stems-Marked.jpeg” alt=”Polymer stems with two that are real identified with arrows” title_text=”Polymer Clay Stems with Dried Stems Marked” align=”center” _builder_version=”4.9.10″ _module_preset=”default” global_colors_info=”{}”][/et_pb_image][et_pb_text _builder_version=”4.9.10″ _module_preset=”default” global_colors_info=”{}”]
Did you guess them? The two in the very back.
I brought them out so I could study them and determine what makes for a real looking pumpkin stem. Not that we have to stay exactly true to that. After all who’s heard of copper or gold pumpkin stems? But if we have the basic shape right then they read much more like pumpkin stems.
Just like a pumpkin wouldn’t be a pumpkin without the ribs.
The big element is that the stem slowly tapers a bit narrower, and it has ridges running down the length of it. Sometimes the ridges have a bit of coloration change to them. And those ridges aftem rotate or twist a bit down the length of the stem.
The base where it attaches to the pumpkin is rarely round but more 4, 5 or 6 sides with small points or corners where the ridges rise from it.
Whew! That’s a lot more info than you probably wanted.
Ready to start Making Faux Pumpkin Stems?
[/et_pb_text][/et_pb_column][/et_pb_row][et_pb_row column_structure=”1_3,1_3,1_3″ _builder_version=”4.9.10″ _module_preset=”default” global_colors_info=”{}”][et_pb_column type=”1_3″ _builder_version=”4.9.10″ _module_preset=”default” global_colors_info=”{}”][et_pb_image src=”https://southhousedesigns.com/wp-content/uploads/2021/09/Pumpkin-Stems-1-Slice-in-Thin-Strips.jpeg” alt=”Hands using a straight edge to cut thin slices of polymer clay” title_text=”Pumpkin Stems 1 Slice in Thin Strips” _builder_version=”4.9.10″ _module_preset=”default” global_colors_info=”{}”][/et_pb_image][/et_pb_column][et_pb_column type=”1_3″ _builder_version=”4.9.10″ _module_preset=”default” global_colors_info=”{}”][et_pb_image src=”https://southhousedesigns.com/wp-content/uploads/2021/09/Pumpkin-Stems-2-Many-strips.jpeg” alt=”Hands with straight edge and exacto knife cutting a lot of slices” title_text=”Pumpkin Stems 2-Many strips” _builder_version=”4.9.10″ _module_preset=”default” global_colors_info=”{}”][/et_pb_image][/et_pb_column][et_pb_column type=”1_3″ _builder_version=”4.9.10″ _module_preset=”default” global_colors_info=”{}”][et_pb_image src=”https://southhousedesigns.com/wp-content/uploads/2021/09/Pumpkin-Stems-3-bundle-strips.jpeg” alt=”hands separating the slices and stacking them in a bundle” title_text=”Pumpkin Stems 3-bundle strips” _builder_version=”4.9.10″ _module_preset=”default” global_colors_info=”{}”][/et_pb_image][/et_pb_column][/et_pb_row][et_pb_row _builder_version=”4.9.10″ _module_preset=”default” global_colors_info=”{}”][et_pb_column type=”4_4″ _builder_version=”4.9.10″ _module_preset=”default” global_colors_info=”{}”][et_pb_text _builder_version=”4.9.10″ _module_preset=”default” global_colors_info=”{}”]
Step 1) Preparing and Cutting Your Clay
Start by working your clay to get it soft, smooth and malleable. Feel free to mix colors to get just the shade you want. You can see I made several light one for neutral pumpkins and then I have two darker shades and then some silver one and I am demonstrating with some “copper” clay that I bloended with some gold because the copper was just too red for the pumpkins I’m making (that adorable little copper mesh one I showed above. And you can see how I made them right here.
When your clay is ready, roll out a thin layer.
With a straight edge and an exacto knife, trim off the end. Then cut a thin strip. About a wide as your clay is thick.
Now cut many more strips. You will want between 7 and 12 per pair of stems depending on the size of the stem and the thickness of your clay.
Use the tip of the exacto to help you lift each slice of clay up and stack them to make a log, staggering the placement a bit so they are not perfectly stacked on top of each other. you want them a bit offset.
[/et_pb_text][/et_pb_column][/et_pb_row][et_pb_row column_structure=”1_3,1_3,1_3″ _builder_version=”4.9.10″ _module_preset=”default” global_colors_info=”{}”][et_pb_column type=”1_3″ _builder_version=”4.9.10″ _module_preset=”default” global_colors_info=”{}”][et_pb_image src=”https://southhousedesigns.com/wp-content/uploads/2021/09/Pumpkin-stems-4-smooth-bundle.jpeg” alt=”hands manipulating the bundle of polymer clay slices” title_text=”Pumpkin stems 4-smooth bundle” _builder_version=”4.9.10″ _module_preset=”default” global_colors_info=”{}”][/et_pb_image][/et_pb_column][et_pb_column type=”1_3″ _builder_version=”4.9.10″ _module_preset=”default” global_colors_info=”{}”][et_pb_image src=”https://southhousedesigns.com/wp-content/uploads/2021/09/Pumpkin-Stems-5-compress-and-stretch-bundle.jpeg” alt=”hand holding the smoothed bundle showing the ridges” title_text=”Pumpkin Stems 5-compress and stretch bundle” _builder_version=”4.9.10″ _module_preset=”default” global_colors_info=”{}”][/et_pb_image][/et_pb_column][et_pb_column type=”1_3″ _builder_version=”4.9.10″ _module_preset=”default” global_colors_info=”{}”][et_pb_image src=”https://southhousedesigns.com/wp-content/uploads/2021/09/Pumpkin-Stems-6-open-end.jpeg” alt=”hand holding an exacto knife using the point to separate the tips of the slices” title_text=”Pumpkin Stems 6-open end” _builder_version=”4.9.10″ _module_preset=”default” global_colors_info=”{}”][/et_pb_image][/et_pb_column][/et_pb_row][et_pb_row _builder_version=”4.9.10″ _module_preset=”default” global_colors_info=”{}”][et_pb_column type=”4_4″ _builder_version=”4.9.10″ _module_preset=”default” global_colors_info=”{}”][et_pb_text _builder_version=”4.9.10″ _module_preset=”default” custom_padding=”41px|||||” global_colors_info=”{}”]
Step 2) Forming Your Stem
Holding this bundle gently in your fingers, smooth it along the length. You want the slice to bind together, but not to lose the definition of the ridges formed by the offset of the different slices. the bundle will stretch a bit longer, but keep the ridges.
Work in one direction and then in the other.
Now use the tip of your knife to spread the ends of the slices to form the base of the stem.
[/et_pb_text][/et_pb_column][/et_pb_row][et_pb_row column_structure=”1_3,1_3,1_3″ _builder_version=”4.9.10″ _module_preset=”default” global_colors_info=”{}”][et_pb_column type=”1_3″ _builder_version=”4.9.10″ _module_preset=”default” global_colors_info=”{}”][et_pb_image src=”https://southhousedesigns.com/wp-content/uploads/2021/09/Pumpkin-Stems-7-open-end-out.jpeg” alt=”fingers spreading the ends to form a flat base” title_text=”Pumpkin Stems 7-open end out” _builder_version=”4.9.10″ _module_preset=”default” global_colors_info=”{}”][/et_pb_image][/et_pb_column][et_pb_column type=”1_3″ _builder_version=”4.9.10″ _module_preset=”default” global_colors_info=”{}”][et_pb_image src=”https://southhousedesigns.com/wp-content/uploads/2021/09/Pumpkin-Stems-8-mold-against-a-flat-surface.jpeg” alt=”using a moulding tool to make points and grooves at the base of the stem” title_text=”Pumpkin Stems 8-mold against a flat surface” _builder_version=”4.9.10″ _module_preset=”default” global_colors_info=”{}”][/et_pb_image][/et_pb_column][et_pb_column type=”1_3″ _builder_version=”4.9.10″ _module_preset=”default” global_colors_info=”{}”][et_pb_image src=”https://southhousedesigns.com/wp-content/uploads/2021/09/Pumpkin-Stems-9-and-other-end.jpeg” alt=”repeat on the other end” title_text=”Pumpkin Stems 9 – and other end” _builder_version=”4.9.10″ _module_preset=”default” global_colors_info=”{}”][/et_pb_image][/et_pb_column][/et_pb_row][et_pb_row _builder_version=”4.9.10″ _module_preset=”default” global_colors_info=”{}”][et_pb_column type=”4_4″ _builder_version=”4.9.10″ _module_preset=”default” global_colors_info=”{}”][et_pb_text _builder_version=”4.9.10″ _module_preset=”default” custom_padding=”5px|||||” global_colors_info=”{}”]
Step 3) Shaping the Stem Base
Use your fingers to spread these ends a bit just at the tips and still press them together up the stem.
Hold that spread end against your smooth work surface and use a molding tool (can be the end of a plastic spoon, or a disposable wooden chopstick) to make indentation in the base that line up with the indentations down the stem and have slight corners that line up with the ridges. There’s a LOT of lattitude here. Be as careful or as carefree as you want.
Repeat with the other end of your bundle.
[/et_pb_text][/et_pb_column][/et_pb_row][et_pb_row column_structure=”1_3,1_3,1_3″ _builder_version=”4.9.10″ _module_preset=”default” global_colors_info=”{}”][et_pb_column type=”1_3″ _builder_version=”4.9.10″ _module_preset=”default” global_colors_info=”{}”][et_pb_image src=”https://southhousedesigns.com/wp-content/uploads/2021/09/Pumpkin-Stems-10-trim-and-adjust-the-ends.jpeg” alt=”hand holding stem against the fingers of the other hand” title_text=”Pumpkin Stems 10-trim and adjust the ends” _builder_version=”4.9.10″ _module_preset=”default” global_colors_info=”{}”][/et_pb_image][/et_pb_column][et_pb_column type=”1_3″ _builder_version=”4.9.10″ _module_preset=”default” global_colors_info=”{}”][et_pb_image src=”https://southhousedesigns.com/wp-content/uploads/2021/09/Pumpkin-Stems-11-cut-in-half.jpeg” alt=”Hand with exacto knife cutting the stem bundle in half” title_text=”Pumpkin Stems 11-cut in half” _builder_version=”4.9.10″ _module_preset=”default” global_colors_info=”{}”][/et_pb_image][/et_pb_column][et_pb_column type=”1_3″ _builder_version=”4.9.10″ _module_preset=”default” global_colors_info=”{}”][et_pb_image src=”https://southhousedesigns.com/wp-content/uploads/2021/09/Pumpkin-Stems-12-twist-and-bend.jpeg” alt=”handing standing the faux stem on a glass plate and twisting and bending it into shape” title_text=”Pumpkin Stems 12 – twist and bend” _builder_version=”4.9.10″ _module_preset=”default” global_colors_info=”{}”][/et_pb_image][/et_pb_column][/et_pb_row][et_pb_row _builder_version=”4.9.10″ _module_preset=”default” global_colors_info=”{}”][et_pb_column type=”4_4″ _builder_version=”4.9.10″ _module_preset=”default” global_colors_info=”{}”][et_pb_text _builder_version=”4.9.10″ _module_preset=”default” global_colors_info=”{}”]
Step 4) The Fnal Shaping
Trim and mould the base as desired.
Carefully cut this bundle in approximate middle. Try to do this in your hands rather than against sa flat work surface that will flatten out your work.
Give each stem a slight twist and as much bend as desired.
[/et_pb_text][/et_pb_column][/et_pb_row][et_pb_row column_structure=”1_2,1_2″ _builder_version=”4.9.10″ _module_preset=”default” global_colors_info=”{}”][et_pb_column type=”1_2″ _builder_version=”4.9.10″ _module_preset=”default” global_colors_info=”{}”][et_pb_image src=”https://southhousedesigns.com/wp-content/uploads/2021/09/Pumpkin-Stesm-13-Stems-on-batting.jpeg” alt=”a foil backing dish lined with batting and filled with many prepared faux stems ready to be baked” title_text=”Pumpkin Stesm – 13 Stems on batting” _builder_version=”4.12.0″ _module_preset=”default” hover_enabled=”0″ global_colors_info=”{}” sticky_enabled=”0″][/et_pb_image][/et_pb_column][et_pb_column type=”1_2″ _builder_version=”4.9.10″ _module_preset=”default” global_colors_info=”{}”][et_pb_image src=”https://southhousedesigns.com/wp-content/uploads/2021/09/Pumpkin-stems-14-22clay-ONly22-pan.jpeg” alt=”A second foil baking dish is inverted over the bottom to asct as a lid with marker on top %22Clay Only%22″ title_text=”Pumpkin stems – 14 %22clay ONly%22 pan” _builder_version=”4.12.0″ _module_preset=”default” hover_enabled=”0″ global_colors_info=”{}” sticky_enabled=”0″][/et_pb_image][/et_pb_column][/et_pb_row][et_pb_row _builder_version=”4.9.10″ _module_preset=”default” global_colors_info=”{}”][et_pb_column type=”4_4″ _builder_version=”4.9.10″ _module_preset=”default” global_colors_info=”{}”][et_pb_text _builder_version=”4.9.10″ _module_preset=”default” global_colors_info=”{}”]
Step 5) Baking
Lay your stems in their baking dish, with none touching each other. Cover and bake according to your clay manufacturer’s instructions.
Mine baked in a preheated oven at 275 for 45 minutes. Then I left them in the covered dish for 30 minutes outside. Opened it and brought them in.
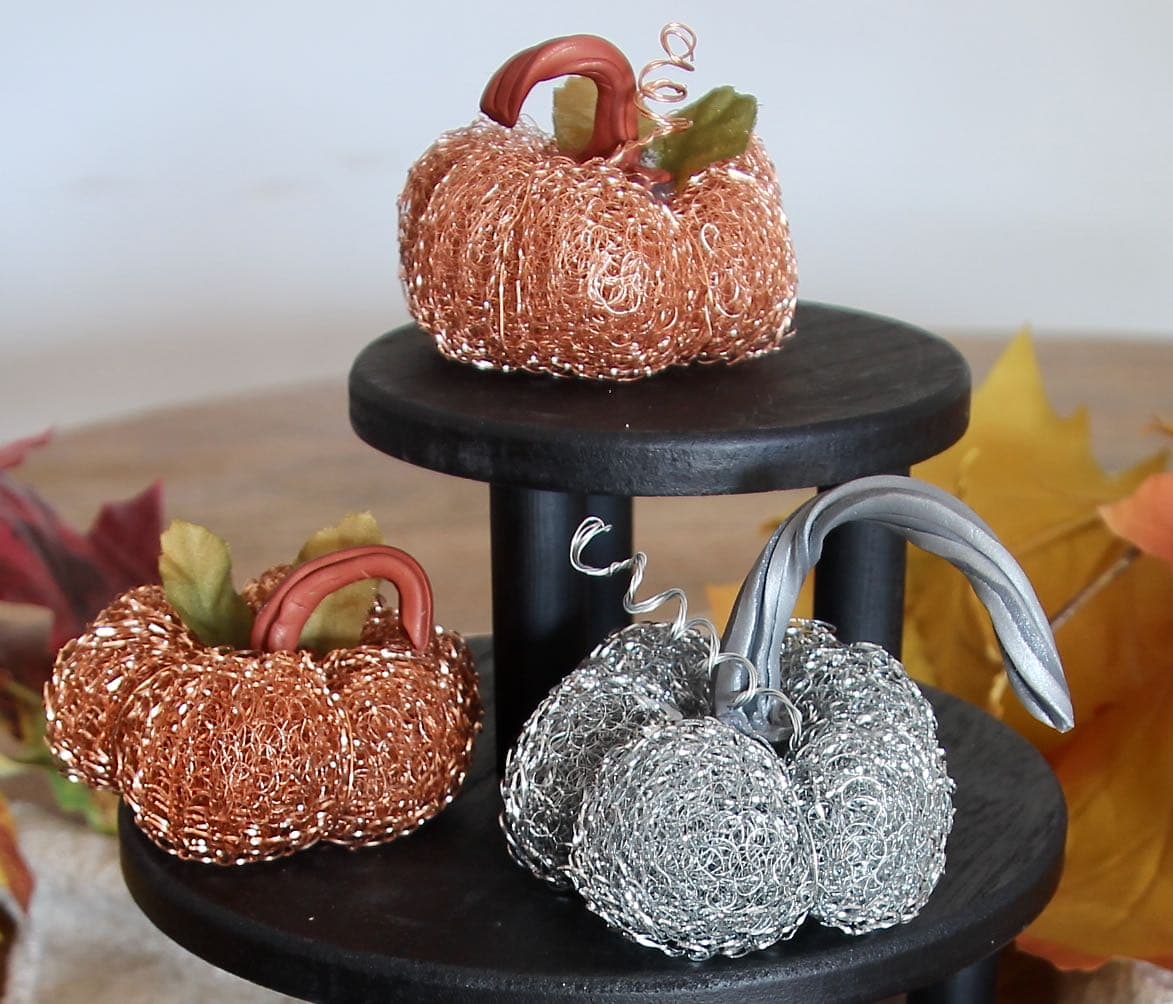
I love these stems. They are quite addictive to make and are the perfect way to finish off my little copper and silver wire mesh pumpkins.
[/et_pb_text][et_pb_image src=”https://southhousedesigns.com/wp-content/uploads/2021/08/Copper-and-Silver-Mini-Pumpkins.jpeg” alt=”Five mini metal pumpkins, some with leaves, some with tendrils on top a stack of two black wood risers on a wood round table with a washed linen runner and Fall leaves” title_text=”Copper and Silver Mini Pumpkins” align=”center” _builder_version=”4.9.10″ _module_preset=”default” global_colors_info=”{}”][/et_pb_image][/et_pb_column][/et_pb_row][et_pb_row column_structure=”1_2,1_2″ _builder_version=”4.7.7″ _module_preset=”default” global_colors_info=”{}”][et_pb_column type=”1_2″ _builder_version=”4.7.7″ _module_preset=”default” global_colors_info=”{}”][et_pb_image src=”https://southhousedesigns.com/wp-content/uploads/2020/06/Pin-It-Now-MC.png” title_text=”Pin-It-Now-MC” _builder_version=”4.12.0″ _module_preset=”default” hover_enabled=”0″ global_colors_info=”{}” sticky_enabled=”0″][/et_pb_image][/et_pb_column][et_pb_column type=”1_2″ _builder_version=”4.7.7″ _module_preset=”default” global_colors_info=”{}”][et_pb_image src=”https://southhousedesigns.com/wp-content/uploads/2021/09/New-Pin-Pumpkin-Stems.jpg” alt=”Pinterest Pin showing hand holding one pumpkin stem and more stems in the background, titled %22Pumpkin Stems for All Your Fall Crafting” title_text=”New Pin – Pumpkin Stems” _builder_version=”4.9.10″ _module_preset=”default” global_colors_info=”{}”][/et_pb_image][/et_pb_column][/et_pb_row][et_pb_row _builder_version=”4.9.10″ _module_preset=”default” global_colors_info=”{}”][et_pb_column type=”4_4″ _builder_version=”4.9.10″ _module_preset=”default” global_colors_info=”{}”][et_pb_text _builder_version=”4.9.10″ _module_preset=”default” global_colors_info=”{}”]
I hope you give this a try and please don’t hesitate to reach out to me with any questions — and to share your pictures!
[/et_pb_text][/et_pb_column][/et_pb_row][et_pb_row column_structure=”1_2,1_2″ _builder_version=”4.7.7″ _module_preset=”default” global_colors_info=”{}”][et_pb_column type=”1_2″ _builder_version=”4.7.7″ _module_preset=”default” global_colors_info=”{}”][et_pb_image src=”https://southhousedesigns.com/wp-content/uploads/2020/08/LargerHeres-to-Joy-filled-Living.png” alt=”Here’s to Joy-Filled Living, Diane” title_text=”LargerHere’s to Joy-filled Living” _builder_version=”4.7.7″ _module_preset=”default” global_colors_info=”{}”][/et_pb_image][/et_pb_column][et_pb_column type=”1_2″ _builder_version=”4.7.7″ _module_preset=”default” global_colors_info=”{}”][et_pb_image src=”https://southhousedesigns.com/wp-content/uploads/sub.png” title_text=”sub” url=”/subscribe” url_new_window=”on” show_bottom_space=”off” align=”right” _builder_version=”4.5.6″ _module_preset=”default” max_width=”400px” module_alignment=”right” custom_margin=”0px|0px|0px|0px|false|false” custom_padding=”0px|0px|0px|0px|false|false” global_colors_info=”{}”][/et_pb_image][/et_pb_column][/et_pb_row][/et_pb_section]
Diane, these are the cutest stems!! I always say I am going to save stems from our garden and I never get out there before the ground gets tilled under for the next season. These stems will fit my needs perfectly! Pinned! I’m also sharing this post in my weekly All Things Vintage post! Happy Crafting!
Oh Diane, I cant wait to give this one a try..
You are such a good teacher my friend.