Title image of a copper and a stainless steel mini pumpkins on a black wood riser with Fall leaves scattered behind

How To Make Easy, Adorable

Mini Metal Pumpkins

— And Cheap!

Here’s how to make THE Most Adorable Mini Metal Pumpkins. Also the EASIEST and CHEAPEST little pumpkins to make. Use them in Fall vignettes, wreaths and more. Copper, silver or both!

This post includes some affiliate  links, which means if you purchase anything using these links, you pay no extra, but I may receive a small commission. Please know that I will never recommend a product I do not believe in!

Happy pumpkin time!!!

You may not know this about me, but  I’m a Spring and Summer gal! So I am extremely grateful for pumpkins. They make the transition to Fall easier.

It’s not that I have anything against Fall specifically, it’s what follows behind all the cute pumpkins and apples and boots and sweaters and bonfires and . . .  See, it’s what follows, that I dread.

And even better than this post, bringing you a fun pumpkin craft, I’m hooking you up with eight other blogging buddies all jumping on the pumpkin patch bandwagon together. You don’t want to miss a one of them. Links to all are at the bottom of this post. Enjoy!!!

Five mini metal pumpkins, some with leaves, some with tendrils on top a stack of two black wood risers on a wood round table with a washed linen runner and Fall leaves

But for now, let’s focus on PUMPKINS, adorable little mini pumpkins!

Pumpkins so cute and perfectly sized to set at each table setting.

Pumpkins to add to a wreath.

Little pumpkins to sit on a windowsill and make you smile.

Copper Mini pumpkins to add to your Fall tiered tray.

Baby pumpkins to tuck into your console table vingette.

Lots of little pumpkins to fill a dough bowl on your coffee table.

SO MANY OPTIONS!

And if this little guy doesn’t capture your heart, check out his big cousins that I just made!

Finished copper metal pumpkin with a clay stem, two leaves and a wire tendril sitting atop a black wood riser

Aren’t they ADORABLE!!!

And you won’t believe how quick & easy they are to make!  And did I mention downright cheap? Less than a dollar each!!!!


Let’s Make Some, okay,  LOTS of Mini Metal Pumpkins:

Supplies, (some linked at end of post):

  • Wire snips (I prefer needlenose pliers)
  • Needle, preferably a large eye, blunt end one.
  • Measuring stick, tape measure, or just a good eye
  • Hot glue gun and glue sticks or another adhesive of your choice
  • Thin paint brush handle, skewer, thin dowel or similar

Materials:

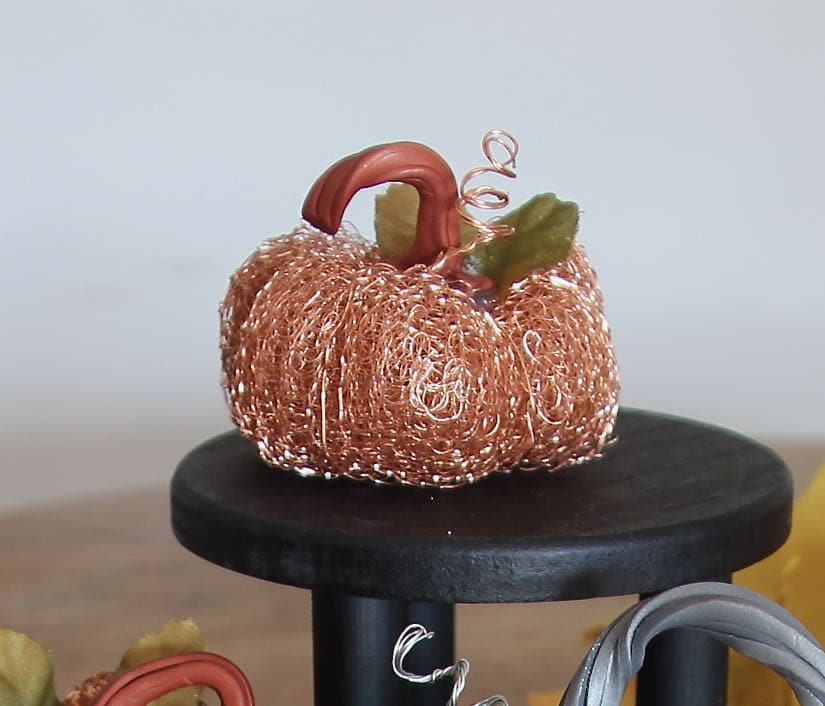
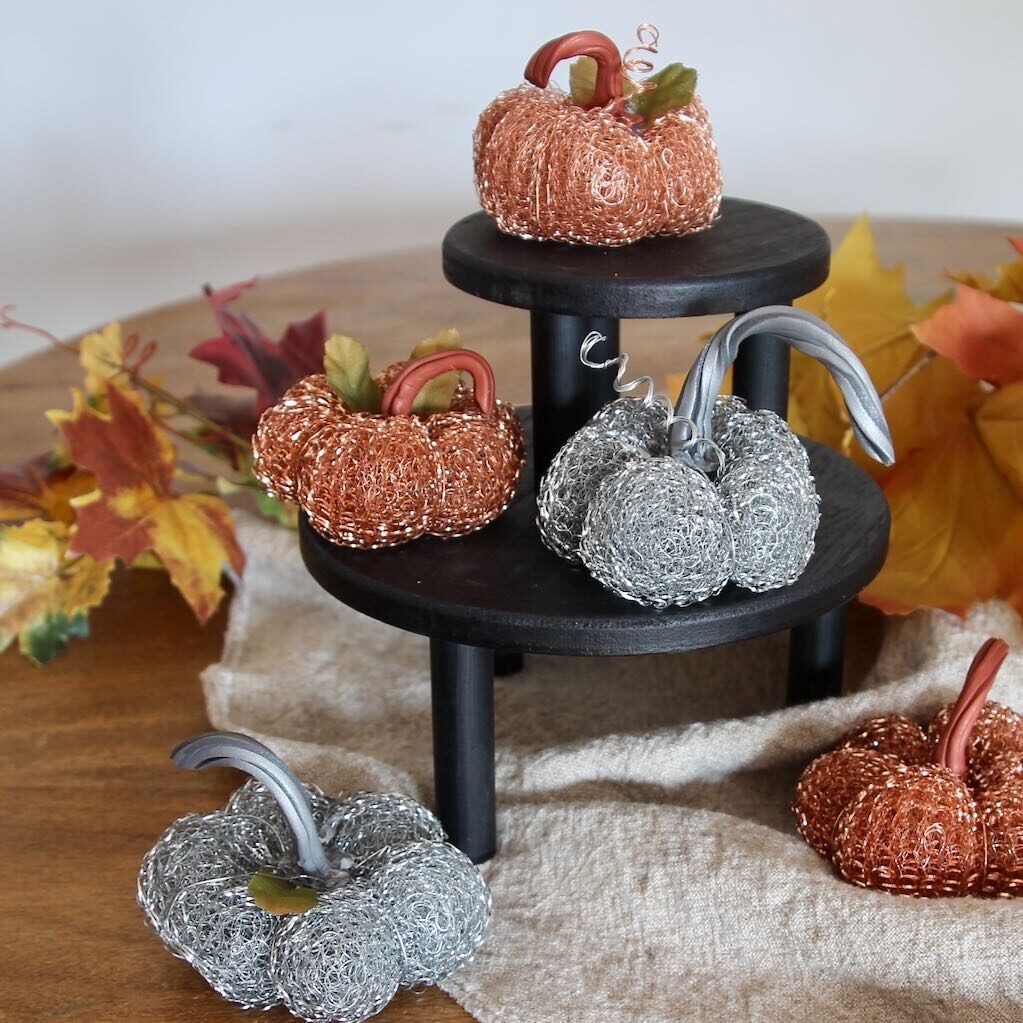
  • Copper scouring pads and/or stainless steel scouring pads. 
  • Matching wire (mine is 26 gauge)
  • A pumpkin stem, a twig from your yard or one made from polymer clay like I made here.
  • Leaves off faux flowers, optional


Step 1) Cut a length of wire, I used about 42-inches and this left enough tail for a little coiled tendril. Sometimes, I just snip off the extra.

Step 2) Thread your wire through your needle.

Step 3) Thread your needle through the center of the scouring pad. 

Step 4) Pull all the wire through except 6 to 8 inches. The side with the six to eight inches will be the top of your pumpkin.

Step 5) Bring the wire over the side of the scouring pad pulling tight on both ends of the wire to cinch in the scouring pad to make the first rib of the pumpkin. Twist the two end of the wire together to lock in this rib.

Step 6) Bring the wire over the over the opposite side of the scouring pad and up thorugh the center again pulling tight to cinch in the scouring pad for the second pumpkin rib.


Step 7) Pull the wire over the scouring pad and through the center, spacing the rib where you want it

Step 8) Pull tight to cinch in your pumpkin ribs. Repeat 7 & 8 four times, spacing the pumpkin ribs as you like.

Step 9) After the last rib is formed, twist the wire with the tail. Twist is tight and continue twisting it for the length of your wire. You can cut it off and and hide the end back in the center of the pumpkin. Or twist it around a thin paintbrush, dowel, skewer, etc to make a coiled tendril.


Step 10) It’s not biologically correct (the leaves grow on the vines not actually on the pumpkin), but they are really cute, so if you want to add a leaf or two, I cut a small tip of a faux leaf from a flower spray I picked up at my local Dollar Tree.

Step 11) I used hot glue to attach a leaf or two on some of my pumpkins and then lastly, glued a pumpkin stem in place. You can use a little twig or a piece of a cinnamon stick. I used stems that I made with polymer clay. I love playing with this clay and came up with these stems as a great option. Or here are a lot of options for dried pumpkin stems and faux pumpkin stems from a number of great Etsy shops.

12) Ta Da! So much Fall cuteness!

closer view of the five finished metal mini pumpkins arranged on a stack of black wood risers on a wood table with a washed linen table runner and scattered Fall leaves

Sourcing to Make Your Mini Pumpkins:

I bought my scouring pads at my local Dollar Tree, pkgs of two. When I saw how great they turned out, I ran back to get more but they are currently sold out. Sadly, they are not on their website. So how fast can you get to your Dollar Tree store to grab some copper and/or silver scouring pads?

I did find this similar one copper on Amazon. And here is a similar stainless steel one, but in a larger size.  And look at this one! It says stainless, but the picture shows it more golden. I ordered a bundle to see. I’ll update this post once I receive it.

And I found a bundle of five wires with wire snips. Keep in mind that these will certainly not be the best snips, but will probably get you through this project. And there is enough wire to make six or seven pumpkins in each color. Or just click the link and then search around a bit for the perfect combination of color and length for your needs. 

Pinterest pin showing one copper metal pumpkin on a black riser with the title "How-To Mini Copper Pumpkins"

And if you stumbled in here, when you were really searching out my 2021 Christmas Stocking Collection, or if you’re just dreaming of holiday decorating (pumpkins, stockings, it doesn’t really matter) you can find the stockings right here.

I hope you give these little metal pumpkins a try! Please let me know when you do. I’d love to see pictures of how they turned out and how you use them!!!

Remember that Pumpkin Patch bandwagon I promised you. Well, here you are. Enjoy!

IkornCrafts - Hello Pumpkin Wreath

Anne at Ikorn Crafts is sharing her DIY for this fun mesh fall wreath.

Blue Sky at Home - fall-pumpkin-wreath

Carol from Blue Sky at Home is sharing her DIY for this festive pumpkin wreath

Shop at Blu dollar tree diy door decor

Sue from Shop at Blue is sharing a festive Dollar Store Pumpkin Wreath

Adorn the Table-DIY-Pumpkin-Place-Card-Holder

Nicole from Adorn the Table is sharing her adorable pumpkin place card holders

South House Design - Copper and Silver Mini Pumpkins

You'll never guess how Diane from South House Designs made these metallic pumpkins

Stephanie from Gathered in the Kitchen is sharing the DIY for these adorable farmhouse fabric pumpkins

Fifth Sparrow No More Thanksgiving Centerpiece in a firkin

Kristin from Fifth Sparrow No More created this beautiful fall center piece in a FIRKIN (what's a FIRKIN?)

Our Tiny Nest DIY hot glue painted pumpkin

Nicolle from Our Tiny Nest shows you how to make these cute pumpkins with a secret tip - click on the photo to find out how easy tip.

A Loverly Life - Decoupage Pumpkin

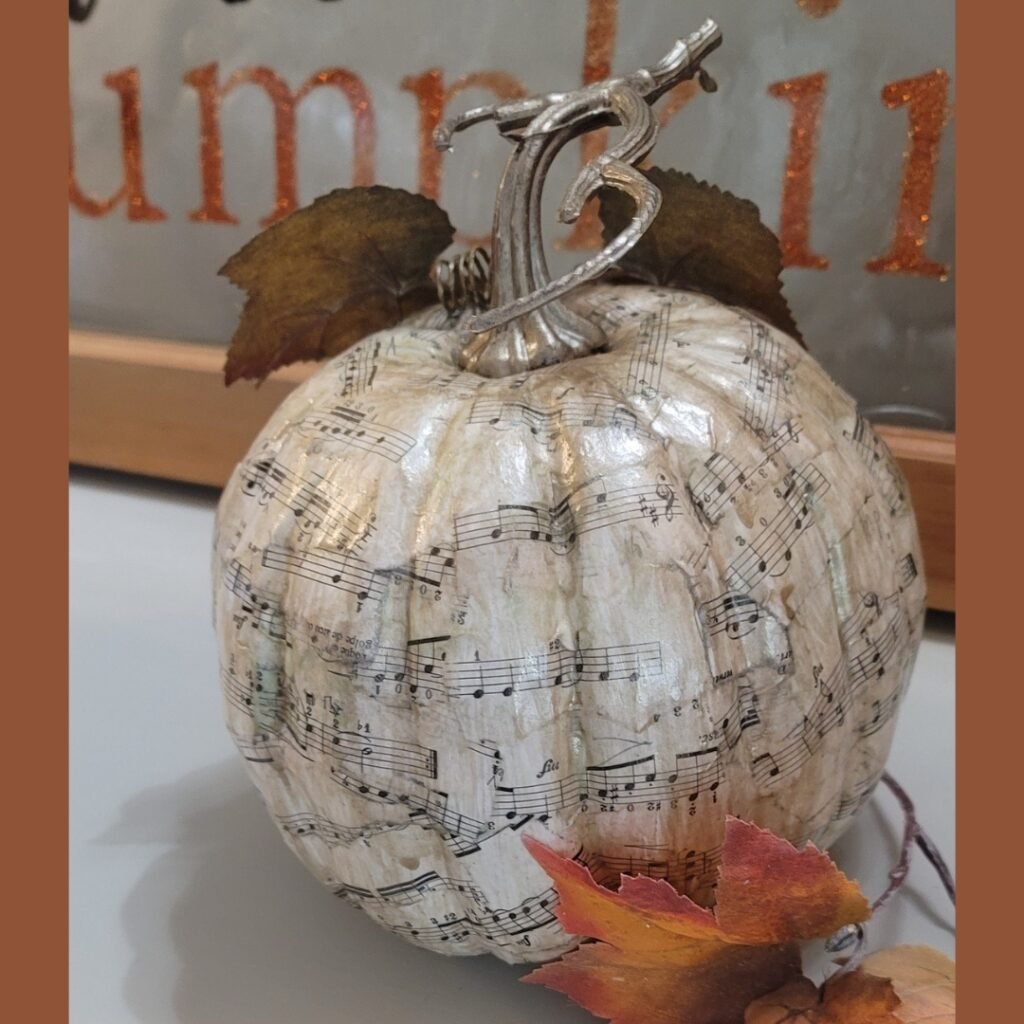
Juliet from A Loverly Life is sharing her Moondance inspired Decoupage Pumpkin.

Thank you so much for visiting - I look forward to seeing you next week for Another Loverly Blog Hop

  • Juliet

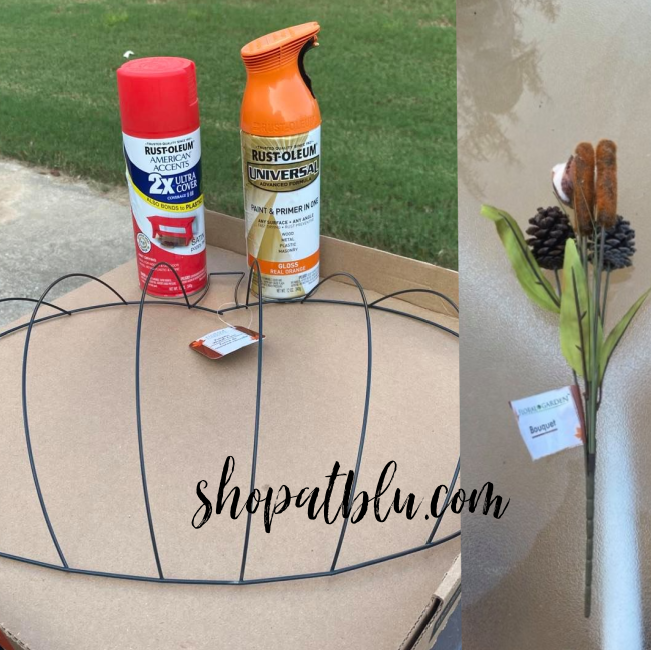
And don’t forget to check out the new pumpkin tutorial I just came up with! Another Dollar Tree wonder.

Two pumpkins made of mesh tubing are seen on a washed linen table runner with two candlesticks behind
Here's to Joy-Filled Living, Diane

9 Comments

  1. Sue at Blu

    These are adorable! They would be great in my kitchen to accent my copper sink!

    Reply
    • Diane

      Thanks!, and yes for all us copper lovers. So jealous of you having a copper sink. Lucky lady.

      Reply
  2. Leslie Watkins

    How adorable! These are so cute. Your amazing creativity is shining through again!

    Reply
    • Diane

      Leslie, you are too sweet. Thanks os very much!

      Reply
  3. Carol@Blueskyathome

    Diane, this project is so stinkin’ cute. And so clever. I didn’t even know there were copper scouring pads. Great instructions, too. Pinned!

    Reply
    • Diane

      Thanks Carol! I hope you give them a try! Happy day.

      Reply
  4. Juliet

    Diane, your project turned out quite loverly – thank you for sharing on the Blog Hop.

    Reply
  5. Rebecca Payne

    These are so cute and clever. Great job. Thank you for sharing. I just found your bog.

    Reply
    • Diane

      Thanks bunches Rebecca! So glad you found me. A big hearty WELCOME! Please don’t hesitate with any questions or feedback. I’m here for you.

      Reply

Trackbacks/Pingbacks

  1. Polymer Clay Pumpkin Stems - South House Designs - […] Start by working your clay to get it soft, smooth and malleable. Feel free to mix colors to get…
  2. Dollar Tree Pumpkin DIY Door Decor - Shop at Blu - […] pumpkin place card holdersYou’ll never guess how Diane from South House Designs made these metallic pumpkinsStephanie from Gathered in…
  3. DIY hot glue painted pumpkin - Our Tiny Nest - […] place card holders You’ll never guess how Diane from South House Designs made these metallic pumpkins Stephanie from Gathered…
  4. How to Make a DIY Pumpkin Wreath ~ Bluesky at Home - […] You’ll never guess how Diane from South House Designs made these metallic pumpkins […]
  5. A Firkin Fall Centerpiece - Part of the Pumpkin Patch Blog Hop - - […] You’ll never guess how Diane from South House Designs made these metallic pumpkins […]
  6. Unique DIY Pumpkin Place Card Holders ~ Adorn the Table - […] You’ll never guess how Diane from South House Designs made these metallic pumpkins […]
  7. Thistlekeeping - Thistlewood Farm - […] can see the DIY here and how to make the stems […]
  8. Easy Pumpkin Decorations - From Mesh Tubing - South House Designs - […] you remember last week when I shared these adorable mini metal pumpkins made from Dollar Tree […]
  9. 7 Easy, Fun Ways to Craft the Best Pumpkin Decor - South House Designs - […] Easy, quick and cheap! Here’s how. […]
  10. Don't Miss This Easy Spot to Add An Unexpected Touch of Fall! - South House Designs - […] for making your post Fall ready, and my favorite Fall wreath ever, my two favorite pumpkins to make here…
  11. How to Add Easy Color to Artificial or Faux Flowers - South House Designs - […] Mini Metal Pumpkins to Make […]

Submit a Comment

Your email address will not be published. Required fields are marked *

Diane Sudhoff
key with a tags that reads "Subscribers" Next to the words "Free Printables Library"
close-up of hand holding a cell phone mock-up of an order page on top of a collage of products
Heading that Reads: Most Popular Organizing Posts

Click Image to

Jump to  Post

closeup of layers of velvet lined jewelry trays in a dresser drawer
shelves holding shoes attached to the legs of a repurposed piano bench
view of storage tubs on rollers on a wall-mounted rack close to the ceiling
bundles of faux flowers are stored on the side off a large painted HVAC system
painted clay hearts hanging from lichhen covered branches
Shamrock shaped meringue cookies on a plate and parchment covered baking sheet
closeup of throw pillows decorated with thick plush yarn in lovers' knots
Copyright © 2024 South House Designs