How to Add Easy Color to Artificial or Faux Flowers
How to easily change the color of flowers, artificial flowers to perfectly coordinate your projects and decor. Plus you can create many effects and it’s perfect for beginners.
Have you ever had a craft project or maybe artificial floral arrangements that got derailed because you couldn’t find the faux flowers in the colors you need?
Well, I’ve been there many times over the years, and one time just recently that put my diy attitude into overdrive!
There had to be a way for me to have the neutral, but not bland, Fall leaves I wanted.
Yep, you guessed it! I came up a creative way and an easy way for us to make them ourselves!!! And I’m sharing it with you today.
Options for Coloring Faux Flowers and Leaves
You’re right, I did find a number of options out there, but not many great options.
My criteria for my method of choice:
- Must be an inexpensive way
- Must be easy
- Must be quick
- Must be able to blend multiple colors
- Must be able to make gradient effects
- Must not make too much of a mess
- Must not require specialized supplies
Spray paint-
There are two kinds: regular spray paint. and floral spray paint.
Regular can of spray paint produces a spray that is too thick and splotchy and you don’t have much fine control.
Floral spray paint gives the soft fine mist, but it’s very pricey. Roughly $24 per color!!! And my gut tells me that it would take quite a bit of practice to achieve color blending with any kind of spray painting. And blending is a high priority for me.
To spray paint artificial flowers with anything other than an airbrush, just doesn’t seem like a good alternative. And an airbrush is not an option
Fabric Dye-
Fabric dye is messy. Without a lot of experience, powder dye that you dissolve (like Rit dye) to make a dye bath will not very easily yield the color blending and variegated saturation that was also on my list.
There are some dyes that you can brush on, but again, they take a lot of practice. Plus many work best on natural materials, cotton, linen and silk. Most of modern faux florals, which we often generically call “silk flowers” are not actually made of silk.
Acrylic Paint-
I love acrylic paint! Okay, I guess I really love almost any kind of paint.
In all honesty, if the watercolor paints had not worked so well, I would have gone back to acrylics and tried again and again till I got it right.
I had some success with diluting craft paints (roughly 2.5 :1, water to paint) and soaking a couple of plain artificial flowers.
They soaked up color okay, but they seemed rather one-note, looking like painted flowers. Not at all like real flowers. I’m not sure how easy it would be to blend colors for a subtle ombre effect.
Alcohol Markers-
I’m sure, that with a bit of practice, alcohol markers could be great way to color, particularly if you want intense colours.
It is more expensive than watercolors — any messier.
But it can produce a bright pop of color better than watercolors.
Watercolor Paints-
Watercolors checked every one of the boxes in my criteria list!!! And that’s saying something. And with the best results.
So about we hop right to it?
Before life interferes (hey, life’s like that, right?)
Safe this to your crafting board
or your faux flower board, so you can find it when you need it.


How to Color Fabric Flowers Using Watercolors
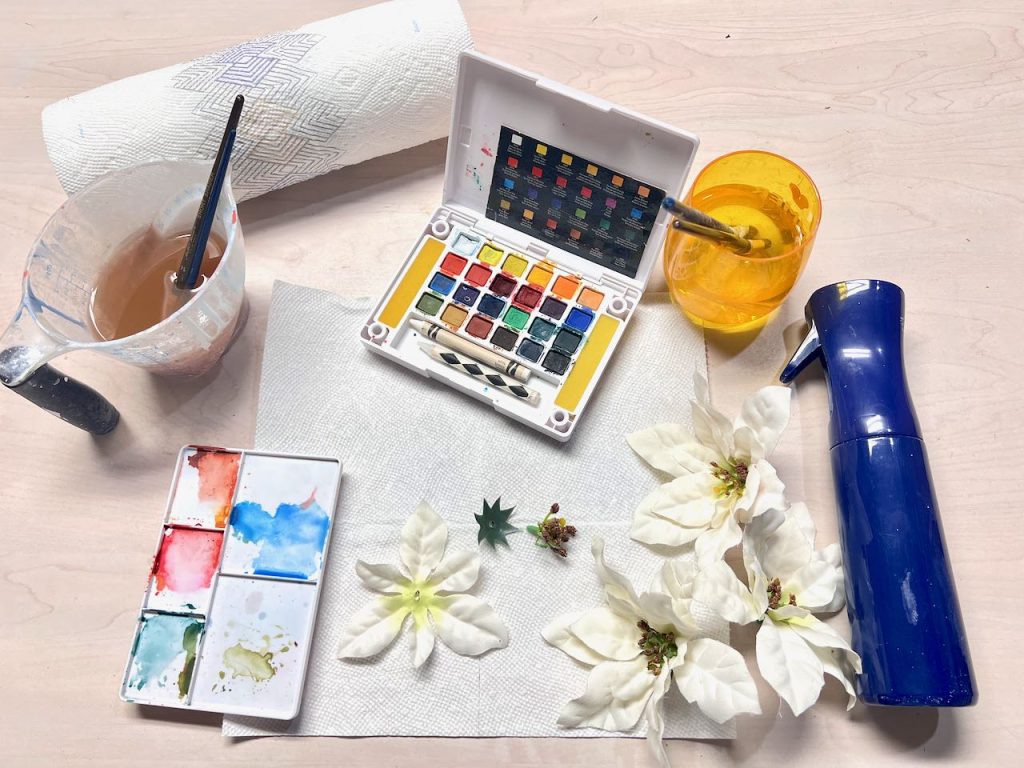
Supplies and Materials-
- Flat surface
- plastic or drop cloth to protect work surface
- White fake flowers and/or leaves, or light neutrals **
- Watercolor set, this is my exact set of 24, for $2 more, I wish I had this 30-color version.
- Plastic palette, if it doesn’t come in your set (I love this one for the lid that I use with acrylics)
- Artist paint brushes, like these
- Misting bottle, so worth it! (watch the video, starting here and you’ll get it)
- Paper towels
- 2 cups of water
** I couldn’t find white leaves, so I bought the lightest I could find at Hobby Lobby. There was another set that was lighter, but many of those leaves are shiny, like a satin and experience has told me the watercolors just roll off rather than soaking in. Flowers in a light color will also work if all you want to do is add a darker accent, like a deep raspberry on a blush colored flower, or even a grass green on a pale pink flower.
Some of the above links may be affiliate links, which means if you use these links to make a purchase, I may receive a small commission. I would greatly appreciate you using these links. You pay nothing more, but it helps me continue producing quality content that’s fun and free for you. Many thanks in advance!
Do You Prefer Tutorial By Video?
No Worries, I’ve Got Ya!
Just click on the image below for the video.

Step 1) Dissect Your Flower-
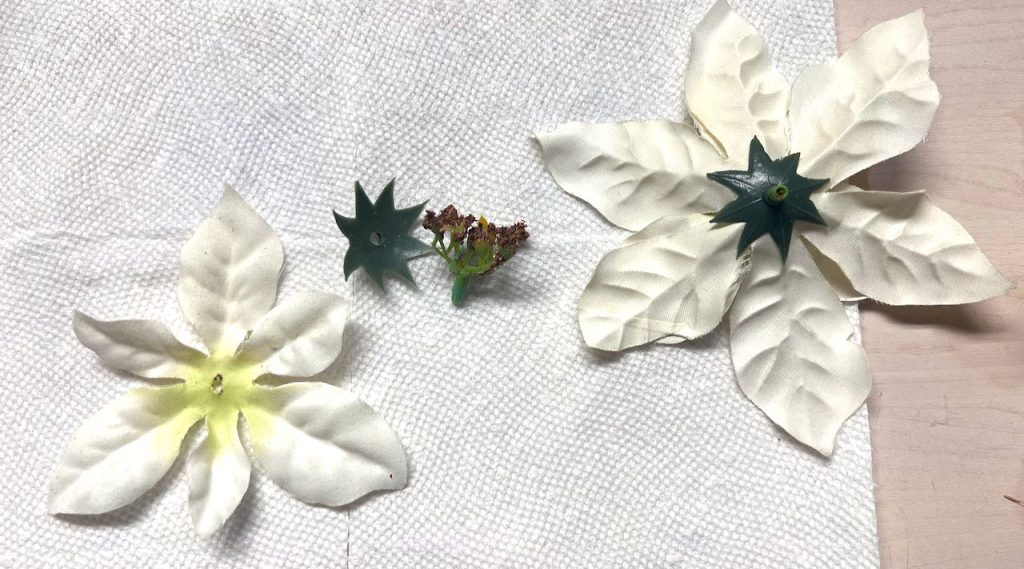
Pull the flowers off the flower stems. Then remove the plastic base from the back. Now you can pull the layers of flower petals from the stamens.
NOTE: Be sure to save the plastic bases and stamens. They are needed to reassemble your flowers.
Step 2) Prepare Your Watercolors-
Keep one cup of water and one paint brush clear. Only use it for wetting the petals before painting.
The other cup of water and paintbrushes will be your “dirty” water and brushes.
Wet your “dirty” paintbrush in the “dirty water” cup and use it to moisten the watercolor cakes that you plan to use.
As your brush picks up paint off the cake, wipe it on the edge of your palette to build up a small pool of color. To thin that pool of color, swish your brush in your water cup and add this to the color pool.
As you are painting your leaves, you will be going back and forth between the watercolor cake, the watercolor pool on the palette and your leaf.
You don’t need to mix it all at once. It’s hard to know how much you will use and how thin you want it. So plan on adjusting it as you go.
Step 3) Moisten Petals-
NOTE: Complete steps, 3, 4 and 5 on one flower at a time.
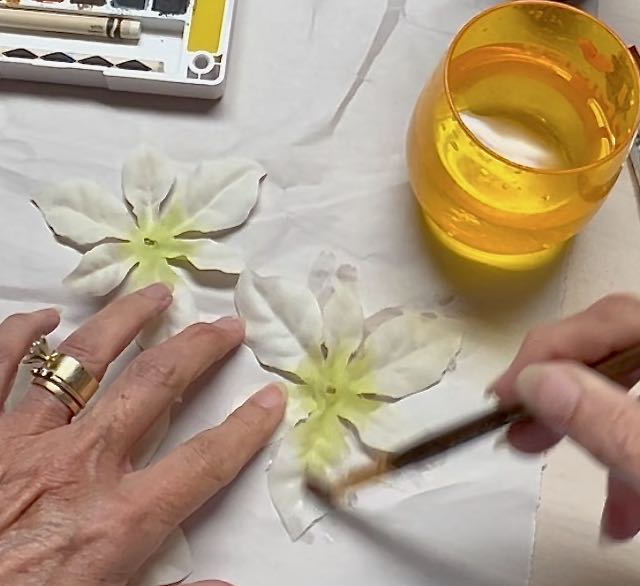
Moisten one layer only. If you want to color the entire petal, dip your “clean” paint brush in the clear water and apply to your petals. Keep dipping and applying until all the petals on that layer are wet.
Step 4) Color Your Petals-
Using your “dirty” brush, pick up some paint from your palette and lightly touch it to the wet petal where you want the color most concentrated.
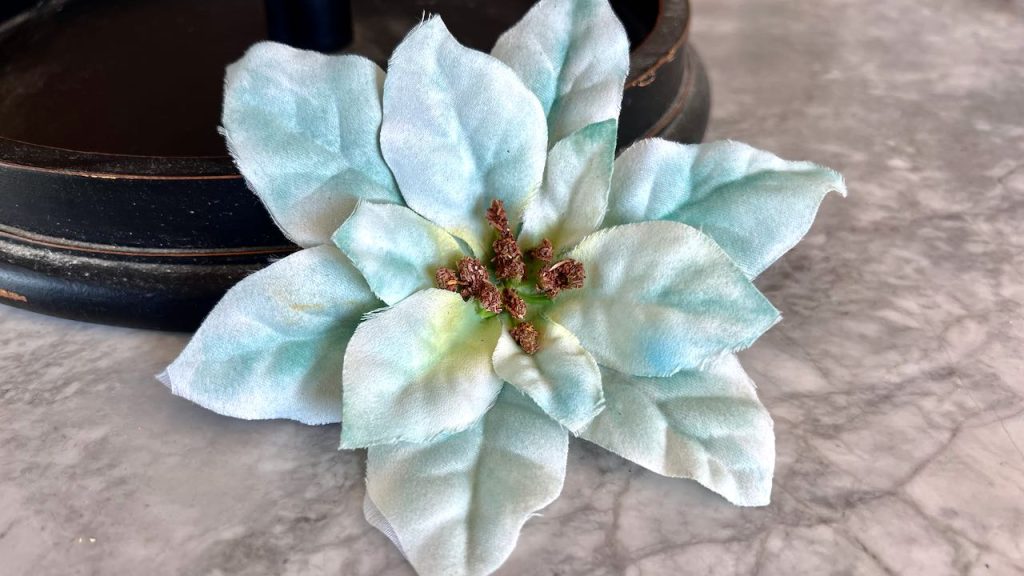
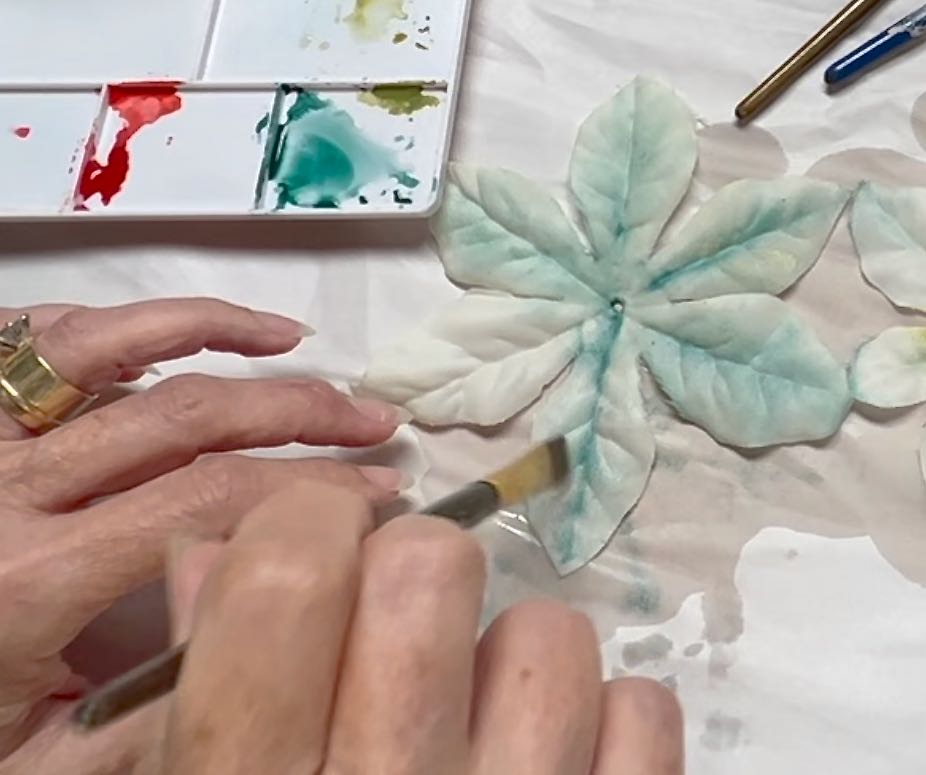
For my deep blue-green flower, on the smaller, top layer, I started in the center, with a deeper mossy green because I wanted to color over the Spring green that was already there.
Then, with the blue-green, I just barely touched the petal tips and spread the paint in a gradient manner up the petal
Taking a cue from fresh flowers, on the larger bottom layer, I wanted those petals to have the same color of the tips, this time drawing out from the center spine of the petal. So here, I used a flat brush and touched on the center spine. Then gently lifting as I went, I brushed outward in both directions from the spine.
This gave me the gradient look I wanted.
It’s subtle and has a more natural look.
Step 5) Add Any Accent Colors-
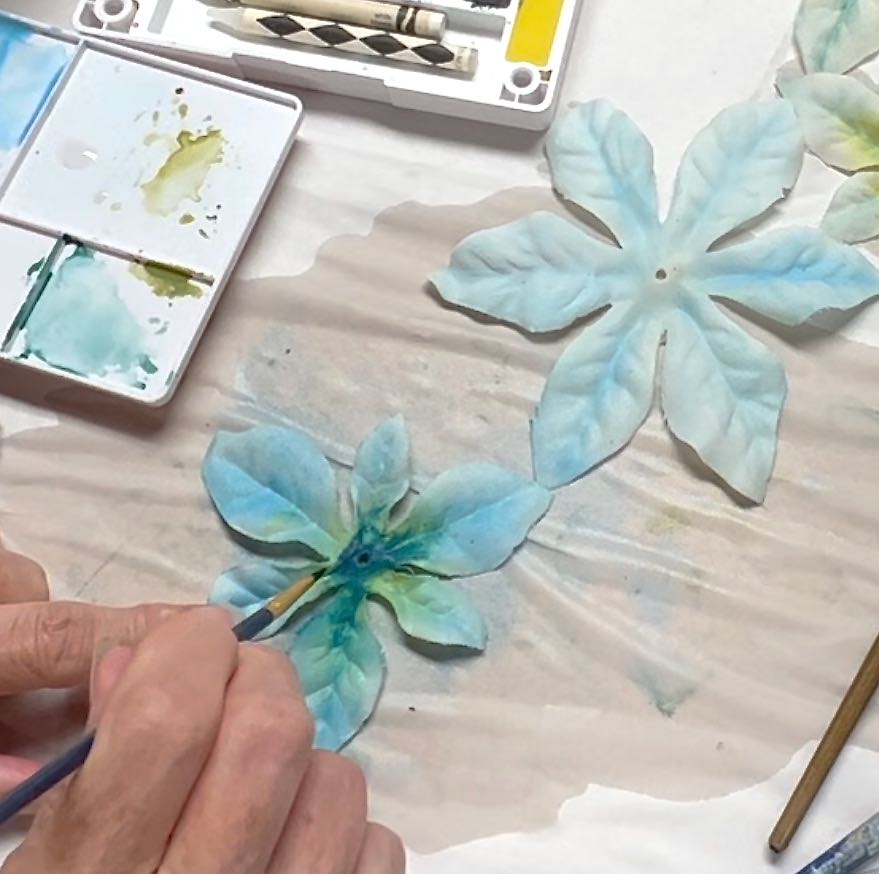
On the same flower, after coloring the bottom petals bolder, I decided I needed more color on the top small petals.
The petals were still set, but not sitting pools of water, so the more intense color did not spread as much. Just as I wanted.
If I had wanted more spread, I could have spritzed it or “flooded” it with my brush.
PRO TIP: With watercolors, if you want two colors to bleed together, add the second color while the first is still wet.If you don’t want them to bleed together, the first needs to dry and then add the second.
With the blue flower, I wanted the brighter blue down the spine and ribs to blend in with light blue of the petals, So I added that blue streak while the paint was still wet, but the puddle was gone.
And if I needed to force it to bleed a bit, I “flooded” a bit of water on it. Which is really just picking up water with your brush and barely touching the spot releasing the water where you want it to go.
Then I went back and added some deep Prussian blue straight from the watercolor cake. And flooded or wet brushed it as needed for the look I wanted.
PRO TIP: If you ever have too much paint and water in a spot, use the corner of a paper towel to suck it up. And you can gently pat the color with the paper towel. This works great if you do it right away.
Step 6) Set Aside to Dry-
Leave your petals on a protected surface to dry.
Now return to Step 3 for the next flower.
Step 7) Reassemble Your Flowers-
Easy peasy. Thread each layer of petals over the base prong of the stamens. Then push the base back in place. Make sure to push it all the way up.
HINT: I love lush flowers! If you don’t mind having fewer flowers, you can combine the layers to make fuller, but fewer flowers. Instead of two layers, add three or four to one stamens.
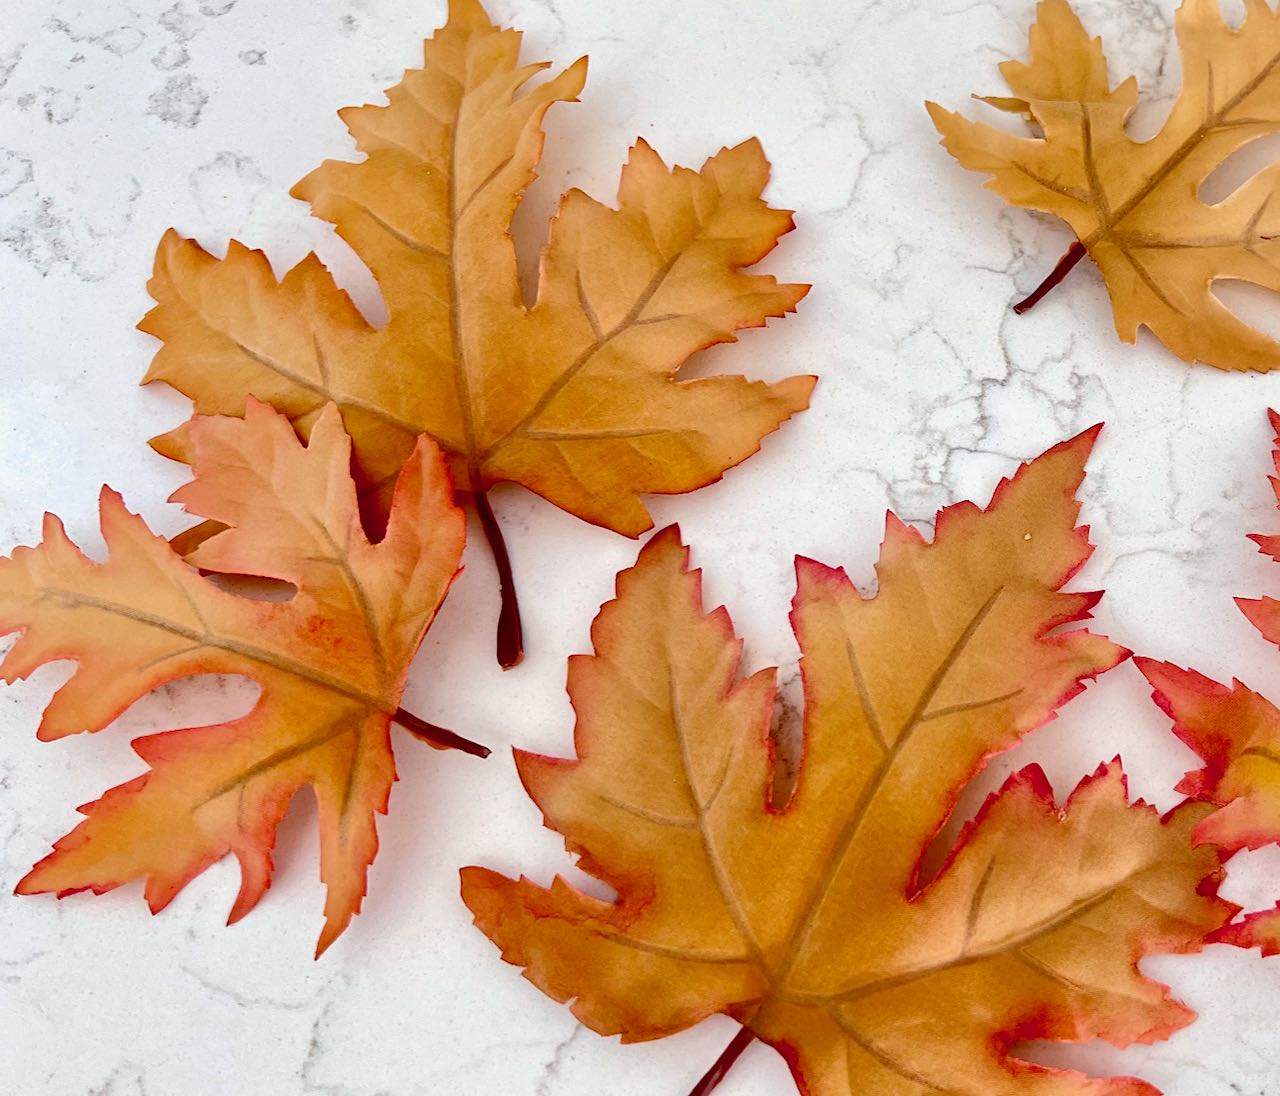
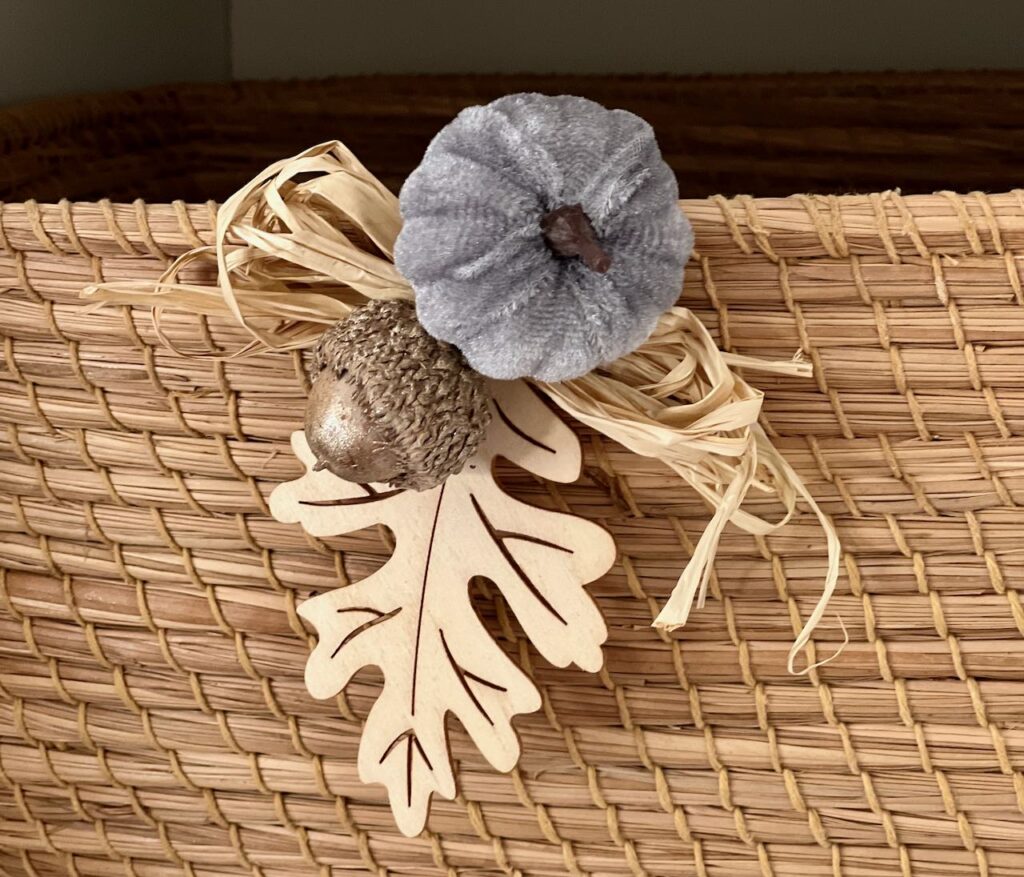
Same Concept, But For Leaves

Aren’t they gorgeous?
I looked everywhere for neutral Fall leaves, that weren’t boring!
I guess the artificial florals industry knows no middle ground between boring bland and intensely colored Fall faux greenery.
I looked a three large retailers before giving up and deciding to make my own for a home decor project that I’m working on. It’s coming soon, so be sure to subscribe so it doesn’t slip by you.
You’re not a subscriber? Well that’s easy to take care of right here, right now:
Thanks bunches! Now back to our leaves:
Supplies and Materials-
Same as for the flowers, but with neutral, white or light colored leaves
Step 1) Prepare Your Leaves-
Remove the leaves from their stems or garland by pulling up on them. Some leaves may come off a larger stems in pairs or even sets of three. If yyou plan to use them as they were once they are colored, don’t cut anything.
When they are dry, you can add them back to the stems or garland by pushing the base of the leaf onto their nubs.
If you are going to use them without the longer stems, you can go ahead and cut them apart to make them easier to manage.
Step 2) Prepare Your Paint-
Keep one cup of water and one paint brush clear. Only use it for wetting the petals before painting.
The other cup of water and paintbrushes will be your “dirty” water and brushes.
Wet your “dirty” paintbrush in the “dirty water” cup and use it to moisten the watercolor cakes that you plan to use.
As your brush picks up paint off the cake, wipe it on the edge of your palette to build up a small pool of color. To thin that pool of color, swish your brush in your water cup and add this to the color pool.
As you are painting your leaves, you will be going back and forth between the watercolor cake, the watercolor pool on the palette and your leaf.
You don’t need to mix it all at once. It’s hard to know how much you will use and how thin you want it. So plan on adjusting it as you go.
Step 3) Moisten the Edges of Your Leaves-
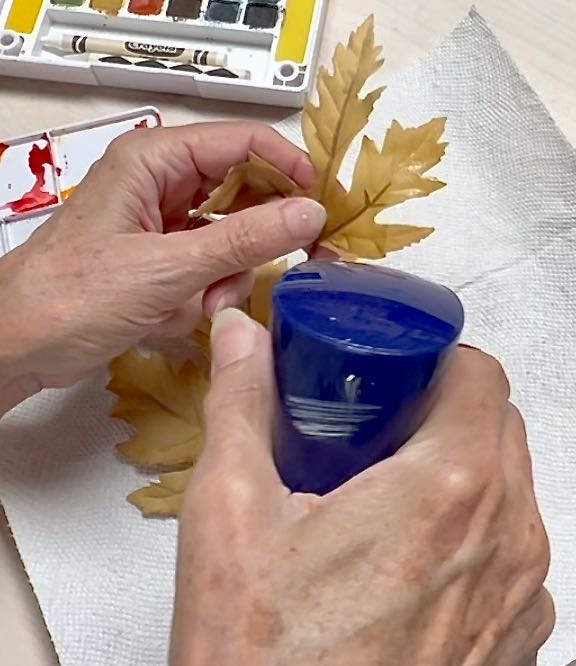
For leaves where you are just adding color around the edges and maybe a bit in the center, you’ll go around each leaf alternating between step 3 and 4 for two or three fingers of the leaf at a time.
With your misting bottle, spritz the first two or three fingers of the leaf.
Step 4) Color Your Leaves-
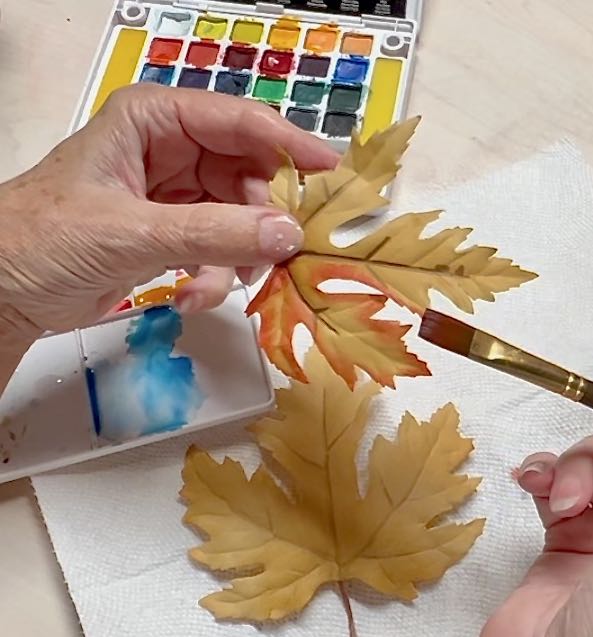
Dip your paintbrush into paint you’ve mixed on your palette.
Gently, have the brush touch to top of the leaf right along the wet sides, You can also move the side of the leaf against the brush and the wet leaf will draw the paint off the brush and onto the leaf.
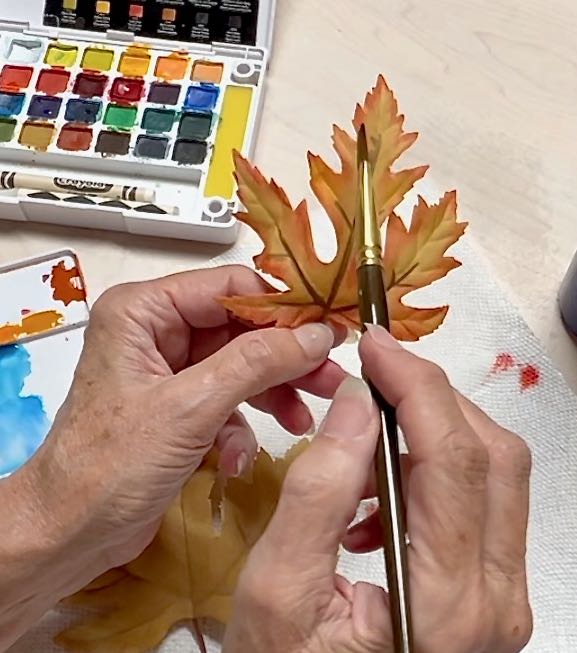
Watch how much and how fast the paint spreads toward the center of each finger and adjust accordingly:
- if you want the paint to spread further, add a touch of water from your paintbrush or a spritz of water from your mister.
- if you want the paint a more saturated (intense) color, dip you brush in paint on the palette that is not as thinned with water and add to the same spot
- If you don’t. want the paint to spread further, but you would like it lighter, gently dab it with the corner of a dry paper towel
It fun and easy to adjust watercolor paint before it dries and even better, before it soaks in too much.
Just like on the flower petals, if you want to blend two or more colors, add the second colors right away. The sooner, the more they will blend.
If you want to add color to your whole leaf, like we did with some of the petals, follow those steps three, four and five.
Now return to Step 3 for the next fingers of this leaf.
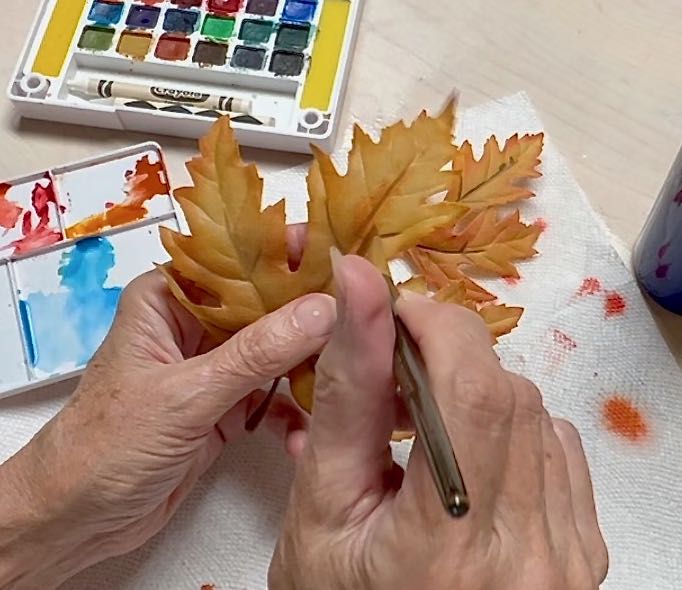
When your leaf is completed, set aside to dry
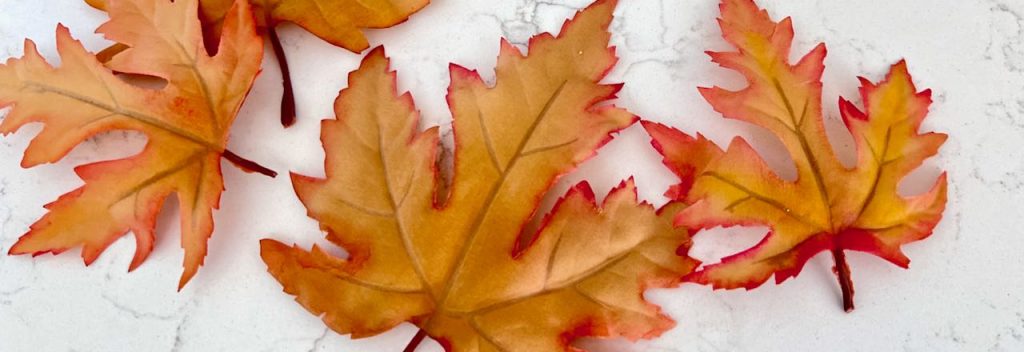
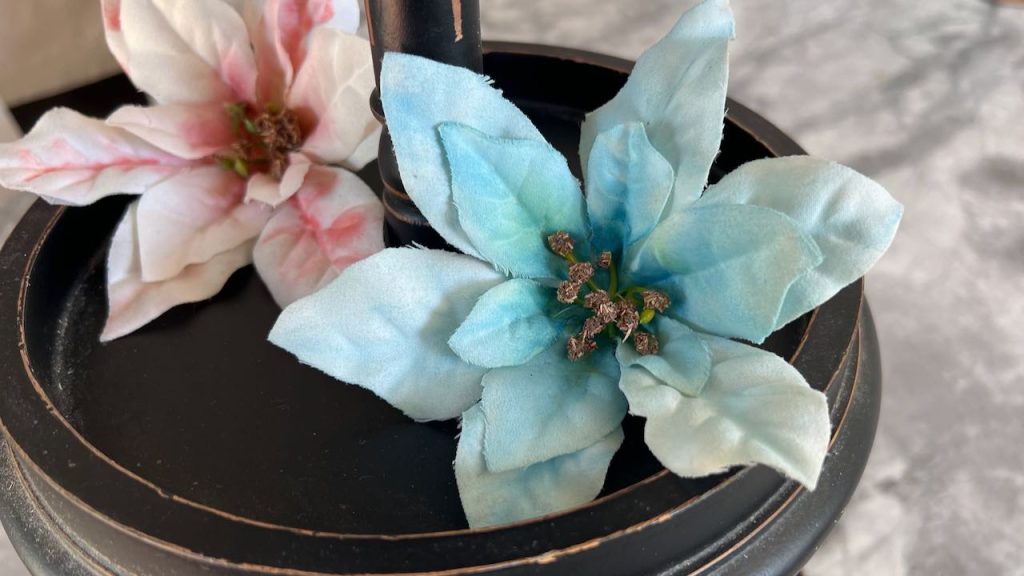
am sooo tickled with how the leaves turned out!
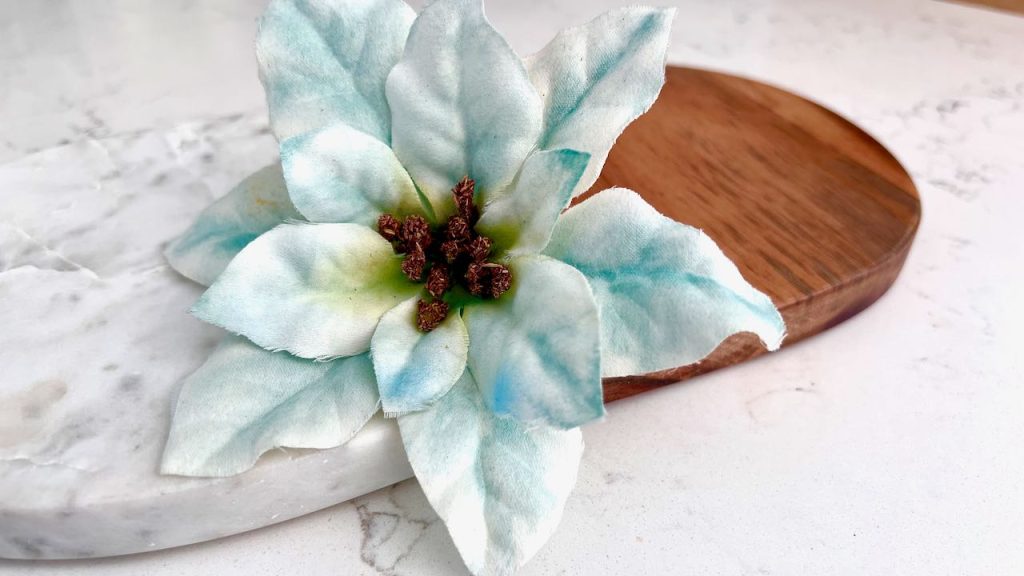
And with the flowers too! I see all kinds of possibilities. In the Spring, I have a cherry blossom branch that needs a bit more color — just some deeper pink accents. And some white tulips that have been crying out for just a kiss of color to make them really pop.
How about you? What flowers or leaves might you be thinking about?
And if you’re into Fall leaves right now, be sure to jump over and see the Fall leaf decor I just made with real leaves and Mod Podge.

Your leaves are definitely not bland! They are beautiful! Thank you for sharing your ideas and tips for creating such lovely fall decor!
Awww thanks Missy! I am totally smitten with how easy this was and how they turned out! I would love to see your verssion with your confidence and zest for color!!!
I love what you did with these leaves Diane! Such an improvement!